目录
0. 前言与声明
1. 项目概述
2. Day 0:基于ensp的网络架构设计与仿真
2.1 拓扑架构设计
2.2 全局网络规划
2.3 设备详细配置表
2.3.1 边缘与出口层
2.3.2 核心与管理层
2.3.3 汇聚层
2.3.4 接入层
2.3.5 管理平面 IP 地址表 (SSH连接)
2.4 Day 0 初始化配置
2.5 逻辑数据流向总结
2.6 主机验证
2.6.1 添加临时静态路由表
2.6.2 ping测试
2.6.3 ssh测试
3. Day 1:基于 Python 的自动化部署
3.1 自动化脚本架构设计
3.2 Day 1 业务自动化下发详情
3.3 全流量镜像分析
3.4 Syslog 日志审计联动
3.5 连通性测试
4. Day 2:基于 Docker 的容器化运维平台构建
4.1 概述
4.2 技术架构
4.3 平台部署与实施步骤
4.3.1:基础设施代码化构建
4.3.2:服务启动与业务验证
4.3 功能模块详解
4.3.1 可视化容器管理 (Portainer)
4.3.2 网络服务存活监控 (Uptime Kuma)
4.3.3 集中式日志审计 (Rsyslog + Frontail)
4.3.4 自动化配置备份与版本控制 (Oxidized)
4.4 平台联动流程
0. 前言与声明
由于本人水平与能力有限,本报告仅用于部分 NetDevOps 的学习、研究与验证。
项目实验环境基于华为 eNSP 模拟器搭建。受限于模拟器底层架构及设备镜像版本,部分功能实现与现网真实设备存在差异,具体说明如下:
设备兼容性与安全性:eNSP 模拟的 AR 系列路由器 SSH 服务默认加密算法较旧。为兼容现代 SSH 客户端(如 Windows OpenSSH, Paramiko),必须强制将 RSA 密钥长度配置为 2048 位(rsa local-key-pair create),这与部分现网设备默认配置可能不同。
自动化数据源:在 Day 1 自动化部署阶段,本项目的 Python 脚本为简化逻辑,采用静态字典(Static Dictionary)存储设备资产信息(IP、账号、角色)。在实际生产环境中,通常会通过读取 Excel/CSV 文件或对接 CMDB(配置管理数据库)来动态获取海量资产数据。
功能完整性:模拟器环境可能存在报文转发性能限制或特定特性支持不全的情况,不代表真实业务场景下的最终性能指标。
1. 项目概述
随着企业网络规模的日益复杂化,传统基于命令行(CLI)的手工运维模式已难以满足高效、稳定的业务需求,且存在人为配置错误风险高、故障响应滞后等痛点。本项目旨在构建一套基于 NetDevOps 理念的全生命周期网络自动化平台。
项目遵循网络生命周期的三个核心阶段进行设计与实现:
-
Day 0(设计与规划):利用 eNSP 搭建高可用企业网络拓扑,完成底层路由与交换架构的设计。
-
Day 1(部署与开局):使用 Python (Netmiko) 开发自动化脚本,实现网络设备的批量配置下发与业务上线,大幅提升部署效率。
-
Day 2(监控与运维):引入 Docker 容器化技术,构建集监控、日志、备份于一体的 Linux 运维平台,保障网络的长期稳定运行。
通过这一闭环体系,本项目成功实现了从底层架构设计到上层自动化运维的完整交付。
2. Day 0:基于ensp的网络架构设计与仿真
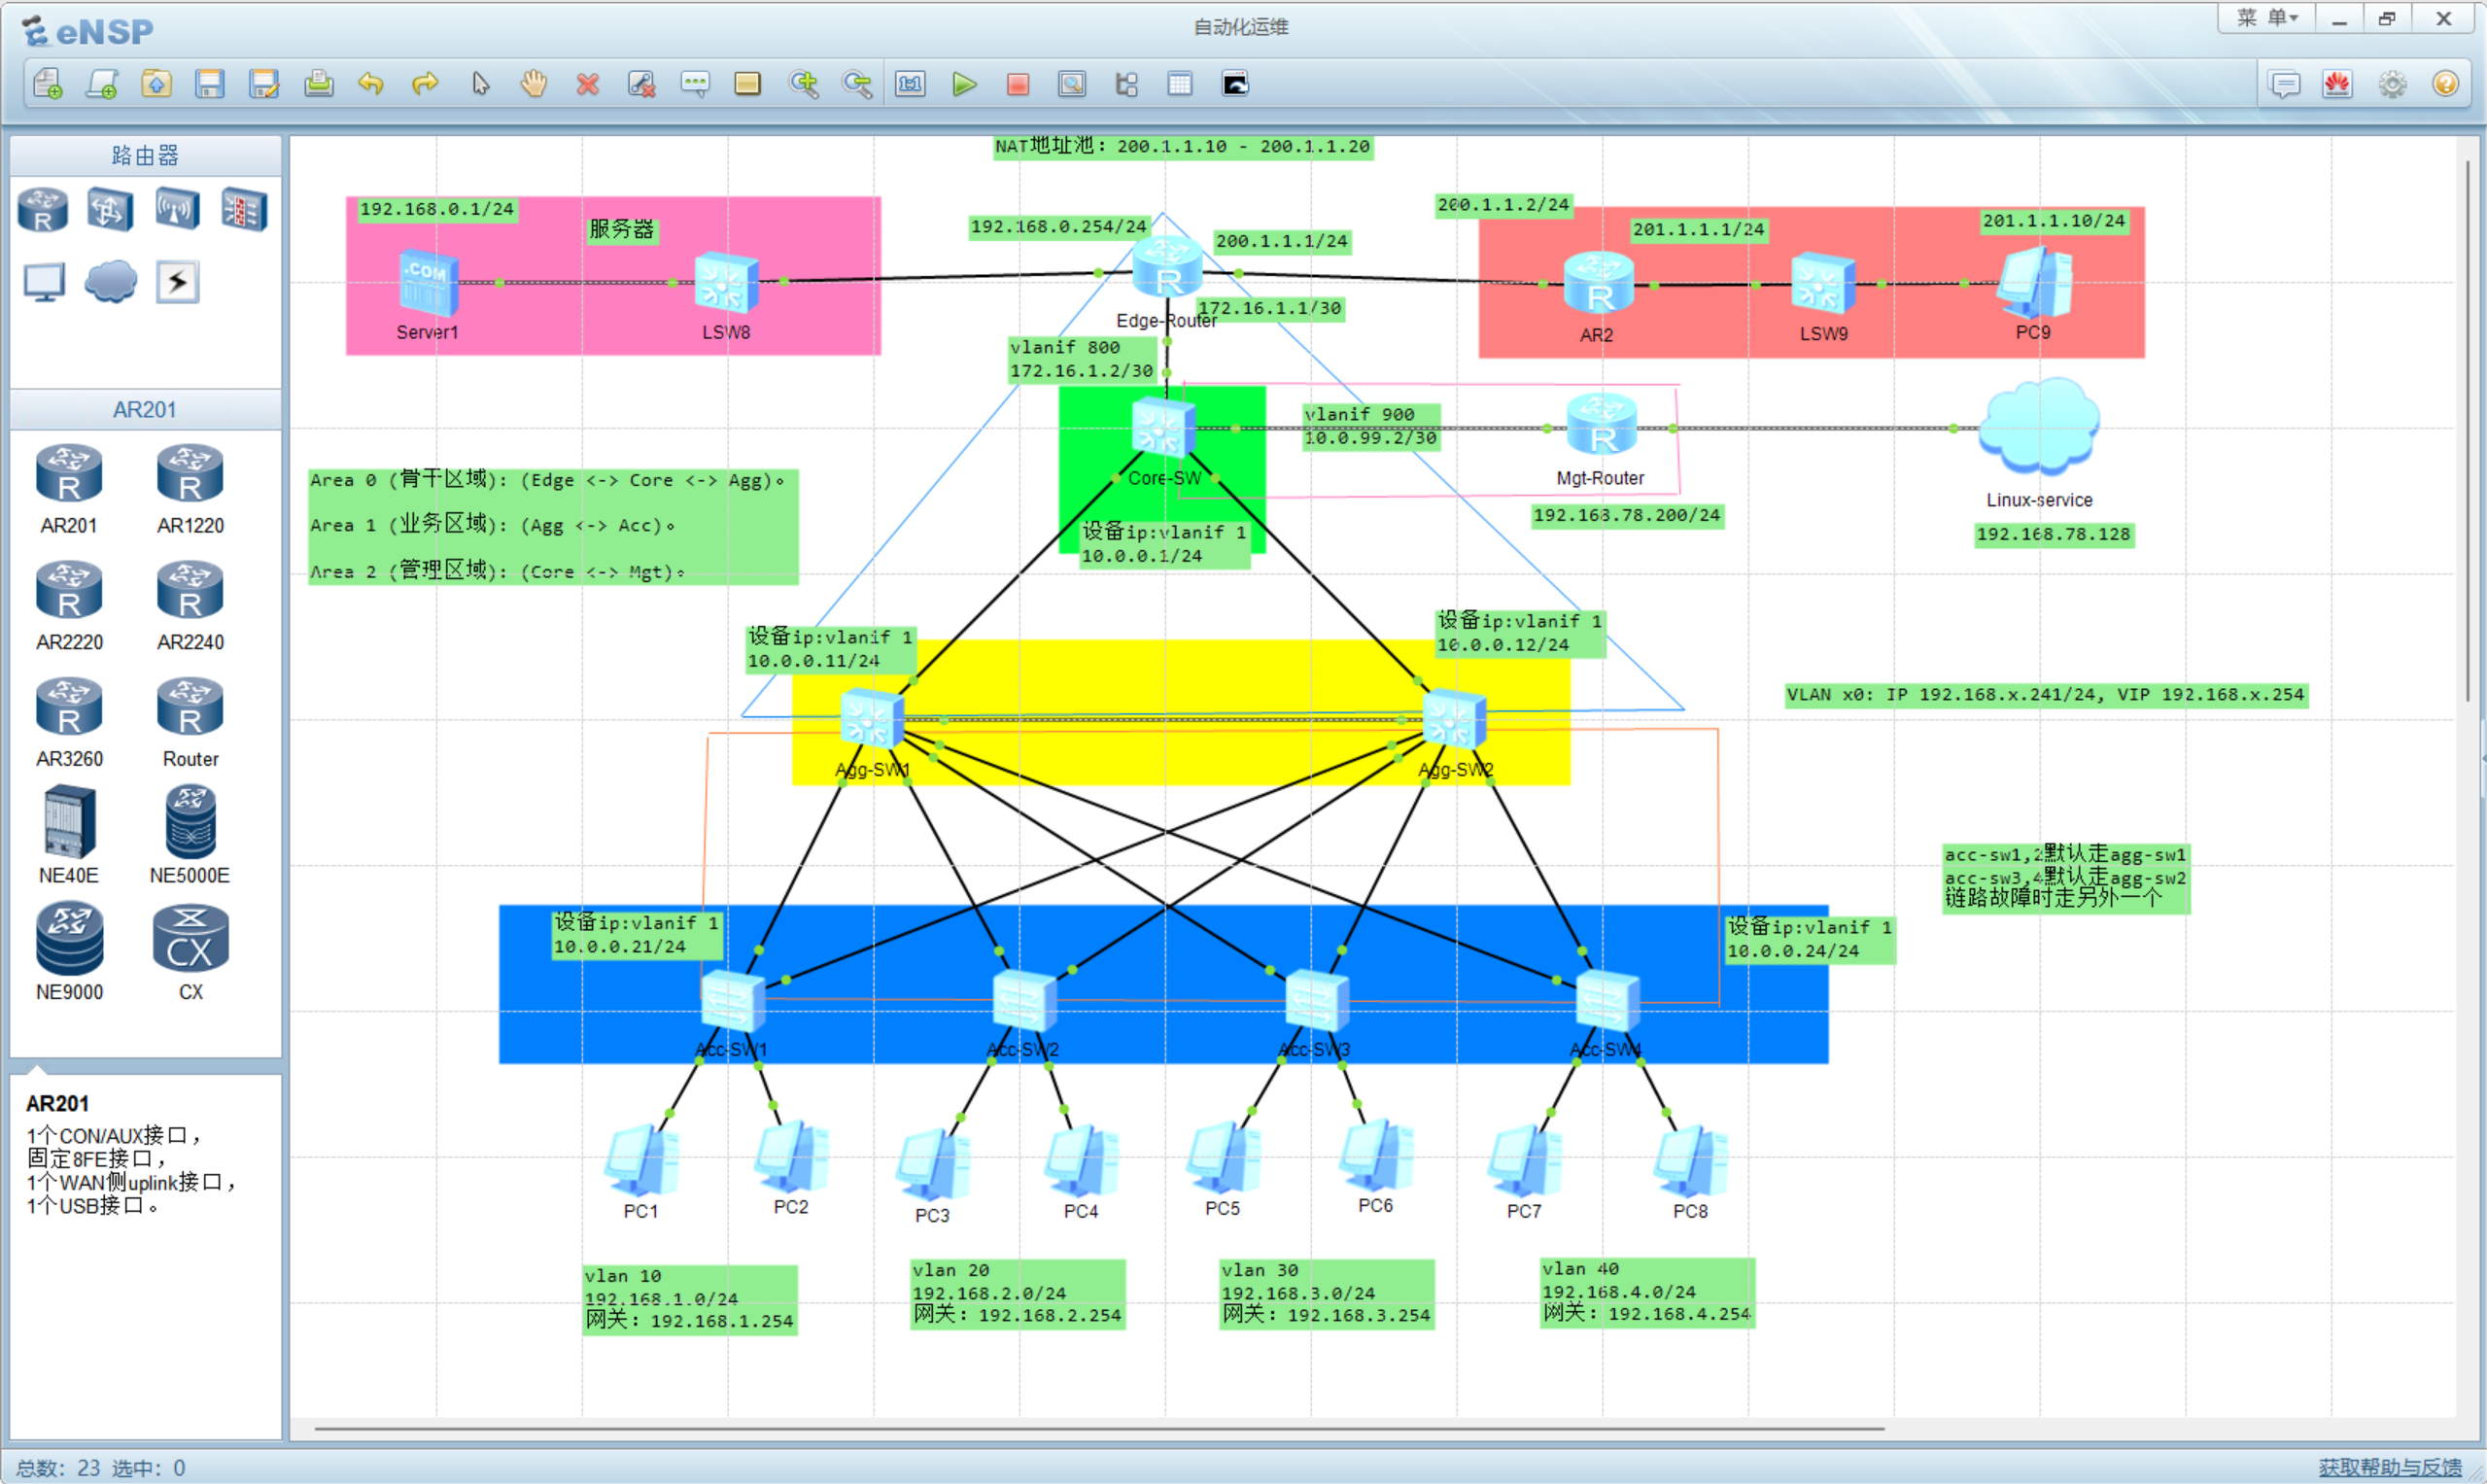
注意“Linux-service”内部的ip要和虚拟机里面的ip一致(虚拟机要联网,在网络适配器里面调整成nat模式)。要添加端口映射表的双向通道 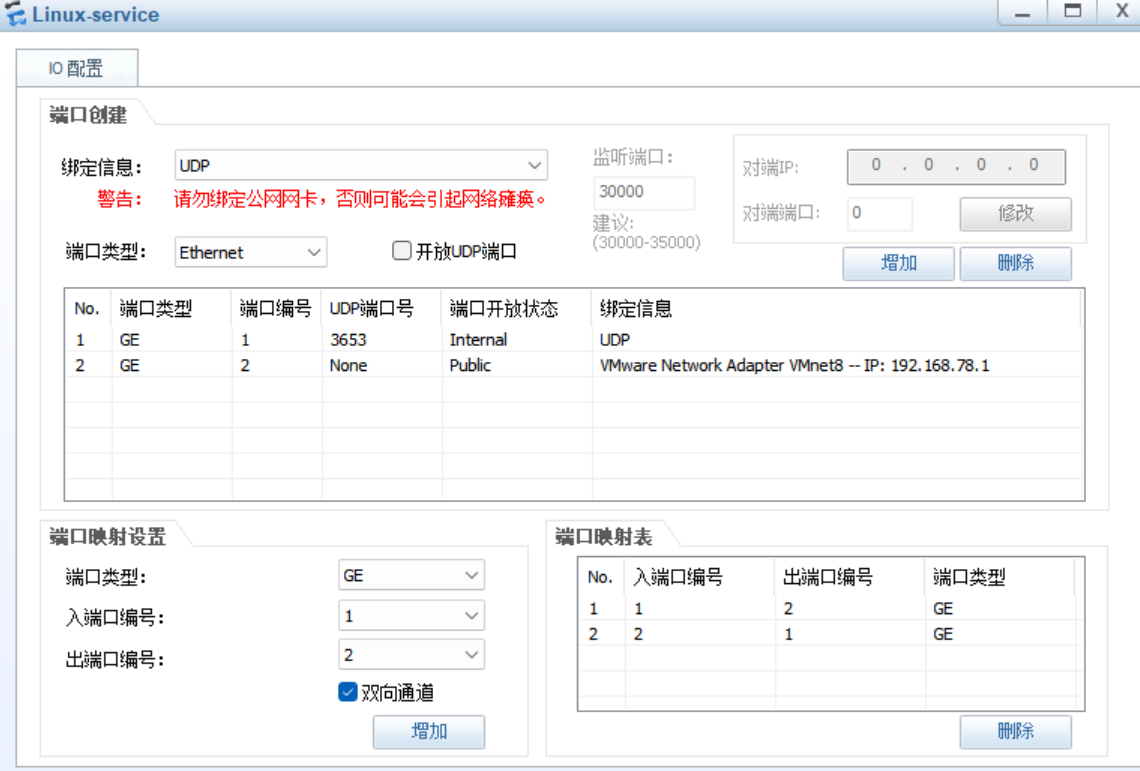
2.1 拓扑架构设计
本项目采用经典的三层网络架构(核心层-汇聚层-接入层),并在出口区与管理区进行了专门设计。
-
出口区 (Edge): 部署 AR2240 路由器 (Edge-Router),负责 NAT 转换与外网互联。
-
核心区 (Core): 部署 S5700 交换机 (Core-SW) 作为核心骨干,负责全网高速转发与流量镜像。
-
管理区 (Mgt): 部署 AR3260 路由器 (Mgt-Router) 作为运维网关,连接 Docker 运维平台与核心网络。
-
汇聚层 (Agg): 部署两台 S5700 (Agg-SW1/2) 组建 VRRP+MSTP 高可用网关。
-
接入层 (Acc): 部署四台 S3700 (Acc-SW1~4) 连接终端 PC。
2.2 全局网络规划
为确保网络的健壮性与可扩展性,本项目制定了以下全局规划标准:
-
路由协议: 全网运行 OSPF 进程 1。
-
路由区域设计:
-
Area 0 (骨干区域): 承载 Edge <-> Core <-> Agg 之间的核心数据转发。
-
Area 1 (业务区域): 承载 Agg <-> Acc 之间的终端用户接入路由。
-
Area 2 (管理区域): 承载 Core <-> Mgt 之间的运维管理流量。
-
-
高可用性: 汇聚层采用 VRRP + MSTP 技术,实现双机热备与流量负载分担。
-
IP 地址规划:
-
业务网段: 192.168.1.0/24 ~ 192.168.4.0/24
-
管理网段: 192.168.78.0/24 (映射物理机网段)
-
互联平面:
-
Core-Edge 互联: 172.16.1.0/30
-
Core-Mgt 互联: 10.0.99.0/30
-
-
管理平面: 全网设备 Loopback/Vlanif 1 使用 10.0.0.x/24
-
2.3 设备详细配置表
2.3.1 边缘与出口层
|
Edge-Router |
内网出口网关,执行 NAT 转换,连接 ISP。 |
Area 0 |
GE0/0/0: 192.168.0.254/24 (Server区) GE0/0/1: 200.1.1.1/24 (WAN) GE0/0/2: 172.16.1.1/30 (Core互联) |
NAT Outbound: GE0/0/1 ACL 2000: 允许源 192.168.0.0/16, 10.0.0.0/8 NAT 地址池: 200.1.1.10 – 200.1.1.20 |
|
AR2 (ISP) |
模拟互联网运营商。 |
– |
GE0/0/0: 200.1.1.2/24 GE0/0/1: 201.1.1.1/24 |
模拟公网路由 |
2.3.2 核心与管理层
|
Core-SW |
网络骨干枢纽,全网流量镜像点。 |
Area 0 (上/下行) Area 2 (管理侧) |
Vlanif 800: 172.16.1.2/30 Vlanif 900: 10.0.99.2/30 GE0/0/1: Access VLAN 800 (Edge) GE0/0/2-3: Trunk (Agg) |
全网流量镜像: 将 GE0/0/1~3 的流量镜像至 GE0/0/4 (观察端口),输出到 Linux-Service。 |
|
Mgt-Router |
运维入口,连接物理机 Cloud。 |
Area 2 |
GE0/0/0: 192.168.78.200/24 GE0/0/1: 10.0.99.1/30 |
静态路由指向 Core-SW 以打通内网。 |
2.3.3 汇聚层
此层配置了 VRRP 作为 PC 的网关,并配置 MSTP 防止二层环路。
|
Agg-SW1 |
Instance 1 主根 Instance 2 备根 |
VLAN 10 (192.168.1.241) VLAN 20 (192.168.2.241) |
VLAN 30 (.241) VLAN 40 (.241) |
GE0/0/4: 心跳线 (Agg-SW2) 下行: Trunk 连 Acc |
|
Agg-SW2 |
Instance 2 主根 Instance 1 备根 |
VLAN 30 (192.168.3.242) VLAN 40 (192.168.4.242) |
VLAN 10 (.242) VLAN 20 (.242) |
GE0/0/4: 心跳线 (Agg-SW1) 下行: Trunk 连 Acc |
2.3.4 接入层
接入交换机运行 OSPF Area 1 实现管理互通,并作为 DHCP 服务器给 PC 分配 IP。
|
Acc-SW1 |
VLAN 10 |
192.168.1.243 |
192.168.1.0/24 |
192.168.1.254 |
|
Acc-SW2 |
VLAN 20 |
192.168.2.244 |
192.168.2.0/24 |
192.168.2.254 |
|
Acc-SW3 |
VLAN 30 |
192.168.3.245 |
192.168.3.0/24 |
192.168.3.254 |
|
Acc-SW4 |
VLAN 40 |
192.168.4.246 |
192.168.4.0/24 |
192.168.4.254 |
2.3.5 管理平面 IP 地址表 (SSH连接)
此表为 Day 1 自动化部署脚本 (main.py) 和 Day 2 运维平台 (Oxidized, Uptime Kuma) 的核心资产依据。
|
Mgt-Router |
运维网关 |
192.168.78.200 |
物理机直连入口 |
|
Edge-Router |
出口网关 |
172.16.1.1 |
需配置静态路由可达 |
|
Core-SW |
核心交换 |
10.0.99.2 |
需配置静态路由可达 |
|
Agg-SW1 |
汇聚 1 |
10.0.0.11 |
Vlanif 1 管理地址 |
|
Agg-SW2 |
汇聚 2 |
10.0.0.12 |
Vlanif 1 管理地址 |
|
Acc-SW1 |
接入 1 |
10.0.0.21 |
Vlanif 1 管理地址 |
|
Acc-SW2 |
接入 2 |
10.0.0.22 |
Vlanif 1 管理地址 |
|
Acc-SW3 |
接入 3 |
10.0.0.23 |
Vlanif 1 管理地址 |
|
Acc-SW4 |
接入 4 |
10.0.0.24 |
Vlanif 1 管理地址 |
2.4 Day 0 初始化配置
定义:指设备“上架”后的最基本配置,核心目标是打通管理通道,使设备可达。
本项目实践:在 eNSP 命令行中手动完成。针对 AR 路由器与交换机 SSH 配置的差异,制定了标准化的初始化模板:
ensp内部分配置脚本如下
Mgt-router:
system-view
sysname Mgt-Router
# 连云 g0/0/0 (192.168.78.200)
interface g0/0/0
ip address 192.168.78.200 24
undo shutdown
# 连 Core-SW g0/0/4 (10.0.99.1)
interface g0/0/1
ip address 10.0.99.1 30
undo shutdown
quit
# 管理路由:去往 10 网段和 172 网段全部扔给核心
ip route-static 10.0.0.0 8 10.0.99.2
ip route-static 172.16.1.0 30 10.0.99.2
# SSH 基础 (AR 路由器无需在系统视图绑定 service-type)
rsa local-key-pair create
2048
aaa
local-user admin password cipher password123
local-user admin privilege level 15
local-user admin service-type ssh
quit
ssh user admin authentication-type password
stelnet server enable
user-interface vty 0 4
authentication-mode aaa
protocol inbound all
Core-SW:
system-view
sysname Core-SW
vlan batch 800 900
# 管理 IP 与互联
interface Vlanif 1
ip address 10.0.0.1 24
interface g0/0/4
port link-type access
port default vlan 900
interface Vlanif 900
ip address 10.0.99.2 30
interface Vlanif 800
ip address 172.16.1.2 30
interface g0/0/1
port link-type access
port default vlan 800
# 下行 Trunk
interface g0/0/2
port link-type trunk
port trunk allow-pass vlan all
interface GigabitEthernet 0/0/3
port link-type trunk
port trunk allow-pass vlan all
quit
# — 流量镜像配置:Linux-service 捕获点 —
observe-port 1 interface GigabitEthernet 0/0/4
interface GigabitEthernet 0/0/1
port-mirroring to observe-port 1 both
interface GigabitEthernet 0/0/2
port-mirroring to observe-port 1 both
interface GigabitEthernet 0/0/3
port-mirroring to observe-port 1 both
quit
ip route-static 192.168.78.0 24 10.0.99.1
# SSH 基础
rsa local-key-pair create
2048
aaa
local-user admin password cipher password123
local-user admin privilege level 15
local-user admin service-type ssh
quit
ssh user admin authentication-type password
ssh user admin service-type stelnet
stelnet server enable
user-interface vty 0 4
authentication-mode aaa
protocol inbound all
注:针对核心交换机 Core-SW,额外配置了 observe-port 观察端口,为后续 Day 1 的全流量镜像分析预留物理接口。
Edge-Router:
system-view
sysname Edge-Router
# 三向接口激活
interface g0/0/2
ip address 172.16.1.1 30
undo shutdown
interface g0/0/1
ip address 200.1.1.1 24
undo shutdown
interface g0/0/0
ip address 192.168.0.254 24
undo shutdown
quit
ip route-static 10.0.0.0 8 172.16.1.2
ip route-static 192.168.78.0 24 172.16.1.2
# SSH 环境
rsa local-key-pair create
2048
aaa
local-user admin password cipher password123
local-user admin privilege level 15
local-user admin service-type ssh
quit
ssh user admin authentication-type password
stelnet server enable
user-interface vty 0 4
authentication-mode aaa
protocol inbound all
Agg-SW1:
system-view
sysname Agg-SW1
interface Vlanif 1
ip address 10.0.0.11 24
quit
ip route-static 0.0.0.0 0 10.0.0.1
# SSH 环境
rsa local-key-pair create
2048
aaa
local-user admin password cipher password123
local-user admin privilege level 15
local-user admin service-type ssh
quit
ssh user admin authentication-type password
ssh user admin service-type stelnet
stelnet server enable
user-interface vty 0 4
authentication-mode aaa
protocol inbound all
Acc-SW1:
system-view
sysname Acc-SW1
interface Vlanif 1
ip address 10.0.0.21 24
quit
ip route-static 0.0.0.0 0 10.0.0.1
rsa local-key-pair create
2048
aaa
local-user admin password cipher password123
local-user admin privilege level 15
local-user admin service-type ssh
quit
ssh user admin authentication-type password
ssh user admin service-type stelnet
stelnet server enable
user-interface vty 0 4
authentication-mode aaa
protocol inbound all
外网与隔离区:
# — AR2 —
system-view
sysname AR2
interface g0/0/0
ip address 200.1.1.2 24
undo shutdown
interface g0/0/1
ip address 201.1.1.1 24
undo shutdown
quit
ip route-static 10.0.0.0 8 200.1.1.1
ip route-static 192.168.0.0 16 200.1.1.1
ip route-static 192.168.78.0 24 200.1.1.1
# — LSW8 —
system-view
sysname LSW8
vlan batch 100
interface g0/0/1
port link-type access
port default vlan 100
interface g0/0/2
port link-type access
port default vlan 100
# — LSW9 —
system-view
sysname LSW9
vlan batch 1
interface GigabitEthernet 0/0/1
port link-type access
port default vlan 1
interface GigabitEthernet 0/0/2
port link-type access
port default vlan 1
2.5 逻辑数据流向总结
-
PC 上网流向 (业务流): PC -> Acc-SW -> Agg-SW (VRRP Gateway) -> Core-SW -> Edge-Router (NAT) -> ISP
-
运维管理流向 (管理流): 物理机 (192.168.78.x) -> Mgt-Router -> Core-SW -> Agg-SW -> Acc-SW -> 目标设备管理 IP
2.6 主机验证
2.6.1 添加临时静态路由表
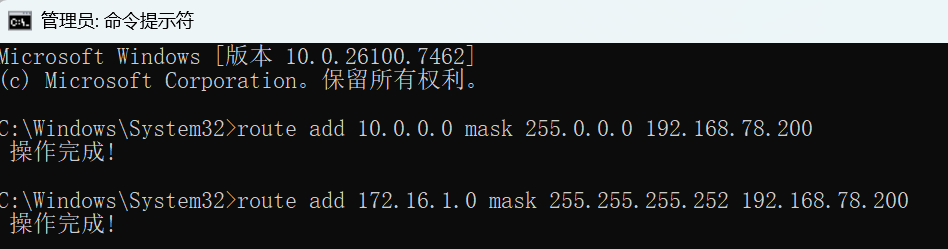
进入cmd管理员模式输入以下路由表(重启电脑失效)
route add 10.0.0.0 mask 255.0.0.0 192.168.78.200
route add 172.16.1.0 mask 255.255.255.252 192.168.78.200
2.6.2 ping测试
测试 Mgt/Core/Edge:
ping 192.168.78.200 & ping 10.0.99.2 & ping 172.16.1.1
测试汇聚 Agg1-2:
ping 10.0.0.11 & ping 10.0.0.12
测试接入 Acc1-4:
ping 10.0.0.21 & ping 10.0.0.22 & ping 10.0.0.23 & ping 10.0.0.24

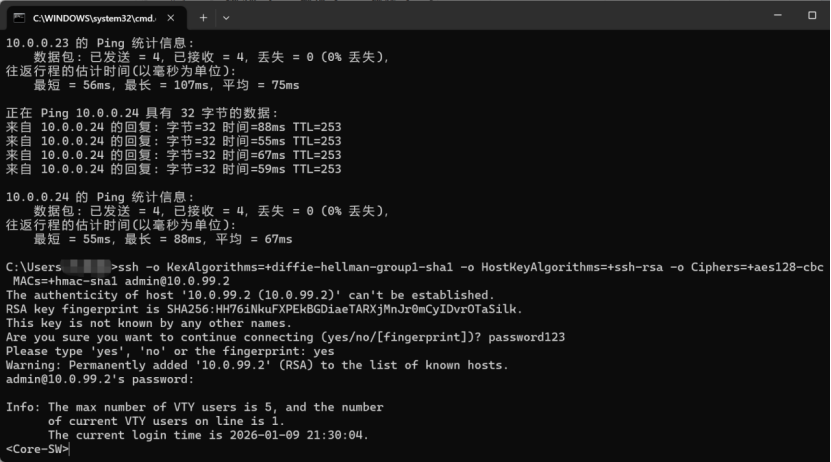
2.6.3 ssh测试
由于ensp加密算法老旧,故需要强制降低电脑的安全标准,去迁就ensp老设备
验证核心 Core-SW
ssh -o KexAlgorithms=+diffie-hellman-group1-sha1 -o HostKeyAlgorithms=+ssh-rsa -o Ciphers=+aes128-cbc -o MACs=+hmac-sha1 admin@10.0.99.2
验证出口路由器 Edge-Router
ssh -o KexAlgorithms=+diffie-hellman-group1-sha1 -o HostKeyAlgorithms=+ssh-rsa -o Ciphers=+aes128-cbc -o MACs=+hmac-sha1 admin@172.16.1.1
验证接入 SW1 Acc-SW1
ssh -o KexAlgorithms=+diffie-hellman-group1-sha1 -o HostKeyAlgorithms=+ssh-rsa -o Ciphers=+aes128-cbc -o MACs=+hmac-sha1 admin@10.0.0.21
其余ssh连接命令类似,修改末尾ip即可
3. Day 1:基于 Python 的自动化部署
3.1 自动化脚本架构设计
本项目摒弃了传统的“逐台 CLI 配置”模式,自主开发了一套基于 Python Netmiko 库的自动化部署系统。系统采用模块化设计,主要包含以下核心组件:
main.py :
-
并发控制策略:针对 eNSP 模拟器性能特性,实现了差异化的执行策略。
-
串行模式: 用于核心层与路由器设备,防止 CPU 过载导致 SSH 断连。
-
并发模式 : 利用 threading 多线程技术,对汇聚层和接入层交换机进行并发配置,大幅缩短部署时间。
-
-
兼容性补丁 : 针对 paramiko 库默认禁用旧版加密算法的问题,在代码底层强制开启 diffie-hellman-group1-sha1 等算法,解决了 eNSP 设备无法连接的难题。
import threading
import time
import paramiko
from netmiko import ConnectHandler
# 导入配置文件
from config_templates import CONFIG_TEMPLATES
# ========================================================
# 兼容性补丁
# ========================================================
def enable_legacy_ssh_algos():
"""针对 eNSP 华为设备老旧算法的底层强制修复。"""
paramiko.Transport._preferred_kex = (
"diffie-hellman-group1-sha1",
"diffie-hellman-group14-sha1",
"diffie-hellman-group-exchange-sha1"
)
paramiko.Transport._preferred_keys = ("ssh-rsa",)
paramiko.Transport._preferred_ciphers = ("aes128-cbc", "3des-cbc", "aes128-ctr")
paramiko.Transport._preferred_macs = ("hmac-sha1", "hmac-md5")
enable_legacy_ssh_algos()
# ========================================================
# 1. 资产清单
# ========================================================
USERNAME = 'admin'
PASSWORD = 'password123'
# 1. 核心与网关层 (路由器性能差,必须串行单一配置)
GROUP_CORE = [
{'host': '192.168.78.200', 'role': 'Mgt-Router'},
{'host': '172.16.1.1', 'role': 'Edge-Router'},
{'host': '10.0.99.2', 'role': 'Core-SW'},
]
# 2. 汇聚层 (交换机性能好,可并发)
GROUP_AGG = [
{'host': '10.0.0.11', 'role': 'Agg-SW1'},
{'host': '10.0.0.12', 'role': 'Agg-SW2'},
]
# 3. 接入层 (交换机性能好,可并发)
GROUP_ACC = [
{'host': '10.0.0.21', 'role': 'Acc-SW1'},
{'host': '10.0.0.22', 'role': 'Acc-SW2'},
{'host': '10.0.0.23', 'role': 'Acc-SW3'},
{'host': '10.0.0.24', 'role': 'Acc-SW4'},
]
# ========================================================
# 2. 部署执行引擎
# ========================================================
def deploy_task(device_info):
role = device_info['role']
host = device_info['host']
# 针对 eNSP 路由器 (AR) 增加额外的延迟,防止 CPU 100% 导致断连
delay_factor = 8 if 'Router' in role else 4
connection_params = {
'device_type': 'huawei',
'host': host,
'username': USERNAME,
'password': PASSWORD,
'global_delay_factor': delay_factor,
'timeout': 180,
}
# 重试机制
max_retries = 3
for attempt in range(max_retries):
try:
print(f"[正在连接] {role} ({host}) (Attempt {attempt + 1}/{max_retries})…")
with ConnectHandler(**connection_params) as conn:
conn.enable()
# 屏蔽日志干扰
conn.send_command("undo info-center enable")
if role in CONFIG_TEMPLATES:
print(f"[部署] {role} 开始…")
output = conn.send_config_set(CONFIG_TEMPLATES[role], cmd_verify=False, read_timeout=120)
if "Error" in output:
print(f" {role} 遇到部分命令报错 (可能是重复配置,正常现象)")
print(f"[配置保存] {role}…")
conn.send_command_timing("save\\ny")
print(f"[成功] {role}")
else:
print(f"[跳过] {role} 未定义业务配置。")
# 成功执行后跳出重试循环
break
except Exception as e:
err_msg = str(e)
print(f"[失败] {role}: {err_msg[:100]}…")
# 如果是 Socket closed 或 EOF,等待后重试
if "Socket is closed" in err_msg or "End of file" in err_msg or "10054" in err_msg:
if attempt < max_retries – 1:
wait_time = 5 * (attempt + 1)
print(f" 连接意外中断,{wait_time}秒后自动重连…")
time.sleep(wait_time)
else:
print(f" {role} 重试次数耗尽,放弃。")
else:
# 其他错误直接退出
break
def run_batch_concurrent(devices, batch_name):
"""并发执行 (适用于交换机)"""
print(f"\\n[启动批次-并发] {batch_name}")
threads = []
for device in devices:
t = threading.Thread(target=deploy_task, args=(device,))
threads.append(t)
t.start()
time.sleep(2)
for t in threads:
t.join()
print(f"[批次完成] {batch_name}")
def run_batch_sequential(devices, batch_name):
"""串行执行 (适用于路由器,防崩)"""
print(f"\\n[启动批次-串行] {batch_name} (慢速稳定模式)")
for device in devices:
deploy_task(device)
time.sleep(3) # 设备间歇
print(f"[批次完成] {batch_name}")
def run_all():
print("=" * 60)
print("华为全网业务自动化部署系统")
print("=" * 60)
# 1. 第一阶段:核心骨干 (路由器必须串行,否则 eNSP 必崩)
run_batch_sequential(GROUP_CORE, "Phase 1: 核心与网关层")
# 2. 第二阶段:汇聚层 (交换机可并发)
run_batch_concurrent(GROUP_AGG, "Phase 2: 汇聚层")
# 等待收敛
print("\\n 正在等待全网路由收敛 (15秒)…")
time.sleep(15)
# 3. 第三阶段:接入层
run_batch_concurrent(GROUP_ACC, "Phase 3: 接入层")
print("\\n" + "=" * 60)
print("自动化业务部署执行完毕!")
print("=" * 60)
if __name__ == "__main__":
run_all()
config_templates.py (配置数据):
-
实现了逻辑与数据分离。将 OSPF、MSTP、VRRP 等复杂的业务命令封装为字典结构 (CONFIG_TEMPLATES),便于后续维护与复用。自动下发配置之前可删除之前非必要配置,避免出错
# ========================================================
# 核心业务逻辑配置模板 (字典数据)
# ========================================================
# 这里的命令用于:配置接口 IP、OSPF、NAT、MSTP、VRRP 等业务功能
CONFIG_TEMPLATES = {
# — 出口路由器 —
'Edge-Router': [
'interface g0/0/0', 'ip address 192.168.0.254 24', 'undo shutdown', 'quit',
'interface g0/0/1', 'ip address 200.1.1.1 24', 'undo shutdown', 'quit',
# NAT 配置
'nat address-group 1 200.1.1.10 200.1.1.20',
'acl 2000',
'rule 5 permit source 192.168.0.0 0.0.255.255',
'rule 10 permit source 10.0.0.0 0.255.255.255',
'quit',
'interface g0/0/1',
'nat outbound 2000 address-group 1',
'quit',
# OSPF
'ip route-static 0.0.0.0 0.0.0.0 200.1.1.2',
'ospf 1 router-id 1.1.1.1',
'import-route static',
'import-route direct',
'area 0',
' network 172.16.1.0 0.0.0.3',
'quit',
'quit'
],
# — 核心交换机 —
'Core-SW': [
'undo ospf 1',
'undo observe-port 1',
'interface g0/0/1', 'undo port-mirroring to observe-port 1 both', 'quit',
'interface g0/0/2', 'undo port-mirroring to observe-port 1 both', 'quit',
'interface g0/0/3', 'undo port-mirroring to observe-port 1 both', 'quit',
# === 开始新配置 ===
'vlan batch 10 20 30 40 800 900',
'stp mode mstp', 'stp region-configuration', 'region-name HWEI', 'revision-level 1',
' instance 1 vlan 10 20', ' instance 2 vlan 30 40', ' active region-configuration', 'quit',
'interface g0/0/2', 'port link-type trunk', 'port trunk allow-pass vlan all', 'quit',
'interface g0/0/3', 'port link-type trunk', 'port trunk allow-pass vlan all', 'quit',
# 流量镜像
'observe-port 1 interface GigabitEthernet 0/0/4',
'interface GigabitEthernet 0/0/1', 'port-mirroring to observe-port 1 both',
'interface GigabitEthernet 0/0/2', 'port-mirroring to observe-port 1 both',
'interface GigabitEthernet 0/0/3', 'port-mirroring to observe-port 1 both',
# OSPF
'ospf 1 router-id 5.5.5.5',
'import-route direct',
'area 0',
' network 10.0.0.0 0.255.255.255',
' network 172.16.1.0 0.0.0.3',
'quit',
'area 2',
' network 10.0.99.0 0.0.0.3',
'quit',
'quit'
],
# — 汇聚 SW1 —
'Agg-SW1': [
'undo ospf 1',
'undo interface Vlanif 10',
'undo interface Vlanif 20',
'undo interface Vlanif 30',
'undo interface Vlanif 40',
# === 开始新配置 ===
'vlan batch 10 20 30 40',
'stp region-configuration', 'region-name HWEI', 'revision-level 1',
' instance 1 vlan 10 20', ' instance 2 vlan 30 40', ' active region-configuration', 'quit',
'stp instance 1 root primary', 'stp instance 2 root secondary',
'interface g0/0/1', 'port link-type trunk', 'port trunk allow-pass vlan all', 'quit',
'interface g0/0/2', 'port link-type trunk', 'port trunk allow-pass vlan all', 'quit',
'interface g0/0/3', 'port link-type trunk', 'port trunk allow-pass vlan all', 'quit',
'interface g0/0/4', 'port link-type trunk', 'port trunk allow-pass vlan all', 'quit',
'interface g0/0/5', 'port link-type trunk', 'port trunk allow-pass vlan all', 'quit',
'interface g0/0/6', 'port link-type trunk', 'port trunk allow-pass vlan all', 'quit',
# VRRP & IP (.241)
'interface Vlanif10', 'ip address 192.168.1.241 24', 'vrrp vrid 10 virtual-ip 192.168.1.254',
'vrrp vrid 10 priority 120', 'quit',
'interface Vlanif20', 'ip address 192.168.2.241 24', 'vrrp vrid 20 virtual-ip 192.168.2.254',
'vrrp vrid 20 priority 120', 'quit',
'interface Vlanif30', 'ip address 192.168.3.241 24', 'vrrp vrid 30 virtual-ip 192.168.3.254', 'quit',
'interface Vlanif40', 'ip address 192.168.4.241 24', 'vrrp vrid 40 virtual-ip 192.168.4.254', 'quit',
# OSPF
'ospf 1',
'area 0', 'network 10.0.0.0 0.0.0.255', 'quit',
'area 1',
' network 192.168.1.0 0.0.0.255',
' network 192.168.2.0 0.0.0.255',
' network 192.168.3.0 0.0.0.255',
' network 192.168.4.0 0.0.0.255',
'quit',
'quit'
],
# — 汇聚 SW2 —
'Agg-SW2': [
'undo ospf 1',
'undo interface Vlanif 10',
'undo interface Vlanif 20',
'undo interface Vlanif 30',
'undo interface Vlanif 40',
# === 开始新配置 ===
'vlan batch 10 20 30 40',
'stp region-configuration', 'region-name HWEI', 'revision-level 1',
' instance 1 vlan 10 20', ' instance 2 vlan 30 40', ' active region-configuration', 'quit',
'stp instance 1 root secondary', 'stp instance 2 root primary',
'interface g0/0/1', 'port link-type trunk', 'port trunk allow-pass vlan all', 'quit',
'interface g0/0/2', 'port link-type trunk', 'port trunk allow-pass vlan all', 'quit',
'interface g0/0/3', 'port link-type trunk', 'port trunk allow-pass vlan all', 'quit',
'interface g0/0/4', 'port link-type trunk', 'port trunk allow-pass vlan all', 'quit',
'interface g0/0/5', 'port link-type trunk', 'port trunk allow-pass vlan all', 'quit',
'interface g0/0/6', 'port link-type trunk', 'port trunk allow-pass vlan all', 'quit',
# VRRP & IP (.242)
'interface Vlanif10', 'ip address 192.168.1.242 24', 'vrrp vrid 10 virtual-ip 192.168.1.254', 'quit',
'interface Vlanif20', 'ip address 192.168.2.242 24', 'vrrp vrid 20 virtual-ip 192.168.2.254', 'quit',
'interface Vlanif30', 'ip address 192.168.3.242 24', 'vrrp vrid 30 virtual-ip 192.168.3.254',
'vrrp vrid 30 priority 120', 'quit',
'interface Vlanif40', 'ip address 192.168.4.242 24', 'vrrp vrid 40 virtual-ip 192.168.4.254',
'vrrp vrid 40 priority 120', 'quit',
# OSPF
'ospf 1',
'area 0', 'network 10.0.0.0 0.0.0.255', 'quit',
'area 1',
' network 192.168.1.0 0.0.0.255',
' network 192.168.2.0 0.0.0.255',
' network 192.168.3.0 0.0.0.255',
' network 192.168.4.0 0.0.0.255',
'quit',
'quit'
],
# — 接入层公共模板 —
'Acc-SW1': [
'undo dhcp enable',
'undo ospf 1',
'undo ip pool p10',
'undo interface Vlanif 10',
# === 开始新配置 ===
'vlan batch 10', 'dhcp enable',
'stp mode mstp', 'stp region-configuration', 'region-name HWEI', 'revision-level 1',
' instance 1 vlan 10 20', ' instance 2 vlan 30 40', ' active region-configuration', 'quit',
# DHCP
'ip pool p10', 'network 192.168.1.0 mask 24', 'gateway-list 192.168.1.254', 'dns-list 8.8.8.8',
'excluded-ip-address 192.168.1.240 192.168.1.254', 'quit',
# Vlanif (.243)
'interface Vlanif 10', 'ip address 192.168.1.243 24', 'dhcp select global', 'quit',
'interface Ethernet0/0/3', 'port link-type access', 'port default vlan 10', 'stp edged-port enable', 'quit',
'interface Ethernet0/0/4', 'port link-type access', 'port default vlan 10', 'stp edged-port enable', 'quit',
'interface Ethernet0/0/1', 'port link-type trunk', 'port trunk allow-pass vlan all', 'quit',
'interface Ethernet0/0/2', 'port link-type trunk', 'port trunk allow-pass vlan all', 'quit',
'ospf 1', 'area 1', 'network 192.168.1.0 0.0.0.255', 'quit', 'quit'
],
'Acc-SW2': [
'undo dhcp enable', 'undo ospf 1', 'undo ip pool p20', 'undo interface Vlanif 20',
# === 开始新配置 ===
'vlan batch 20', 'dhcp enable',
'stp mode mstp', 'stp region-configuration', 'region-name HWEI', 'revision-level 1',
' instance 1 vlan 10 20', ' instance 2 vlan 30 40', ' active region-configuration', 'quit',
'ip pool p20', 'network 192.168.2.0 mask 24', 'gateway-list 192.168.2.254', 'dns-list 8.8.8.8',
'excluded-ip-address 192.168.2.240 192.168.2.254', 'quit',
'interface Vlanif 20', 'ip address 192.168.2.244 24', 'dhcp select global', 'quit',
'interface Ethernet0/0/3', 'port link-type access', 'port default vlan 20', 'stp edged-port enable', 'quit',
'interface Ethernet0/0/4', 'port link-type access', 'port default vlan 20', 'stp edged-port enable', 'quit',
'interface Ethernet0/0/1', 'port link-type trunk', 'port trunk allow-pass vlan all', 'quit',
'interface Ethernet0/0/2', 'port link-type trunk', 'port trunk allow-pass vlan all', 'quit',
'ospf 1', 'area 1', 'network 192.168.2.0 0.0.0.255', 'quit', 'quit'
],
'Acc-SW3': [
'undo dhcp enable', 'undo ospf 1', 'undo ip pool p30', 'undo interface Vlanif 30',
# === 开始新配置 ===
'vlan batch 30', 'dhcp enable',
'stp mode mstp', 'stp region-configuration', 'region-name HWEI', 'revision-level 1',
' instance 1 vlan 10 20', ' instance 2 vlan 30 40', ' active region-configuration', 'quit',
'ip pool p30', 'network 192.168.3.0 mask 24', 'gateway-list 192.168.3.254', 'dns-list 8.8.8.8',
'excluded-ip-address 192.168.3.240 192.168.3.254', 'quit',
'interface Vlanif 30', 'ip address 192.168.3.245 24', 'dhcp select global', 'quit',
'interface Ethernet0/0/3', 'port link-type access', 'port default vlan 30', 'stp edged-port enable', 'quit',
'interface Ethernet0/0/4', 'port link-type access', 'port default vlan 30', 'stp edged-port enable', 'quit',
'interface Ethernet0/0/1', 'port link-type trunk', 'port trunk allow-pass vlan all', 'quit',
'interface Ethernet0/0/2', 'port link-type trunk', 'port trunk allow-pass vlan all', 'quit',
'ospf 1', 'area 1', 'network 192.168.3.0 0.0.0.255', 'quit', 'quit'
],
'Acc-SW4': [
'undo dhcp enable', 'undo ospf 1', 'undo ip pool p40', 'undo interface Vlanif 40',
# === 开始新配置 ===
'vlan batch 40', 'dhcp enable',
'stp mode mstp', 'stp region-configuration', 'region-name HWEI', 'revision-level 1',
' instance 1 vlan 10 20', ' instance 2 vlan 30 40', ' active region-configuration', 'quit',
'ip pool p40', 'network 192.168.4.0 mask 24', 'gateway-list 192.168.4.254', 'dns-list 8.8.8.8',
'excluded-ip-address 192.168.4.240 192.168.4.254', 'quit',
'interface Vlanif 40', 'ip address 192.168.4.246 24', 'dhcp select global', 'quit',
'interface Ethernet0/0/3', 'port link-type access', 'port default vlan 40', 'stp edged-port enable', 'quit',
'interface Ethernet0/0/4', 'port link-type access', 'port default vlan 40', 'stp edged-port enable', 'quit',
'interface Ethernet0/0/1', 'port link-type trunk', 'port trunk allow-pass vlan all', 'quit',
'interface Ethernet0/0/2', 'port link-type trunk', 'port trunk allow-pass vlan all', 'quit',
'ospf 1', 'area 1', 'network 192.168.4.0 0.0.0.255', 'quit', 'quit'
],
# — 管理路由器 —
'Mgt-Router': [
'ospf 1',
'area 2',
' network 192.168.78.0 0.0.0.255',
' network 10.0.99.0 0.0.0.3',
'quit',
'quit'
]
}
3.2 Day 1 业务自动化下发详情
脚本执行后,全网设备将自动完成以下复杂业务的部署:
IGP 路由设计 (OSPF):
-
Area 0 (骨干区域): 覆盖 Edge-Router <-> Core-SW <-> Agg-SW,实现高速骨干互通。
-
Area 1 (业务区域): 覆盖汇聚与接入层,承载业务网段路由。
-
Area 2 (管理区域): 覆盖 Mgt-Router,隔离运维流量。
高可用二层设计 (MSTP + VRRP):
-
MSTP 域配置: 全网配置域名为 HWEI 的 MSTP 域。
-
负载均衡:
-
Instance 1 (VLAN 10/20): Agg-SW1 为根桥,Agg-SW2 为备份。
-
Instance 2 (VLAN 30/40): Agg-SW2 为根桥,Agg-SW1 为备份。
-
-
网关冗余: 在汇聚层配置 VRRP,虚拟网关 IP 统一为 254,优先级 120 配合 MSTP 实现流量的双活负载分担。
接入安全与优化:
-
Edge Port: 接入交换机连接 PC 端口配置 stp edged-port enable,防止终端上下线引起 STP 震荡。
-
DHCP Snooping: 接入层启用 DHCP 服务,自动剔除冲突地址。
3.3 全流量镜像分析
本项目不仅关注“通不通”,更关注“安不安全”。利用 Python 自动化的灵活性,实现了与 Linux 后端服务的联动。
-
技术点:利用 Python 脚本在 Core-SW(核心交换机)上动态配置观察端口(observe-port)和端口镜像。
-
实现逻辑:脚本识别核心链路端口(G0/0/1, G0/0/2, G0/0/3),下发镜像策略,将经过核心交换机的所有业务流量“克隆”一份,通过物理接口 G0/0/4 发送至后端的 Linux-service 服务器。
-
应用场景:为 Day 2 阶段的 Docker 流量分析引擎(如 Snort 或 ELK 栈)提供实时数据源,实现对内网异常流量的深度检测(DPI)。
3.4 Syslog 日志审计联动
为了实现 Day 2 运维平台中的集中式日志审计功能(Rsyslog + Frontail),必须首先打通设备到日志服务器的数据通道。由独立的 Python 脚本 syslog_sender.py用于标准化全网设备的日志发送策略。
-
功能定义:将全网 9 台设备的系统日志(Info-Center)统一指向 Linux 运维平台的 Rsyslog 容器地址。
import threading
import time
import paramiko
from netmiko import ConnectHandler
# ========================================================
# 🛡️ 兼容性补丁 (eNSP 必备)
# ========================================================
def enable_legacy_ssh_algos():
paramiko.Transport._preferred_kex = (
"diffie-hellman-group1-sha1",
"diffie-hellman-group14-sha1",
"diffie-hellman-group-exchange-sha1"
)
paramiko.Transport._preferred_keys = ("ssh-rsa",)
paramiko.Transport._preferred_ciphers = ("aes128-cbc", "3des-cbc", "aes128-ctr")
paramiko.Transport._preferred_macs = ("hmac-sha1", "hmac-md5")
enable_legacy_ssh_algos()
# ========================================================
# 1. 资产清单
# ========================================================
USERNAME = 'admin'
PASSWORD = 'password123'
SYSLOG_SERVER = '192.168.78.128' # 你的虚拟机 IP
ALL_DEVICES = [
{'host': '192.168.78.200', 'role': 'Mgt-Router'},
{'host': '172.16.1.1', 'role': 'Edge-Router'},
{'host': '10.0.99.2', 'role': 'Core-SW'},
{'host': '10.0.0.11', 'role': 'Agg-SW1'},
{'host': '10.0.0.12', 'role': 'Agg-SW2'},
{'host': '10.0.0.21', 'role': 'Acc-SW1'},
{'host': '10.0.0.22', 'role': 'Acc-SW2'},
{'host': '10.0.0.23', 'role': 'Acc-SW3'},
{'host': '10.0.0.24', 'role': 'Acc-SW4'},
]
# ========================================================
# 2. Syslog 配置命令
# ========================================================
SYSLOG_TEMPLATE = [
'info-center enable',
f'info-center loghost {SYSLOG_SERVER} facility local7',
# 关闭一些不必要的详细日志,防止刷屏
'info-center source default channel 2 log level notification',
'quit'
]
def deploy_syslog(device_info):
role = device_info['role']
host = device_info['host']
connection_params = {
'device_type': 'huawei',
'host': host,
'username': USERNAME,
'password': PASSWORD,
'global_delay_factor': 4, # 增加延时防止 eNSP 卡顿
'timeout': 60,
}
try:
print(f"📡 [配置日志] {role} ({host})…")
with ConnectHandler(**connection_params) as conn:
# 清理旧配置 (可选,视情况而定)
# conn.send_command("undo info-center enable")
# 下发新配置
output = conn.send_config_set(SYSLOG_TEMPLATE)
print(output)
conn.send_command("save", expect_string=r"[y/n]")
conn.send_command("y")
print(f"[成功] {role} -> 日志已指向 {SYSLOG_SERVER}")
except Exception as e:
print(f"[失败] {role}: {str(e)[:100]}")
def run_all():
print("=" * 60)
print("华为Syslog 配置下发工具")
print(f"目标 Rsyslog 服务器: {SYSLOG_SERVER}")
print("=" * 60)
threads = []
for device in ALL_DEVICES:
t = threading.Thread(target=deploy_syslog, args=(device,))
threads.append(t)
t.start()
time.sleep(2) # eNSP 性能较弱,建议间隔时间设为 2 秒
for t in threads:
t.join()
print("\\n" + "=" * 60)
print("Syslog 配置完毕!")
print("=" * 60)
if __name__ == "__main__":
run_all()
独立执行机制:该脚本设计为独立运行,不干扰主业务配置(Main Configuration)。它使用与主程序相同的 enable_legacy_ssh_algos 补丁,确保能稳定连接 eNSP 设备。
-
实施效果: 脚本执行后,设备发生任何状态变更(如 OSPF 邻居震荡、SSH 登录、接口 Up/Down),都会立即以 UDP 514 报文发送至 192.168.78.128,并在 Frontail 大屏上实时滚动展示,实现了“配置变更”与“行为审计”的自动化闭环。
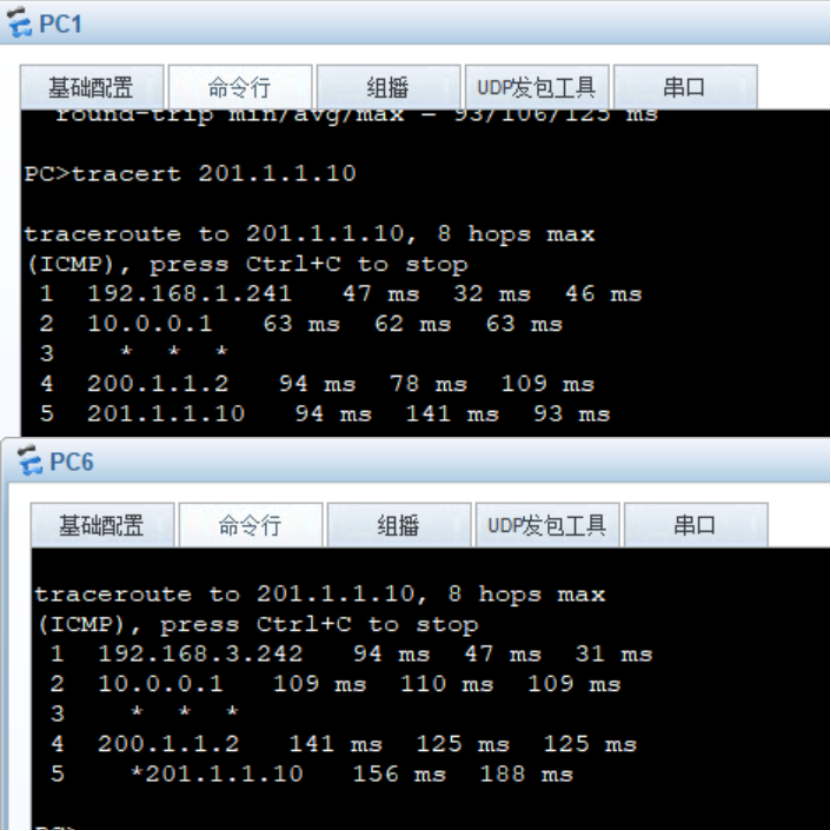
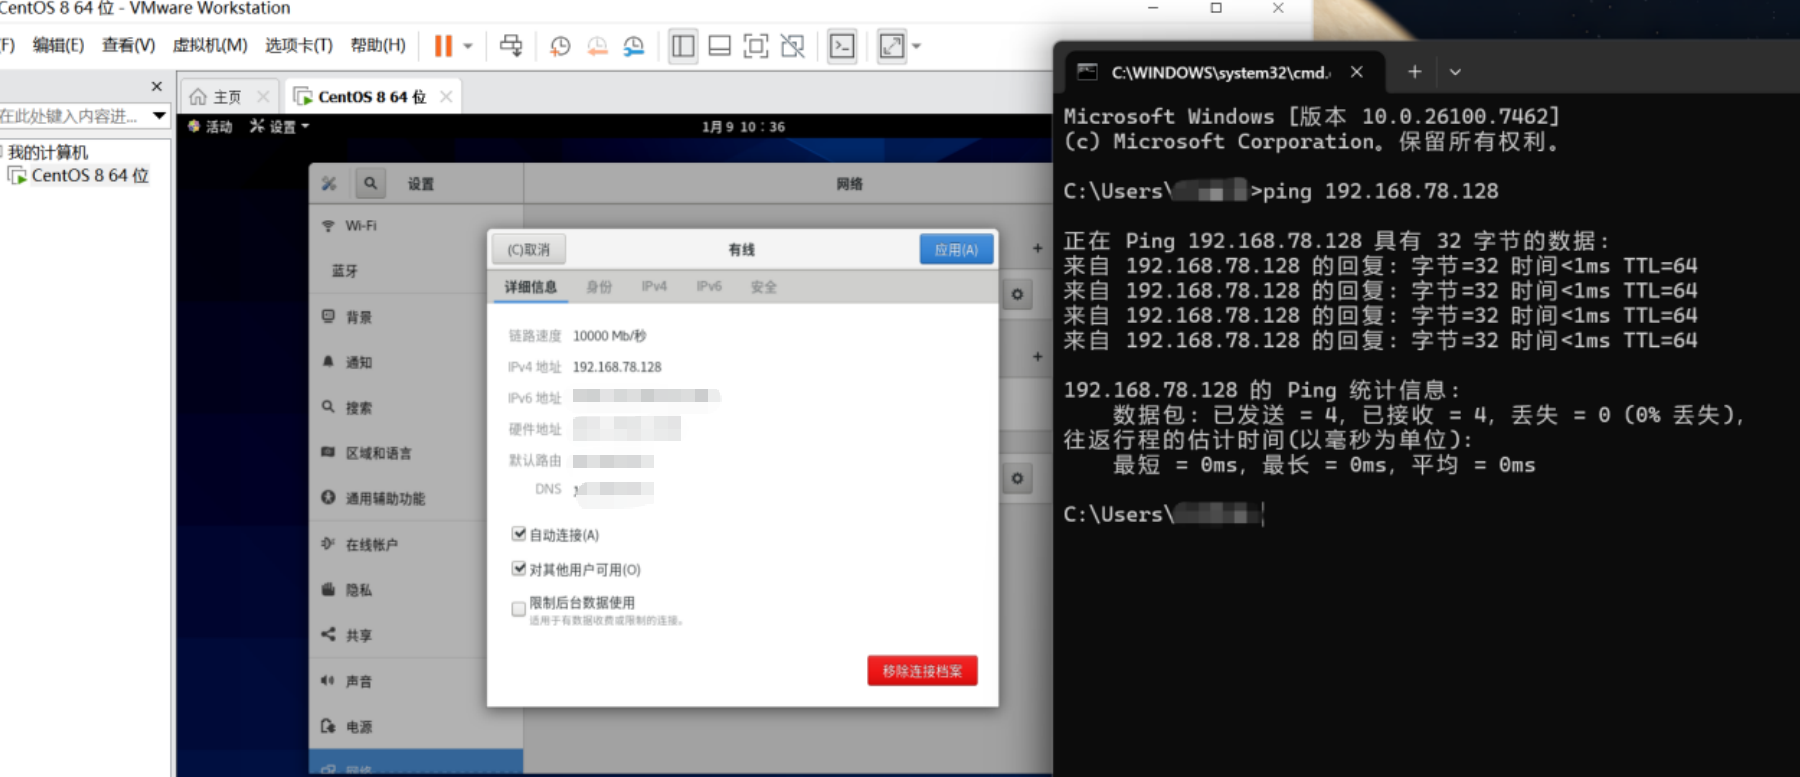
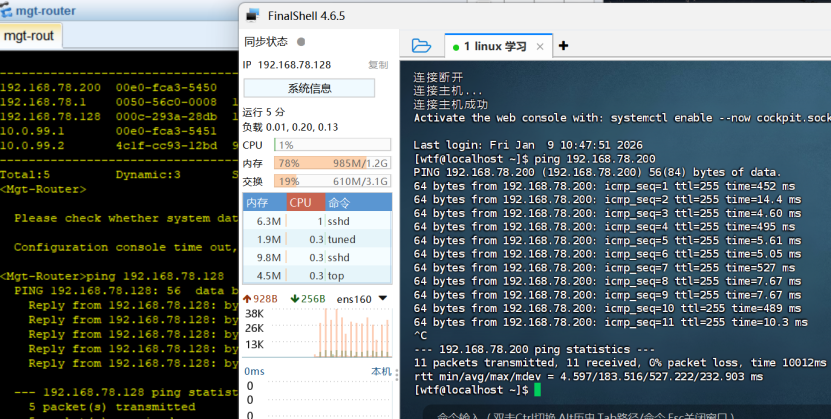
3.5 连通性测试
1.需要在虚拟机上配置以下命令,【】内填写自己的网卡:
允许访问核心与管理网段 (10.x.x.x)
sudo ip route add 10.0.0.0/8 via 192.168.78.200 dev 【eth0】
允许访问边缘互联网段 (172.16.x.x)
sudo ip route add 172.16.0.0/12 via 192.168.78.200 dev 【eth0】
允许访问业务 PC 网段 (192.168.x.x)
这不会影响虚拟机自己所在的 192.168.78.0 网段,因为直连路由优先级更高
sudo ip route add 192.168.0.0/16 via 192.168.78.200 dev 【eth0】
2.为保证实验连通性,建议关闭虚拟机防火墙:
sudo systemctl stop firewalld
sudo systemctl disable firewalld
4. Day 2:基于 Docker 的容器化运维平台构建
4.1 概述
在完成了网络的基础架构搭建与自动化部署(Day 1)后,为了保障企业网络的长期稳定运行,本项目引入了基于 Docker 容器技术的 Linux 运维平台,实现了对网络设备的全生命周期管理(Day 2 Operations)。
通过容器编排技术,集成了监控、日志、备份、管理四大核心模块,构建了一套轻量级、可视化的 NetDevOps 解决方案。
4.2 技术架构
本系统部署于 CentOS/Linux 虚拟机中,采用 Docker Compose 进行微服务编排。相比传统物理机部署,容器化方案具有部署快、资源占用少、环境隔离性强的优势。
组件清单:
-
服务编排与管理: Portainer CE
-
服务可用性监控: Uptime Kuma
-
日志收集与分析: Rsyslog + Frontail
-
配置备份与版本控制: Oxidized(碍于ensp模拟器的老旧,此块容易出错)
|
服务名称 |
端口 |
访问网址 |
功能备注 |
|
Portainer |
9000 |
http://【虚拟机ip】:9000 |
容器总管家。在这里管理所有服务,看日志、重启容器等。 |
|
Uptime Kuma |
3001 |
http://【虚拟机ip】:3001 |
监控大屏。添加 Ping 监控,查看网络设备存活状态和延迟图表。 |
|
Frontail |
9001 |
http://【虚拟机ip】:9001 |
日志实时流。当你运行 Python 脚本或操作设备时,在这里看滚动的 Syslog。 |
|
Oxidized |
8888 |
http://【虚拟机ip】:8888 |
配置备份。查看设备配置的版本历史,对比配置变更差异 (Diff)。 |
4.3 平台部署与实施步骤
为了确保 Linux 运维平台的顺利交付,本项目制定了严格的“三步走”实施流程,涵盖了从底层文件构建、环境预处理到最终服务拉起与验证的全过程。
4.3.1:基础设施代码化构建
本阶段的目标是在 Linux 文件系统中建立规范的目录结构,并写入各容器的核心配置文件,实现“配置即代码”。
1. 创建标准化目录结构 在 /opt 目录下创建项目总目录及各微服务的持久化挂载点,确保容器重启后数据不丢失。
# 创建项目主目录及子目录
mkdir -p /opt/netops
mkdir -p /opt/netops/logs # 存放 Rsyslog 日志
mkdir -p /opt/netops/uptime-kuma-data # 存放监控数据
mkdir -p /opt/netops/portainer_data # 存放 Portainer 数据
mkdir -p /opt/netops/oxidized # 存放备份配置
2. 编写容器编排文件 (docker-compose.yml)
version: '3'
services:
uptime-kuma:
image: louislam/uptime-kuma:1
container_name: uptime-kuma
restart: always
ports:
– "3001:3001"
volumes:
– ./uptime-kuma-data:/app/data
rsyslog:
image: rsyslog/rsyslog:latest
container_name: rsyslog
restart: always
ports:
– "514:514/udp"
volumes:
– ./logs:/var/log
– ./rsyslog.conf:/etc/rsyslog.conf
frontail:
image: mthenw/frontail
container_name: frontail
restart: always
ports:
– "9001:9001"
command: /log/messages –ui-highlight –disable-usage-stats
volumes:
– ./logs:/log:ro
depends_on:
– rsyslog
portainer:
image: portainer/portainer-ce:latest
container_name: portainer
restart: always
ports:
– "9000:9000"
volumes:
– /var/run/docker.sock:/var/run/docker.sock
– ./portainer_data:/data
oxidized:
image: oxidized/oxidized:latest
container_name: oxidized
restart: always
ports:
– "8888:8888"
environment:
– OXIDIZED_HOME=/home/oxidized/.config/oxidized
– LANG=C.UTF-8
volumes:
– ./oxidized:/home/oxidized/.config/oxidized:z
-
关键配置说明:
-
Oxidized 路径修正:强制指定环境变量 OXIDIZED_HOME 指向 /home/oxidized/.config/oxidized,以匹配容器内部非 Root 用户的运行环境。
-
SELinux 权限适配:在挂载路径后添加 :z 参数(如 ./oxidized:…:z),自动调整 SELinux 安全上下文,防止权限拒绝错误。
-
3. 配置日志服务 (rsyslog.conf) 定义 Rsyslog 监听 UDP 514 端口,并将接收到的网络设备日志流转存至 /var/log/messages,供前端可视化工具 Frontail 读取。
# 加载 UDP 模块,监听 514 端口
module(load="imudp")
input(type="imudp" port="514")
# 设置默认权限,确保 frontail 能读取
$FileCreateMode 0644
# 将所有接收到的日志 (*.*) 写入 /var/log/messages
*.* /var/log/messages
4. 配置备份服务 (oxidized/config) 编写 Oxidized 的核心逻辑配置,定义设备连接与备份策略:
username: admin
password: password123
model: huaweivrp
interval: 3600
use_syslog: false
debug: false
# === 降低并发,防止把 eNSP 冲垮 ===
threads: 5
timeout: 20
retries: 3
prompt: !ruby/regexp /^.+[#>]\\s?$/
rest: 0.0.0.0:8888
input:
default: ssh
debug: false
ssh:
secure: false
auth_methods: ["password"]
output:
default: file
file:
directory: /home/oxidized/.config/oxidized/backups
source:
default: csv
csv:
file: /home/oxidized/.config/oxidized/router.db
delimiter: !ruby/regexp /:/
map:
name: 0
model: 1
ip: 2
5. 建立资产清单 (oxidized/router.db) 创建 CSV 格式的资产列表文件,明确需要备份的目标设备。
# 格式说明: 设备名称:设备型号:IP地址
Mgt-Router:huaweivrp:192.168.78.200
Edge-Router:huaweivrp:172.16.1.1
Core-SW:huaweivrp:10.0.99.2
Agg-SW1:huaweivrp:10.0.0.11
Agg-SW2:huaweivrp:10.0.0.12
Acc-SW1:huaweivrp:10.0.0.21
Acc-SW2:huaweivrp:10.0.0.22
Acc-SW3:huaweivrp:10.0.0.23
Acc-SW4:huaweivrp:10.0.0.24
-
格式规范:设备名:huaweivrp:IP地址
6. 运行Oxidized报错(huaweivrp not found)的解决办法(仅供参考)
$ sudo docker logs –tail 20 oxidized
2026-01-10 14:10:58.508706 E [159:1140 nodes.rb:27] Oxidized::Nodes — node {:name=>"Acc-SW2", :model=>"huaweivrp", :ip=>"10.0.0.22"} raised Oxidized::ModelNotFound with message 'huaweivrp not found for node 10.0.0.22'
2026-01-10 14:10:58.508969 E [159:1140 nodes.rb:27] Oxidized::Nodes — node {:name=>"Acc-SW3", :model=>"huaweivrp", :ip=>"10.0.0.23"} raised Oxidized::ModelNotFound with message 'huaweivrp not found for node 10.0.0.23'
2026-01-10 14:10:58.509574 E [159:1140 nodes.rb:27] Oxidized::Nodes — node {:name=>"Acc-SW4", :model=>"huaweivrp", :ip=>"10.0.0.24"} raised Oxidized::ModelNotFound with message 'huaweivrp not found for node 10.0.0.24'
若出现“huaweivrp not found”,需要手动安装 华为 VRP 的 model 文件。 第一步:进入 oxidized 容器
sudo docker exec -it oxidized bash
第二步:进入 models 目录
cd /home/oxidized/.config/oxidized/model
如果目录不存在,创建它:
mkdir -p /home/oxidized/.config/oxidized/modelcd /home/oxidized/.config/oxidized/model
第三步:创建 huaweivrp.rb 文件
nano huaweivrp.rb
把下面内容完整粘贴进去(这是社区常用的华为 VRP model,能跑 S 系列、AR 系列、CE 系列):
class Huaweivrp < Oxidized::Model
prompt /^<.*?>$/
comment '# '
cmd 'display current-configuration' do |cfg|
cfg
end
cfg :telnet do
username /^Username:/
password /^Password:/
end
cfg :ssh do
username /^Username:/
password /^Password:/
end
cfg :telnet, :ssh do
post_login 'screen-length 0 temporary'
pre_logout 'quit'
end
end
保存退出(Ctrl+O 回车,Ctrl+X)。
第四步:退出容器
exit
4.3.2:服务启动与业务验证
执行最终部署,并对各模块功能进行验收测试。
1. 启动容器集群 在项目根目录下执行 Docker Compose 启动命令:
cd /opt/netops
sudo docker compose up -d

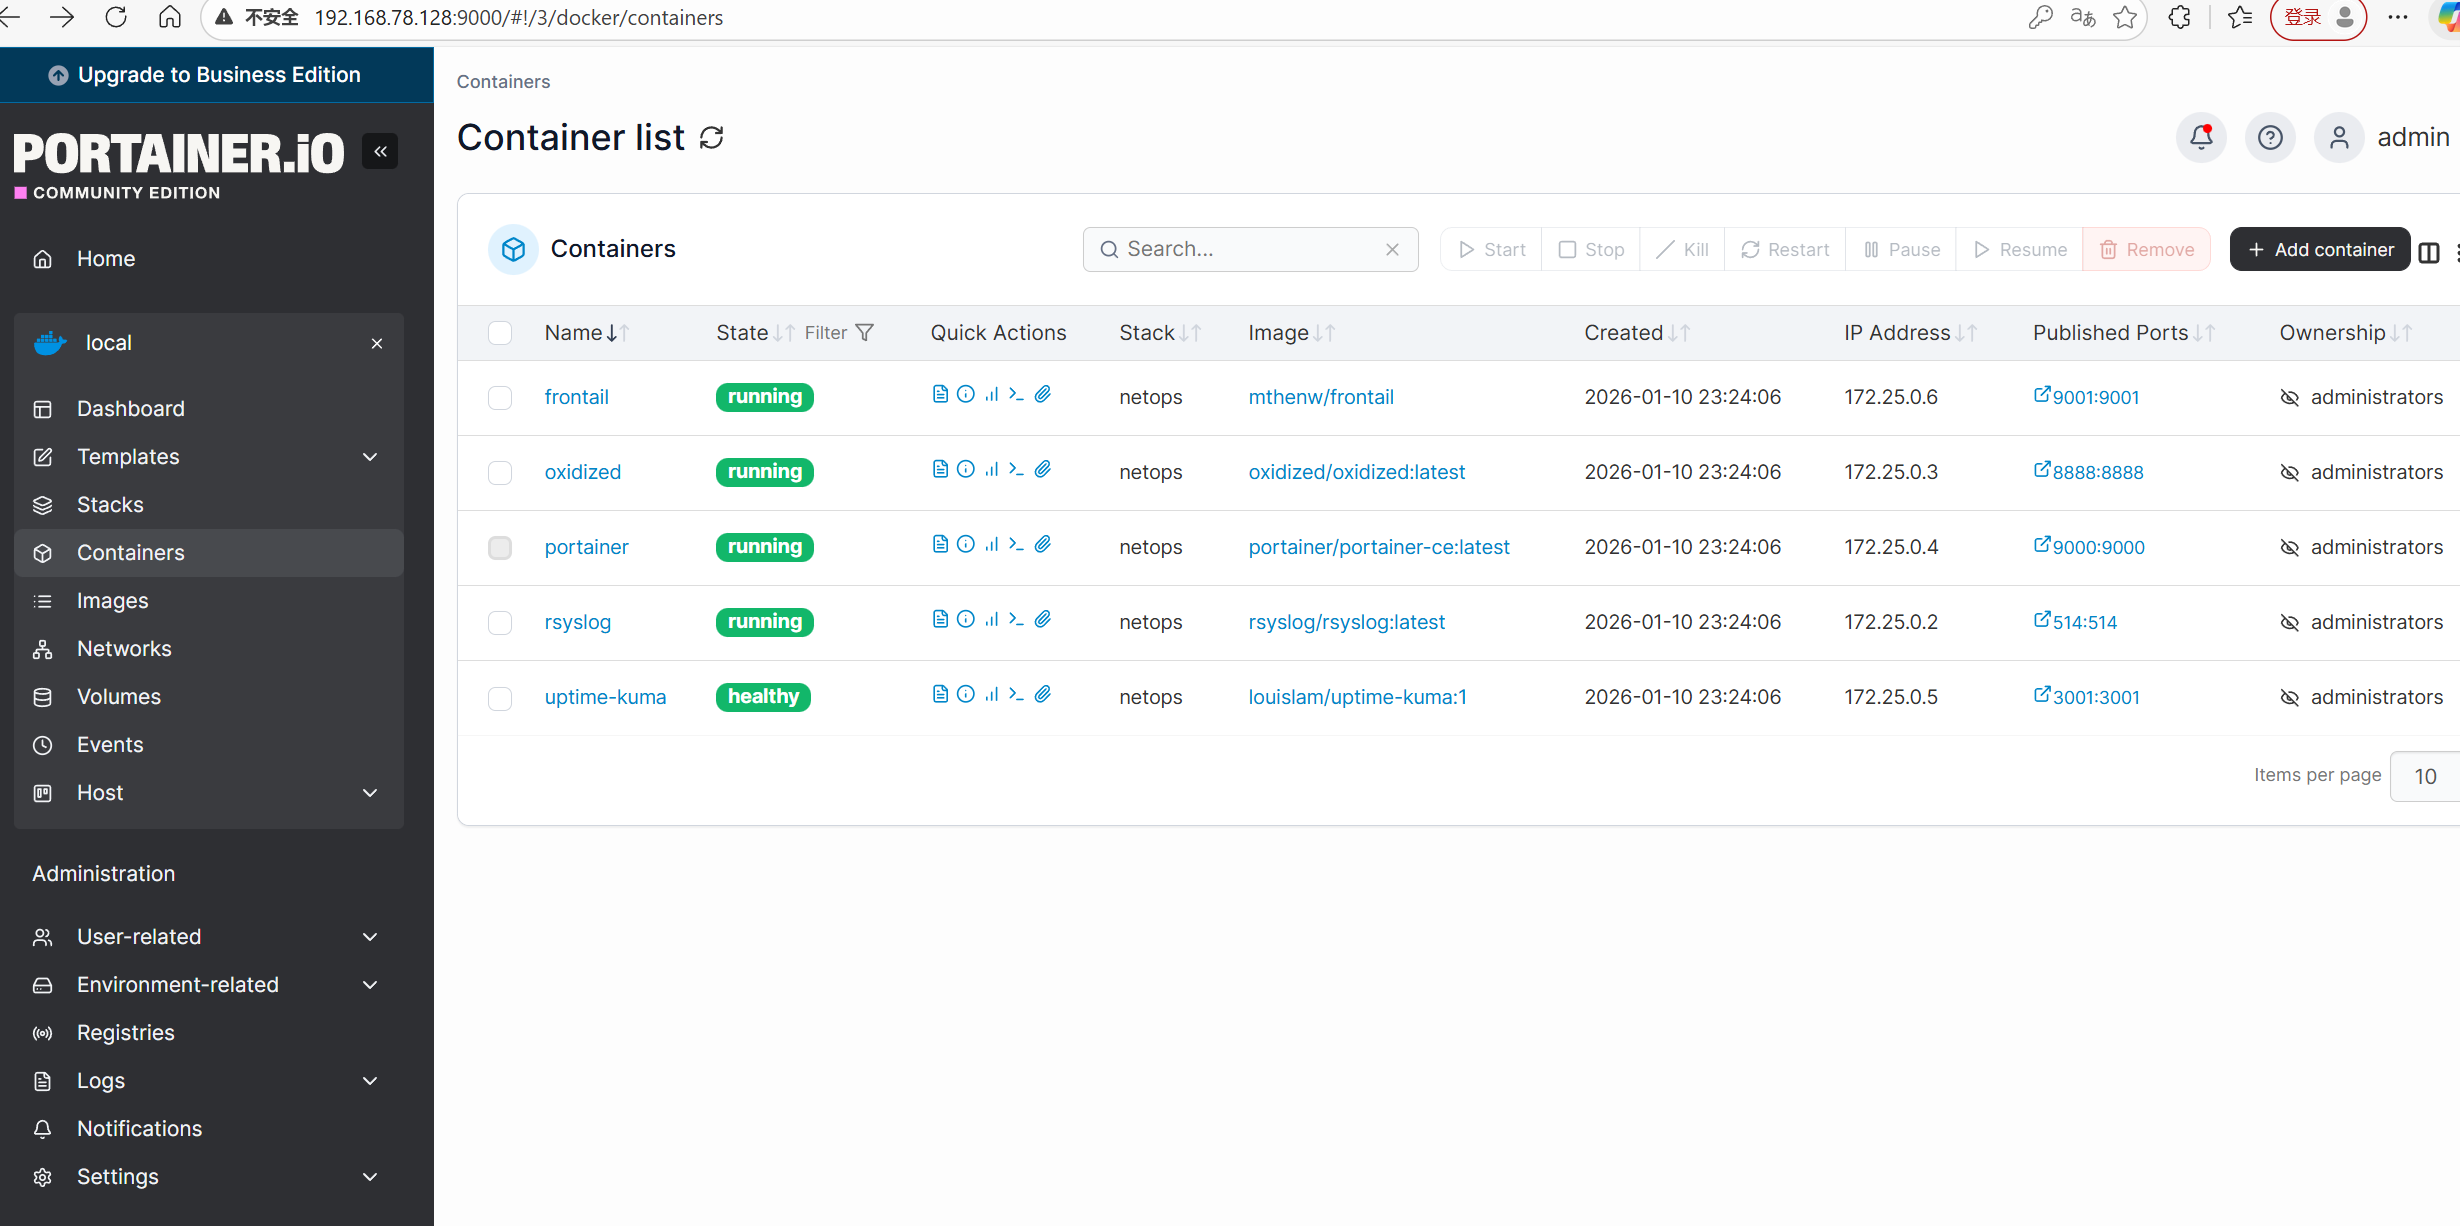
执行 docker ps,确保所有 5 个容器的状态均为 Up (Started)。
4.3 功能模块详解
4.3.1 可视化容器管理 (Portainer)
-
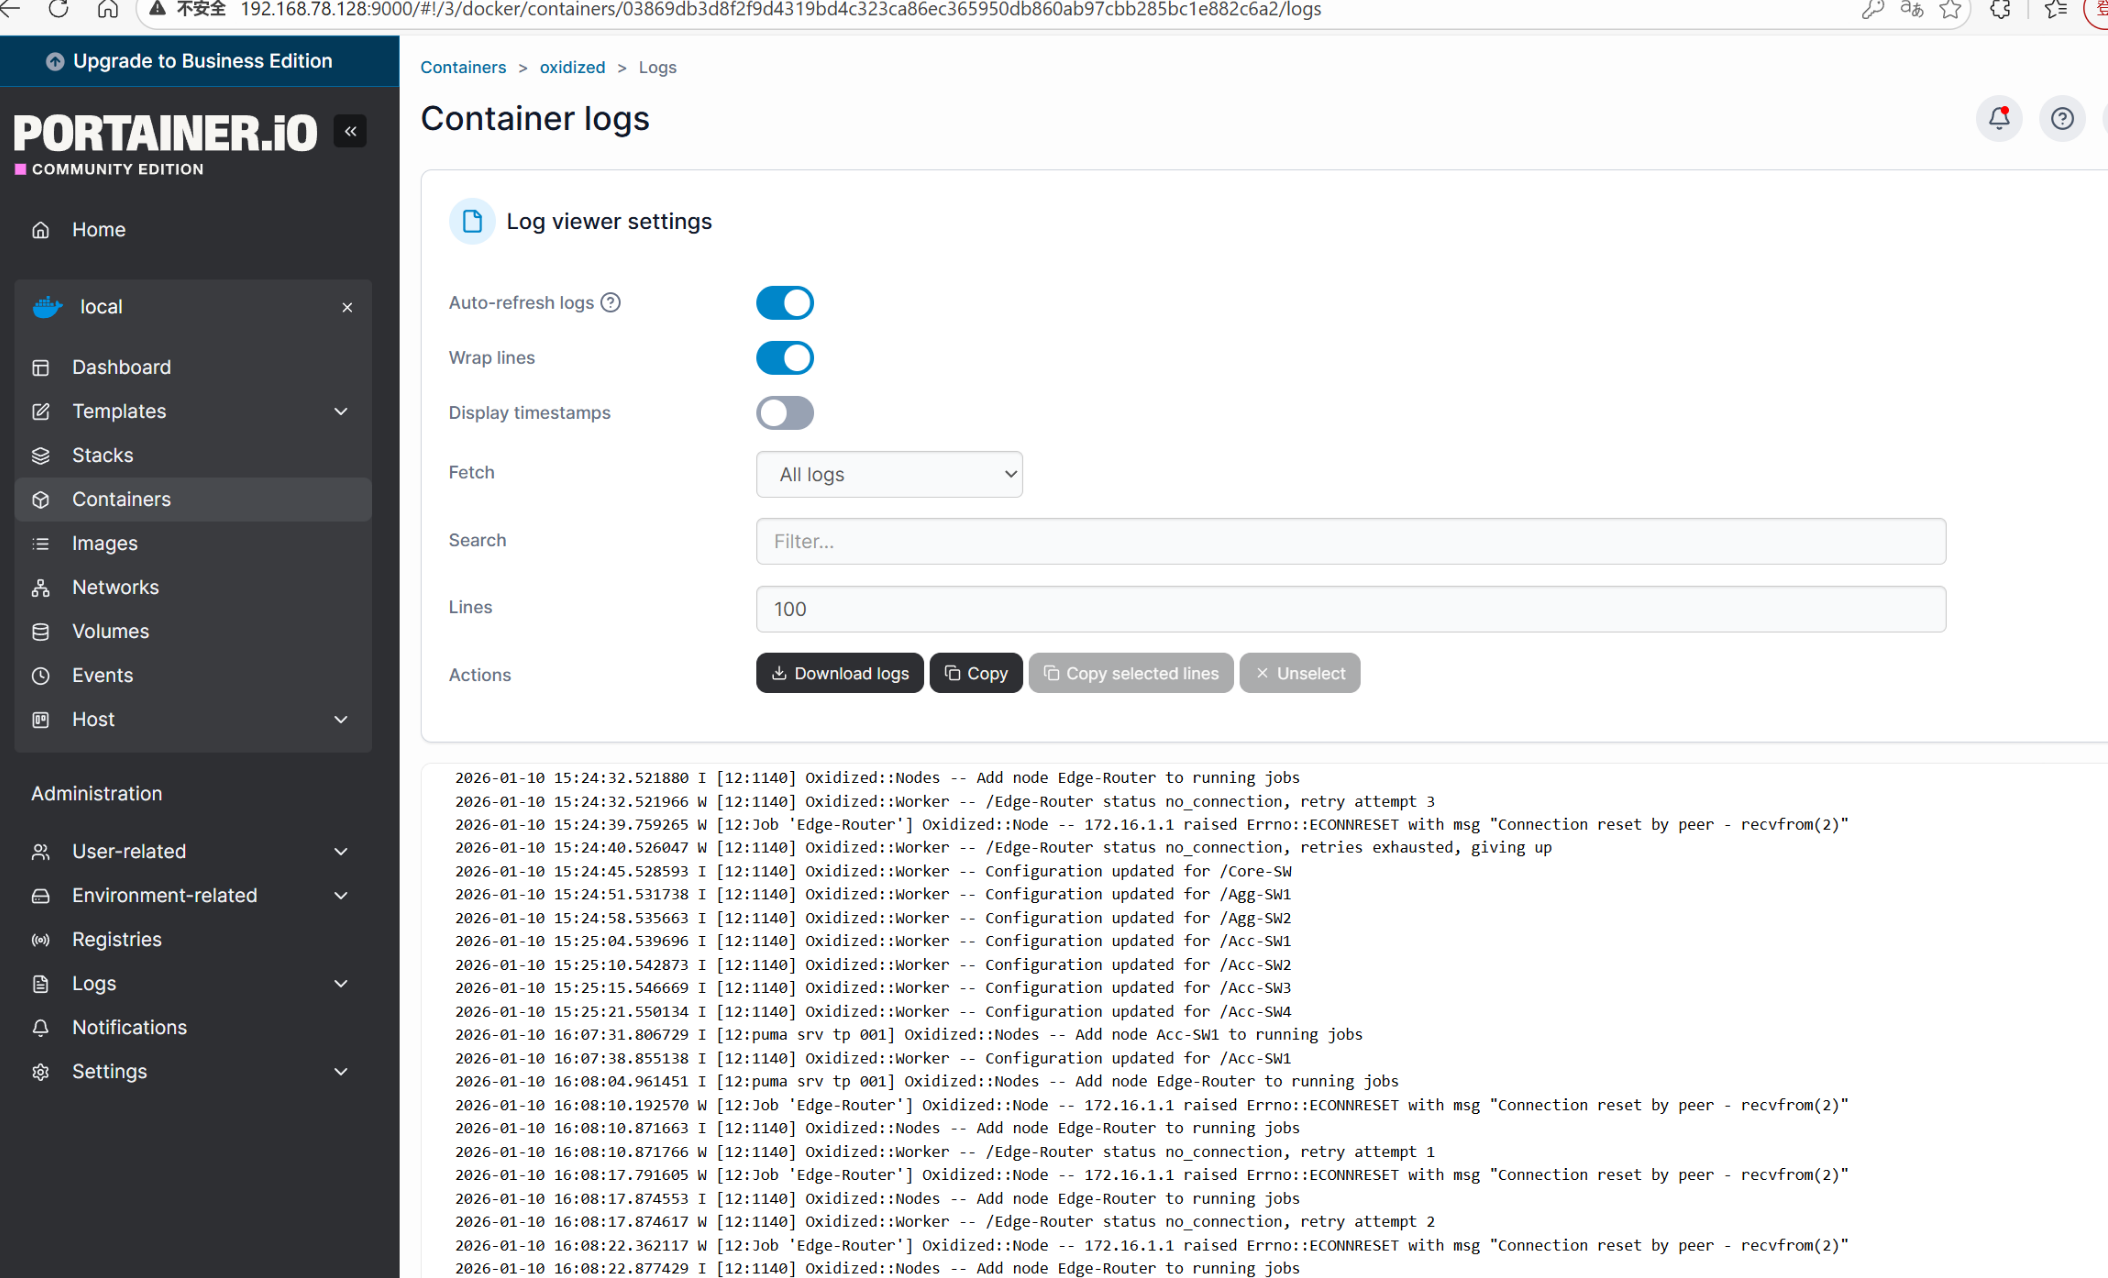
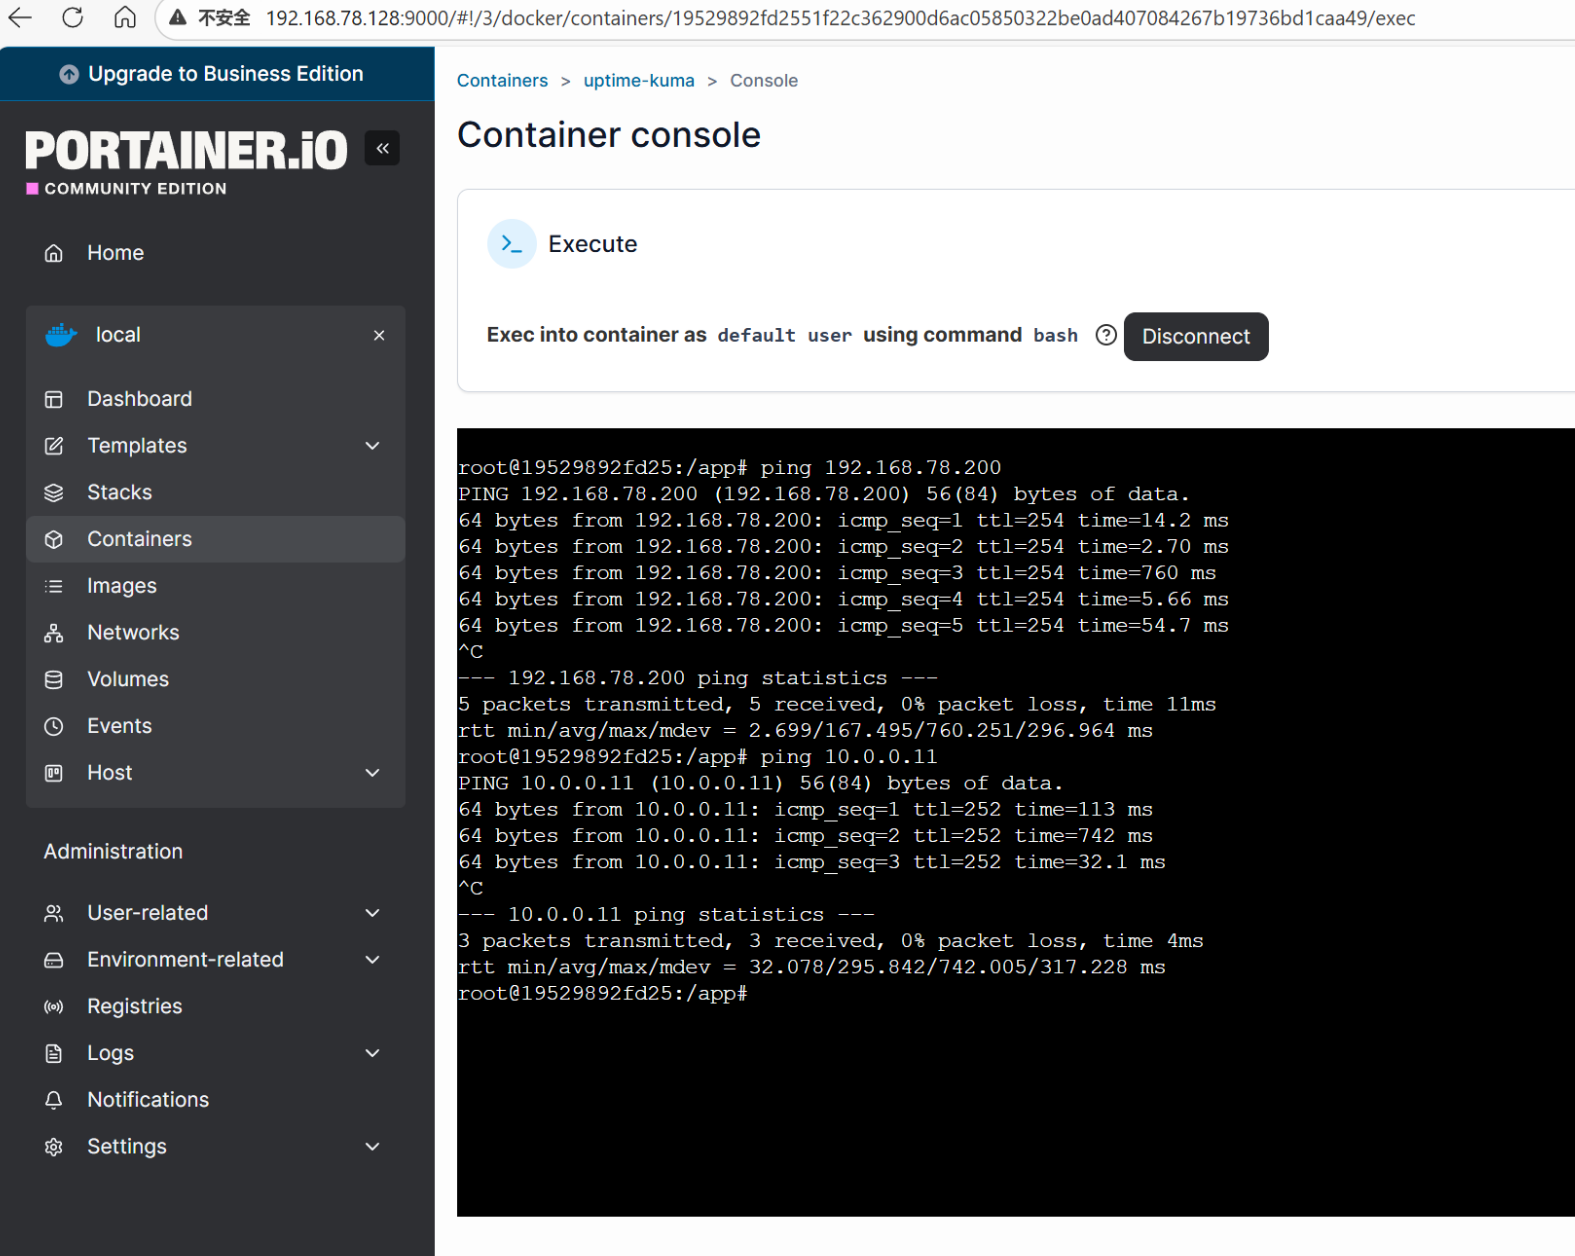
功能描述: 部署 Portainer 作为 Docker 的图形化管理界面,替代复杂的命令行操作。
-
运维价值: 实现了运维工具栈的统一管理。管理员可以通过 Web 界面实时查看各组件(Oxidized, Uptime Kuma 等)的运行状态、CPU/内存占用,并能快速查看容器日志进行故障排查,极大地降低了运维门槛。

4.3.2 网络服务存活监控 (Uptime Kuma)
-
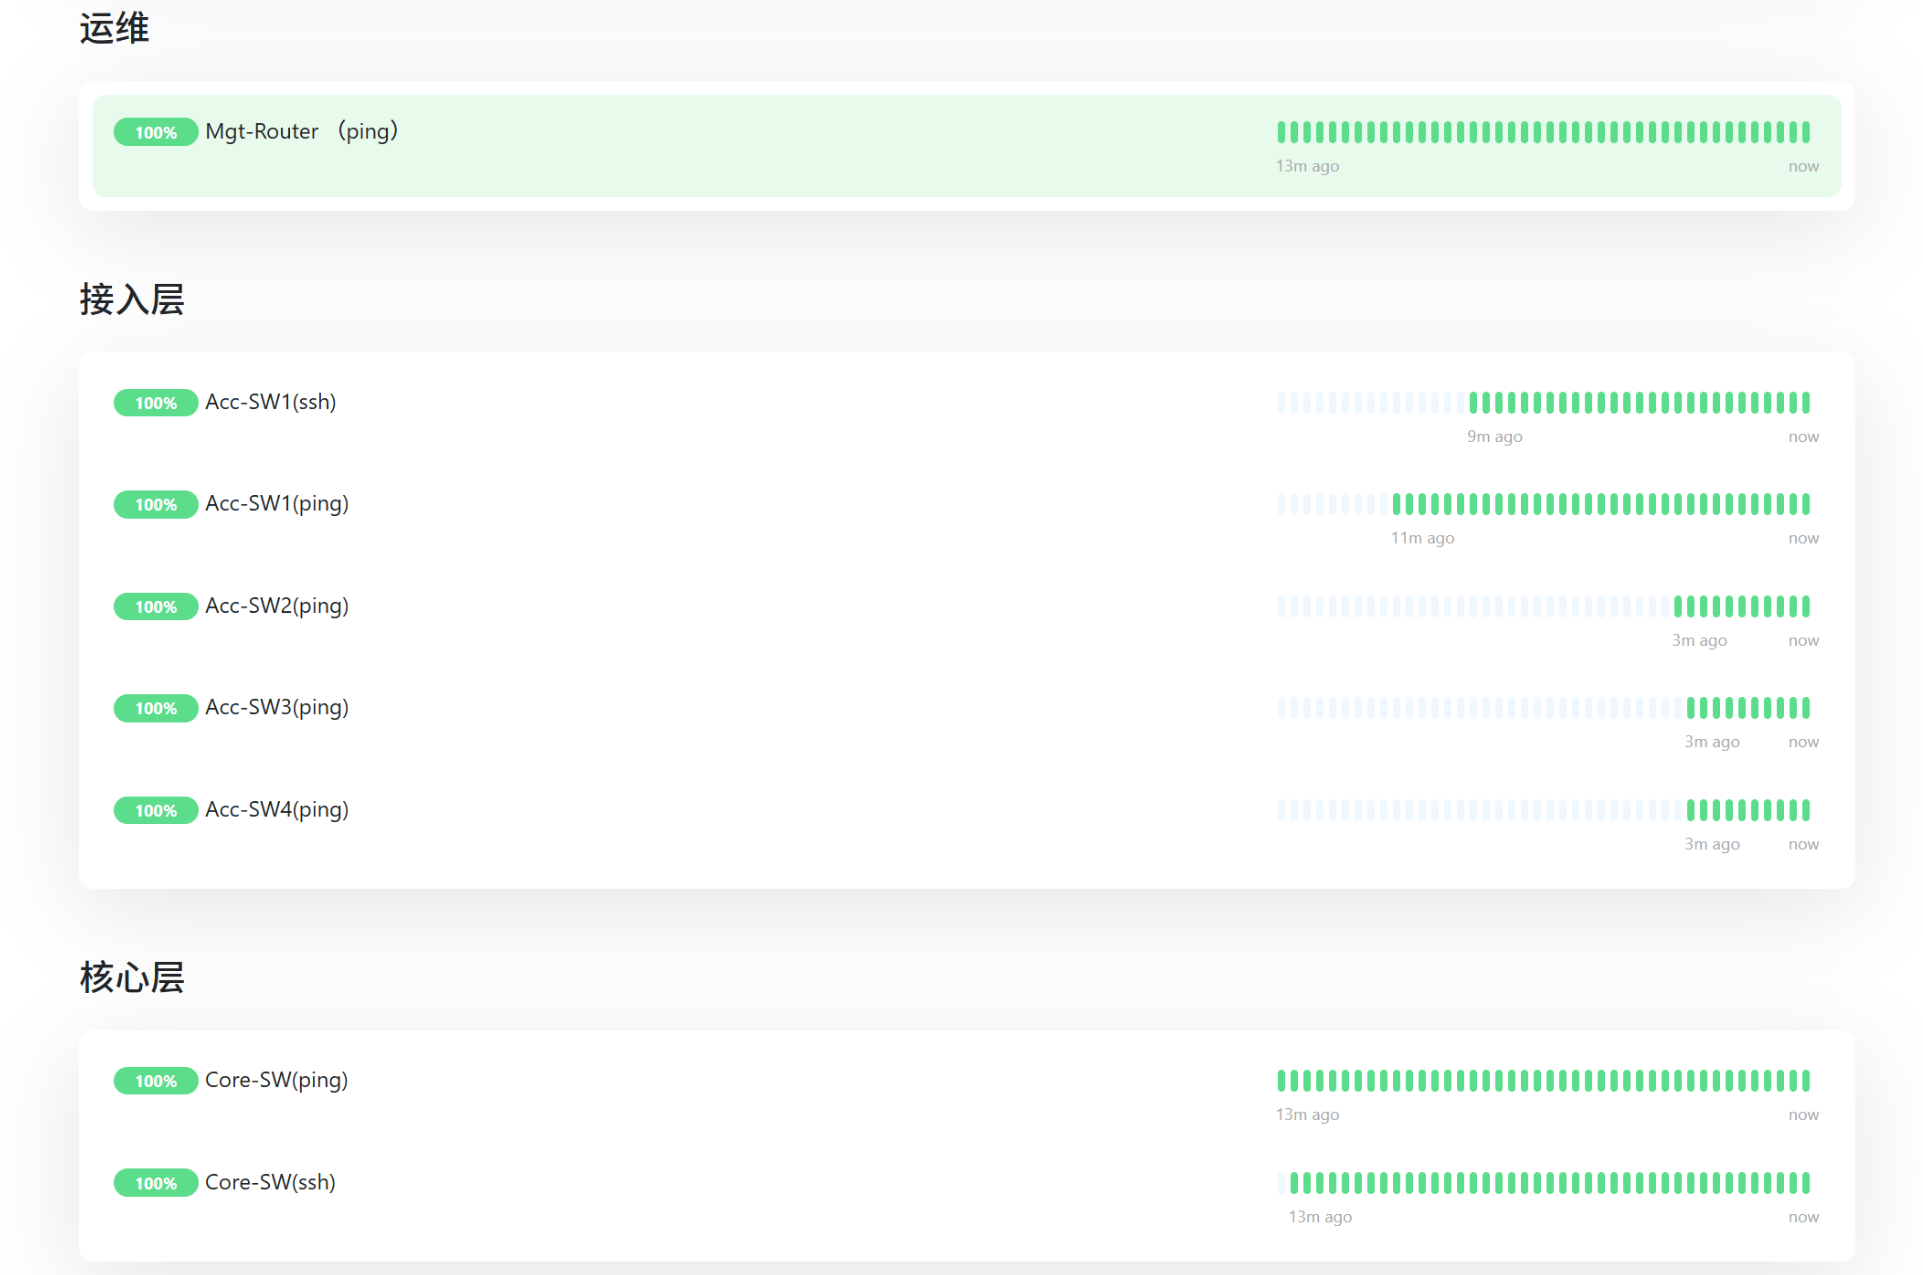
功能描述: 部署 Uptime Kuma 构建实时监控大屏。配置了针对核心路由器 (Mgt-Router, Edge-Router) 及汇聚交换机的 ICMP (Ping) 探测,以及针对关键服务端口(如 SSH Port 22)的 TCP 探测。
-
运维价值: 实现了故障的秒级发现。一旦网络设备宕机或 SSH 服务异常,大屏状态条立即变红,解决了传统运维中“用户报修才知道断网”的滞后性问题。

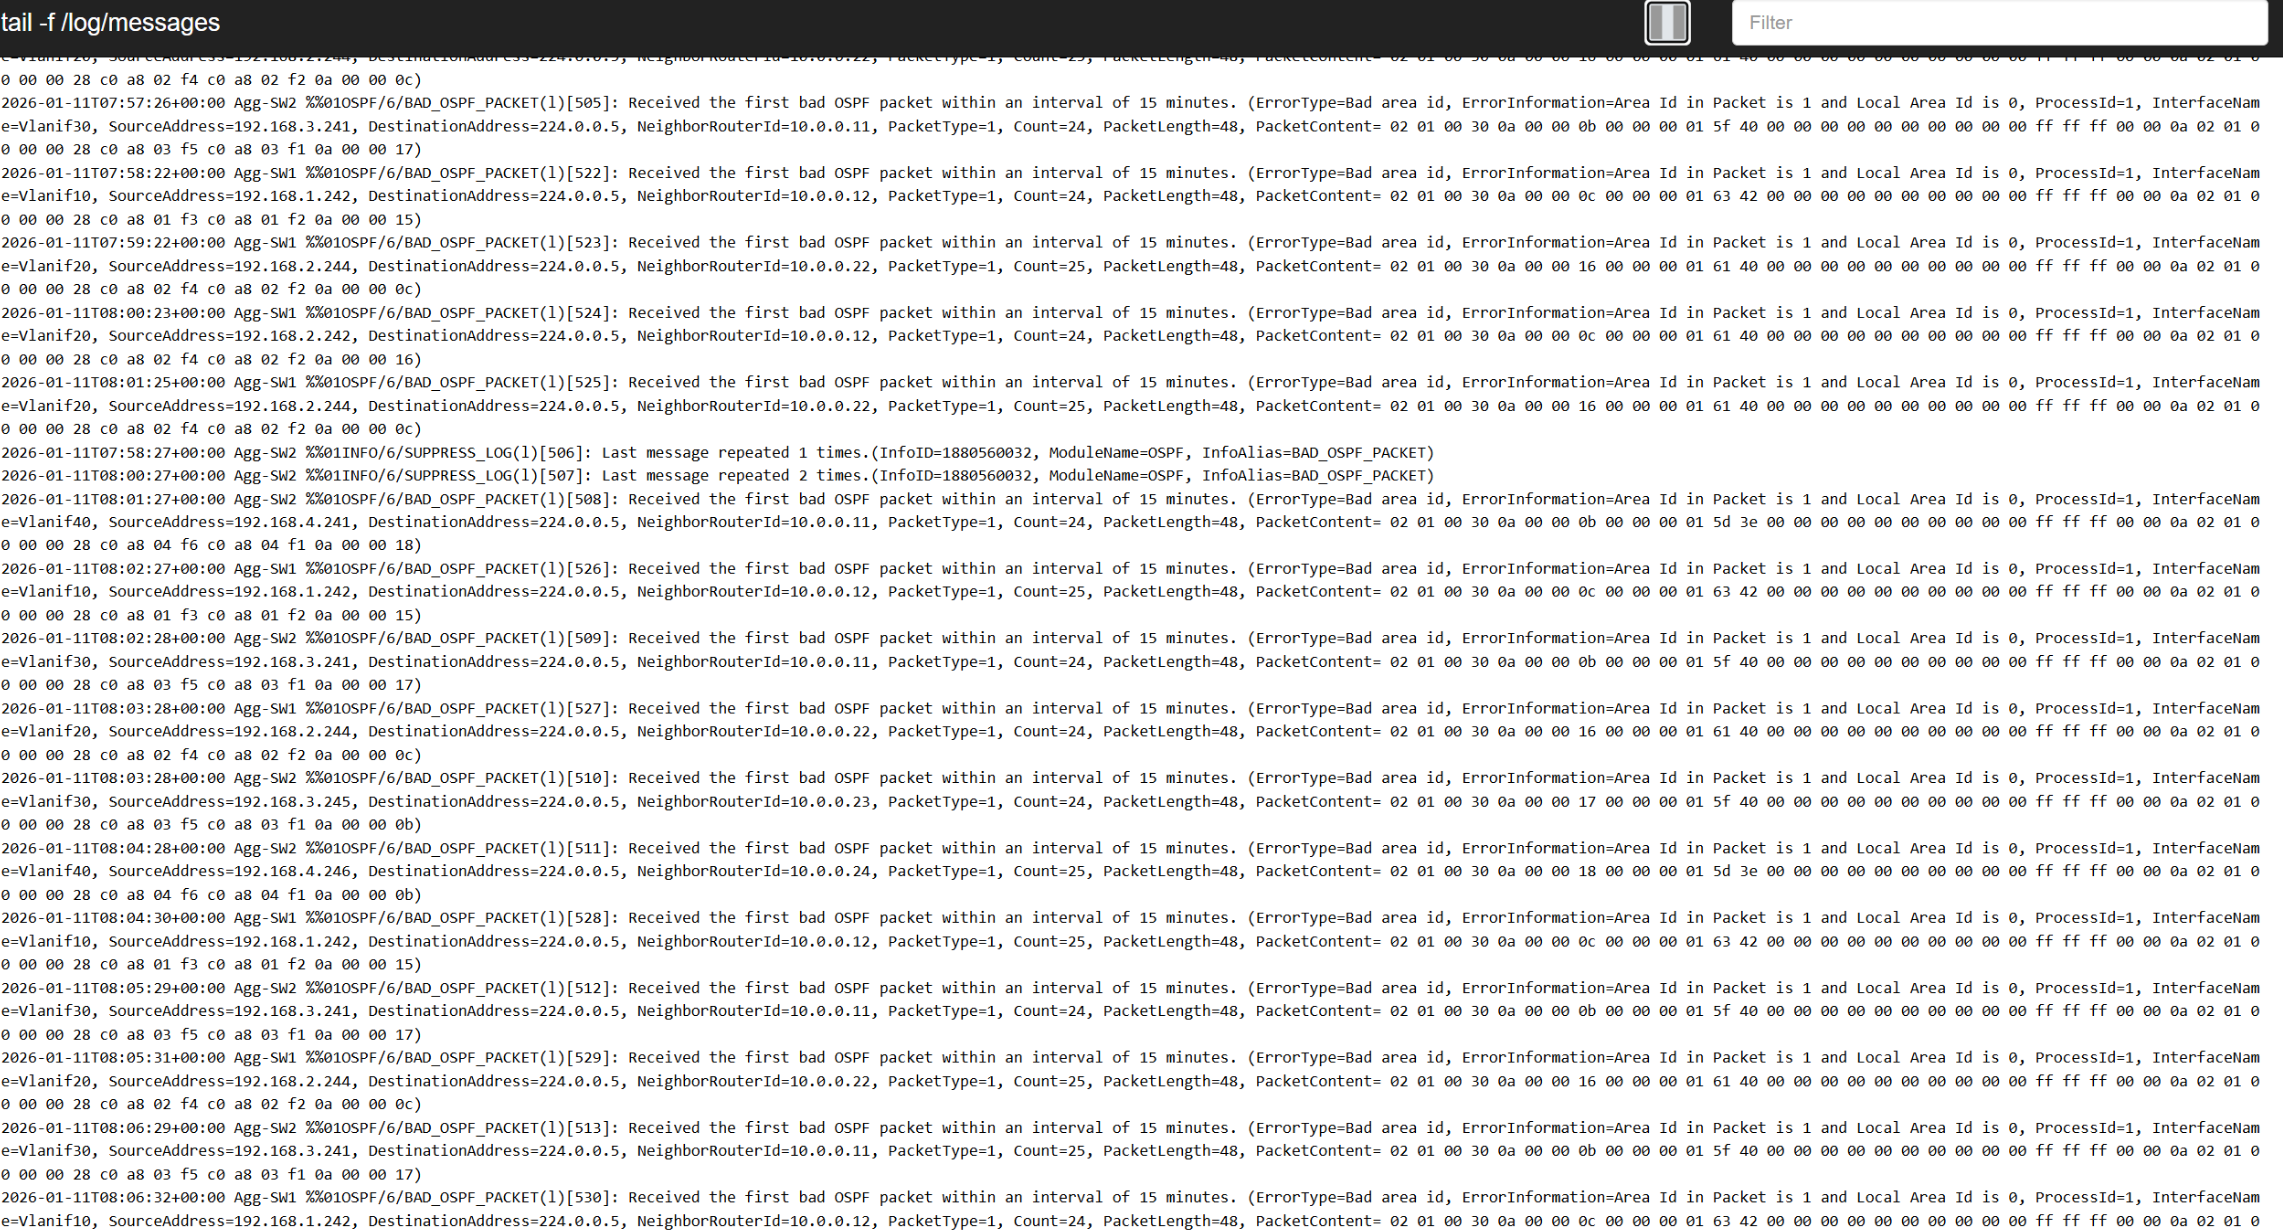
4.3.3 集中式日志审计 (Rsyslog + Frontail)
-
功能描述:
-
后端: 使用 Rsyslog 容器监听 UDP 514 端口,集中接收全网华为设备发送的 Syslog 日志。
-
前端: 使用 Frontail 实时读取日志文件,并通过 WebSocket 推送到 Web 页面,实现日志的高亮显示与自动滚动。
-
-
运维价值: 实现了日志的集中化管理。当 Python 自动化脚本下发配置或网络发生震荡时,运维人员无需登录每一台设备查看日志,只需在 Web 端即可掌握全网动态,极大提升了故障根因分析(RCA)的效率。
4.3.4 自动化配置备份与版本控制 (Oxidized)
-
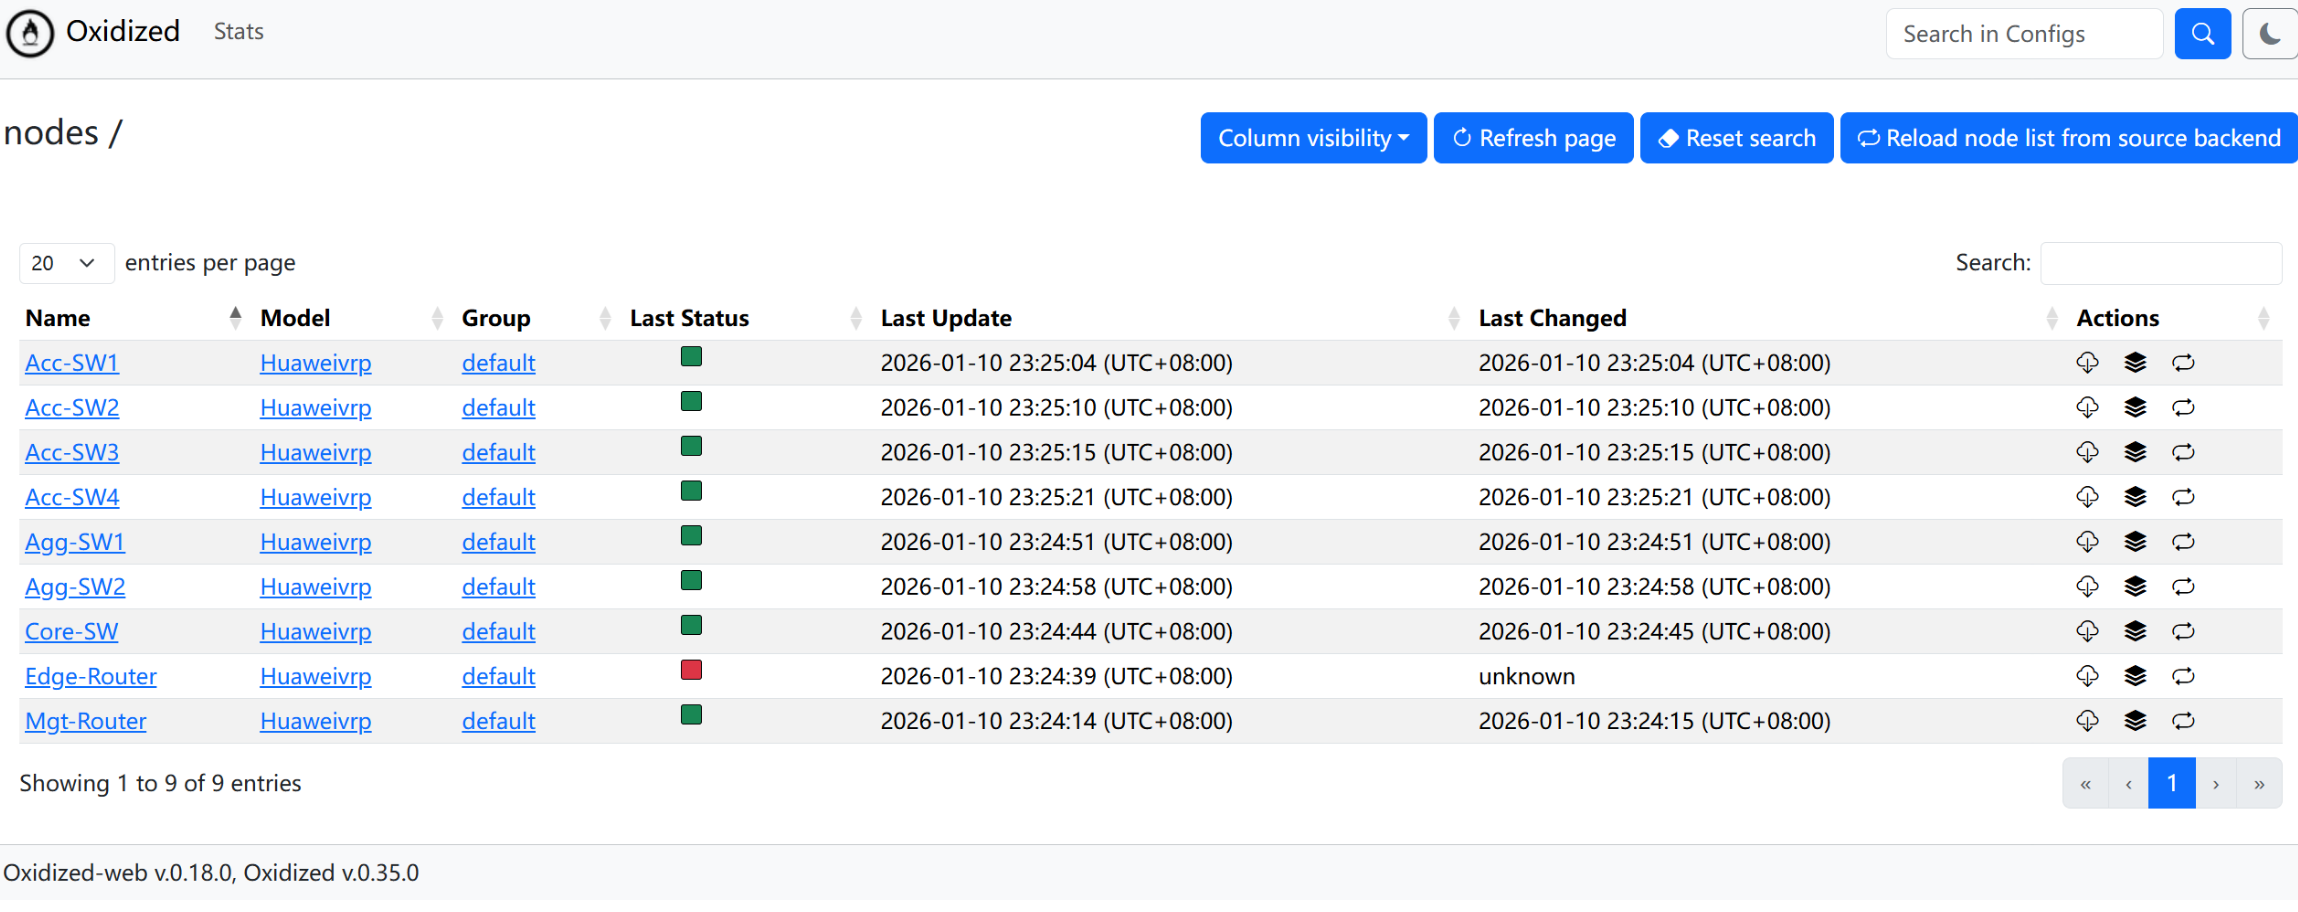
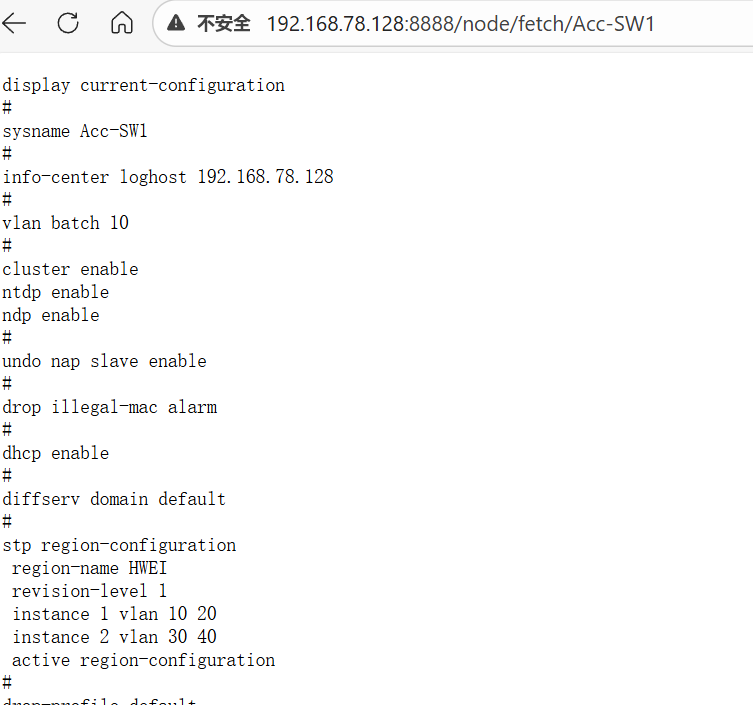
功能描述: 部署 Oxidized 服务,配置其通过 SSH 定期轮询(Interval: 3600s)全网设备。Oxidized 自动执行 display current-configuration,并将结果保存为文件。
-
运维价值: 解决了配置丢失的风险。Oxidized 能够自动识别配置变更,并生成差异对比报告(Diff)。当网络因配置错误导致故障时,管理员可以快速查看“谁在什么时间改了哪行配置”,并依据备份文件快速回滚,保障了配置管理的安全性。
4.4 平台联动流程
本平台与 Day 1 阶段的 Python 脚本形成了完整的自动化闭环:
变更: 使用 Python 脚本批量下发新配置(如修改接口描述、调整路由)。
审计: 设备立即发送 Syslog 到 Frontail,记录变更操作。
监控: Uptime Kuma 持续监测网络连通性,确保变更未导致断网。
备份: Oxidized 在检测到配置变动或周期到达时,自动拉取最新配置并存档。