1、Maven简介
1.1 为什么使用Maven
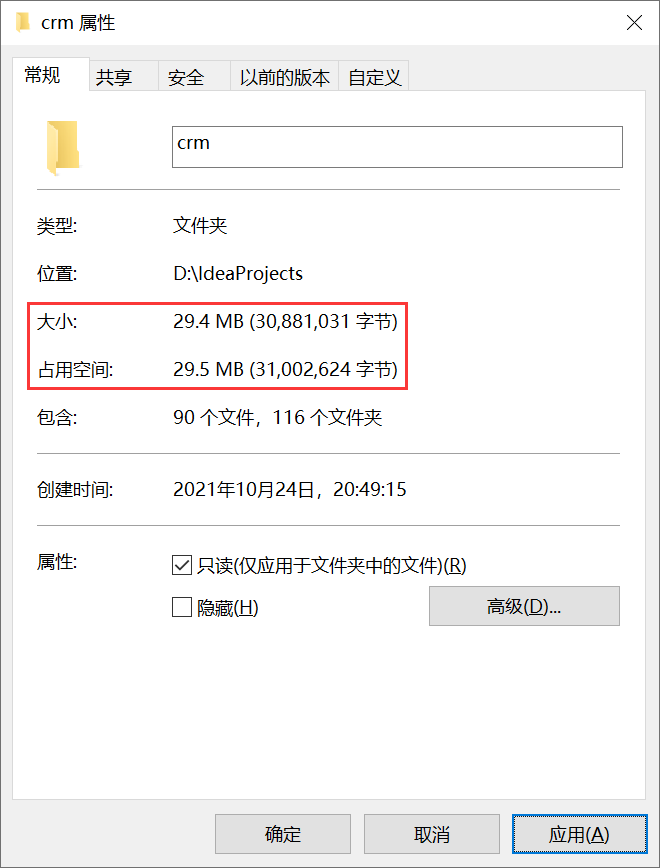
传统方式构建的 web 项目: 项目中使用jar包,需要重复的复制到项目的lib中,冗余且维护成本高。
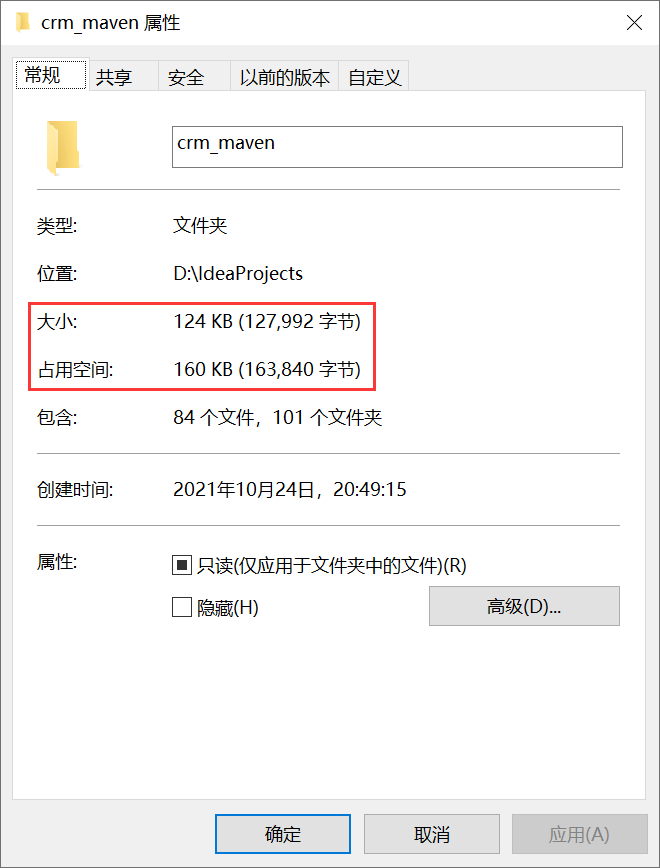
maven方式构建的 web 项目:Maven 项目中无需手动存放 jar 包,通过依赖坐标统一管理,简洁高效。
1.2 Maven的功能

logo
Maven是 Apache 公司的开源项目管理工具,核心功能包含两大块:
- 依赖管理:对 jar 包进行统一版本、统一存储的集中式管理
- 项目管理:一键完成项目编译、测试、打包、部署等全流程操作
1.3 Maven的基本概念
1.3.1 仓库
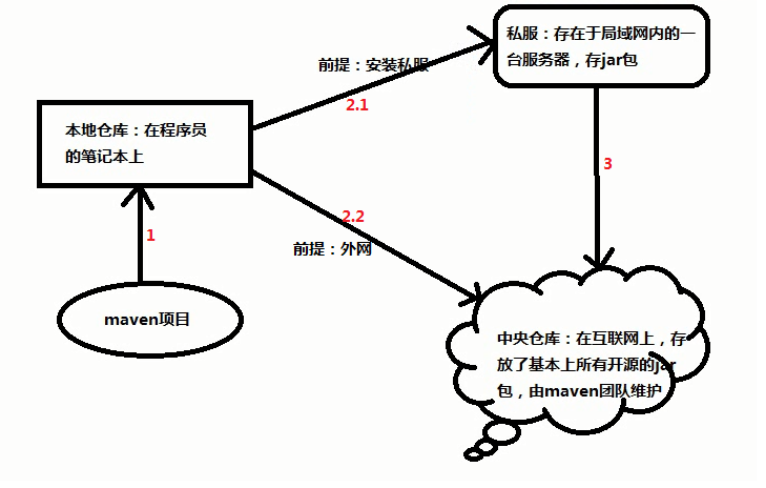
本地仓库: 本地电脑存储 jar 包 / 插件的目录
私服: 企业内部搭建的私有仓库,团队共享构件,优先于中央仓库下载
中央仓库:Maven 官方维护的公共仓库,包含几乎所有主流开源构件
1.3.2 坐标
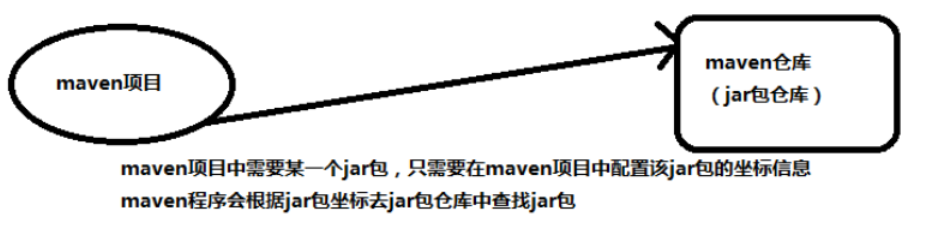
作用:用于定位jar包在仓库中的位置
示例:mybatis-3.4.5.jar
坐标:org.mybatis(公司) + mybatis(项目) + 3.4.5(版本信息)
xml
<dependency>
<groupId>org.mybatis</groupId> <!– 公司/组织标识 –>
<artifactId>mybatis</artifactId> <!– 项目名称 –>
<version>3.4.5</version> <!– 版本号 –>
</dependency>
2、Maven安装
安装前提:maven是由java语言开发,它的运行依赖于JDK,需先安装 JDK
2.1 下载
官网:http://maven.apache.org/
2.2 解压
将下载的 Maven 压缩包解压到无中文、无空格的路径下,解压后目录结构:
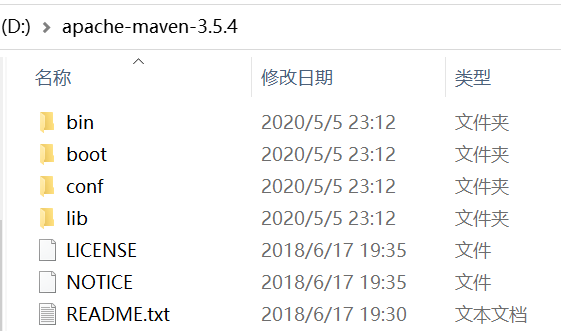
| bin | 脚本命令(如 mvn.cmd) |
| boot | 引导程序(类加载器等) |
| conf | 配置文件(核心:settings.xml) |
| lib | Maven 运行依赖的 jar 包 |
2.3 配置阿里云镜像仓库
默认中央仓库下载速度慢,找到解压后目录,进入conf,修改settings.xml,配置阿里云镜像:
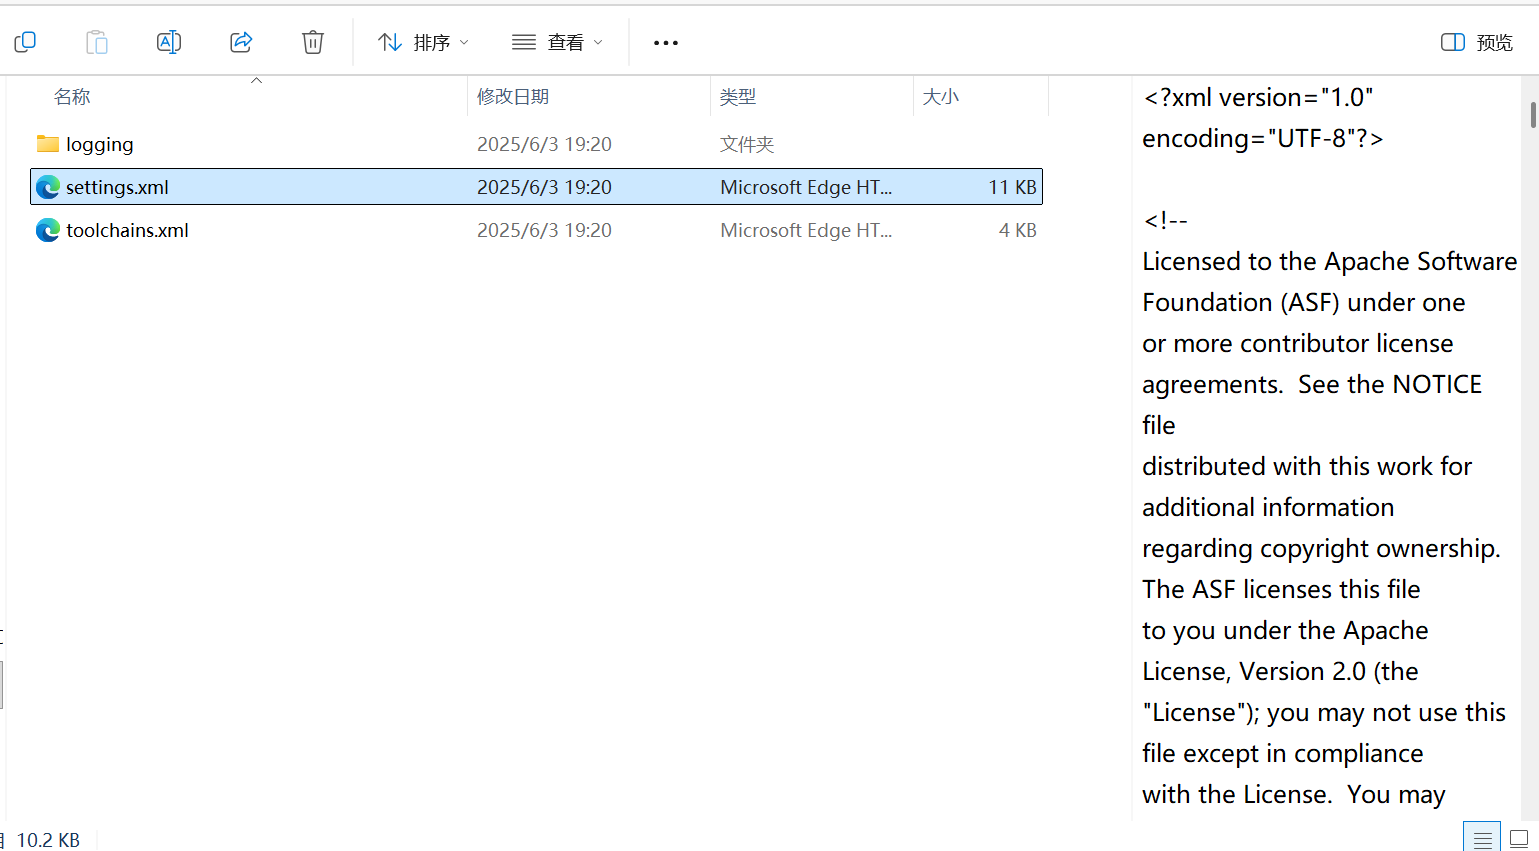
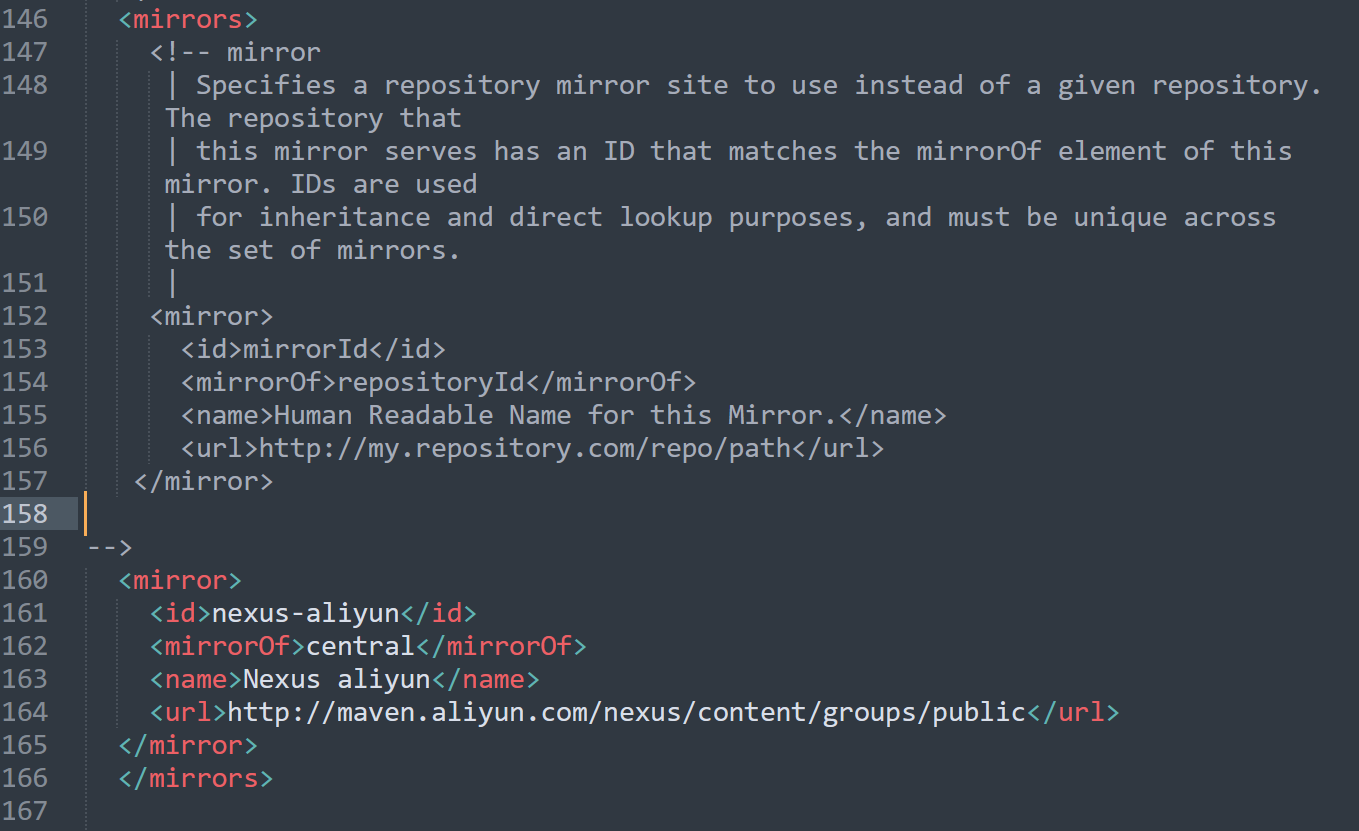
将以下代码粘贴到<mirrors>… </mirrors>里
<mirror>
<id>nexus-aliyun</id>
<mirrorOf>central</mirrorOf>
<name>Nexus aliyun</name>
<url>http://maven.aliyun.com/nexus/content/groups/public</url>
</mirror>
例如:
2.4 配置本地仓库路径
在settings.xml文件,配置如下:
<localRepository>D:\\mvn_repository</localRepository>
//注意:复制<localRepository>到非注释区域并修改
例如:

2.5 配置环境变量(可选)
1、配置MAVEN_HOME: 系统变量(S),新建MAVEN_HOME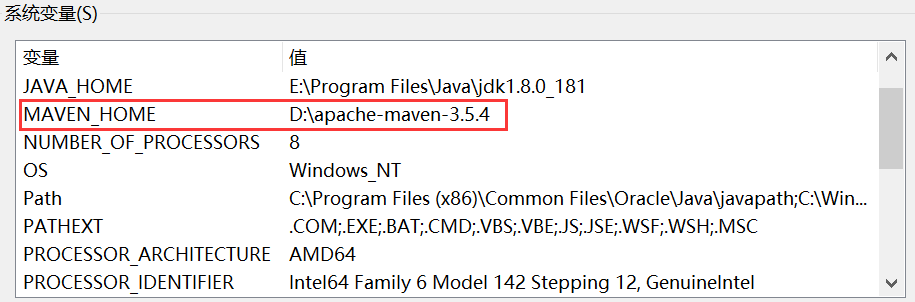
2、将MAVEN_HOME环境变量配置到path中
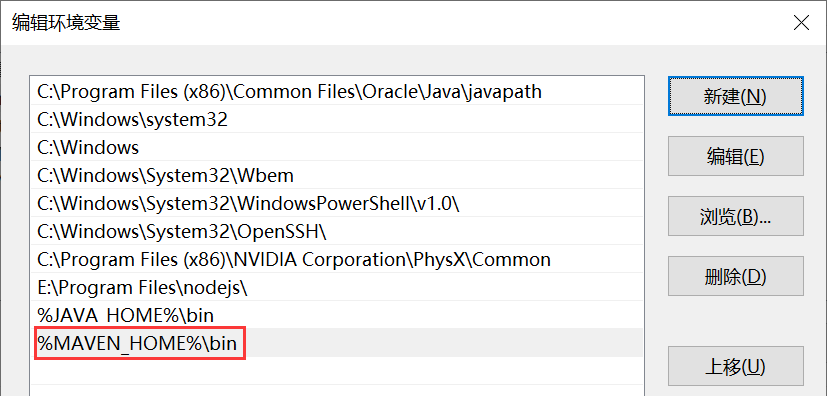
3、验证安装
找开 cmd 命令,输入 mvn –version命令,输出如下信息则安装成功:
3、IDEA集成Maven
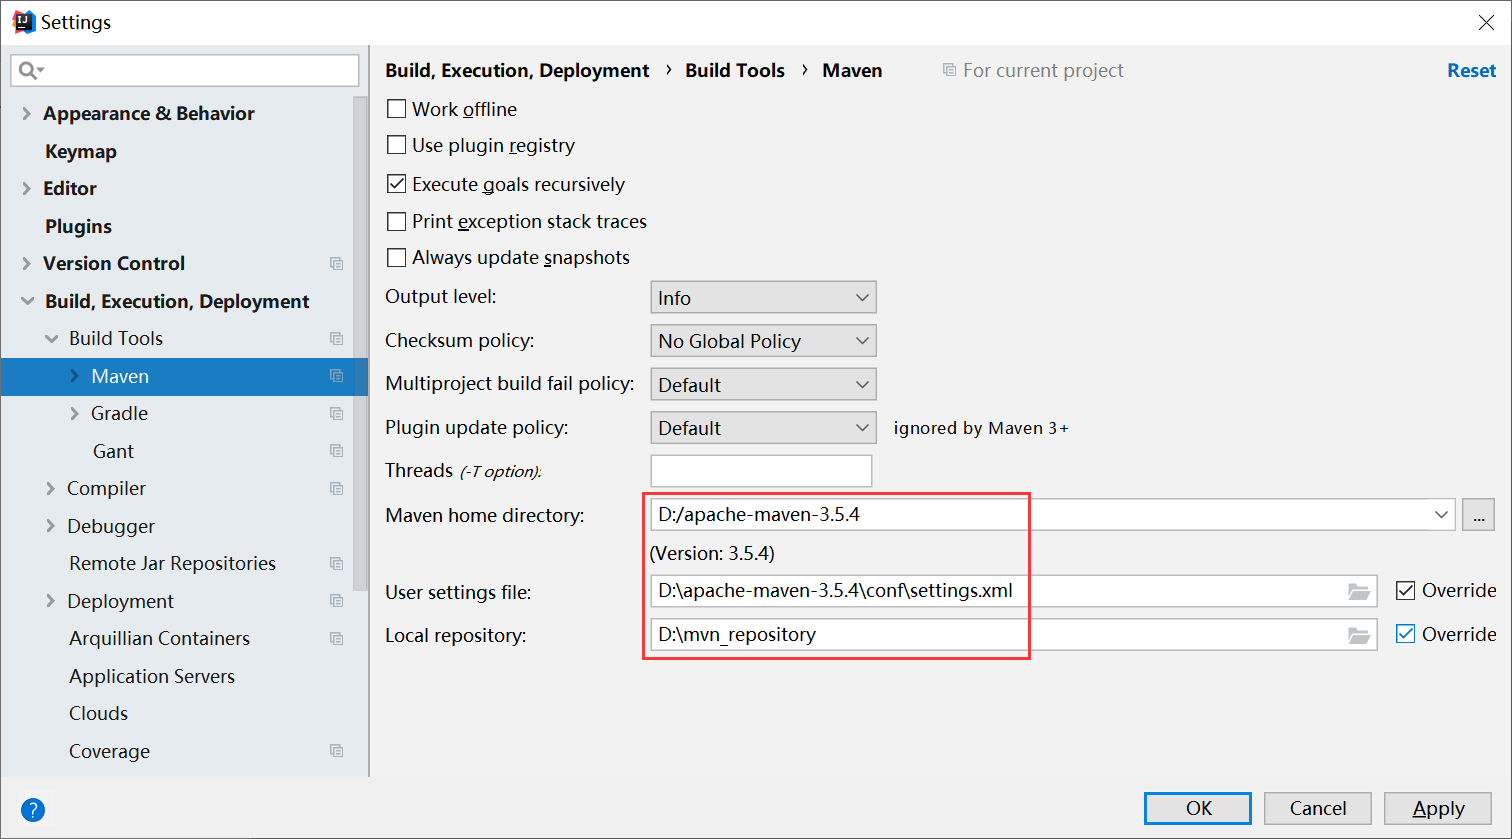
3.1.配置maven
打开 Idea,路径:File | Settings | Build, Execution, Deployment | Build Tools | Maven,配置如下:
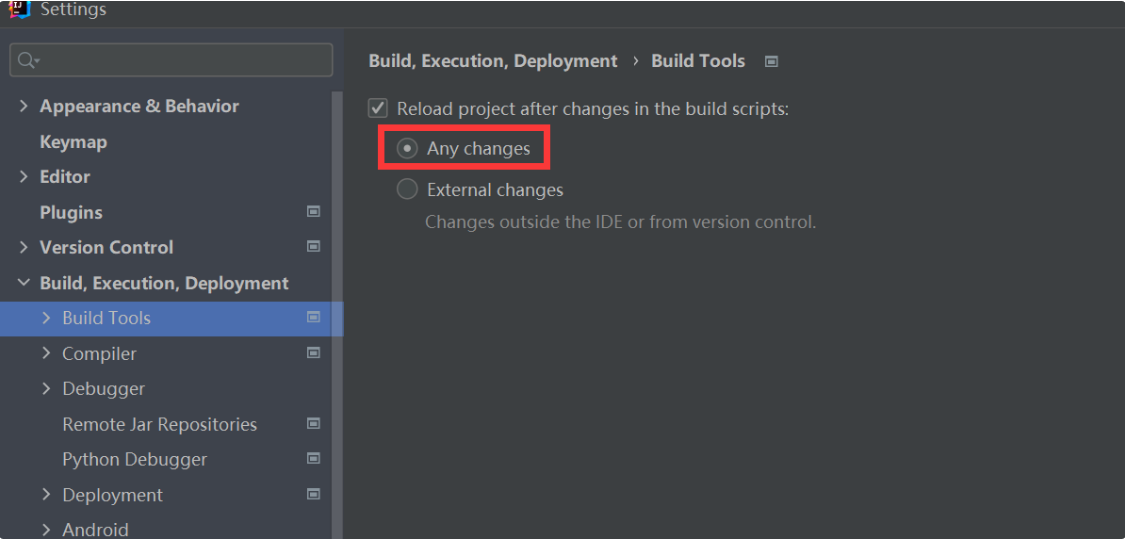
3.2.设置idea自动导入依赖
默认需手动刷新依赖,开启自动导入可提升效率:
第一步:点击Auto-Reload Settings…
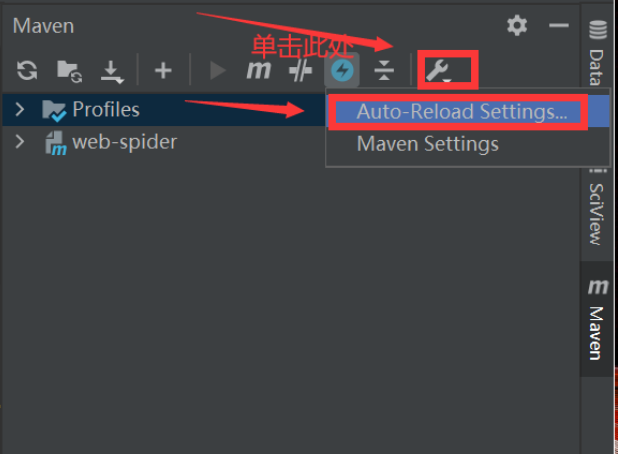
第二步:勾选any changes
4.创建maven工程
4.1 创建工程
1、创建项目,选择 Maven 骨架(空白工程直接选 Maven):
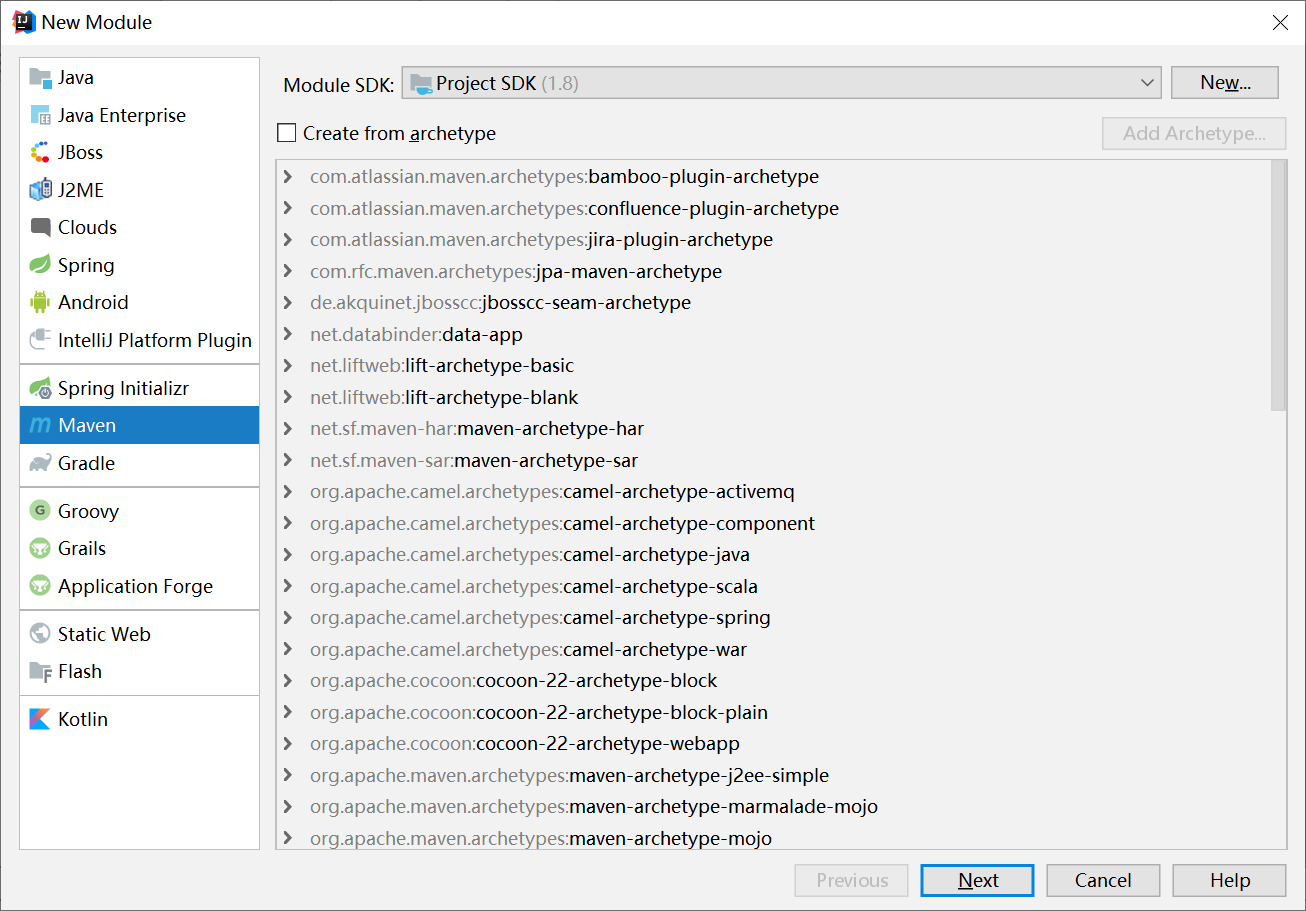
2、设置工程名

3、设置工程位置

4.2.maven工程目录结构
目录结构:
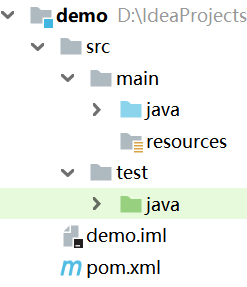
目录说明
| src/main/java | 主程序 Java 源码 |
| src/main/resources | 配置文件(如 mybatis-config.xml) |
| src/test/java | 测试程序源码 |
| pom.xml | Maven 核心配置文件(依赖、打包方式等) |
4.3.添加依赖(以 JUnit 为例)
步骤 1:查找坐标
在浏览器打开https://mvnrepository.com/,搜索 JUnit 并复制坐标。
步骤 2:添加到 pom.xml
<dependencies>
<dependency>
<groupId>junit</groupId>
<artifactId>junit</artifactId>
<version>4.12</version>
</dependency>
</dependencies>
步骤 3:编写测试类
import org.junit.Test;
public class DemoTest {
@Test
public void test(){
System.out.println("hello,maven!");
}
}
5.Maven生命周期
5.1.常用命令
方式1 : 在Idea中双击命令:
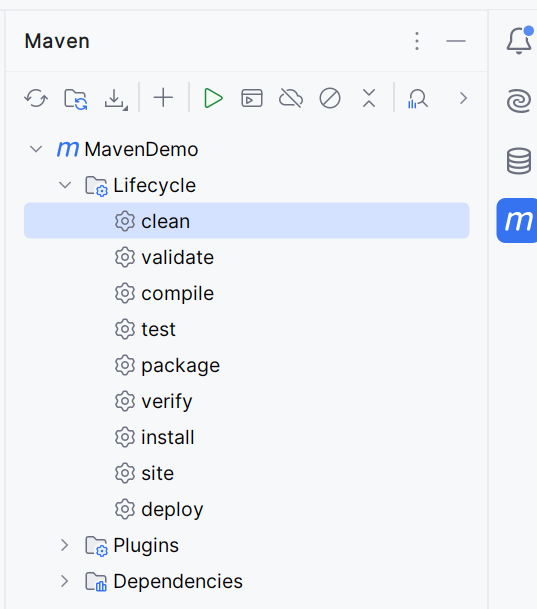
方式2 : 在 pom.xml 同级目录执行 CMD 命令:(需配置环境变量)
| mvn clean | 清理 target 目录(编译 / 打包产物) |
| mvn compile | 编译 main/java 下的.java 文件为.class 文件 |
| mvn test | 执行 test/java 下的测试用例 |
| mvn package | 将项目打包(jar/war)到 target 目录 |
| mvn install | 打包并安装到本地仓库(供本地其他项目依赖) |
| mvn deploy | 打包并部署到远程仓库(私服) |
5.2.生命周期
5.2 生命周期体系
Maven 包含 3 套相互独立的生命周期,执行后续命令会自动触发前置命令:
- 清理生命周期:clean(仅清理操作)
- 默认生命周期:compile → test → package → install → deploy(核心流程)
- 站点生命周期:site(生成项目文档)
6. 依赖管理
6.1 依赖传递

- 直接依赖:当前项目 pom.xml 中显式配置的依赖(如 spring-context)
- 间接依赖:直接依赖的 jar 包依赖的其他 jar 包(如 spring-context 依赖 spring-core)
6.2 依赖冲突
问题场景
同一 jar 包存在多个版本(如 spring-core 同时依赖 5.1.8 和 5.2.0),导致类加载异常。
xml
<dependency>
<groupId>org.springframework</groupId>
<artifactId>spring-context</artifactId>
<version>5.1.8.RELEASE</version>
</dependency>
<dependency>
<groupId>org.springframework</groupId>
<artifactId>spring-aop</artifactId>
<version>5.2.0.RELEASE</version>
</dependency>
依赖冲突示例

解决方式
方式 1:第一声明者优先
谁先在 pom.xml 中声明,就使用谁的传递依赖:
xml
<!– 调整顺序,spring-aop先声明则使用5.2.0版本的spring-core –>
<dependency>
<groupId>org.springframework</groupId>
<artifactId>spring-aop</artifactId>
<version>5.2.0.RELEASE</version>
</dependency>
<dependency>
<groupId>org.springframework</groupId>
<artifactId>spring-context</artifactId>
<version>5.1.8.RELEASE</version>
</dependency>
效果:

方式 2:路径近者优先
直接依赖优先级 > 间接依赖,显式声明冲突 jar 包:
xml
<dependency>
<groupId>org.springframework</groupId>
<artifactId>spring-context</artifactId>
<version>5.1.8.RELEASE</version>
</dependency>
<dependency>
<groupId>org.springframework</groupId>
<artifactId>spring-aop</artifactId>
<version>5.2.0.RELEASE</version>
</dependency>
<!– 直接声明spring-core,优先级最高 –>
<dependency>
<groupId>org.springframework</groupId>
<artifactId>spring-core</artifactId>
<version>5.2.0.RELEASE</version>
</dependency>
效果:

方式 3:排除依赖
排除冲突的间接依赖,不影响项目运行:
xml
<dependency>
<groupId>org.springframework</groupId>
<artifactId>spring-context</artifactId>
<version>5.1.8.RELEASE</version>
<!– 排除spring-context传递的spring-core –>
<exclusions>
<exclusion>
<artifactId>spring-core</artifactId>
<groupId>org.springframework</groupId>
</exclusion>
</exclusions>
</dependency>
<dependency>
<groupId>org.springframework</groupId>
<artifactId>spring-aop</artifactId>
<version>5.2.0.RELEASE</version>
</dependency>
效果:
 "
"
方式 4:版本锁定(推荐)
使用dependencyManagement统一管理版本,避免冲突:
xml
<properties>
<spring-core.version>5.2.0.RELEASE</spring-core.version>
</properties>
<!– 版本锁定:仅声明版本,不实际引入 –>
<dependencyManagement>
<dependencies>
<dependency>
<groupId>org.springframework</groupId>
<artifactId>spring-core</artifactId>
<version>${spring-core.version}</version>
</dependency>
</dependencies>
</dependencyManagement>
<!– 实际依赖:无需指定版本,自动使用锁定版本 –>
<dependencies>
<dependency>
<groupId>org.springframework</groupId>
<artifactId>spring-context</artifactId>
<version>5.1.8.RELEASE</version>
</dependency>
<dependency>
<groupId>org.springframework</groupId>
<artifactId>spring-aop</artifactId>
<version>5.2.0.RELEASE</version>
</dependency>
</dependencies>
效果:

6.3 依赖范围
通过scope标签控制 jar 包的作用范围,默认值:compile。
| compile(默认) | ✅ | ✅ | ✅ | log4j |
| test | ❌ | ✅ | ❌ | junit |
| runtime | ❌ | ✅ | ✅ | jdbc 驱动 |
| provided | ✅ | ✅ | ❌ | servlet-api(容器已提供) |
测试示例
将 MyBatis 依赖的 scope 设为 test:
xml
<dependency>
<groupId>org.mybatis</groupId>
<artifactId>mybatis</artifactId>
<version>3.4.5</version>
<scope>test</scope>
</dependency>
- main/java 中使用 MyBatis 类:报错(无权限)
- test/java 中使用 MyBatis 类:正常(test 范围生效)
7. 拆分与聚合(模块化开发)
7.1 核心思想
将大型项目拆分为多个模块(dao、service、web),独立开发、打包,再通过 Maven 聚合为完整项目,优势:
- 分工明确,便于团队协作
- 模块复用,减少冗余代码
- 维护成本低,单个模块修改不影响整体
7.2 拆分思路
plaintext
maven_parent(父工程,pom打包)
├── maven_dao(dao层,jar打包)
├── maven_service(service层,jar打包)
└── maven_web(web层,war打包)
模块依赖关系:

7.3 创建父工程(maven_parent)
步骤 1:新建 Project(非 Module)
 ❌ 不要选择骨架,直接创建空白Maven工程。

步骤 2:配置 pom.xml(核心:依赖版本管理)
xml
<?xml version="1.0" encoding="UTF-8"?>
<project xmlns="http://maven.apache.org/POM/4.0.0"
xmlns:xsi="http://www.w3.org/2001/XMLSchema-instance"
xsi:schemaLocation="http://maven.apache.org/POM/4.0.0 http://maven.apache.org/xsd/maven-4.0.0.xsd">
<modelVersion>4.0.0</modelVersion>
<groupId>com.hg</groupId>
<artifactId>maven_parent</artifactId>
<version>1.0-SNAPSHOT</version>
<packaging>pom</packaging> <!– 父工程打包方式为pom –>
<!– 版本常量定义 –>
<properties>
<javax.servlet-api>2.5</javax.servlet-api>
<javax.servlet.jsp-api>2.2</javax.servlet.jsp-api>
<jstl>1.2</jstl>
</properties>
<!– 依赖管理:仅声明版本,子工程按需引入 –>
<dependencyManagement>
<dependencies>
<dependency>
<groupId>javax.servlet</groupId>
<artifactId>servlet-api</artifactId>
<version>${javax.servlet-api}</version>
<scope>provided</scope>
</dependency>
<dependency>
<groupId>javax.servlet.jsp</groupId>
<artifactId>jsp-api</artifactId>
<version>${javax.servlet.jsp-api}</version>
<scope>provided</scope>
</dependency>
<dependency>
<groupId>javax.servlet</groupId>
<artifactId>jstl</artifactId>
<version>${jstl}</version>
</dependency>
</dependencies>
</dependencyManagement>
<!– 插件管理:统一插件版本 –>
<build>
<pluginManagement>
<plugins>
<plugin>
<groupId>org.apache.tomcat.maven</groupId>
<artifactId>tomcat7-maven-plugin</artifactId>
<version>2.2</version>
</plugin>
</plugins>
</pluginManagement>
</build>
</project>
关键问题:为什么父工程只管理版本?
- 子工程按需引入依赖,避免父工程引入冗余依赖
- 统一版本,子工程无需重复声明版本,降低冲突风险
7.4 创建子工程(maven_dao)
步骤 1:新建 Module

不要选择骨架

设置保存位置

步骤 2:配置 pom.xml(继承父工程)
xml
<?xml version="1.0" encoding="UTF-8"?>
<project xmlns="http://maven.apache.org/POM/4.0.0"
xmlns:xsi="http://www.w3.org/2001/XMLSchema-instance"
xsi:schemaLocation="http://maven.apache.org/POM/4.0.0 http://maven.apache.org/xsd/maven-4.0.0.xsd">
<!– 继承父工程 –>
<parent>
<artifactId>maven_parent</artifactId>
<groupId>com.hg</groupId>
<version>1.0-SNAPSHOT</version>
</parent>
<modelVersion>4.0.0</modelVersion>
<artifactId>maven_dao</artifactId>
<!– 默认打包方式为jar,可省略 –>
</project>
步骤 3:编写 DAO 代码
java
运行
public interface HelloDao {
void hello();
}
public class HelloDaoImpl implements HelloDao {
@Override
public void hello() {
System.out.println("hello,maven!");
}
}
7.5 创建子工程(maven_service)
步骤 1:新建 Module(同 maven_dao)
步骤 2:配置 pom.xml(依赖 maven_dao)
xml
<?xml version="1.0" encoding="UTF-8"?>
<project xmlns="http://maven.apache.org/POM/4.0.0"
xmlns:xsi="http://www.w3.org/2001/XMLSchema-instance"
xsi:schemaLocation="http://maven.apache.org/POM/4.0.0 http://maven.apache.org/xsd/maven-4.0.0.xsd">
<parent>
<artifactId>maven_parent</artifactId>
<groupId>com.hg</groupId>
<version>1.0-SNAPSHOT</version>
</parent>
<modelVersion>4.0.0</modelVersion>
<artifactId>maven_service</artifactId>
<!– 依赖dao层模块 –>
<dependencies>
<dependency>
<groupId>com.hg</groupId>
<artifactId>maven_dao</artifactId>
<version>1.0-SNAPSHOT</version>
</dependency>
</dependencies>
</project>
步骤 3:编写 Service 代码
java
运行
public interface HelloService {
void hello();
}
public class HelloServiceImpl implements HelloService {
private HelloDao helloDao = new HelloDaoImpl();
@Override
public void hello() {
helloDao.hello();
}
}
7.6 创建子工程(maven_web)
步骤 1:新建 Module(同前)
步骤 2:配置 pom.xml(依赖 maven_service+Web 相关)
xml
<?xml version="1.0" encoding="UTF-8"?>
<project xmlns="http://maven.apache.org/POM/4.0.0"
xmlns:xsi="http://www.w3.org/2001/XMLSchema-instance"
xsi:schemaLocation="http://maven.apache.org/POM/4.0.0 http://maven.apache.org/xsd/maven-4.0.0.xsd">
<parent>
<artifactId>maven_parent</artifactId>
<groupId>com.hg</groupId>
<version>1.0-SNAPSHOT</version>
</parent>
<modelVersion>4.0.0</modelVersion>
<artifactId>maven_web</artifactId>
<packaging>war</packaging> <!– Web工程打包方式为war –>
<dependencies>
<!– 继承父工程版本,无需指定version –>
<dependency>
<groupId>javax.servlet</groupId>
<artifactId>servlet-api</artifactId>
</dependency>
<dependency>
<groupId>javax.servlet.jsp</groupId>
<artifactId>jsp-api</artifactId>
</dependency>
<dependency>
<groupId>javax.servlet</groupId>
<artifactId>jstl</artifactId>
</dependency>
<!– 依赖service层模块 –>
<dependency>
<groupId>com.hg</groupId>
<artifactId>maven_service</artifactId>
<version>1.0-SNAPSHOT</version>
</dependency>
</dependencies>
<!– 配置Tomcat插件 –>
<build>
<plugins>
<plugin>
<groupId>org.apache.tomcat.maven</groupId>
<artifactId>tomcat7-maven-plugin</artifactId>
<configuration>
<port>80</port> <!– 端口 –>
<path>/</path> <!– 访问路径 –>
</configuration>
</plugin>
</plugins>
</build>
</project>
步骤 3:编写 Servlet
java
运行
import javax.servlet.ServletException;
import javax.servlet.annotation.WebServlet;
import javax.servlet.http.HttpServlet;
import javax.servlet.http.HttpServletRequest;
import javax.servlet.http.HttpServletResponse;
import java.io.IOException;
public class HelloServlet extends HttpServlet {
@Override
protected void doGet(HttpServletRequest req, HttpServletResponse resp) throws ServletException, IOException {
HelloService helloService = new HelloServiceImpl();
helloService.hello();
req.getRequestDispatcher("/hello.jsp").forward(req, resp);
}
}
步骤 4:配置 web.xml
xml
<?xml version="1.0" encoding="UTF-8"?>
<web-app xmlns="http://xmlns.jcp.org/xml/ns/javaee"
xmlns:xsi="http://www.w3.org/2001/XMLSchema-instance"
xsi:schemaLocation="http://xmlns.jcp.org/xml/ns/javaee http://xmlns.jcp.org/xml/ns/javaee/web-app_4_0.xsd"
version="4.0">
<servlet>
<servlet-name>hello</servlet-name>
<servlet-class>com.hg.servlet.HelloServlet</servlet-class>
</servlet>
<servlet-mapping>
<servlet-name>hello</servlet-name>
<url-pattern>/hello</url-pattern>
</servlet-mapping>
</web-app>
步骤 5:编写 hello.jsp
jsp
<%@ page contentType="text/html;charset=UTF-8" language="java" %>
<html>
<head>
<title>Maven Web Demo</title>
</head>
<body>
<h2>欢迎来到我的第一个Maven模块化项目!!!</h2>
</body>
</html>
8. 私服(Nexus)- 了解
Nexus 是 Maven 仓库管理器,用于搭建企业私有仓库,实现构件的内部共享和统一管理。
8.1 下载 Nexus
下载地址:https://help.sonatype.com/repomanager2/download
8.2 安装 Nexus
1、解压nexus-2.14.5-02-bundle.zip到无中文 / 空格路径:

2、管理员打开 CMD,进入 Nexus 的 bin 目录,执行:nexus.bat install

3、验证:系统服务中出现Nexus 服务

8.3 卸载 Nexus
CMD 进入nexus 的 bin 目录,执行:nexus.bat uninstall

8.4 启动 / 关闭 Nexus
启动
- 方式 1:CMD 执行nexus.bat start

- 方式 2:直接启动 Nexus 系统服务

关闭
- 方式 1:CMD 执行nexus.bat stop

- 方式 2:直接停止 Nexus 系统服务

8.5 访问私服

properties
# Jetty section
application-port=8081 # nexus的访问端口配置
application-host=0.0.0.0 # nexus主机监听配置(不用修改)
nexus-webapp=${bundleBasedir}/nexus # nexus工程目录
nexus-webapp-context-path=/nexus # nexus的web访问路径

8.6 仓库类型
Nexus 包含 4 类仓库,核心为前 3 类:

| hosted(宿主仓库) | 存储企业自研 jar 包(正式版 / 测试版) |
| proxy(代理仓库) | 代理中央仓库,自动下载构件到私服 |
| group(组仓库) | 聚合 hosted+proxy,对外提供统一访问入口 |
| virtual(虚拟仓库) | 兼容 Maven1 版本(几乎不用) |
nexus仓库默认在sonatype-work目录中:

8.7 发布 jar 到私服
步骤 1:配置 settings.xml(私服账号)
xml
<servers>
<!– 发布正式版本 –>
<server>
<id>releases</id>
<username>admin</username>
<password>admin123</password>
</server>
<!– 发布测试版本 –>
<server>
<id>snapshots</id>
<username>admin</username>
<password>admin123</password>
</server>
</servers>
步骤 2:配置项目 pom.xml(私服地址)
xml
<distributionManagement>
<repository>
<id>releases</id>
<url>http://localhost:8081/nexus/content/repositories/releases/</url>
</repository>
<snapshotRepository>
<id>snapshots</id>
<url>http://localhost:8081/nexus/content/repositories/snapshots/</url>
</snapshotRepository>
</distributionManagement>
步骤 3:执行发布命令
bash
运行
mvn deploy
验证:查看私服中的 jar 包

8.8 从私服下载 jar 包

总结
Maven 作为 Java 项目的核心构建工具,核心价值在于依赖管理和项目生命周期自动化。本文从基础安装配置到模块化开发、私服搭建,覆盖了 Maven 核心使用场景。掌握 Maven 不仅能提升项目构建效率,更是大型分布式项目协作的基础,建议结合实际项目多实操,重点掌握依赖冲突解决、模块化拆分等核心技能。