鸿蒙6.0应用开发——ArkWeb和应用的跳转与拉起
【高心星出品】
文章目录
- 鸿蒙6.0应用开发——ArkWeb和应用的跳转与拉起
-
- 概述
- ArkWeb页面与ArkTS页面互相跳转
-
- ArkWeb页面跳转ArkWeb页面
- ArkTS页面跳转ArkWeb页面
- ArkWeb页面跳转ArkTS页面
- ArkWeb页面指定应用跳转
- ArkWeb页面指定类型跳转
- ArkWeb页面跳转系统应用页面
概述
在使用ArkTS与ArkWeb进行混合开发时,应用内的部分页面使用了前端相关能力进行了开发,结合Web组件进行了页面加载,在这种场景下涉及到从ArkWeb加载的页面向其他页面跳转,以及从ArkWeb页面拉起应用。
ArkWeb页面与ArkTS页面互相跳转
ArkWeb页面跳转ArkWeb页面
开发者在做Hybrid App混合开发时,Web页面的跳转可以直接在前端侧使用HTML提供的a标签来进行跳转,修改href为跳转后的地址即可。
<a href="www.example.com">跳转到其他页面</a>
ArkTS页面跳转ArkWeb页面
在HarmonyOS应用开发中,会有Web页面和ArkTS页面互相之间进行跳转的场景,例如列表页用了ArkTS进行开发,而详情页设计上只有简单的内容展示并没有复杂的逻辑操作,于是使用了Web开发并使用了ArkTS中的Web组件进行了加载,在这种场景下,从列表页跳转到详情页就是从ArkTS页面跳转到Web页面,在这种场景下,开发者只需要在ArkTS页面对应的事件回调函数中使用路由栈提供的跳转功能即可实现。关于Navigation组件的使用开发者可以参考:组件导航(Navigation)。
NavDestination() {
Column() {
Button($r('app.string.back_to_web_page'))
.width('100%')
.height(40)
.onClick(() => {
this.navPathStack.pushPath({ name: 'WebPage' });
})
}
// …
}
.title('ArkTS页面')
代码逻辑走读:
ArkWeb页面跳转ArkTS页面
同样开发者也会有从Web页面跳转到ArkTS页面的场景,例如刚刚的场景中希望返回到ArkTS页面,就是从Web页面跳转回ArkTS页面的场景,在这种场景下,实现步骤如下:
在HTML页面内使用a标签的href属性自定义跳转链接。
<a class="function_item" href="arkts://pages/toOriginPage">跳转到ArkTS页面</a>
说明
开发者可以根据业务场景自行定义href,此处定义的href并不作为a标签跳转后的地址,而是会在ArkTS侧进行跳转拦截,当检测到该链接时执行自定义逻辑。
然后在Web页面中,需要在
onLoadIntercept()
回调函数中进行跳转拦截,获取跳转的url,如果与自定义的跳转链接一致,那么可以使用路由栈进行页面跳转。
NavDestination() {
Column() {
Web({
src: $rawfile('index.html'),
controller: this.controller
})
.zoomAccess(false)
.onLoadIntercept((event) => {
const url: string = event.data.getRequestUrl();
if (url === 'arkts://pages/toOriginPage') {
this.navPathStack.pop();
}
// …
})
}
}
代码逻辑走读:
ArkWeb页面指定应用跳转
开发者在HarmonyOS应用内使用了Web页面做了部分页面的实现,同时出于推广,或者需要在其他应用内处理一些逻辑等目的,需要拉起其他的指定应用,例如跳转到支付应用进行支付,在这些场景下,就需要用到指定应用跳转的相关知识,首先在实现方案上,指定应用跳转建议使用如下两种方案:
方案1:使用Deep Linking。
在目标方配置module.json5文件,保证entities中包含entity.system.browsable、actions中包含ohos.want.action.viewData,最后再配置uris,用户可以自定义scheme,host,port以及path。具体含义可以参考:
uris标签说明
。
{
"module": {
// …
"abilities": [
{
// …
"skills": [
// …
{
"entities": [
"entity.system.browsable"
],
"actions": [
"ohos.want.action.viewData"
],
"uris": [
{
"scheme": "appScheme",
"host": "www.test.com",
"port": "80",
"path": "path1"
}
]
}
]
}
],
// …
}
}
在调用方的module.json5文件中配置
querySchemes
,标识允许当前应用进行跳转查询的URL schemes。
"querySchemes": [
"app1Scheme"
],
根据目标方的uris配置拼凑出完整的link地址,拼接方式为:scheme://host:port/path,例如上述配置对应的拉起地址为:appScheme://www.test.com:80/path1。
const link: string = "appScheme://www.test.com:80/path1";
通过
canOpenLink()
接口判断link是否可以打开,如不能打开链接开发者可以自定义响应逻辑,此处直接返回。
if (!bundleManager.canOpenLink(link)) {
return true;
}
配置拉起时的启动参数
openLinkOptions
,在该配置中可以进行参数传递以及配置appLinkingOnly属性。代码参考如下:
Navigation(this.navPathStack) {
Column() {
Web({
src: $rawfile('index.html'),
controller: this.controller
})
.zoomAccess(false)
.onLoadIntercept((event) => {
const url: string = event.data.getRequestUrl();
if (url === 'third-party://pages/toThirdApp') {
const link: string = "appScheme://www.test.com:80/path1";
if (!bundleManager.canOpenLink(link)) {
return true;
}
// Configuration parameter.
const openLinkOptions: OpenLinkOptions = {
appLinkingOnly: false,
parameters: {
name: 'test'
}
};
// Open the application using the openLink interface.
this.context.openLink(link, openLinkOptions).then(() => {
console.info('open link success.');
}).catch((err: BusinessError) => {
console.error(`open link failed. Code is ${err.code}, message is ${err.message}`);
})
}
return url !== 'resource://rawfile/index2.html';
})
}
}
代码逻辑走读:
- 构建一个应用scheme的URLconst link: string = "appScheme://www.test.com:80/path1"。
- 使用bundleManager.canOpenLink(link)检查当前应用是否可以打开该链接。如果不能,则直接返回true,表示阻止加载。
- 配置打开链接的选项const openLinkOptions: OpenLinkOptions = {…}。
- 使用this.context.openLink(link, openLinkOptions)尝试打开链接,并处理成功和失败的情况。
方案2:当开发者希望无论应用是否已安装,用户都可以访问到链接对应的内容,当应用安装时优先打开应用去呈现内容;当应用未安装时,则打开浏览器呈现Web版的内容,就可以使用App Linking的方式,App Linking配置可以参考:使用App Linking实现应用间跳转,以下为在ArkWeb页面中使用App Linking进行跳转的操作步骤。
在HTML文件中直接使用a标签的href配置为要跳转应用详情的App Linking地址(需要应用已上架到应用市场),此处以华为应用市场中的华为商城为例。
<a class="function_item" href="https://appgallery.huawei.com/app/detail?id=com.huawei.hmos.vmall">去应用市场下载</a>
<a class="function_item" href="https://www.huawei.com">打开应用</a>
ArkWeb组件内部完成了对App Linking的自动适配,不需要开发者再做拦截处理,执行默认逻辑即可打开应用市场中的华为商城。
图1 Web页面打开效果图 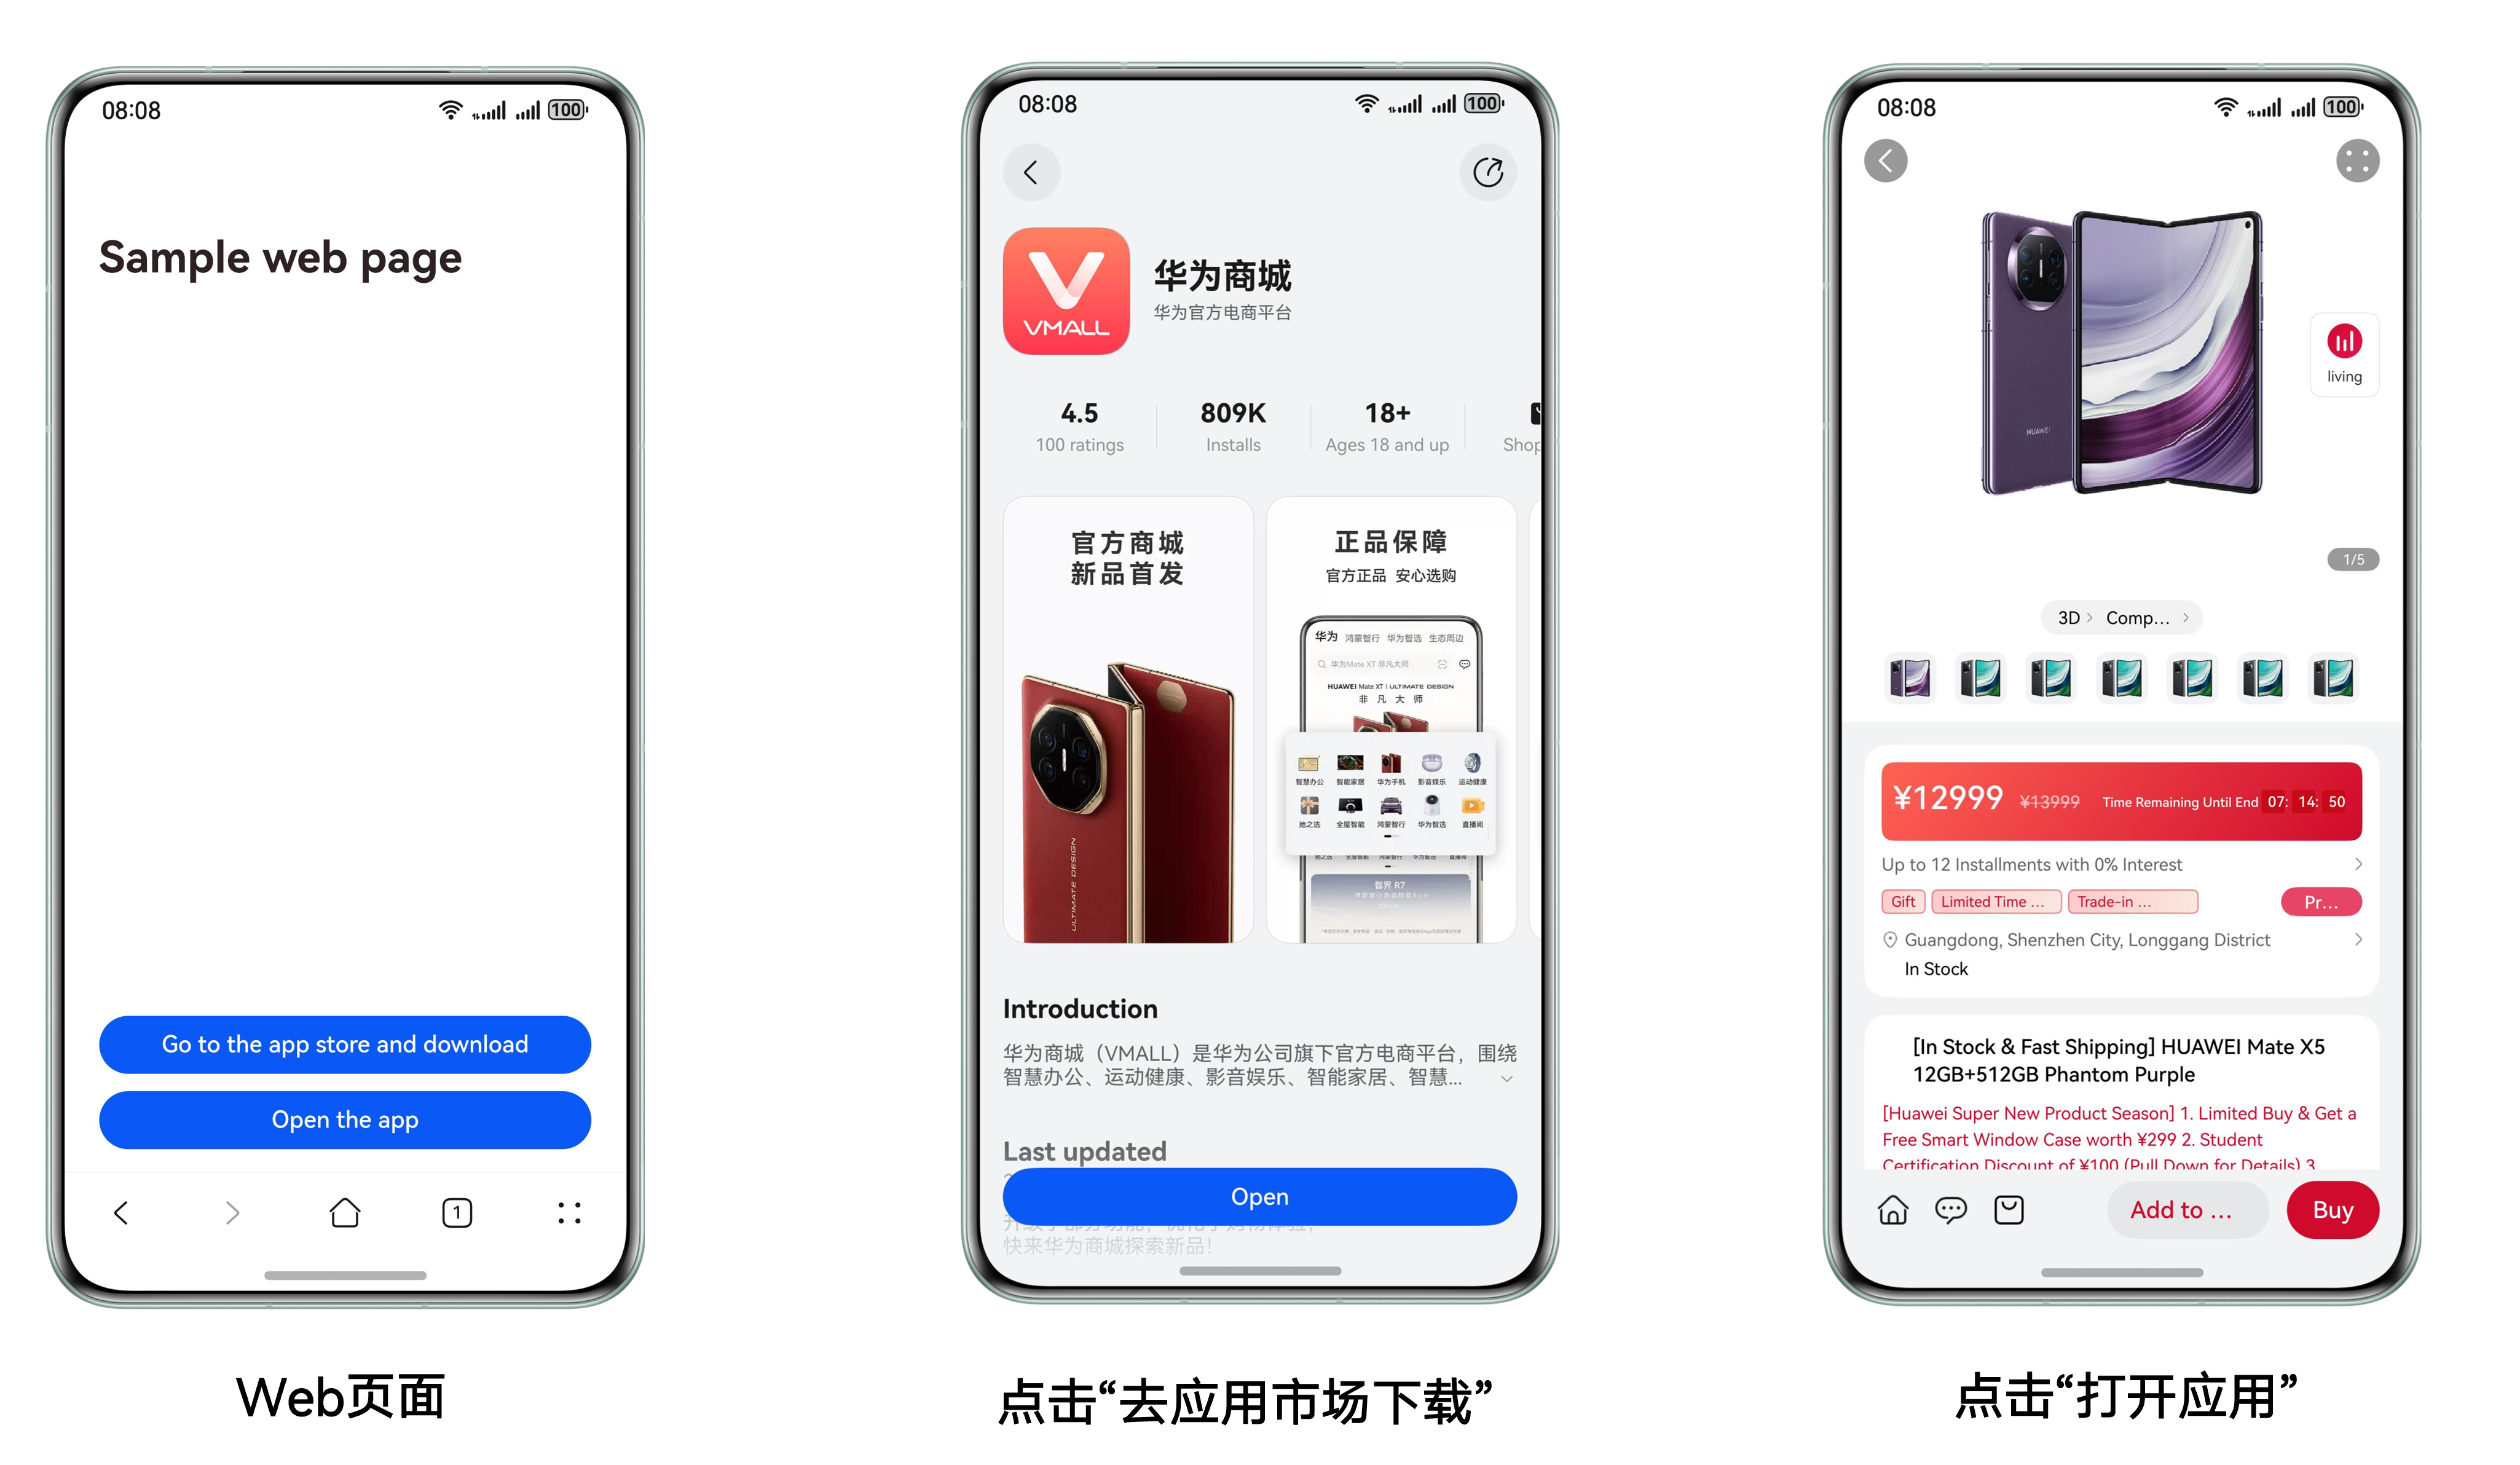
因此,Deep Linking适用于需要在已安装的应用之间进行跳转,实现相对简单,但当无应用匹配时用户体验不佳。而App Linking适用于社交分享、广告引流等需要外部链接访问应用的场景,以及对安全性和用户体验要求较高的场景。AppLinking在Deep Linking的基础上增加了域名校验,提高了链接的安全性和可靠性,且无论应用是否安装,用户都能访问内容。
ArkWeb页面指定类型跳转
在某些场景下,系统存在多个同类的应用,希望由用户按个人偏好自行选择在哪个应用中进行处理,例如用户收到了一个地址,而系统内有多个导航软件,希望让用户自行选择偏好的软件进行导航。实现上开发者可以参考:拉起指定类型的应用。以下参考代码以调用方拉起地图导航类应用为例。
在HTML页面中使用a标签规定拉起指定应用的字符串。
<a class="function_item" href="arkts://pullSpeciallyApp">拉起指定类型应用</a>
在Web组件中,当匹配到对应的文本时,执行拉起指定类型的操作。
Navigation(this.navPathStack) {
Column() {
Web({
src: $rawfile('index.html'),
controller: this.controller
})
.zoomAccess(false)
.onLoadIntercept((event) => {
const url: string = event.data.getRequestUrl();
if (url === 'arkts://pullSpeciallyApp') {
const wantParam: Record<string, Object> = {
'sceneType': 1,
'destinationLatitude': 32.060844,
'destinationLongitude': 118.78315,
'destinationName': 'xx市xx路xx号',
'destinationPoiIds': {
1: '111111111111',
2: '222222222222'
} as Record<number, string>,
'originName': 'xx市xx公园',
'originLatitude': 31.060844,
'originLongitude': 120.78315,
'originPoiIds': {
1: '333333333333',
2: '444444444444'
} as Record<number, string>,
'vehicleType': 0
};
const abilityStartCallback: common.AbilityStartCallback = {
onError: (code: number, name: string, message: string) => {
hilog.error(0x0000, 'Sample', '%{public}s', 'onError code ' + code + 'name: ' + name + 'message: ' + message);
},
onResult: (result:ESObject) => {
hilog.error(0x0000, 'Sample', '%{public}s', 'onResult result: ' + JSON.stringify(result));
}
};
this.context.startAbilityByType('navigation', wantParam, abilityStartCallback);
}
return url !== 'resource://rawfile/index.html';
})
}
}
代码逻辑走读:
导航组件初始化:使用Navigation组件初始化导航路径栈this.navPathStack。
布局结构:在Navigation内部使用Column布局组件来组织子组件。
Web视图嵌入:在Column中嵌入一个Web组件,该组件加载本地HTML文件index.html,并使用this.controller控制Web视图。
缩放权限设置:通过.zoomAccess(false)禁用Web视图的缩放功能。
加载拦截:
通过.onLoadIntercept((event) => {…})监听Web视图的加载事件。
- 获取加载的URL并存储在url变量中。
- 检查url是否等于arkts://pullSpeciallyApp。
- 如果是,构造一个导航参数对象wantParam,包含目的地、起点、车辆类型等信息。
- 定义一个abilityStartCallback回调对象,用于处理导航启动后的错误和结果。
- 调用this.context.startAbilityByType('navigation', wantParam, abilityStartCallback)启动导航功能。
- 返回url是否不等于resource://rawfile/index.html,决定是否继续加载其他资源。
ArkWeb页面跳转系统应用页面
从ArkWeb页面拉起系统应用界面,也是一个常见的场景,例如开发者有发布图片的需求,而且图片上传的界面在前端界面已经有了实现并且做了多端适配,现在希望复用原有的界面,但是具体的图片选择的逻辑以及上传的逻辑希望修改成ArkTS侧的实现。实现步骤如下:
在Web页面内配置跳转的链接地址。此处使用a标签并不意味着上传的HTML元素就是a标签,而是以它为例,理论上开发者可以用任何HTML元素绑定点击事件,通过设置window.location.href属性进行页面跳转。
<a class="function_item" href="photo://pages/selectPhoto">拉起系统应用</a>
使用系统提供的照片选择Picker进行图片的选择以及后续逻辑的开发。
Navigation(this.navPathStack) {
Column() {
Web({
src: $rawfile('index.html'),
controller: this.controller
})
.zoomAccess(false)
.onLoadIntercept((event) => {
const url: string = event.data.getRequestUrl();
if (url === 'photo://pages/selectPhoto') {
const photoSelectOptions = new photoAccessHelper.PhotoSelectOptions();
photoSelectOptions.MIMEType = photoAccessHelper.PhotoViewMIMETypes.IMAGE_TYPE; // Filter and select the media file type as IMAGE
photoSelectOptions.maxSelectNumber = 5; // Select the maximum number of media files
let uris: Array<string> = [];
const photoViewPicker = new photoAccessHelper.PhotoViewPicker();
photoViewPicker.select(photoSelectOptions)
.then((photoSelectResult: photoAccessHelper.PhotoSelectResult) => {
uris = photoSelectResult.photoUris;
console.info('photoViewPicker.select to file succeed and uris are:' + uris);
})
.catch((err: BusinessError) => {
console.error(`Invoke photoViewPicker.select failed, code is ${err.code}, message is ${err.message}`);
})
}
return url !== 'resource://rawfile/index3.html';
})
}
}
.hideTitleBar(true)
.navDestination(this.PageMap)
代码逻辑走读:
- 如果URL等于'photo://pages/selectPhoto',则创建PhotoSelectOptions对象,设置MIME类型为图片类型,最大选择数量为5,并使用PhotoViewPicker来选择照片。
- 成功选择照片后,将照片的URI存储在uris数组中,并在控制台输出成功信息。
- 如果选择失败,则在控制台输出错误信息。