前言
在移动应用开发中,列表是最常见的 UI 组件之一。而列表项的滑动操作则是提升用户体验的重要交互方式。通过左滑或右滑,用户可以快速执行删除、编辑、收藏等操作,无需进入详情页面。
本文将通过一个实际案例——饮水记录列表,带你深入理解 ArkTS 中 SwipeAction 的使用方法和交互设计技巧。
本文适合已经了解 ArkTS 基础语法的初学者阅读。通过学习本文,你将掌握:
- SwipeAction 的基本用法和参数配置
- 如何设计符合用户习惯的滑动交互
- 列表数据的动态更新与删除
- 滑动操作的视觉反馈设计
- 常见问题的解决方案
- 性能优化技巧
什么是 SwipeAction
SwipeAction(滑动操作)是一种常见的移动端交互模式。用户在列表项上左滑或右滑,会显示隐藏的操作按钮,点击按钮执行相应的操作。
常见应用场景:
为什么需要 SwipeAction?
- 操作便捷: 无需进入详情页,直接在列表上操作
- 节省空间: 隐藏的按钮不占用屏幕空间
- 符合习惯: 用户已经习惯这种交互方式
- 视觉清爽: 列表保持简洁,操作按钮按需显示
案例背景
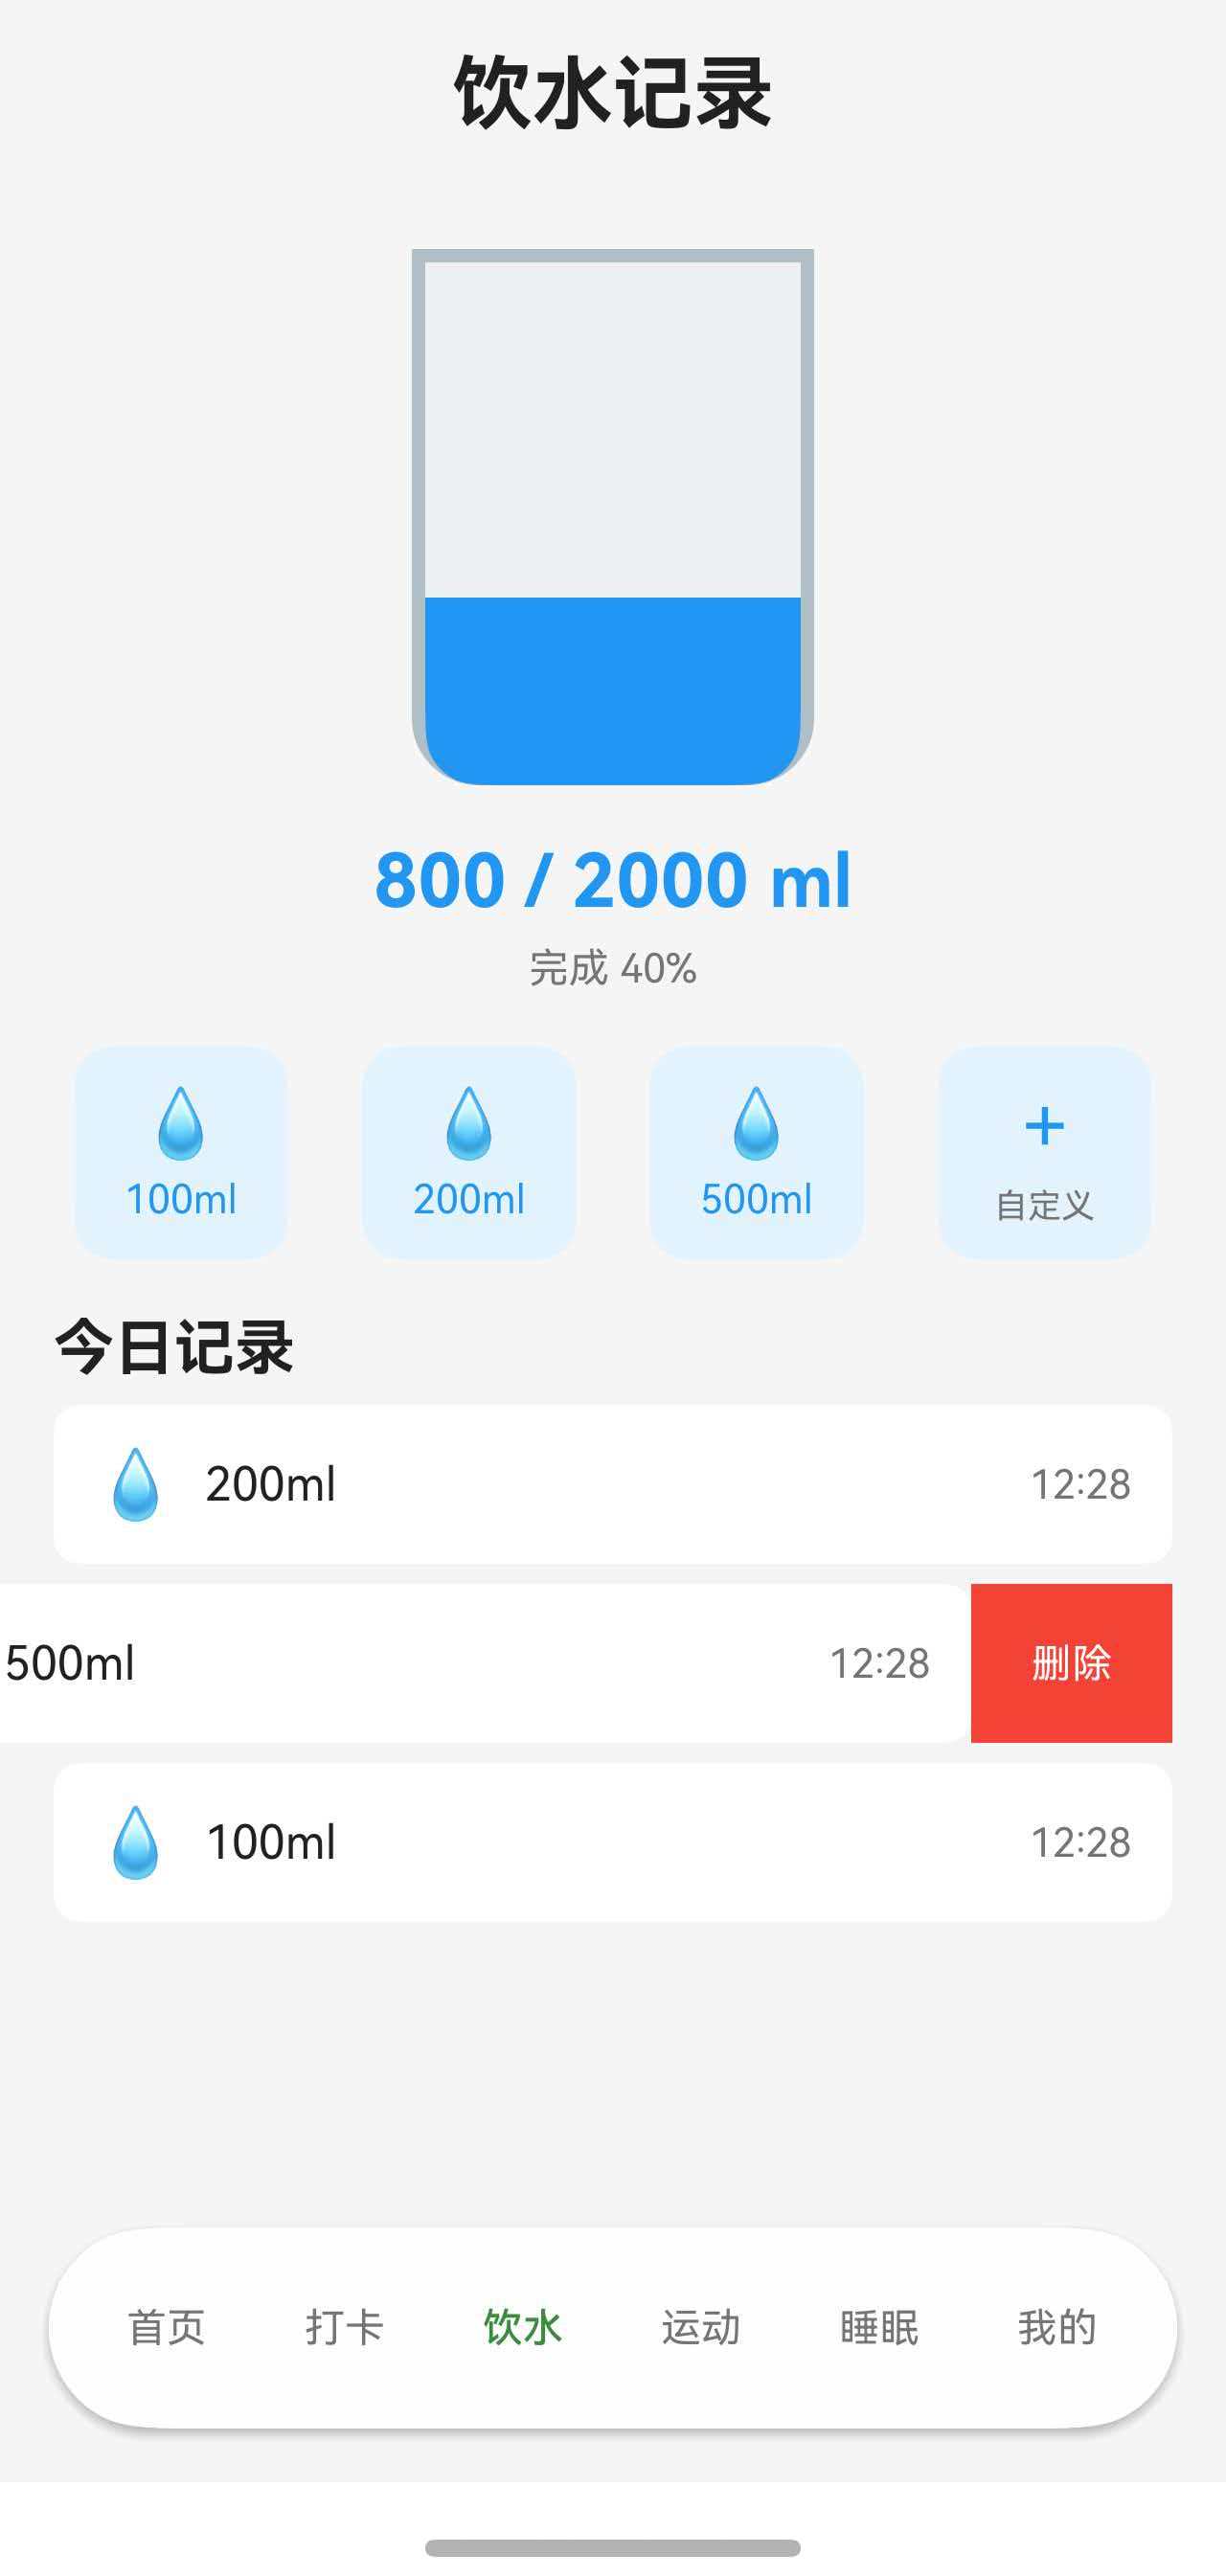
我们要实现一个饮水记录列表,具备以下功能:
最终效果如下图所示:
完整代码
首先,让我们看一下完整的实现代码:
import { PreferencesService, getTodayDateString } from '../service/PreferencesService';
import { WaterRecord, DailyWaterSummary } from '../model/HealthModels';
import { CommonCard } from '../components/CommonCard';
import common from '@ohos.app.ability.common';
@Entry
@Component
struct WaterPage {
@State waterCurrent: number = 0;
@State waterTarget: number = 2000;
@State waterRecords: WaterRecord[] = [];
private prefService: PreferencesService | null = null;
aboutToAppear(): void {
const ctx = getContext(this) as common.UIAbilityContext;
this.prefService = PreferencesService.getInstance(ctx);
this.loadWaterData();
}
async loadWaterData(): Promise<void> {
if (!this.prefService) return;
const today = getTodayDateString();
const data = await this.prefService.getWaterData(today);
this.waterCurrent = data.totalAmount;
this.waterTarget = data.targetAmount;
this.waterRecords = data.records;
}
async removeRecord(recordId: number): Promise<void> {
if (!this.prefService) return;
const today = getTodayDateString();
await this.prefService.removeWaterRecord(today, recordId);
await this.loadWaterData();
}
@Builder
DeleteButton(recordId: number) {
Row() {
Text('删除')
.fontSize(14)
.fontColor(Color.White)
}
.width(70)
.height('100%')
.justifyContent(FlexAlign.Center)
.backgroundColor($r('app.color.error_color'))
.onClick(() => {
this.removeRecord(recordId);
})
}
build() {
Scroll() {
Column() {
// 今日记录
Column() {
CommonCard({ title: '今日记录' }) {
Column() {
if (this.waterRecords.length === 0) {
Text('暂无记录')
.fontSize(14)
.fontColor($r('app.color.text_secondary'))
.padding({ top: 16, bottom: 16 })
} else {
List() {
ForEach(this.waterRecords.slice().reverse(), (record: WaterRecord) => {
ListItem() {
Row() {
Text('💧')
.fontSize(18)
Text(`${record.amount}ml`)
.fontSize(16)
.fontColor($r('app.color.text_primary'))
.margin({ left: 8 })
Blank()
Text(record.time)
.fontSize(14)
.fontColor($r('app.color.text_secondary'))
}
.width('100%')
.padding({ top: 12, bottom: 12 })
}
.swipeAction({
end: this.DeleteButton(record.id)
})
})
}
.width('100%')
.divider({
strokeWidth: 1,
color: $r('app.color.divider_color'),
startMargin: 0,
endMargin: 0
})
}
}
}
}
.margin({ left: 16, right: 16, bottom: 32 })
}
}
.width('100%')
.height('100%')
.backgroundColor($r('app.color.background_color'))
}
}
逐步解析
1. 数据模型定义
在开始实现 UI 之前,我们需要先了解数据结构:
// 单条饮水记录
interface WaterRecord {
id: number; // 唯一标识
amount: number; // 饮水量(毫升)
time: string; // 记录时间 HH:mm
date: string; // 记录日期 YYYY-MM-DD
}
// 每日饮水汇总
interface DailyWaterSummary {
date: string; // 日期
totalAmount: number; // 总饮水量
targetAmount: number; // 目标饮水量
records: WaterRecord[]; // 饮水记录列表
}
数据结构设计要点:
为什么需要 id?
考虑这样的场景:用户在同一时间添加了两条 200ml 的记录。如果没有 id,我们无法区分要删除哪一条:
// ❌ 没有 id,无法精确删除
records = [
{ amount: 200, time: '14:30' },
{ amount: 200, time: '14:30' } // 完全相同!
]
// ✅ 有 id,可以精确删除
records = [
{ id: 1001, amount: 200, time: '14:30' },
{ id: 1002, amount: 200, time: '14:30' } // id 不同
]
2. 组件状态管理
@State waterCurrent: number = 0;
@State waterTarget: number = 2000;
@State waterRecords: WaterRecord[] = [];
状态变量详解:
waterCurrent: 当前饮水总量
- 类型: number
- 用途: 显示今日已喝水量,计算完成度
- 更新时机: 添加或删除记录后重新计算
waterTarget: 目标饮水量
- 类型: number
- 用途: 显示目标值,计算完成百分比
- 更新时机: 用户修改设置时更新
waterRecords: 饮水记录列表
- 类型: WaterRecord[]
- 用途: 渲染列表,展示所有记录
- 更新时机: 加载数据、添加记录、删除记录后更新
为什么使用 @State?
@State 装饰器让变量具有响应式特性。当变量值改变时,使用该变量的 UI 会自动重新渲染:
// 删除记录后
this.waterRecords = newRecords; // 修改 @State 变量
// ArkTS 自动执行:
// 1. 检测到 waterRecords 变化
// 2. 重新执行 build() 方法
// 3. 更新列表显示
// 4. 用户看到记录被删除
如果不使用 @State,修改变量后 UI 不会更新,用户看不到变化。
3. 数据加载
private prefService: PreferencesService | null = null;
aboutToAppear(): void {
const ctx = getContext(this) as common.UIAbilityContext;
this.prefService = PreferencesService.getInstance(ctx);
this.loadWaterData();
}
async loadWaterData(): Promise<void> {
if (!this.prefService) return;
const today = getTodayDateString();
const data = await this.prefService.getWaterData(today);
this.waterCurrent = data.totalAmount;
this.waterTarget = data.targetAmount;
this.waterRecords = data.records;
}
生命周期方法 aboutToAppear:
aboutToAppear() 是组件的生命周期方法,在组件即将显示时调用。这是初始化数据的最佳时机。
执行流程:
1. 用户打开页面
↓
2. ArkTS 创建 WaterPage 组件
↓
3. 调用 aboutToAppear()
↓
4. 获取 Context 上下文
↓
5. 初始化 PreferencesService
↓
6. 调用 loadWaterData() 加载数据
↓
7. 从本地存储读取数据
↓
8. 更新 @State 变量
↓
9. 触发 UI 渲染
↓
10. 用户看到数据
为什么使用 async/await?
数据加载是异步操作(需要读取本地存储),使用 async/await 可以让代码更清晰:
// ✅ 使用 async/await: 代码清晰,易读
async loadWaterData(): Promise<void> {
const data = await this.prefService.getWaterData(today);
this.waterRecords = data.records;
}
空值检查的重要性:
if (!this.prefService) return;
这行代码防止 prefService 为 null 时调用方法导致崩溃。虽然正常情况下不会为 null,但防御性编程是好习惯。
4. 删除操作实现
async removeRecord(recordId: number): Promise<void> {
if (!this.prefService) return;
const today = getTodayDateString();
await this.prefService.removeWaterRecord(today, recordId);
await this.loadWaterData();
}
删除流程详解:
1. 用户左滑列表项
↓
2. 显示删除按钮
↓
3. 用户点击删除按钮
↓
4. 调用 removeRecord(recordId)
↓
5. 从本地存储删除记录
↓
6. 调用 loadWaterData() 重新加载数据
↓
7. 更新 @State waterRecords
↓
8. UI 自动刷新
↓
9. 用户看到记录消失
为什么要重新加载数据?
删除记录后,我们需要更新三个数据:
直接调用 loadWaterData() 可以一次性更新所有数据,保证数据一致性:
// ✅ 好的做法: 重新加载,数据一致
async removeRecord(recordId: number): Promise<void> {
await this.prefService.removeWaterRecord(today, recordId);
await this.loadWaterData(); // 重新加载所有数据
}
// ❌ 不好的做法: 手动更新,容易出错
async removeRecord(recordId: number): Promise<void> {
await this.prefService.removeWaterRecord(today, recordId);
// 手动从数组中删除
const index = this.waterRecords.findIndex(r => r.id === recordId);
this.waterRecords.splice(index, 1);
// 手动重新计算总量
this.waterCurrent = this.waterRecords.reduce((sum, r) => sum + r.amount, 0);
// 如果逻辑复杂,容易遗漏或出错
}
异步操作的顺序:
注意 await 的使用顺序:
await this.prefService.removeWaterRecord(today, recordId); // 先删除
await this.loadWaterData(); // 再加载
必须等删除操作完成后,再加载数据。如果不用 await,可能出现数据不一致:
// ❌ 错误示例: 不等待删除完成
this.prefService.removeWaterRecord(today, recordId); // 开始删除(异步)
await this.loadWaterData(); // 立即加载(删除可能还没完成)
// 结果: 加载的数据中还包含刚删除的记录
5. 删除按钮的设计
@Builder
DeleteButton(recordId: number) {
Row() {
Text('删除')
.fontSize(14)
.fontColor(Color.White)
}
.width(70)
.height('100%')
.justifyContent(FlexAlign.Center)
.backgroundColor($r('app.color.error_color'))
.onClick(() => {
this.removeRecord(recordId);
})
}
使用 @Builder 的原因:
@Builder 装饰器用于封装可复用的 UI 片段。删除按钮会在每个列表项中使用,封装成 @Builder 有以下好处:
点击事件处理:
.onClick(() => {
this.removeRecord(recordId);
})
点击按钮时,调用 removeRecord() 方法,传入当前记录的 id。这样每个删除按钮都知道要删除哪条记录。
为什么使用箭头函数?
// ✅ 正确: 使用箭头函数
.onClick(() => {
this.removeRecord(recordId);
})
// ❌ 错误: 直接传递方法
.onClick(this.removeRecord(recordId)) // 会立即执行!
箭头函数创建了一个新函数,只有在点击时才会执行。如果直接传递 this.removeRecord(recordId),会在渲染时立即执行,导致所有记录被删除。
6. 列表结构实现
List() {
ForEach(this.waterRecords.slice().reverse(), (record: WaterRecord) => {
ListItem() {
Row() {
Text('💧')
.fontSize(18)
Text(`${record.amount}ml`)
.fontSize(16)
.fontColor($r('app.color.text_primary'))
.margin({ left: 8 })
Blank()
Text(record.time)
.fontSize(14)
.fontColor($r('app.color.text_secondary'))
}
.width('100%')
.padding({ top: 12, bottom: 12 })
}
.swipeAction({
end: this.DeleteButton(record.id)
})
})
}
.width('100%')
.divider({
strokeWidth: 1,
color: $r('app.color.divider_color'),
startMargin: 0,
endMargin: 0
})
List 组件:
List 是 ArkTS 提供的列表容器组件,专门用于渲染列表数据。它的特点:
ForEach 循环渲染:
ForEach(this.waterRecords.slice().reverse(), (record: WaterRecord) => {
// 渲染每一项
})
为什么使用 slice().reverse()?
this.waterRecords.slice().reverse()
这行代码包含两个操作:
slice(): 创建数组的浅拷贝
- 原因: reverse() 会修改原数组
- 如果直接 this.waterRecords.reverse(),会改变原始数据
- 使用 slice() 创建副本,保护原始数据
reverse(): 反转数组顺序
- 原因: 数据按时间正序存储(早→晚)
- 显示时需要倒序(晚→早),最新的记录在最上面
- 符合用户习惯(最新的信息最重要)
示例:
// 原始数据(按时间正序)
waterRecords = [
{ id: 1, time: '09:00', amount: 200 },
{ id: 2, time: '12:00', amount: 300 },
{ id: 3, time: '15:00', amount: 250 }
]
// 显示顺序(反转后)
显示:
15:00 250ml ← 最新
12:00 300ml
09:00 200ml ← 最早
ListItem 结构:
每个 ListItem 包含一个 Row,水平排列三个元素:
┌────────────────────────────┐
│ 💧 200ml 14:30 │
│ ↑ ↑ ↑ │
│图标 饮水量 时间 │
└────────────────────────────┘
如下图所示:

Blank() 组件的作用:
Row() {
Text('💧')
Text(`${record.amount}ml`)
Blank() // 占据剩余空间
Text(record.time)
}
Blank() 是一个弹性空白组件,会占据 Row 中的所有剩余空间。效果:
不使用 Blank:
┌────────────────────────────┐
│ 💧 200ml 14:30 │ ← 元素靠左
└────────────────────────────┘
使用 Blank:
┌────────────────────────────┐
│ 💧 200ml 14:30 │ ← 时间靠右
└────────────────────────────┘
这样时间会自动靠右显示,布局更美观。
divider 分割线:
.divider({
strokeWidth: 1,
color: $r('app.color.divider_color'),
startMargin: 0,
endMargin: 0
})
divider 在列表项之间添加分割线,参数说明:
- strokeWidth: 线条粗细(1px)
- color: 线条颜色(通常是浅灰色)
- startMargin: 左侧边距(0 表示从最左边开始)
- endMargin: 右侧边距(0 表示到最右边结束)
分割线的作用:
7. SwipeAction 核心实现
ListItem() {
Row() {
// 列表项内容
}
}
.swipeAction({
end: this.DeleteButton(record.id)
})
swipeAction 参数详解:
swipeAction 是 ListItem 的一个方法,用于配置滑动操作。它接受一个对象参数:
interface SwipeActionOptions {
start?: CustomBuilder; // 右滑显示的内容
end?: CustomBuilder; // 左滑显示的内容
}
start vs end:
-
start: 从左向右滑动时显示(右滑)
- 通常用于"标记已读"、"收藏"等非破坏性操作
- 显示在列表项左侧
-
end: 从右向左滑动时显示(左滑)
- 通常用于"删除"、"移除"等破坏性操作
- 显示在列表项右侧
为什么删除操作使用 end?
这是移动端的通用设计规范:
滑动交互流程:
1. 用户手指按住列表项
↓
2. 向左滑动
↓
3. 列表项向左移动,露出右侧的删除按钮
↓
4. 用户松开手指
↓
5. 如果滑动距离足够,按钮保持显示
↓
6. 如果滑动距离不够,列表项回弹
↓
7. 用户点击删除按钮
↓
8. 执行删除操作
↓
9. 列表项消失,其他项上移
多个操作按钮:
如果需要多个操作按钮,可以使用 Row 组合:
@Builder
MultipleActions(recordId: number) {
Row() {
// 编辑按钮
Row() {
Text('编辑')
.fontSize(14)
.fontColor(Color.White)
}
.width(70)
.height('100%')
.justifyContent(FlexAlign.Center)
.backgroundColor('#FF9800')
.onClick(() => {
this.editRecord(recordId);
})
// 删除按钮
Row() {
Text('删除')
.fontSize(14)
.fontColor(Color.White)
}
.width(70)
.height('100%')
.justifyContent(FlexAlign.Center)
.backgroundColor('#F44336')
.onClick(() => {
this.removeRecord(recordId);
})
}
}
// 使用
ListItem() {
// …
}
.swipeAction({
end: this.MultipleActions(record.id)
})
效果:
左滑后:
┌────────────────────────────┐
│ 💧 200ml 14:30 │编辑│删除│
└────────────────────────────┘
8. 空状态处理
if (this.waterRecords.length === 0) {
Text('暂无记录')
.fontSize(14)
.fontColor($r('app.color.text_secondary'))
.padding({ top: 16, bottom: 16 })
} else {
List() {
// 列表内容
}
}
为什么需要空状态?
当用户第一次使用应用,或删除了所有记录后,列表为空。如果不处理空状态,用户会看到一片空白,不知道发生了什么。
好的空状态设计:
// ✅ 好的设计: 提供明确的提示
if (this.waterRecords.length === 0) {
Column() {
Text('💧')
.fontSize(48)
.opacity(0.3)
Text('暂无饮水记录')
.fontSize(16)
.fontColor($r('app.color.text_secondary'))
.margin({ top: 12 })
Text('点击下方按钮添加记录')
.fontSize(14)
.fontColor($r('app.color.text_tertiary'))
.margin({ top: 4 })
}
.width('100%')
.padding({ top: 40, bottom: 40 })
.justifyContent(FlexAlign.Center)
}
// ❌ 不好的设计: 没有任何提示
if (this.waterRecords.length === 0) {
Column() {
// 空白
}
}
空状态的设计原则:
交互设计的最佳实践
1. 滑动方向的选择
左滑(end) vs 右滑(start):
| 删除 | 左滑(end) | 符合用户习惯,大多数应用都是左滑删除 |
| 编辑 | 左滑(end) | 与删除一起出现时,放在删除左侧 |
| 收藏 | 右滑(start) | 正向操作,与删除区分开 |
| 标记已读 | 右滑(start) | 非破坏性操作,使用右滑更安全 |
| 归档 | 左滑(end) | 类似删除的移除操作 |
设计建议:
2. 按钮颜色的语义
颜色心理学在 UI 设计中的应用:
// 删除 – 红色系
.backgroundColor('#F44336') // 警告、危险、停止
// 编辑 – 橙色系
.backgroundColor('#FF9800') // 中性、提示、修改
// 收藏 – 黄色系
.backgroundColor('#FFC107') // 积极、重要、标记
// 完成 – 绿色系
.backgroundColor('#4CAF50') // 成功、确认、完成
// 详情 – 蓝色系
.backgroundColor('#2196F3') // 信息、链接、查看
// 取消 – 灰色系
.backgroundColor('#9E9E9E') // 中立、取消、禁用
为什么删除按钮用红色?
进阶功能实现
1. 确认对话框
对于重要的删除操作,最好添加二次确认,防止误删:
@State showDeleteDialog: boolean = false;
@State pendingDeleteId: number = –1;
@Builder
DeleteButton(recordId: number) {
Row() {
Text('删除')
.fontSize(14)
.fontColor(Color.White)
}
.width(70)
.height('100%')
.justifyContent(FlexAlign.Center)
.backgroundColor($r('app.color.error_color'))
.onClick(() => {
// 不直接删除,而是显示确认对话框
this.pendingDeleteId = recordId;
this.showDeleteDialog = true;
})
}
build() {
Stack() {
// 主内容
Scroll() {
// …
}
// 确认对话框
if (this.showDeleteDialog) {
Column() {
Column() {
Text('确认删除')
.fontSize(18)
.fontWeight(FontWeight.Bold)
.margin({ bottom: 12 })
Text('删除后无法恢复,确定要删除这条记录吗?')
.fontSize(14)
.fontColor($r('app.color.text_secondary'))
.textAlign(TextAlign.Center)
Row() {
Button('取消')
.layoutWeight(1)
.backgroundColor($r('app.color.button_secondary'))
.onClick(() => {
this.showDeleteDialog = false;
this.pendingDeleteId = –1;
})
Button('删除')
.layoutWeight(1)
.backgroundColor($r('app.color.error_color'))
.margin({ left: 12 })
.onClick(() => {
this.removeRecord(this.pendingDeleteId);
this.showDeleteDialog = false;
this.pendingDeleteId = –1;
})
}
.width('100%')
.margin({ top: 20 })
}
.width('80%')
.padding(24)
.backgroundColor($r('app.color.card_background'))
.borderRadius(16)
}
.width('100%')
.height('100%')
.backgroundColor('rgba(0, 0, 0, 0.5)')
.justifyContent(FlexAlign.Center)
}
}
}
确认对话框的设计要点:
何时需要确认对话框?
需要确认:
✅ 删除重要数据(联系人、文件等)
✅ 不可逆操作(清空购物车、注销账号等)
✅ 影响其他数据(删除分类会删除其下所有项目)
不需要确认:
❌ 删除临时数据(搜索历史、浏览记录等)
❌ 可撤销操作(有"撤销"按钮的删除)
❌ 低价值数据(单条饮水记录、单次打卡等)
对于饮水记录,是否需要确认对话框取决于产品定位:
- 如果是健康管理应用,记录很重要 → 需要确认
- 如果是简单的记录工具,记录可随时添加 → 不需要确认
常见问题与解决方案
Q1: 滑动后按钮不显示?
症状:
用户左滑列表项,但删除按钮没有出现。
可能的原因和解决方案:
原因1: swipeAction 设置在错误的组件上
// ❌ 错误示例
List() {
ForEach(this.waterRecords, (record) => {
ListItem() {
Row() {
Text(`${record.amount}ml`)
}
}
})
}
.swipeAction({ // 设置在 List 上,不会生效
end: this.DeleteButton(record.id)
})
// ✅ 正确示例
List() {
ForEach(this.waterRecords, (record) => {
ListItem() {
Row() {
Text(`${record.amount}ml`)
}
}
.swipeAction({ // 设置在 ListItem 上
end: this.DeleteButton(record.id)
})
})
}
原因2: @Builder 方法定义错误
// ❌ 错误示例: 没有使用 @Builder
DeleteButton(recordId: number) { // 缺少 @Builder
Row() {
Text('删除')
}
}
// ✅ 正确示例
@Builder
DeleteButton(recordId: number) {
Row() {
Text('删除')
}
}
原因3: 按钮高度设置不当
// ❌ 错误示例: 按钮高度固定,可能与列表项不匹配
@Builder
DeleteButton(recordId: number) {
Row() {
Text('删除')
}
.width(70)
.height(40) // 固定高度,如果列表项高度是 50,会显示不全
}
// ✅ 正确示例: 使用 '100%' 自动适配
@Builder
DeleteButton(recordId: number) {
Row() {
Text('删除')
}
.width(70)
.height('100%') // 自动匹配列表项高度
}
Q2: 删除后列表不更新?
症状:
点击删除按钮后,记录没有从列表中消失。
可能的原因和解决方案:
原因1: 没有使用 @State
// ❌ 错误示例
waterRecords: WaterRecord[] = []; // 没有 @State
async removeRecord(recordId: number): Promise<void> {
// 删除操作
await this.loadWaterData(); // 数据更新了,但 UI 不会刷新
}
// ✅ 正确示例
@State waterRecords: WaterRecord[] = []; // 使用 @State
async removeRecord(recordId: number): Promise<void> {
await this.loadWaterData(); // UI 会自动刷新
}
原因2: 直接修改数组元素
// ❌ 错误示例: 直接修改数组元素,不会触发更新
async removeRecord(recordId: number): Promise<void> {
const index = this.waterRecords.findIndex(r => r.id === recordId);
this.waterRecords.splice(index, 1); // 修改了数组,但 ArkTS 可能检测不到
}
// ✅ 正确示例: 创建新数组,触发更新
async removeRecord(recordId: number): Promise<void> {
this.waterRecords = this.waterRecords.filter(r => r.id !== recordId);
}
// ✅ 更好的做法: 重新加载数据
async removeRecord(recordId: number): Promise<void> {
await this.prefService.removeWaterRecord(today, recordId);
await this.loadWaterData(); // 重新加载,保证数据一致性
}
原因3: 异步操作没有等待
// ❌ 错误示例: 没有等待删除完成
async removeRecord(recordId: number): Promise<void> {
this.prefService.removeWaterRecord(today, recordId); // 没有 await
await this.loadWaterData(); // 可能在删除完成前就加载了
}
// ✅ 正确示例: 等待删除完成
async removeRecord(recordId: number): Promise<void> {
await this.prefService.removeWaterRecord(today, recordId); // 等待删除
await this.loadWaterData(); // 删除完成后再加载
}
Q3: 如何实现右滑操作?
需求:
除了左滑删除,还想实现右滑收藏。
解决方案:
@Builder
FavoriteButton(recordId: number) {
Row() {
Text('⭐')
.fontSize(18)
}
.width(70)
.height('100%')
.justifyContent(FlexAlign.Center)
.backgroundColor('#FFC107')
.onClick(() => {
this.toggleFavorite(recordId);
})
}
ListItem() {
Row() {
// 列表项内容
}
}
.swipeAction({
start: this.FavoriteButton(record.id), // 右滑显示收藏
end: this.DeleteButton(record.id) // 左滑显示删除
})
注意事项:
实战练习
练习 1: 实现编辑功能
任务: 在删除按钮旁边添加编辑按钮,点击后可以修改饮水量。
提示:
参考答案:
@State showEditDialog: boolean = false;
@State editingRecordId: number = –1;
@State editingAmount: string = '';
@Builder
EditButton(recordId: number, currentAmount: number) {
Row() {
Text('编辑')
.fontSize(14)
.fontColor(Color.White)
}
.width(70)
.height('100%')
.justifyContent(FlexAlign.Center)
.backgroundColor('#FF9800')
.onClick(() => {
this.editingRecordId = recordId;
this.editingAmount = currentAmount.toString();
this.showEditDialog = true;
})
}
@Builder
ActionButtons(recordId: number, currentAmount: number) {
Row() {
this.EditButton(recordId, currentAmount)
this.DeleteButton(recordId)
}
}
async updateRecord(recordId: number, newAmount: number): Promise<void> {
if (!this.prefService) return;
// 1. 删除旧记录
const today = getTodayDateString();
await this.prefService.removeWaterRecord(today, recordId);
// 2. 添加新记录
await this.prefService.addWaterRecord(today, newAmount);
// 3. 重新加载数据
await this.loadWaterData();
// 4. 关闭对话框
this.showEditDialog = false;
}
// 在 build() 中使用
ListItem() {
// …
}
.swipeAction({
end: this.ActionButtons(record.id, record.amount)
})
练习 2: 实现滑动提示
任务: 用户第一次使用时,显示提示引导用户左滑删除。
提示:
参考答案:
@State showSwipeHint: boolean = false;
async aboutToAppear(): Promise<void> {
// 检查是否已显示过提示
const hasShownHint = await this.prefService.getSwipeHintShown();
if (!hasShownHint && this.waterRecords.length > 0) {
this.showSwipeHint = true;
}
}
async dismissSwipeHint(): Promise<void> {
this.showSwipeHint = false;
await this.prefService.setSwipeHintShown(true);
}
@Builder
SwipeHintCard() {
Row() {
Column() {
Text('💡 小提示')
.fontSize(14)
.fontWeight(FontWeight.Medium)
Text('左滑记录可以删除哦')
.fontSize(12)
.fontColor($r('app.color.text_secondary'))
.margin({ top: 4 })
}
.alignItems(HorizontalAlign.Start)
.layoutWeight(1)
Button('知道了')
.fontSize(12)
.height(32)
.onClick(() => {
this.dismissSwipeHint();
})
}
.width('100%')
.padding(12)
.backgroundColor('#FFF9C4')
.borderRadius(8)
.margin({ bottom: 12 })
}
build() {
Column() {
if (this.showSwipeHint) {
this.SwipeHintCard()
}
List() {
// 列表内容
}
}
}
练习 3: 实现滑动删除动画
任务: 删除记录时添加淡出动画,让删除过程更流畅。
提示:
参考答案:
@State deletingId: number = –1;
async removeRecordWithAnimation(recordId: number): Promise<void> {
// 1. 标记为正在删除
this.deletingId = recordId;
// 2. 等待动画完成
await new Promise(resolve => setTimeout(resolve, 300));
// 3. 执行实际删除
if (!this.prefService) return;
const today = getTodayDateString();
await this.prefService.removeWaterRecord(today, recordId);
await this.loadWaterData();
// 4. 重置状态
this.deletingId = –1;
}
List() {
ForEach(this.waterRecords.slice().reverse(), (record: WaterRecord) => {
ListItem() {
Row() {
Text('💧')
Text(`${record.amount}ml`)
Blank()
Text(record.time)
}
.width('100%')
.padding({ top: 12, bottom: 12 })
.opacity(this.deletingId === record.id ? 0 : 1) // 淡出动画
.animation({
duration: 300,
curve: Curve.EaseOut
})
}
.height(this.deletingId === record.id ? 0 : 'auto') // 高度动画
.animation({
duration: 300,
curve: Curve.EaseOut
})
.swipeAction({
end: this.DeleteButton(record.id)
})
})
}
设计规范总结
1. 滑动方向规范
| 删除 | 左滑(end) | 红色 #F44336 | 🗑️ 或 “删除” |
| 编辑 | 左滑(end) | 橙色 #FF9800 | ✏️ 或 “编辑” |
| 收藏 | 右滑(start) | 黄色 #FFC107 | ⭐ 或 “收藏” |
| 标记 | 右滑(start) | 蓝色 #2196F3 | ✓ 或 “标记” |
| 归档 | 左滑(end) | 灰色 #9E9E9E | 📦 或 “归档” |
2. 按钮尺寸规范
// 单个按钮
.width(70)
.height('100%')
// 两个按钮
.width(60) // 每个按钮
.height('100%')
// 三个按钮
.width(50) // 每个按钮
.height('100%')
// 文字较长的按钮
.width(80–90)
.height('100%')
3. 颜色对比度规范
确保按钮文字与背景有足够的对比度:
// ✅ 符合 WCAG AA 标准(对比度 ≥ 4.5:1)
.backgroundColor('#F44336') // 红色
.fontColor(Color.White) // 白色
.backgroundColor('#2196F3') // 蓝色
.fontColor(Color.White) // 白色
// ❌ 不符合标准(对比度 < 3:1)
.backgroundColor('#FFEB3B') // 黄色
.fontColor(Color.White) // 白色(对比度不够)
// ✅ 修正: 使用深色文字
.backgroundColor('#FFEB3B') // 黄色
.fontColor('#000000') // 黑色
4. 动画时长规范
// 滑动展开/收起
.animation({
duration: 200–300, // 快速响应
curve: Curve.EaseOut
})
// 删除淡出
.animation({
duration: 300, // 适中速度
curve: Curve.EaseOut
})
// 高度变化
.animation({
duration: 300, // 与淡出同步
curve: Curve.EaseOut
})
5. 交互反馈规范
视觉反馈:
- 按钮按下时改变颜色或透明度
- 删除时添加动画效果
- 操作完成后显示 Toast 提示
触觉反馈(如果支持):
- 滑动到阈值时震动
- 删除操作时震动
音效反馈(可选):
- 滑动展开时播放音效
- 删除成功时播放音效
总结
通过本文的学习,我们深入了解了 ArkTS 中 SwipeAction 的使用方法和交互设计技巧。
通过本文的学习和实践,相信你已经掌握了 SwipeAction 的核心技术和设计技巧。在实际开发中,记得根据具体场景灵活运用,创造出流畅、直观的用户体验!
如果你在实践中遇到问题,欢迎留言交流讨论。