人工智能之核心技术 深度学习
第九章
文章目录
- 人工智能之核心技术 深度学习
- 前言:框架实操(PyTorch / TensorFlow)—— 从理论到落地
-
- 一、PyTorch 实战
-
- 1.1 张量操作与自动求导
- 1.2 模型定义
-
- 方法1:`nn.Sequential`(简单模型)
- 方法2:继承 `nn.Module`(灵活,推荐)
- 1.3 数据加载:`Dataset` + `DataLoader`
- 1.4 训练与验证流程
- 二、TensorFlow / Keras 实战(完整标准化流程)
-
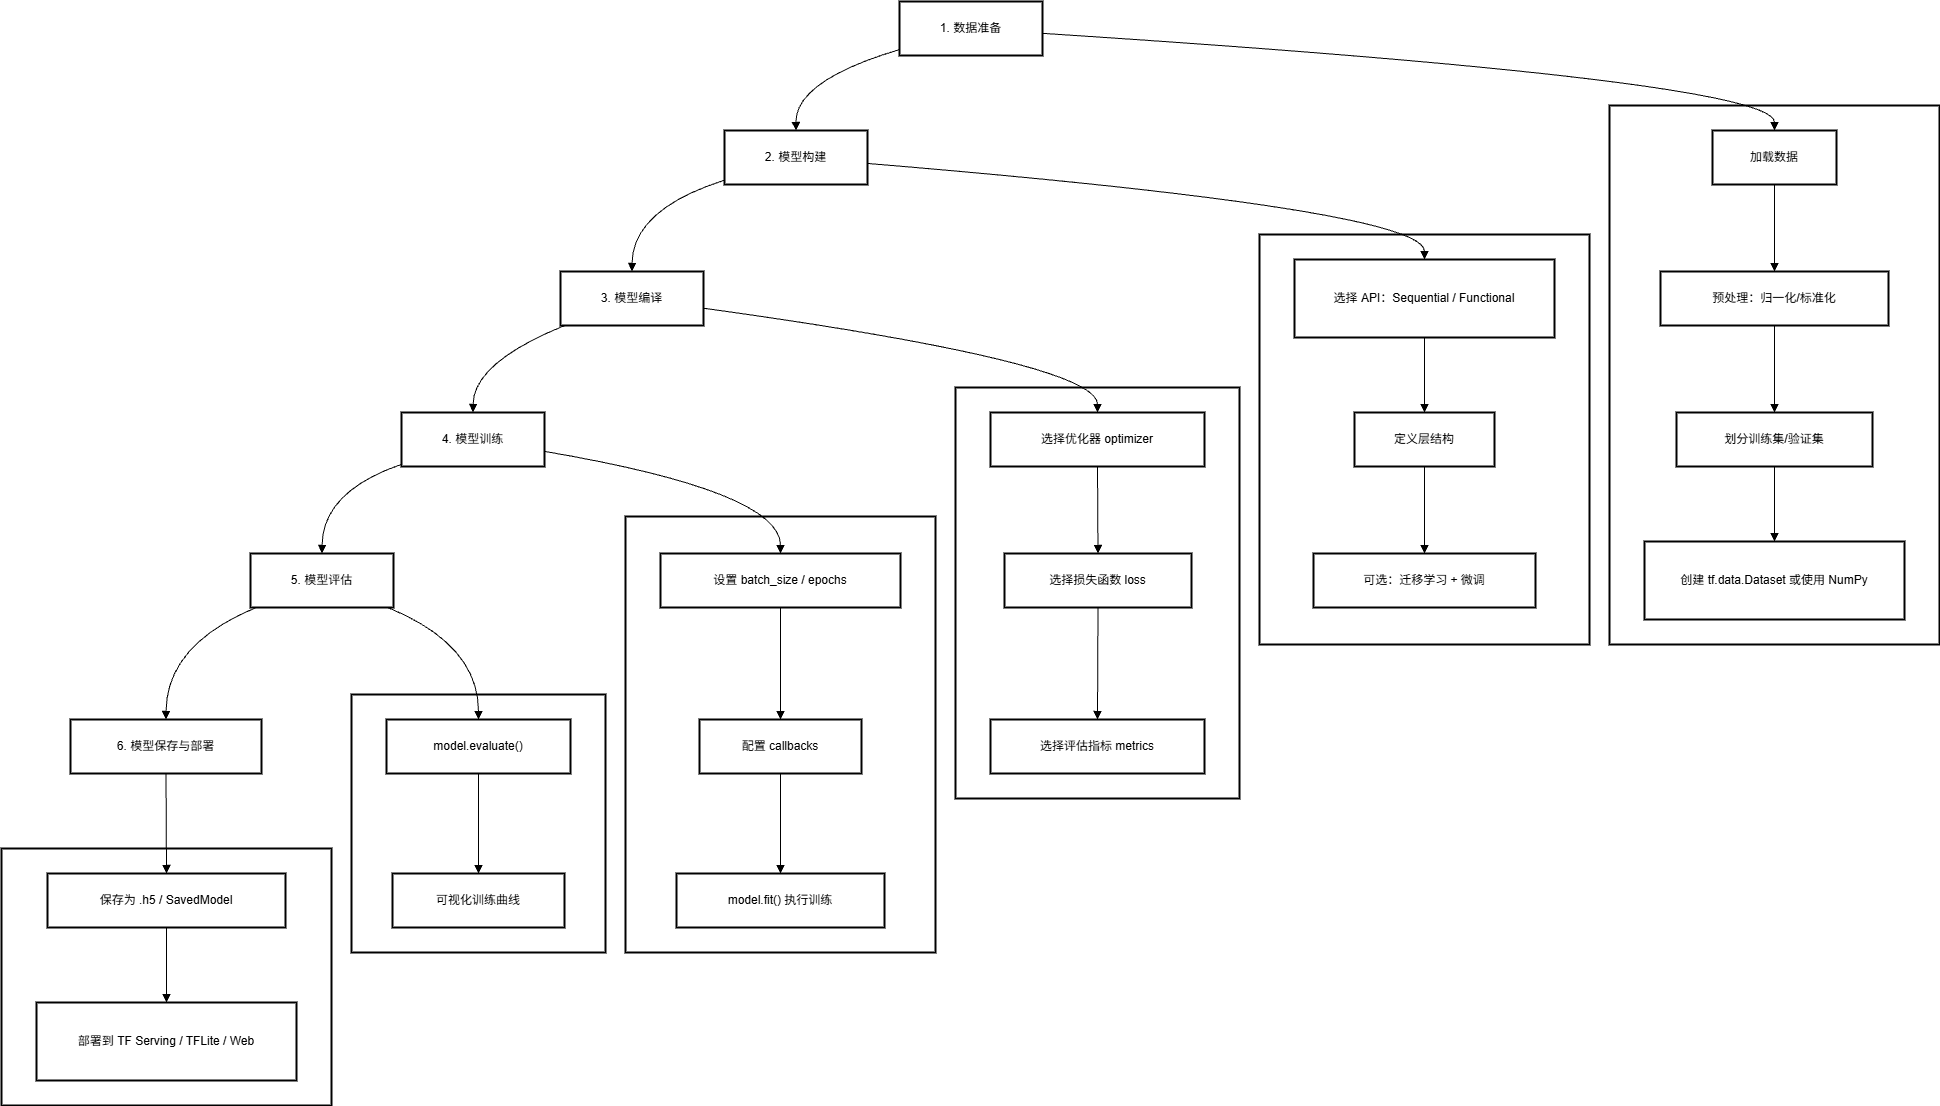
- 2.1 整体开发流程
- 2.2 分步详解(以 Fashion-MNIST 图像分类为例)
-
- 步骤 1️⃣:数据准备
- 步骤 2️⃣:模型构建
-
- 方式 A:Sequential API(简单线性模型)
- 方式 B:Functional API(支持复杂结构)
- 步骤 3️⃣:模型编译
- 步骤 4️⃣:模型训练(含回调)
- 步骤 5️⃣:模型评估与可视化
- 步骤 6️⃣:模型保存与部署
- 2.3 迁移学习实战(ImageNet 预训练)
- 三、经典项目实战
-
- 项目1:图像分类(MNIST / Fashion-MNIST)
-
- PyTorch 实现(CNN)
- 项目2:文本情感分析(IMDB 电影评论)
-
- 方案A:LSTM(PyTorch)
- 方案B:BERT(Hugging Face)
- 项目3:图像生成(GAN)
-
- DCGAN 生成 MNIST(PyTorch)
- 项目4:文生图入门(Stable Diffusion)
- 四、PyTorch vs TensorFlow 对比总结
- 五、总结
- 资料关注
前言:框架实操(PyTorch / TensorFlow)—— 从理论到落地
掌握深度学习理论后,动手实现是检验理解、积累经验的关键一步。本章将系统对比两大主流框架 PyTorch 与 TensorFlow/Keras,并通过四大经典项目带你完成端到端实战,并完整呈现 TensorFlow/Keras 的标准化开发流程。
一、PyTorch 实战
PyTorch 以 “Pythonic” 风格 和 动态计算图 著称,深受研究者喜爱。
1.1 张量操作与自动求导
import torch
# 创建张量(支持 GPU)
x = torch.randn(3, requires_grad=True) # requires_grad=True 启用自动求导
y = x * 2
z = y.sum()
# 反向传播
z.backward() # 自动计算 dz/dx
print(x.grad) # 输出梯度
✅ 核心机制:
- requires_grad=True:标记需计算梯度
- .backward():触发反向传播
- .grad:存储梯度值
1.2 模型定义
方法1:nn.Sequential(简单模型)
model = nn.Sequential(
nn.Linear(784, 128),
nn.ReLU(),
nn.Linear(128, 10)
)
方法2:继承 nn.Module(灵活,推荐)
class CNN(nn.Module):
def __init__(self):
super().__init__()
self.conv1 = nn.Conv2d(1, 32, 3)
self.fc1 = nn.Linear(32 * 26 * 26, 10)
def forward(self, x):
x = torch.relu(self.conv1(x))
x = x.view(x.size(0), –1) # flatten
x = self.fc1(x)
return x
1.3 数据加载:Dataset + DataLoader
from torch.utils.data import Dataset, DataLoader
from torchvision import datasets, transforms
# 自定义 Dataset(通常用现成的)
transform = transforms.ToTensor()
train_data = datasets.MNIST('data', train=True, download=True, transform=transform)
# DataLoader 批处理 + 多线程
train_loader = DataLoader(train_data, batch_size=64, shuffle=True, num_workers=4)
1.4 训练与验证流程
#mermaid-svg-ZWu1btcu0HjQmZaS{font-family:\”trebuchet ms\”,verdana,arial,sans-serif;font-size:16px;fill:#333;}@keyframes edge-animation-frame{from{stroke-dashoffset:0;}}@keyframes dash{to{stroke-dashoffset:0;}}#mermaid-svg-ZWu1btcu0HjQmZaS .edge-animation-slow{stroke-dasharray:9,5!important;stroke-dashoffset:900;animation:dash 50s linear infinite;stroke-linecap:round;}#mermaid-svg-ZWu1btcu0HjQmZaS .edge-animation-fast{stroke-dasharray:9,5!important;stroke-dashoffset:900;animation:dash 20s linear infinite;stroke-linecap:round;}#mermaid-svg-ZWu1btcu0HjQmZaS .error-icon{fill:#552222;}#mermaid-svg-ZWu1btcu0HjQmZaS .error-text{fill:#552222;stroke:#552222;}#mermaid-svg-ZWu1btcu0HjQmZaS .edge-thickness-normal{stroke-width:1px;}#mermaid-svg-ZWu1btcu0HjQmZaS .edge-thickness-thick{stroke-width:3.5px;}#mermaid-svg-ZWu1btcu0HjQmZaS .edge-pattern-solid{stroke-dasharray:0;}#mermaid-svg-ZWu1btcu0HjQmZaS .edge-thickness-invisible{stroke-width:0;fill:none;}#mermaid-svg-ZWu1btcu0HjQmZaS .edge-pattern-dashed{stroke-dasharray:3;}#mermaid-svg-ZWu1btcu0HjQmZaS .edge-pattern-dotted{stroke-dasharray:2;}#mermaid-svg-ZWu1btcu0HjQmZaS .marker{fill:#333333;stroke:#333333;}#mermaid-svg-ZWu1btcu0HjQmZaS .marker.cross{stroke:#333333;}#mermaid-svg-ZWu1btcu0HjQmZaS svg{font-family:\”trebuchet ms\”,verdana,arial,sans-serif;font-size:16px;}#mermaid-svg-ZWu1btcu0HjQmZaS p{margin:0;}#mermaid-svg-ZWu1btcu0HjQmZaS .label{font-family:\”trebuchet ms\”,verdana,arial,sans-serif;color:#333;}#mermaid-svg-ZWu1btcu0HjQmZaS .cluster-label text{fill:#333;}#mermaid-svg-ZWu1btcu0HjQmZaS .cluster-label span{color:#333;}#mermaid-svg-ZWu1btcu0HjQmZaS .cluster-label span p{background-color:transparent;}#mermaid-svg-ZWu1btcu0HjQmZaS .label text,#mermaid-svg-ZWu1btcu0HjQmZaS span{fill:#333;color:#333;}#mermaid-svg-ZWu1btcu0HjQmZaS .node rect,#mermaid-svg-ZWu1btcu0HjQmZaS .node circle,#mermaid-svg-ZWu1btcu0HjQmZaS .node ellipse,#mermaid-svg-ZWu1btcu0HjQmZaS .node polygon,#mermaid-svg-ZWu1btcu0HjQmZaS .node path{fill:#ECECFF;stroke:#9370DB;stroke-width:1px;}#mermaid-svg-ZWu1btcu0HjQmZaS .rough-node .label text,#mermaid-svg-ZWu1btcu0HjQmZaS .node .label text,#mermaid-svg-ZWu1btcu0HjQmZaS .image-shape .label,#mermaid-svg-ZWu1btcu0HjQmZaS .icon-shape .label{text-anchor:middle;}#mermaid-svg-ZWu1btcu0HjQmZaS .node .katex path{fill:#000;stroke:#000;stroke-width:1px;}#mermaid-svg-ZWu1btcu0HjQmZaS .rough-node .label,#mermaid-svg-ZWu1btcu0HjQmZaS .node .label,#mermaid-svg-ZWu1btcu0HjQmZaS .image-shape .label,#mermaid-svg-ZWu1btcu0HjQmZaS .icon-shape .label{text-align:center;}#mermaid-svg-ZWu1btcu0HjQmZaS .node.clickable{cursor:pointer;}#mermaid-svg-ZWu1btcu0HjQmZaS .root .anchor path{fill:#333333!important;stroke-width:0;stroke:#333333;}#mermaid-svg-ZWu1btcu0HjQmZaS .arrowheadPath{fill:#333333;}#mermaid-svg-ZWu1btcu0HjQmZaS .edgePath .path{stroke:#333333;stroke-width:2.0px;}#mermaid-svg-ZWu1btcu0HjQmZaS .flowchart-link{stroke:#333333;fill:none;}#mermaid-svg-ZWu1btcu0HjQmZaS .edgeLabel{background-color:rgba(232,232,232, 0.8);text-align:center;}#mermaid-svg-ZWu1btcu0HjQmZaS .edgeLabel p{background-color:rgba(232,232,232, 0.8);}#mermaid-svg-ZWu1btcu0HjQmZaS .edgeLabel rect{opacity:0.5;background-color:rgba(232,232,232, 0.8);fill:rgba(232,232,232, 0.8);}#mermaid-svg-ZWu1btcu0HjQmZaS .labelBkg{background-color:rgba(232, 232, 232, 0.5);}#mermaid-svg-ZWu1btcu0HjQmZaS .cluster rect{fill:#ffffde;stroke:#aaaa33;stroke-width:1px;}#mermaid-svg-ZWu1btcu0HjQmZaS .cluster text{fill:#333;}#mermaid-svg-ZWu1btcu0HjQmZaS .cluster span{color:#333;}#mermaid-svg-ZWu1btcu0HjQmZaS div.mermaidTooltip{position:absolute;text-align:center;max-width:200px;padding:2px;font-family:\”trebuchet ms\”,verdana,arial,sans-serif;font-size:12px;background:hsl(80, 100%, 96.2745098039%);border:1px solid #aaaa33;border-radius:2px;pointer-events:none;z-index:100;}#mermaid-svg-ZWu1btcu0HjQmZaS .flowchartTitleText{text-anchor:middle;font-size:18px;fill:#333;}#mermaid-svg-ZWu1btcu0HjQmZaS rect.text{fill:none;stroke-width:0;}#mermaid-svg-ZWu1btcu0HjQmZaS .icon-shape,#mermaid-svg-ZWu1btcu0HjQmZaS .image-shape{background-color:rgba(232,232,232, 0.8);text-align:center;}#mermaid-svg-ZWu1btcu0HjQmZaS .icon-shape p,#mermaid-svg-ZWu1btcu0HjQmZaS .image-shape p{background-color:rgba(232,232,232, 0.8);padding:2px;}#mermaid-svg-ZWu1btcu0HjQmZaS .icon-shape rect,#mermaid-svg-ZWu1btcu0HjQmZaS .image-shape rect{opacity:0.5;background-color:rgba(232,232,232, 0.8);fill:rgba(232,232,232, 0.8);}#mermaid-svg-ZWu1btcu0HjQmZaS .label-icon{display:inline-block;height:1em;overflow:visible;vertical-align:-0.125em;}#mermaid-svg-ZWu1btcu0HjQmZaS .node .label-icon path{fill:currentColor;stroke:revert;stroke-width:revert;}#mermaid-svg-ZWu1btcu0HjQmZaS :root{–mermaid-font-family:\”trebuchet ms\”,verdana,arial,sans-serif;}
初始化模型/优化器/损失
for epoch in epochs
训练模式 model.train()
for batch in train_loader
前向传播 → loss
反向传播 optimizer.zero_grad(); loss.backward(); optimizer.step()
记录训练指标
验证模式 model.eval()
with torch.no_grad(): for batch in val_loader
计算验证 loss/acc
保存最佳模型
# 完整训练循环
model = CNN().to(device)
optimizer = torch.optim.Adam(model.parameters(), lr=1e-3)
criterion = nn.CrossEntropyLoss()
for epoch in range(10):
model.train()
for images, labels in train_loader:
images, labels = images.to(device), labels.to(device)
outputs = model(images)
loss = criterion(outputs, labels)
optimizer.zero_grad()
loss.backward()
optimizer.step()
# 验证
model.eval()
correct = 0
with torch.no_grad():
for images, labels in val_loader:
images, labels = images.to(device), labels.to(device)
outputs = model(images)
pred = outputs.argmax(dim=1)
correct += pred.eq(labels).sum().item()
acc = correct / len(val_loader.dataset)
print(f"Epoch {epoch}, Val Acc: {acc:.4f}")
二、TensorFlow / Keras 实战(完整标准化流程)
TensorFlow 以 生产部署友好 和 静态图优化 见长,Keras 提供简洁高级 API。以下是 工业级开发标准流程。
2.1 整体开发流程
2.2 分步详解(以 Fashion-MNIST 图像分类为例)
步骤 1️⃣:数据准备
import tensorflow as tf
from tensorflow.keras import datasets, layers, models
import numpy as np
# 加载数据
(x_train, y_train), (x_test, y_test) = datasets.fashion_mnist.load_data()
# 归一化到 [0,1]
x_train = x_train.astype('float32') / 255.0
x_test = x_test.astype('float32') / 255.0
# 添加通道维度 (28,28) → (28,28,1)
x_train = np.expand_dims(x_train, –1)
x_test = np.expand_dims(x_test, –1)
# 划分验证集(10%)
val_split = int(0.1 * len(x_train))
x_val = x_train[:val_split]
y_val = y_train[:val_split]
x_train = x_train[val_split:]
y_train = y_train[val_split:]
✅ 关键点:
- 图像需归一化(CNN 对尺度敏感)
- expand_dims 添加 channel 维度(Keras 要求 NHWC 格式)
步骤 2️⃣:模型构建
方式 A:Sequential API(简单线性模型)
model = models.Sequential([
layers.Conv2D(32, (3,3), activation='relu', input_shape=(28,28,1)),
layers.MaxPooling2D((2,2)),
layers.Conv2D(64, (3,3), activation='relu'),
layers.MaxPooling2D((2,2)),
layers.Flatten(),
layers.Dense(64, activation='relu'),
layers.Dense(10, activation='softmax')
])
方式 B:Functional API(支持复杂结构)
inputs = layers.Input(shape=(28,28,1))
x = layers.Conv2D(32, 3, activation='relu')(inputs)
x = layers.MaxPooling2D(2)(x)
x = layers.Conv2D(64, 3, activation='relu')(x)
x = layers.MaxPooling2D(2)(x)
x = layers.Flatten()(x)
x = layers.Dense(64, activation='relu')(x)
outputs = layers.Dense(10, activation='softmax')(x)
model = models.Model(inputs=inputs, outputs=outputs)
💡 何时用 Functional API?
- 多输入/多输出(如图像+文本)
- 残差连接(ResNet)
- 共享层
步骤 3️⃣:模型编译
model.compile(
optimizer='adam',
loss='sparse_categorical_crossentropy', # 标签为整数(0~9)
metrics=['accuracy']
)
⚠️ 注意损失函数选择:
- sparse_categorical_crossentropy:标签是整数
- categorical_crossentropy:标签是 one-hot 编码
步骤 4️⃣:模型训练(含回调)
from tensorflow.keras.callbacks import EarlyStopping, ModelCheckpoint
callbacks = [
EarlyStopping(monitor='val_loss', patience=3, verbose=1),
ModelCheckpoint('best_fashion_cnn.h5', save_best_only=True, verbose=1)
]
history = model.fit(
x_train, y_train,
batch_size=64,
epochs=20,
validation_data=(x_val, y_val),
callbacks=callbacks
)
✅ 回调函数作用:
- EarlyStopping:防止过拟合
- ModelCheckpoint:自动保存最佳模型
步骤 5️⃣:模型评估与可视化
# 评估测试集
test_loss, test_acc = model.evaluate(x_test, y_test, verbose=0)
print(f"Test Accuracy: {test_acc:.4f}")
# 可视化训练过程
import matplotlib.pyplot as plt
plt.plot(history.history['accuracy'], label='Train Acc')
plt.plot(history.history['val_accuracy'], label='Val Acc')
plt.xlabel('Epoch')
plt.ylabel('Accuracy')
plt.legend()
plt.show()
步骤 6️⃣:模型保存与部署
# 保存为 HDF5(轻量)
model.save('fashion_cnn.h5')
# 保存为 SavedModel(推荐,含完整计算图)
model.save('saved_model/fashion_cnn')
# 转 TFLite(移动端)
converter = tf.lite.TFLiteConverter.from_keras_model(model)
tflite_model = converter.convert()
with open('model.tflite', 'wb') as f:
f.write(tflite_model)
🌐 部署选项:
- 服务器:TensorFlow Serving
- 移动端:TensorFlow Lite
- Web:TensorFlow.js
- 嵌入式:TensorFlow Lite Micro
2.3 迁移学习实战(ImageNet 预训练)
# 加载 ResNet50(不含顶层)
base_model = tf.keras.applications.ResNet50(
weights='imagenet',
include_top=False,
input_shape=(224, 224, 3)
)
base_model.trainable = False # 冻结特征提取层
# 添加自定义分类头
model = models.Sequential([
base_model,
layers.GlobalAveragePooling2D(),
layers.Dropout(0.2),
layers.Dense(10, activation='softmax')
])
# 编译(小学习率)
model.compile(optimizer=tf.keras.optimizers.Adam(1e-4),
loss='sparse_categorical_crossentropy',
metrics=['accuracy'])
# 训练
model.fit(train_ds, validation_data=val_ds, epochs=10)
🔁 进阶技巧: 第一阶段冻结 backbone → 保存顶层; 第二阶段解冻部分层 → 微调(fine-tune)
三、经典项目实战
项目1:图像分类(MNIST / Fashion-MNIST)
PyTorch 实现(CNN)
class SimpleCNN(nn.Module):
def __init__(self):
super().__init__()
self.conv1 = nn.Conv2d(1, 32, 3, padding=1)
self.pool = nn.MaxPool2d(2)
self.fc1 = nn.Linear(32 * 14 * 14, 128)
self.fc2 = nn.Linear(128, 10)
def forward(self, x):
x = self.pool(torch.relu(self.conv1(x)))
x = x.view(–1, 32 * 14 * 14)
x = torch.relu(self.fc1(x))
x = self.fc2(x)
return x
📊 结果:准确率 > 98%(MNIST),> 90%(Fashion-MNIST)
项目2:文本情感分析(IMDB 电影评论)
方案A:LSTM(PyTorch)
class LSTMClassifier(nn.Module):
def __init__(self, vocab_size, embed_dim, hidden_dim):
super().__init__()
self.embedding = nn.Embedding(vocab_size, embed_dim)
self.lstm = nn.LSTM(embed_dim, hidden_dim, batch_first=True)
self.fc = nn.Linear(hidden_dim, 1)
def forward(self, x):
x = self.embedding(x)
_, (h_n, _) = self.lstm(x)
return self.fc(h_n[–1])
方案B:BERT(Hugging Face)
from transformers import BertTokenizer, BertForSequenceClassification
tokenizer = BertTokenizer.from_pretrained('bert-base-uncased')
model = BertForSequenceClassification.from_pretrained('bert-base-uncased', num_labels=2)
✅ 效果:BERT 准确率 ≈ 94%,LSTM ≈ 88%
项目3:图像生成(GAN)
DCGAN 生成 MNIST(PyTorch)
# 生成器
class Generator(nn.Module):
def __init__(self):
super().__init__()
self.model = nn.Sequential(
nn.Linear(100, 256),
nn.ReLU(),
nn.Linear(256, 784),
nn.Tanh()
)
def forward(self, z): return self.model(z)
# 判别器
class Discriminator(nn.Module):
def __init__(self):
super().__init__()
self.model = nn.Sequential(
nn.Linear(784, 256),
nn.LeakyReLU(0.2),
nn.Linear(256, 1),
nn.Sigmoid()
)
def forward(self, x): return self.model(x)
🖼️ 输出:可生成模糊但可辨的手写数字
项目4:文生图入门(Stable Diffusion)
⚠️ 需 GPU(≥8GB 显存)
from diffusers import StableDiffusionPipeline
import torch
pipe = StableDiffusionPipeline.from_pretrained(
"runwayml/stable-diffusion-v1-5",
torch_dtype=torch.float16
).to("cuda")
image = pipe("a cyberpunk cat wearing sunglasses").images[0]
image.save("cat.png")
#mermaid-svg-O8ywE0dfHrCDzoJm{font-family:\”trebuchet ms\”,verdana,arial,sans-serif;font-size:16px;fill:#333;}@keyframes edge-animation-frame{from{stroke-dashoffset:0;}}@keyframes dash{to{stroke-dashoffset:0;}}#mermaid-svg-O8ywE0dfHrCDzoJm .edge-animation-slow{stroke-dasharray:9,5!important;stroke-dashoffset:900;animation:dash 50s linear infinite;stroke-linecap:round;}#mermaid-svg-O8ywE0dfHrCDzoJm .edge-animation-fast{stroke-dasharray:9,5!important;stroke-dashoffset:900;animation:dash 20s linear infinite;stroke-linecap:round;}#mermaid-svg-O8ywE0dfHrCDzoJm .error-icon{fill:#552222;}#mermaid-svg-O8ywE0dfHrCDzoJm .error-text{fill:#552222;stroke:#552222;}#mermaid-svg-O8ywE0dfHrCDzoJm .edge-thickness-normal{stroke-width:1px;}#mermaid-svg-O8ywE0dfHrCDzoJm .edge-thickness-thick{stroke-width:3.5px;}#mermaid-svg-O8ywE0dfHrCDzoJm .edge-pattern-solid{stroke-dasharray:0;}#mermaid-svg-O8ywE0dfHrCDzoJm .edge-thickness-invisible{stroke-width:0;fill:none;}#mermaid-svg-O8ywE0dfHrCDzoJm .edge-pattern-dashed{stroke-dasharray:3;}#mermaid-svg-O8ywE0dfHrCDzoJm .edge-pattern-dotted{stroke-dasharray:2;}#mermaid-svg-O8ywE0dfHrCDzoJm .marker{fill:#333333;stroke:#333333;}#mermaid-svg-O8ywE0dfHrCDzoJm .marker.cross{stroke:#333333;}#mermaid-svg-O8ywE0dfHrCDzoJm svg{font-family:\”trebuchet ms\”,verdana,arial,sans-serif;font-size:16px;}#mermaid-svg-O8ywE0dfHrCDzoJm p{margin:0;}#mermaid-svg-O8ywE0dfHrCDzoJm .label{font-family:\”trebuchet ms\”,verdana,arial,sans-serif;color:#333;}#mermaid-svg-O8ywE0dfHrCDzoJm .cluster-label text{fill:#333;}#mermaid-svg-O8ywE0dfHrCDzoJm .cluster-label span{color:#333;}#mermaid-svg-O8ywE0dfHrCDzoJm .cluster-label span p{background-color:transparent;}#mermaid-svg-O8ywE0dfHrCDzoJm .label text,#mermaid-svg-O8ywE0dfHrCDzoJm span{fill:#333;color:#333;}#mermaid-svg-O8ywE0dfHrCDzoJm .node rect,#mermaid-svg-O8ywE0dfHrCDzoJm .node circle,#mermaid-svg-O8ywE0dfHrCDzoJm .node ellipse,#mermaid-svg-O8ywE0dfHrCDzoJm .node polygon,#mermaid-svg-O8ywE0dfHrCDzoJm .node path{fill:#ECECFF;stroke:#9370DB;stroke-width:1px;}#mermaid-svg-O8ywE0dfHrCDzoJm .rough-node .label text,#mermaid-svg-O8ywE0dfHrCDzoJm .node .label text,#mermaid-svg-O8ywE0dfHrCDzoJm .image-shape .label,#mermaid-svg-O8ywE0dfHrCDzoJm .icon-shape .label{text-anchor:middle;}#mermaid-svg-O8ywE0dfHrCDzoJm .node .katex path{fill:#000;stroke:#000;stroke-width:1px;}#mermaid-svg-O8ywE0dfHrCDzoJm .rough-node .label,#mermaid-svg-O8ywE0dfHrCDzoJm .node .label,#mermaid-svg-O8ywE0dfHrCDzoJm .image-shape .label,#mermaid-svg-O8ywE0dfHrCDzoJm .icon-shape .label{text-align:center;}#mermaid-svg-O8ywE0dfHrCDzoJm .node.clickable{cursor:pointer;}#mermaid-svg-O8ywE0dfHrCDzoJm .root .anchor path{fill:#333333!important;stroke-width:0;stroke:#333333;}#mermaid-svg-O8ywE0dfHrCDzoJm .arrowheadPath{fill:#333333;}#mermaid-svg-O8ywE0dfHrCDzoJm .edgePath .path{stroke:#333333;stroke-width:2.0px;}#mermaid-svg-O8ywE0dfHrCDzoJm .flowchart-link{stroke:#333333;fill:none;}#mermaid-svg-O8ywE0dfHrCDzoJm .edgeLabel{background-color:rgba(232,232,232, 0.8);text-align:center;}#mermaid-svg-O8ywE0dfHrCDzoJm .edgeLabel p{background-color:rgba(232,232,232, 0.8);}#mermaid-svg-O8ywE0dfHrCDzoJm .edgeLabel rect{opacity:0.5;background-color:rgba(232,232,232, 0.8);fill:rgba(232,232,232, 0.8);}#mermaid-svg-O8ywE0dfHrCDzoJm .labelBkg{background-color:rgba(232, 232, 232, 0.5);}#mermaid-svg-O8ywE0dfHrCDzoJm .cluster rect{fill:#ffffde;stroke:#aaaa33;stroke-width:1px;}#mermaid-svg-O8ywE0dfHrCDzoJm .cluster text{fill:#333;}#mermaid-svg-O8ywE0dfHrCDzoJm .cluster span{color:#333;}#mermaid-svg-O8ywE0dfHrCDzoJm div.mermaidTooltip{position:absolute;text-align:center;max-width:200px;padding:2px;font-family:\”trebuchet ms\”,verdana,arial,sans-serif;font-size:12px;background:hsl(80, 100%, 96.2745098039%);border:1px solid #aaaa33;border-radius:2px;pointer-events:none;z-index:100;}#mermaid-svg-O8ywE0dfHrCDzoJm .flowchartTitleText{text-anchor:middle;font-size:18px;fill:#333;}#mermaid-svg-O8ywE0dfHrCDzoJm rect.text{fill:none;stroke-width:0;}#mermaid-svg-O8ywE0dfHrCDzoJm .icon-shape,#mermaid-svg-O8ywE0dfHrCDzoJm .image-shape{background-color:rgba(232,232,232, 0.8);text-align:center;}#mermaid-svg-O8ywE0dfHrCDzoJm .icon-shape p,#mermaid-svg-O8ywE0dfHrCDzoJm .image-shape p{background-color:rgba(232,232,232, 0.8);padding:2px;}#mermaid-svg-O8ywE0dfHrCDzoJm .icon-shape rect,#mermaid-svg-O8ywE0dfHrCDzoJm .image-shape rect{opacity:0.5;background-color:rgba(232,232,232, 0.8);fill:rgba(232,232,232, 0.8);}#mermaid-svg-O8ywE0dfHrCDzoJm .label-icon{display:inline-block;height:1em;overflow:visible;vertical-align:-0.125em;}#mermaid-svg-O8ywE0dfHrCDzoJm .node .label-icon path{fill:currentColor;stroke:revert;stroke-width:revert;}#mermaid-svg-O8ywE0dfHrCDzoJm :root{–mermaid-font-family:\”trebuchet ms\”,verdana,arial,sans-serif;}
文本提示
CLIP Tokenizer
CLIP Text Encoder
文本嵌入
随机噪声
UNet
时间步
去噪 latent
VAE Decoder
生成图像
四、PyTorch vs TensorFlow 对比总结
| 易用性 | 动态图,调试方便 | 静态图(TF2 默认 eager),Keras 简洁 |
| 研究友好 | ✅ 极佳 | ⚠️ 一般 |
| 生产部署 | TorchScript, ONNX | ✅ TF Serving, TFLite, TF.js |
| 社区生态 | Hugging Face, Lightning | TF Hub, TFX |
| 分布式训练 | DeepSpeed, FSDP | TF Distributed Strategy |
🎯 选择建议:
- 学术研究 / 快速原型 → PyTorch
- 工业部署 / 移动端 → TensorFlow
五、总结
通过本章,掌握:
- ✅ PyTorch/TensorFlow 核心 API
- ✅ TensorFlow/Keras 工业级六步开发流程
- ✅ 四大经典任务完整实现
- ✅ 从数据加载到模型部署的全流程
🔚 结语: 深度学习不仅是算法,更是工程艺术。 愿你以理论为帆,以代码为桨,在 AI 的海洋中扬帆远航!
附录:环境配置建议
# PyTorch
pip install torch torchvision torchaudio
# TensorFlow
pip install tensorflow
# Hugging Face 生态
pip install transformers datasets accelerate diffusers``
资料关注
公众号:咚咚王 gitee:https://gitee.com/wy18585051844/ai_learning
《Python编程:从入门到实践》 《利用Python进行数据分析》 《算法导论中文第三版》 《概率论与数理统计(第四版) (盛骤) 》 《程序员的数学》 《线性代数应该这样学第3版》 《微积分和数学分析引论》 《(西瓜书)周志华-机器学习》 《TensorFlow机器学习实战指南》 《Sklearn与TensorFlow机器学习实用指南》 《模式识别(第四版)》 《深度学习 deep learning》伊恩·古德费洛著 花书 《Python深度学习第二版(中文版)【纯文本】 (登封大数据 (Francois Choliet)) (Z-Library)》 《深入浅出神经网络与深度学习+(迈克尔·尼尔森(Michael+Nielsen)》 《自然语言处理综论 第2版》 《Natural-Language-Processing-with-PyTorch》 《计算机视觉-算法与应用(中文版)》 《Learning OpenCV 4》 《AIGC:智能创作时代》杜雨+&+张孜铭 《AIGC原理与实践:零基础学大语言模型、扩散模型和多模态模型》 《从零构建大语言模型(中文版)》 《实战AI大模型》 《AI 3.0》