Ubuntu/Debian 搭建 Nginx RTMP 服务器全攻略
-
- 一. 安装依赖 (Ubuntu/Debian 系统)
- 二. 配置安装Nginx 安装 nginx-rtmp-module 模块
- 三. 实现 RTMP 推流的关键步骤:
-
- 配置文件结构解析
- 四. 启动Nginx时的权限问题
- 五. 安装配置 FFmpeg
- 六. 推流-拉流测试
-
- 使用 OBS Studio、FFmpeg 等工具推流到 Nginx 服务器:
- 使用 VLC 或其他 RTMP 客户端拉流:
- 七. 自启动Nginx
Nginx 本身并不原生支持 RTMP 推流功能。Nginx 是一个高性能的 HTTP 和反向代理服务器,默认情况下主要用于处理 HTTP请求。要实现 RTMP(实时消息传输协议)的推流和拉流功能,需要通过 第三方模块 扩展 Nginx 的能力。
RTMP 是一种用于低延迟实时音视频传输的协议,其处理逻辑与 HTTP 不同。Nginx 本身并未内置 RTMP 协议的支持,因此需要通过nginx-rtmp-module 这样的第三方模块来实现 RTMP 功能。
一. 安装依赖 (Ubuntu/Debian 系统)
# 安装 GCC、G++ 和编译 Nginx 所需的依赖库
sudo apt update
sudo apt install -y build-essential gcc g++ make
gcc –version
g++ –version
sudo apt install -y libpcre3 libpcre3-dev
sudo apt install -y openssl libssl-dev
sudo apt install -y zlib1g zlib1g-dev
二. 配置安装Nginx 安装 nginx-rtmp-module 模块
# 下载 Nginx 源码和模块源码
wget https://nginx.org/download/nginx-1.26.0.tar.gz
wget https://github.com/arut/nginx-rtmp-module/archive/refs/tags/v1.2.2.tar.gz
# 解压源码
tar -zxvf nginx-1.26.0.tar.gz
tar -zxvf v1.2.2.tar.gz
# 进入 Nginx 源码目录,配置编译选项
cd nginx-1.26.0
./configure –add-module=../nginx-rtmp-module-1.2.2 –with-http_ssl_module
# 编译并安装 Nginx
# 在配置成功后,需要执行以下命令完成编译和安装:
make
sudo make install
Configuration summary
+ using system PCRE library
+ using system OpenSSL library
+ using system zlib library
nginx path prefix: "/usr/local/nginx"
nginx binary file: "/usr/local/nginx/sbin/nginx"
nginx modules path: "/usr/local/nginx/modules"
nginx configuration prefix: "/usr/local/nginx/conf"
nginx configuration file: "/usr/local/nginx/conf/nginx.conf"
nginx pid file: "/usr/local/nginx/logs/nginx.pid"
nginx error log file: "/usr/local/nginx/logs/error.log"
nginx http access log file: "/usr/local/nginx/logs/access.log"
nginx http client request body temporary files: "client_body_temp"
nginx http proxy temporary files: "proxy_temp"
nginx http fastcgi temporary files: "fastcgi_temp"
nginx http uwsgi temporary files: "uwsgi_temp"
nginx http scgi temporary files: "scgi_temp"
依赖库已正确使用: PCRE、OpenSSL、zlib 三个依赖库均使用系统自带版本(using system)。 Nginx 安装路径: 安装目录为 /usr/local/nginx,包含二进制文件、配置文件、日志目录等。
/usr/local/nginx/sbin/nginx -V
# 输出信息
wlj@wlj-virtual:~$ /usr/local/nginx/sbin/nginx -V
nginx version: nginx/1.26.0
built by gcc 11.4.0 (Ubuntu 11.4.0-1ubuntu1~22.04)
built with OpenSSL 3.0.2 15 Mar 2022
TLS SNI support enabled
configure arguments: –add-module=../nginx-rtmp-module-1.2.2
三. 实现 RTMP 推流的关键步骤:
#user nobody;
worker_processes 1;
#error_log logs/error.log;
#error_log logs/error.log notice;
#error_log logs/error.log info;
#pid logs/nginx.pid;
events {
worker_connections 1024;
}
rtmp {
server {
listen 1935; # RTMP 默认端口
chunk_size 4096;
application live {
live on; # 开启直播模式
hls on; # 启用 HLS 切片
hls_path /usr/local/nginx/html/hls; # HLS 文件存储路径
hls_fragment 4s; # HLS 分片时长
}
}
}
http {
include mime.types;
default_type application/octet-stream;
#log_format main '$remote_addr – $remote_user [$time_local] "$request" '
# '$status $body_bytes_sent "$http_referer" '
# '"$http_user_agent" "$http_x_forwarded_for"';
#access_log logs/access.log main;
sendfile on;
#tcp_nopush on;
#keepalive_timeout 0;
keepalive_timeout 65;
#gzip on;
server {
listen 80;
server_name localhost;
#charset koi8-r;
#access_log logs/host.access.log main;
location / {
root html;
index index.html index.htm;
}
#error_page 404 /404.html;
# redirect server error pages to the static page /50x.html
#
error_page 500 502 503 504 /50x.html;
location = /50x.html {
root html;
}
location /hls {
types { # HLS 文件类型映射
application/vnd.apple.mpegurl m3u8;
video/mp2t ts;
}
add_header Cache-Control no-cache;
add_header Access-Control-Allow-Origin *;
root /usr/local/nginx/html; # HLS 文件访问路径
}
# proxy the PHP scripts to Apache listening on 127.0.0.1:80
#
#location ~ \\.php$ {
# proxy_pass http://127.0.0.1;
#}
# pass the PHP scripts to FastCGI server listening on 127.0.0.1:9000
#
#location ~ \\.php$ {
# root html;
# fastcgi_pass 127.0.0.1:9000;
# fastcgi_index index.php;
# fastcgi_param SCRIPT_FILENAME /scripts$fastcgi_script_name;
# include fastcgi_params;
#}
# deny access to .htaccess files, if Apache's document root
# concurs with nginx's one
#
#location ~ /\\.ht {
# deny all;
#}
}
# another virtual host using mix of IP-, name-, and port-based configuration
#
#server {
# listen 8000;
# listen somename:8080;
# server_name somename alias another.alias;
# location / {
# root html;
# index index.html index.htm;
# }
#}
# HTTPS server
#
#server {
# listen 443 ssl;
# server_name localhost;
# ssl_certificate cert.pem;
# ssl_certificate_key cert.key;
# ssl_session_cache shared:SSL:1m;
# ssl_session_timeout 5m;
# ssl_ciphers HIGH:!aNULL:!MD5;
# ssl_prefer_server_ciphers on;
# location / {
# root html;
# index index.html index.htm;
# }
#}
}
配置文件结构解析
RTMP 模块配置
rtmp {
server {
listen 1935; # 监听 RTMP 默认端口
chunk_size 4096;
application live {
live on; # 开启直播模式
hls on; # 启用 HLS 切片
hls_path /usr/local/nginx/html/hls; # HLS 文件存储路径
hls_fragment 4s; # HLS 分片时长
}
}
}
作用:该模块配置 RTMP 服务器,监听 1935 端口,并支持:
- 推流地址:rtmp://<服务器IP>/live/<stream_key>
- HLS 拉流地址:http://<服务器IP>/hls/<stream_key>.m3u8
HTTP 模块配置
http {
...
server {
listen 80;
...
location /hls {
types {
application/vnd.apple.mpegurl m3u8;
video/mp2t ts;
}
add_header Cache-Control no-cache;
add_header Access-Control-Allow-Origin *;
root /usr/local/nginx/html; # HLS 文件访问路径
}
}
}
作用:该模块配置 HTTP 服务器,支持通过 HTTP 提供 HLS 流媒体文件(.m3u8 和 .ts 文件)。
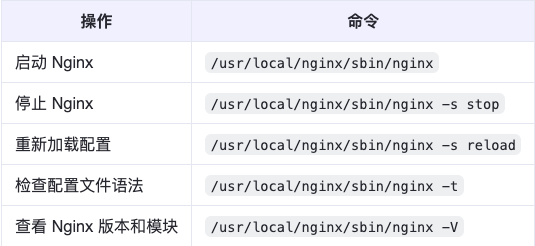
sudo /usr/local/nginx/sbin/nginx
sudo /usr/local/nginx/sbin/nginx -s reload # 如果已运行
# 进入 Nginx 安装目录(默认路径)
# 启动 Nginx
sudo /usr/local/nginx/sbin/nginx # 直接启动
 4. 检查进程是否启动
ps -elf | grep nginx
wlj@wlj-virtual:/usr/local/nginx/conf$ ps -elf | grep nginx
1 S root 4192 1486 0 80 0 – 4372 – 13:51 ? 00:00:00 nginx: master process /usr/local/nginx/sbin/nginx
5 S nobody 35561 4192 0 80 0 – 4622 – 17:06 ? 00:00:00 nginx: worker process
5 S nobody 35562 4192 0 80 0 – 4495 – 17:06 ? 00:00:00 nginx: cache manager process
0 S wlj 36211 35420 0 80 0 – 3075 pipe_r 17:15 pts/3 00:00:00 grep –color=auto nginx
四. 启动Nginx时的权限问题
权限问题(open() “/usr/local/nginx/logs/error.log” failed (13: Permission denied))
需要配置权限问题,否则将导致Nginx无法访问HLS文件,调整logs文件目录的权限或所有权,因此需要解决权限问题:
whereis nginx
sudo /usr/local/nginx/sbin/nginx -t
输出:
nginx: the configuration file /usr/local/nginx/conf/nginx.conf syntax is ok
nginx: configuration file /usr/local/nginx/conf/nginx.conf test is successful
PID 文件配置: 确保 nginx.conf 中有 pid 指令:
pid /usr/local/nginx/logs/nginx.pid;
如无则添加,并创建目录:
sudo mkdir -p /usr/local/nginx/logs
ps -elf | grep nginx
wlj@wlj-virtual:/usr/local/nginx/conf$ ps -elf | grep nginx
1 S root 4192 1486 0 80 0 – 4372 – 13:51 ? 00:00:00 nginx: master process /usr/local/nginx/sbin/nginx
5 S nobody 35561 4192 0 80 0 – 4622 – 17:06 ? 00:00:00 nginx: worker process
5 S nobody 35562 4192 0 80 0 – 4495 – 17:06 ? 00:00:00 nginx: cache manager process
0 S wlj 36211 35420 0 80 0 – 3075 pipe_r 17:15 pts/3 00:00:00 grep –color=auto nginx
sudo chown -R nobody:nogroup /usr/local/nginx/html/hls
sudo chmod -R 755 /usr/local/nginx/html/hls
sudo chmod -R 755 /usr/local/nginx/logs
五. 安装配置 FFmpeg
- 推荐使用nasm,因为FFmpeg的新特性可能依赖新指令集,且nasm有更好的维护。
- 如果系统非常旧,yasm可能更容易安装到旧版本,但新系统建议nasm。
sudo apt install nasm # 推荐
sudo apt install yasm
nasm –version # 应输出类似 "NASM version 2.15.05"
yasm –version # 可选,应输出类似 "yasm 1.3.0"
sudo apt install pkg-config
/* Download ffmpeg */
tar -zxvf ffmpeg-4.3.2.tar.gz
./configure –enable-shared
make -j4
sudo make install
ffmpeg -version
sudo ldconfig
wlj@wlj-virtual:~/Desktop/FFmpeg-n4.3.2$ ffmpeg -version
ffmpeg version 4.3.2 Copyright (c) 2000-2021 the FFmpeg developers
built with gcc 11 (Ubuntu 11.4.0-1ubuntu1~22.04)
configuration: –enable-shared
libavutil 56. 51.100 / 56. 51.100
libavcodec 58. 91.100 / 58. 91.100
libavformat 58. 45.100 / 58. 45.100
libavdevice 58. 10.100 / 58. 10.100
libavfilter 7. 85.100 / 7. 85.100
libswscale 5. 7.100 / 5. 7.100
libswresample 3. 7.100 / 3. 7.100
六. 推流-拉流测试
- 启动 Nginx:
sudo /usr/local/nginx/sbin/nginx
- 检查防火墙:
sudo ufw status
sudo ufw allow 1935
验证 RTMP 服务是否正常 检查端口监听:
netstat -tuln | grep 1935
查看 Nginx 日志:
tail -f /var/log/nginx/error.log
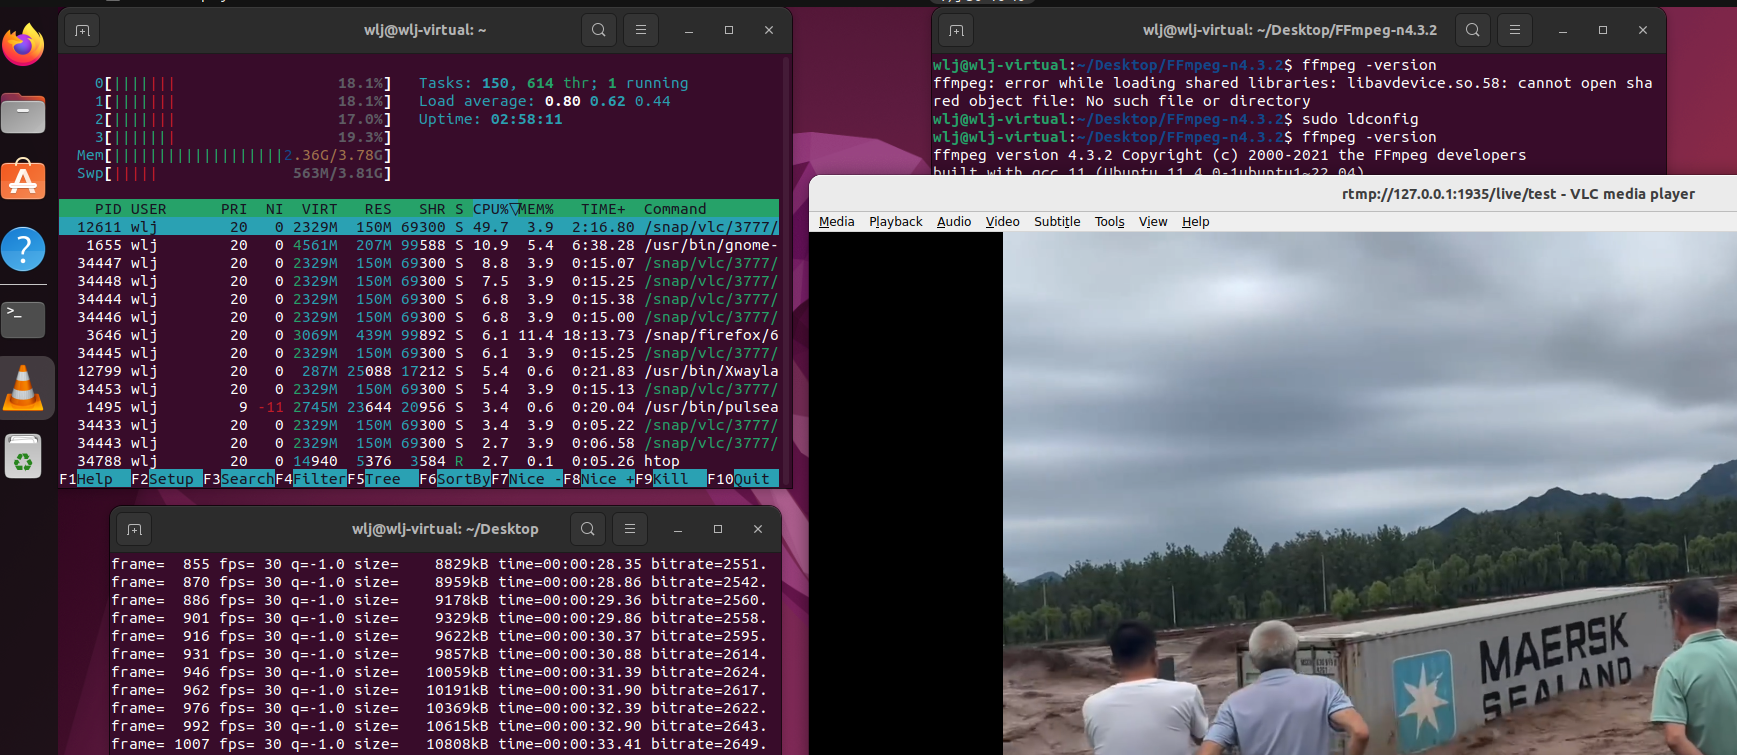
使用 OBS Studio、FFmpeg 等工具推流到 Nginx 服务器:
rtmp://127.0.0.1:1935/live/test
ffmpeg -re -i input.mp4 -c copy -f flv rtmp://127.0.0.1:1935/live/test
ffmpeg -re -f h264 -i input.h264 -c:v copy -an -f flv rtmp://127.0.0.1:1935/live/test
- -re 按照原始帧率读取输入文件(模拟实时流速度),直播推流必须添加
- -c copy 直接复制视频和音频流,不重新编码(要求MP4内的编码是RTMP兼容的H.264+AAC)
- -c:v copy: 直接复制视频流,不重新编码。
- -f flv 强制输出为FLV格式(RTMP协议的标准容器格式)
- -f h264: 强制指定输入格式为原始H.264流(关键参数)。
- -an: 禁用音频(输入文件无音频)。
循环推流(持续直播):
ffmpeg -re -stream_loop -1 -i input.mp4 -c copy -f flv rtmp://127.0.0.1:1935/live/test
待 5-10 秒,让 Nginx 生成 .m3u8 和 .ts 文件。 访问 HLS 文件: 浏览器或 VLC 播放:
- 本地测试:使用 127.0.0.1 或局域网 IP。
- 远程服务器:使用公网 IP。
- 推流地址格式:rtmp://:<端口>/live/<流名>
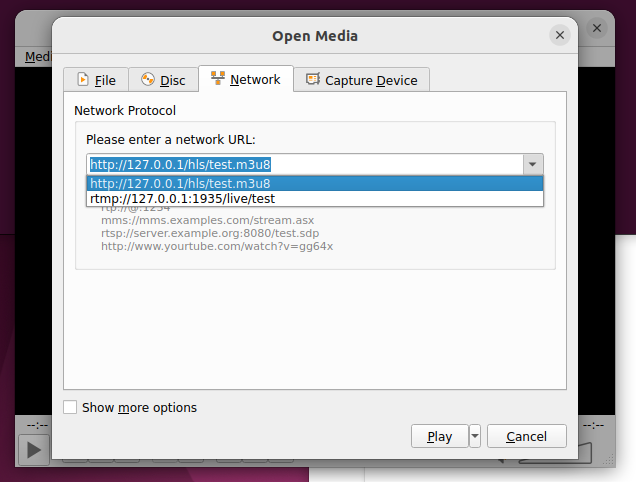
使用 VLC 或其他 RTMP 客户端拉流:
rtmp://127.0.0.1:1935/live/test
http://127.0.0.1/hls/test.m3u8

- 关键点:确保 Nginx 正确加载 RTMP 模块,配置路径和权限正确,防火墙开放必要端口。
- 验证步骤:推流 → 检查 HLS 文件 → 拉流测试 → 查看统计页面。
- 扩展功能:可通过添加 HTTPS、限制连接数、配置负载均衡等进一步优化。
七. 自启动Nginx
要实现 Nginx 自动启动,可以根据您的操作系统选择不同的方法。以下是 Linux(基于 Systemd)的详细步骤:
Linux 系统(基于 Systemd)创建 Systemd 服务文件
创建一个 Nginx 的 Systemd 服务配置文件:
sudo vim /etc/systemd/systm/nginx.service
[Unit]
Description=Nginx Web Server
After=network.target
[Service]
Type=forking
PIDFile=/usr/local/nginx/logs/nginx.pid
ExecStartPre=/usr/local/nginx/sbin/nginx -t
ExecStart=/usr/local/nginx/sbin/nginx
ExecReload=/usr/local/nginx/sbin/nginx -s reload
ExecStop=/usr/local/nginx/sbin/nginx -s quit
PrivateTmp=true
[Install]
WantedBy=multi-user.target
# 重新加载 Systemd 配置
sudo systemctl daemon-reload
# 启动并启用 Nginx 自启动
sudo systemctl start nginx
sudo systemctl enable nginx
# 验证自启动状态
sudo systemctl is-enabled nginx # 应返回 "enabled"
检查 Nginx 状态
sudo systemctl status nginx
扩展功能建议
openssl req -x509 -nodes -days 365 -newkey 2048 -keyout /usr/local/nginx/conf/server.key -out /usr/local/nginx/conf/server.crt
server {
listen 443 ssl;
server_name example.com;
ssl_certificate /usr/local/nginx/conf/server.crt;
ssl_certificate_key /usr/local/nginx/conf/server.key;
...
}