🦀 ZeroClaw Reflex UI
完整搭建流程
ZeroClaw Gateway + LM Studio + Reflex 本地 AI 管理面板
2026 年 2 月
相似项目部署参考:
【OpenClaw 本地实战 Ep.1】抛弃 Ollama?转向 LM Studio!Windows 下用 NVIDIA 显卡搭建 OpenClaw 本地极速推理服务
【OpenClaw 本地实战 Ep.2】零代码对接:使用交互式向导快速连接本地 LM Studio 用 CUDA GPU 推理
【OpenClaw 本地实战 Ep.3】突破瓶颈:强制修改 openclaw.json 解锁 32k 上下文记忆
【OpenClaw 本地实战 Ep.4】终极提效:一劳永逸解决切换浏览器 Token 鉴权失败与断连问题
前言:为什么要给 ZeroClaw 做 Web UI?
ZeroClaw 是一个用 Rust 编写的高性能本地 AI 网关工具,设计目标是速度快、体积小、无依赖。但它本身只有命令行界面(CLI),每次使用都需要手动输入命令,管理起来不够直观。
ZeroClaw
https://github.com/zeroclaw-labs/zeroclaw
本文记录了从零开始,用 Python Reflex 框架 为 ZeroClaw 打造一个现代化 Web 管理面板的完整过程,包括踩过的所有坑和最终解决方案。
Python Reflex 框架
GitHub – reflex-dev/reflex: ️ Web apps in pure Python
reflex · PyPI
|
💡 ZeroClaw 架构:用户 → ZeroClaw Gateway (127.0.0.1:8080) → LM Studio API → 本地大模型 |
技术栈
|
组件 |
说明 |
|
ZeroClaw |
Rust 编写的本地 AI 网关,提供 /webhook HTTP 接口 |
|
LM Studio |
本地大模型运行环境,提供 OpenAI 兼容 API |
|
Reflex |
Python 全栈 Web 框架,前后端均用 Python 编写 |
|
llama.cpp |
底层推理引擎(可选) |
第一步:环境准备
1.1 安装依赖
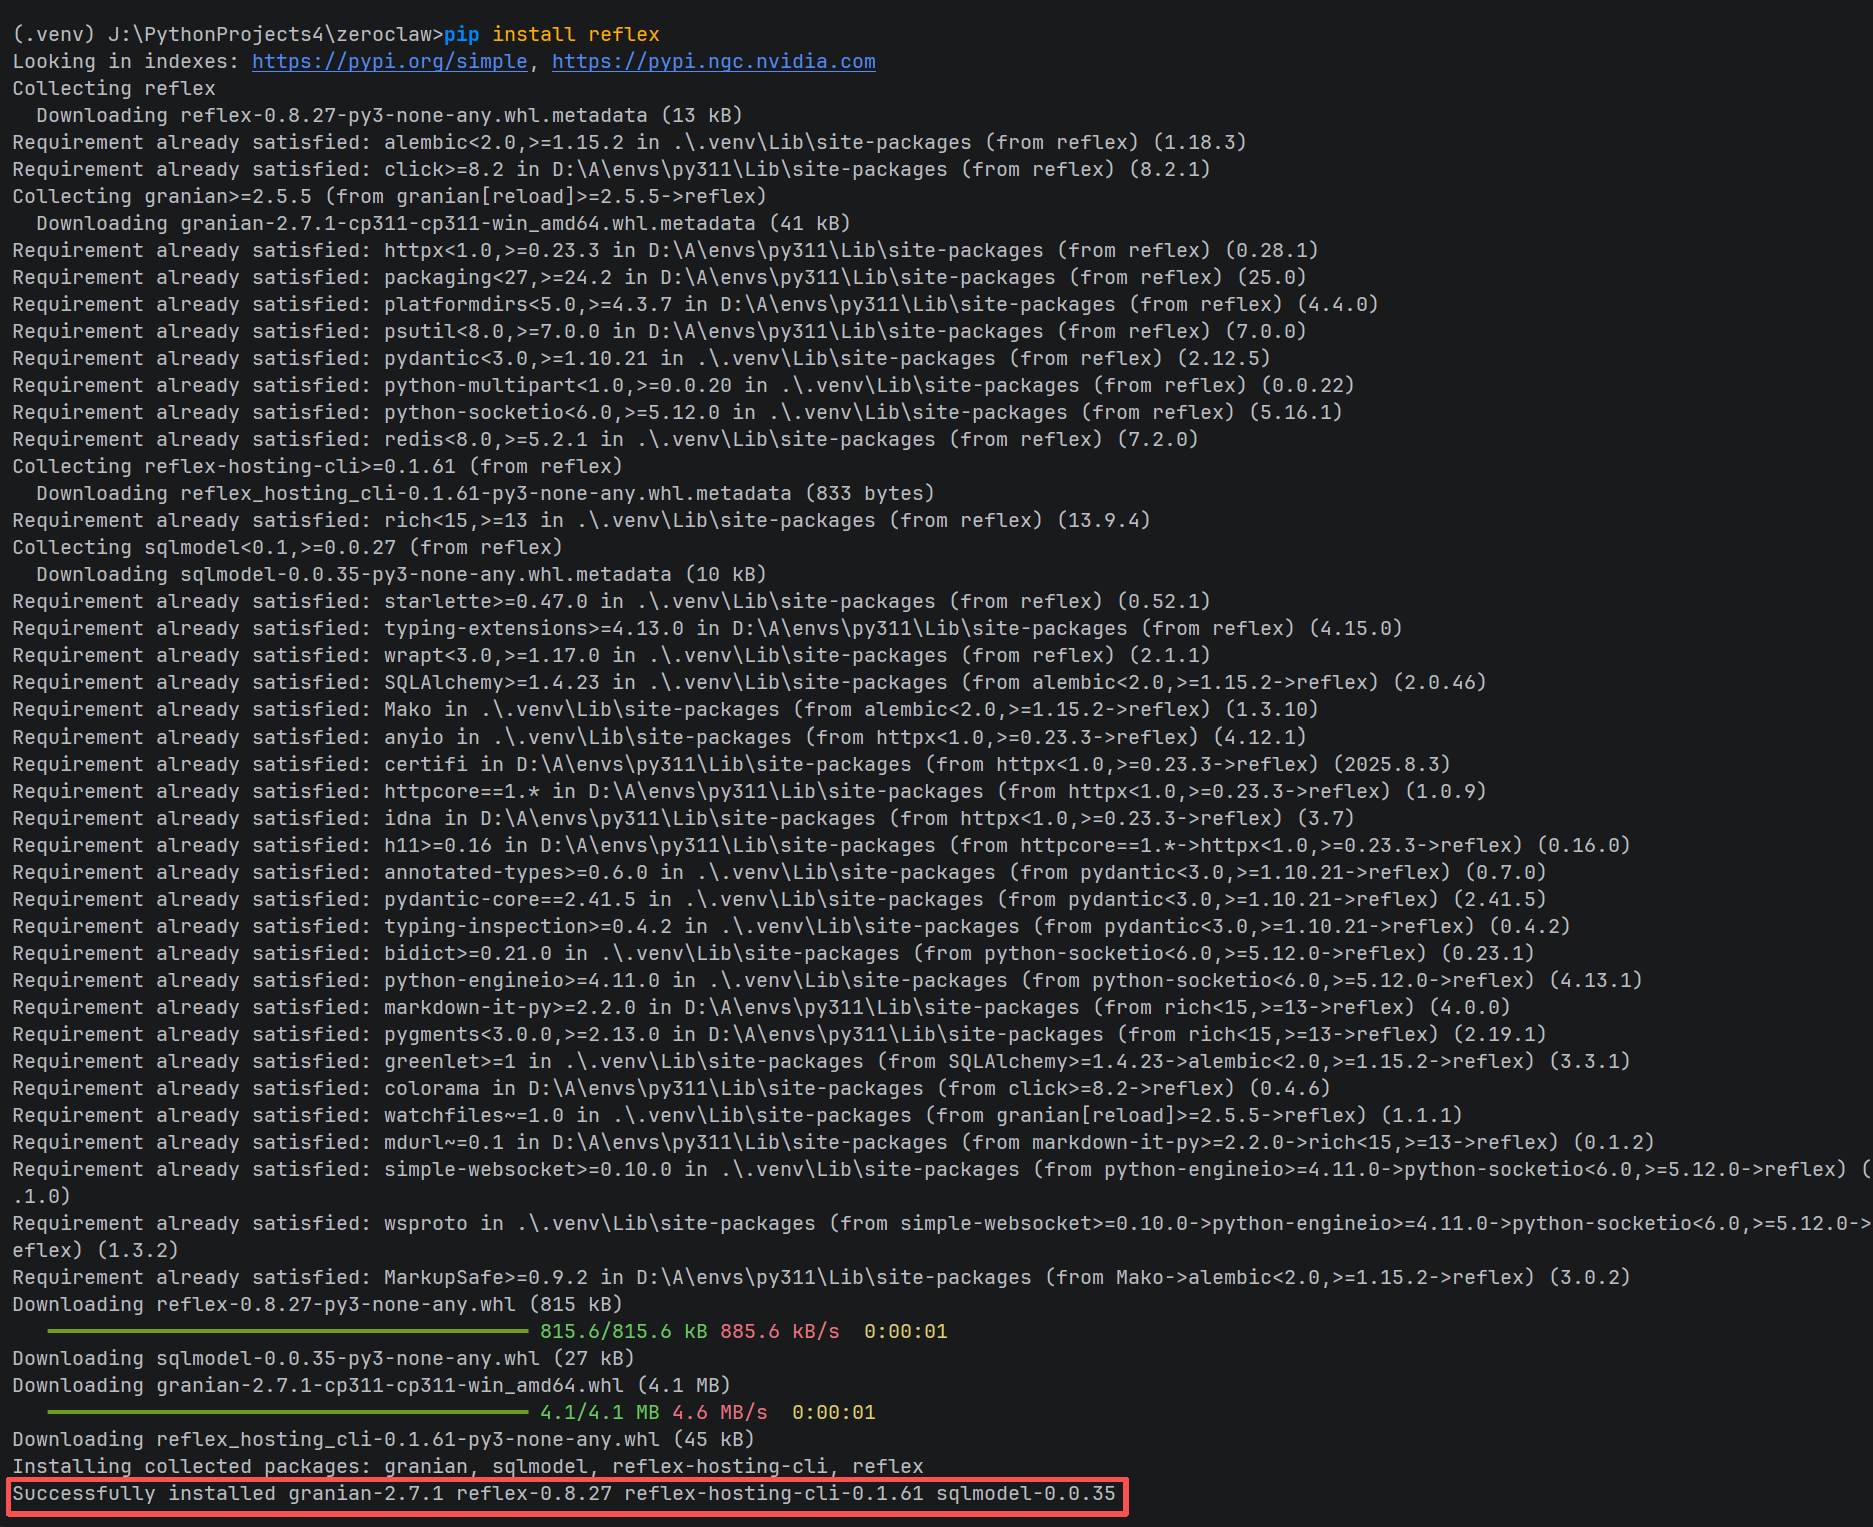
在 ZeroClaw 项目根目录,激活虚拟环境后安装所需 Python 包:
|
# 激活虚拟环境(Windows PowerShell) .venv\\Scripts\\Activate.ps1
# 安装依赖 pip install reflex psutil python-dotenv requests pywin32 |

1.2 初始化 Reflex 项目
|
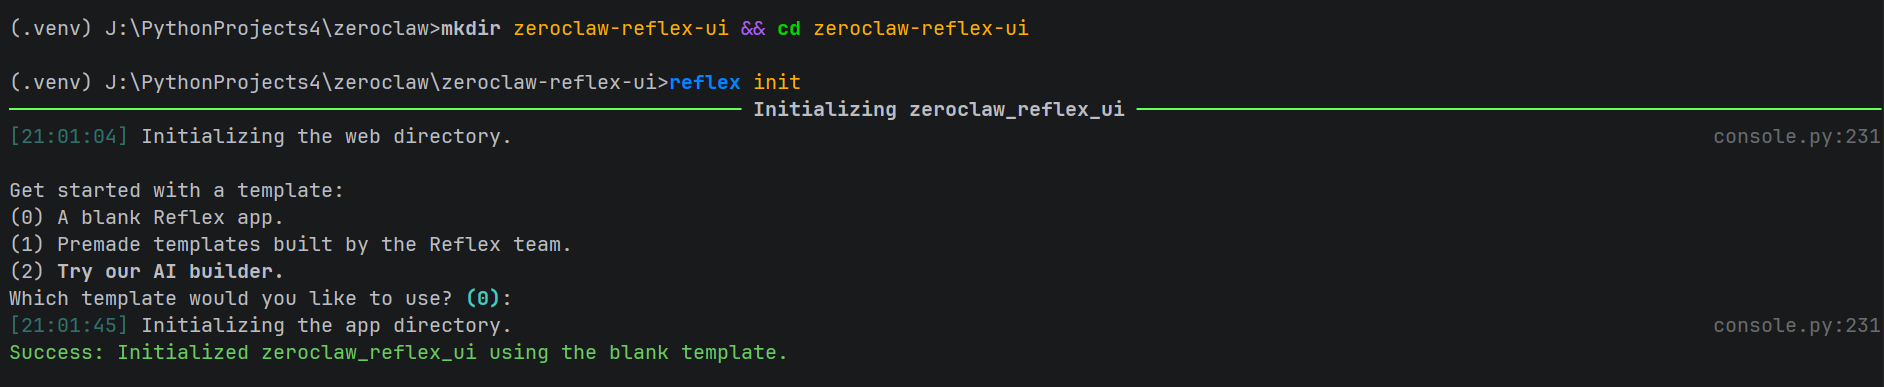
mkdir zeroclaw-reflex-ui cd zeroclaw-reflex-ui reflex init # 选择模板 0(空白) |
|
⚠️ Reflex init 会生成同名的 Python 包目录和入口文件,注意不要覆盖错位置。 |
1.3 放置主文件
将我们编写的 zeroclaw_reflex_ui.py 覆盖到 Reflex 自动生成的同名文件:
|
# Windows 命令 move zeroclaw_reflex_ui.py zeroclaw_reflex_ui\\ # 提示覆盖时选 Yes(Y) |
zeroclaw_reflex_ui.py 完整内容示例:
import re
import time
import tomllib
import reflex as rx
import requests
import subprocess
import os
import threading
from dotenv import load_dotenv
from typing import Dict, List, Optional
# 过滤 ANSI 终端控制码(颜色、粗体、日志前缀等)
_ANSI_ESCAPE = re.compile(r'\\x1b\\[[0-9;]*[a-zA-Z]|\\x1b\\][^\\x07]*\\x07')
load_dotenv(".env")
# ZeroClaw 网关地址(固定,由 zeroclaw gateway 命令启动)
GATEWAY_URL = "http://127.0.0.1:8080"
ZEROCLAW_PATH = "J:\\\\PythonProjects4\\\\zeroclaw\\\\target\\\\release\\\\zeroclaw.exe"
ZEROCLAW_CONFIG = os.path.expanduser("~\\\\.zeroclaw\\\\config.toml")
# 全局持有网关进程(跨请求共享)
_gateway_process: Optional[subprocess.Popen] = None
_gateway_lock = threading.Lock()
def _start_gateway_process(lm_url: str, lm_key: str, model: str) -> subprocess.Popen:
"""在后台启动 zeroclaw gateway 进程"""
env = os.environ.copy()
env["OPENAI_API_BASE"] = lm_url
env["OPENAI_BASE_URL"] = lm_url
env["OPENAI_API_KEY"] = lm_key
env["LM_STUDIO_API_URL"] = lm_url
env["LM_STUDIO_API_KEY"] = lm_key
env["MODEL_ID"] = model
proc = subprocess.Popen(
[ZEROCLAW_PATH, "gateway"],
env=env,
stdout=subprocess.PIPE,
stderr=subprocess.PIPE,
creationflags=subprocess.CREATE_NEW_PROCESS_GROUP # Windows:独立进程组,方便终止
)
return proc
def _check_gateway_alive() -> bool:
"""检查网关是否响应"""
try:
r = requests.get(f"{GATEWAY_URL}/health", timeout=2)
return r.status_code == 200
except Exception:
return False
class State(rx.State):
# LM Studio 配置
lm_studio_api_url: str = os.getenv("LM_STUDIO_API_URL", "http://127.0.0.1:1234/v1")
lm_studio_api_key: str = os.getenv("LM_STUDIO_API_KEY", "sk-local-lmstudio-2026-zeroclaw")
model_id: str = os.getenv("MODEL_ID", "")
models: List[str] = []
# 对话状态
user_message: str = ""
system_prompt: str = "你是一个本地运行的 AI 助手,基于开源大模型。请不要声称自己是 ChatGPT 或 GPT-4。"
chat_history: List[Dict[str, str]] = []
is_loading: bool = False
# 系统状态
gpu_usage: str = "检测中…"
lm_studio_status: str = "未连接"
gateway_status: str = "未启动"
zeroclaw_bin_status: str = "未检测"
# ————————–
# Setters
# ————————–
def set_lm_studio_api_url(self, value: str):
self.lm_studio_api_url = value
def set_lm_studio_api_key(self, value: str):
self.lm_studio_api_key = value
def set_model_id(self, value: str):
self.model_id = value
def set_user_message(self, value: str):
self.user_message = value
def set_system_prompt(self, value: str):
self.system_prompt = value
def handle_form_submit(self, form_data: dict):
yield State.send_message
# ————————–
# System Prompt 配置文件读写
# ————————–
def load_system_prompt_from_config(self):
"""从 config.toml 读取 system_prompt 字段"""
try:
with open(ZEROCLAW_CONFIG, "rb") as f:
config = tomllib.load(f)
self.system_prompt = config.get("system_prompt", self.system_prompt)
except Exception:
pass # 文件不存在或解析失败时保留当前值
def save_system_prompt_to_config(self):
"""将 system_prompt 写入 config.toml,然后重启网关生效"""
try:
# 读取原始文件内容(保留格式和注释)
with open(ZEROCLAW_CONFIG, "r", encoding="utf-8") as f:
content = f.read()
escaped = self.system_prompt.replace("\\\\", "\\\\\\\\").replace('"', '\\\\"')
new_line = f'system_prompt = "{escaped}"'
if re.search(r'^system_prompt\\s*=', content, re.MULTILINE):
# 替换已有的 system_prompt 行
content = re.sub(
r'^system_prompt\\s*=.*$',
new_line,
content,
flags=re.MULTILINE
)
else:
# 插入到文件顶部(第一个 [section] 之前)
content = new_line + "\\n" + content
with open(ZEROCLAW_CONFIG, "w", encoding="utf-8") as f:
f.write(content)
# 保存成功后重启网关使其生效
yield State.stop_gateway
yield State.start_gateway
yield rx.toast.success("System Prompt 已保存,网关已重启!")
except Exception as e:
yield rx.toast.error(f"保存失败:{str(e)}")
# ————————–
# 网关管理
# ————————–
def start_gateway(self):
"""启动 ZeroClaw 网关"""
global _gateway_process
with _gateway_lock:
if _check_gateway_alive():
self.gateway_status = "✅ 运行中"
return rx.toast.info("网关已在运行中!")
if _gateway_process and _gateway_process.poll() is None:
_gateway_process.kill()
try:
_gateway_process = _start_gateway_process(
self.lm_studio_api_url,
self.lm_studio_api_key,
self.model_id
)
for _ in range(6):
time.sleep(0.5)
if _check_gateway_alive():
self.gateway_status = "✅ 运行中"
return rx.toast.success("网关启动成功!")
self.gateway_status = "⚠️ 启动超时"
return rx.toast.error("网关启动超时,请检查路径和配置")
except FileNotFoundError:
self.gateway_status = "❌ 找不到 zeroclaw.exe"
return rx.toast.error(f"找不到:{ZEROCLAW_PATH}")
except Exception as e:
self.gateway_status = f"❌ 异常"
return rx.toast.error(f"启动失败:{str(e)}")
def stop_gateway(self):
"""停止 ZeroClaw 网关"""
global _gateway_process
with _gateway_lock:
if _gateway_process and _gateway_process.poll() is None:
_gateway_process.kill()
_gateway_process = None
self.gateway_status = "⛔ 已停止"
return rx.toast.success("网关已停止")
else:
self.gateway_status = "⛔ 未运行"
return rx.toast.info("网关当前未运行")
# ————————–
# LM Studio
# ————————–
def fetch_lm_studio_models(self):
"""获取 LM Studio 可用模型列表"""
try:
response = requests.get(
f"{self.lm_studio_api_url}/models",
headers={"Authorization": f"Bearer {self.lm_studio_api_key}"},
timeout=5
)
if response.status_code == 200:
data = response.json()
self.models = [model["id"] for model in data.get("data", [])]
self.lm_studio_status = "✅ 已连接"
if not self.model_id and self.models:
self.model_id = self.models[0]
else:
self.lm_studio_status = f"❌ 失败({response.status_code})"
self.models = []
except Exception:
self.lm_studio_status = "❌ 连接异常"
self.models = []
def save_config(self):
"""保存配置到 .env"""
with open(".env", "w") as f:
f.write(f'LM_STUDIO_API_URL="{self.lm_studio_api_url}"\\n')
f.write(f'LM_STUDIO_API_KEY="{self.lm_studio_api_key}"\\n')
f.write(f'MODEL_ID="{self.model_id}"\\n')
return rx.toast.success("配置已保存!")
# ————————–
# 对话:直接 POST 到网关 /webhook
# ————————–
def send_message(self):
"""通过 ZeroClaw 网关 /webhook 发送消息"""
if not self.user_message.strip():
return rx.toast.error("请输入消息!")
if not _check_gateway_alive():
return rx.toast.error("网关未启动!请先点击「▶ 启动网关」")
user_text = self.user_message
self.chat_history.append({"role": "user", "content": user_text})
self.is_loading = True
self.user_message = ""
yield # 立即刷新 UI
try:
response = requests.post(
f"{GATEWAY_URL}/webhook",
json={"message": user_text, "system_prompt": self.system_prompt},
timeout=120
)
if response.status_code == 200:
data = response.json()
if isinstance(data, dict):
raw = (
data.get("response") # ZeroClaw 网关实际返回字段
or data.get("reply")
or data.get("message")
or data.get("content")
or str(data)
)
else:
raw = str(data)
# 去除 ANSI 控制码
clean = _ANSI_ESCAPE.sub("", raw)
# 去除 zeroclaw 日志行(以时间戳或 INFO/WARN 开头的行)
lines = clean.splitlines()
reply_lines = [
ln for ln in lines
if not re.match(r'^\\s*(INFO|WARN|ERROR|DEBUG|\\d{4}-\\d{2}-\\d{2})', ln)
]
reply = "\\n".join(reply_lines).strip() or clean.strip()
self.chat_history.append({"role": "assistant", "content": reply})
else:
self.chat_history.append({
"role": "assistant",
"content": f"❌ 网关返回错误 {response.status_code}:{response.text[:300]}"
})
except requests.exceptions.Timeout:
self.chat_history.append({
"role": "assistant",
"content": "⏱️ 请求超时,模型响应过慢,请稍后重试"
})
except Exception as e:
self.chat_history.append({
"role": "assistant",
"content": f"❌ 请求异常:{str(e)}"
})
finally:
self.is_loading = False
def clear_chat(self):
self.chat_history = []
# ————————–
# 系统状态刷新
# ————————–
def update_system_status(self):
"""刷新所有系统状态"""
self.zeroclaw_bin_status = "✅ 已找到" if os.path.exists(ZEROCLAW_PATH) else "❌ 未找到"
self.gateway_status = "✅ 运行中" if _check_gateway_alive() else "⛔ 未运行"
try:
result = subprocess.run(
["nvidia-smi", "–query-gpu=utilization.gpu", "–format=csv,noheader,nounits"],
capture_output=True, text=True, timeout=3
)
self.gpu_usage = f"{result.stdout.strip()}%" if result.returncode == 0 else "无法读取"
except Exception:
self.gpu_usage = "不支持"
self.fetch_lm_studio_models()
# ————————–
# UI 组件
# ————————–
def status_card(label: str, value) -> rx.Component:
return rx.box(
rx.text(label, size="1", color="#6b7280", margin_bottom="0.2em"),
rx.text(value, size="3", font_weight="600"),
padding="0.8em 1em",
border_radius="0.5em",
background_color="#f9fafb",
border="1px solid #e5e7eb",
width="100%"
)
def gateway_panel() -> rx.Component:
return rx.card(
rx.vstack(
rx.heading("ZeroClaw 网关控制", size="5"),
rx.grid(
status_card("zeroclaw.exe", State.zeroclaw_bin_status),
status_card("网关状态", State.gateway_status),
status_card("LM Studio", State.lm_studio_status),
status_card("GPU 使用率", State.gpu_usage),
columns="2",
width="100%",
gap="0.75em"
),
rx.hstack(
rx.button("▶ 启动网关", on_click=State.start_gateway, color_scheme="green", size="2"),
rx.button("■ 停止网关", on_click=State.stop_gateway, color_scheme="red", size="2"),
rx.button("↻ 刷新状态", on_click=State.update_system_status, size="2"),
spacing="3"
),
rx.callout(
rx.text("发送消息前请确保网关显示「✅ 运行中」。启动网关前请先配置好 LM Studio 并选择模型。", size="2"),
color="blue",
size="1"
),
spacing="4",
width="100%"
),
width="100%",
margin_bottom="1em"
)
def config_panel() -> rx.Component:
return rx.card(
rx.vstack(
rx.heading("LM Studio 配置", size="5"),
rx.text("API 地址(带 /v1)", size="2", color="#6b7280"),
rx.input(
value=State.lm_studio_api_url,
on_change=State.set_lm_studio_api_url,
placeholder="http://127.0.0.1:1234/v1",
width="100%"
),
rx.text("API 密钥", size="2", color="#6b7280"),
rx.input(
value=State.lm_studio_api_key,
on_change=State.set_lm_studio_api_key,
placeholder="sk-local-xxx",
type="password",
width="100%"
),
rx.text("选择本地模型", size="2", color="#6b7280"),
rx.select(
State.models,
value=State.model_id,
on_change=State.set_model_id,
placeholder="点击「刷新模型列表」加载…",
width="100%"
),
rx.hstack(
rx.button("↻ 刷新模型列表", on_click=State.fetch_lm_studio_models, size="2"),
rx.button("💾 保存配置", on_click=State.save_config, color_scheme="green", size="2"),
spacing="3"
),
rx.divider(),
rx.text("系统提示词(System Prompt)", size="2", color="#6b7280"),
rx.callout(
rx.text("修改后需点击「保存并重启网关」才能生效,网关会自动重启。", size="2"),
color="amber",
size="1"
),
rx.text_area(
value=State.system_prompt,
on_change=State.set_system_prompt,
placeholder="在此输入系统提示词,约束模型的身份和行为…",
width="100%",
rows="4"
),
rx.button(
"💾 保存 System Prompt 并重启网关",
on_click=State.save_system_prompt_to_config,
color_scheme="amber",
size="2",
width="100%"
),
spacing="4",
width="100%"
),
width="100%",
margin_bottom="1em"
)
def chat_bubble(msg) -> rx.Component:
is_user = msg["role"] == "user"
return rx.box(
rx.hstack(
rx.text(
rx.cond(is_user, "你", "AI"),
font_weight="700",
color=rx.cond(is_user, "#1d4ed8", "#065f46"),
white_space="nowrap",
min_width="1.8em"
),
rx.text(":", color="#9ca3af"),
rx.cond(
is_user,
rx.text(msg["content"], flex="1"),
rx.box(
rx.markdown(msg["content"]),
flex="1",
class_name="markdown-body"
)
),
align="start",
width="100%"
),
background_color=rx.cond(is_user, "#eff6ff", "#f0fdf4"),
border_left=rx.cond(is_user, "3px solid #3b82f6", "3px solid #22c55e"),
padding="0.6em 0.8em",
border_radius="0.4em",
margin_bottom="0.5em",
width="100%"
)
def chat_interface() -> rx.Component:
return rx.card(
rx.vstack(
rx.hstack(
rx.heading("ZeroClaw 对话窗口", size="5"),
rx.spacer(),
rx.button("🗑 清空对话", on_click=State.clear_chat, size="1", color_scheme="gray"),
),
rx.box(
rx.cond(
State.chat_history.length() == 0,
rx.center(
rx.text("还没有对话,输入消息开始吧~", color="#9ca3af", size="2"),
height="100%"
),
rx.foreach(State.chat_history, chat_bubble)
),
height="420px",
width="100%",
overflow_y="auto",
padding="1em",
border="1px solid #e2e8f0",
border_radius="0.5em",
),
rx.form(
rx.hstack(
rx.input(
placeholder="输入消息,按 Enter 或点击发送…",
value=State.user_message,
on_change=State.set_user_message,
width="100%",
name="message",
disabled=State.is_loading
),
rx.button(
rx.cond(
State.is_loading,
rx.hstack(rx.spinner(size="2"), rx.text("等待中"), spacing="2"),
rx.text("发送")
),
type="submit",
disabled=State.is_loading,
color_scheme="blue",
size="2"
),
width="100%",
spacing="2"
),
on_submit=State.handle_form_submit,
width="100%"
),
spacing="4",
width="100%"
),
width="100%"
)
def index() -> rx.Component:
return rx.container(
rx.vstack(
rx.heading("🦀 ZeroClaw 本地管理面板", size="7", margin_bottom="0.2em"),
rx.text("ZeroClaw Gateway + LM Studio 本地 AI 控制台", size="2", color="#6b7280", margin_bottom="0.5em"),
gateway_panel(),
config_panel(),
chat_interface(),
max_width="820px",
margin="0 auto",
spacing="4",
padding="2em"
)
)
app = rx.App()
app.add_page(
index,
title="ZeroClaw 本地管理面板",
on_load=[State.update_system_status, State.load_system_prompt_from_config]
)
if __name__ == "__main__":
app.run()
第二步:理解 ZeroClaw 网关架构
2.1 正确的通信方式
这是本项目最关键的发现。ZeroClaw 提供了一个 HTTP 网关服务,支持以下接口:
|
POST /webhook — {"message": "你的提问"} → AI 回复 GET /health — 健康检查(用于检测网关是否在线) POST /pair — 配对新客户端 |
错误做法(最初的方案): 直接调用 zeroclaw.exe agent 命令行
|
# ❌ 错误 — agent 子命令不支持 –api-base 等参数 zeroclaw.exe agent –message "你好" –model xxx –api-base http://… |
正确做法: 启动网关后,直接 POST 到 /webhook 接口
|
# ✅ 正确 — 通过 HTTP 与网关通信 import requests response = requests.post( "http://127.0.0.1:8080/webhook", json={"message": "你好"}, timeout=120 ) reply = response.json().get("response", "") |
2.2 网关启动方式
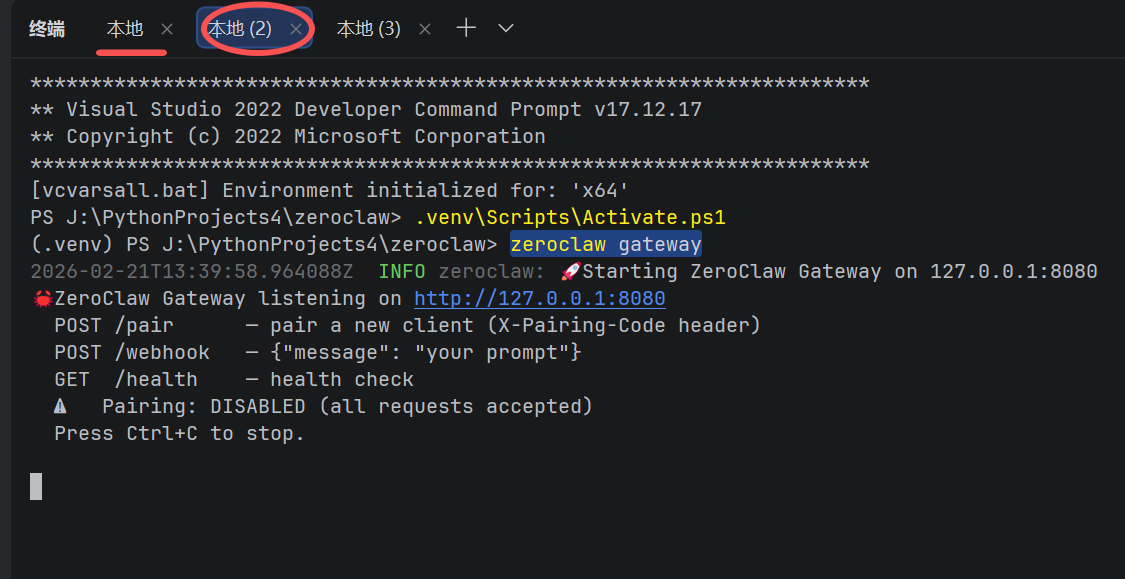
ZeroClaw 网关通过以下命令启动,API 配置通过环境变量传入:
zeroclaw gateway
|
# 手动启动方式 zeroclaw gateway
# 输出示例: # 🚀 Starting ZeroClaw Gateway on 127.0.0.1:8080 # POST /webhook — {"message": "your prompt"} # GET /health — health check |
在 Reflex UI 里,我们用 subprocess.Popen 在后台启动网关进程,通过环境变量注入配置:
|
env = os.environ.copy() env["OPENAI_API_BASE"] = lm_studio_url env["OPENAI_API_KEY"] = lm_studio_key proc = subprocess.Popen([ZEROCLAW_PATH, "gateway"], env=env, creationflags=subprocess.CREATE_NEW_PROCESS_GROUP) |
第三步:Reflex 开发关键踩坑记录
Reflex 0.8.x 版本变化较大,以下是本次开发中遇到的所有报错及解决方案:
3.1 Button size 参数
错误:TypeError: Invalid var passed for prop Button.size
|
❌ 旧写法 |
✅ 新写法(0.8.x) |
|
size="sm" |
size="2" |
|
size="lg" |
size="3" |
|
is_disabled=True |
disabled=True |
3.2 自动 Setter 弃用
错误:DeprecationWarning: state_auto_setters defaulting to True
Reflex 0.8.9+ 不再自动生成 set_xxx 方法,需要手动在 State 类里定义:
|
class State(rx.State): lm_studio_api_url: str = ""
# ✅ 必须显式定义 setter def set_lm_studio_api_url(self, value: str): self.lm_studio_api_url = value |
3.3 rx.foreach 里不能用 Python if/else
错误:VarTypeError: Cannot convert Var to bool
在 rx.foreach 的 lambda 里,变量是 Reflex 响应式 Var,不能用 Python 原生条件:
|
# ❌ 错误写法 "你" if msg["role"] == "user" else "AI"
# ✅ 正确写法 — 使用 rx.cond() rx.cond(msg["role"] == "user", "你", "AI")
# 属性也一样 background_color=rx.cond(msg["role"] == "user", "#f0f", "#0ff") |
3.4 rx.input 不支持 on_submit
错误:ValueError: TextFieldRoot does not take in an `on_submit` event trigger
Reflex 的 rx.input 组件不支持 on_submit。解决方案是用 rx.form 包裹,通过表单提交触发:
|
# ✅ 用 rx.form 包裹支持回车发送 rx.form( rx.hstack( rx.input(value=State.user_message, on_change=State.set_user_message), rx.button("发送", type="submit") ), on_submit=State.handle_form_submit # 接收 dict 参数 )
# State 里定义: def handle_form_submit(self, form_data: dict): yield State.send_message |
3.5 rx.select 的正确用法
Reflex 的 rx.select 将选项列表作为第一个位置参数传入,不用 options= 关键字:
|
# ❌ 错误 rx.select(label="模型", options=State.models, value=State.model_id)
# ✅ 正确 rx.select(State.models, value=State.model_id, on_change=State.set_model_id) |
第四步:System Prompt 的实现
4.1 网关不支持动态传入 system_prompt
通过分析 ZeroClaw 源码(src/gateway/mod.rs),发现网关的 /webhook 接口参数签名为:
|
// Rust 源码片段 _system_prompt: Option<&str>, // 下划线前缀 = 故意忽略该参数 |
这意味着通过 /webhook 传入的 system_prompt 字段会被直接丢弃。
4.2 正确方式:写入配置文件
ZeroClaw 的 system_prompt 在 config.toml 里配置,网关启动时读取:
|
# 配置文件位置:C:\\Users\\{用户名}\\.zeroclaw\\config.toml
# 添加这一行: system_prompt = "你是一个本地运行的 AI 助手,基于开源大模型。" |
在 UI 里实现了「保存 System Prompt 并重启网关」功能,通过正则替换写入配置文件后自动重启网关:
|
def save_system_prompt_to_config(self): with open(ZEROCLAW_CONFIG, "r", encoding="utf-8") as f: content = f.read() new_line = f'system_prompt = "{self.system_prompt}"' if re.search(r'^system_prompt', content, re.MULTILINE): content = re.sub(r'^system_prompt.*$', new_line, content, flags=re.MULTILINE) else: content = new_line + "\\n" + content with open(ZEROCLAW_CONFIG, "w", encoding="utf-8") as f: f.write(content) yield State.stop_gateway yield State.start_gateway |
第五步:清理模型输出的 ANSI 控制码
ZeroClaw 网关返回的 response 字段有时会包含终端 ANSI 控制码和日志行,需要过滤:
|
import re
# 过滤 ANSI 控制码 _ANSI_ESCAPE = re.compile(r'\\x1b\\[[0-9;]*[a-zA-Z]|\\x1b\\][^\\x07]*\\x07')
def clean_reply(raw: str) -> str: clean = _ANSI_ESCAPE.sub("", raw) # 过滤 zeroclaw 日志行(时间戳 / INFO / WARN 开头) lines = clean.splitlines() reply_lines = [ ln for ln in lines if not re.match(r'^\\s*(INFO|WARN|ERROR|\\d{4}-\\d{2}-\\d{2})', ln) ] return "\\n".join(reply_lines).strip() or clean.strip() |
第六步:完整使用流程
每次启动顺序
|
cd zeroclaw-reflex-ui .venv\\Scripts\\Activate.ps1 reflex run |
|
⚡ 网关启动后可以直接对话,不需要每次重启 Reflex 服务。配置修改后才需要重启网关。 |

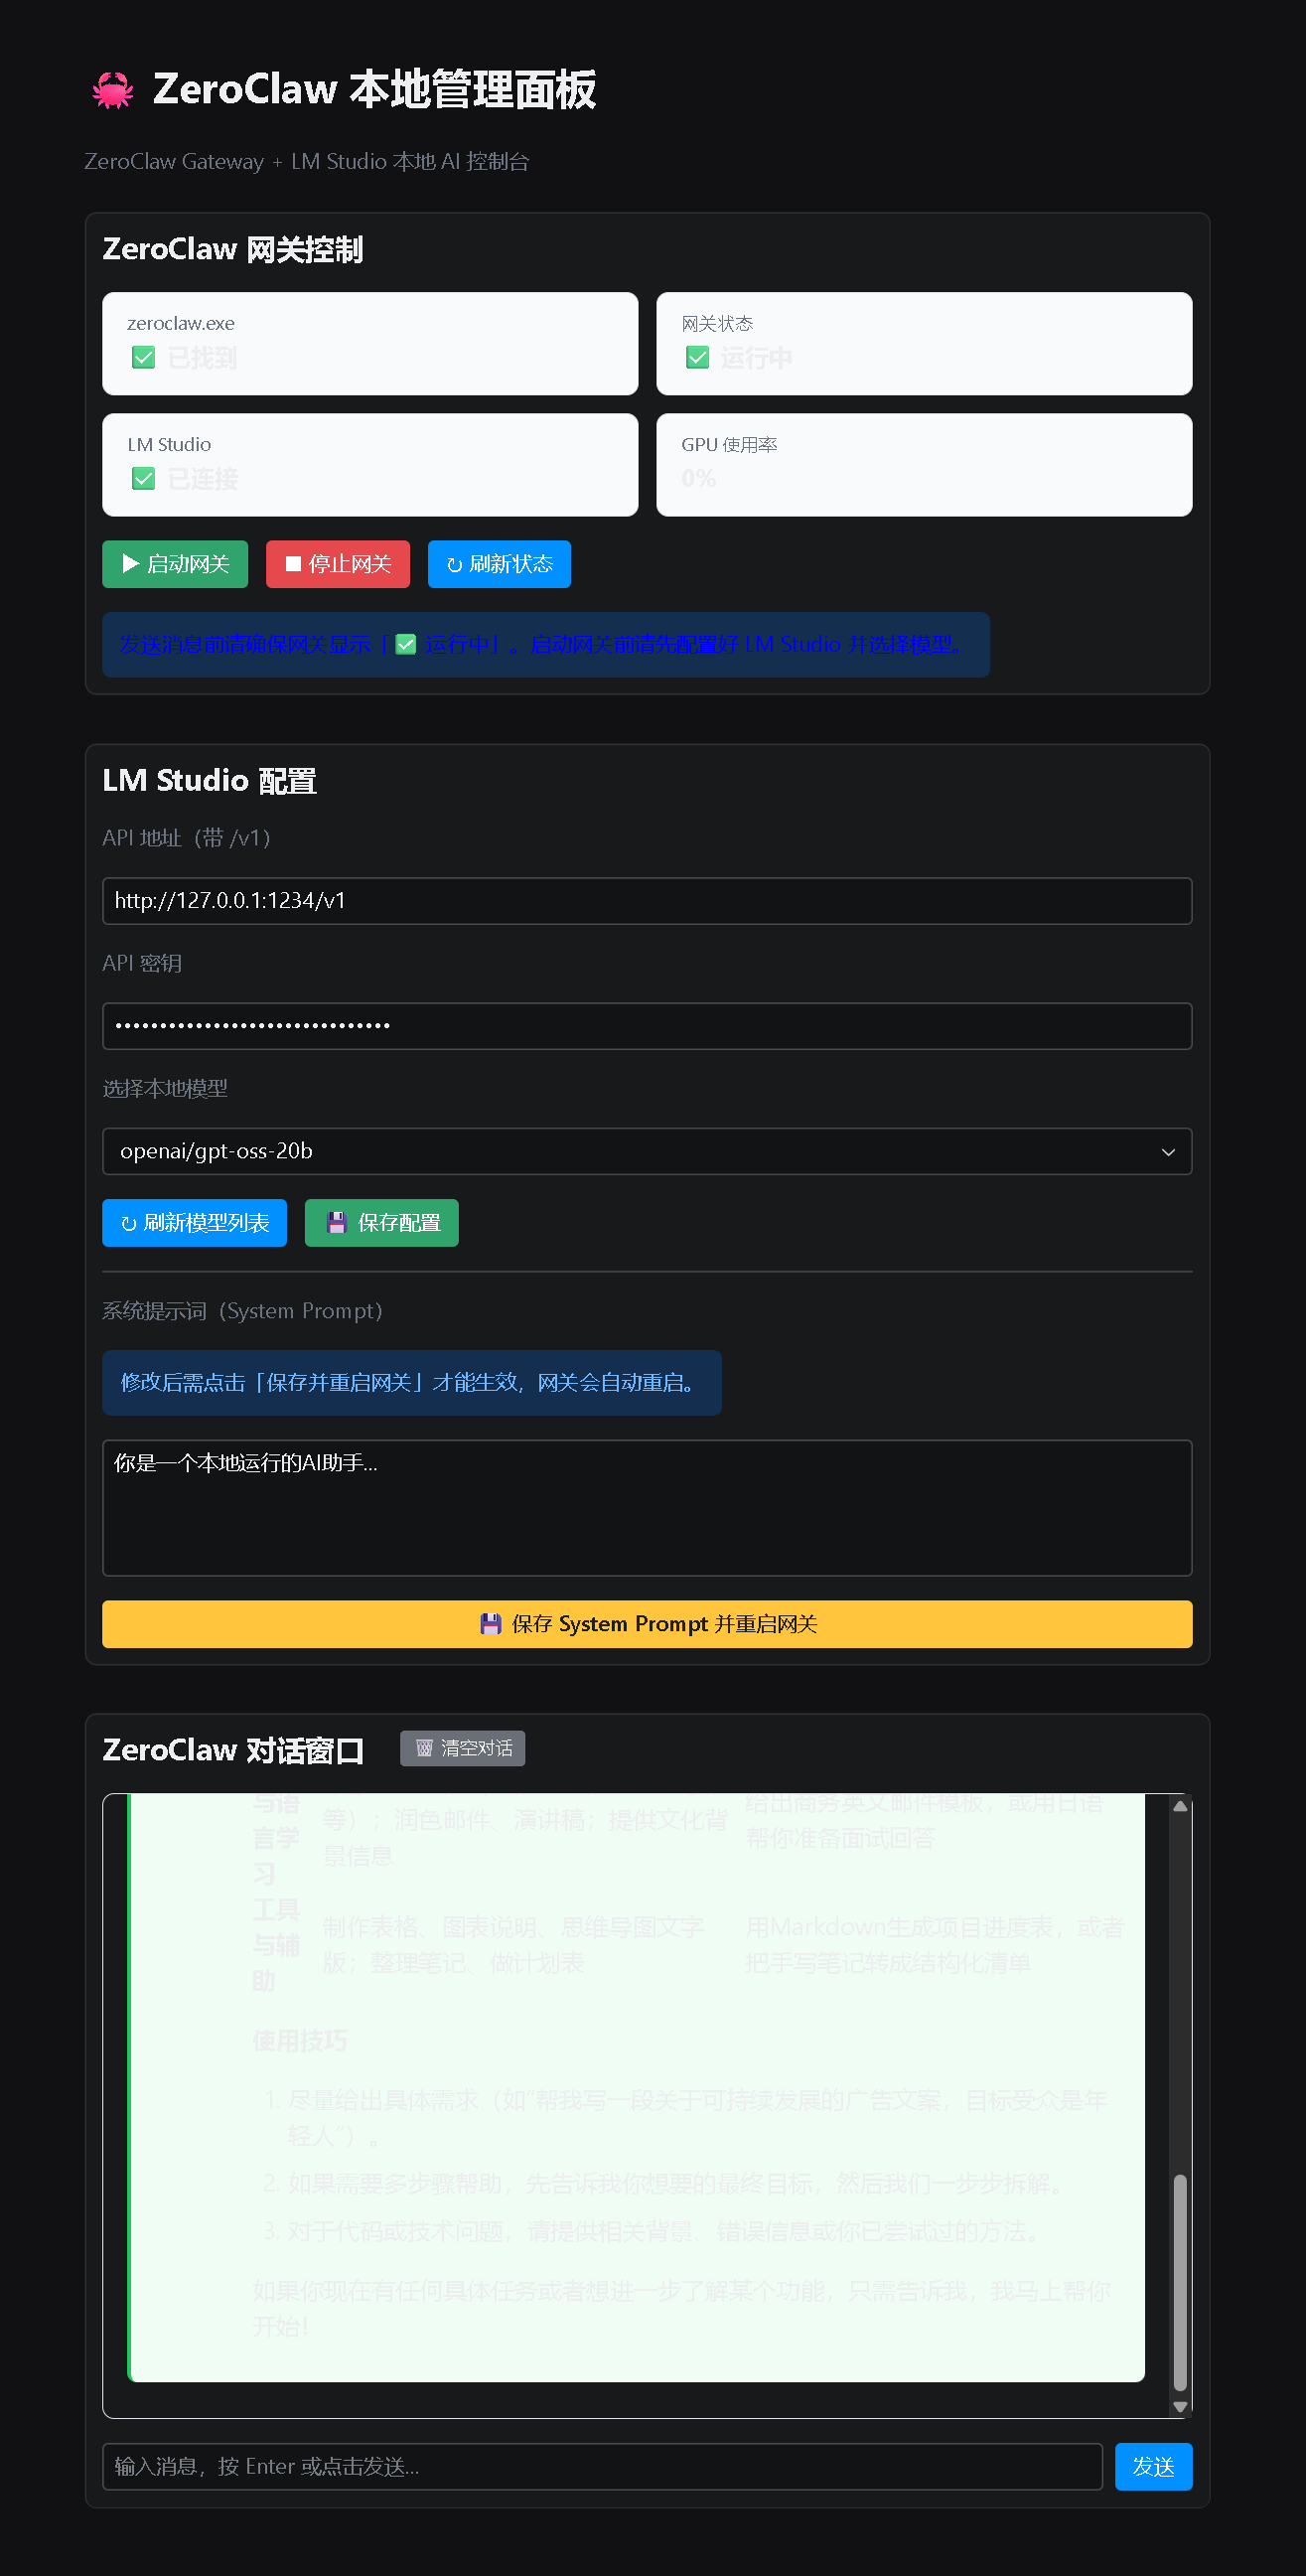
UI 功能一览
|
功能模块 |
说明 |
|
▶ 启动网关 |
在后台启动 zeroclaw gateway,自动注入 LM Studio 配置 |
|
■ 停止网关 |
终止网关进程 |
|
↻ 刷新状态 |
检测网关心跳、GPU 使用率、LM Studio 连接状态 |
|
刷新模型列表 |
从 LM Studio API 获取当前加载的模型列表 |
|
💾 保存配置 |
将 API 地址、密钥、模型 ID 保存到 .env 文件 |
|
System Prompt |
修改并写入 config.toml,自动重启网关生效 |
|
对话窗口 |
支持 Markdown 渲染,回复显示 AI/用户气泡样式 |
|
🗑 清空对话 |
清除当前会话历史记录 |
总结
本项目从零到能跑,主要经历了以下几个阶段:
- 架构误解纠正: 从「调用 CLI 命令」改为「HTTP 调用 /webhook 接口」
- Reflex API 适配: 解决了 5+ 个 0.8.x 版本的 API 变更问题
- System Prompt 实现: 通过写入 config.toml + 重启网关的方式生效
- 输出清洗: 过滤 ANSI 控制码和日志行,让 AI 回复干净呈现
- Markdown 渲染: 使用 rx.markdown() 组件,AI 回复支持表格、代码块等格式
完整代码见 zeroclaw_reflex_ui.py,单文件约 350 行,涵盖了网关管理、对话、配置保存的完整功能。
|
🦀 ZeroClaw 本身的设计哲学:零依赖、极速、小体积。配合 Reflex UI,终于有了一个对人类友好的操作界面。 |