1. 后台任务基础
1.1 核心概念与适用场景
后台任务是指在HTTP请求处理完成后异步执行的任务,适用于以下场景:
- 发送邮件通知
- 生成报表或导出数据
- 执行耗时操作而不阻塞请求响应
- 系统维护和清理任务
1.2 BackgroundTasks
FastAPI 提供了内置的 BackgroundTasks 类,用于处理后台任务:
from fastapi import FastAPI, BackgroundTasks
app = FastAPI()
def send_email(email: str, message: str):
"""发送邮件的后台任务"""
# 模拟邮件发送
print(f"Sending email to {email} with message: {message}")
@app.post("/send-email/")
async def send_email_endpoint(email: str, message: str, background_tasks: BackgroundTasks):
"""发送邮件的API端点"""
# 将任务添加到后台执行
background_tasks.add_task(send_email, email, message)
return {"message": "Email will be sent in the background"}
1.3 简单示例与执行流程
执行流程:
1.4 任务参数传递机制
任务参数可以是任何可序列化的对象,包括:
- 基本类型(字符串、数字、布尔值)
- 复杂类型(字典、列表)
- 对象实例(需要确保可序列化)
# 传递复杂参数的示例
def process_data(user_id: int, data: dict):
"""处理数据的后台任务"""
print(f"Processing data for user {user_id}: {data}")
@app.post("/process-data/")
async def process_data_endpoint(user_id: int, data: dict, background_tasks: BackgroundTasks):
background_tasks.add_task(process_data, user_id, data)
return {"message": "Data processing started in background"}
2. 后台任务高级特性
2.1 任务依赖管理与传递
后台任务可以依赖其他服务或组件,例如数据库连接、外部API客户端等:
from fastapi import Depends
from sqlalchemy.orm import Session
from .database import get_db
def update_user_stats(user_id: int, db: Session):
"""更新用户统计信息的后台任务"""
# 从数据库获取用户信息
user = db.query(User).filter(User.id == user_id).first()
if user:
user.stats_updated = True
db.commit()
@app.post("/update-stats/{user_id}")
async def update_stats_endpoint(
user_id: int,
background_tasks: BackgroundTasks,
db: Session = Depends(get_db)
):
# 传递数据库会话给后台任务
background_tasks.add_task(update_user_stats, user_id, db)
return {"message": "Stats update started in background"}
2.2 异常处理机制
后台任务中的异常不会影响主请求的响应,但应该妥善处理以避免任务失败:
def risky_operation():
"""可能失败的操作"""
try:
# 执行可能失败的操作
raise Exception("Something went wrong")
except Exception as e:
# 记录异常
print(f"Error in background task: {e}")
# 可以添加重试逻辑或告警机制
@app.post("/risky/")
async def risky_endpoint(background_tasks: BackgroundTasks):
background_tasks.add_task(risky_operation)
return {"message": "Risky operation started in background"}
2.3 任务生命周期管理
后台任务的生命周期与应用程序的生命周期相关:
- 任务在请求处理完成后开始执行
- 应用程序关闭时,未完成的任务可能会被中断
- 对于长时间运行的任务,需要考虑任务的持久性
2.4 任务持久化
任务持久化是指将任务信息存储到持久存储中,以便在应用重启后能够恢复未完成的任务。
实现方式:
APScheduler 持久化配置:
from apscheduler.jobstores.sqlalchemy import SQLAlchemyJobStore
# 配置数据库存储
jobstores = {
'default': SQLAlchemyJobStore(url='postgresql://user:password@localhost/dbname')
}
# 创建调度器
scheduler = BackgroundScheduler(jobstores=jobstores)
优点:
- 应用重启后任务不会丢失
- 支持分布式部署
- 任务状态可追踪
注意事项:
- 需要确保数据库连接的可靠性
- 定期清理过期任务,避免数据库膨胀
- 对于高频任务,考虑性能影响
2.5 与异步函数的结合使用
后台任务可以是异步函数,FastAPI 会自动处理异步任务的执行:
import asyncio
async def async_task():
"""异步后台任务"""
await asyncio.sleep(2) # 模拟异步操作
print("Async task completed")
@app.post("/async-task/")
async def async_task_endpoint(background_tasks: BackgroundTasks):
background_tasks.add_task(async_task)
return {"message": "Async task started in background"}
2.6 任务取消与超时设置
虽然 FastAPI 的内置 BackgroundTasks 不直接支持任务取消,但可以通过以下方式实现:
import asyncio
from concurrent.futures import ThreadPoolExecutor
# 创建一个线程池执行器
executor = ThreadPoolExecutor(max_workers=10)
async def long_running_operation():
"""长时间运行的操作"""
# 模拟长时间运行的操作
await asyncio.sleep(60) # 模拟60秒的操作
async def task_with_timeout():
"""带超时的任务"""
try:
# 设置超时
await asyncio.wait_for(long_running_operation(), timeout=30.0)
except asyncio.TimeoutError:
print("Task timed out")
@app.post("/timeout-task/")
async def timeout_task_endpoint(background_tasks: BackgroundTasks):
background_tasks.add_task(task_with_timeout)
return {"message": "Task with timeout started"}
3. Scheduled Tasks
3.1 核心概念与适用场景
定时任务是指按照预定时间或间隔自动执行的任务,适用于以下场景:
- 定期数据备份
- 系统清理和维护
- 定期报表生成
- 定时API调用
3.2 实现方案对比
| APScheduler | 轻量级、易于集成、支持多种调度器 | 不支持分布式部署 | 小型应用、单机部署 |
| Celery | 功能丰富、支持分布式、任务队列 | 配置复杂、依赖多 | 大型应用、分布式部署 |
| FastAPI + 外部调度器 | 灵活、可定制 | 需要额外配置 | 特定需求场景 |
3.3 基本配置与调度方式
使用 APScheduler 实现定时任务:
from fastapi import FastAPI
from apscheduler.schedulers.background import BackgroundScheduler
from apscheduler.triggers.cron import CronTrigger
app = FastAPI()
# 创建调度器
scheduler = BackgroundScheduler()
def daily_job():
"""每天执行的任务"""
print("Daily job executed")
# 添加定时任务
scheduler.add_job(
daily_job,
trigger=CronTrigger(hour=0, minute=0), # 每天凌晨执行
id="daily_job",
name="Daily maintenance job",
replace_existing=True
)
# 启动调度器
@app.on_event("startup")
async def startup_event():
scheduler.start()
# 关闭调度器
@app.on_event("shutdown")
async def shutdown_event():
scheduler.shutdown()
@app.get("/")
async def root():
return {"message": "Scheduled tasks are running"}
3.4 任务队列基础概念
任务队列是用于存储和管理待执行任务的数据结构,主要组件包括:
- 任务生产者:创建和提交任务
- 任务队列:存储任务的缓冲区
- 任务消费者:从队列中获取并执行任务
- 任务结果存储:保存任务执行结果
4. 定时任务高级配置
4.1 任务触发器类型详解
APScheduler 支持三种类型的触发器:
4.2 任务参数传递与上下文管理
def task_with_params(user_id: int, message: str):
"""带参数的定时任务"""
print(f"Task executed for user {user_id}: {message}")
# 添加带参数的任务
scheduler.add_job(
task_with_params,
trigger=IntervalTrigger(minutes=1),
args=[123, "Hello from scheduled task"],
id="task_with_params"
)
4.3 任务依赖注入与服务集成
from fastapi import Depends
from sqlalchemy.orm import Session
from .database import get_db
# 改进的依赖注入实现
def create_task():
"""创建依赖数据库的定时任务"""
def task():
"""依赖数据库的定时任务"""
db = next(get_db())
try:
# 使用数据库会话
users = db.query(User).all()
print(f"Found {len(users)} users")
finally:
# 确保数据库连接被正确关闭
db.close()
return task
@app.on_event("startup")
async def startup_event():
scheduler.add_job(
create_task(),
trigger=IntervalTrigger(minutes=5),
id="db_task"
)
scheduler.start()
4.4 与依赖注入系统的深度集成
FastAPI的依赖注入系统可以与后台任务和定时任务深度集成,提供更灵活的依赖管理方式。
示例:
from fastapi import Depends, FastAPI, BackgroundTasks
from sqlalchemy.orm import Session
from .database import get_db
from .services import UserService, EmailService
app = FastAPI()
# 使用依赖注入的任务
def send_welcome_email(user_id: int, user_service: UserService, email_service: EmailService):
"""发送欢迎邮件的后台任务"""
# 获取用户信息
user = user_service.get_user(user_id)
if user:
# 发送欢迎邮件
email_service.send_welcome_email(user.email, user.name)
@app.post("/register/")
async def register_user(
user_data: UserCreate,
background_tasks: BackgroundTasks,
user_service: UserService = Depends(),
email_service: EmailService = Depends()
):
"""注册用户并发送欢迎邮件"""
# 创建用户
user = user_service.create_user(user_data)
# 添加后台任务,传递依赖服务
background_tasks.add_task(
send_welcome_email,
user.id,
user_service,
email_service
)
return {"message": "User registered, welcome email will be sent"}
# 定时任务使用依赖注入
@app.on_event("startup")
async def startup_event(
user_service: UserService = Depends(),
email_service: EmailService = Depends()
):
"""启动定时任务"""
def daily_reminder():
"""每日提醒任务"""
users = user_service.get_active_users()
for user in users:
email_service.send_daily_reminder(user.email)
# 添加定时任务
scheduler.add_job(
daily_reminder,
trigger=CronTrigger(hour=9, minute=0), # 每天上午9点执行
id="daily_reminder"
)
scheduler.start()
优点:
- 依赖管理更清晰
- 服务复用性更高
- 测试更容易
- 代码可维护性更好
注意事项:
- 确保依赖服务是线程安全的
- 避免在任务中使用请求相关的依赖
- 对于长时间运行的任务,考虑使用独立的服务实例
4.5 任务优先级与分组管理
# 分组管理任务
scheduler.add_job(
maintenance_task,
trigger=IntervalTrigger(hours=1),
id="maintenance_job",
name="Maintenance",
jobstore="default",
executor="default",
replace_existing=True
)
# 优先级管理(通过执行器配置)
from apscheduler.executors.pool import ThreadPoolExecutor
# 创建具有不同优先级的执行器
executors = {
'default': ThreadPoolExecutor(10), # 普通任务
'high_priority': ThreadPoolExecutor(5) # 高优先级任务
}
# 使用高优先级执行器
scheduler.add_job(
critical_task,
trigger=IntervalTrigger(minutes=30),
id="critical_job",
executor="high_priority"
)
4.6 任务优先级的具体实现
任务优先级可以通过多种方式实现,以下是详细的实现示例:
方法1:使用优先级队列
from queue import PriorityQueue
import threading
# 创建优先级队列
task_queue = PriorityQueue()
# 任务执行线程
task_thread = None
# 线程运行标志
running = True
def worker():
"""任务执行线程"""
global running
while running:
try:
# 阻塞获取任务,超时1秒
priority, (task, args, kwargs) = task_queue.get(timeout=1)
try:
# 执行任务
task(*args, **kwargs)
finally:
# 标记任务完成
task_queue.task_done()
except:
# 超时或其他错误,继续循环
pass
# 启动任务执行线程
task_thread = threading.Thread(target=worker, daemon=True)
task_thread.start()
def add_priority_task(priority, task, *args, **kwargs):
"""添加带优先级的任务
Args:
priority: 优先级,数值越小优先级越高
task: 任务函数
*args: 任务参数
**kwargs: 任务关键字参数
"""
task_queue.put((priority, (task, args, kwargs)))
# 示例使用
def high_priority_task():
"""高优先级任务"""
print("Executing high priority task")
def normal_priority_task():
"""普通优先级任务"""
print("Executing normal priority task")
def low_priority_task():
"""低优先级任务"""
print("Executing low priority task")
# 添加任务(优先级:1最高,3最低)
add_priority_task(3, low_priority_task)
add_priority_task(1, high_priority_task)
add_priority_task(2, normal_priority_task)
# 等待所有任务完成
task_queue.join()
# 停止任务执行线程
running = False
if task_thread:
task_thread.join()
方法2:使用APScheduler的优先级执行器
from apscheduler.executors.pool import ThreadPoolExecutor
from apscheduler.schedulers.background import BackgroundScheduler
# 创建具有不同优先级的执行器
executors = {
'low': ThreadPoolExecutor(5), # 低优先级
'default': ThreadPoolExecutor(10), # 普通优先级
'high': ThreadPoolExecutor(5) # 高优先级
}
# 创建调度器
scheduler = BackgroundScheduler(executors=executors)
# 低优先级任务
def cleanup_task():
"""清理任务"""
print("Executing cleanup task")
# 普通优先级任务
def report_task():
"""报表生成任务"""
print("Executing report task")
# 高优先级任务
def critical_task():
"""关键任务"""
print("Executing critical task")
# 添加任务
# 低优先级任务
scheduler.add_job(
cleanup_task,
trigger=IntervalTrigger(hours=1),
id="cleanup_task",
executor="low"
)
# 普通优先级任务
scheduler.add_job(
report_task,
trigger=IntervalTrigger(minutes=30),
id="report_task",
executor="default"
)
# 高优先级任务
scheduler.add_job(
critical_task,
trigger=IntervalTrigger(minutes=10),
id="critical_task",
executor="high"
)
# 启动调度器
scheduler.start()
方法3:使用消息队列的优先级
import pika
# 连接RabbitMQ
connection = pika.BlockingConnection(pika.ConnectionParameters('localhost'))
channel = connection.channel()
# 声明队列,开启优先级支持
channel.queue_declare(queue='priority_tasks', arguments={'x-max-priority': 10})
def send_task(priority, message):
"""发送带优先级的任务"""
channel.basic_publish(
exchange='',
routing_key='priority_tasks',
body=message,
properties=pika.BasicProperties(
delivery_mode=2, # 消息持久化
priority=priority # 优先级,1-10
)
)
def callback(ch, method, properties, body):
"""任务回调函数"""
print(f"Received task with priority {properties.priority}: {body.decode()}")
ch.basic_ack(delivery_tag=method.delivery_tag)
# 消费任务
channel.basic_consume(queue='priority_tasks', on_message_callback=callback)
# 发送任务
send_task(1, "Low priority task")
send_task(5, "Medium priority task")
send_task(10, "High priority task")
# 开始消费
print("Waiting for tasks…")
channel.start_consuming()
优点:
- 任务执行顺序可控
- 重要任务优先执行
- 资源分配更合理
注意事项:
- 优先级设置要合理,避免任务饥饿
- 对于长时间运行的任务,考虑使用超时机制
- 在分布式环境中,确保优先级策略的一致性
4.7 任务版本控制
任务版本控制是指管理任务代码变更的机制,确保任务执行的一致性和可追溯性。
实现方式:
示例:
def task_v1():
"""版本1的任务"""
print("Executing task version 1")
def task_v2():
"""版本2的任务"""
print("Executing task version 2")
# 部署新版本任务
scheduler.add_job(
task_v2,
trigger=IntervalTrigger(minutes=10),
id="task_v2",
replace_existing=True
)
# 保留旧版本任务(可选)
scheduler.add_job(
task_v1,
trigger=IntervalTrigger(minutes=10),
id="task_v1",
name="Legacy task version 1"
)
优点:
- 支持平滑升级和回滚
- 便于调试和问题定位
- 确保任务执行的一致性
注意事项:
- 定期清理过期版本的任务
- 确保任务版本之间的兼容性
- 记录版本变更日志
5. 具体场景实现
5.1 邮件发送任务
from fastapi import FastAPI, BackgroundTasks
import smtplib
from email.mime.text import MIMEText
from email.mime.multipart import MIMEMultipart
app = FastAPI()
import os
from dotenv import load_dotenv
# 加载环境变量
load_dotenv()
def send_email(to_email: str, subject: str, body: str):
"""发送邮件的后台任务"""
# 邮件服务器配置(从环境变量获取)
smtp_server = os.getenv("SMTP_SERVER", "smtp.example.com")
smtp_port = int(os.getenv("SMTP_PORT", "587"))
smtp_user = os.getenv("SMTP_USER", "your-email@example.com")
smtp_password = os.getenv("SMTP_PASSWORD", "")
# 创建邮件
msg = MIMEMultipart()
msg['From'] = smtp_user
msg['To'] = to_email
msg['Subject'] = subject
msg.attach(MIMEText(body, 'plain'))
# 发送邮件
try:
server = smtplib.SMTP(smtp_server, smtp_port)
server.starttls()
server.login(smtp_user, smtp_password)
text = msg.as_string()
server.sendmail(smtp_user, to_email, text)
server.quit()
print(f"Email sent to {to_email}")
except Exception as e:
print(f"Error sending email: {e}")
@app.post("/send-email/")
async def send_email_endpoint(
to_email: str,
subject: str,
body: str,
background_tasks: BackgroundTasks
):
background_tasks.add_task(send_email, to_email, subject, body)
return {"message": "Email will be sent in the background"}
5.2 数据导出与报表生成
import pandas as pd
import io
import boto3
def export_data_to_s3(user_id: int, data: list):
"""导出数据到S3的后台任务"""
# 创建DataFrame
df = pd.DataFrame(data)
# 转换为CSV
csv_buffer = io.StringIO()
df.to_csv(csv_buffer, index=False)
# 上传到S3
s3 = boto3.client('s3')
bucket_name = "your-bucket"
file_key = f"exports/user_{user_id}_{pd.Timestamp.now().strftime('%Y%m%d_%H%M%S')}.csv"
try:
s3.put_object(
Bucket=bucket_name,
Key=file_key,
Body=csv_buffer.getvalue(),
ContentType='text/csv'
)
print(f"Data exported to S3: {file_key}")
except Exception as e:
print(f"Error exporting data: {e}")
@app.post("/export-data/")
async def export_data_endpoint(
user_id: int,
data: list,
background_tasks: BackgroundTasks
):
background_tasks.add_task(export_data_to_s3, user_id, data)
return {"message": "Data export started in background"}
5.3 系统清理与维护任务
from apscheduler.schedulers.background import BackgroundScheduler
from apscheduler.triggers.cron import CronTrigger
import os
import glob
def cleanup_temp_files():
"""清理临时文件的定时任务"""
temp_dir = "/tmp"
# 查找并删除24小时前的临时文件
import time
cutoff_time = time.time() – (24 * 60 * 60)
for file_path in glob.glob(os.path.join(temp_dir, "*.tmp")):
if os.path.getmtime(file_path) < cutoff_time:
try:
os.remove(file_path)
print(f"Deleted old temp file: {file_path}")
except Exception as e:
print(f"Error deleting file {file_path}: {e}")
# 添加清理任务
scheduler.add_job(
cleanup_temp_files,
trigger=CronTrigger(hour=2, minute=0), # 每天凌晨2点执行
id="cleanup_temp_files",
name="Cleanup temporary files",
replace_existing=True
)
5.4 第三方服务集成任务
import requests
import pandas as pd
def get_latest_records():
"""获取最新记录的函数"""
# 实现获取最新记录的逻辑
return []
def sync_with_external_api():
"""同步数据到外部API的定时任务"""
api_url = "https://api.example.com/sync"
api_key = "your-api-key" # 建议使用环境变量存储
# 准备数据
data = {
"sync_time": pd.Timestamp.now().isoformat(),
"records": get_latest_records()
}
# 发送请求
try:
response = requests.post(
api_url,
json=data,
headers={"Authorization": f"Bearer {api_key}"}
)
response.raise_for_status()
print("Data synced with external API")
except Exception as e:
print(f"Error syncing with external API: {e}")
# 添加同步任务
scheduler.add_job(
sync_with_external_api,
trigger=IntervalTrigger(hours=6), # 每6小时执行一次
id="sync_with_external_api",
name="Sync with external API",
replace_existing=True
)
5.5 实时数据处理任务
import asyncio
import websockets
import json
async def process_realtime_data():
"""处理实时数据的后台任务"""
async with websockets.connect("wss://api.example.com/ws") as websocket:
# 发送认证信息
await websocket.send(json.dumps({"action": "authenticate", "token": "your-api-key"}))
# 处理实时数据
while True:
try:
# 接收数据
message = await websocket.recv()
data = json.loads(message)
# 处理数据
await process_data(data)
except websockets.exceptions.ConnectionClosed:
print("WebSocket connection closed")
break
except Exception as e:
print(f"Error processing realtime data: {e}")
async def process_data(data):
"""处理数据的异步函数"""
# 实现数据处理逻辑
print(f"Processing data: {data}")
@app.on_event("startup")
async def startup_event():
"""启动实时数据处理任务"""
# 创建后台任务
import threading
def run_async_task():
asyncio.run(process_realtime_data())
# 启动线程
thread = threading.Thread(target=run_async_task, daemon=True)
thread.start()
5.6 批量数据处理任务
from sqlalchemy.orm import Session
from .database import get_db
from .models import User
def batch_process_users():
"""批量处理用户数据的定时任务"""
db = next(get_db())
try:
# 获取需要处理的用户
users = db.query(User).filter(User.needs_processing == True).limit(100).all()
for user in users:
try:
# 处理用户数据
process_user(user)
# 标记为已处理
user.needs_processing = False
db.commit()
except Exception as e:
print(f"Error processing user {user.id}: {e}")
db.rollback()
finally:
db.close()
def process_user(user):
"""处理单个用户数据"""
# 实现用户数据处理逻辑
print(f"Processing user: {user.id}")
# 添加批量处理任务
scheduler.add_job(
batch_process_users,
trigger=IntervalTrigger(minutes=30), # 每30分钟执行一次
id="batch_process_users",
name="Batch process users",
replace_existing=True
)
5.7 缓存更新任务
import redis
import json
# 连接Redis
redis_client = redis.Redis(host='localhost', port=6379, db=0)
def update_cache():
"""更新缓存的定时任务"""
try:
# 获取需要更新的数据
data = get_fresh_data()
# 更新缓存
for key, value in data.items():
redis_client.set(key, json.dumps(value), ex=3600) # 1小时过期
print("Cache updated successfully")
except Exception as e:
print(f"Error updating cache: {e}")
def get_fresh_data():
"""获取最新数据"""
# 实现获取最新数据的逻辑
return {"key1": "value1", "key2": "value2"}
# 添加缓存更新任务
scheduler.add_job(
update_cache,
trigger=IntervalTrigger(minutes=15), # 每15分钟更新一次
id="update_cache",
name="Update cache",
replace_existing=True
)
5.8 机器学习模型训练任务
import pandas as pd
from sklearn.model_selection import train_test_split
from sklearn.ensemble import RandomForestClassifier
import joblib
import os
def train_model():
"""训练机器学习模型的定时任务"""
try:
# 加载数据
data = load_training_data()
# 准备特征和标签
X = data.drop('target', axis=1)
y = data['target']
# 分割数据
X_train, X_test, y_train, y_test = train_test_split(X, y, test_size=0.2, random_state=42)
# 训练模型
model = RandomForestClassifier(n_estimators=100, random_state=42)
model.fit(X_train, y_train)
# 评估模型
accuracy = model.score(X_test, y_test)
print(f"Model accuracy: {accuracy}")
# 保存模型
model_path = os.path.join("models", "model.pkl")
os.makedirs(os.path.dirname(model_path), exist_ok=True)
joblib.dump(model, model_path)
print(f"Model saved to {model_path}")
except Exception as e:
print(f"Error training model: {e}")
def load_training_data():
"""加载训练数据"""
# 实现加载训练数据的逻辑
return pd.DataFrame({
'feature1': [1, 2, 3, 4, 5],
'feature2': [6, 7, 8, 9, 10],
'target': [0, 1, 0, 1, 0]
})
# 添加模型训练任务
scheduler.add_job(
train_model,
trigger=CronTrigger(hour=1, minute=0), # 每天凌晨1点执行
id="train_model",
name="Train machine learning model",
replace_existing=True
)
6. 源码分析与内部机制
6.1 BackgroundTasks实现原理
FastAPI 的 BackgroundTasks 是基于 Starlette 的实现,核心源码如下:
# 简化版源码分析
class BackgroundTasks:
def __init__(self) -> None:
self.tasks = []
def add_task(self, func: Callable[…, Any], *args: Any, **kwargs: Any) -> None:
"""添加后台任务"""
self.tasks.append((func, args, kwargs))
async def __call__(self) -> None:
"""执行所有后台任务"""
for func, args, kwargs in self.tasks:
if asyncio.iscoroutinefunction(func):
await func(*args, **kwargs)
else:
func(*args, **kwargs)
6.2 任务执行流程与线程模型
- 请求处理阶段:
- 客户端发送请求
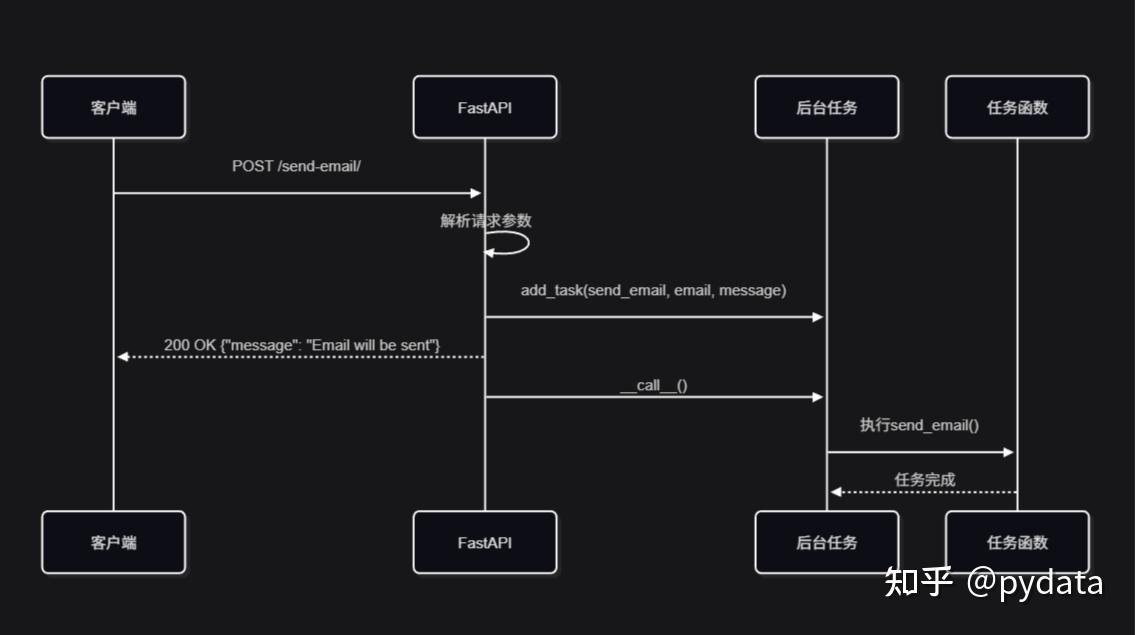
- FastAPI 处理请求,创建 BackgroundTasks 实例
- 开发者调用 add_task() 添加任务
- FastAPI 返回响应给客户端
- 后台执行阶段:
- FastAPI 在响应返回后,调用 BackgroundTasks.__call__() 方法
- 对于同步任务,默认在事件循环线程中执行,可能会阻塞事件循环
- 对于异步任务,使用事件循环执行
- 建议:对于耗时的同步任务,应使用线程池执行以避免阻塞事件循环
6.3 定时任务调度器工作原理
APScheduler 的核心组件:
6.4 关键类与方法分析
APScheduler 核心类:
| BackgroundScheduler | 后台运行的调度器 | add_job(), start(), shutdown() |
| CronTrigger | 基于cron表达式的触发器 | __init__() |
| IntervalTrigger | 基于时间间隔的触发器 | __init__() |
| Job | 任务对象 | modify(), pause(), resume() |
FastAPI BackgroundTasks 关键方法:
| add_task() | 添加后台任务 | func: 任务函数 *args: 位置参数 **kwargs: 关键字参数 |
| __call__() | 执行所有后台任务 | 无 |
7. 执行流程图与架构图
7.1 后台任务执行时序图
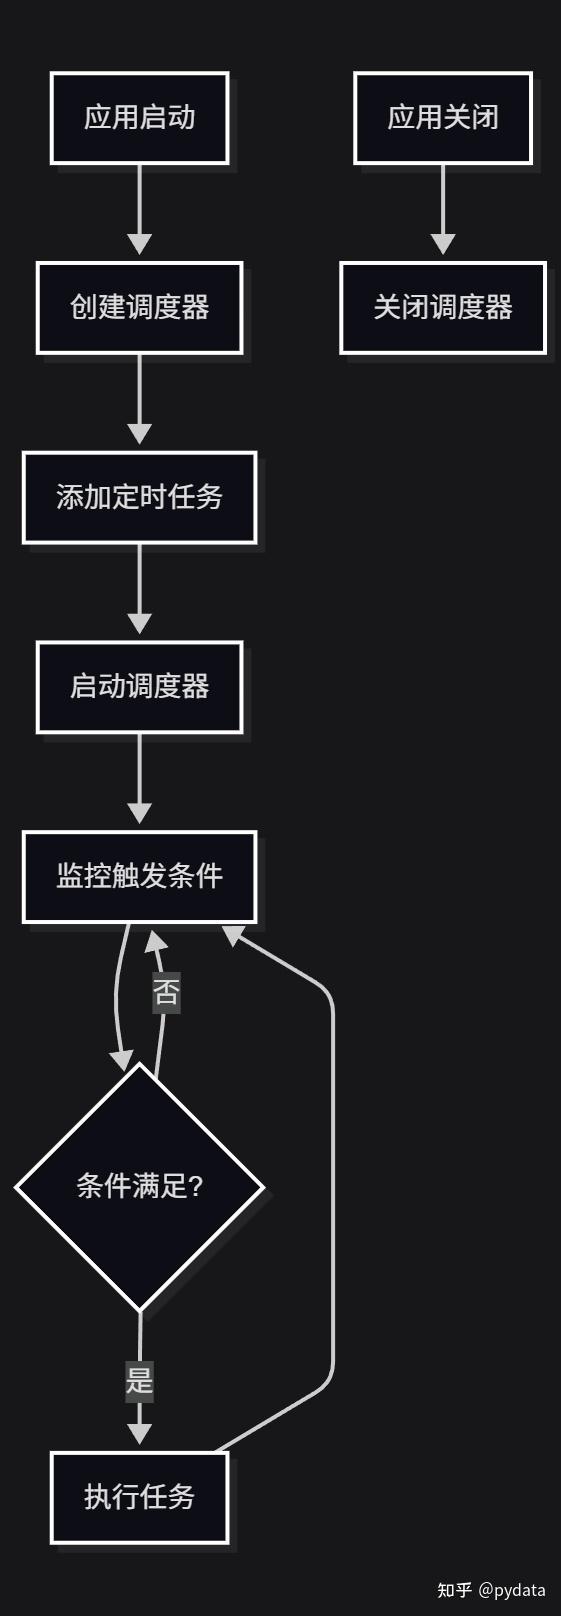
7.2 定时任务调度流程图
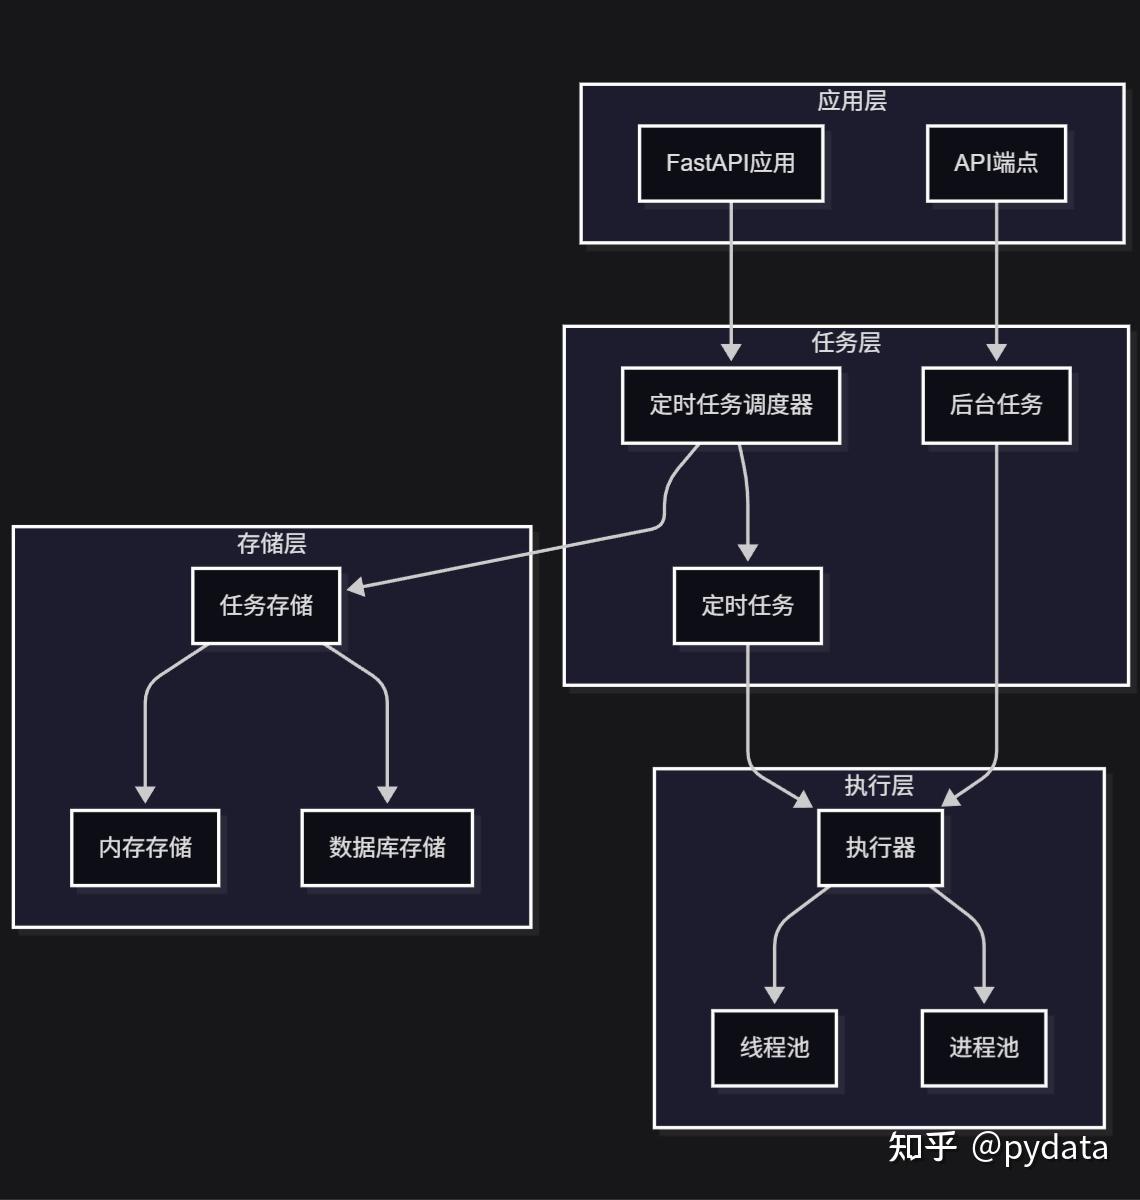
7.3系统架构与组件关系图
8. 常见问题与解决方案
8.1 任务执行失败处理
问题:后台任务执行失败,没有错误提示
解决方案:
- 在任务函数中添加异常捕获
- 实现错误日志记录
- 考虑添加任务重试机制
def retry_task():
"""重试任务的函数"""
# 实现重试逻辑
print("Retrying task…")
def robust_task():
"""健壮的任务函数"""
try:
# 执行任务
pass
except Exception as e:
# 记录错误
logger.error(f"Task failed: {e}")
# 可选:添加重试逻辑
retry_task()
8.2 任务队列管理
问题:任务堆积,执行延迟
解决方案:
- 增加执行器的工作线程数
- 实现任务优先级
- 考虑使用消息队列(如RabbitMQ、Redis)
# 配置更多工作线程
executors = {
'default': ThreadPoolExecutor(20), # 增加线程数
'processpool': ProcessPoolExecutor(5)
}
8.3 资源占用与性能优化
问题:任务执行占用过多资源
解决方案:
- 限制并发任务数
- 优化任务执行逻辑
- 使用进程池执行CPU密集型任务
# 使用进程池执行CPU密集型任务
scheduler.add_job(
cpu_intensive_task,
trigger=IntervalTrigger(minutes=10),
executor="processpool" # 使用进程池
)
8.4 分布式部署与任务协调
问题:多实例部署时任务重复执行
解决方案:
- 使用共享的任务存储(如数据库)
- 实现分布式锁
- 考虑使用Celery等分布式任务队列
# 使用数据库存储任务
from apscheduler.jobstores.sqlalchemy import SQLAlchemyJobStore
jobstores = {
'default': SQLAlchemyJobStore(url='sqlite:///jobs.sqlite')
}
scheduler = BackgroundScheduler(jobstores=jobstores)
8.5 任务结果处理机制
问题:需要获取任务执行结果
解决方案:
- 使用回调函数
- 存储任务结果到数据库
- 实现任务状态查询API
def task_with_result():
"""返回结果的任务"""
result = compute_result()
save_result_to_db(result)
return result
# 添加带回调的任务
def callback_func(job_id, result):
"""任务完成回调"""
print(f"Job {job_id} completed with result: {result}")
scheduler.add_job(
task_with_result,
trigger=IntervalTrigger(minutes=5),
id="task_with_result"
)
8.6 任务执行状态管理
任务执行状态管理是指跟踪和管理任务的执行状态,包括 pending、running、success、failed 等状态。
实现方式:
示例:
from enum import Enum
from sqlalchemy import Column, String, Enum as SQLEnum, DateTime
from sqlalchemy.ext.declarative import declarative_base
from datetime import datetime
Base = declarative_base()
class TaskStatus(Enum):
PENDING = "pending"
RUNNING = "running"
SUCCESS = "success"
FAILED = "failed"
class Task(Base):
__tablename__ = "tasks"
id = Column(String, primary_key=True)
name = Column(String)
status = Column(SQLEnum(TaskStatus))
result = Column(String)
error = Column(String)
created_at = Column(DateTime, default=datetime.utcnow)
updated_at = Column(DateTime, default=datetime.utcnow, onupdate=datetime.utcnow)
def tracked_task():
"""带状态跟踪的任务"""
task_id = "tracked_task_" + str(datetime.utcnow().timestamp())
# 创建任务记录
task = Task(id=task_id, name="Tracked Task", status=TaskStatus.PENDING)
db.add(task)
db.commit()
try:
# 更新为运行状态
task.status = TaskStatus.RUNNING
db.commit()
# 执行任务
result = execute_task()
# 更新为成功状态
task.status = TaskStatus.SUCCESS
task.result = str(result)
db.commit()
except Exception as e:
# 更新为失败状态
task.status = TaskStatus.FAILED
task.error = str(e)
db.commit()
# 任务状态查询API
@app.get("/tasks/{task_id}")
async def get_task_status(task_id: str, db: Session = Depends(get_db)):
task = db.query(Task).filter(Task.id == task_id).first()
if not task:
return {"error": "Task not found"}
return {
"id": task.id,
"name": task.name,
"status": task.status.value,
"result": task.result,
"error": task.error,
"created_at": task.created_at,
"updated_at": task.updated_at
}
优点:
- 实时跟踪任务执行状态
- 便于监控和调试
- 支持任务执行历史查询
注意事项:
- 定期清理过期任务状态记录
- 对于高频任务,考虑性能影响
- 确保状态更新的原子性
9. 生产环境最佳实践
9.1 任务监控与日志管理
最佳实践:
- 配置结构化日志
- 实现任务执行监控
- 集成监控工具(如Prometheus、Grafana)
import logging
# 配置日志
logging.basicConfig(
level=logging.INFO,
format='%(asctime)s – %(name)s – %(levelname)s – %(message)s'
)
logger = logging.getLogger(__name__)
def monitored_task():
"""带监控的任务"""
logger.info("Starting task")
try:
# 执行任务
logger.info("Task completed successfully")
except Exception as e:
logger.error(f"Task failed: {e}")
9.2 错误处理与告警机制
最佳实践:
- 实现错误捕获和处理
- 配置邮件或短信告警
- 集成监控系统(如Sentry)
import sentry_sdk
sentry_sdk.init(
dsn="your-sentry-dsn",
traces_sample_rate=1.0
)
def task_with_sentry():
"""带Sentry监控的任务"""
with sentry_sdk.start_transaction(name="task_with_sentry"):
try:
# 执行任务
pass
except Exception as e:
sentry_sdk.capture_exception(e)
raise
9.3 部署策略与容器化
最佳实践:
- 使用容器化部署(如Docker)
- 配置健康检查
- 实现优雅启动和关闭
# Dockerfile
FROM python:3.9
WORKDIR /app
COPY requirements.txt .
RUN pip install –no-cache-dir -r requirements.txt
COPY . .
CMD ["uvicorn", "app.main:app", "–host", "0.0.0.0", "–port", "8000"]
9.4 性能调优与资源配置
最佳实践:
- 根据任务类型选择合适的执行器
- 优化任务执行逻辑
- 合理配置资源限制
# 性能优化配置
executors = {
'default': ThreadPoolExecutor(10), # IO密集型任务
'processpool': ProcessPoolExecutor(4) # CPU密集型任务
}
job_defaults = {
'coalesce': False, # 任务堆积时是否合并
'max_instances': 3 # 同一任务的最大实例数
}
scheduler = BackgroundScheduler(
executors=executors,
job_defaults=job_defaults
)
9.5 重要参数配置指南
| max_workers | 线程池最大工作线程数 | 10-20 | IO密集型任务 |
| max_instances | 同一任务的最大实例数 | 1-3 | 避免任务并发冲突 |
| coalesce | 任务堆积时是否合并 | False | 实时性要求高的任务 |
| misfire_grace_time | 任务错过执行时间的 grace 时间 | 60秒 | 保证任务执行 |
| replace_existing | 是否替换已存在的任务 | True | 避免任务重复 |
10. 高级应用与扩展
10.1 任务重试机制
from apscheduler.jobstores.base import JobLookupError
from apscheduler.triggers.date import DateTrigger
from datetime import datetime, timedelta
def risky_operation():
"""可能失败的操作"""
# 实现可能失败的操作
raise Exception("Operation failed")
def task_with_retry():
"""带重试机制的任务"""
try:
# 执行可能失败的操作
risky_operation()
except Exception as e:
print(f"Task failed, will retry: {e}")
# 重新调度任务
try:
scheduler.add_job(
task_with_retry,
trigger=DateTrigger(run_date=datetime.now() + timedelta(minutes=5)),
id="retry_task",
replace_existing=True
)
except JobLookupError:
pass
10.2 与消息队列集成
import pika
import json
def send_to_queue(message: dict):
"""发送消息到RabbitMQ"""
connection = pika.BlockingConnection(pika.ConnectionParameters('localhost'))
channel = connection.channel()
channel.queue_declare(queue='task_queue', durable=True)
channel.basic_publish(
exchange='',
routing_key='task_queue',
body=json.dumps(message),
properties=pika.BasicProperties(
delivery_mode=2, # 消息持久化
)
)
connection.close()
# 后台任务发送消息到队列
@app.post("/send-to-queue/")
async def send_to_queue_endpoint(
message: dict,
background_tasks: BackgroundTasks
):
background_tasks.add_task(send_to_queue, message)
return {"message": "Message sent to queue"}
10.3 大规模任务处理方案
方案:使用 Celery 处理大规模任务
from celery import Celery
# 创建Celery实例
app = Celery('tasks', broker='redis://localhost:6379/0')
# 配置
app.conf.update(
result_backend='redis://localhost:6379/0',
task_serializer='json',
result_serializer='json',
accept_content=['json'],
timezone='Asia/Shanghai',
enable_utc=True,
)
# 定义任务
@app.task
def process_large_data(data):
"""处理大规模数据的任务"""
# 处理逻辑
return len(data)
# 在FastAPI中使用
@app.post("/process-large-data/")
async def process_large_data_endpoint(data: list):
# 异步执行任务
task = process_large_data.delay(data)
return {"task_id": task.id, "status": "Task started"}
@app.get("/task-status/{task_id}")
async def get_task_status(task_id: str):
task = process_large_data.AsyncResult(task_id)
return {"task_id": task_id, "status": task.status, "result": task.result}
10.4 任务调度策略优化
策略:
- 基于负载动态调整任务执行
- 实现任务优先级队列
- 考虑使用工作流引擎
# 动态调整任务执行
import psutil
def reschedule_task(task_id: str, minutes: int):
"""重新调度任务"""
from apscheduler.triggers.interval import IntervalTrigger
try:
# 获取任务
job = scheduler.get_job(task_id)
if job:
# 修改任务的触发间隔
job.reschedule(trigger=IntervalTrigger(minutes=minutes))
print(f"Task {task_id} rescheduled to run every {minutes} minutes")
except Exception as e:
print(f"Error rescheduling task: {e}")
def adjust_task_schedule():
"""根据系统负载调整任务调度"""
cpu_usage = psutil.cpu_percent()
if cpu_usage > 80:
# 高负载时减少任务频率
reschedule_task('resource_intensive_task', minutes=30)
else:
# 正常负载时恢复任务频率
reschedule_task('resource_intensive_task', minutes=10)
# 添加监控任务
scheduler.add_job(
adjust_task_schedule,
trigger=IntervalTrigger(minutes=5),
id="adjust_task_schedule"
)
10.5 任务执行统计与分析
import time
from collections import defaultdict
# 任务执行统计
task_stats = defaultdict(lambda: {
'count': 0,
'success': 0,
'failure': 0,
'total_time': 0,
'last_executed': None
})
def execute_task():
"""执行任务的函数"""
# 实现任务执行逻辑
return "Task completed"
def task_with_stats(task_name):
"""带统计的任务"""
start_time = time.time()
stats = task_stats[task_name]
stats['count'] += 1
try:
# 执行任务
result = execute_task()
stats['success'] += 1
return result
except Exception as e:
stats['failure'] += 1
raise
finally:
stats['total_time'] += time.time() – start_time
stats['last_executed'] = time.time()
# 暴露统计信息的API
@app.get("/task-stats/")
async def get_task_stats():
return dict(task_stats)
10.6 任务执行统计与分析的可视化
任务执行统计数据可以通过可视化工具进行展示,便于监控和分析任务执行情况。
使用FastAPI和Plotly实现监控面板:
from fastapi import FastAPI, Request
from fastapi.templating import Jinja2Templates
import plotly.graph_objects as go
import plotly.express as px
import pandas as pd
from datetime import datetime, timedelta
app = FastAPI()
templates = Jinja2Templates(directory="templates")
# 任务执行统计数据
task_stats = defaultdict(lambda: {
'count': 0,
'success': 0,
'failure': 0,
'total_time': 0,
'last_executed': None,
'history': [] # 存储历史执行数据
})
def task_with_stats_and_history(task_name):
"""带统计和历史记录的任务"""
start_time = time.time()
stats = task_stats[task_name]
stats['count'] += 1
try:
# 执行任务
result = execute_task()
stats['success'] += 1
status = "success"
except Exception as e:
stats['failure'] += 1
status = "failure"
finally:
execution_time = time.time() – start_time
stats['total_time'] += execution_time
stats['last_executed'] = time.time()
# 记录历史数据
stats['history'].append({
'timestamp': datetime.now(),
'status': status,
'execution_time': execution_time
})
# 保留最近100条记录
if len(stats['history']) > 100:
stats['history'] = stats['history'][-100:]
# 生成任务执行统计图表
@app.get("/task-stats/dashboard")
async def task_stats_dashboard(request: Request):
"""任务统计仪表盘"""
# 准备数据
tasks = list(task_stats.keys())
if not tasks:
return templates.TemplateResponse("dashboard.html", {"request": request, "graphs": []})
# 1. 任务执行成功率饼图
success_rates = []
for task in tasks:
stats = task_stats[task]
if stats['count'] > 0:
success_rate = (stats['success'] / stats['count']) * 100
else:
success_rate = 0
success_rates.append(success_rate)
fig1 = px.pie(
names=tasks,
values=success_rates,
title="任务执行成功率",
hover_data={"成功率": [f"{rate:.1f}%" for rate in success_rates]}
)
fig1.update_traces(textposition='inside', textinfo='percent+label')
# 2. 任务执行时间趋势图
all_history = []
for task in tasks:
history = task_stats[task]['history']
for record in history:
all_history.append({
'task': task,
'timestamp': record['timestamp'],
'execution_time': record['execution_time'],
'status': record['status']
})
df = pd.DataFrame(all_history)
if not df.empty:
fig2 = px.line(
df, x='timestamp', y='execution_time', color='task',
title="任务执行时间趋势",
labels={"execution_time": "执行时间 (秒)", "timestamp": "时间"}
)
fig2.update_layout(hovermode="x unified")
else:
fig2 = go.Figure()
fig2.update_layout(title="任务执行时间趋势", xaxis_title="时间", yaxis_title="执行时间 (秒)")
# 3. 任务执行状态分布
if not df.empty:
fig3 = px.histogram(
df, x='task', color='status', barmode='group',
title="任务执行状态分布",
labels={"count": "执行次数", "task": "任务", "status": "状态"}
)
else:
fig3 = go.Figure()
fig3.update_layout(title="任务执行状态分布", xaxis_title="任务", yaxis_title="执行次数")
# 生成图表HTML
graph1 = fig1.to_html(full_html=False)
graph2 = fig2.to_html(full_html=False)
graph3 = fig3.to_html(full_html=False)
return templates.TemplateResponse(
"dashboard.html",
{
"request": request,
"graphs": [graph1, graph2, graph3],
"tasks": tasks,
"stats": task_stats
}
)
# 模板文件 (templates/dashboard.html)
"""
<!DOCTYPE html>
<html>
<head>
<title>任务执行统计仪表盘</title>
<link rel="stylesheet" href="https://cdn.jsdelivr.net/npm/bootstrap@5.3.0/dist/css/bootstrap.min.css">
</head>
<body>
<div class="container mt-4">
<h1 class="text-center">任务执行统计仪表盘</h1>
<div class="row mt-4">
<div class="col-md-4">
{{ graphs[0]|safe }}
</div>
<div class="col-md-8">
{{ graphs[1]|safe }}
</div>
</div>
<div class="row mt-4">
<div class="col-md-12">
{{ graphs[2]|safe }}
</div>
</div>
<div class="row mt-4">
<div class="col-md-12">
<h2>任务详细统计</h2>
<div class="table-responsive">
<table class="table table-striped">
<thead>
<tr>
<th>任务名称</th>
<th>执行次数</th>
<th>成功次数</th>
<th>失败次数</th>
<th>成功率</th>
<th>平均执行时间 (秒)</th>
<th>最后执行时间</th>
</tr>
</thead>
<tbody>
{% for task in tasks %}
{% set stats = stats[task] %}
<tr>
<td>{{ task }}</td>
<td>{{ stats.count }}</td>
<td>{{ stats.success }}</td>
<td>{{ stats.failure }}</td>
<td>{{ "{:.1f}%"|format((stats.success / stats.count * 100) if stats.count > 0 else 0) }}</td>
<td>{{ "{:.2f}"|format(stats.total_time / stats.count if stats.count > 0 else 0) }}</td>
<td>{{ stats.last_executed.strftime('%Y-%m-%d %H:%M:%S') if stats.last_executed else 'N/A' }}</td>
</tr>
{% endfor %}
</tbody>
</table>
</div>
</div>
</div>
</div>
</body>
</html>
"""
使用Prometheus和Grafana监控:
from prometheus_client import Counter, Histogram, Gauge, start_http_server
# 创建监控指标
task_executions = Counter('task_executions_total', 'Total number of task executions', ['task', 'status'])
task_duration = Histogram('task_duration_seconds', 'Task execution duration in seconds', ['task'])
task_success_rate = Gauge('task_success_rate', 'Task success rate', ['task'])
# 启动Prometheus metrics服务器
start_http_server(8000)
def monitored_task(task_name):
"""带监控的任务"""
start_time = time.time()
status = "success"
try:
# 执行任务
result = execute_task()
except Exception as e:
status = "failure"
raise
finally:
# 记录指标
execution_time = time.time() – start_time
task_executions.labels(task=task_name, status=status).inc()
task_duration.labels(task=task_name).observe(execution_time)
# 更新成功率
stats = task_stats[task_name]
if stats['count'] > 0:
success_rate = stats['success'] / stats['count']
task_success_rate.labels(task=task_name).set(success_rate)
# 示例任务
@app.post("/execute-task/")
async def execute_task_endpoint(task_name: str, background_tasks: BackgroundTasks):
"""执行带监控的任务"""
background_tasks.add_task(monitored_task, task_name)
return {"message": f"Task {task_name} started"}