声明,本文仅供搭建国内的局域网参考,不为其他任何技术作参考。
一、硬件环境
| CPU | Intel i3-12100F | ||
| 主板 | ASUS H610M-A | DDR4 | 同 CPU 共 ¥1070 |
| 内存 | 爱国者 承影 3200MHz | 16GB ×2 | ¥344 |
| 硬盘 | 梵想 S790E | SSD, 1TB | ¥363 |
| 致态 TiPlus7100 | SSD, 512GB | ¥369 | |
| 西数蓝盘 | HDD, 4TB | ¥574 | |
| Seagate Barracuda 7200 | HDD, 500GB | 拆机 | |
| 西数蓝盘 | HDD, 1TB | 拆机 | |
| Hitachi/HGST Travelstar | HDD, 500GB | 拆机 | |
| 电源 | 海韵 500W | 铜牌直出 | ¥297 |
二、总体需求
主要需求就是在移动网络下可以访问本地的 NAS 系统。 并且因为从事硬件设计,所以搭建了 EDA_ALL 虚拟机来写自己的项目。并且能够通过家里的机器挂校园网。
三、PVE 的安装
PVE 是一个基于硬件虚拟化的 OS,安装后几乎可以运行所有虚拟机。 个人体验非常好,当时看极客湾的视频时也发现他们的服务器上用了 PVE 系统。
3.1 安装黑屏问题的解决办法
如果 GUI 安装界面出现黑屏,通常是显卡无法驱动显示适配器导致的。 需要在引导菜单中选择:
Install Proxmox VE (Terminal UI)
然后:
按 e 进入编辑模式;
找到以 linux 开头的行;
在该行末尾添加参数 nomodeset(前后留空格);
按 Ctrl + X 或 F10 启动安装程序。
推荐视频教程: 🎥 在下莫老师 | 利用 PVE 虚拟机打造属于自己的 All-in-One 系统
四、第一阶段构建
4.1 虚拟机的安装与分配
安装好 PVE 后,我创建了以下虚拟机:
| fnos | 6C + 8GB + 直通所有 HDD 和 500GB SSD 作为读缓存 | NAS |
| EDA_ALL | 4C + 10GB + 400GB | 学习硬件设计 |
| Ubuntu22.04 | 2C + 10GB + 200GB | 学习硬件设计 |
4.2 PVE 硬盘直通
1️⃣ 使用命令查看所有磁盘:
ls /dev/disk/by-id 2️⃣ 直通磁盘给虚拟机:
qm set [虚拟机编号] –(sata0-6 或 scsi0-6) /dev/disk/by-id/ata-WDC_WD40EZAX-22C8UB0_WD-WX42D43F7PX6
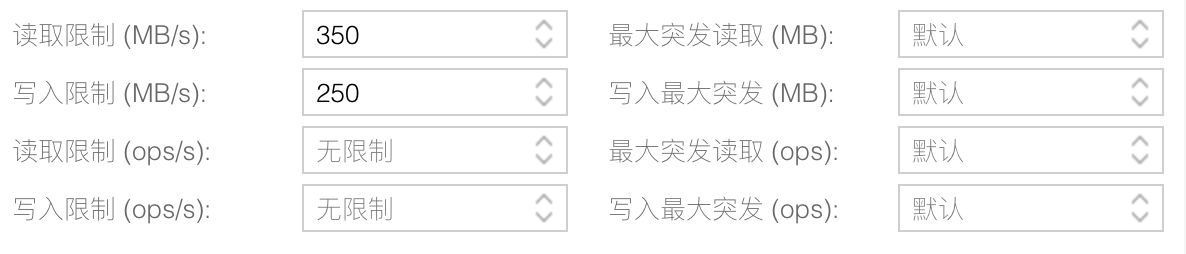
这样虚拟机就可以直接访问物理硬盘。 但注意:NAS 系统若存放大量照片,频繁访问可能造成 IO 堵塞,甚至导致宿主机宕机。 建议在 PVE GUI 中限制 I/O 带宽。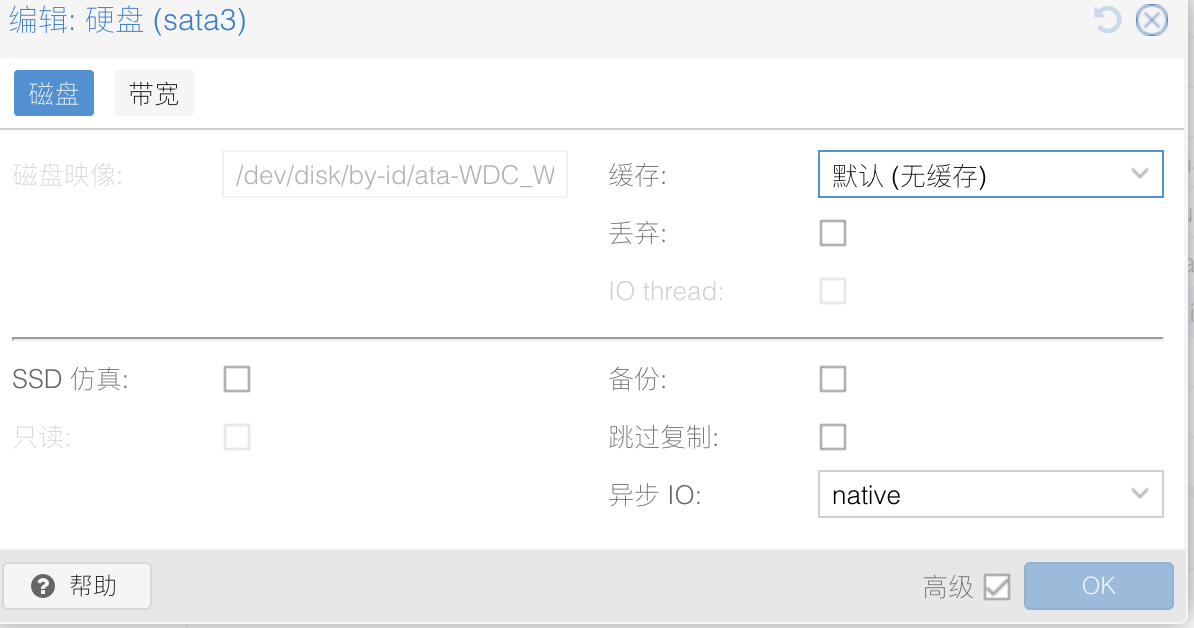
4.3 PVE 网络配置
进入「数据中心 → PVE → DNS」 填入以下 DNS:
223.5.5.5
8.8.8.8
即可联网。
4.4 网络架构:Zerotier 阶段
前期我用学生优惠白嫖了一台阿里云服务器,所以最初使用 Zerotier 构建虚拟局域网。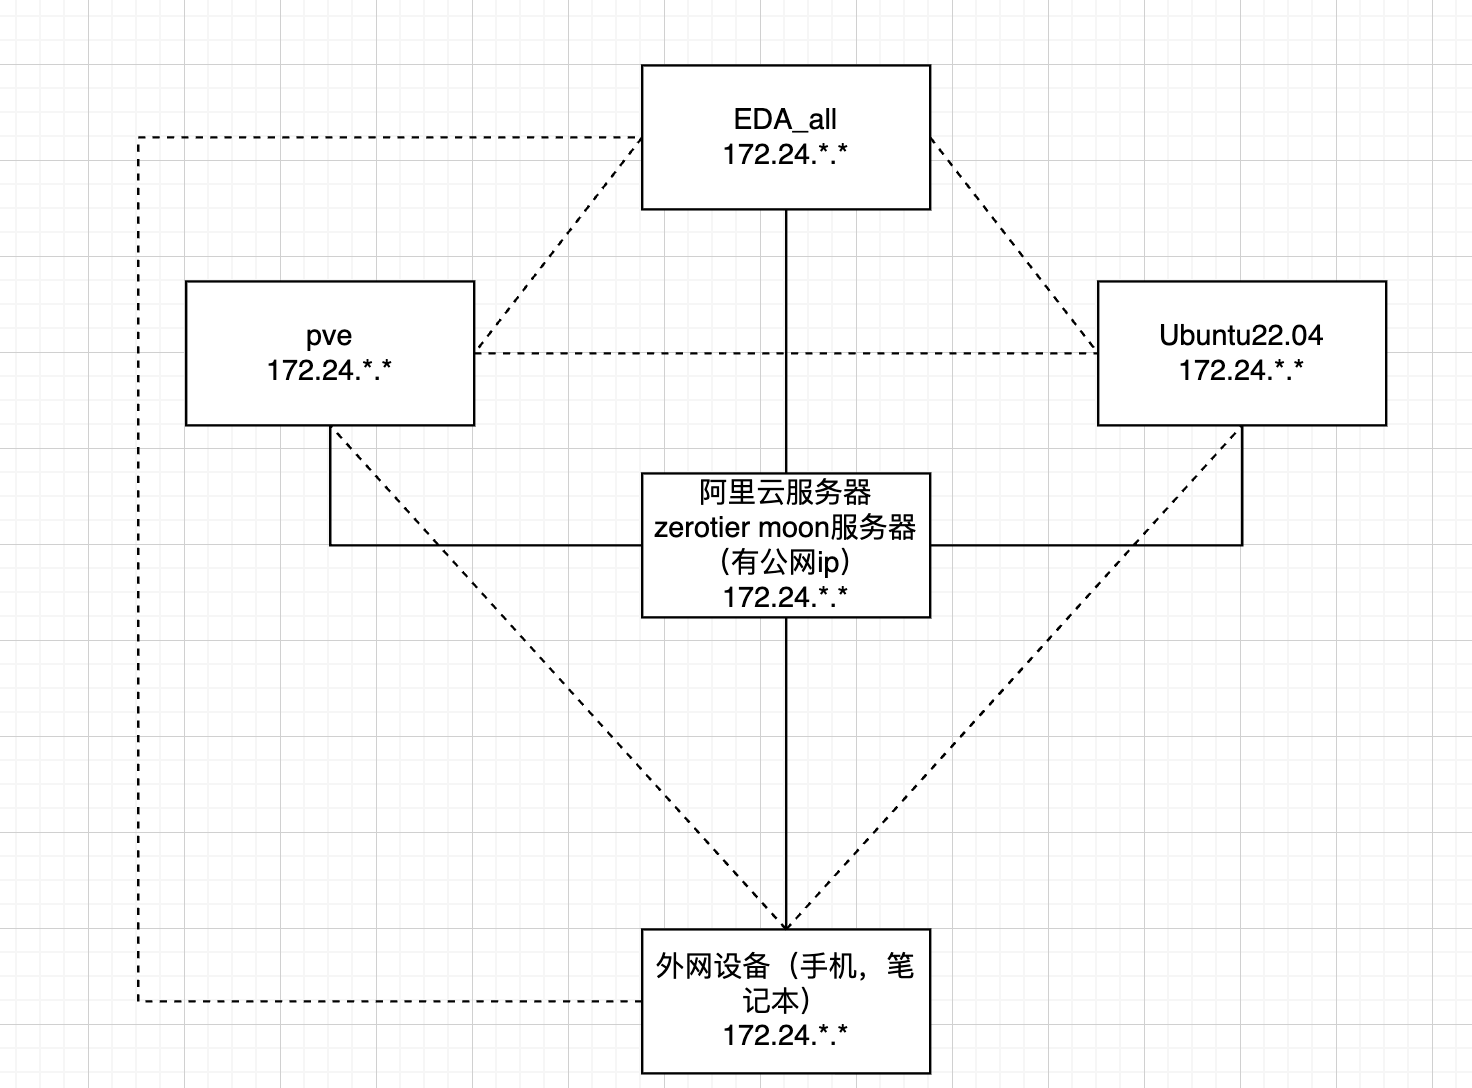
虚线代表可 P2P 打洞连接(速度更快); 最坏情况下会走阿里云服务器中继。 限制是子网最多 10 台设备,每次新增设备都要手动批准,略显麻烦。
4.5 构建 Zerotier Moon 服务器
云服务器加入自己的子网:
zerotier-cli join [network_ID]
进入配置目录:
cd /var/lib/zerotier-one
生成 moon 配置:
zerotier-idtool initmoon identity.public >> moon.json
编辑 moon.json,在 stableEndpoints 填写外网 IP 与端口;
生成 .moon 文件:
zerotier-idtool genmoon moon.json
移动文件并重启服务:
mkdir moons.d && mv 000000xxxxxx.moon moons.d
systemctl restart zerotier-one
其他主机复制 moons.d 文件夹到 /var/lib/zerotier-one/ 并重启即可。
五、第二阶段构建:WireGuard
阿里云学生服务的带宽是需要额外付费的,不然就只有5Mbps的小水管,当阿里云服务器上没钱之后,我就想着能不能有更便宜一点的方案。然后就想到了家里的宽带是可以开通公网ip的,也就只需要一个月10元。然后我就更改了网络架构。
为了承载多余的功能,我使用了openwrt作为家里拨号上网的设备,具体的安装视频也可以参考莫老师的视频。
5.1 虚拟机分配
| fnos | 6C + 8GB + 直通 HDD | NAS |
| EDA_ALL | 4C + 10GB + 400GB | 学习硬件设计 |
| Ubuntu22.04 | 2C + 10GB + 200GB | Linux 开发 |
| OpenWrt | 2C + 1GB + 8GB | 家庭拨号 |
| 网络中枢 (Ubuntu24.04) | 4C + 2GB + 32GB | 外部访问跳板 |
| Windows11 | 2C + 2GB + 128GB | 校园网跳板 |
5.2 Zerotier 的问题
Zerotier 的 stableEndpoints 只支持固定 IP, 而国内运营商分配的公网 IP 是动态的, 因此 Zerotier 无法长期使用。
5.3 WireGuard 的搭建
我选择在中枢节点(Ubuntu24.04)中搭建 WireGuard,轻量且配置灵活。
① 安装 WireGuard
sudo apt update
sudo apt install -y wireguard
② 生成密钥对
wg genkey | tee /etc/wireguard/server_private.key | wg pubkey > /etc/wireguard/server_public.key
③ 创建配置文件 /etc/wireguard/wg0.conf
[Interface]
PrivateKey = <服务器私钥>
Address = 172.25.1.1/24
ListenPort = 51820
PostUp = sysctl -w net.ipv4.ip_forward=1
PostDown = sysctl -w net.ipv4.ip_forward=0
PostUp = iptables -t nat -A POSTROUTING -o eth0 -j MASQUERADE
PostDown = iptables -t nat -D POSTROUTING -o eth0 -j MASQUERADE
⚠️ 将 eth0 替换为服务器的外网网卡。
④ 启动服务
sudo systemctl enable wg-quick@wg0
sudo systemctl start wg-quick@wg0
⑤ 客户端配置
[Interface]
PrivateKey = <客户端私钥>
Address = 172.25.1.2/24
DNS = 1.1.1.1
[Peer]
PublicKey = <服务器公钥>
Endpoint = <服务器公网IP>:51820
AllowedIPs = 0.0.0.0/0
PersistentKeepalive = 25
若只想访问内网,可改为 AllowedIPs = 10.10.10.0/24
⑥ 验证连接
sudo wg-quick up wg0
ping 172.25.1.1
若能 ping 通,说明隧道建立成功。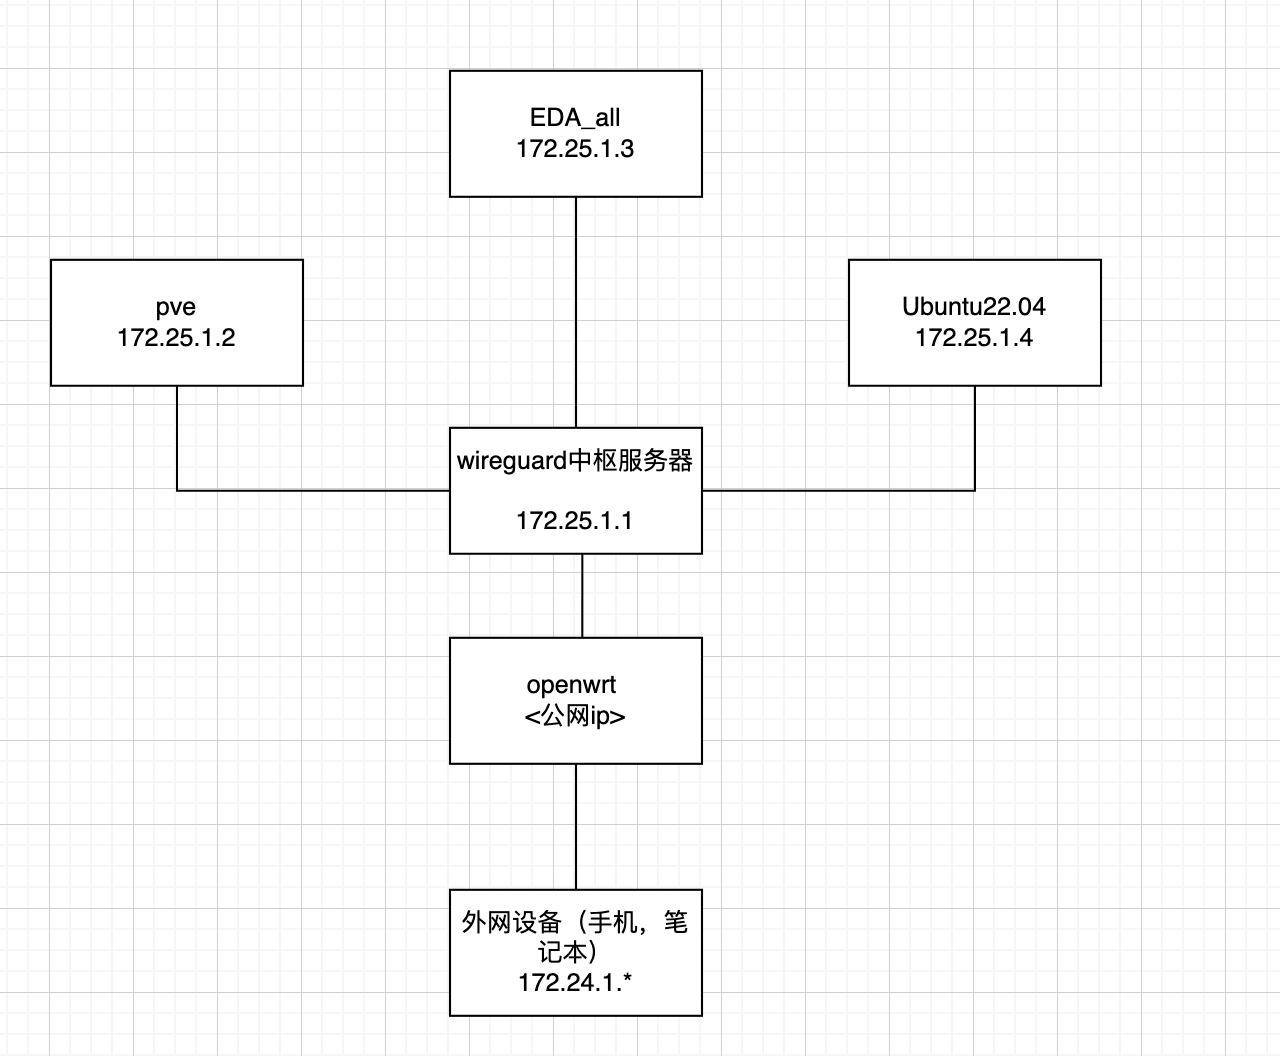
📉 缺点:所有流量都经中枢节点转发,无法 P2P 打洞。 RDP 访问时每隔 7~8 秒会卡顿 3 秒,体验很差。 于是我开始尝试 Tailscale。
六、第三阶段构建:Tailscale + 自建 DERP
Tailscale 是一个可打洞、支持 iOS 客户端的 VPN,体验极佳。
6.1 DDNS 配置(Cloudflare)
在配置 Tailscale 之前,需要将域名解析至家中中枢节点。 我在 Namecheap 上申请了免费学生域名,并托管到 Cloudflare。
首先找到cloudflare自己的域名下面的两个API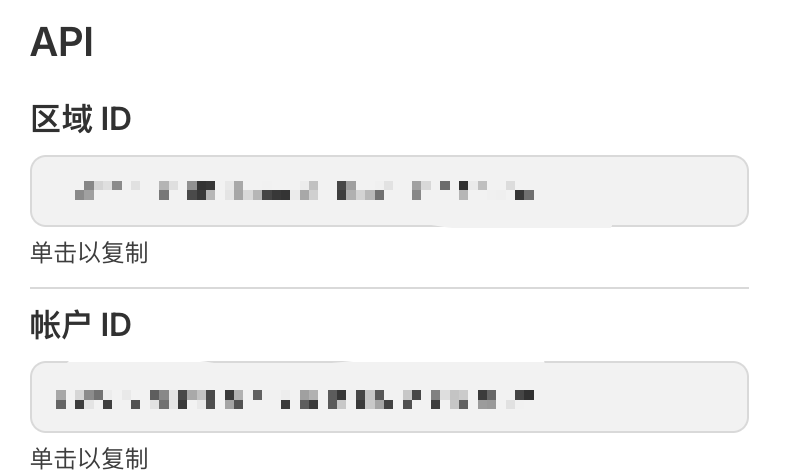
创建 API Token:
-
模板:Edit Zone DNS
-
权限:Zone / DNS / Edit
-
区域:Include → Specific zone → 你的域名
生成后,将 Token、Zone ID、Zone Name 填入 /etc/ddns/.env:
API_TOKEN=<申请的token>
ZONE_ID=<zone_id>
ZONE_NAME=<自己的域名>
然后使用脚本定时更新公网 IP(每 5 分钟执行一次)。
脚本示例:
#!/usr/bin/env bash
set -Eeuo pipefail
# —- 配置 —-
ENV_FILE="/etc/ddns/.env"
LOG="/var/log/ddns.log"
: "${ENV_FILE:?missing env file path}"
source "$ENV_FILE"
: "${API_TOKEN:?missing API_TOKEN}"
: "${ZONE_ID:?missing ZONE_ID}"
: "${ZONE_NAME:?missing ZONE_NAME}" #
CURL="/usr/bin/curl"
JQ="/usr/bin/jq"
DATE="/bin/date"
TR="/usr/bin/tr"
ts() { "$DATE" +"%a %b %d %I:%M:%S %p %Z %Y"; }
log() { echo "$(ts) $*" | tee -a "$LOG"; }
fail_if_missing() {
for x in "$CURL" "$JQ"; do
[[ -x "$x" ]] || { log "❌ Missing $x"; exit 1; }
done
}
get_ipv4() {
for url in \\
"http://ip.3322.net" \\
"http://members.3322.org/dyndns/getip" \\
"https://ipv4.icanhazip.com" \\
"https://api.ipify.org"; do
ip=$("$CURL" –noproxy '*' –max-time 5 -4 -fsS "$url" \\
| "$TR" -d '\\n\\r ' || true)
[[ "$ip" =~ ^([0-9]{1,3}\\.){3}[0-9]{1,3}$ ]] && echo "$ip" && return
done
echo "ERR"
}
# —- Cloudflare —-
cf_get_record_id() {
local name="$1"<你的域名>
"$CURL" -fsS -H "Authorization: Bearer $API_TOKEN" \\
-H "Content-Type: application/json" \\
"$CF_API/zones/$ZONE_ID/dns_records?type=A&name=$name" \\
| "$JQ" -r '.result[0].id // empty'
}
cf_get_current_ip() {
local record_id="$1"
"$CURL" -fsS -H "Authorization: Bearer $API_TOKEN" \\
-H "Content-Type: application/json" \\
"$CF_API/zones/$ZONE_ID/dns_records/$record_id" \\
| "$JQ" -r '.result.content' | "$TR" -d '\\n\\r ' || true
}
cf_update_record() {
local name="$1" ip="$2" record_id="$3"
if [[ -z "$record_id" ]]; then
log "➕ 创建记录 $name -> $ip"
"$CURL" -fsS -X POST \\
-H "Authorization: Bearer $API_TOKEN" \\
-H "Content-Type: application/json" \\
–data "{\\"type\\":\\"A\\",\\"name\\":\\"$name\\",\\"content\\":\\"$ip\\",\\"ttl\\":120,\\"proxied\\":false}" \\
"$CF_API/zones/$ZONE_ID/dns_records" > /dev/null
else
log "♻️ 更新记录 $name: $ip"
"$CURL" -fsS -X PUT \\
-H "Authorization: Bearer $API_TOKEN" \\
-H "Content-Type: application/json" \\
–data "{\\"type\\":\\"A\\",\\"name\\":\\"$name\\",\\"content\\":\\"$ip\\",\\"ttl\\":120,\\"proxied\\":false}" \\
"$CF_API/zones/$ZONE_ID/dns_records/$record_id" > /dev/null
fi
}
# —- 主流程 —-
fail_if_missing
CF_API="https://api.cloudflare.com/client/v4"
IP="$(get_ipv4)"
[[ "$IP" == "ERR" ]] && { log "❌ 获取公网 IP 失败"; exit 1; }
for sub in "@" "*"; do
[[ "$sub" == "@" ]] && NAME="$ZONE_NAME" || NAME="*.$ZONE_NAME"
log "🌐 处理记录:$NAME"
RID="$(cf_get_record_id "$NAME")"
CUR_IP=""
[[ -n "$RID" ]] && CUR_IP="$(cf_get_current_ip "$RID")"
if [[ "$IP" == "$CUR_IP" ]]; then
log "✅ $NAME 已是最新: $IP"
else
log "🔧 $NAME: $CUR_IP -> $IP"
cf_update_record "$NAME" "$IP" "$RID"
log "✅ 完成 $NAME = $IP"
fi
done
log "🎉 DDNS 同步完成: $IP"
6.2 部署 DERP 中继服务器
① 安装 Golang 环境
curl -OL https://go.dev/dl/go1.23.0.linux-amd64.tar.gz
tar -C /usr/local -xzf go1.23.0.linux-amd64.tar.gz
export PATH=$PATH:/usr/local/go/bin
② 安装 DERP 服务端
go install tailscale.com/cmd/derper@main
验证安装:
~/go/bin/derper -h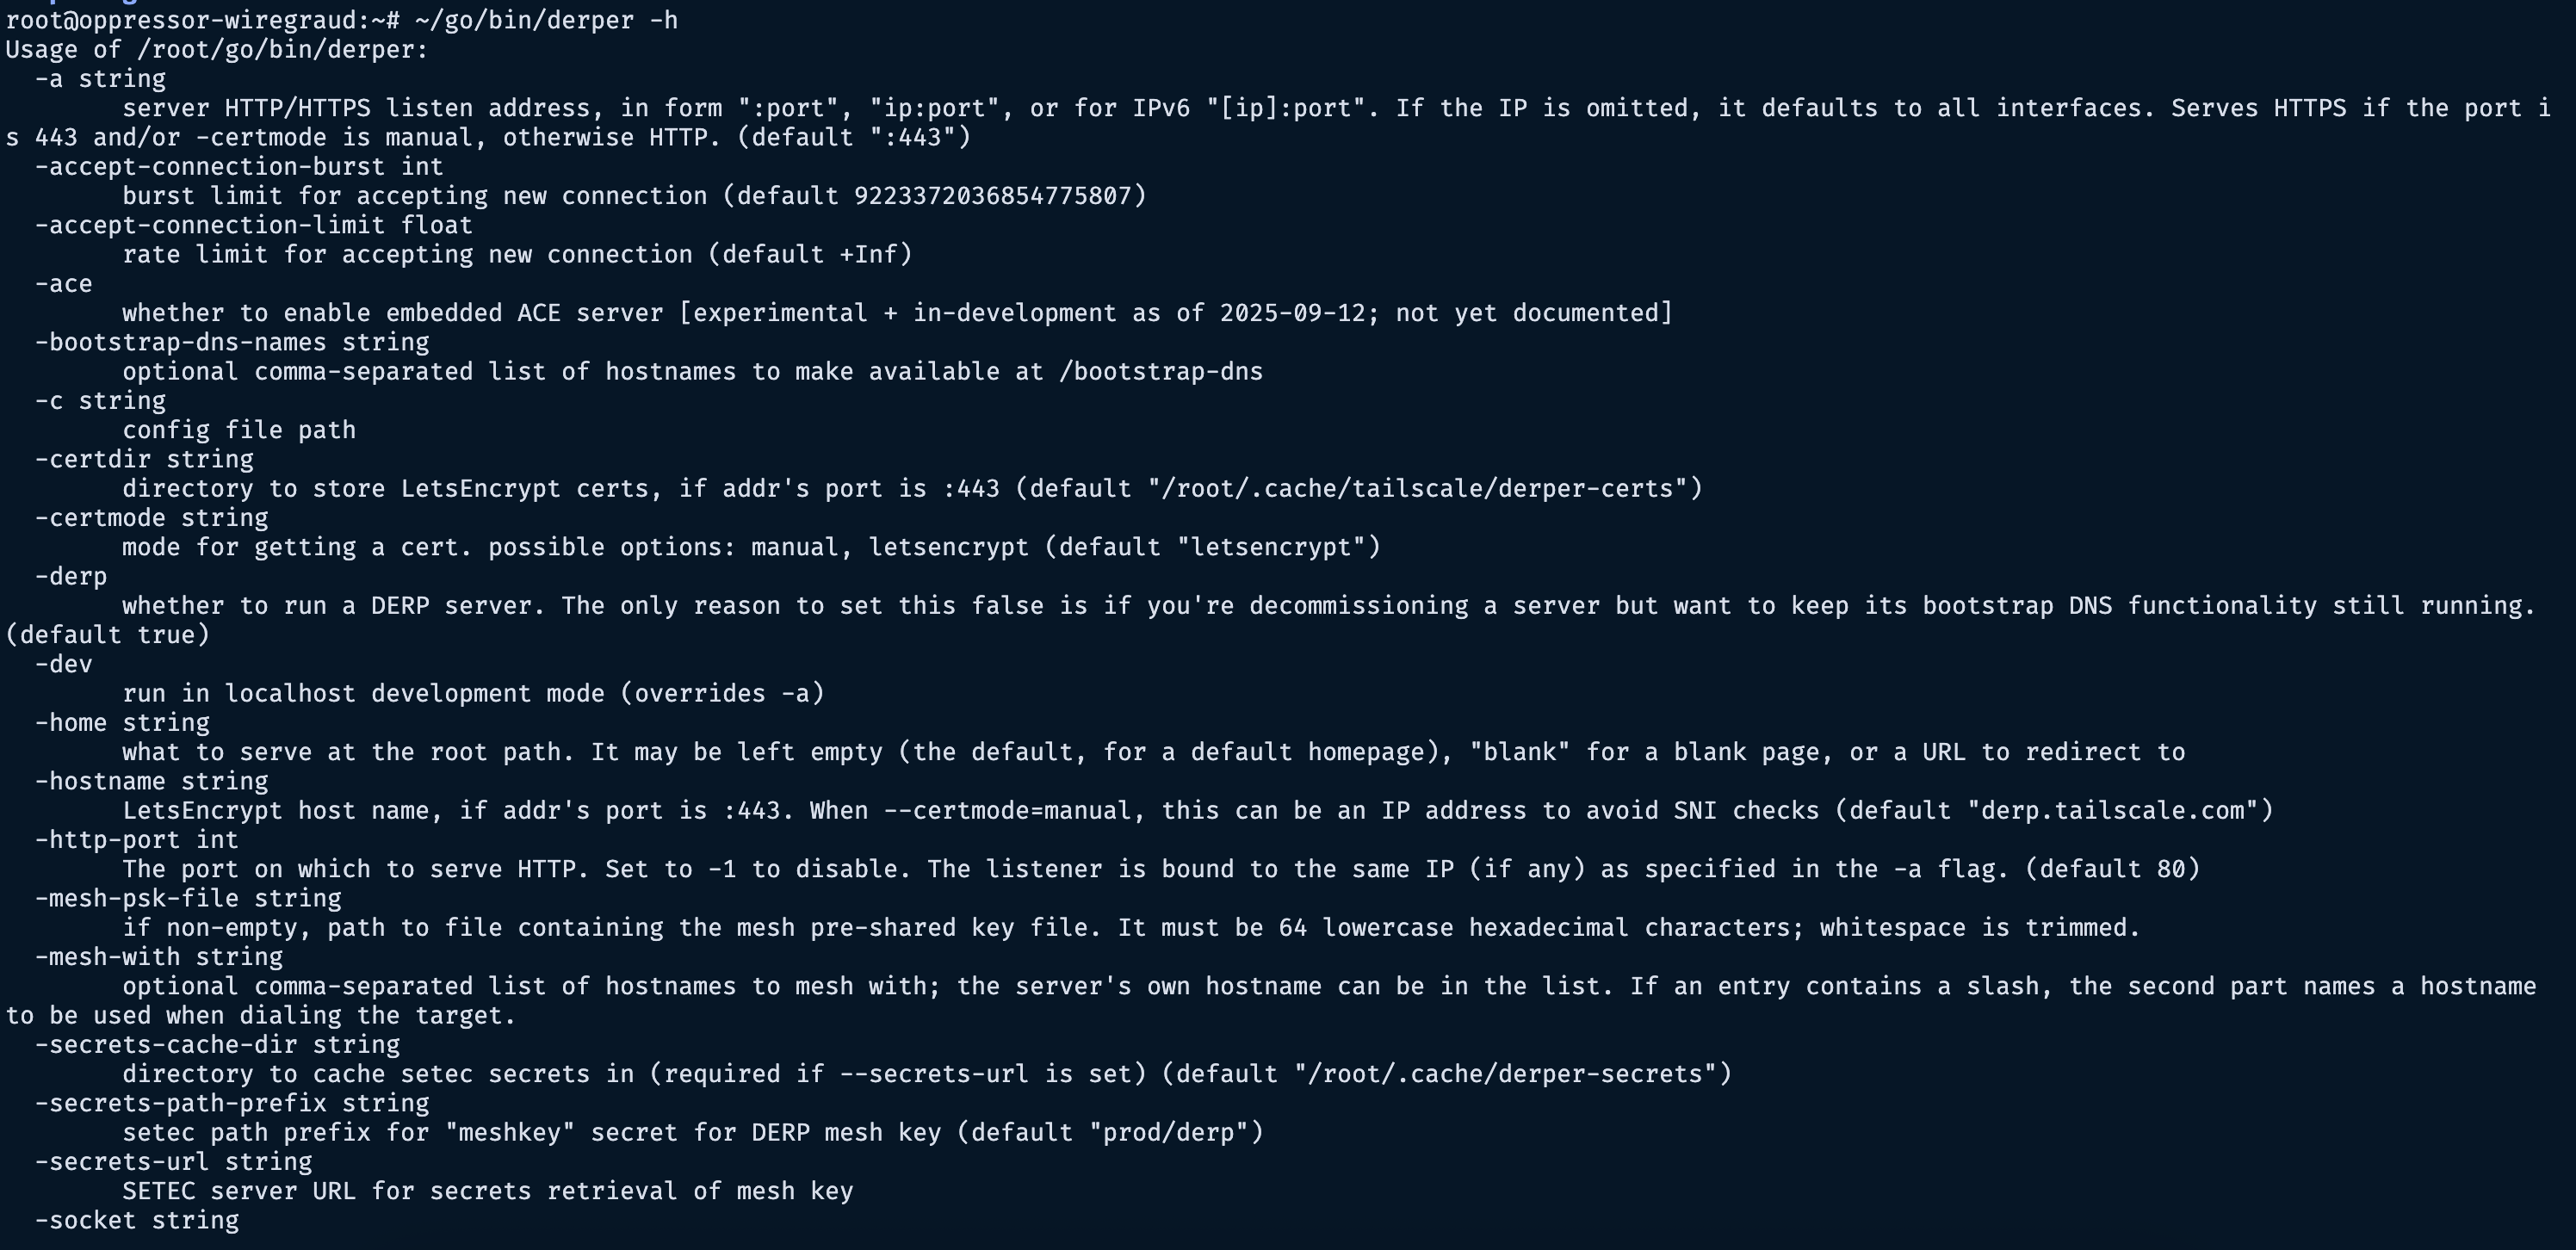
③ 申请 HTTPS 证书
使用 acme.sh(DNS 验证方式):
curl https://get.acme.sh | sh -s email=my@example.com
acme.sh –set-default-ca –server letsencrypt
export CF_Token="<API令牌>"
export CF_Account_ID="<账户ID>"
export CF_Zone_ID="<域名的区域ID>"
acme.sh –issue –dns dns_cf -d yourdomain.com
安装证书到指定目录:
mkdir -p ~/derper/ssl
acme.sh –install-cert -d yourdomain.com \\
–fullchain-file ~/derper/ssl/yourdomain.com.crt \\
–key-file ~/derper/ssl/yourdomain.com.key
④ 运行 DERP 服务
derper -hostname yourdomain.com \\
-certmode manual \\
-certdir ~/derper/ssl \\
-verify-clients \\
-http-port -1 \\
-a :4443 \\
-stun-port 53478
使用 screen 让其后台常驻。
访问 https://yourdomain.com:4443 出现下图即为成功: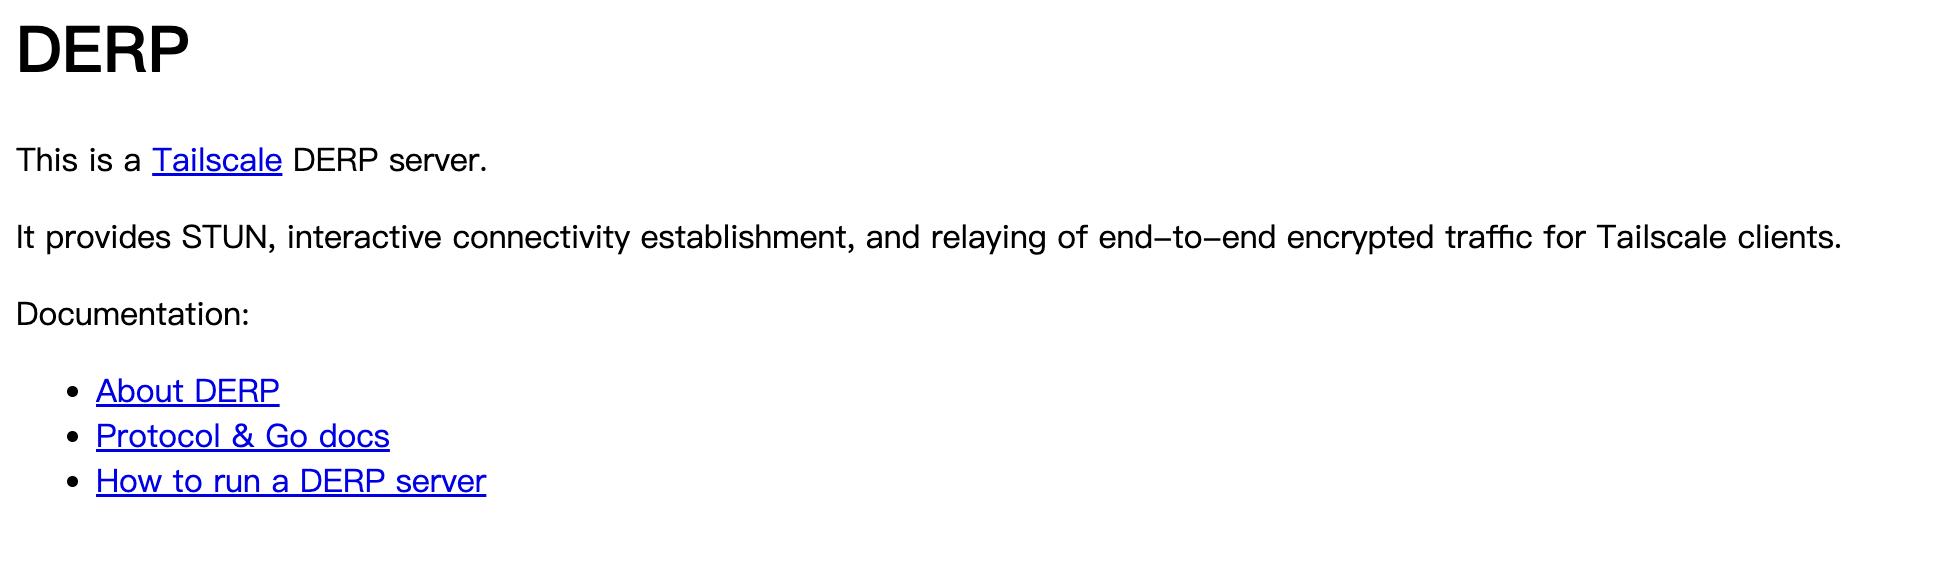
6.3 在 Tailscale 控制台配置自建 DERP
进入 Tailscale 管理面板 → Access Controls → derpMap, 添加自定义 DERP 节点: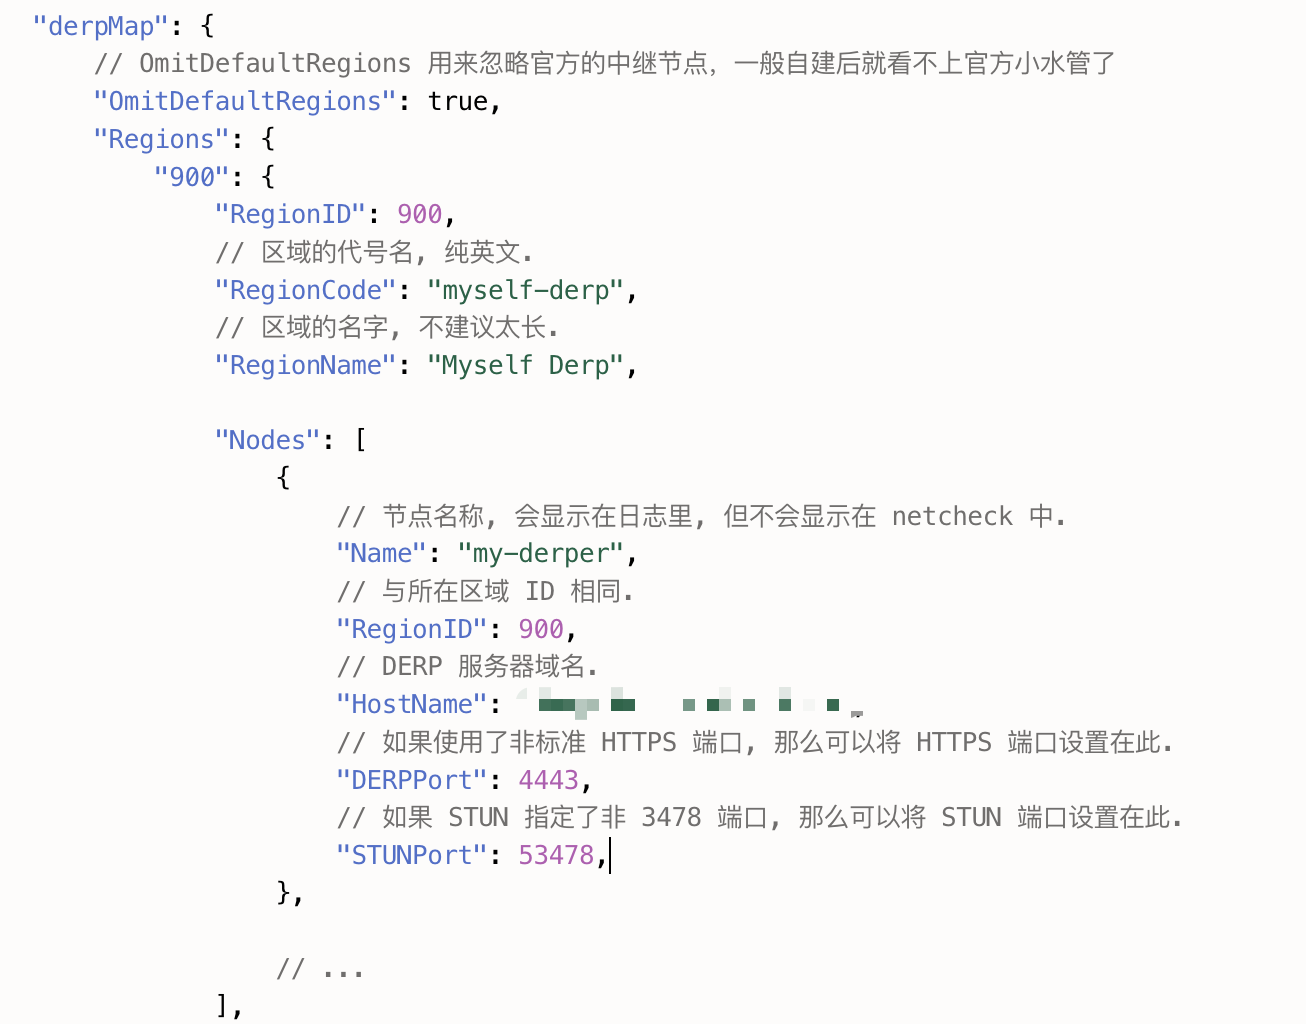
开启验证后,在中枢节点登录自己的 Tailscale 账号即可。
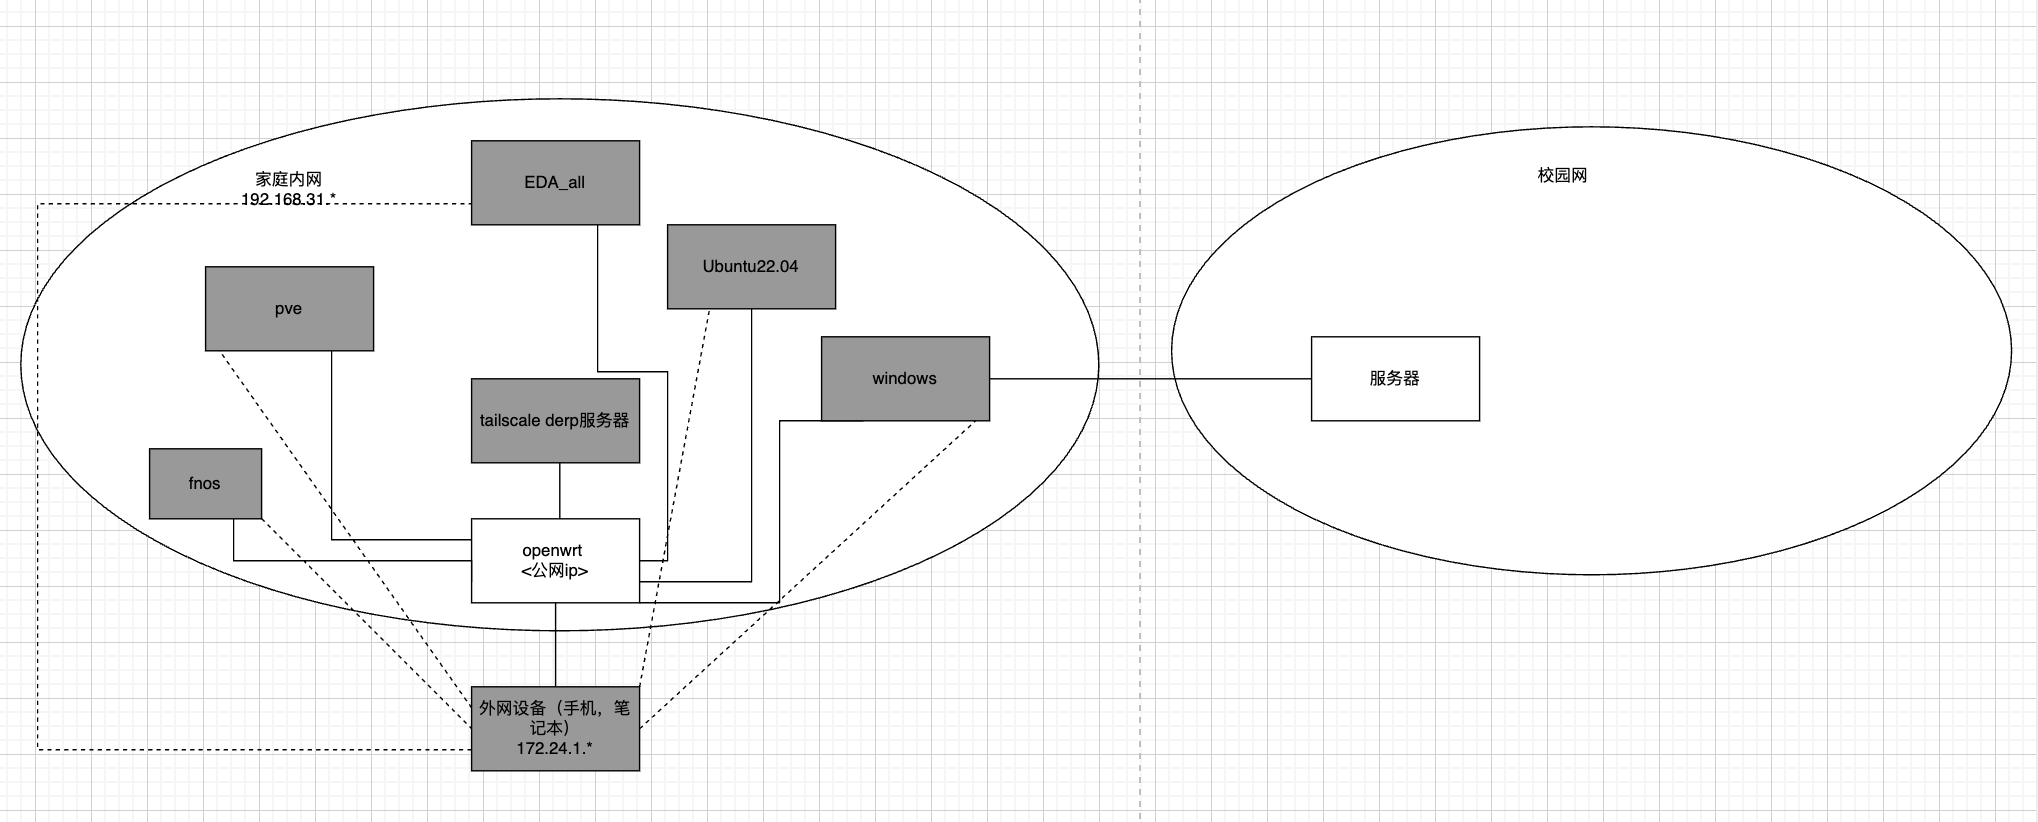
6.4 最终网络拓扑
灰色框代表连接了 Tailscale 的设备,虚线表示成功打洞。 实际体验非常流畅,没有卡顿。 测试结果:访问家中服务器可跑满家庭宽带上传带宽。
✅ 总结:
-
Zerotier:P2P 打洞强,但节点管理复杂;
-
WireGuard:轻量稳定,但无打洞,抖动高;
-
Tailscale + 自建 DERP:完美结合,体验接近局域网。