文章目录
- 一文保姆式大白话讲清楚Web Component原理、使用、通信方式、应用场景等问题,如果看了不明白,请挂直接脑科
- 先理解概念
- Custom Elements
- Shadow DOM
- template
- SFC化
- web components组件之间的通信
-
- 组件通信之一——CustomEvent,自定义事件
- 组件通信之一——属性监听
- 组件通信之一——实例方法
- 组件通信之一——其他
- web components应用场景
-
- 通用UI组件库
- 低代码平台
- 第三放嵌入式组件开发
- 微前端
一文保姆式大白话讲清楚Web Component原理、使用、通信方式、应用场景等问题,如果看了不明白,请挂直接脑科
先理解概念
- Web Components,乍一听,可能有点陌生,不慌,拆一下,就是Web+Component
- 先看components,这是什么,组件,那这很好理解,作为一个前端开发者,尤其是管用框架的开发者,像Vue,React这些,组件是不可或缺的东西
- 当然组件又可分为业务组件和通用组件,业务组件一般会多少关联一些框架本身的东西,比如在vue里面,我们通过SFC来抽离复杂业务,实现业务拆分和逻辑复用
- 而通用组件一般又可分为框架通用组件和跨框架通用组件,很好理解,框架通用组件就是只能在某个框架下使用,比如在Vue框架下,有很多的通用组件,也就是Vue的生态
- 而跨框架通用组件实现了跟框架的解耦,不管你是什么框架都能使用,那怎么才能做到不管你是什么框架才能都能使用呢,那就得跟框架无关,那怎么跟框架无关呢,用原生,因为你不管是哪个框架,用的什么原理,所有原生的东西你一定都会兼容支持
- 那前端原生的东西里面有组件这个东西么
- 问得好,真有,而且就是Web Components
- 这东西是个啥呢,别着急
- 且听我分析
- 我们还是回到业务组件来说,在VUE框架下,我们如何封装一个SFC,很简单,就是创建一个.vue的文件,然后处理template,script,和style三部分逻辑
- 比如我们现在创建一个业务组件叫MyButton,封装各种场景的button样式,比如一般默认,警告,成功等
- 上代码
// 子组件MyButton.vue
<template>
<button :class="type">{{ name }}</button>
</template>
<script>
export default{
name:'MyButton',
props:{
type:{
type:String,
default:'info',
},
name:{
type:String,
default:'提示',
}
},
data(){
return{
}
}
}
</script>
<style scoped>
.info{
/**/
}
.warning{
/**/
}
</style>
- 然后我们在父组件里面引用子组件
/*Parent.vue*/
<template>
<div>
<my-button type="info" name="提示"></my-button>
</div>
</template>
<script>
import MyButton from './components/MyButton.vue'
export default{
name:'APP',
components:{
MyButton
},
data(){
return{
}
}
}
</script>
<style>
</style>
-
到这,父组件引用了子组件MyButton,然后,父组件最终被浏览器渲染
-
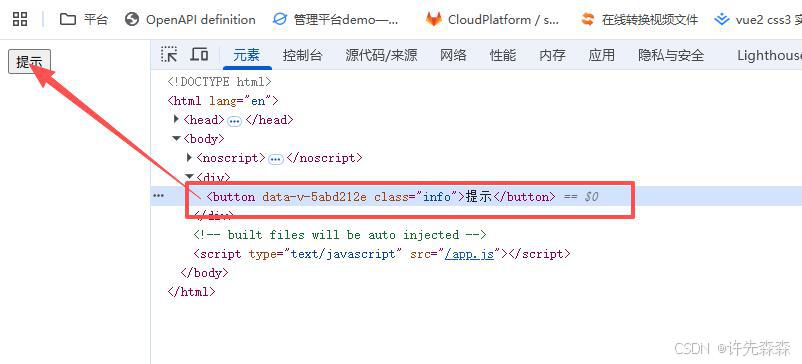
关键来了,渲染之后,我们打开F12,看看elements(元素)一栏里面,Mybutton被渲染成了啥
-
你会发现,MyButton被渲染成了button,也就是说我们在父组件里面引用了MyButton,但是最终浏览器渲染的时候还是把MyButton解体,渲染成了button
-
为什么呢,因为浏览器只会渲染HTML存在的元素,MyButton就不是一个HTML,所以他必须经过编译,转化为button然后再渲染
-
也就是说,我们只是在编码逻辑上存在MyButton,渲染逻辑上并不存在MyButton
-
这你就想,那我是不是多余写MyButton,虽然代码层实现了封装复用,但是最终页面上没体现出来
-
我现在就想让浏览器里面渲染MyButton,而不是button,怎么办呢,那就需要把MyButton变成HTML,那怎么才能变成HTML呢
-
问得好,还真有,Web Component就能做到,怎么做到,MyButton现在不是非HTML,那我就声明他是,怎么声明,自定义
-
怎么自定义,使用 Custom Elements
Custom Elements
- 这是啥玩意呢,一句话,这是一个可以让你注册一个自定义HTML么的方法
- 上代码
<!DOCTYPE html>
<html lang="zh-CN">
<head>
<meta charset="UTF-8">
<title></title>
</head>
<body>
<!– 这里使用自定义组件 –>
<my-button></my-button>
<script>
// 定义自定义组件
class MyButton extends HTMLElement{
constructor(){
super()
this.innerHTML=`<button class="info">提示</button>`
}
}
//注册自定义元素,也就是把MyButton注册为my-button,这样就相当于注册了一个HTML元素,名字叫my-button,可以直接被浏览器渲染
customElements.define('my-button',MyButton)
</script>
</body>
</html>
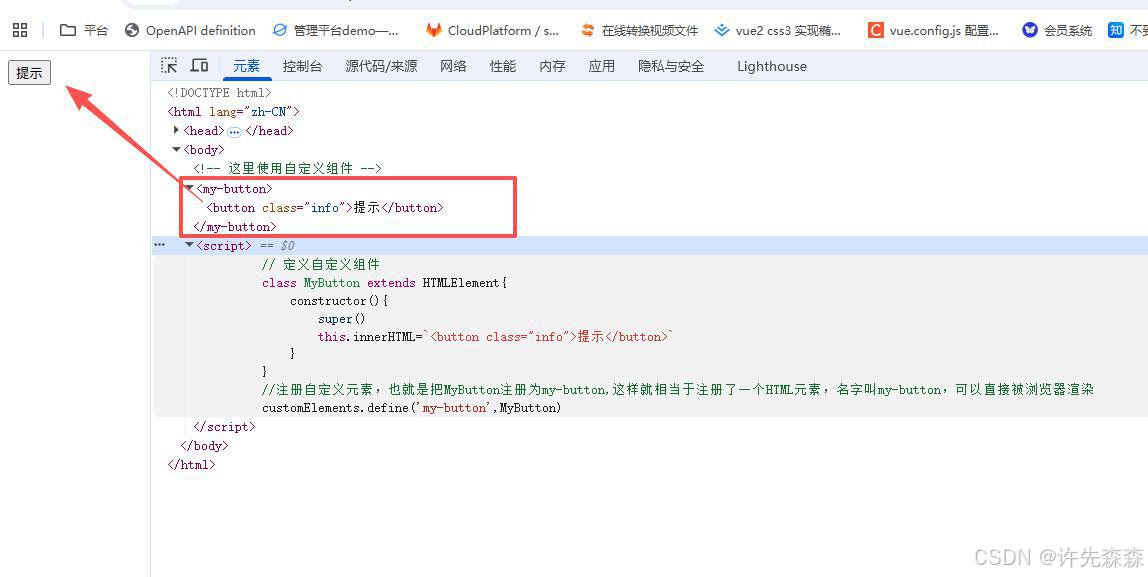
- 看到没有,这时候MyButton直接被渲染了,而不是拆解为button,为了验证这一逻辑,我们在Button里面再加入些其他元素
<!DOCTYPE html>
<html lang="zh-CN">
<head>
<meta charset="UTF-8">
<title></title>
</head>
<body>
<!– 这里使用自定义组件 –>
<my-button></my-button>
<script>
// 定义自定义组件
class MyButton extends HTMLElement{
constructor(){
super()
this.innerHTML=`<div>
<span>我是MyButton组件的span标签</span>
<button class="info">提示</button>
</div>`
}
}
//注册自定义元素,也就是把MyButton注册为my-button,这样就相当于注册了一个HTML元素,名字叫my-button,可以直接被浏览器渲染
customElements.define('my-button',MyButton)
</script>
</body>
</html>
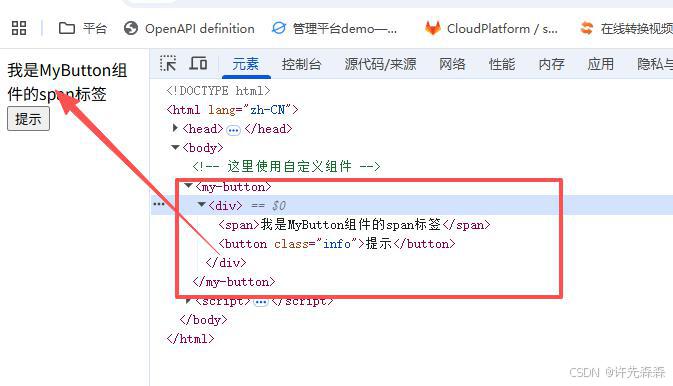
- 看到了吧,无论我们在MyButton内添加多少元素,他都会被MyButton封装然后整体渲染不拆解,
- 这个就很牛逼了啊,相当于我们可以自己创建很多HTML,然后他会被当做一个整体组件直接渲染
- 那么问题来了,既然是组件,干过Vue的都知道,组件是有生命周期的,最起码有挂载和销毁,这个自定义HTML有么
- 别慌,真有
<!DOCTYPE html>
<html lang="zh-CN">
<head>
<meta charset="UTF-8">
<title></title>
</head>
<body>
<!– 这里使用自定义组件 –>
<my-button type="info"></my-button>
<script>
// 定义自定义组件
class MyButton extends HTMLElement{
constructor(){
super()
this.innerHTML=`<div>
<span>我是MyButton组件的span标签</span>
<button class="info">提示</button>
</div>`
}
//生命周期,组件挂载到DOM时触发
connectedCallback(){
console.log('my-button挂载完成')
console.log(this)
this.querySelector('button').addEventListener('click',()=>{
console.log(`click ${this.getAttribute('type')} button`)
})
}
//生命周期,组件从DOM移除时触发
disconnectedCallback(){
console.log('my-button 已移除')
this.querySelector('button').removeEventListener('click',null)
}
}
//注册自定义元素,也就是把MyButton注册为my-button,这样就相当于注册了一个HTML元素,名字叫my-button,可以直接被浏览器渲染
customElements.define('my-button',MyButton)
</script>
</body>
</html>
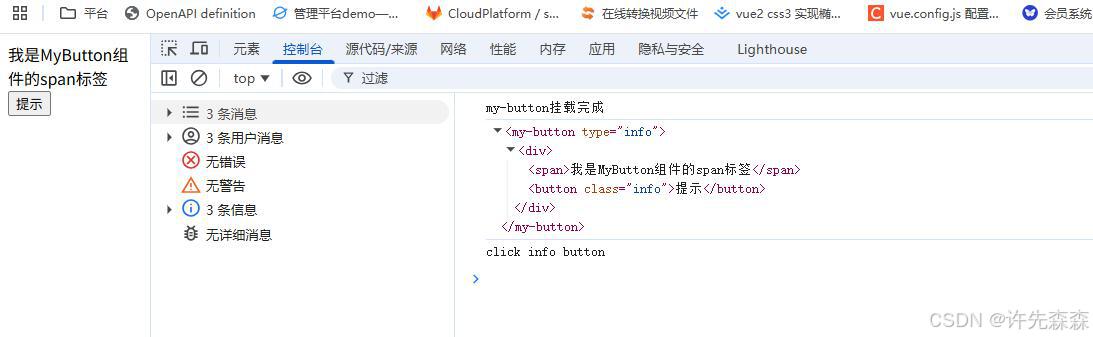
- 可以看到,customElements有两个生命周期,connectedCallback,在组件挂载到页面上时触发,disconnectedCallback在页面上移除时触发
- 现在又来一个问题,既然是组件,那么肯定是可以被复用的,我们尝试一下
<!DOCTYPE html>
<html lang="zh-CN">
<head>
<meta charset="UTF-8">
<title></title>
</head>
<body>
<!– 这里使用自定义组件 –>
<my-button type="info"></my-button>
<my-button type="warning"></my-button>
<script>
// 定义自定义组件
class MyButton extends HTMLElement{
constructor(){
super()
this.innerHTML=`<div>
<span>我是MyButton组件的span标签</span>
<button class="info">提示</button>
</div>`
}
//生命周期,组件挂载到DOM时触发
connectedCallback(){
console.log('my-button挂载完成')
console.log(this)
this.querySelector('button').addEventListener('click',()=>{
console.log(`click ${this.getAttribute('type')} button`)
})
}
//生命周期,组件从DOM移除时触发
disconnectedCallback(){
console.log('my-button 已移除')
this.querySelector('button').removeEventListener('click',null)
}
}
//注册自定义元素,也就是把MyButton注册为my-button,这样就相当于注册了一个HTML元素,名字叫my-button,可以直接被浏览器渲染
customElements.define('my-button',MyButton)
</script>
</body>
</html>
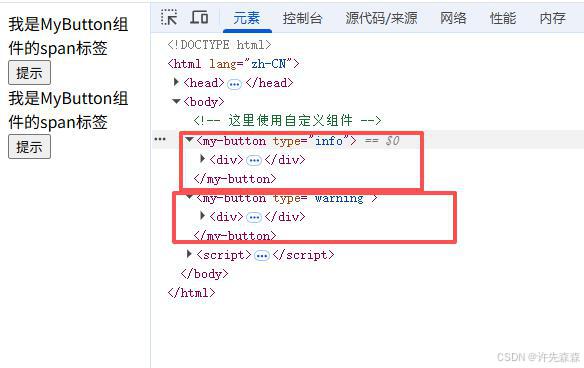
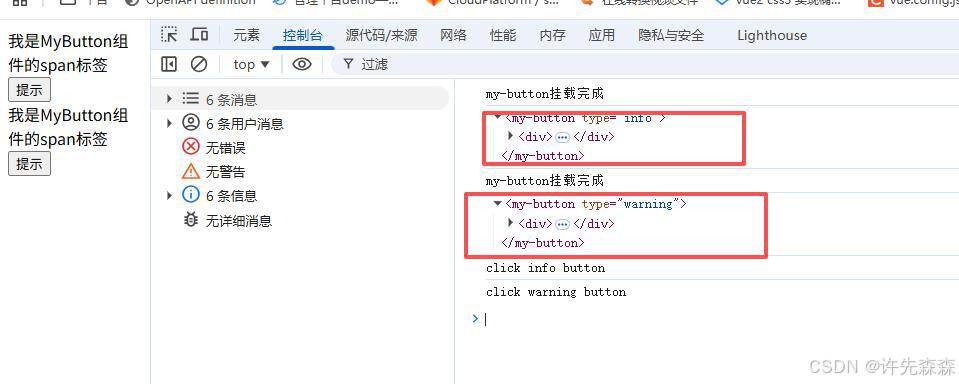
- 可以看到,复用也没问题,观察仔细的小伙伴肯定发现了,每一次组件的复用其实都是在创建一个MyButton类的实例,所以this之前当前组件,我们就可以通过this去获得组件和组件内部的元素和属性
- 现在又来一个问题,虽然我们现在能封装原生的组件了,但是我们要问一个问题,封装组件的目的是什么
- 有很多,但其中有一项是为了样式隔离,防止全局污染,也就是说我们希望组件内的样式是封闭的,不受任何外部样式的渲染,不然我本来定义了一个红色的button,但由于全局样式对button定义了蓝色,最后呈现了一个蓝色的button,这不是我想要的
- 那customElements能实现样式隔离么,不重要,上代码
<!DOCTYPE html>
<html lang="zh-CN">
<head>
<meta charset="UTF-8">
<title></title>
<style>
/*设置divde全局样式*/
div{
background-color: yellow;
}
</style>
</head>
<body>
<!– 这里使用自定义组件 –>
<my-button type="info"></my-button>
<my-button type="warning"></my-button>
<script>
// 定义自定义组件
class MyButton extends HTMLElement{
constructor(){
super()
this.innerHTML=`<div style="background-color:red">/*我们在组件内设置div的背景色为红色*/
<span>我是MyButton组件的span标签</span>
<button class="info">提示</button>
</div>`
}
//生命周期,组件挂载到DOM时触发
connectedCallback(){
console.log('my-button挂载完成')
console.log(this)
this.querySelector('button').addEventListener('click',()=>{
console.log(`click ${this.getAttribute('type')} button`)
})
}
//生命周期,组件从DOM移除时触发
disconnectedCallback(){
console.log('my-button 已移除')
this.querySelector('button').removeEventListener('click',null)
}
}
//注册自定义元素,也就是把MyButton注册为my-button,这样就相当于注册了一个HTML元素,名字叫my-button,可以直接被浏览器渲染
customElements.define('my-button',MyButton)
</script>
</body>
</html>
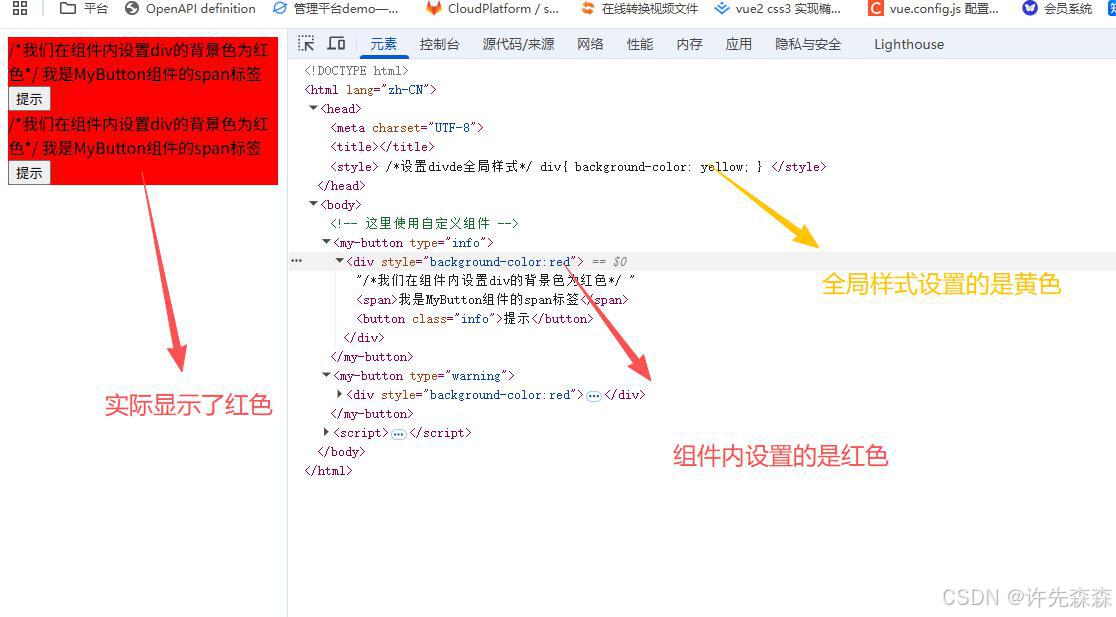
- 呀哈,这么一看好像是样式隔离了昂,别高兴地太早,
- 与其说是发生了隔离,不如说是行内样式的优先级高于style
- 为什么这么说,上代码
<!DOCTYPE html>
<html lang="zh-CN">
<head>
<meta charset="UTF-8">
<title></title>
<style>
/*设置divde全局样式*/
div{
width:100px;
height: 100px;
background-color: yellow;
}
</style>
</head>
<body>
<div style="background-color: red;"></div>
<script>
</script>
</body>
</html>
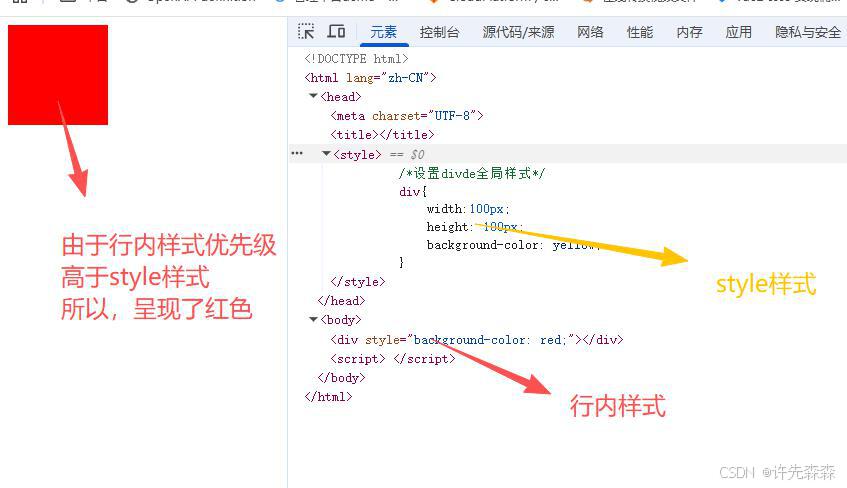
- 明白没,现在组件的背景显示红色不是因为样式发生了隔离,是他本来就是应该是红色,应为行内样式的优先级高
- 那怎么验证呢,我们提高全局样式的优先级试试,怎么提高,!impportant
<!DOCTYPE html>
<html lang="zh-CN">
<head>
<meta charset="UTF-8">
<title></title>
<style>
/*设置divde全局样式*/
div{
background-color: yellow !important;/*提高全局样式的优先级*/
}
</style>
</head>
<body>
<!– 这里使用自定义组件 –>
<my-button type="info"></my-button>
<my-button type="warning"></my-button>
<script>
// 定义自定义组件
class MyButton extends HTMLElement{
constructor(){
super()
this.innerHTML=`<div style="background-color:red">/*我们在组件内设置div的背景色为红色*/
<span>我是MyButton组件的span标签</span>
<button class="info">提示</button>
</div>`
}
//生命周期,组件挂载到DOM时触发
connectedCallback(){
console.log('my-button挂载完成')
console.log(this)
this.querySelector('button').addEventListener('click',()=>{
console.log(`click ${this.getAttribute('type')} button`)
})
}
//生命周期,组件从DOM移除时触发
disconnectedCallback(){
console.log('my-button 已移除')
this.querySelector('button').removeEventListener('click',null)
}
}
//注册自定义元素,也就是把MyButton注册为my-button,这样就相当于注册了一个HTML元素,名字叫my-button,可以直接被浏览器渲染
customElements.define('my-button',MyButton)
</script>
</body>
</html>
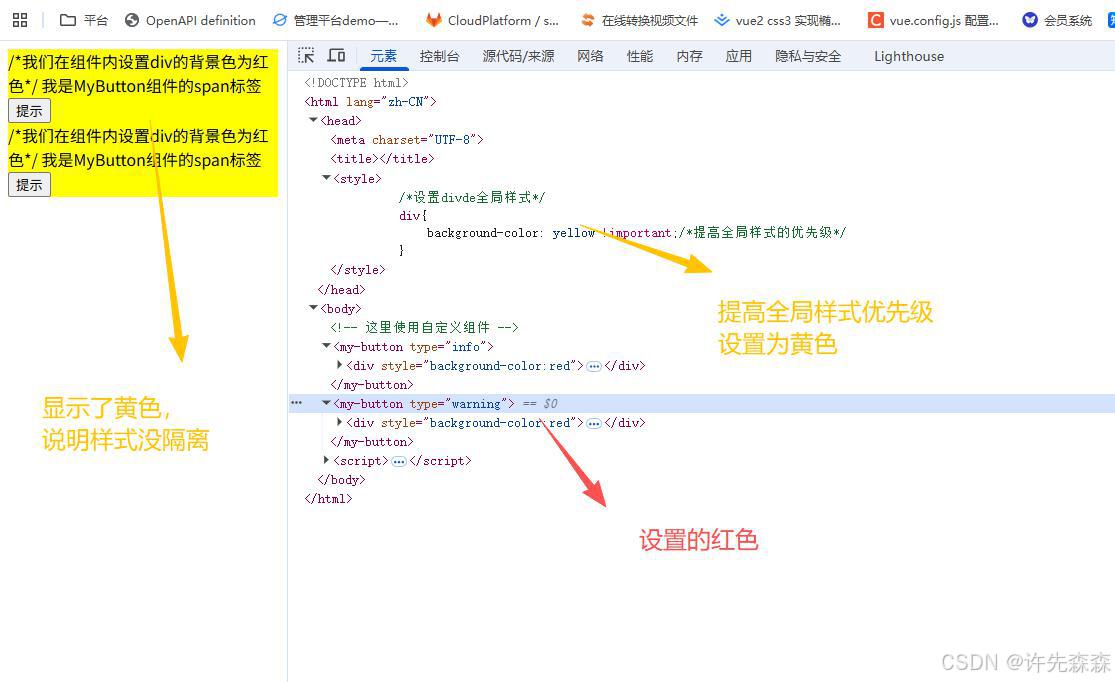
- 看见没,样式完全没隔离,那这可不是我们想要的,我们想要的是样式的绝对隔离
- 有没有办法呢
- 有,用Shadow DOM
Shadow DOM
- 啥是个ShadowDOm,Shadow就是影子,影子DOM,也就是说,你最终在页面上看到的只是个影子DOM,而不是真实的DOM,真实ODM去哪了呢
- 简单点说,真实的DOM被一个透明的玻璃盒子罩住了,你在页面上只能透过玻璃盒子看到DOM,但是你操作不多,自然也就无法影响到
- 所以我们给DOM罩一个玻璃罩
<!DOCTYPE html>
<html lang="zh-CN">
<head>
<meta charset="UTF-8">
<title></title>
<style>
/*设置divde全局样式*/
div{
background-color: yellow !important;/*提高全局样式的优先级*/
}
</style>
</head>
<body>
<!– 这里使用自定义组件 –>
<my-button type="info"></my-button>
<my-button type="warning"></my-button>
<script>
// 定义自定义组件
class MyButton extends HTMLElement{
constructor(){
super()
const shadow=this.attachShadow({mode:'open'})
const component=document.createElement('div')
component.style.backgroundColor='red'
component.innerHTML=`/*我们在组件内设置div的背景色为红色*/
<span>我是MyButton组件的span标签</span>
<button class="info">提示</button>
`
shadow.appendChild(component)
}
//生命周期,组件挂载到DOM时触发
connectedCallback(){
console.log('my-button挂载完成')
console.log(this)
this.querySelector('button').addEventListener('click',()=>{
console.log(`click ${this.getAttribute('type')} button`)
})
}
//生命周期,组件从DOM移除时触发
disconnectedCallback(){
console.log('my-button 已移除')
this.querySelector('button').removeEventListener('click',null)
}
}
//注册自定义元素,也就是把MyButton注册为my-button,这样就相当于注册了一个HTML元素,名字叫my-button,可以直接被浏览器渲染
customElements.define('my-button',MyButton)
</script>
</body>
</html>
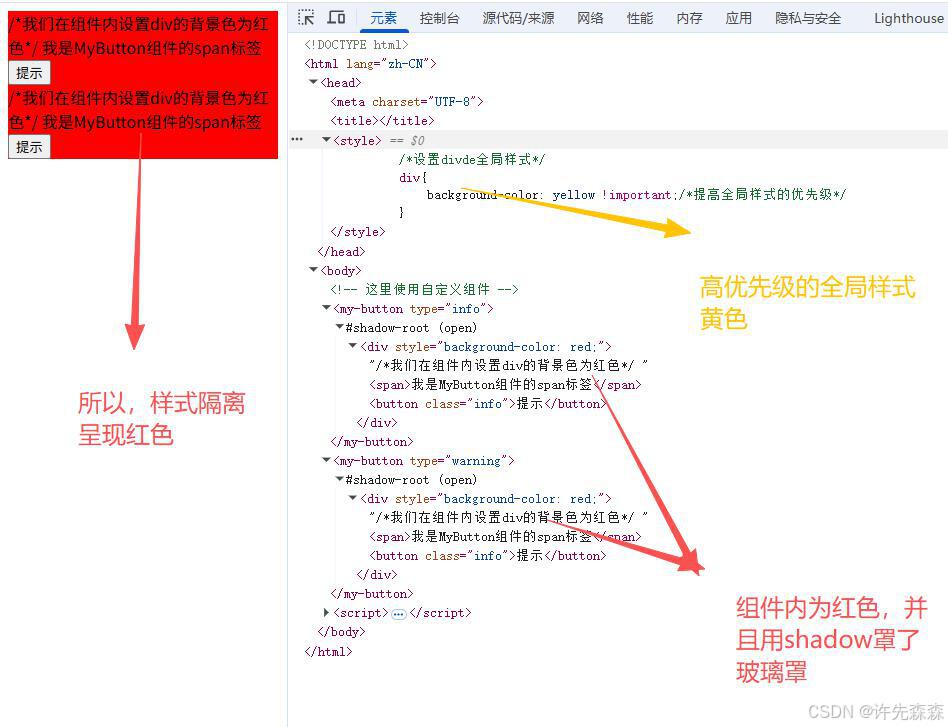
-
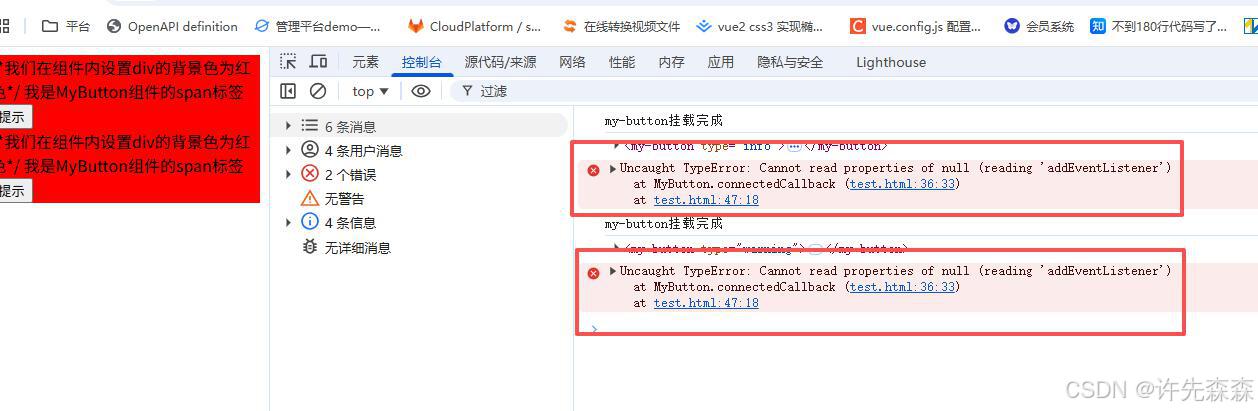
看到这看似没啥问题吧,别急,再看看控制台打印了啥
-
意思我们通过this.querySelector(‘button’)获取button时获取到的是空,啊,为啥嘞,别着急,听哥哥给你分析
-
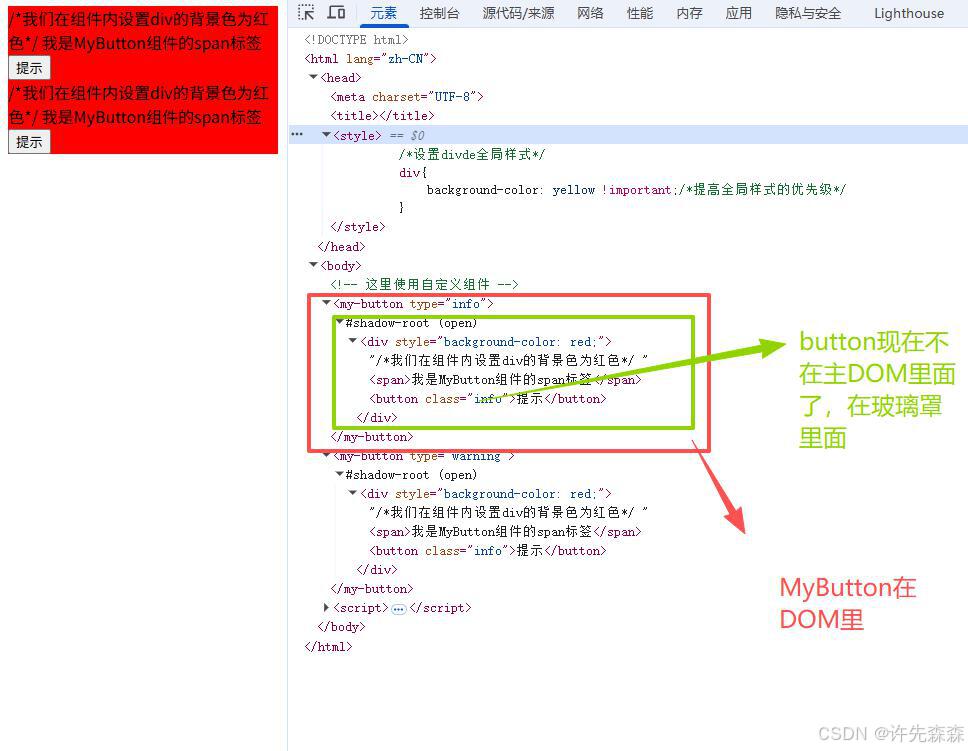
现在MyButton在主DOM里面,this还是指向的MyButton,这没问题
-
但是MyButton里面的button现在不直接在MyButton里面了,它在MyButton里面的玻璃罩的里面
-
所以你直接通过this肯定找不到button。你得通过this.玻璃罩.button才能找到
-
多说无意,上代码
<!DOCTYPE html>
<html lang="zh-CN">
<head>
<meta charset="UTF-8">
<title></title>
<style>
/*设置divde全局样式*/
div{
background-color: yellow !important;/*提高全局样式的优先级*/
}
</style>
</head>
<body>
<!– 这里使用自定义组件 –>
<my-button type="info"></my-button>
<my-button type="warning"></my-button>
<script>
// 定义自定义组件
class MyButton extends HTMLElement{
constructor(){
super()
this.shadow=this.attachShadow({mode:'open'})
const component=document.createElement('div')
component.style.backgroundColor='red'
component.innerHTML=`/*我们在组件内设置div的背景色为红色*/
<span>我是MyButton组件的span标签</span>
<button class="info">提示</button>
`
this.shadow.appendChild(component)
}
//生命周期,组件挂载到DOM时触发
connectedCallback(){
console.log('my-button挂载完成')
console.log(this)
/*通过shadow也就是玻璃罩去哪shadow内部的元素*/
this.shadow.querySelector('button').addEventListener('click',()=>{
console.log(`click ${this.getAttribute('type')} button`)
})
}
//生命周期,组件从DOM移除时触发
disconnectedCallback(){
console.log('my-button 已移除')
this.shadow.querySelector('button').removeEventListener('click',null)
}
}
//注册自定义元素,也就是把MyButton注册为my-button,这样就相当于注册了一个HTML元素,名字叫my-button,可以直接被浏览器渲染
customElements.define('my-button',MyButton)
</script>
</body>
</html>
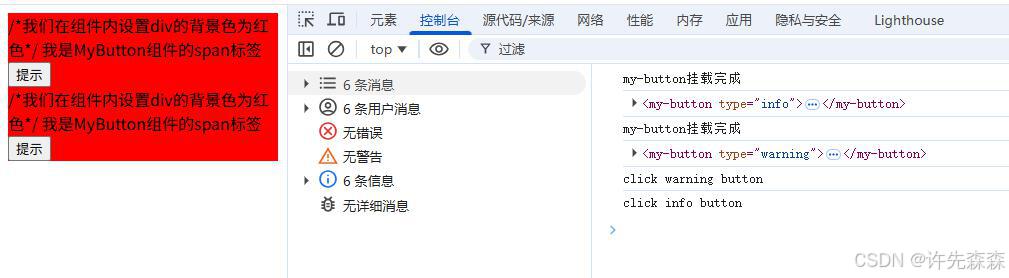
- 看到了吧,找到了button,点击的时候也打印了
- 到这,你又觉得完美的不行了
- 不,还不完美,为啥不完美呢,你看我们上面写MyButton里面的代码是怎么写的,都是通过/``/进行的字符串拼接
- 这样写不仅没有代码提示,还很难处理格式,就很容易混乱
- 那有没有可能这样,就是我还是能像正常写HTML代码那样去写MyButton
- 你真机智,还真可以,那就是template
template
- 这个词可不陌生,vue的SFC里面不都是template么,翻译就是模板
- 是的,就是模板,那怎么用呢
- 别着急,上代码
<!DOCTYPE html>
<html lang="zh-CN">
<head>
<meta charset="UTF-8">
<title></title>
<style>
/*设置divde全局样式*/
div{
background-color: yellow !important;/*提高全局样式的优先级*/
}
</style>
</head>
<body>
<!– 定义模板,不会自动渲染,需要克隆后才会渲染 –>
<template id="myButtonTemplate">
<style>
.bg{
background-color: red;
}
</style>
<div class="bg">
<span>我是MyButton组件的span标签</span>
<button class="info">提示</button>
</div>
</template>
<!– 这里使用自定义组件 –>
<my-button type="info"></my-button>
<my-button type="warning"></my-button>
<script>
// 定义自定义组件
class MyButton extends HTMLElement{
constructor(){
super()
this.shadow=this.attachShadow({mode:'open'})
/*我们不再通过字符串去定义MyButton里面的内容,而是把tempalte里面的内容克隆过来*/
const template=document.getElementById('myButtonTemplate')
const templateContent=template.content.cloneNode(true)
// const component=document.createElement('div')
// component.style.backgroundColor='red'
// component.innerHTML=`/*我们在组件内设置div的背景色为红色*/
// <span>我是MyButton组件的span标签</span>
// <button class="info">提示</button>
// `
this.shadow.appendChild(templateContent)
}
//生命周期,组件挂载到DOM时触发
connectedCallback(){
console.log('my-button挂载完成')
console.log(this)
/*通过shadow也就是玻璃罩去哪shadow内部的元素*/
this.shadow.querySelector('button').addEventListener('click',()=>{
console.log(`click ${this.getAttribute('type')} button`)
})
}
//生命周期,组件从DOM移除时触发
disconnectedCallback(){
console.log('my-button 已移除')
this.shadow.querySelector('button').removeEventListener('click',null)
}
}
//注册自定义元素,也就是把MyButton注册为my-button,这样就相当于注册了一个HTML元素,名字叫my-button,可以直接被浏览器渲染
customElements.define('my-button',MyButton)
</script>
</body>
</html>
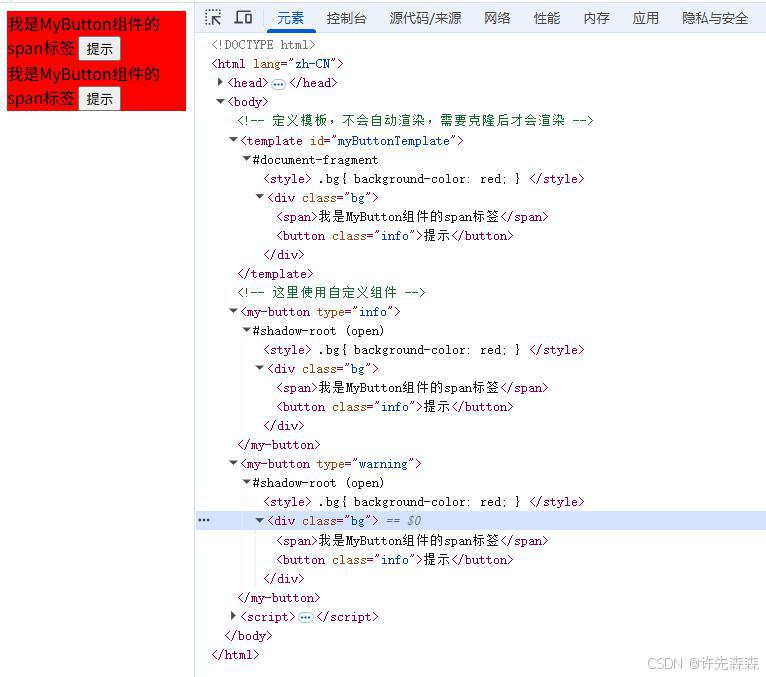
- 看明白了么亲,
- template就是允许你在页面内直接像写HTML那样,定义一个模板
- 但是这个模板不直接被渲染,为啥呢,因为我现在只是定义啊,很多业务逻辑还没写完呢,你渲染个毛啊
- 那要怎么渲染嗯,很简单,你需要渲染的时候就把我克隆过去,然后去渲染就行了
- 那有人就又要问了,为什么要克隆呢,不直接使用template.content呢
- 问得很好,我们先不说出答案,先试一下,看会怎么样
- 上代码
<!DOCTYPE html>
<html lang="zh-CN">
<head>
<meta charset="UTF-8">
<title></title>
<style>
/*设置divde全局样式*/
div{
background-color: yellow !important;/*提高全局样式的优先级*/
}
</style>
</head>
<body>
<!– 定义模板,不会自动渲染,需要克隆后才会渲染 –>
<template id="myButtonTemplate">
<style>
.bg{
background-color: red;
}
</style>
<div class="bg">
<span>我是MyButton组件的span标签</span>
<button class="info">提示</button>
</div>
<script>
console.log('111111111')
</script>
</template>
<!– 这里使用自定义组件 –>
<my-button type="info"></my-button>
<my-button type="warning"></my-button>
<script>
// 定义自定义组件
class MyButton extends HTMLElement{
constructor(){
super()
this.shadow=this.attachShadow({mode:'open'})
/*我们不再通过字符串去定义MyButton里面的内容,而是把tempalte里面的内容克隆过来*/
const template=document.getElementById('myButtonTemplate')
const templateContent=template.content//.cloneNode(true)/*不使用cloneNode*/
// const component=document.createElement('div')
// component.style.backgroundColor='red'
// component.innerHTML=`/*我们在组件内设置div的背景色为红色*/
// <span>我是MyButton组件的span标签</span>
// <button class="info">提示</button>
// `
this.shadow.appendChild(templateContent)
}
//生命周期,组件挂载到DOM时触发
connectedCallback(){
console.log('my-button挂载完成')
console.log(this)
/*通过shadow也就是玻璃罩去哪shadow内部的元素*/
this.shadow.querySelector('button').addEventListener('click',()=>{
console.log(`click ${this.getAttribute('type')} button`)
})
}
//生命周期,组件从DOM移除时触发
disconnectedCallback(){
console.log('my-button 已移除')
this.shadow.querySelector('button').removeEventListener('click',null)
}
}
//注册自定义元素,也就是把MyButton注册为my-button,这样就相当于注册了一个HTML元素,名字叫my-button,可以直接被浏览器渲染
customElements.define('my-button',MyButton)
</script>
</body>
</html>
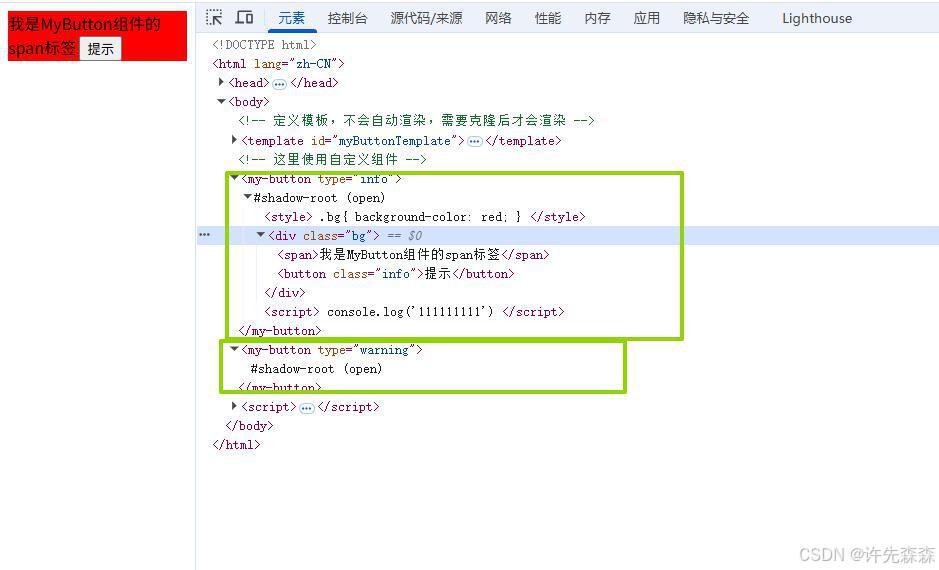
- 看出设问题没有,第一个组件my-button的实例是完成的,第二个里面的DOM丢失了
- 有点意思吧,这是为什么呢
- 那得说说tempalte.content的本质,
- tempalte.content返回的其实是一个DocumentFragement,Fragement应该都知道吧,不知道的去查字典,去抽自己的脸,啥都不知道怎么成长为像我一样的架构师
- 这玩意有三个特性,第一个很普通,可就是容器特性,那肯定么,既然是Fragment,作为容器,就可以存放HTML节点,但是他本身不会渲染到页面上,就是可以理解为我是个盒子,里面装一堆HTML元素
- 第二个就很奇葩了,移动特性。啥意思,就是你跟我要的时候HTML元素的时候,我不是把盒子的里面的元素复制一份给你,而是直接倒出来给你,我自己就没有了,我靠,好嘛,很大方
- 这也就是上面为什么第二个MyButton里面没东西了,因为我们创建了两个MyButton实例,执行第一个的时候,通过template.content拿到了DOM渲染,但此时template.content已经就剩一个空盒子了,第二个去拿的时候,拿了个寂寞,所以没有东西
- 第三个,共享特性,就是所有访问template.content的代码,拿到的都是同一个盒子,也就是同一个DocuemntFragement,而不是副本,相比这有些弟弟又开始联想对象拷贝啥的了,好着了,说明知识扎实
- 所以,需要cloneNode
- 那cloneNode干了个啥呢,既然你是谁要就直接给自己不留,那我的作用是克隆一样的DocumenFragmen给你,我自己还留着,这样别人还可以来cloneNode
- 至于他的参数cloneNode(true),既然是克隆,那参数肯定就是深浅的问题么,true就是深拷贝,里面的子节点统统拷贝,false就是只克隆盒子,也就是DocuemntFragment,那不是克隆了个寂寞么,所以,让他true
- -到这,你又觉得完美了
- 不,还不完美,为啥呢,干过vue的都知道
- 我们在搞SFC的时候,往往会加一个slot,干啥呢,就是在引用组件的时候提搞一个插槽,让组件内容的自定义
- 说白点就是我定义组件的时候并不定义他具体是什么样,你给我什么东西我就是什么样,这就很牛逼啊,高度自由化啊
- 在vue里面,我们可以通过匿名插槽,具名插槽,默认插槽等传递自定义内容,这里我们可以使用slot么,乖乖,你真棒,完全可以的
- 二话不说,上代码
<!DOCTYPE html>
<html lang="zh-CN">
<head>
<meta charset="UTF-8">
<title></title>
<style>
/*设置divde全局样式*/
div{
background-color: yellow !important;/*提高全局样式的优先级*/
}
</style>
</head>
<body>
<!– 定义模板,不会自动渲染,需要克隆后才会渲染 –>
<template id="myButtonTemplate">
<style>
.bg{
background-color: red;
}
</style>
<div class="bg">
<span>我是MyButton组件的span标签</span>
<button class="info">提示</button>
<div>
<!– 具名插槽 –>
<slot name="title"></slot>
</div>
<div>
<!– 默认插槽 –>
<slot name="img">
<span>如果不传内容,我就会显示</span>
</slot>
</div>
<div>
<!– 匿名插槽 –>
<slot></slot>
</div>
</div>
<script>
console.log('111111111')
</script>
</template>
<!– 这里使用自定义组件 –>
<my-button type="info">
<span slot="title">我是组件1传递具名插槽title过来的</span>
<span slot="img">我是组件1传递默认插槽img过来的</span>
<span>我是组件1传递匿名插槽过来的</span>
</my-button>
<my-button type="warning">
<span slot="title">我是组件2传递具名插槽title过来的</span>
<span>我是组件2传递匿名插槽过来的</span>
</my-button>
<script>
// 定义自定义组件
class MyButton extends HTMLElement{
constructor(){
super()
this.shadow=this.attachShadow({mode:'open'})
/*我们不再通过字符串去定义MyButton里面的内容,而是把tempalte里面的内容克隆过来*/
const template=document.getElementById('myButtonTemplate')
const templateContent=template.content.cloneNode(true)/*不使用cloneNode*/
// const component=document.createElement('div')
// component.style.backgroundColor='red'
// component.innerHTML=`/*我们在组件内设置div的背景色为红色*/
// <span>我是MyButton组件的span标签</span>
// <button class="info">提示</button>
// `
this.shadow.appendChild(templateContent)
}
//生命周期,组件挂载到DOM时触发
connectedCallback(){
console.log('my-button挂载完成')
console.log(this)
/*通过shadow也就是玻璃罩去哪shadow内部的元素*/
this.shadow.querySelector('button').addEventListener('click',()=>{
console.log(`click ${this.getAttribute('type')} button`)
})
}
//生命周期,组件从DOM移除时触发
disconnectedCallback(){
console.log('my-button 已移除')
this.shadow.querySelector('button').removeEventListener('click',null)
}
}
//注册自定义元素,也就是把MyButton注册为my-button,这样就相当于注册了一个HTML元素,名字叫my-button,可以直接被浏览器渲染
customElements.define('my-button',MyButton)
</script>
</body>
</html>
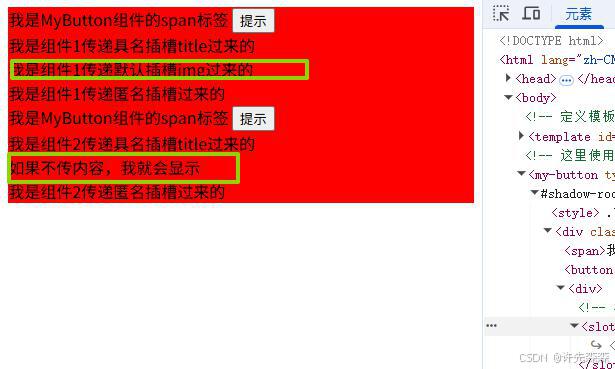
- slot完美支持
- 到这里,哥哥们,咱们讲了customElements、shadowDOM、template、slot,这时候你再问我,啥是个Web Compoents,我会告诉你,师爷,这他么的就是特么的Web Components
- 他不是一个单一的技术,而是上述四个原生浏览器的特性组合,合理应用,形成的组件生态
- 明白了不,那你又问了,人家vue啥的组件都是SFC,咱们都写在主页面里么了,密密麻麻一大堆,咱们能抽离SFC么
- 这话问的,那必须行啊,咋也是组件啊
SFC化
- 很简单,我们组件的流程单独封装为一个js模块
- 直接上代码,新建一个MyButton.js,把逻辑抽离一下
/*MyButton.js*/
// 1. 修正变量名拼写错误:tempalte → template
const template = `
<style>
.bg{
background-color: red;
}
.info {
cursor: pointer;
}
</style>
<div class="bg">
<span>我是MyButton组件的span标签</span>
<button class="info">提示</button>
<div>
<!– 具名插槽 –>
<slot name="title"></slot>
</div>
<div>
<!– 默认插槽 –>
<slot name="img">
<span>如果不传内容,我就会显示</span>
</slot>
</div>
<div>
<!– 匿名插槽 –>
<slot></slot>
</div>
</div>
<!– 移除无效的script标签:template内的script不会执行 –>
`;
class MyButton extends HTMLElement {
constructor() {
super();
this.shadow = this.attachShadow({ mode: 'open' });
// 2. 创建template元素并赋值模板内容
const el = document.createElement('template');
el.innerHTML = template; // 用修正后的变量名
console.log(el)
// 3. 确保content存在(template元素的content永远是DocumentFragment,不会undefined)
const templateContent = el.content.cloneNode(true);
this.shadow.appendChild(templateContent);
// 4. 抽离事件函数(方便移除事件)
this.handleButtonClick = () => {
console.log(`click ${this.getAttribute('type')} button`);
};
}
// 生命周期:组件挂载到DOM时触发
connectedCallback() {
console.log('my-button挂载完成');
console.log(this);
// 5. 增加判空逻辑,避免找不到button时报错
const btn = this.shadow.querySelector('button');
if (btn) {
btn.addEventListener('click', this.handleButtonClick);
}
}
// 生命周期:组件从DOM移除时触发
disconnectedCallback() {
console.log('my-button 已移除');
// 6. 修正removeEventListener:传入相同的函数引用,且判空
const btn = this.shadow.querySelector('button');
if (btn) {
btn.removeEventListener('click', this.handleButtonClick);
}
}
}
// 注册自定义元素
customElements.define('my-button', MyButton);
export default MyButton
- 在主页面内引用
<!DOCTYPE html>
<html lang="zh-CN">
<head>
<meta charset="UTF-8">
<title></title>
<style>
/*设置divde全局样式*/
div{
background-color: yellow !important;/*提高全局样式的优先级*/
}
</style>
</head>
<body>
<!– 这里使用自定义组件 –>
<my-button type="info">
<span slot="title">我是组件1传递具名插槽title过来的</span>
<span slot="img">我是组件1传递默认插槽img过来的</span>
<span>我是组件1传递匿名插槽过来的</span>
</my-button>
<my-button type="warning">
<span slot="title">我是组件2传递具名插槽title过来的</span>
<span>我是组件2传递匿名插槽过来的</span>
</my-button>
<script type="module" src="./MyButton.js">
</script>
</body>
</html>
- 这时候会发现报下面错误,原因是我们直接双击打开的html文件,所以跟js文件之间产生了跨域

-
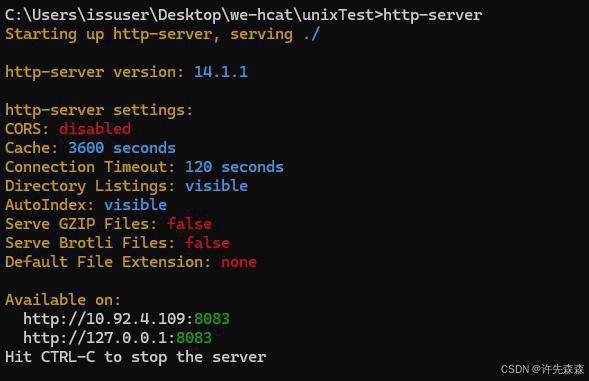
我们安装个本地http-server
-
npm install -g http-server
-
切换到html目录下,输入http-server启动服务
-
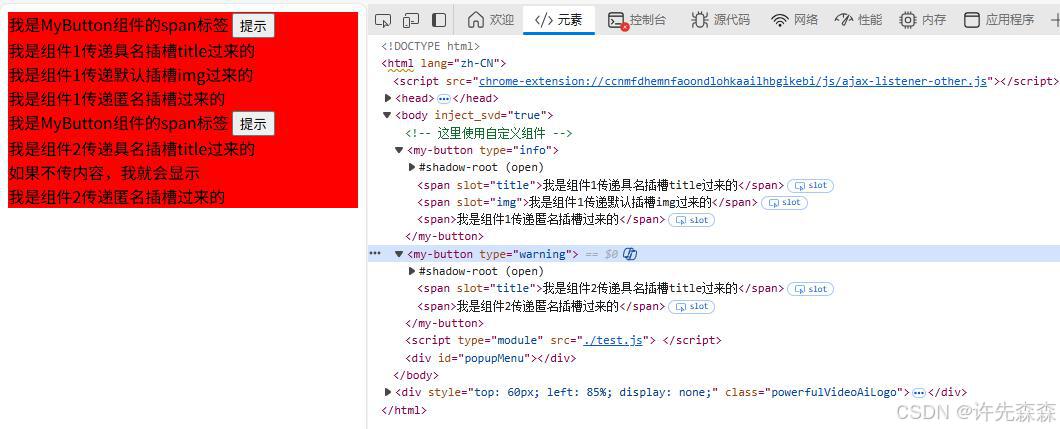
然后点击就可以运行了
-
这下你是不是觉得又完美了,组件实现了模块化封装,不,还不够完美
-
哪里不够完美呢,既然是组件,也实现了组件的模块化封装
-
那组件之间着呢么通信呢
-
我们在vue里面,组件之间的通信可以有props,emit,EventBus,vuex等等
-
web Components组件之间又该怎么通信呢
web components组件之间的通信
- 既然现在是组件了,那就涉及到组件之间的通讯,而组建之间的通讯无非是三类,
- 隔代类:父子,爷孙,一直再往下
- 平辈类:兄弟
- 无亲类:无关联组件
- 就这三类,再没了,而这三类又分别适用于什么样的通信方式呢,别着急
- 我们得先了解他有什么样的通信方式是不是
组件通信之一——CustomEvent,自定义事件
- 这个很好理解,就跟我在vue里面在子组件通过emit去触发一个自定义事件,父组件可以捕获到自定义事件,拿到参数,完成业务处理一样
- web components也支持我们自定义一个事件,并在其中一个组件内触发,另外一个组件内捕获,并携带参数
- 通过new CustomEvent(name,options)去自定义一个事件
- 然后通过document.dispatchEvent(eventName)派发
- 最后通过document.addEventListener(eventName)捕获到事件,拿到参数,处理业务逻辑
- 话不多说,还是上代码
- 我们把在MyButton基础上,再创建一个组件MyCount,通过点击MyButton里面的button,给MyCount里面的计数器进行+1操作,实现MyButton和MyCount通讯
/**
* MyButton.js
*/
// 1. 修正变量名拼写错误:tempalte → template
const template = `
<style>
.bg{
background-color: red;
}
.info {
cursor: pointer;
}
</style>
<div class="bg">
<span>我是MyButton组件的span标签</span>
<button class="info">提示</button>
<div>
<!– 具名插槽 –>
<slot name="title"></slot>
</div>
<div>
<!– 默认插槽 –>
<slot name="img">
<span>如果不传内容,我就会显示</span>
</slot>
</div>
<div>
<!– 匿名插槽 –>
<slot></slot>
</div>
</div>
<!– 移除无效的script标签:template内的script不会执行 –>
`;
class MyButton extends HTMLElement {
constructor() {
super();
this.shadow = this.attachShadow({ mode: 'open' });
// 2. 创建template元素并赋值模板内容
const el = document.createElement('template');
el.innerHTML = template; // 用修正后的变量名
console.log(el)
// 3. 确保content存在(template元素的content永远是DocumentFragment,不会undefined)
const templateContent = el.content.cloneNode(true);
this.shadow.appendChild(templateContent);
// // 4. 抽离事件函数(方便移除事件)
// this.handleButtonClick = () => {
// console.log(`click ${this.getAttribute('type')} button`);
// };
}
// 生命周期:组件挂载到DOM时触发
connectedCallback() {
console.log('my-button挂载完成');
console.log(this);
// 5. 增加判空逻辑,避免找不到button时报错
const btn = this.shadow.querySelector('button');
if (btn) {
//创建自定义事件,通过detail传递参数
btn.addEventListener('click', ()=>{
/**
* 创建自定义事件并进行派发-start
*/
const incrementEvent = new CustomEvent('count-increment', {
bubbles: true, // 允许事件冒泡(可选,事件总线可省略)
cancelable: true,
detail: { step: 1 } // 传递的参数:每次增加1
});
// 全局派发事件(事件总线核心:基于document)
document.dispatchEvent(incrementEvent);
/**
* -end
*/
console.log('按钮点击,触发计数增加事件')
});
}
}
// 生命周期:组件从DOM移除时触发
disconnectedCallback() {
console.log('my-button 已移除');
// 6. 修正removeEventListener:传入相同的函数引用,且判空
const btn = this.shadow.querySelector('button');
if (btn) {
btn.removeEventListener('click', this.handleButtonClick);
}
}
}
// 注册自定义元素
customElements.define('my-button', MyButton);
export default MyButton
- MyCount组件
/**
* MyCount.js
*/
// MyCount.js
console.log('222222')
class MyCount extends HTMLElement {
constructor() {
super();
console.log('myCOunt')
// 1. 初始化计数(私有属性,避免全局污染)
this.count = 0;
// 2. 创建 Shadow DOM
this.shadow = this.attachShadow({ mode: 'open' });
// 3. 组件模板(显示计数)
this.render(); // 初始化渲染
}
// 核心:渲染/更新视图的方法
render() {
const templateStr = `
<style>
.count-box {
margin: 16px 0;
padding: 16px;
border: 1px solid #eee;
border-radius: 4px;
font-size: 18px;
}
.count-num {
color: #42b983;
font-weight: bold;
}
</style>
<div class="count-box">
当前计数:<span class="count-num">${this.count}</span>
</div>
`;
// 清空原有内容,重新渲染
this.shadow.innerHTML = '';
const tpl = document.createElement('template');
tpl.innerHTML = templateStr;
this.shadow.appendChild(tpl.content.cloneNode(true));
}
// 组件挂载到 DOM 时触发:监听全局事件
connectedCallback() {
// 监听 MyButton 派发的 count-increment 事件
console.log('444')
this.countHandler = (e) => {
// 从事件 detail 中获取步长,更新计数
this.count += e.detail.step;
// 重新渲染视图
this.render();
console.log('计数更新:', this.count);
};
// 绑定全局事件监听
document.addEventListener('count-increment', this.countHandler);
}
// 组件移除时:销毁事件监听(关键!避免内存泄漏)
disconnectedCallback() {
document.removeEventListener('count-increment', this.countHandler);
}
}
// 注册自定义元素
customElements.define('my-count', MyCount);
export default MyCount
- 主页面内,分别引用两个组件
<!DOCTYPE html>
<html lang="zh-CN">
<head>
<meta charset="UTF-8">
<title></title>
<style>
/*设置divde全局样式*/
div{
background-color: yellow !important;/*提高全局样式的优先级*/
}
</style>
</head>
<body>
<my-count></my-count>
<!– 这里使用自定义组件 –>
<my-button type="info">
<span slot="title">我是组件1传递具名插槽title过来的</span>
<span slot="img">我是组件1传递默认插槽img过来的</span>
<span>我是组件1传递匿名插槽过来的</span>
</my-button>
<script type="module" src='./MyButton.js'></script>
<script type="module" src="./MyCount.js"></script>
</body>
</html>
-
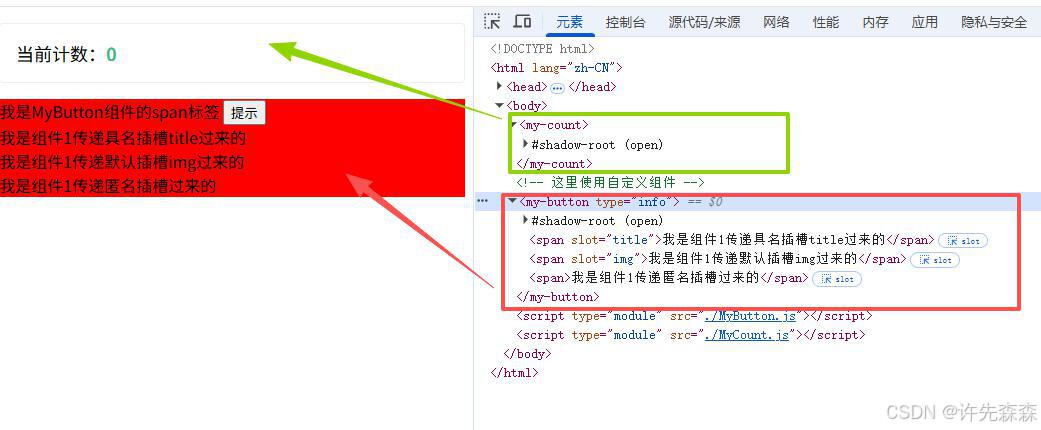
这时候我们看到MyButton组件和MyCount都正常显示
-
然后点击MyButton组件的提示按钮,看看MyCount里面的计数器是否+1

-
成功实现,这说明利用CustomEvent通是没有任何问题的,当然我们现在演示的两个非关联组件的通讯,这种方式也可用于隔代组件通讯和兄弟组件通讯,也就是说自定义事件通讯方式是万能的
组件通信之一——属性监听
- 啥意思,既然是属性监听,意思就是属性变化了,能知道
- 那问题来了,谁改的,改了谁,改了什么,又是谁知道了,怎么知道的
- 问的好,这些问题清楚了,也就明白属性监听是什么回事了
- 谁改的,父组件
- 改了谁,子组件
- 改了什么,子组件属性
- 谁知道了,子组件
- 怎么知道的,通过observedAttributes声明监听,然后通过attributeChangedCallback触发
- 啥意思,就是子组件在实例化时通过observedAttributes进行声明一些需要监听的属性,比如name等,如果父组件改变了对应的子组件的name,那就会触发子组件的attributeChangedCallback,同时携带新的name值回来
- 这不就实现了父组件向子组件传递值么
- 我们来验证
- 我们改造一下MyButton,设置两种类型的按钮,除了现在的提示info,在定义一个警示warning,然后在主页面里面增加一个button,通过点击button,改变子组件的type属性,切换子组件的按钮状态
- 话不多说,上代码
/**
* MyButton.js
*/
// 1. 修正变量名拼写错误:tempalte → template
const template = `
<style>
.bg{
}
.info {
background-color: #EFEFEF;
cursor: pointer;
color:#540008
}
.warning{
background-color: red;
cursor: pointer;
color:white
}
</style>
<div class="bg">
<span>我是MyButton组件的span标签</span>
<button class="info">提示</button>
<div>
<!– 具名插槽 –>
<slot name="title"></slot>
</div>
<div>
<!– 默认插槽 –>
<slot name="img">
<span>如果不传内容,我就会显示</span>
</slot>
</div>
<div>
<!– 匿名插槽 –>
<slot></slot>
</div>
</div>
<!– 移除无效的script标签:template内的script不会执行 –>
`;
class MyButton extends HTMLElement {
/**
* 1.声明需要监听的属性,进监听已经声明的属性,没声明的不监听
* 这是一个静态方法
*/
static get observedAttributes(){
return ['type']//监听type
}
constructor() {
super();
this.shadow = this.attachShadow({ mode: 'open' });
// 2. 创建template元素并赋值模板内容
const el = document.createElement('template');
el.innerHTML = template; // 用修正后的变量名
console.log(el)
// 3. 确保content存在(template元素的content永远是DocumentFragment,不会undefined)
const templateContent = el.content.cloneNode(true);
this.shadow.appendChild(templateContent);
// // 4. 抽离事件函数(方便移除事件)
// this.handleButtonClick = () => {
// console.log(`click ${this.getAttribute('type')} button`);
// };
}
/**
* 属性变化的回调函数
* 父组件修改子组件额type属性时触发
*/
attributeChangedCallback(attrName,oldVal,newVal){
if(oldVal === newVal) return
this.shadow.querySelector('button').className=newVal
}
// 生命周期:组件挂载到DOM时触发
connectedCallback() {
console.log('my-button挂载完成');
console.log(this);
// 5. 增加判空逻辑,避免找不到button时报错
const btn = this.shadow.querySelector('button');
if (btn) {
//创建自定义事件,通过detail传递参数
btn.addEventListener('click', ()=>{
const incrementEvent = new CustomEvent('count-increment', {
bubbles: true, // 允许事件冒泡(可选,事件总线可省略)
cancelable: true,
detail: { step: 1 } // 传递的参数:每次增加1
});
// 全局派发事件(事件总线核心:基于document)
document.dispatchEvent(incrementEvent);
console.log('按钮点击,触发计数增加事件')
});
}
}
// 生命周期:组件从DOM移除时触发
disconnectedCallback() {
console.log('my-button 已移除');
// 6. 修正removeEventListener:传入相同的函数引用,且判空
const btn = this.shadow.querySelector('button');
if (btn) {
btn.removeEventListener('click', this.handleButtonClick);
}
}
}
// 注册自定义元素
customElements.define('my-button', MyButton);
export default MyButton
- 主页面
<!DOCTYPE html>
<html lang="zh-CN">
<head>
<meta charset="UTF-8">
<title></title>
<style>
/*设置divde全局样式*/
div{
background-color: yellow !important;/*提高全局样式的优先级*/
}
</style>
</head>
<body>
<!– <my-count></my-count> –>
<!– 这里使用自定义组件 –>
<div>
<button onclick="changeType()">改变MyButton的type为warning</button>
</div>
<my-button type="info">
<span slot="title">我是组件1传递具名插槽title过来的</span>
<span slot="img">我是组件1传递默认插槽img过来的</span>
<span>我是组件1传递匿名插槽过来的</span>
</my-button>
<script type="module" src='./MyButton.js'></script>
<!– <script type="module" src="./MyCount.js"></script> –>
<script>
function changeType(){
document.querySelector('my-button').setAttribute('type','warning')
console.log(document.querySelector('my-button'))
}
</script>
</body>
</html>

-
然后我们点击按钮,改变子组件的type为warning

-
如此,就完成了父组件向子组件传值
-
那如果子组件需要向父组件传值呢,谢谢,请用自定义事件
-
当然,上面父组件向子组件传值的时候,有没有可能还有这么一种方法
-
子组件在父组件里面吧,那么父组件是不是可以拿到子组件的实例,那是不是可以调用子组件的方法,那是不是也可以进行传值交互,你真是个聪明的孩子,是的
组件通信之一——实例方法
- 很简单,就是拿到组件的实例,然后调用实例的方法,传参,交互
- 我们改一下MyButton,写一个changeTyppe(type)方法,供实例调用,调用后改变button状态;然后父组件获取MyButton实例,然后调用该方法
/**
* MyButton.js
*/
// 1. 修正变量名拼写错误:tempalte → template
const template = `
<style>
.bg{
}
.info {
background-color: #EFEFEF;
cursor: pointer;
color:#540008
}
.warning{
background-color: red;
cursor: pointer;
color:white
}
</style>
<div class="bg">
<span>我是MyButton组件的span标签</span>
<button class="info">提示</button>
<div>
<!– 具名插槽 –>
<slot name="title"></slot>
</div>
<div>
<!– 默认插槽 –>
<slot name="img">
<span>如果不传内容,我就会显示</span>
</slot>
</div>
<div>
<!– 匿名插槽 –>
<slot></slot>
</div>
</div>
<!– 移除无效的script标签:template内的script不会执行 –>
`;
class MyButton extends HTMLElement {
/**
* 1.声明需要监听的属性,进监听已经声明的属性,没声明的不监听
* 这是一个静态方法
*/
// static get observedAttributes(){
// return ['type']//监听type
// }
constructor() {
super();
this.shadow = this.attachShadow({ mode: 'open' });
// 2. 创建template元素并赋值模板内容
const el = document.createElement('template');
el.innerHTML = template; // 用修正后的变量名
console.log(el)
// 3. 确保content存在(template元素的content永远是DocumentFragment,不会undefined)
const templateContent = el.content.cloneNode(true);
this.shadow.appendChild(templateContent);
// // 4. 抽离事件函数(方便移除事件)
// this.handleButtonClick = () => {
// console.log(`click ${this.getAttribute('type')} button`);
// };
}
/**
* 属性变化的回调函数
* 父组件修改子组件额type属性时触发
*/
// attributeChangedCallback(attrName,oldVal,newVal){
// if(oldVal === newVal) return
// this.shadow.querySelector('button').className=newVal
// }
changeType(type){
this.shadow.querySelector('button').className=type
}
// 生命周期:组件挂载到DOM时触发
connectedCallback() {
console.log('my-button挂载完成');
console.log(this);
// 5. 增加判空逻辑,避免找不到button时报错
const btn = this.shadow.querySelector('button');
if (btn) {
//创建自定义事件,通过detail传递参数
btn.addEventListener('click', ()=>{
const incrementEvent = new CustomEvent('count-increment', {
bubbles: true, // 允许事件冒泡(可选,事件总线可省略)
cancelable: true,
detail: { step: 1 } // 传递的参数:每次增加1
});
// 全局派发事件(事件总线核心:基于document)
document.dispatchEvent(incrementEvent);
console.log('按钮点击,触发计数增加事件')
});
}
}
// 生命周期:组件从DOM移除时触发
disconnectedCallback() {
console.log('my-button 已移除');
// 6. 修正removeEventListener:传入相同的函数引用,且判空
const btn = this.shadow.querySelector('button');
if (btn) {
btn.removeEventListener('click', this.handleButtonClick);
}
}
}
// 注册自定义元素
customElements.define('my-button', MyButton);
export default MyButton
- 主页面
<!DOCTYPE html>
<html lang="zh-CN">
<head>
<meta charset="UTF-8">
<title></title>
<style>
/*设置divde全局样式*/
div{
background-color: yellow !important;/*提高全局样式的优先级*/
}
</style>
</head>
<body>
<!– <my-count></my-count> –>
<!– 这里使用自定义组件 –>
<div>
<button onclick="changeType()">改变MyButton的type为warning</button>
</div>
<my-button type="info">
<span slot="title">我是组件1传递具名插槽title过来的</span>
<span slot="img">我是组件1传递默认插槽img过来的</span>
<span>我是组件1传递匿名插槽过来的</span>
</my-button>
<script type="module" src='./MyButton.js'></script>
<!– <script type="module" src="./MyCount.js"></script> –>
<script>
function changeType(){
/**
* 获取MyButton实例,然后调用实例的方法,进行传值交互
*/
document.querySelector('my-button').changeType('warning')
console.log(document.querySelector('my-button'))
}
</script>
</body>
</html>
组件通信之一——其他
- 还有很多通信方式,
- 比如广播Broadcast Channel
- Shared Worker
- LocalStorage/SessionStorage
- 全局状态
- 等等
- 篇幅问题,就不一一赘述了,大家可自行写一下
- 好,那么问题来了,现在web component搞清楚了,怎么通讯也搞清楚了,问题来了,在哪用呢,场景是啥呢
- 问得好
web components应用场景
通用UI组件库
- 首当其冲是通用UI组件库,为啥呢,还是从web components的组合特性来说,原生支持,样式隔离,无依赖性,跨框架,标准化
- 所以他开发出来的UI组件在哪都能用,跟项目本身不会有任何耦合,简直完美
低代码平台
- 低代码平台需要即插即用,跨环境兼容的组件,而web component简直就是量身定做的,典型的像阿里宜搭,腾讯微搭登都是web components实现的
第三放嵌入式组件开发
- 第三方组件(广告、支付按钮、统计图表、地图插件)需要嵌入到任意网站,需避免样式 / JS 冲突,Web Components 的隔离性可确保不影响宿主页面。
微前端
- 这个就不多说了吧,web component好像简直就是wield微前端实现的