WebUI LiuMo Batch:下一代AIGC工作流批量生成平台深度解析
引言:AIGC工作流优化的新范式
在当今人工智能生成内容(AIGC)爆炸式增长的时代,Stable Diffusion等文生图模型已成为创意工作者和研究人员的重要工具。然而,随着应用场景的不断扩展,传统WebUI的单张图像生成模式已难以满足批量生产、参数对比和工作流管理的复杂需求。正是在这样的背景下,WebUI LiuMo Batch应运而生,它将工作流思维与批量处理能力深度融合,为AIGC创作提供了全新的解决方案。
WebUI LiuMo Batch是由开发者liudef06与DeepSeek v3.2 AI共同打造的创新型批量生成平台,基于现代Web技术栈构建,充分利用了Stable Diffusion WebUI的API接口,通过多标签页管理、JSON配置驱动和智能队列系统三大核心机制,彻底改变了用户与AI图像生成模型的交互方式。本文将从项目架构、核心代码、功能特性、应用场景等多个维度对这一开源项目进行全面剖析。 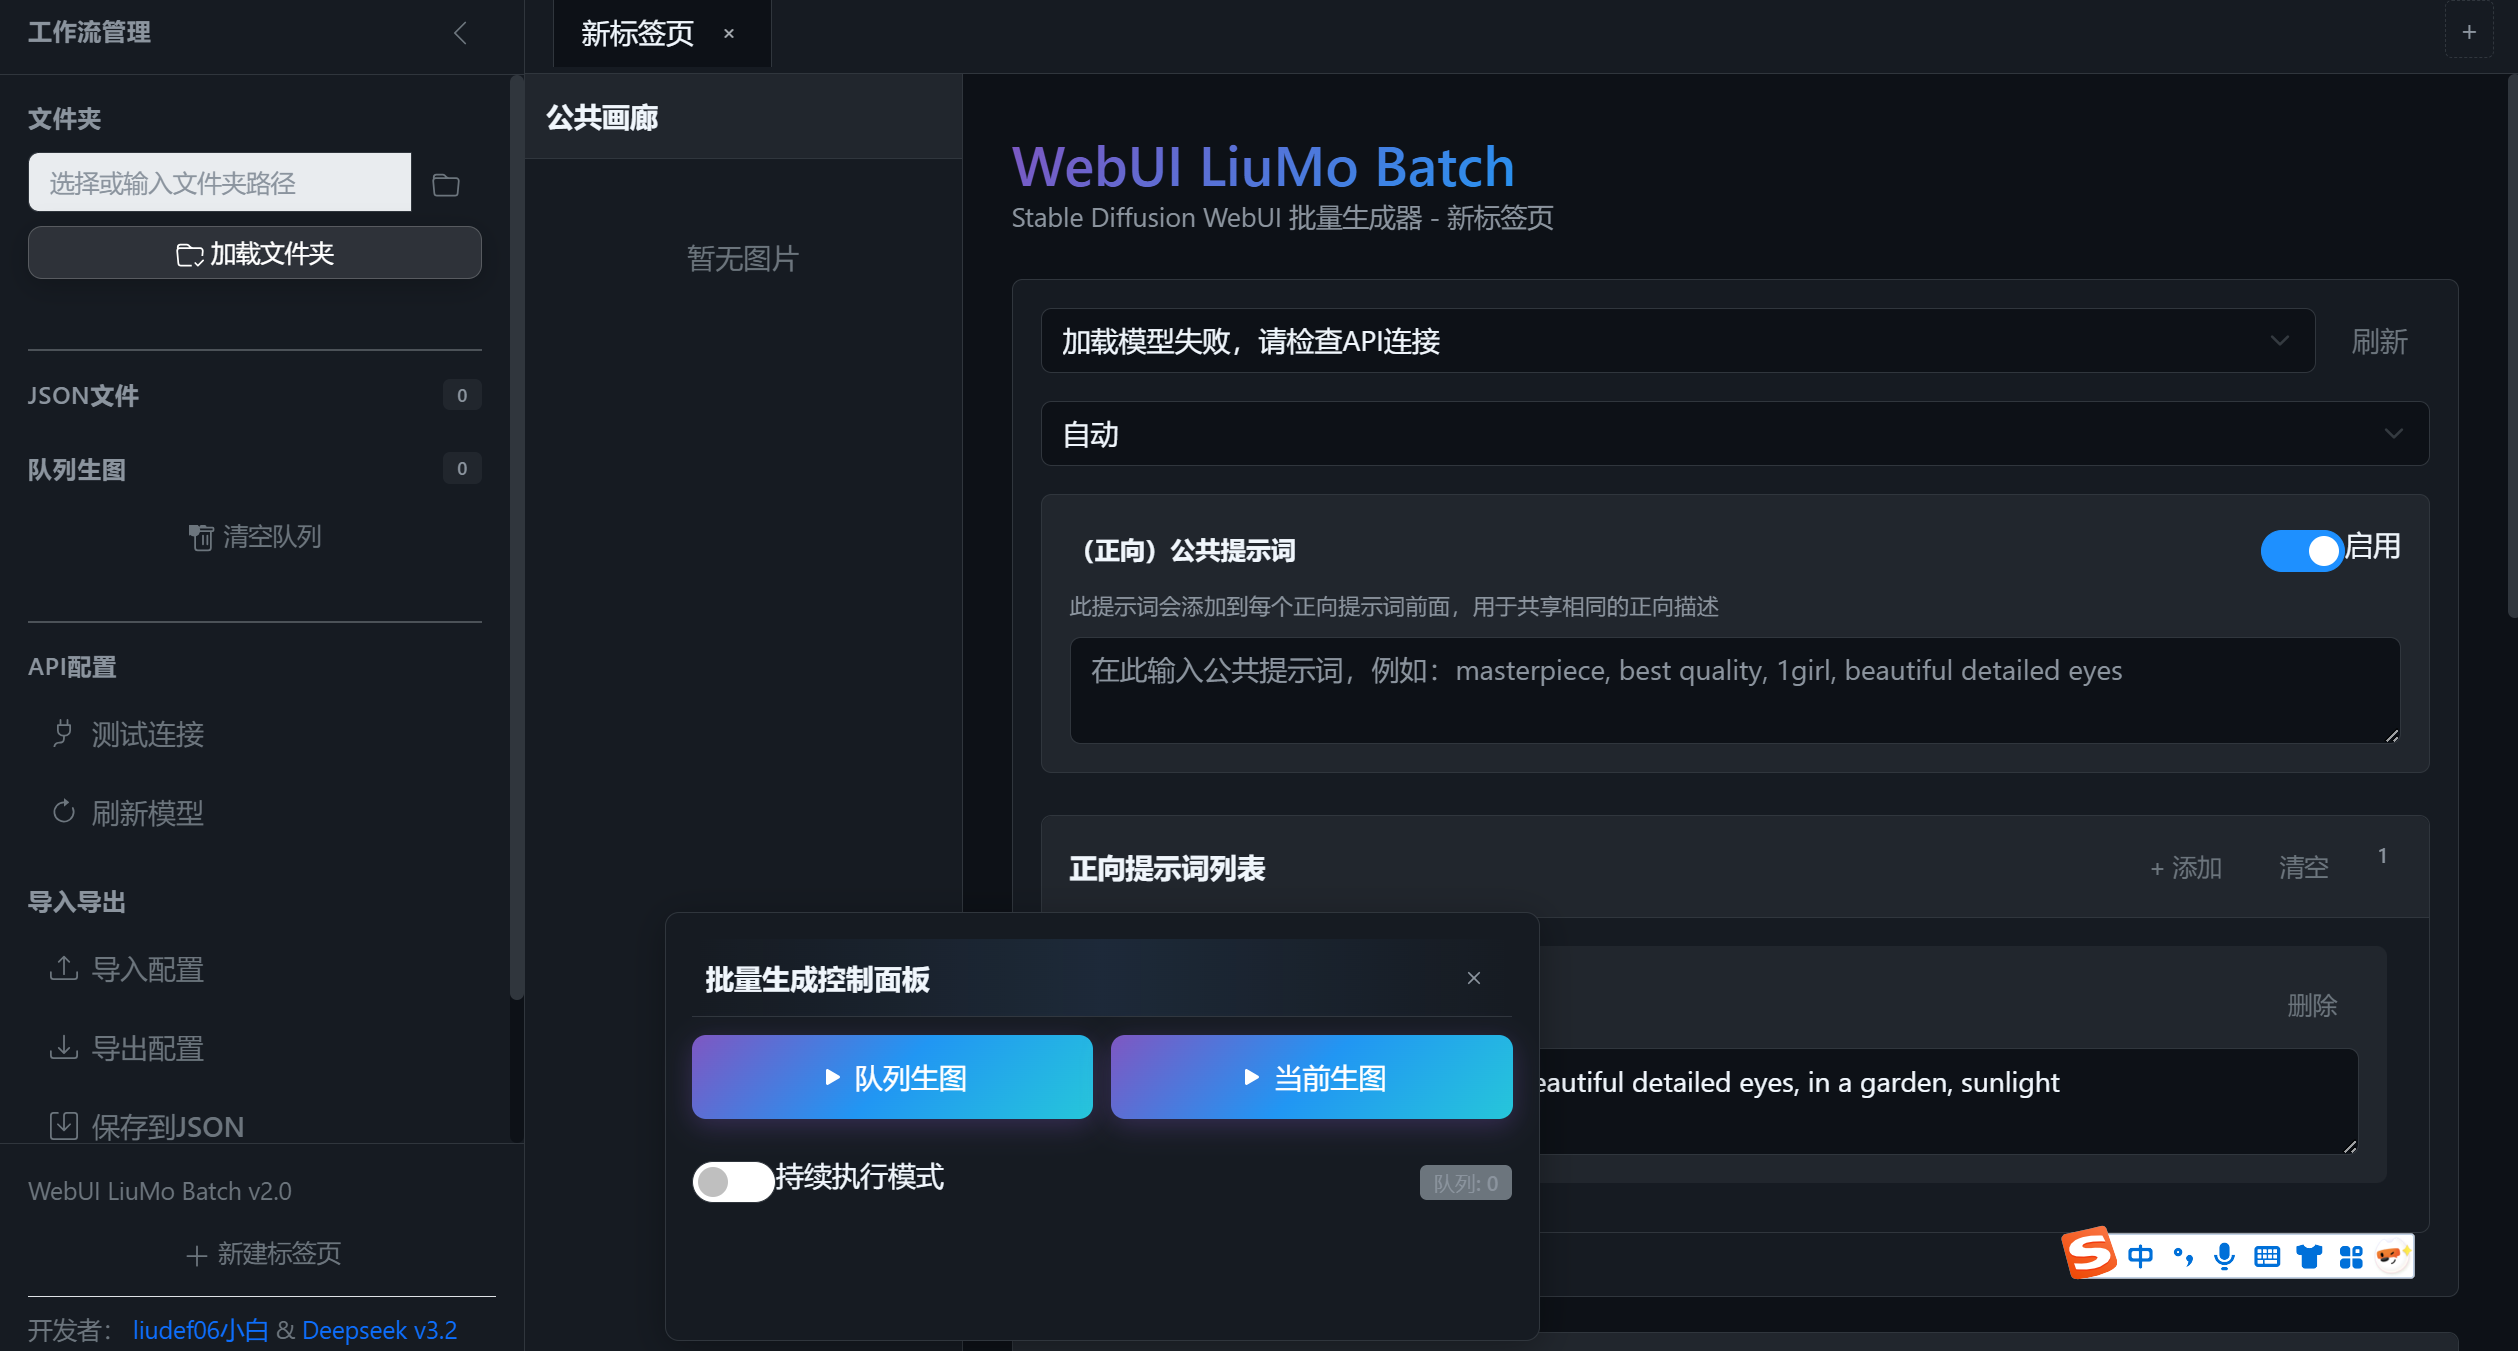
一、项目概述与核心价值
1.1 项目定位与特色
WebUI LiuMo Batch并非简单的界面封装,而是一个完整的AIGC工作流管理系统。它解决了传统使用方式中的多个痛点:
该项目以 “配置即代码” 为核心理念,将复杂的生成参数封装为结构化的JSON配置文件,通过可视化界面进行管理,同时保留了代码级配置的灵活性和可复用性。
1.2 技术架构概览
WebUI LiuMo Batch采用纯前端技术栈实现,主要包含以下层次:
- 呈现层:基于HTML5、CSS3和SVG图标系统,采用深色主题设计
- 交互层:使用原生JavaScript实现,无第三方框架依赖
- 通信层:通过Fetch API与Stable Diffusion WebUI的REST API交互
- 状态管理层:自定义的AppState全局状态管理机制
- 数据持久层:基于浏览器LocalStorage的配置保存和恢复
下表展示了项目的核心功能模块及其相互关系:
| 侧边栏管理 | 文件浏览、队列管理、API配置 | CSS变量主题、折叠动画 | 独立模块 |
| 标签页系统 | 多配置并行编辑、快速切换 | 动态DOM操作、事件委托 | 状态管理 |
| 队列引擎 | 任务调度、进度监控、错误处理 | Promise链、异步控制 | API通信 |
| 浮动控制面板 | 实时控制、进度显示、拖拽交互 | 绝对定位、拖拽事件 | 队列引擎 |
| 配置管理器 | JSON导入导出、参数解析 | JSON序列化、文件API | 标签页系统 |
| 图片画廊 | 生成结果预览、元数据显示 | 栅格布局、模态框 | 状态管理 |
二、核心架构深度解析
2.1 全局状态管理设计
项目的核心是精心设计的全局状态管理对象 AppState,它采用单例模式管理整个应用的状态:
const AppState = {
// 侧边栏状态
sidebarCollapsed: false,
// JSON文件管理
jsonFiles: [], // {name: string, path: string, content: object, lastModified: Date}
selectedJsonPath: null,
// 执行队列
executionQueue: [], // {jsonPath: string, jsonName: string, config: object, status: string}
isQueueRunning: false,
// 标签页管理
tabs: [],
activeTabId: null,
nextTabId: 1,
// 公共图片画廊(所有任务生成的图片)
commonGallery: [], // {id: string, tabId: string, jsonName: string, prompt: string, seed: number, imageBase64: string, timestamp: Date, info: object, generationTime: number}
// 全局配置
apiUrl: 'http://127.0.0.1:7860',
currentFolderPath: null,
// 模型和VAE列表
sdModels: [],
vaeModels: [],
// 模型加载状态
modelsLoaded: false,
// 全局任务ID计数器
nextTaskId: 1,
// 进度查询定时器
progressTimer: null,
originalTitle: null,
// 执行状态
isExecutionRunning: false,
isContinuousMode: false,
currentExecutionStartTime: null,
currentExecutionType: null, // 'queue' 或 'current'
currentProgress: {
current: 0,
total: 0,
currentTaskName: '',
startTime: null
},
// 单张图片进度
currentImageProgress: 0,
// 当前查看的图片索引
currentImageIndex: 0,
// 控制面板状态
floatingPanelState: {
isVisible: true,
position: { x: null, y: null },
isDragging: false,
dragOffset: { x: 0, y: 0 }
}
};
这种设计有几个关键优势:
2.2 响应式UI更新机制
项目采用手动DOM更新而非虚拟DOM方案,通过精心设计的更新函数实现高效UI同步:
function updateJsonList() {
dom.jsonList.innerHTML = '';
dom.jsonCount.textContent = AppState.jsonFiles.length;
AppState.jsonFiles.forEach((jsonFile, index) => {
const li = document.createElement('li');
li.className = `json-item ${AppState.sidebarCollapsed ? 'collapsed' : ''}`;
if (jsonFile.path === AppState.selectedJsonPath) {
li.classList.add('active');
}
// 条件渲染:侧边栏折叠时显示图标,展开时显示完整信息
li.innerHTML = AppState.sidebarCollapsed ?
// 折叠状态HTML
`<svg>…</svg>` :
// 展开状态HTML
`
<div class="json-name" title="${jsonFile.name}">${jsonFile.name}</div>
<div class="json-actions">
<button class="json-action-btn add-queue" title="添加到队列" data-index="${index}">
<svg>…</svg>
</button>
<div class="json-badge">${jsonFile.content.version || 'v1.0'}</div>
</div>
`;
// 事件绑定
li.addEventListener('click', () => openJsonInTab(jsonFile));
// 添加队列按钮事件
if (!AppState.sidebarCollapsed) {
const addQueueBtn = li.querySelector('.add-queue');
addQueueBtn.addEventListener('click', (e) => {
e.stopPropagation();
addToQueue(jsonFile);
});
}
dom.jsonList.appendChild(li);
});
}
这种更新模式的优点包括:
- 精确控制:只更新必要的DOM元素,避免不必要的重绘
- 条件渲染:根据应用状态(如侧边栏折叠状态)动态调整显示内容
- 事件委托优化:在元素创建时直接绑定事件,避免全局事件委托的开销
- 内存管理:每次更新前清空容器,避免内存泄漏
2.3 API通信与错误处理
与Stable Diffusion WebUI的通信通过统一的API层实现:
async function generateImageWithConfig(config, prompt, taskName) {
// 获取API URL
const apiUrl = config.apiUrl || AppState.apiUrl;
// 准备请求参数
const params = {
prompt: prompt,
negative_prompt: config.globalParams.negativePrompt || '',
seed: config.globalParams.seed === –1 ? –1 : parseInt(config.globalParams.seed),
steps: parseInt(config.globalParams.steps),
width: parseInt(config.globalParams.width),
height: parseInt(config.globalParams.height),
cfg_scale: parseFloat(config.globalParams.cfgScale),
sampler_name: config.globalParams.sampler || 'DPM++ 2M Karras',
batch_size: 1,
n_iter: 1,
save_images: config.globalParams.autoSave !== false
};
// 添加模型信息
if (config.globalParams.sdModel) {
params.override_settings = {
sd_model_checkpoint: config.globalParams.sdModel
};
}
// 错误处理和超时控制
const controller = new AbortController();
const timeoutId = setTimeout(() => controller.abort(), 300000); // 5分钟超时
try {
const response = await fetch(`${apiUrl}/sdapi/v1/txt2img`, {
method: 'POST',
headers: { 'Content-Type': 'application/json' },
body: JSON.stringify(params),
signal: controller.signal
});
clearTimeout(timeoutId);
if (!response.ok) {
throw new Error(`API请求失败: ${response.status} ${response.statusText}`);
}
const result = await response.json();
// 验证响应数据
if (!result.images || result.images.length === 0) {
throw new Error('API返回的图片为空');
}
// 标准化图片数据格式
let imageData = result.images[0];
if (!imageData.startsWith('data:')) {
imageData = `data:image/png;base64,${imageData}`;
}
return {
image: imageData,
seed: result.seed || config.globalParams.seed,
info: result.info || {}
};
} catch (error) {
clearTimeout(timeoutId);
throw new Error(`生图失败: ${error.message}`);
}
}
API层的设计特色:
- 参数标准化:将前端配置转换为WebUI API要求的格式
- 超时控制:防止长时间挂起的请求阻塞系统
- 错误恢复:详细的错误分类和处理策略
- 数据验证:确保API响应符合预期格式
三、关键模块实现详解
3.1 标签页系统:多工作流并行管理
标签页系统是WebUI LiuMo Batch的核心创新之一,它允许用户同时管理多个生成配置:
function createNewTab(name, jsonFile = null) {
const tabId = `tab-${AppState.nextTabId++}`;
const tab = {
id: tabId,
name: name,
jsonPath: jsonFile?.path || null,
jsonName: jsonFile?.name || null,
state: createTabState()
};
AppState.tabs.push(tab);
AppState.activeTabId = tabId;
// 创建Tab页头
createTabHeader(tab);
// 创建Tab内容
createTabContent(tab);
// 更新Tab显示
updateTabDisplay();
return tabId;
}
function createTabState() {
return {
prompts: [{
id: 1,
label: '示例提示词',
text: 'masterpiece, best quality, 1girl, beautiful detailed eyes, in a garden, sunlight'
}],
nextId: 2,
isGenerating: false,
currentQueue: [],
results: [],
autoSaveEnabled: true,
maxHistoryImages: 10,
commonPrompt: '' // 正向公共提示词
};
}
标签页系统的技术特点:
3.2 队列引擎:智能任务调度
队列引擎负责管理批量生成任务的执行顺序、状态跟踪和错误处理:
async function startQueueExecution() {
if (AppState.executionQueue.length === 0) {
showNotification('队列为空', 'warning');
return;
}
if (AppState.isQueueRunning) {
showNotification('队列正在执行中', 'info');
return;
}
AppState.isQueueRunning = true;
AppState.currentExecutionType = 'queue';
AppState.currentExecutionStartTime = new Date();
// 计算总任务数(所有JSON文件的提示词总数)
let totalPrompts = 0;
AppState.executionQueue.forEach(queueItem => {
if (queueItem.config && queueItem.config.prompts) {
totalPrompts += queueItem.config.prompts.length;
}
});
// 进度管理初始化
AppState.currentProgress = {
current: 0,
total: totalPrompts,
currentTaskName: '',
currentTaskIndex: 0
};
// 执行循环设计:支持连续执行模式
do {
for (let i = 0; i < AppState.executionQueue.length; i++) {
if (!AppState.isQueueRunning) break;
const queueItem = AppState.executionQueue[i];
queueItem.status = 'running';
updateQueueList();
// 更新进度信息
AppState.currentProgress.currentTaskName = queueItem.jsonName;
AppState.currentProgress.currentTaskIndex = i + 1;
updateProgressDisplay();
try {
await executeJsonGeneration(queueItem, AppState.currentProgress);
queueItem.status = 'completed';
showNotification(`完成: ${queueItem.jsonName}`, 'success');
} catch (error) {
queueItem.status = 'failed';
showNotification(`失败: ${queueItem.jsonName}: ${error.message}`, 'danger');
// 错误继续:即使单个任务失败,队列继续执行
}
updateQueueList();
}
// 连续执行模式支持
if (AppState.isContinuousMode && AppState.isQueueRunning) {
showNotification('开始新一轮队列执行', 'info');
// 重置队列状态
AppState.executionQueue.forEach(item => {
item.status = 'pending';
});
AppState.currentProgress.current = 0;
}
} while (AppState.isContinuousMode && AppState.isQueueRunning);
// 清理工作
AppState.isQueueRunning = false;
AppState.currentExecutionType = null;
stopProgressPolling();
updateExecutionButtons(false);
showNotification('队列执行完成', 'success');
}
队列引擎的核心特性:
| 任务状态跟踪 | pending/running/completed/failed四状态模型 | 清晰的执行进度可视化 |
| 错误隔离 | 单任务错误不影响队列继续执行 | 提高批量任务成功率 |
| 连续执行模式 | 循环执行队列直到手动停止 | 适合长期稳定运行场景 |
| 进度实时更新 | 浏览器标题+浮动面板双重显示 | 多任务监控便捷 |
| 资源释放 | 执行完成自动清理定时器和状态 | 避免内存泄漏 |
3.3 浮动控制面板:交互设计创新
浮动控制面板是项目的UI设计亮点,实现了可拖拽、可最小化的控制中心:
function setupDragAndDrop() {
const panel = dom.floatingControlPanel;
const header = panel.querySelector('.floating-control-panel-header');
let isDragging = false;
let startX, startY;
let initialLeft, initialTop;
// 鼠标拖拽实现
header.addEventListener('mousedown', startDrag);
function startDrag(e) {
isDragging = true;
startX = e.clientX;
startY = e.clientY;
const rect = panel.getBoundingClientRect();
initialLeft = rect.left;
initialTop = rect.top;
panel.classList.add('dragging');
document.addEventListener('mousemove', drag);
document.addEventListener('mouseup', stopDrag);
}
function drag(e) {
if (!isDragging) return;
const dx = e.clientX – startX;
const dy = e.clientY – startY;
let newLeft = initialLeft + dx;
let newTop = initialTop + dy;
// 边界检查:确保面板在视窗内
const maxX = window.innerWidth – panel.offsetWidth;
const maxY = window.innerHeight – panel.offsetHeight;
newLeft = Math.max(0, Math.min(newLeft, maxX));
newTop = Math.max(0, Math.min(newTop, maxY));
panel.style.left = `${newLeft}px`;
panel.style.top = `${newTop}px`;
panel.style.transform = 'none';
// 保存位置状态
AppState.floatingPanelState.position.x = newLeft;
AppState.floatingPanelState.position.y = newTop;
}
function stopDrag() {
if (!isDragging) return;
isDragging = false;
panel.classList.remove('dragging');
savePanelState(); // 保存到本地存储
document.removeEventListener('mousemove', drag);
document.removeEventListener('mouseup', stopDrag);
}
}
浮动面板的设计哲学:
3.4 图片参数导入:逆向工程创新
项目实现了从已有图片中提取生成参数的创新功能:
async function extractImageInfo(file) {
try {
// 将图片转换为base64
const imageBase64 = await new Promise((resolve, reject) => {
const reader = new FileReader();
reader.onload = () => resolve(reader.result.split(',')[1]);
reader.onerror = reject;
reader.readAsDataURL(file);
});
// 调用WebUI的png-info API
const response = await fetch(`${AppState.apiUrl}/sdapi/v1/png-info`, {
method: 'POST',
headers: { 'Content-Type': 'application/json' },
body: JSON.stringify({ image: `data:image/png;base64,${imageBase64}` })
});
if (!response.ok) throw new Error(`API请求失败: ${response.status}`);
const data = await response.json();
if (!data.info) throw new Error('图片中未找到生成信息');
// 解析生成信息
return parseGenerationInfo(data.info);
} catch (error) {
// 备用方案:手动解析PNG文件的tEXt块
return await extractPNGInfoManually(file);
}
}
function parseGenerationInfo(infoString) {
const result = {
prompt: '',
negativePrompt: '',
sampler: '',
steps: 20,
cfgScale: 7,
seed: –1,
width: 512,
height: 512,
model: '',
hires: { enable: false, scale: 2, denoiseStrength: 0.7, upscaler: 'Latent' }
};
// 多种格式解析逻辑
if (infoString.trim().startsWith('{')) {
// JSON格式解析
try {
const jsonInfo = JSON.parse(infoString);
// 提取关键参数…
} catch (e) { /* 回退到文本解析 */ }
}
// 文本格式解析(常见SD格式)
const lines = infoString.split('\\n');
// 复杂的文本解析逻辑…
return result;
}
此功能的技术价值:
四、配置文件系统与数据流
4.1 JSON配置规范
WebUI LiuMo Batch定义了一套完整的JSON配置规范:
{
"version": "2.0",
"exportDate": "2025-01-04T10:30:00.000Z",
"globalParams": {
"sdModel": "dreamshaper_8.safetensors",
"vaeModel": "Automatic",
"negativePrompt": "lowres, bad anatomy, worst quality, low quality",
"sampler": "DPM++ 2M Karras",
"steps": 25,
"width": 512,
"height": 768,
"cfgScale": 7,
"seed": –1,
"batchCount": 1,
"clipSkip": 1,
"enableHr": false,
"hrScale": 2,
"denoiseStrength": 0.7,
"hrUpscaler": "Latent",
"hrSecondPassSteps": 0,
"autoSave": true
},
"commonPrompt": "masterpiece, best quality, 1girl, beautiful detailed eyes",
"prompts": [
{
"label": "花园场景",
"text": "in a garden, sunlight, cherry blossoms"
},
{
"label": "室内场景",
"text": "indoors, cozy room, window light, reading book"
}
],
"apiUrl": "http://127.0.0.1:7860"
}
配置文件的设计原则:
4.2 数据流架构
项目的完整数据流涉及多个组件间的协作:
用户操作 → 事件处理器 → 状态更新 → UI渲染 → API调用 → 结果处理 → 状态更新 → UI反馈
↓ ↓ ↓ ↓ ↓ ↓ ↓ ↓
点击按钮 → 解析参数 → 更新AppState → 重绘DOM → 调用SD API → 保存图片 → 更新画廊 → 显示通知
关键数据转换节点:
五、项目中的关键技术栈应用
5.1 现代CSS特性应用
项目大量使用CSS自定义属性和现代布局技术:
:root {
/* CSS变量定义 – 主题系统 */
–bg-primary: #0d1117;
–bg-secondary: #161b22;
–bg-tertiary: #21262d;
–border-color: #30363d;
–text-primary: #f0f6fc;
–text-secondary: #8b949e;
–accent-color: #238636;
–accent-hover: #2ea043;
–sidebar-width: 300px;
–sidebar-collapsed-width: 60px;
}
/* CSS Grid布局 – 图片画廊 */
.common-gallery-content {
display: grid;
grid-template-columns: repeat(auto-fill, minmax(150px, 1fr));
gap: 0.5rem;
}
/* Flexbox布局 – 自适应界面 */
.app-container {
display: flex;
min-height: 100vh;
}
/* 现代选择器和伪类 */
.image-thumb:hover .image-info {
opacity: 1;
transition: opacity 0.2s;
}
/* 响应式设计 */
@media (max-width: 768px) {
.floating-control-panel {
min-width: 90%;
left: 5%;
transform: none;
}
}
CSS设计的亮点:
5.2 JavaScript设计模式应用
项目中应用了多种经典设计模式:
| 单例模式 | 全局状态管理 | AppState 全局对象 |
| 观察者模式 | 事件通知系统 | showNotification 函数 |
| 工厂模式 | 标签页创建 | createNewTab 函数 |
| 策略模式 | 图片解析器 | parseGenerationInfo 支持多种格式 |
| 命令模式 | 队列任务 | executionQueue 中的任务对象 |
| 备忘录模式 | 状态持久化 | saveToLocalStorage 函数 |
这些模式的应用使代码:
- 结构清晰:各模块职责明确,耦合度低
- 易于测试:独立的功能单元便于单元测试
- 可扩展性强:新功能可通过添加新策略实现
- 维护成本低:标准化的模式降低理解成本
六、API接口封装与通信机制
6.1 WebUI API封装层
项目实现了对Stable Diffusion WebUI API的完整封装:
// API端点映射表
const API_ENDPOINTS = {
SD_MODELS: '/sdapi/v1/sd-models',
SD_VAE: '/sdapi/v1/sd-vae',
TXT2IMG: '/sdapi/v1/txt2img',
PNG_INFO: '/sdapi/v1/png-info',
PROGRESS: '/sdapi/v1/progress',
OPTIONS: '/sdapi/v1/options'
};
// 统一的API请求函数
async function callWebUIApi(endpoint, method = 'GET', data = null) {
const url = `${AppState.apiUrl}${endpoint}`;
const options = {
method,
headers: { 'Content-Type': 'application/json' }
};
if (data && (method === 'POST' || method === 'PUT')) {
options.body = JSON.stringify(data);
}
try {
const response = await fetch(url, options);
if (!response.ok) {
throw new Error(`API请求失败 (${response.status}): ${await response.text()}`);
}
return await response.json();
} catch (error) {
console.error(`API调用失败 [${endpoint}]:`, error);
throw error;
}
}
6.2 进度监控与实时反馈
项目实现了细粒度的进度监控系统:
function startProgressPolling() {
// 清除现有定时器
if (AppState.progressTimer) {
clearInterval(AppState.progressTimer);
}
// 启动新定时器
AppState.progressTimer = setInterval(async () => {
try {
const progressData = await callWebUIApi(API_ENDPOINTS.PROGRESS);
// 更新单张图片进度
if (progressData.progress !== undefined) {
AppState.currentImageProgress = progressData.progress;
updateSingleImageProgress();
}
// 更新标题栏进度显示
updateTitleProgress();
// 更新浮动控制面板
updateProgressDisplay();
} catch (error) {
console.warn('进度查询失败:', error);
}
}, 500); // 500ms轮询间隔
}
进度监控的特点:
七、性能优化与内存管理
7.1 图片数据的内存管理
批量生成可能产生大量图片数据,项目实现了有效的内存管理:
// 图片数据生命周期管理
function addToGallery(imageData) {
// 添加到公共画廊
AppState.commonGallery.unshift(imageData);
// 限制画廊大小,防止内存溢出
const MAX_GALLERY_SIZE = 50;
if (AppState.commonGallery.length > MAX_GALLERY_SIZE) {
// 移除最旧的图片,释放内存
const removed = AppState.commonGallery.splice(MAX_GALLERY_SIZE);
// 可选:通知用户
if (removed.length > 0) {
console.log(`清理了 ${removed.length} 张旧图片以释放内存`);
}
}
// 触发UI更新
updateCommonGallery();
}
// Base64图片数据的优化处理
function optimizeImageStorage(imageBase64) {
// 对于缩略图,可以使用降低质量的方法
if (imageBase64.length > 1024 * 1024) { // 大于1MB
console.warn('大图片数据,考虑优化存储策略');
// 实际应用中可实现压缩或外部存储
}
return imageBase64;
}
7.2 DOM性能优化
针对频繁的UI更新,项目实施了多项优化:
// 批量DOM操作优化
function batchUpdatePrompts(tabId) {
// 使用文档片段减少重排
const fragment = document.createDocumentFragment();
const tab = AppState.tabs.find(t => t.id === tabId);
tab.state.prompts.forEach(prompt => {
const item = createPromptElement(prompt);
fragment.appendChild(item);
});
// 一次性更新DOM
const container = document.querySelector(`#prompts-container-${tabId}`);
container.innerHTML = '';
container.appendChild(fragment);
}
// 事件委托优化
function setupGlobalEventDelegation() {
// 使用事件委托减少事件监听器数量
document.addEventListener('click', (e) => {
// 提示词删除按钮
if (e.target.classList.contains('delete-prompt-btn')) {
const id = e.target.closest('.prompt-item').dataset.id;
removePromptItem(getCurrentTabId(), parseInt(id));
}
// 队列控制按钮
if (e.target.closest('.queue-btn')) {
const index = e.target.closest('.queue-item').dataset.index;
handleQueueButtonClick(e.target, parseInt(index));
}
});
}
八、安全性与错误处理
8.1 输入验证与清理
所有用户输入都经过严格验证:
function validateAndSanitizeInput(input, type) {
switch (type) {
case 'prompt':
// 移除潜在的危险脚本
return input.replace(/<script\\b[^<]*(?:(?!<\\/script>)<[^<]*)*<\\/script>/gi, '');
case 'apiUrl':
// 验证URL格式
const urlPattern = /^(http|https):\\/\\/[^ "]+$/;
if (!urlPattern.test(input)) {
throw new Error('无效的API URL格式');
}
return input;
case 'jsonContent':
// 验证JSON结构
try {
const parsed = JSON.parse(input);
// 验证必需字段
if (!parsed.version || !parsed.globalParams) {
throw new Error('无效的JSON配置格式');
}
return parsed;
} catch (e) {
throw new Error(`JSON解析失败: ${e.message}`);
}
default:
return input;
}
}
8.2 全面的错误处理策略
项目实现了分层的错误处理机制:
async function executeWithErrorHandling(operation, context = {}) {
try {
showNotification(`开始: ${context.name || '操作'}`, 'info');
const result = await operation();
showNotification(`完成: ${context.name || '操作'}`, 'success');
return result;
} catch (error) {
console.error(`操作失败 [${context.name || '未知'}]:`, error);
// 分类错误处理
if (error.message.includes('网络') || error.message.includes('Network')) {
showNotification('网络错误,请检查连接', 'danger');
} else if (error.message.includes('API') || error.message.includes('请求')) {
showNotification('API服务异常,请检查WebUI状态', 'danger');
} else if (error.message.includes('JSON') || error.message.includes('解析')) {
showNotification('数据格式错误', 'danger');
} else {
showNotification(`操作失败: ${error.message}`, 'danger');
}
// 错误恢复逻辑
if (context.recoverable) {
await attemptRecovery(context);
}
throw error; // 重新抛出供上层处理
}
}
九、扩展性与插件架构
9.1 模块化的扩展接口
项目设计了可扩展的架构:
// 扩展点定义
const EXTENSION_POINTS = {
BEFORE_GENERATION: 'beforeGeneration',
AFTER_GENERATION: 'afterGeneration',
CONFIG_LOAD: 'configLoad',
CONFIG_SAVE: 'configSave',
UI_RENDER: 'uiRender'
};
// 插件管理器
class PluginManager {
constructor() {
this.plugins = new Map();
this.hooks = new Map();
// 初始化所有扩展点
Object.values(EXTENSION_POINTS).forEach(point => {
this.hooks.set(point, []);
});
}
registerPlugin(plugin) {
this.plugins.set(plugin.name, plugin);
// 注册插件钩子
if (plugin.hooks) {
Object.entries(plugin.hooks).forEach(([point, callback]) => {
if (this.hooks.has(point)) {
this.hooks.get(point).push(callback);
}
});
}
}
async triggerHook(point, data) {
const hooks = this.hooks.get(point) || [];
for (const hook of hooks) {
try {
data = await hook(data) || data;
} catch (error) {
console.error(`插件钩子执行失败 [${point}]:`, error);
}
}
return data;
}
}
// 使用示例:生成前处理
async function generateImageWithPlugins(config, prompt) {
const pluginManager = AppState.pluginManager;
// 触发生成前钩子
let processedConfig = await pluginManager.triggerHook(
EXTENSION_POINTS.BEFORE_GENERATION,
{ config, prompt }
);
// 执行生成
const result = await generateImageWithConfig(
processedConfig.config,
processedConfig.prompt
);
// 触发生成后钩子
const finalResult = await pluginManager.triggerHook(
EXTENSION_POINTS.AFTER_GENERATION,
result
);
return finalResult;
}
十、实际应用场景与案例
10.1 角色设计批量生成
假设游戏角色设计师需要生成同一角色在不同场景中的表现:
{
"commonPrompt": "masterpiece, best quality, 1girl, silver hair, blue eyes, fantasy armor",
"prompts": [
{"label": "战斗姿态", "text": "in battle stance, holding sword, dramatic lighting"},
{"label": "休闲场景", "text": "resting at campfire, night sky, stars"},
{"label": "城镇中", "text": "in medieval town, marketplace, daylight"},
{"label": "魔法释放", "text": "casting spell, magical energy, glowing runes"}
]
}
设计师可以:
10.2 参数对比研究
AI研究者需要对比不同参数对生成结果的影响:
// 创建参数对比矩阵
const paramMatrix = {
samplers: ['Euler a', 'DPM++ 2M Karras', 'DDIM'],
cfgScales: [5, 7, 9, 11],
steps: [20, 30, 40, 50]
};
// 自动生成所有组合
const allCombinations = generateParamCombinations(paramMatrix);
// 批量执行并记录结果
allCombinations.forEach((params, index) => {
addToQueue({
name: `实验_${index + 1}`,
config: {
globalParams: { …baseConfig, …params },
prompts: [{ text: "standard test prompt for comparison" }]
}
});
});
10.3 商业应用工作流
电商内容创作团队的商品图生成流程:
| 需求分析 | 手动记录需求 | 创建需求配置模板 |
| 参数配置 | 每张图单独调整 | 批量应用参数模板 |
| 批量生成 | 手动逐张生成 | 自动队列执行 |
| 效果审核 | 文件夹中查找对比 | 画廊中并排对比 |
| 选定优化 | 重新调整参数重试 | 修改配置后重新队列 |
| 交付存档 | 文件散落各处 | 完整配置+结果打包 |
十一、项目部署与使用指南
11.1 本地部署步骤
环境准备:
# 1. 确保已安装Stable Diffusion WebUI
# 2. 启动WebUI时添加API参数
./webui.sh –api
# 3. 获取LiuMo Batch代码
git clone https://gitcode.com/Liudef06/liumo-base.git
快速启动:
# 方法1:直接打开HTML文件
open liumo-base/index.html
# 方法2:使用本地HTTP服务器
python -m http.server 8000
# 然后访问 http://localhost:8000
配置连接:
- 在侧边栏API配置中输入WebUI地址(默认http://127.0.0.1:7860)
- 点击"测试连接"验证
- 点击"刷新模型"加载可用模型
11.2 高级配置选项
// 自定义配置示例
const customConfig = {
// 界面定制
ui: {
theme: 'dark', // 'dark' | 'light' | 'auto'
language: 'zh-CN', // 界面语言
defaultTabCount: 3, // 启动时创建的标签页数
autoSaveInterval: 300000 // 自动保存间隔(ms)
},
// 生成设置
generation: {
defaultSteps: 25,
defaultWidth: 512,
defaultHeight: 768,
defaultSampler: 'DPM++ 2M Karras',
maxQueueSize: 100, // 队列最大任务数
retryFailed: true, // 自动重试失败任务
retryCount: 3 // 最大重试次数
},
// 存储设置
storage: {
maxHistoryImages: 50,
enableLocalStorage: true,
exportFormat: 'json', // 'json' | 'yaml'
backupInterval: 3600000 // 自动备份间隔(ms)
}
};
十二、未来发展方向与社区贡献
12.1 技术演进路线
基于当前架构,项目有几个明确的演进方向:
插件生态系统:
- 官方插件市场
- 第三方插件审核机制
- 插件沙盒安全环境
云原生支持:
- 分布式任务队列
- 多WebUI实例负载均衡
- 云端配置同步
AI增强功能:
- 提示词智能优化
- 自动参数调优
- 生成结果智能分类
12.2 社区贡献指南
项目采用开放协作模式,欢迎多种形式的贡献:
| 代码贡献 | JavaScript/CSS | 修复已知issue、添加测试用例 |
| 文档改进 | 技术写作 | 完善使用文档、添加教程 |
| 插件开发 | 前端开发 | 开发实用插件、工具集成 |
| 问题反馈 | 产品使用 | 提交bug报告、功能建议 |
| 社区支持 | 沟通能力 | 回答用户问题、社区管理 |
关键资源链接:
- 项目主页:WebUI LiuMo Batch
- 开发者博客:liudef06的技术博客
- 技术合作伙伴:DeepSeek AI
结论:重新定义AIGC工作流程
WebUI LiuMo Batch代表了AIGC工具发展的一个重要方向:从单点工具到工作流平台的演进。通过将复杂的批量生成任务抽象为可管理的配置和工作流,它显著降低了Stable Diffusion等AI绘画工具的使用门槛,同时提高了专业用户的工作效率。
项目的技术实现展示了现代Web技术的强大能力:纯前端实现、完整的本地运行、丰富的交互体验,所有这些都不需要复杂的后端架构。其代码质量、架构设计和用户体验都达到了生产级应用的标准。
随着AIGC技术的普及和深化,类似WebUI LiuMo Batch的工作流工具将变得越来越重要。它们不仅是效率工具,更是创意工作者的思维延伸,帮助人们更好地驾驭AI的创造力,将更多精力聚焦于创意本身而非技术细节。
无论你是AI绘画的爱好者、专业的内容创作者,还是研究AI生成技术的研究者,WebUI LiuMo Batch都值得你深入了解和使用。它可能就是你寻找的那个能够将AI创造力与人类工作流程完美结合的关键工具。