一、Istio架构与安装
1.1 架构与核心组件
Istio 是云原生场景下的服务网格框架,核心是通过 Sidecar 代理(Envoy)接管微服务的网络通信,无需修改业务代码,就能统一解决微服务架构的网络管理问题,核心作用分以下几点:
精细化流量治理
可实现智能路由(如版本分流、请求头匹配路由)、权重分配(灰度发布)、负载均衡、熔断 / 限流、故障注入等能力,比如bookinfo配置的服务多版本流量分配,就是通过 Istio 完成的。
服务间安全增强
自动实现服务间通信的 mTLS 加密(无需业务代码适配),同时提供统一的身份认证、权限控制(比如限制特定服务调用某接口),保障微服务通信的安全。
全链路可观测性
统一采集服务调用的监控指标(如延迟、错误率)、分布式追踪(调用链)、访问日志,不用业务服务单独集成监控组件,就能快速排查跨服务的问题。
无侵入式接入
以 Sidecar 代理的形式与业务服务部署在同一 Pod 中,业务代码无需任何改造,仅需通过配置(如 VirtualService、DestinationRule)即可启用所有能力。
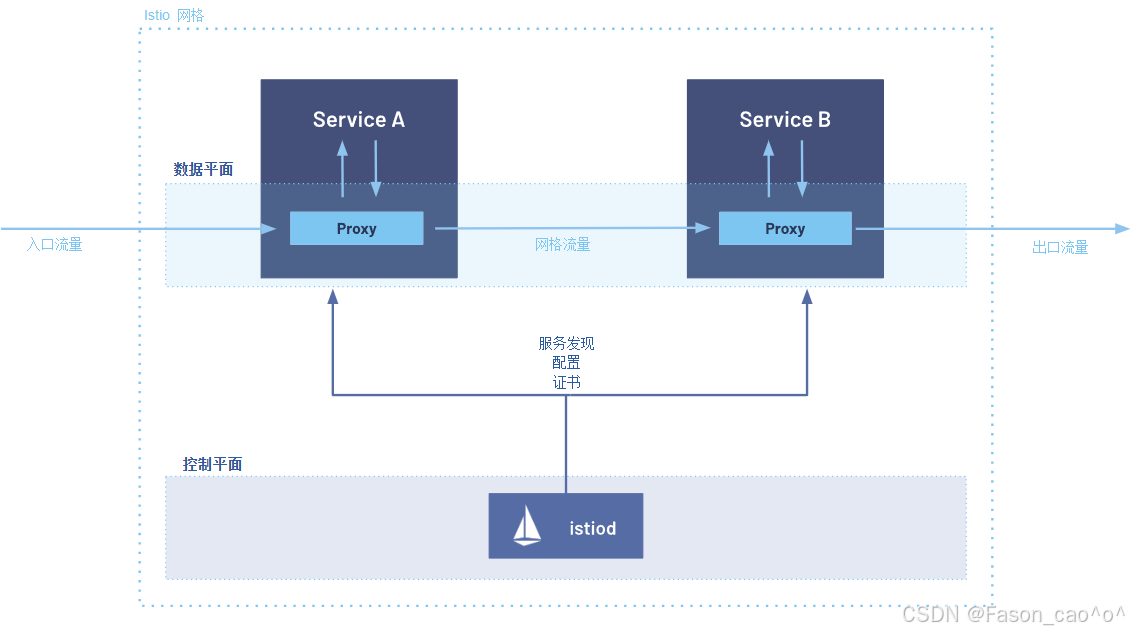
结合图中架构(控制平面 + 数据平面),流量流程分为入口流量→网格内流量→出口流量三个阶段,具体步骤如下:
外部用户 → istio-ingressgateway (入口网关) → Service A 的 Sidecar → Service A
入口流量接入外部请求(入口流量)首先到达 Service A 对应的 Sidecar Proxy(数据平面组件,即 Envoy)——Sidecar 与业务服务(Service A)同 Pod 部署,是流量进入网格的 “网关”。
Proxy 基于控制平面配置处理请求Sidecar Proxy 会从控制平面的 istiod 获取预先下发的配置(包括路由规则、安全策略、服务发现信息等),对入口流量执行协议解析、认证鉴权、流量路由等处理。
流量转发至业务服务处理后的流量被 Proxy 转发给同 Pod 内的 Service A,Service A 执行业务逻辑。
网格内服务调用(Service A → Service B)当 Service A 需要调用 Service B 时,请求不会直接发往 Service B,而是先发送到自身的 Sidecar Proxy。
网格流量转发Service A 的 Proxy 依据 istiod 提供的服务发现信息,找到 Service B 对应的 Sidecar Proxy 地址,将请求转发至 Service B 的 Proxy(此阶段流量为 “网格流量”)。
Service B 接收请求Service B 的 Sidecar Proxy 接收请求后,基于 istiod 的配置执行负载均衡、熔断检查等处理,再将请求转发给同 Pod 内的 Service B。
出口流量透出若 Service B 需要对外请求(出口流量),请求会先发送到自身的 Sidecar Proxy,Proxy 执行出口策略(如限流、黑白名单)后,将流量发往外部目标。
核心组件作用说明表
| 控制平面 | istiod | 1. 合并了 Pilot、Citadel 等组件,是控制平面唯一核心;2. 负责服务发现、流量规则 / 策略分发;3. 管理网格内的证书(提供 mTLS 加密);4. 向 Sidecar Proxy 推送动态配置。 |
| 数据平面 | Sidecar Proxy(Envoy) | 1. 与业务服务同 Pod 部署,拦截服务的所有入 / 出流量;2. 执行 istiod 下发的流量规则(路由、负载均衡、熔断等);3. 实现网格内的安全通信(mTLS)、监控 metrics 采集。 |
| 业务层 | Service A/B | 网格内的业务服务,专注于执行业务逻辑;所有网络通信均通过 Sidecar Proxy 代理,无需修改业务代码。 |
| 网关 | Gateway | 统一出入口总控中心,把微服务的通用能力(流量、安全、监控)从单个服务中剥离,集中统一管理。 |
1.2 安装istio1.28.1版本
下载软件包
https://github.com/istio/istio/releases/download/1.28.1/istio-1.28.1-linux-amd64.tar.gz
解压安装
tar解压之后直接将bin目录下的istioctl移动到/usr/local/bin/目录下
然后执行安装命令
# 安装Istio(demo Profile包含所有核心组件,包括sidecar-injector)
istioctl install –set profile=demo -y
# 自己测试建议安装demo的模式
[root@k8s-master ~/istio]# kubectl get po -n istio-system
NAME READY STATUS RESTARTS AGE
istio-egressgateway-6f6bb8f7f9-t77rc 1/1 Running 1 (5h24m ago) 26h
istio-ingressgateway-7b787c97fc-c2dk6 1/1 Running 1 (5h24m ago) 26h
istiod-cd86994b8-2t4x2 1/1 Running 1 (5h24m ago) 26h
kiali-7b58697666-l5j89 1/1 Running 0 130m
Istio 的 Profile 是官方为不同场景定制的 “部署套餐”,省去了手动配置数百个参数的麻烦。核心逻辑是:不同 Profile 包含的组件不同,只有包含 istiod 和 sidecar-injector 的 Profile,才能实现 Envoy 自动注入。
| demo | 测试 / 学习 / 演示(推荐) | istiod、sidecar-injector、ingressgateway、egressgateway | 功能最全,资源占用适中,适合新手验证注入 |
| default | 生产基础部署 | istiod、sidecar-injector、ingressgateway | 精简版,去掉演示组件,保留核心注入功能 |
| minimal | 极简部署(仅控制面) | 仅 istiod(无 sidecar-injector / 网关) | 无自动注入功能,需手动配置 |
| openshift | RedHat OpenShift 平台 | 适配 OpenShift 的 istiod、injector、网关 | 兼容 OpenShift 的安全策略和网络规则 |
| production | 高可用生产部署 | 多副本 istiod、injector、网关,带监控 |
开启自动注入功能
# 打上label为ns,然后这个名称空间的所有新建的pod都会自动注入一个proxy(envoy).
[root@k8s-master ~/istio]# kubectl label ns default istio-injection=enabled
这样就是在pod下都会存在一个proxy代理容器,也就是标志着接入了服务网格的功能.
卸载(拓展)
# 卸载现有Istio(如果安装过)
istioctl uninstall -y –purge
# 删除istio-system命名空间(清理残留)
kubectl delete namespace istio-system
二、Istio流量管理
2.1 Envoy代理架构与核心组件
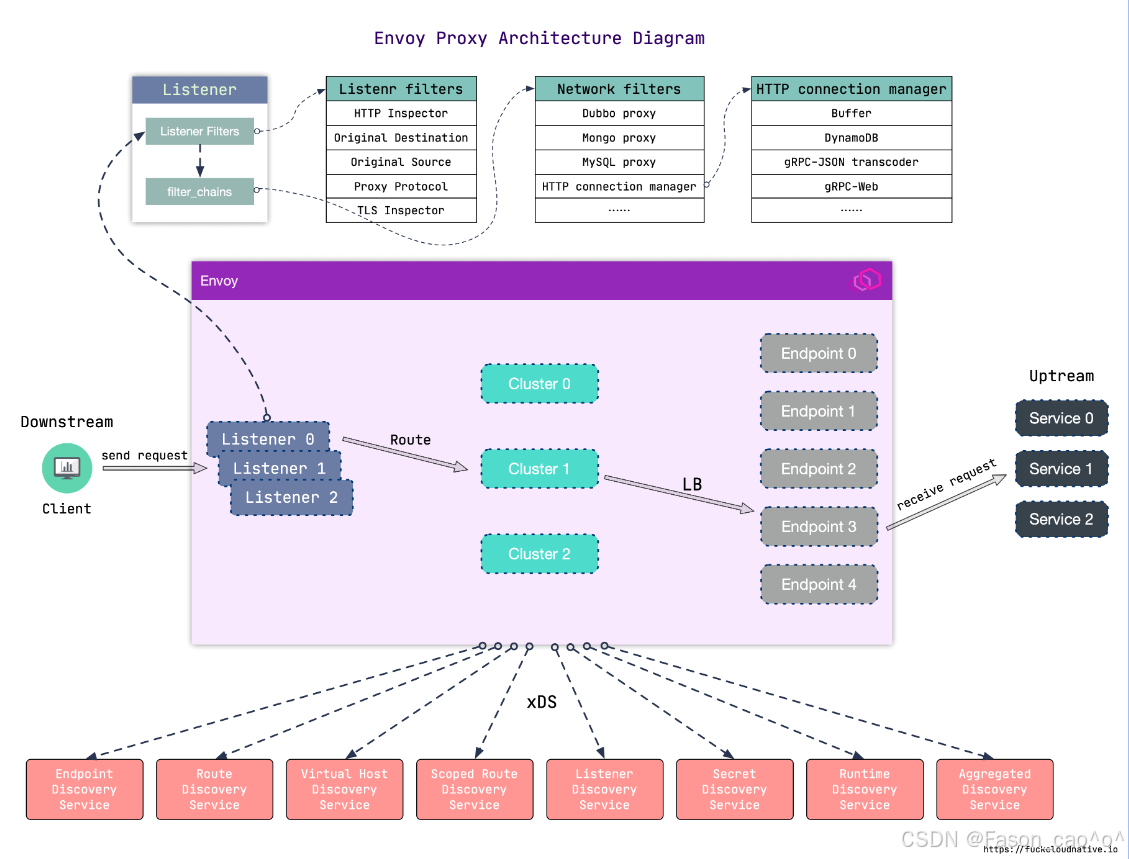
Envoy 作为代理的流量流程是下游(Client)→ Envoy 代理 → 上游(后端服务),具体步骤如下:
下游请求进入 Envoy客户端(下游)发起请求,首先到达 Envoy 的 Listener(监听器)(图中 Listener 0/1/2)——Listener 是 Envoy 的 “入口”,负责监听指定端口的流量(一个 Envoy 可配置多个 Listener 处理不同端口 / 协议的请求)。
Listener 层初步处理请求进入 Listener 后,先经过 Listener Filters(如图中的 HTTP Inspector、TLS Inspector):这些过滤器会对请求做初步检测(比如识别请求的协议类型、获取原始目标地址),为后续流程做准备;之后通过 filter_chains 进入对应的网络处理链路。
协议 / 网络层处理请求进入 Network Filters(如图中的 HTTP connection manager、Dubbo proxy):这一层是 “协议适配层”,会根据请求的协议类型(HTTP、RPC、MySQL 等)进行针对性处理(比如 HTTP 协议会交给 HTTP connection manager 解析请求头、管理连接)。
路由匹配与集群选择经过协议处理后,请求会通过 Route(路由规则) 进行匹配:根据请求的域名、路径、请求头等信息,匹配到对应的 Cluster(上游集群)(图中 Cluster 0/1/2)——Cluster 是 “上游服务的逻辑分组”(比如一个后端服务的所有实例会被归为一个 Cluster)。
负载均衡与请求转发确定目标 Cluster 后,Envoy 会通过 LB(负载均衡) 算法(如轮询、加权随机),从 Cluster 对应的 Endpoint(端点)(图中 Endpoint 0/1/2 等)中选择一个具体的后端服务实例,最终将请求转发到该上游服务。
核心组件
| Listener Filters | 对进入 Listener 的请求做初步检测(如识别协议、解析原始目标),为后续流程预处理 |
| Listener(监听器) | Envoy 的流量入口,负责监听指定端口的请求;支持多 Listener 对应不同端口 / 协议 |
| Network Filters | 按请求的协议类型(HTTP、Dubbo、MySQL 等)做针对性处理,是协议适配的核心层 |
| HTTP Connection Manager | Network Filters 的子集,专门处理 HTTP 协议请求(解析请求头、管理连接、路由匹配) |
| Route(路由) | 依据请求的域名、路径等信息,匹配对应的上游服务集群(Cluster) |
| Cluster(上游集群) | 后端服务的逻辑分组(如一个服务的所有实例),是负载均衡的作用对象 |
| Endpoint(端点) | 上游服务的具体实例(IP + 端口),是请求最终转发的目标 |
| LB(负载均衡) | 属于 Cluster 的功能,按算法(轮询、加权等)选择 Cluster 内的 Endpoint |
| xDS 服务 | Envoy 的动态配置源(如 Endpoint 发现、Route 配置更新),支撑 Envoy 动态调整配置 |
2.2 请求路由
Envoy 是高性能的云原生代理(常用作服务网格的 Sidecar),核心作用可拆分为以下几点:
全链路流量拦截:作为 Sidecar 与业务服务同部署,接管服务的所有入 / 出流量,成为服务通信的 “必经网关”,业务服务无需自己处理网络连接逻辑。
多协议适配处理:原生支持 HTTP/1.1、HTTP/2、gRPC、TCP、WebSocket 等协议,能自动解析不同协议的请求,还可实现协议转换(如 HTTP/1.1 转 HTTP/2),适配复杂微服务的通信场景。
精细化流量管控:内置负载均衡(轮询、加权等)、熔断(限制异常服务请求)、限流(控制请求速率)、故障注入(模拟延迟 / 错误)等能力,保障服务通信的稳定性。
可观测性数据采集:在流量路径上天然采集请求的监控指标(延迟、错误率)、访问日志(请求头、响应码)、分布式追踪数据(传递 Trace ID),是服务网格可观测性的核心数据来源。
安全通信支撑:支持 mTLS 加密(与其他 Envoy 间的通信加密)、请求身份校验,配合控制平面(如 Istiod)实现服务间的安全访问控制。
动态配置更新:通过 xDS 协议从控制平面实时获取路由、端点等配置,无需重启代理即可生效,适配云原生的动态扩缩容、配置变更场景。
DestinationRule
Istio / Destination Rule
DestinationRule——>是配置envoy下的cluster的
Istio 里的流量路由规则(导航仪) —— 只管「流量该往哪走」:匹配指定的流量(比如网格内访问 my-nginx 的 80/443 流量),定义转发路径(如先到 Egress Gateway,再到 Nginx),是控制流量走向的核心。
1️⃣ 服务子集(Subsets):就像给服务分组,比如把reviews服务按版本分成v1、v2、v3三个小组,这样你就能精准控制流量流向哪个版本。
2️⃣ 流量策略(Traffic Policy):定义怎么把流量分发给这些子集,比如用轮询(ROUND_ROBIN)、随机(RANDOM)或者最少连接数(LEAST_CONN)等策略。
3️⃣ TLS设置:配置安全通信,比如用ISTIO_MUTUAL启用双向TLS,这是服务网格内部通信的安全最佳实践。
"DestinationRule与VirtualService配合使用,可以实现强大的流量管理功能。"VirtualService是"宏观的交通规划",DestinationRule是"微观的本地交通管理"。
VirtualService
VirtualService ——> 控制envoy的route下的路由表
Istio 里的流量策略规则(执行规范) —— 只管「流量到目标后该怎么处理」:针对指定目标服务(如 Egress Gateway、Nginx),定义流量的加密方式(mTLS)、负载均衡、SNI、证书关联等规则,是控制流量传输行为的核心。
核心作用是:将客户端请求与目标负载进行解耦,让流量管理变得超级灵活!
1️⃣ 根据请求特征路由:比如"如果请求头里有X-User-Type: VIP,就路由到VIP服务"
2️⃣ 实现精细流量控制:90%流量到v1,10%到v2,完美实现灰度发布
3️⃣ 配置超时和重试:比如"请求超时5秒,重试3次"
4️⃣ 实现重定向:比如"把旧版API请求自动重定向到新版"
VirtualService不需要修改你的应用程序代码!就像给城市交通系统加装了智能调度系统,但公交车和司机(你的服务)完全不需要改变。
流量管理之固定访问
以Bookinfo为例
进入 Istio 安装目录。
Istio 默认自动注入 Sidecar。 为 default 命名空间打上标签 istio-injection=enabled:
$ kubectl label namespace default istio-injection=enabled
使用 kubectl 命令来部署应用:
$ kubectl apply -f samples/bookinfo/platform/kube/bookinfo.yaml
上面这条命令会启动 bookinfo 应用架构图中显示的全部四个服务。 也会启动三个版本的 reviews 服务:v1、v2 以及 v3。
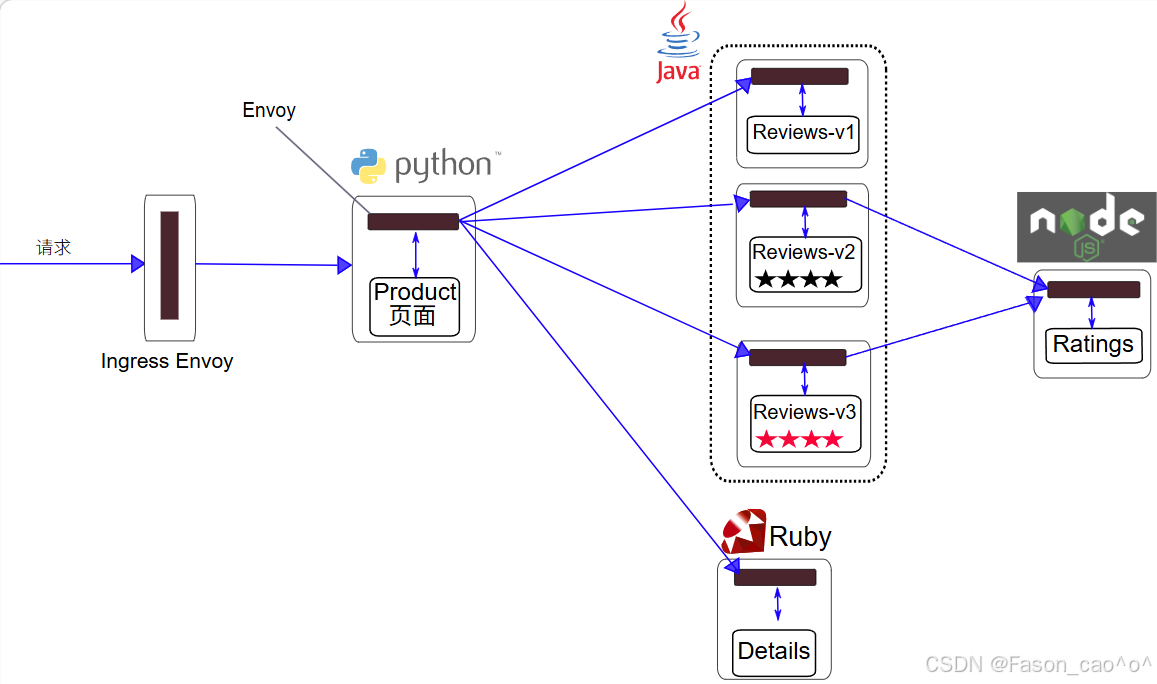
这里就需要用到DestinationRule资源对象去对流量的集群处理。
# 编写istio DestinationRule的资源清单(格式类似于K8S)
[root@k8s-master ~/istio]# cat dr+vs.yaml
apiVersion: networking.istio.io/v1alpha3
kind: DestinationRule
metadata:
name: reviews
spec:
host: reviews
# 创建cluster的子集
subsets:
– name: v1
labels:
version: v1
– name: v2
labels:
version: v2
– name: v3
labels:
version: v3
—
apiVersion: networking.istio.io/v1alpha3
kind: VirtualService
metadata:
name: reviews
spec:
hosts:
– reviews
http:
– route:
– destination:
host: reviews
subset: v1
[root@k8s-master ~/istio]# kubectl apply -f dr+vs.yaml
destinationrule.networking.istio.io/reviews unchanged
virtualservice.networking.istio.io/reviews created
[root@k8s-master ~/istio]# kubectl get dr
NAME HOST AGE
reviews reviews 2m23s
[root@k8s-master ~/istio]# kubectl get vs
NAME GATEWAYS HOSTS AGE
bookinfo ["bookinfo-gateway"] ["*"] 25h
reviews ["reviews"] 92s
这些规则写完之后istio的envoy数据层面是会动态更新的
在没有创建DR的时候envoy的集群cluster信息只有productpage一个outbound|9080||productpage.default.svc.cluster.local 创建完DR资源之后后做了3个reviews的子集的cluster概念因为host: reviews,分别为 outbound|9080|v1|reviews.default.svc.cluster.local outbound|9080|v2|reviews.default.svc.cluster.local outbound|9080|v3|reviews.default.svc.cluster.local 变成了4个cluster。
同时对应cluster的endpoint也对应着后端的podIP
[root@k8s-master ~/istio]# istioctl proxy-config endpoint productpage-v1-54bb874995-zp9w2 -n default –cluster "outbound|9080|v1|reviews.default.svc.cluster.local" -o yaml
hostStatuses:
– address:
socketAddress:
address: 10.200.36.90
portValue: 9080
[root@k8s-master ~/istio]# istioctl proxy-config endpoint productpage-v1-54bb874995-zp9w2 -n default –cluster "outbound|9080|v2|reviews.default.svc.cluster.local" -o yaml
hostStatuses:
– address:
socketAddress:
address: 10.200.169.157
portValue: 9080
[root@k8s-master ~/istio]# istioctl proxy-config endpoint productpage-v1-54bb874995-zp9w2 -n default –cluster "outbound|9080|v3|reviews.default.svc.cluster.local" -o yaml
edsServiceName: outbound|9080|v3|reviews.default.svc.cluster.local
hostStatuses:
– address:
socketAddress:
address: 10.200.36.96
portValue: 9080
[root@k8s-master ~/istio]# kubectl get po -o wide -l app=reviews
NAME READY STATUS RESTARTS AGE IP NODE NOMINATED NODE READINESS GATES
reviews-v1-598b896c9d-trb4c 2/2 Running 2 (6h16m ago) 26h 10.200.36.90 k8s-node1 <none> <none>
reviews-v2-556d6457d-69lx4 2/2 Running 2 (6h16m ago) 26h 10.200.169.157 k8s-node2 <none> <none>
reviews-v3-564544b4d6-cbcf2 2/2 Running 2 (6h16m ago) 26h 10.200.36.96 k8s-node1 <none> <none>
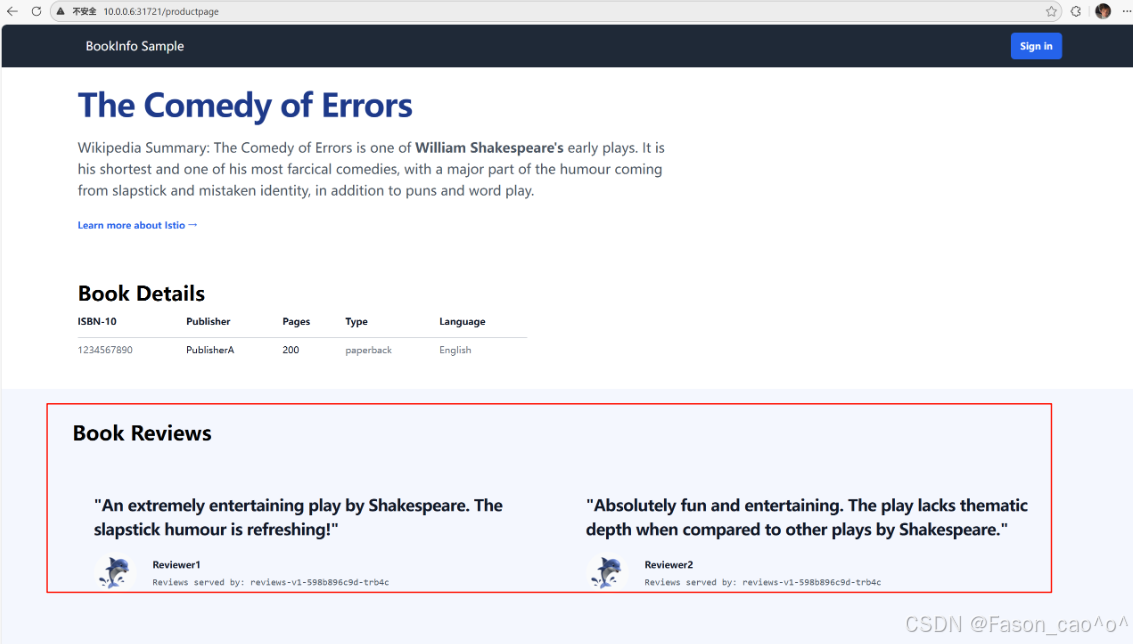
做完这个VirtualService规则创建之后我们再访问Simple Bookstore Aphttp://10.0.0.6:31721/productpageSimple Bookstore Ap页面就一直为v1版本了。
流量管理之权重访问
apiVersion: networking.istio.io/v1alpha3
kind: DestinationRule
metadata:
name: reviews
spec:
host: reviews
subsets:
– name: v1
labels:
version: v1
– name: v2
labels:
version: v2
– name: v3
labels:
version: v3
—
apiVersion: networking.istio.io/v1alpha3
kind: VirtualService
metadata:
name: reviews
spec:
hosts:
– reviews
http:
– route:
# 为 v1 版本分配 50% 流量
– destination:
host: reviews
subset: v1
weight: 50
# 为 v3 版本分配 50% 流量
– destination:
host: reviews
subset: v3
weight: 50
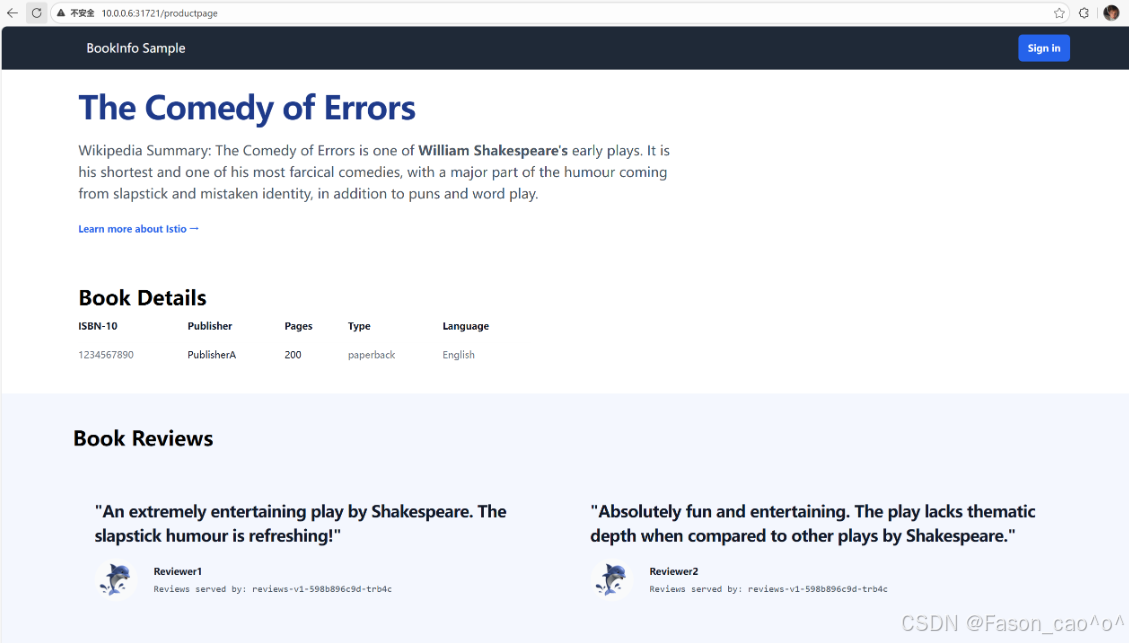
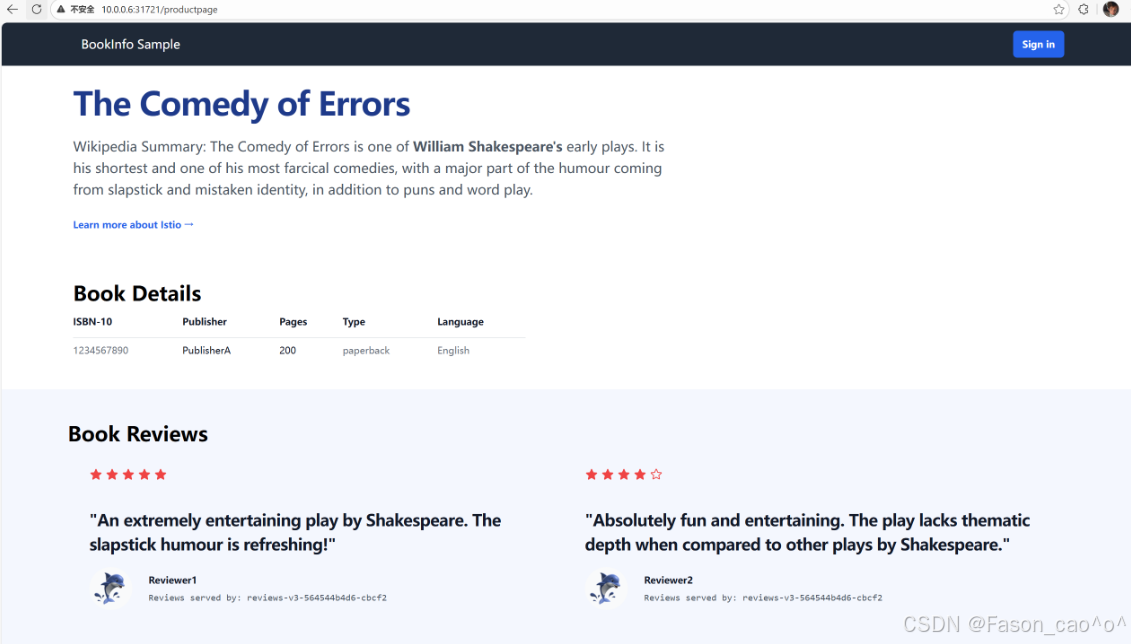
流量管理之请求头访问
[root@k8s-master ~/istio]# cat dr+vs_user_agent.yaml
apiVersion: networking.istio.io/v1alpha3
kind: DestinationRule
metadata:
name: reviews
spec:
host: reviews
subsets:
– name: v1
labels:
version: v1
– name: v2
labels:
version: v2
– name: v3
labels:
version: v3
—
apiVersion: networking.istio.io/v1alpha3
kind: VirtualService
metadata:
name: reviews
spec:
hosts:
– reviews
http:
# 第一个路由规则:匹配 user=Jason 的请求头,转发到 v2
– match:
– headers:
end-user:
exact: Jason # exact 表示精准匹配字符串
# 忽略名称大小写
# headers:
# user:
# regex: ^[Jj]ason$ # 匹配 Jason 或 jason
route:
– destination:
host: reviews
subset: v2
# 第二个路由规则:匹配 user=jack 的请求头,转发到 v3
– match:
– headers:
end-user:
exact: jack
route:
– destination:
host: reviews
subset: v3
# 第三个路由规则:默认路由(无匹配条件),所有其他请求转发到 v1
– route:
– destination:
host: reviews
subset: v1
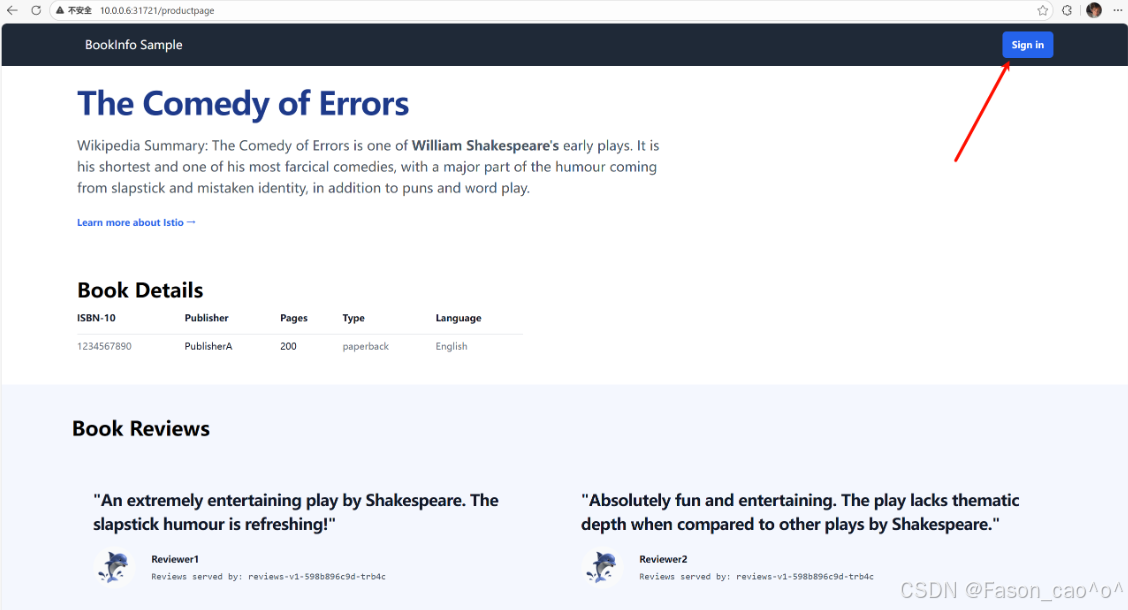
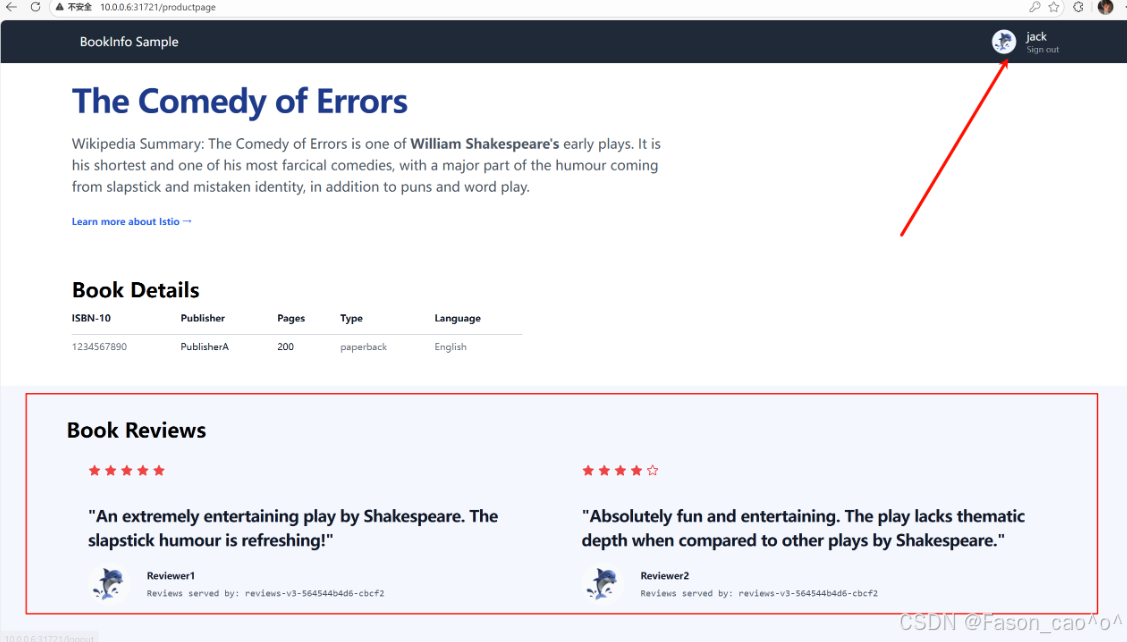
到这里我们就明白了要通过 Istio 实现服务的流量管理,需要用到Gateway、 VirtualService、DestinationRule三个 CRD 对象,这些对象其实最终都是去拼凑 Envoy 的配置,每个对象管理Envoy配置的一部分,把这个关系搞清楚我们就能更好的掌握lstio的使用了。
2.3 故障注入
故障注入就是 Istio 不改动业务代码,给服务间流量模拟网络 / 服务故障,验证微服务容错能力的流量治理功能。核心是提前发现服务脆弱点,避免线上真故障出问题,简答核心就 3 点:
无侵入:不用改业务代码,靠 Istio Sidecar 拦截流量实现
模拟故障:常用延迟(网络卡慢)、中断(服务不可用 / 5xx),也支持限流、重置连接等
精准控制:可按服务、接口、比例、来源等条件定向注入,不影响正常业务
注入HTTP延迟故障
给请求加延迟,专门测服务能不能扛住慢响应,验证超时、熔断好不好使,防止线上一慢就雪崩。
# 需要先创建一个vs的路由规则,如果访问头用户信息是jason,那么请求就会被路由到reviews的v2版本上面去,正常都是v1.
[root@k8s-master ~/istio]# cat samples/bookinfo/networking/virtual-service-reviews-test-v2.yaml
apiVersion: networking.istio.io/v1
kind: VirtualService
metadata:
name: reviews
spec:
hosts:
– reviews
http:
– match:
– headers:
end-user:
exact: jason
route:
– destination:
host: reviews
subset: v2
– route:
– destination:
host: reviews
subset: v1
延迟两秒访问针对于ratings服务
[root@k8s-master ~/istio]# cat samples/bookinfo/networking/virtual-service-ratings-test-delay.yaml
apiVersion: networking.istio.io/v1
kind: VirtualService
metadata:
name: ratings
spec:
hosts:
– ratings
http:
– match:
– headers:
end-user:
exact: jason
fault:
delay:
percentage:
value: 100.0
fixedDelay: 2s
route:
– destination:
host: ratings
subset: v1
– route:
– destination:
host: ratings
subset: v1
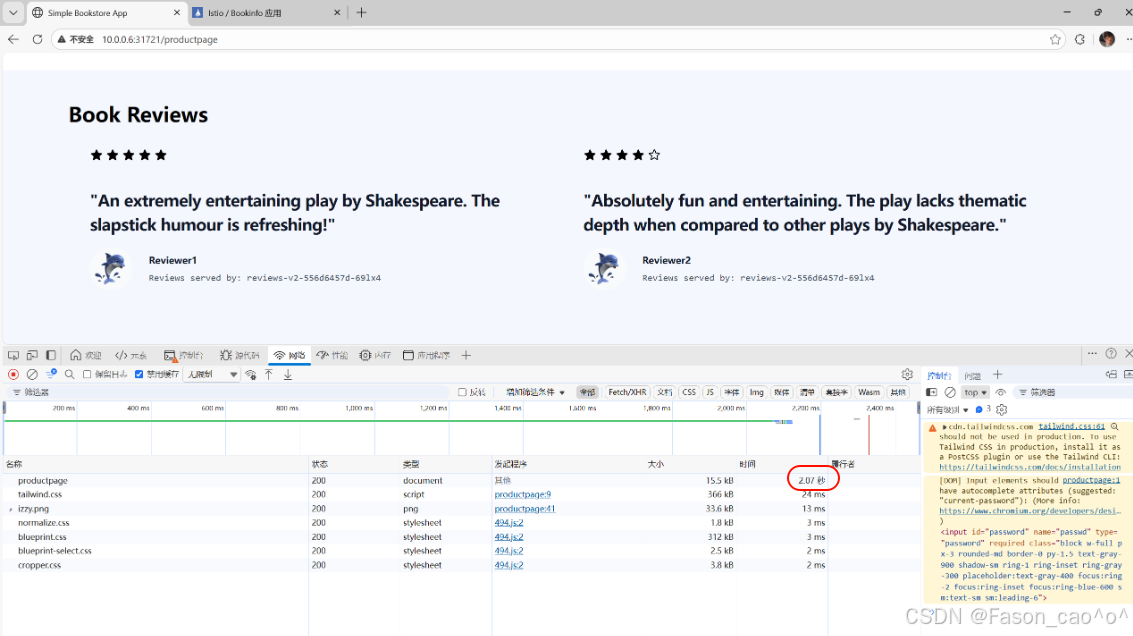
可以看到以及是延迟访问生效了且还是无侵入式的,但是我们的v1版本是不会受到任何影响的。
# 再次查看envoy的路由规则,因为说过vs资源本质上修改的就是envoy的route规则。
[root@k8s-master ~/istio]# istioctl proxy-config route reviews-v2-556d6457d-69lx4 –name 9080 -oyaml
routes:
– decorator:
operation: ratings.default.svc.cluster.local:9080/*
match:
caseSensitive: true
headers:
– name: end-user
stringMatch:
exact: jason
prefix: /
metadata:
filterMetadata:
istio:
config: /apis/networking.istio.io/v1/namespaces/default/virtual-service/ratings
route:
cluster: outbound|9080|v1|ratings.default.svc.cluster.local
maxGrpcTimeout: 0s
retryPolicy:
hostSelectionRetryMaxAttempts: "5"
numRetries: 2
retryHostPredicate:
– name: envoy.retry_host_predicates.previous_hosts
typedConfig:
'@type': type.googleapis.com/envoy.extensions.retry.host.previous_hosts.v3.PreviousHostsPredicate
retryOn: connect-failure,refused-stream,unavailable,cancelled,retriable-status-codes
timeout: 0s
typedPerFilterConfig:
envoy.filters.http.fault:
'@type': type.googleapis.com/envoy.extensions.filters.http.fault.v3.HTTPFault
delay:
fixedDelay: 2s
percentage:
denominator: MILLION
numerator: 1000000
注入HTTP abort故障
直接模拟服务报错(返回指定 HTTP 错误码),测服务容错和降级是否生效,防止一个服务挂了连带其他服务雪崩。
核心场景:模拟服务直接不可用(如 503 服务忙、404、500),比延迟更极端
验证重点:调用方是否能捕获错误、是否自动重试 / 降级、是否熔断,不卡死
无侵入:Istio 直接拦截返回错误,业务代码完全不用改
[root@k8s-master ~/istio]# cat samples/bookinfo/networking/virtual-service-ratings-test-abort.yaml
apiVersion: networking.istio.io/v1
kind: VirtualService
metadata:
name: ratings
spec:
hosts:
– ratings
http:
– match:
– headers:
end-user:
exact: jason
fault:
abort:
percentage:
value: 100.0
httpStatus: 500
route:
– destination:
host: ratings
subset: v1
– route:
– destination:
host: ratings
subset: v1
[root@k8s-master ~/istio]# kubectl apply -f samples/bookinfo/networking/virtual-service-ratings-test-abort.yaml
virtualservice.networking.istio.io/ratings configured
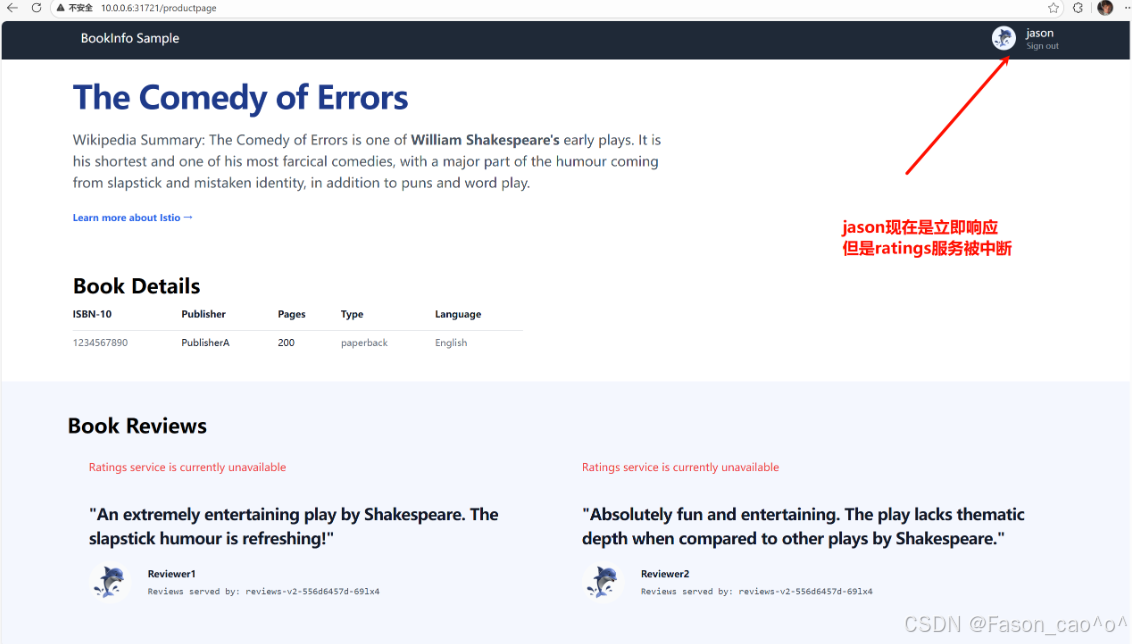
其他的请求只要不是jason的用户请求头都正常。响应服务。
✅ 延迟 vs abort 核心区别(一句话分清)
-
延迟:慢响应 → 测超时、慢调用熔断
-
abort:直接报错 → 测错误处理、降级、故障隔离
2.4 HTTP流量拆分
权重拆分流量
# 先创建好路由,先将流量都请求到v1版本
[root@k8s-master ~/istio]# cat samples/bookinfo/networking/virtual-service-all-v1.yaml
apiVersion: networking.istio.io/v1
kind: VirtualService
metadata:
name: productpage
spec:
hosts:
– productpage
http:
– route:
– destination:
host: productpage
subset: v1
—
apiVersion: networking.istio.io/v1
kind: VirtualService
metadata:
name: reviews
spec:
hosts:
– reviews
http:
– route:
– destination:
host: reviews
subset: v1
—
apiVersion: networking.istio.io/v1
kind: VirtualService
metadata:
name: ratings
spec:
hosts:
– ratings
http:
– route:
– destination:
host: ratings
subset: v1
—
apiVersion: networking.istio.io/v1
kind: VirtualService
metadata:
name: details
spec:
hosts:
– details
http:
– route:
– destination:
host: details
subset: v1
—
# 再创建好子集方便后续的测试
[root@k8s-master ~/istio]# cat samples/bookinfo/networking/destination-rule-all.yaml
apiVersion: networking.istio.io/v1
kind: DestinationRule
metadata:
name: productpage
spec:
host: productpage
subsets:
– name: v1
labels:
version: v1
—
apiVersion: networking.istio.io/v1
kind: DestinationRule
metadata:
name: reviews
spec:
host: reviews
subsets:
– name: v1
labels:
version: v1
– name: v2
labels:
version: v2
– name: v3
labels:
version: v3
—
apiVersion: networking.istio.io/v1
kind: DestinationRule
metadata:
name: ratings
spec:
host: ratings
subsets:
– name: v1
labels:
version: v1
– name: v2
labels:
version: v2
– name: v2-mysql
labels:
version: v2-mysql
– name: v2-mysql-vm
labels:
version: v2-mysql-vm
—
apiVersion: networking.istio.io/v1
kind: DestinationRule
metadata:
name: details
spec:
host: details
subsets:
– name: v1
labels:
version: v1
– name: v2
labels:
version: v2
—
# 再做流量拆分
# 将50%的流量路由到v1版本,再将50%的流量路由到v3版本,这样就可以实现我们的灰度发布,金丝雀发布,以及A/B测试。
[root@k8s-master ~/istio]# cat samples/bookinfo/networking/virtual-service-reviews-50-v3.yaml
apiVersion: networking.istio.io/v1
kind: VirtualService
metadata:
name: reviews
spec:
hosts:
– reviews
http:
– route:
– destination:
host: reviews
subset: v1
weight: 50
– destination:
host: reviews
subset: v3
weight: 50
# 测试差不多之后就可以完全将流量路由到v3的新版本即可
[root@k8s-master ~/istio]# cat samples/bookinfo/networking/virtual-service-reviews-v3.yaml
apiVersion: networking.istio.io/v1
kind: VirtualService
metadata:
name: reviews
spec:
hosts:
– reviews
http:
– route:
– destination:
host: reviews
subset: v3
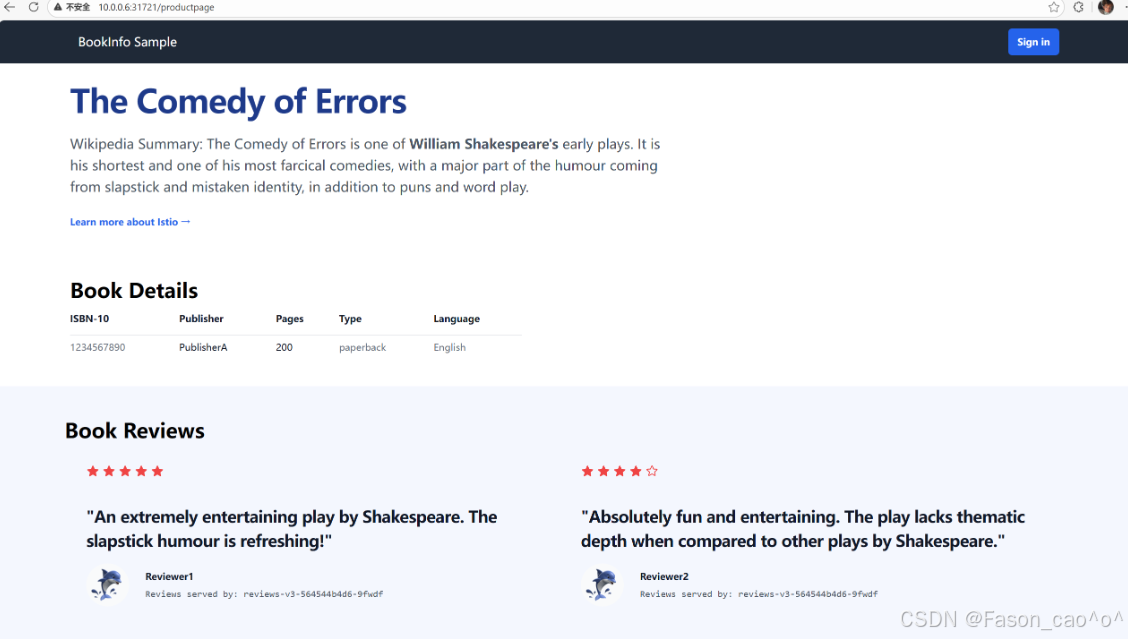
流量镜像
也成为影子流量,把生产环境的真实流量 “复制一份” 转发到测试 / 新版本服务,既不影响用户的正常请求,又能拿真实流量验证新服务的可用性、兼容性。
简单说就是原本的请求v1版本的流量会同步流量到新版本v2上面去,对新版本做真实的流量测试,从而去验证新服务。
# 创建一个v1版本的pod,模拟我们的v1稳定版本。
[root@k8s-master ~/istio]# cat httpbin-v1.yaml
apiVersion: apps/v1
kind: Deployment
metadata:
name: http-v1
spec:
selector:
matchLabels:
app: httpbin
version: v1
template:
metadata:
labels:
app: httpbin
version: v1
spec:
containers:
– image: docker.io/kennethreitz/httpbin:latest
imagePullPolicy: IfNotPresent
name: httpbinv1
command: ["gunicorn","–access-logfile","-","-b","0.0.0.0","httpbin:app"]
ports:
– containerPort: 80
# 创建一个v2版本的Pod,去模拟我们的新版本
[root@k8s-master ~/istio]# cat httpbin-v2.yaml
apiVersion: apps/v1
kind: Deployment
metadata:
name: http-v2
spec:
selector:
matchLabels:
app: httpbin
version: v2
template:
metadata:
labels:
app: httpbin
version: v2
spec:
containers:
– image: docker.io/kennethreitz/httpbin:latest
imagePullPolicy: IfNotPresent
name: httpbinv2
command: ["gunicorn","–access-logfile","-","-b","0.0.0.0","httpbin:app"]
ports:
– containerPort: 80
# 使用DR资源将新老业务使用Pod的labels去划分两个子集,然后再将流量都先路由到v1版本上去。
[root@k8s-master ~/istio]# cat httpbin-dr-vs-v1.yaml
apiVersion: networking.istio.io/v1alpha3
kind: VirtualService
metadata:
name: httpbin
spec:
hosts:
– httpbin
http:
– route:
– destination:
host: httpbin
subset: v1
weight: 100
—
apiVersion: networking.istio.io/v1alpha3
kind: DestinationRule
metadata:
name: httpbin
spec:
host: httpbin
subsets:
– name: v1
labels:
version: v1
– name: v2
labels:
version: v2
# 创建一个curl测试Pod
[root@k8s-master ~/istio]# cat curl.yaml
apiVersion: apps/v1
kind: Deployment
metadata:
name: sleep
spec:
selector:
matchLabels:
app: sleep
template:
metadata:
labels:
app: sleep
spec:
containers:
– name: sleep
image: docker.io/curlimages/curl:8.9.1
imagePullPolicy: IfNotPresent
command: ["/bin/sleep", "3650d"]
imagePullPolicy: IfNotPresent
# 创建httpbinPod的统一入口。
[root@k8s-master ~/istio]# cat http-svc.yaml
apiVersion: v1
kind: Service
metadata:
name: httpbin
labels:
app: httpbin
spec:
ports:
– name: http
port: 8000
targetPort: 8000
selector:
app: httpbin
[root@k8s-master ~/istio]# kubectl get po -l 'app in (httpbin,sleep)'
NAME READY STATUS RESTARTS AGE
http-v1-8ff584bb6-g4ft9 2/2 Running 0 28m
http-v2-56bddbb874-dbjbp 2/2 Running 0 27m
sleep-7f8d77f79b-4ddsv 2/2 Running 0 22m
[root@k8s-master ~/istio]# kubectl get dr,vs
NAME HOST AGE
…
destinationrule.networking.istio.io/httpbin httpbin 14m
NAME GATEWAYS HOSTS AGE
…
virtualservice.networking.istio.io/httpbin ["httpbin"] 14m
[root@k8s-master ~/istio]# kubectl get svc
NAME TYPE CLUSTER-IP EXTERNAL-IP PORT(S) AGE
…
httpbin ClusterIP 10.98.234.250 <none> 8000/TCP 24m
[root@k8s-master ~/istio]#
# 测试
[root@k8s-master ~/istio]# kubectl exec sleep-7f8d77f79b-4ddsv -c sleep — curl -sS http://httpbin:8000/headers
{
"headers": {
"Accept": "*/*",
"Host": "httpbin:8000",
"User-Agent": "curl/8.9.1",
"X-Envoy-Attempt-Count": "1",
"X-Forwarded-Client-Cert": "By=spiffe://cluster.local/ns/default/sa/default;Hash=3f6be10c16848e6447c5a6685411e35923ad9f3f548b8ba3e1ac95a99ab2d417;Subject=\\"\\";URI=spiffe://cluster.local/ns/default/sa/default"
}
}
[root@k8s-master ~/istio]# kubectl exec sleep-7f8d77f79b-4ddsv -c sleep — curl -sS http://httpbin:8000/headers
{
"headers": {
"Accept": "*/*",
"Host": "httpbin:8000",
"User-Agent": "curl/8.9.1",
"X-Envoy-Attempt-Count": "1",
"X-Forwarded-Client-Cert": "By=spiffe://cluster.local/ns/default/sa/default;Hash=3f6be10c16848e6447c5a6685411e35923ad9f3f548b8ba3e1ac95a99ab2d417;Subject=\\"\\";URI=spiffe://cluster.local/ns/default/sa/default"
}
}
[root@k8s-master ~/istio]# kubectl exec sleep-7f8d77f79b-4ddsv -c sleep — curl -sS http://httpbin:8000/headers
{
"headers": {
"Accept": "*/*",
"Host": "httpbin:8000",
"User-Agent": "curl/8.9.1",
"X-Envoy-Attempt-Count": "1",
"X-Forwarded-Client-Cert": "By=spiffe://cluster.local/ns/default/sa/default;Hash=3f6be10c16848e6447c5a6685411e35923ad9f3f548b8ba3e1ac95a99ab2d417;Subject=\\"\\";URI=spiffe://cluster.local/ns/default/sa/default"
}
}
# 可以发现v1版本的日志可以正常接收到请求日志
[root@k8s-master ~/istio]# kubectl logs http-v1-8ff584bb6-g4ft9
[2025-12-24 03:11:30 +0000] [1] [INFO] Starting gunicorn 19.9.0
[2025-12-24 03:11:30 +0000] [1] [INFO] Listening at: http://0.0.0.0:8000 (1)
[2025-12-24 03:11:30 +0000] [1] [INFO] Using worker: sync
[2025-12-24 03:11:30 +0000] [9] [INFO] Booting worker with pid: 9
127.0.0.6 – – [24/Dec/2025:03:20:06 +0000] "GET / HTTP/1.1" 200 9593 "-" "curl/8.14.1"
127.0.0.6 – – [24/Dec/2025:03:25:35 +0000] "GET /headers HTTP/1.1" 200 355 "-" "curl/8.9.1"
127.0.0.6 – – [24/Dec/2025:03:40:32 +0000] "GET /headers HTTP/1.1" 200 355 "-" "curl/8.9.1"
127.0.0.6 – – [24/Dec/2025:03:40:33 +0000] "GET /headers HTTP/1.1" 200 355 "-" "curl/8.9.1"
127.0.0.6 – – [24/Dec/2025:03:40:34 +0000] "GET /headers HTTP/1.1" 200 355 "-" "curl/8.9.1"
# 但是v2版本就不会有
[root@k8s-master ~/istio]# kubectl logs http-v2-56bddbb874-dbjbp
[2025-12-24 03:12:24 +0000] [1] [INFO] Starting gunicorn 19.9.0
[2025-12-24 03:12:24 +0000] [1] [INFO] Listening at: http://0.0.0.0:8000 (1)
[2025-12-24 03:12:24 +0000] [1] [INFO] Using worker: sync
[2025-12-24 03:12:24 +0000] [10] [INFO] Booting worker with pid: 10
# 开启流量镜像功能,也就是请求v1版本的流量,也要同时100%的请求到v2新版本上去。权重可以自己控制。
[root@k8s-master ~/istio]# cat v1-v2mirror.yaml
apiVersion: networking.istio.io/v1alpha3
kind: VirtualService
metadata:
name: httpbin
spec:
hosts:
– httpbin
http:
– route:
– destination:
host: httpbin
subset: v1
weight: 100
mirror:
host: httpbin
subset: v2
mirrorPercentage:
value: 100.0
[root@k8s-master ~/istio]# kubectl exec sleep-7f8d77f79b-4ddsv -c sleep — curl -sS http://httpbin:8000/headers
{
"headers": {
"Accept": "*/*",
"Host": "httpbin:8000",
"User-Agent": "curl/8.9.1",
"X-Envoy-Attempt-Count": "1",
"X-Forwarded-Client-Cert": "By=spiffe://cluster.local/ns/default/sa/default;Hash=3f6be10c16848e6447c5a6685411e35923ad9f3f548b8ba3e1ac95a99ab2d417;Subject=\\"\\";URI=spiffe://cluster.local/ns/default/sa/default"
}
}
[root@k8s-master ~/istio]# kubectl exec sleep-7f8d77f79b-4ddsv -c sleep — curl -sS http://httpbin:8000/headers
{
"headers": {
"Accept": "*/*",
"Host": "httpbin:8000",
"User-Agent": "curl/8.9.1",
"X-Envoy-Attempt-Count": "1",
"X-Forwarded-Client-Cert": "By=spiffe://cluster.local/ns/default/sa/default;Hash=3f6be10c16848e6447c5a6685411e35923ad9f3f548b8ba3e1ac95a99ab2d417;Subject=\\"\\";URI=spiffe://cluster.local/ns/default/sa/default"
}
}
# 可以看到流量以及同时请求到新版本了。
[root@k8s-master ~/istio]# kubectl logs http-v1-8ff584bb6-g4ft9
[2025-12-24 03:11:30 +0000] [1] [INFO] Starting gunicorn 19.9.0
[2025-12-24 03:11:30 +0000] [1] [INFO] Listening at: http://0.0.0.0:8000 (1)
[2025-12-24 03:11:30 +0000] [1] [INFO] Using worker: sync
[2025-12-24 03:11:30 +0000] [9] [INFO] Booting worker with pid: 9
127.0.0.6 – – [24/Dec/2025:03:20:06 +0000] "GET / HTTP/1.1" 200 9593 "-" "curl/8.14.1"
127.0.0.6 – – [24/Dec/2025:03:25:35 +0000] "GET /headers HTTP/1.1" 200 355 "-" "curl/8.9.1"
127.0.0.6 – – [24/Dec/2025:03:40:32 +0000] "GET /headers HTTP/1.1" 200 355 "-" "curl/8.9.1"
127.0.0.6 – – [24/Dec/2025:03:40:33 +0000] "GET /headers HTTP/1.1" 200 355 "-" "curl/8.9.1"
127.0.0.6 – – [24/Dec/2025:03:40:34 +0000] "GET /headers HTTP/1.1" 200 355 "-" "curl/8.9.1"
127.0.0.6 – – [24/Dec/2025:03:43:19 +0000] "GET /headers HTTP/1.1" 200 355 "-" "curl/8.9.1"
127.0.0.6 – – [24/Dec/2025:03:43:20 +0000] "GET /headers HTTP/1.1" 200 355 "-" "curl/8.9.1"
[root@k8s-master ~/istio]# kubectl logs http-v2-56bddbb874-dbjbp
[2025-12-24 03:12:24 +0000] [1] [INFO] Starting gunicorn 19.9.0
[2025-12-24 03:12:24 +0000] [1] [INFO] Listening at: http://0.0.0.0:8000 (1)
[2025-12-24 03:12:24 +0000] [1] [INFO] Using worker: sync
[2025-12-24 03:12:24 +0000] [10] [INFO] Booting worker with pid: 10
127.0.0.6 – – [24/Dec/2025:03:43:19 +0000] "GET /headers HTTP/1.1" 200 355 "-" "curl/8.9.1"
127.0.0.6 – – [24/Dec/2025:03:43:20 +0000] "GET /headers HTTP/1.1" 200 355 "-" "curl/8.9.1"
# Envoy代理的route配置requestMirrorPolicies
[root@k8s-master ~/istio]# istioctl proxy-config route http-v2-56bddbb874-dbjbp –name 8000 -oyaml
– ignorePortInHostMatching: true
maxDirectResponseBodySizeBytes: 1048576
name: "8000"
…
requestMirrorPolicies:
– cluster: outbound|8000|v2|httpbin.default.svc.cluster.local
disableShadowHostSuffixAppend: true
runtimeFraction:
defaultValue:
denominator: MILLION
numerator: 1000000
traceSampled: false
retryPolicy:
hostSelectionRetryMaxAttempts: "5"
numRetries: 2
retryHostPredicate:
– name: envoy.retry_host_predicates.previous_hosts
typedConfig:
'@type': type.googleapis.com/envoy.extensions.retry.host.previous_hosts.v3.PreviousHostsPredicate
retryOn: connect-failure,refused-stream,unavailable,cancelled,retriable-status-codes
timeout: 0s
– domains:
– '*'
includeRequestAttemptCount: true
name: allow_any
routes:
– match:
prefix: /
name: allow_any
route:
cluster: PassthroughCluster
maxGrpcTimeout: 0s
timeout: 0s
2.5 熔断
Istio 熔断是Sidecar 代理实现的无侵入故障隔离机制,类比电路跳闸:当目标服务故障达到阈值,代理临时切断调用方与目标服务的连接,避免故障扩散,保障整体服务可用性,全程无需改业务代码。
✅ 在 Istio 里,熔断是只能配置在 DestinationRule 中,由目标服务对应的调用方 Sidecar执行熔断,而非目标服务自身:比如服务 B 调用服务 A,熔断规则配在 A 的 DestinationRule,实际是 B 的 Sidecar 来判断是否触发熔断,拦截请求。
谁发起请求,谁就是调用方;谁接收请求,谁就是目标方
核心作用
防雪崩:目标服务故障(慢 / 报错),不会拖垮调用方,更不会顺着调用链扩散(比如 C→B→A,A 故障,熔断能让 B 不崩,进而 C 也不崩)
保资源:避免调用方因 “一直等待 / 重试故障服务” 耗尽线程、CPU 等资源,保障调用方自身正常提供服务
核心特性
快速失败:触发熔断后,调用方请求不阻塞、不等待,直接返回失败,不给调用方造成资源浪费
自动恢复:熔断不是永久断连,会按 sleepWindow(冷静期,如 20s)定期发少量试探请求,若目标服务恢复正常,自动恢复正常调用,无需手动干预
熔断是保护调用方,不是保护目标服务(目标服务故障时,优先保调用方可用)
熔断仅对经过 Istio Sidecar 的流量生效,未注入 Sidecar 的 Pod 不受管控
熔断触发后,调用方收到的是 Sidecar 返回的错误(如 503),而非目标服务的错误.
Istio 熔断:Sidecar 替调用方盯着目标服务,故障达标就临时断连,快速失败不阻塞,冷静后自动试探恢复,只保整体不雪崩,全程业务无感知。
[root@k8s-master ~/istio]# cat rd_dr.yaml
apiVersion: networking.istio.io/v1alpha3
kind: DestinationRule
metadata:
name: httpbin
spec:
# 目标服务名:所有针对httpbin服务的流量都会应用下面的熔断规则
host: httpbin
# 流量策略:包含连接池限制、异常检测(熔断)等核心规则
trafficPolicy:
# 连接池配置:限制调用方与httpbin之间的连接/请求数(熔断的基础限流层)
connectionPool:
# TCP层连接池配置(针对TCP层面的连接限制)
tcp:
# 限制调用方对httpbin服务的最大并发TCP连接数为1
# 效果:同一时间只能有1个TCP连接连到httpbin,超过则直接拒绝新连接
maxConnections: 1
# HTTP层连接池配置(针对HTTP请求的精细化限制,优先级高于TCP层)
http:
# 限制HTTP请求排队等待连接的最大队列数为1
# 效果:当TCP连接占满(1个)后,最多只能有1个请求排队,超过则快速失败
http1MaxPendingRequests: 1
# 限制单个TCP连接上允许承载的最大HTTP请求数为1
# 效果:每个连接只能处理1个请求,处理完就关闭重建,完全禁用连接复用
maxRequestsPerConnection: 1
# 异常检测(熔断)配置:检测httpbin实例的异常,触发熔断隔离(真正的断连逻辑)
outlierDetection:
# 连续5xx错误数阈值:只要出现1次5xx错误(如500/503/504),就判定该实例异常
# 效果:1次5xx就标记实例故障,触发熔断隔离
consecutive5xxErrors: 1
# 异常检测的时间间隔:每1秒统计一次错误数/实例状态
# 效果:极高灵敏度,几乎实时检测错误,易触发熔断(生产常用10-30s)
interval: 1s
# 异常实例的基础隔离时间:首次熔断隔离3分钟,后续隔离时间会按次数递增(如第2次6分钟)
# 效果:隔离时间极长,熔断后3分钟内仅发少量试探请求,恢复慢
baseEjectionTime: 3m
# 最大可隔离实例比例:允许隔离httpbin服务100%的实例
# 效果:极端情况下,httpbin所有实例都可能被熔断隔离,导致服务完全不可用(生产常用30-50%)
maxEjectionPercent: 100
这个DestinationRule是给httpbin服务配置极严格的熔断规则(适合测试 / 验证熔断效果,生产环境不会用这么苛刻的阈值),核心是:限制连接 / 请求数到极致,只要出现 1 次 5xx 错误就熔断实例,且隔离时间长达 3 分钟,最多可隔离 100% 实例。
connectionPool 连接池参数(分 TCP/HTTP 层,按需配置)
connectionPool 连接池参数(分 TCP/HTTP 层,按需配置)
| HTTP 层 | http.maxConnections | 限制调用方对目标服务的最大并发连接数,超阈值直接拒绝新连接 | http.maxConnections: 50 | 核心兜底参数,防止目标服务连接过载,同时避免调用方创建过多连接耗尽自身资源 |
| HTTP 层 | http.http1MaxPendingRequests | 限制请求排队等待连接的最大队列数,队列满直接快速失败 | http.http1MaxPendingRequests: 20 | 解决连接占满后请求阻塞问题,避免调用方线程被长时间占用,保障调用方可用性 |
| HTTP 层 | http.maxRequestsPerConnection | 单个连接允许承载的最大请求数,超阈值关闭连接重建 | http.maxRequestsPerConnection: 100 | 提升连接复用率,避免单个长连接长期占用导致请求分发不均,减少无效长连接堆积 |
| HTTP 层 | http.httpMaxRequests | 对目标服务的最大并发请求总数(含连接内请求 + 排队请求) | http.httpMaxRequests: 200 | 优先级高于 maxConnections,精准控制总请求量,适配高并发场景,防止请求过载 |
| HTTP 层 | http.idleTimeout | 空闲连接超时时间,超时自动关闭空闲连接 | http.idleTimeout: 30s | 清理无效空闲连接释放资源,适配长连接场景,默认 30s,多数场景无需修改 |
| HTTP 层 | http.maxRetries | 单个请求的最大重试次数,超阈值停止重试 | http.maxRetries: 2 | 配合熔断使用,避免对故障服务频繁重试放大问题,需与异常检测阈值联动 |
| HTTP 层 | http.retriableStatusCodes | 指定可重试的 HTTP 状态码 | http.retriableStatusCodes: [503, 504] | 精细化控制重试场景,只对指定异常码重试,减少无效重试 |
| TCP 层 | tcp.maxConnections | TCP 层最大并发连接数,仅对 TCP 服务生效(非 HTTP) | tcp.maxConnections: 30 | 适配 TCP 微服务、数据库、Redis 等非 HTTP 服务,HTTP 服务无需重复配置 |
| TCP 层 | tcp.connectTimeout | TCP 连接建立超时时间,超时判定连接失败 | tcp.connectTimeout: 2s | 避免调用方等待无效连接过久,默认 30s,高可用场景建议缩短至 1-3s |
| TCP 层 | tcp.tcpKeepalive | TCP 长连接保活配置 |
outlierDetection 异常检测参数(熔断触发核心)
| consecutiveErrors | 判定实例异常的连续错误数阈值,超阈值标记为异常实例 | consecutiveErrors: 5 | 最核心熔断触发条件,错误含 5xx 状态码、连接超时、连接拒绝等,精准识别故障实例 |
| sleepWindow | 异常实例被隔离后的冷静期,期间仅发少量试探请求 | sleepWindow: 30s | 熔断自动恢复关键参数,冷静期内不批量发请求,避免反复触发故障,适配 20-60s |
| interval | 异常状态统计的时间间隔,多久校验一次错误数 / 异常指标 | interval: 10s | 控制熔断检测灵敏度,间隔太短易误触发,太长易漏触发,常用 10-30s |
| baseEjectionTime | 异常实例的基础隔离时间,隔离时间随异常次数递增 | baseEjectionTime: 15s | 递增惩罚机制(第 1 次 15s,第 2 次 30s…),避免实例频繁隔离 / 恢复导致流量抖动 |
| maxEjectionPercent | 目标服务实例池最大可隔离比例,避免全量实例被隔离 | maxEjectionPercent: 50 | 核心兜底参数!防止网络抖动等场景导致全量实例异常,保障服务至少有部分实例可用,常用 30%-50% |
| consecutiveGatewayErrors | 连续网关类错误数阈值(502/503/504),单独触发熔断 | consecutiveGatewayErrors: 3 | 比 consecutiveErrors 更精准,适配网关转发场景,优先对网关类错误熔断 |
| successRateMinimumHosts | 开启成功率熔断的最小实例数,实例不足则不触发 | successRateMinimumHosts: 5 | 成功率熔断前置条件,避免实例过少时统计失真导致误熔断 |
| successRateRequestVolume | 开启成功率熔断的最小请求量,请求不足则不触发 | successRateRequestVolume: 100 | 保障成功率统计样本量,避免少量请求导致成功率波动过大,误触发熔断 |
| successRateThreshold | 成功率阈值,低于阈值则判定实例异常 | successRateThreshold: 80 | 按请求成功率触发熔断,适配 “错误数少但成功率低” 的场景,常用 80%-90% |
| enforcingConsecutiveErrors | 强制执行连续错误熔断的阈值(低于该值不熔断) | enforcingConsecutiveErrors: 3 | 精细化控制熔断触发严格度,避免少量错误就触发熔断,提升稳定性 |
connectionPool 是熔断基础:先限制连接 / 请求量,避免过载,再由 outlierDetection 检测异常触发熔断,缺一不可
熔断执行逻辑:先触发 connectionPool 限流(快速失败),再累计错误触发 outlierDetection 实例隔离
核心兜底必配:http.maxConnections + http.http1MaxPendingRequests + consecutiveErrors + sleepWindow + maxEjectionPercent,满足绝大多数企业场景
[root@k8s-master ~/istio]# cat samples/httpbin/httpbin.yaml
# Copyright Istio Authors
#
# Licensed under the Apache License, Version 2.0 (the "License");
# you may not use this file except in compliance with the License.
# You may obtain a copy of the License at
#
# http://www.apache.org/licenses/LICENSE-2.0
#
# Unless required by applicable law or agreed to in writing, software
# distributed under the License is distributed on an "AS IS" BASIS,
# WITHOUT WARRANTIES OR CONDITIONS OF ANY KIND, either express or implied.
# See the License for the specific language governing permissions and
# limitations under the License.
##################################################################################################
# httpbin service
##################################################################################################
apiVersion: v1
kind: ServiceAccount
metadata:
name: httpbin
—
apiVersion: v1
kind: Service
metadata:
name: httpbin
labels:
app: httpbin
service: httpbin
spec:
ports:
– name: http
port: 8000
targetPort: 8080
selector:
app: httpbin
—
apiVersion: apps/v1
kind: Deployment
metadata:
name: httpbin
spec:
replicas: 1
selector:
matchLabels:
app: httpbin
version: v1
template:
metadata:
labels:
app: httpbin
version: v1
spec:
serviceAccountName: httpbin
containers:
– image: docker.io/mccutchen/go-httpbin:v2.15.0
imagePullPolicy: IfNotPresent
name: httpbin
ports:
– containerPort: 8080
部署一个客户端进行测试
[root@k8s-master ~/istio]# cat samples/httpbin/sample-client/fortio-deploy.yaml
apiVersion: v1
kind: Service
metadata:
name: fortio
labels:
app: fortio
service: fortio
spec:
ports:
– port: 8080
name: http
selector:
app: fortio
—
apiVersion: apps/v1
kind: Deployment
metadata:
name: fortio-deploy
spec:
replicas: 1
selector:
matchLabels:
app: fortio
template:
metadata:
annotations:
# This annotation causes Envoy to serve cluster.outbound statistics via 15000/stats
# in addition to the stats normally served by Istio. The Circuit Breaking example task
# gives an example of inspecting Envoy stats via proxy config.
proxy.istio.io/config: |-
proxyStatsMatcher:
inclusionPrefixes:
– "cluster.outbound"
– "cluster_manager"
– "listener_manager"
– "server"
– "cluster.xds-grpc"
labels:
app: fortio
spec:
containers:
– name: fortio
image: docker.io/fortio/fortio:1.71.2
imagePullPolicy: IfNotPresent
ports:
– containerPort: 8080
name: http-fortio
– containerPort: 8079
name: grpc-ping
[root@k8s-master ~/istio]# kubectl exec fortio-deploy-55f886bd9f-pj8fg -c fortio — /usr/bin/fortio load -c 1 -qps 0 -n 20 -loglevel Warning http://httpbin:8000/get
{"ts":1766560907.994363,"level":"info","r":1,"file":"logger.go","line":298,"msg":"Log level is now 3 Warning (was 2 Info)"}
Fortio 1.71.2 running at 0 queries per second, 4->4 procs, for 20 calls: http://httpbin:8000/get
Starting at max qps with 1 thread(s) [gomax 4] for exactly 20 calls (20 per thread + 0)
Ended after 64.585669ms : 20 calls. qps=309.67
Aggregated Function Time : count 20 avg 0.0032283574 +/- 0.003243 min 0.001711826 max 0.017105884 sum 0.064567147
# range, mid point, percentile, count
>= 0.00171183 <= 0.002 , 0.00185591 , 20.00, 4
> 0.002 <= 0.003 , 0.0025 , 80.00, 12
> 0.003 <= 0.004 , 0.0035 , 90.00, 2
> 0.004 <= 0.005 , 0.0045 , 95.00, 1
> 0.016 <= 0.0171059 , 0.0165529 , 100.00, 1
# target 50% 0.0025
# target 75% 0.00291667
# target 90% 0.004
# target 99% 0.0168847
# target 99.9% 0.0170838
Error cases : no data
# Socket and IP used for each connection:
[0] 1 socket used, resolved to 10.107.121.13:8000, connection timing : count 1 avg 0.000531627 +/- 0 min 0.000531627 max 0.000531627 sum 0.000531627
Connection time (s) : count 1 avg 0.000531627 +/- 0 min 0.000531627 max 0.000531627 sum 0.000531627
Sockets used: 1 (for perfect keepalive, would be 1)
Uniform: false, Jitter: false, Catchup allowed: true
IP addresses distribution:
10.107.121.13:8000: 1
Code 200 : 20 (100.0 %) #####看这里…当前我们只有一个并发所有不会触发熔断
Response Header Sizes : count 20 avg 245 +/- 0 min 245 max 245 sum 4900
Response Body/Total Sizes : count 20 avg 866 +/- 0 min 866 max 866 sum 17320
All done 20 calls (plus 0 warmup) 3.228 ms avg, 309.7 qps
测试限流
[root@k8s-master ~/istio]# kubectl exec fortio-deploy-55f886bd9f-pj8fg -c fortio — /usr/bin/fortio load -c 2 -qps 0 -n 20 -loglevel Warning http://httpbin:8000/get
{"ts":1766561002.874524,"level":"info","r":1,"file":"logger.go","line":298,"msg":"Log level is now 3 Warning (was 2 Info)"}
Fortio 1.71.2 running at 0 queries per second, 4->4 procs, for 20 calls: http://httpbin:8000/get
Starting at max qps with 2 thread(s) [gomax 4] for exactly 20 calls (10 per thread + 0)
{"ts":1766561002.881833,"level":"warn","r":24,"file":"http_client.go","line":1155,"msg":"Non ok http code","code":503,"status":"HTTP/1.1 503","thread":0,"run":0}
{"ts":1766561002.884690,"level":"warn","r":25,"file":"http_client.go","line":1155,"msg":"Non ok http code","code":503,"status":"HTTP/1.1 503","thread":1,"run":0}
{"ts":1766561002.889991,"level":"warn","r":24,"file":"http_client.go","line":1155,"msg":"Non ok http code","code":503,"status":"HTTP/1.1 503","thread":0,"run":0}
{"ts":1766561002.892426,"level":"warn","r":25,"file":"http_client.go","line":1155,"msg":"Non ok http code","code":503,"status":"HTTP/1.1 503","thread":1,"run":0}
{"ts":1766561002.894924,"level":"warn","r":24,"file":"http_client.go","line":1155,"msg":"Non ok http code","code":503,"status":"HTTP/1.1 503","thread":0,"run":0}
{"ts":1766561002.896708,"level":"warn","r":25,"file":"http_client.go","line":1155,"msg":"Non ok http code","code":503,"status":"HTTP/1.1 503","thread":1,"run":0}
{"ts":1766561002.899812,"level":"warn","r":24,"file":"http_client.go","line":1155,"msg":"Non ok http code","code":503,"status":"HTTP/1.1 503","thread":0,"run":0}
{"ts":1766561002.901889,"level":"warn","r":25,"file":"http_client.go","line":1155,"msg":"Non ok http code","code":503,"status":"HTTP/1.1 503","thread":1,"run":0}
Ended after 31.907574ms : 20 calls. qps=626.81
Aggregated Function Time : count 20 avg 0.0029840042 +/- 0.002155 min 0.000266309 max 0.007260489 sum 0.059680084
# range, mid point, percentile, count
>= 0.000266309 <= 0.001 , 0.000633154 , 35.00, 7
> 0.002 <= 0.003 , 0.0025 , 45.00, 2
> 0.003 <= 0.004 , 0.0035 , 60.00, 3
> 0.004 <= 0.005 , 0.0045 , 85.00, 5
> 0.005 <= 0.006 , 0.0055 , 90.00, 1
> 0.006 <= 0.007 , 0.0065 , 95.00, 1
> 0.007 <= 0.00726049 , 0.00713024 , 100.00, 1
# target 50% 0.00333333
# target 75% 0.0046
# target 90% 0.006
# target 99% 0.00720839
# target 99.9% 0.00725528
Error cases : count 8 avg 0.0007740775 +/- 0.0008211 min 0.000266309 max 0.002928705 sum 0.00619262
# range, mid point, percentile, count
>= 0.000266309 <= 0.001 , 0.000633154 , 87.50, 7
> 0.002 <= 0.00292871 , 0.00246435 , 100.00, 1
# target 50% 0.000633155
# target 75% 0.000877718
# target 90% 0.00218574
# target 99% 0.00285441
# target 99.9% 0.00292128
# Socket and IP used for each connection:
[0] 5 socket used, resolved to 10.107.121.13:8000, connection timing : count 5 avg 0.0002575416 +/- 0.0001675 min 0.00012531 max 0.000580808 sum 0.001287708
[1] 5 socket used, resolved to 10.107.121.13:8000, connection timing : count 5 avg 0.0003968148 +/- 0.0003817 min 6.1415e-05 max 0.000864916 sum 0.001984074
Connection time (s) : count 10 avg 0.0003271782 +/- 0.0003029 min 6.1415e-05 max 0.000864916 sum 0.003271782
Sockets used: 10 (for perfect keepalive, would be 2)
Uniform: false, Jitter: false, Catchup allowed: true
IP addresses distribution:
10.107.121.13:8000: 10
Code 200 : 12 (60.0 %) # 两个并发就触发了熔断的限流
Code 503 : 8 (40.0 %)
Response Header Sizes : count 20 avg 147 +/- 120 min 0 max 245 sum 2940
Response Body/Total Sizes : count 20 avg 616 +/- 306.2 min 241 max 866 sum 12320
All done 20 calls (plus 0 warmup) 2.984 ms avg, 626.8 qps
# 查看熔断的数据
[root@k8s-master ~/istio]# kubectl exec fortio-deploy-55f886bd9f-pj8fg -c istio-proxy — pilot-agent request GET stats | grep httpbin | grep pending
cluster.outbound|8000||httpbin.default.svc.cluster.local;.circuit_breakers.default.remaining_pending: 1
cluster.outbound|8000||httpbin.default.svc.cluster.local;.circuit_breakers.default.rq_pending_open: 0
cluster.outbound|8000||httpbin.default.svc.cluster.local;.circuit_breakers.high.rq_pending_open: 0
cluster.outbound|8000||httpbin.default.svc.cluster.local;.upstream_rq_pending_active: 0
cluster.outbound|8000||httpbin.default.svc.cluster.local;.upstream_rq_pending_failure_eject: 0
cluster.outbound|8000||httpbin.default.svc.cluster.local;.upstream_rq_pending_overflow: 54
cluster.outbound|8000||httpbin.default.svc.cluster.local;.upstream_rq_pending_total: 106
这条命令是查看 Istio Sidecar 中httpbin服务(8000 端口)请求排队(pending)相关的熔断统计指标,这些指标能直观反映你之前配置的connectionPool(排队数限制)是否生效。
从上述结果的反馈中可以看出配置的 httpbin 服务http1MaxPendingRequests:1的连接池规则已生效,累计 54 个请求因排队队列满被拒绝(upstream_rq_pending_overflow:54),当前无请求排队(upstream_rq_pending_active:0)、剩余可排队数为 1(remaining_pending:1),累计排队请求共 106 个,暂未触发排队相关熔断。
测试故障检测
# 用2个并发、发10个请求到httpbin的500错误接口,触发5xx返回
[root@k8s-master ~/istio]# kubectl exec fortio-deploy-55f886bd9f-pj8fg -c fortio — /usr/bin/fortio load -c 2 -qps 0 -n 10 -loglevel Warning http://httpbin:8000/status/500
{"ts":1766561354.695825,"level":"info","r":1,"file":"logger.go","line":298,"msg":"Log level is now 3 Warning (was 2 Info)"}
Fortio 1.71.2 running at 0 queries per second, 4->4 procs, for 10 calls: http://httpbin:8000/status/500
Starting at max qps with 2 thread(s) [gomax 4] for exactly 10 calls (5 per thread + 0)
{"ts":1766561354.703040,"level":"warn","r":8,"file":"http_client.go","line":1155,"msg":"Non ok http code","code":503,"status":"HTTP/1.1 503","thread":1,"run":0}
{"ts":1766561354.711022,"level":"warn","r":7,"file":"http_client.go","line":1155,"msg":"Non ok http code","code":500,"status":"HTTP/1.1 500","thread":0,"run":0}
{"ts":1766561354.713069,"level":"warn","r":8,"file":"http_client.go","line":1155,"msg":"Non ok http code","code":500,"status":"HTTP/1.1 500","thread":1,"run":0}
{"ts":1766561354.715562,"level":"warn","r":7,"file":"http_client.go","line":1155,"msg":"Non ok http code","code":503,"status":"HTTP/1.1 503","thread":0,"run":0}
{"ts":1766561354.715824,"level":"warn","r":8,"file":"http_client.go","line":1155,"msg":"Non ok http code","code":503,"status":"HTTP/1.1 503","thread":1,"run":0}
{"ts":1766561354.717383,"level":"warn","r":7,"file":"http_client.go","line":1155,"msg":"Non ok http code","code":503,"status":"HTTP/1.1 503","thread":0,"run":0}
{"ts":1766561354.717470,"level":"warn","r":8,"file":"http_client.go","line":1155,"msg":"Non ok http code","code":503,"status":"HTTP/1.1 503","thread":1,"run":0}
{"ts":1766561354.719267,"level":"warn","r":8,"file":"http_client.go","line":1155,"msg":"Non ok http code","code":503,"status":"HTTP/1.1 503","thread":1,"run":0}
{"ts":1766561354.721007,"level":"warn","r":7,"file":"http_client.go","line":1155,"msg":"Non ok http code","code":503,"status":"HTTP/1.1 503","thread":0,"run":0}
{"ts":1766561354.722475,"level":"warn","r":7,"file":"http_client.go","line":1155,"msg":"Non ok http code","code":503,"status":"HTTP/1.1 503","thread":0,"run":0}
Ended after 21.056314ms : 10 calls. qps=474.92
Aggregated Function Time : count 10 avg 0.0037848261 +/- 0.003153 min 0.000741265 max 0.01003455 sum 0.037848261
# range, mid point, percentile, count
>= 0.000741265 <= 0.001 , 0.000870633 , 10.00, 1
> 0.001 <= 0.002 , 0.0015 , 50.00, 4
> 0.002 <= 0.003 , 0.0025 , 60.00, 1
> 0.003 <= 0.004 , 0.0035 , 70.00, 1
> 0.004 <= 0.005 , 0.0045 , 80.00, 1
> 0.009 <= 0.01 , 0.0095 , 90.00, 1
> 0.01 <= 0.0100345 , 0.0100173 , 100.00, 1
# target 50% 0.002
# target 75% 0.0045
# target 90% 0.01
# target 99% 0.0100311
# target 99.9% 0.0100342
Error cases : count 10 avg 0.0037848261 +/- 0.003153 min 0.000741265 max 0.01003455 sum 0.037848261
# range, mid point, percentile, count
>= 0.000741265 <= 0.001 , 0.000870633 , 10.00, 1
> 0.001 <= 0.002 , 0.0015 , 50.00, 4
> 0.002 <= 0.003 , 0.0025 , 60.00, 1
> 0.003 <= 0.004 , 0.0035 , 70.00, 1
> 0.004 <= 0.005 , 0.0045 , 80.00, 1
> 0.009 <= 0.01 , 0.0095 , 90.00, 1
> 0.01 <= 0.0100345 , 0.0100173 , 100.00, 1
# target 50% 0.002
# target 75% 0.0045
# target 90% 0.01
# target 99% 0.0100311
# target 99.9% 0.0100342
# Socket and IP used for each connection:
[0] 5 socket used, resolved to 10.107.121.13:8000, connection timing : count 5 avg 0.0001565162 +/- 5.371e-05 min 7.977e-05 max 0.000241436 sum 0.000782581
[1] 5 socket used, resolved to 10.107.121.13:8000, connection timing : count 5 avg 0.0001619598 +/- 8.053e-05 min 6.5422e-05 max 0.000294337 sum 0.000809799
Connection time (s) : count 10 avg 0.000159238 +/- 6.85e-05 min 6.5422e-05 max 0.000294337 sum 0.00159238
Sockets used: 10 (for perfect keepalive, would be 2)
Uniform: false, Jitter: false, Catchup allowed: true
IP addresses distribution:
10.107.121.13:8000: 10
Code 500 : 2 (20.0 %)
Code 503 : 8 (80.0 %)
Response Header Sizes : count 10 avg 0 +/- 0 min 0 max 0 sum 0
Response Body/Total Sizes : count 10 avg 182.4 +/- 45.08 min 153 max 256 sum 1824
All done 10 calls (plus 0 warmup) 3.785 ms avg, 474.9 qps
# 查看结果
[root@k8s-master ~/istio]# kubectl exec fortio-deploy-55f886bd9f-pj8fg -c istio-proxy — pilot-agent request GET stats | grep httpbin | egrep "5xx|eject"
cluster.outbound|8000||httpbin.default.svc.cluster.local;.external.upstream_rq_5xx: 64
cluster.outbound|8000||httpbin.default.svc.cluster.local;.http1.requests_rejected_with_underscores_in_headers: 0
cluster.outbound|8000||httpbin.default.svc.cluster.local;.outlier_detection.ejections_active: 1
cluster.outbound|8000||httpbin.default.svc.cluster.local;.outlier_detection.ejections_consecutive_5xx: 1
cluster.outbound|8000||httpbin.default.svc.cluster.local;.outlier_detection.ejections_detected_consecutive_5xx: 1
cluster.outbound|8000||httpbin.default.svc.cluster.local;.outlier_detection.ejections_detected_consecutive_gateway_failure: 0
cluster.outbound|8000||httpbin.default.svc.cluster.local;.outlier_detection.ejections_detected_consecutive_local_origin_failure: 0
cluster.outbound|8000||httpbin.default.svc.cluster.local;.outlier_detection.ejections_detected_failure_percentage: 0
cluster.outbound|8000||httpbin.default.svc.cluster.local;.outlier_detection.ejections_detected_local_origin_failure_percentage: 0
cluster.outbound|8000||httpbin.default.svc.cluster.local;.outlier_detection.ejections_detected_local_origin_success_rate: 0
cluster.outbound|8000||httpbin.default.svc.cluster.local;.outlier_detection.ejections_detected_success_rate: 0
cluster.outbound|8000||httpbin.default.svc.cluster.local;.outlier_detection.ejections_enforced_consecutive_5xx: 1
cluster.outbound|8000||httpbin.default.svc.cluster.local;.outlier_detection.ejections_enforced_consecutive_gateway_failure: 0
cluster.outbound|8000||httpbin.default.svc.cluster.local;.outlier_detection.ejections_enforced_consecutive_local_origin_failure: 0
cluster.outbound|8000||httpbin.default.svc.cluster.local;.outlier_detection.ejections_enforced_failure_percentage: 0
cluster.outbound|8000||httpbin.default.svc.cluster.local;.outlier_detection.ejections_enforced_local_origin_failure_percentage: 0
cluster.outbound|8000||httpbin.default.svc.cluster.local;.outlier_detection.ejections_enforced_local_origin_success_rate: 0
cluster.outbound|8000||httpbin.default.svc.cluster.local;.outlier_detection.ejections_enforced_success_rate: 0
cluster.outbound|8000||httpbin.default.svc.cluster.local;.outlier_detection.ejections_enforced_total: 1
cluster.outbound|8000||httpbin.default.svc.cluster.local;.outlier_detection.ejections_overflow: 0
cluster.outbound|8000||httpbin.default.svc.cluster.local;.outlier_detection.ejections_success_rate: 0
cluster.outbound|8000||httpbin.default.svc.cluster.local;.outlier_detection.ejections_total: 1
cluster.outbound|8000||httpbin.default.svc.cluster.local;.update_rejected: 0
cluster.outbound|8000||httpbin.default.svc.cluster.local;.upstream_rq_5xx: 64
cluster.outbound|8000||httpbin.default.svc.cluster.local;.upstream_rq_pending_failure_eject: 0
此时 Istio熔断隔离的是httpbin服务的整个实例,而非某一个请求:一旦触发熔断,在3分钟(首次)隔离期内,所有发往httpbin:8000的请求(不管是你这次执行的fortio请求,还是其他Pod/客户端的请求)都会被Istio Sidecar拦截,无法转发到被隔离的httpbin实例,都会快速失败,直到隔离期结束或实例恢复。
[root@k8s-master ~/istio]# kubectl exec fortio-deploy-55f886bd9f-pj8fg -c fortio — /usr/bin/fortio load -c 2 -qps 0 -n 10 -loglevel Warning http://httpbin:8000/status/500
{"ts":1766561544.581381,"level":"info","r":1,"file":"logger.go","line":298,"msg":"Log level is now 3 Warning (was 2 Info)"}
Fortio 1.71.2 running at 0 queries per second, 4->4 procs, for 10 calls: http://httpbin:8000/status/500
Starting at max qps with 2 thread(s) [gomax 4] for exactly 10 calls (5 per thread + 0)
{"ts":1766561544.588499,"level":"warn","r":38,"file":"http_client.go","line":1155,"msg":"Non ok http code","code":503,"status":"HTTP/1.1 503","thread":1,"run":0}
{"ts":1766561544.591050,"level":"warn","r":37,"file":"http_client.go","line":1155,"msg":"Non ok http code","code":500,"status":"HTTP/1.1 500","thread":0,"run":0}
{"ts":1766561544.592075,"level":"warn","r":38,"file":"http_client.go","line":1155,"msg":"Non ok http code","code":503,"status":"HTTP/1.1 503","thread":1,"run":0}
{"ts":1766561544.593288,"level":"warn","r":38,"file":"http_client.go","line":1155,"msg":"Non ok http code","code":503,"status":"HTTP/1.1 503","thread":1,"run":0}
{"ts":1766561544.593408,"level":"warn","r":37,"file":"http_client.go","line":1155,"msg":"Non ok http code","code":503,"status":"HTTP/1.1 503","thread":0,"run":0}
{"ts":1766561544.594983,"level":"warn","r":37,"file":"http_client.go","line":1155,"msg":"Non ok http code","code":503,"status":"HTTP/1.1 503","thread":0,"run":0}
{"ts":1766561544.595347,"level":"warn","r":38,"file":"http_client.go","line":1155,"msg":"Non ok http code","code":503,"status":"HTTP/1.1 503","thread":1,"run":0}
{"ts":1766561544.597415,"level":"warn","r":38,"file":"http_client.go","line":1155,"msg":"Non ok http code","code":503,"status":"HTTP/1.1 503","thread":1,"run":0}
{"ts":1766561544.597536,"level":"warn","r":37,"file":"http_client.go","line":1155,"msg":"Non ok http code","code":503,"status":"HTTP/1.1 503","thread":0,"run":0}
{"ts":1766561544.599721,"level":"warn","r":37,"file":"http_client.go","line":1155,"msg":"Non ok http code","code":503,"status":"HTTP/1.1 503","thread":0,"run":0}
Ended after 15.559261ms : 10 calls. qps=642.7
Aggregated Function Time : count 10 avg 0.0024307444 +/- 0.001034 min 0.001126912 max 0.004995371 sum 0.024307444
# range, mid point, percentile, count
>= 0.00112691 <= 0.002 , 0.00156346 , 30.00, 3
> 0.002 <= 0.003 , 0.0025 , 80.00, 5
> 0.003 <= 0.004 , 0.0035 , 90.00, 1
> 0.004 <= 0.00499537 , 0.00449769 , 100.00, 1
# target 50% 0.0024
# target 75% 0.0029
# target 90% 0.004
# target 99% 0.00489583
# target 99.9% 0.00498542
Error cases : count 10 avg 0.0024307444 +/- 0.001034 min 0.001126912 max 0.004995371 sum 0.024307444
# range, mid point, percentile, count
>= 0.00112691 <= 0.002 , 0.00156346 , 30.00, 3
> 0.002 <= 0.003 , 0.0025 , 80.00, 5
> 0.003 <= 0.004 , 0.0035 , 90.00, 1
> 0.004 <= 0.00499537 , 0.00449769 , 100.00, 1
# target 50% 0.0024
# target 75% 0.0029
# target 90% 0.004
# target 99% 0.00489583
# target 99.9% 0.00498542
# Socket and IP used for each connection:
[0] 5 socket used, resolved to 10.107.121.13:8000, connection timing : count 5 avg 0.0001646394 +/- 0.0001064 min 8.9768e-05 max 0.000375805 sum 0.000823197
[1] 5 socket used, resolved to 10.107.121.13:8000, connection timing : count 5 avg 0.0002437228 +/- 0.0001446 min 0.000101941 max 0.000465151 sum 0.001218614
Connection time (s) : count 10 avg 0.0002041811 +/- 0.000133 min 8.9768e-05 max 0.000465151 sum 0.002041811
Sockets used: 10 (for perfect keepalive, would be 2)
Uniform: false, Jitter: false, Catchup allowed: true
IP addresses distribution:
10.107.121.13:8000: 10
Code 500 : 1 (10.0 %)
Code 503 : 9 (90.0 %)
Response Header Sizes : count 10 avg 0 +/- 0 min 0 max 0 sum 0
Response Body/Total Sizes : count 10 avg 172.1 +/- 38.35 min 153 max 256 sum 1721
All done 10 calls (plus 0 warmup) 2.431 ms avg, 642.7 qps
[root@k8s-master ~/istio]# kubectl exec fortio-deploy-55f886bd9f-pj8fg -c fortio — /usr/bin/fortio load -c 2 -qps 0 -n 10 -loglevel Warning http://httpbin:8000/status/500
{"ts":1766561546.207284,"level":"info","r":1,"file":"logger.go","line":298,"msg":"Log level is now 3 Warning (was 2 Info)"}
Fortio 1.71.2 running at 0 queries per second, 4->4 procs, for 10 calls: http://httpbin:8000/status/500
Starting at max qps with 2 thread(s) [gomax 4] for exactly 10 calls (5 per thread + 0)
{"ts":1766561546.211749,"level":"warn","r":15,"file":"http_client.go","line":1155,"msg":"Non ok http code","code":503,"status":"HTTP/1.1 503","thread":1,"run":0}
{"ts":1766561546.212834,"level":"warn","r":14,"file":"http_client.go","line":1155,"msg":"Non ok http code","code":503,"status":"HTTP/1.1 503","thread":0,"run":0}
{"ts":1766561546.215536,"level":"warn","r":14,"file":"http_client.go","line":1155,"msg":"Non ok http code","code":503,"status":"HTTP/1.1 503","thread":0,"run":0}
{"ts":1766561546.215919,"level":"warn","r":15,"file":"http_client.go","line":1155,"msg":"Non ok http code","code":503,"status":"HTTP/1.1 503","thread":1,"run":0}
{"ts":1766561546.217935,"level":"warn","r":14,"file":"http_client.go","line":1155,"msg":"Non ok http code","code":503,"status":"HTTP/1.1 503","thread":0,"run":0}
{"ts":1766561546.218161,"level":"warn","r":15,"file":"http_client.go","line":1155,"msg":"Non ok http code","code":503,"status":"HTTP/1.1 503","thread":1,"run":0}
{"ts":1766561546.219894,"level":"warn","r":14,"file":"http_client.go","line":1155,"msg":"Non ok http code","code":503,"status":"HTTP/1.1 503","thread":0,"run":0}
{"ts":1766561546.220025,"level":"warn","r":15,"file":"http_client.go","line":1155,"msg":"Non ok http code","code":503,"status":"HTTP/1.1 503","thread":1,"run":0}
{"ts":1766561546.221592,"level":"warn","r":15,"file":"http_client.go","line":1155,"msg":"Non ok http code","code":503,"status":"HTTP/1.1 503","thread":1,"run":0}
{"ts":1766561546.221812,"level":"warn","r":14,"file":"http_client.go","line":1155,"msg":"Non ok http code","code":503,"status":"HTTP/1.1 503","thread":0,"run":0}
Ended after 11.028864ms : 10 calls. qps=906.71
Aggregated Function Time : count 10 avg 0.0021678682 +/- 0.0006841 min 0.001253226 max 0.003853526 sum 0.021678682
# range, mid point, percentile, count
>= 0.00125323 <= 0.002 , 0.00162661 , 60.00, 6
> 0.002 <= 0.003 , 0.0025 , 90.00, 3
> 0.003 <= 0.00385353 , 0.00342676 , 100.00, 1
# target 50% 0.00185065
# target 75% 0.0025
# target 90% 0.003
# target 99% 0.00376817
# target 99.9% 0.00384499
Error cases : count 10 avg 0.0021678682 +/- 0.0006841 min 0.001253226 max 0.003853526 sum 0.021678682
# range, mid point, percentile, count
>= 0.00125323 <= 0.002 , 0.00162661 , 60.00, 6
> 0.002 <= 0.003 , 0.0025 , 90.00, 3
> 0.003 <= 0.00385353 , 0.00342676 , 100.00, 1
# target 50% 0.00185065
# target 75% 0.0025
# target 90% 0.003
# target 99% 0.00376817
# target 99.9% 0.00384499
# Socket and IP used for each connection:
[0] 5 socket used, resolved to 10.107.121.13:8000, connection timing : count 5 avg 0.0003478014 +/- 0.0003191 min 6.8659e-05 max 0.000943249 sum 0.001739007
[1] 5 socket used, resolved to 10.107.121.13:8000, connection timing : count 5 avg 0.0001834538 +/- 4.33e-05 min 0.000106059 max 0.000235412 sum 0.000917269
Connection time (s) : count 10 avg 0.0002656276 +/- 0.0002421 min 6.8659e-05 max 0.000943249 sum 0.002656276
Sockets used: 10 (for perfect keepalive, would be 2)
Uniform: false, Jitter: false, Catchup allowed: true
IP addresses distribution:
10.107.121.13:8000: 10
Code 503 : 10 (100.0 %)
Response Header Sizes : count 10 avg 0 +/- 0 min 0 max 0 sum 0
Response Body/Total Sizes : count 10 avg 153 +/- 0 min 153 max 153 sum 1530
All done 10 calls (plus 0 warmup) 2.168 ms avg, 906.7 qps
[root@k8s-master ~/istio]#
如果再执行访问,执行后所有请求会快速失败,且熔断隔离时间会翻倍至 6 分钟。
此时httpbin实例仍在 3 分钟熔断隔离期内,Istio Sidecar 会直接拒绝将请求转发到该异常实例,请求根本到不了httpbin,因此会直接返回失败(而非 5xx);
因实例已被隔离,再次执行请求会触发 Istio 的 “递增惩罚” 机制,baseEjectionTime翻倍,隔离时间从 3 分钟变为 6 分钟。
熔断说白了就是目标端触发了之后,在固定的时间内不再接收请求了。
2.6 TCP流量拆分
创建测试用例
[root@k8s-master ~/istio]# cat samples/tcp-echo/tcp-echo-services.yaml
# Copyright 2018 Istio Authors
#
# Licensed under the Apache License, Version 2.0 (the "License");
# you may not use this file except in compliance with the License.
# You may obtain a copy of the License at
#
# http://www.apache.org/licenses/LICENSE-2.0
#
# Unless required by applicable law or agreed to in writing, software
# distributed under the License is distributed on an "AS IS" BASIS,
# WITHOUT WARRANTIES OR CONDITIONS OF ANY KIND, either express or implied.
# See the License for the specific language governing permissions and
# limitations under the License.
apiVersion: v1
kind: Service
metadata:
name: tcp-echo
labels:
app: tcp-echo
service: tcp-echo
spec:
ports:
– name: tcp
port: 9000
– name: tcp-other
port: 9001
# Port 9002 is omitted intentionally for testing the pass through filter chain.
selector:
app: tcp-echo
—
apiVersion: apps/v1
kind: Deployment
metadata:
name: tcp-echo-v1
labels:
app: tcp-echo
version: v1
spec:
replicas: 1
selector:
matchLabels:
app: tcp-echo
version: v1
template:
metadata:
labels:
app: tcp-echo
version: v1
spec:
containers:
– name: tcp-echo
image: docker.io/istio/tcp-echo-server:1.3
imagePullPolicy: IfNotPresent
args: [ "9000,9001,9002", "one" ]
ports:
– containerPort: 9000
– containerPort: 9001
—
apiVersion: apps/v1
kind: Deployment
metadata:
name: tcp-echo-v2
labels:
app: tcp-echo
version: v2
spec:
replicas: 1
selector:
matchLabels:
app: tcp-echo
version: v2
template:
metadata:
labels:
app: tcp-echo
version: v2
spec:
containers:
– name: tcp-echo
image: docker.io/istio/tcp-echo-server:1.3
imagePullPolicy: IfNotPresent
args: [ "9000,9001,9002", "two" ]
ports:
– containerPort: 9000
– containerPort: 9001
[root@k8s-master ~/istio]# kubectl get po -l app=tcp-echo
NAME READY STATUS RESTARTS AGE
tcp-echo-v1-7bbd599b4d-8mvkn 2/2 Running 0 38m
tcp-echo-v2-5454955849-scnd5 2/2 Running 0 38m
创建GET和DR和VS资源
istio-ingressgateway是集群级的网关实例,Gateway 是 “流量规则模板”,只要 selector 匹配,无论规则在哪个命名空间,都会被 Istiod 推送给 ingressgateway,最终由 ingressgateway 执行规则处理外部流量。
[root@k8s-master ~/istio]# cat samples/tcp-echo/tcp-echo-all-v1.yaml
# Copyright 2018 Istio Authors
#
# Licensed under the Apache License, Version 2.0 (the "License");
# you may not use this file except in compliance with the License.
# You may obtain a copy of the License at
#
# http://www.apache.org/licenses/LICENSE-2.0
#
# Unless required by applicable law or agreed to in writing, software
# distributed under the License is distributed on an "AS IS" BASIS,
# WITHOUT WARRANTIES OR CONDITIONS OF ANY KIND, either express or implied.
# See the License for the specific language governing permissions and
# limitations under the License.
apiVersion: networking.istio.io/v1
kind: Gateway
metadata:
name: tcp-echo-gateway
spec:
selector:
istio: ingressgateway
servers:
– port:
# 此端口是bookinfo的资源写好了TCP的端口为31400,可以通过查看ingress-gateway的pod去确认。
number: 31400
name: tcp
protocol: TCP
hosts:
– "*"
—
apiVersion: networking.istio.io/v1
kind: DestinationRule
metadata:
name: tcp-echo-destination
spec:
host: tcp-echo
subsets:
– name: v1
labels:
version: v1
– name: v2
labels:
version: v2
—
apiVersion: networking.istio.io/v1
kind: VirtualService
metadata:
name: tcp-echo
spec:
hosts:
– "*"
gateways:
– tcp-echo-gateway
tcp:
– match:
– port: 31400
route:
– destination:
host: tcp-echo
port:
number: 9000
subset: v1
# 这个实例创建了一个TCP的Gateway的入口,允许所有的hosts发生请求,然后就是通过DestinationRule去定义子集,再通过VirtualService去定义路由规则。
[root@k8s-master ~/istio]# kubectl get gateway tcp-echo-gateway
NAME AGE
tcp-echo-gateway 28m
[root@k8s-master ~/istio]# kubectl get vs tcp-echo
NAME GATEWAYS HOSTS AGE
tcp-echo ["tcp-echo-gateway"] ["*"] 28m
创建测试客户端
[root@k8s-master ~/istio]# cat samples/sleep/sleep.yaml
# Copyright Istio Authors
#
# Licensed under the Apache License, Version 2.0 (the "License");
# you may not use this file except in compliance with the License.
# You may obtain a copy of the License at
#
# http://www.apache.org/licenses/LICENSE-2.0
#
# Unless required by applicable law or agreed to in writing, software
# distributed under the License is distributed on an "AS IS" BASIS,
# WITHOUT WARRANTIES OR CONDITIONS OF ANY KIND, either express or implied.
# See the License for the specific language governing permissions and
# limitations under the License.
##################################################################################################
# Sleep service
##################################################################################################
apiVersion: v1
kind: ServiceAccount
metadata:
name: sleep
—
apiVersion: v1
kind: Service
metadata:
name: sleep
labels:
app: sleep
service: sleep
spec:
ports:
– port: 80
name: http
selector:
app: sleep
—
apiVersion: apps/v1
kind: Deployment
metadata:
name: sleep
spec:
replicas: 1
selector:
matchLabels:
app: sleep
template:
metadata:
labels:
app: sleep
spec:
terminationGracePeriodSeconds: 0
serviceAccountName: sleep
containers:
– name: sleep
image: docker.io/curlimages/curl:8.9.1
command: ["/bin/sleep", "infinity"]
imagePullPolicy: IfNotPresent
volumeMounts:
– mountPath: /etc/sleep/tls
name: secret-volume
volumes:
– name: secret-volume
secret:
secretName: sleep-secret
optional: true
—
[root@k8s-master ~/istio]# kubectl get po -l app=sleep
NAME READY STATUS RESTARTS AGE
sleep-65f688f8f5-jxrzc 2/2 Running 0 21m
测试访问
# 当前是所有的TCP请求都会路由到v1版本。
[root@k8s-master ~/istio]# for i in `seq 10`; do kubectl exec sleep-65f688f8f5-jxrzc — sh -c "(date; sleep 1) | nc 10.98.106.118 31400"; done
one Wed Dec 24 08:51:58 UTC 2025
one Wed Dec 24 08:51:59 UTC 2025
one Wed Dec 24 08:52:00 UTC 2025
one Wed Dec 24 08:52:01 UTC 2025
one Wed Dec 24 08:52:02 UTC 2025
one Wed Dec 24 08:52:03 UTC 2025
one Wed Dec 24 08:52:04 UTC 2025
one Wed Dec 24 08:52:06 UTC 2025
one Wed Dec 24 08:52:07 UTC 2025
one Wed Dec 24 08:52:08 UTC 2025
测试流量分发
80%路由到v1版本,20%路由到v2版本
[root@k8s-master ~/istio]# cat samples/tcp-echo/tcp-echo-20-v2.yaml
# Copyright 2018 Istio Authors
#
# Licensed under the Apache License, Version 2.0 (the "License");
# you may not use this file except in compliance with the License.
# You may obtain a copy of the License at
#
# http://www.apache.org/licenses/LICENSE-2.0
#
# Unless required by applicable law or agreed to in writing, software
# distributed under the License is distributed on an "AS IS" BASIS,
# WITHOUT WARRANTIES OR CONDITIONS OF ANY KIND, either express or implied.
# See the License for the specific language governing permissions and
# limitations under the License.
apiVersion: networking.istio.io/v1
kind: VirtualService
metadata:
name: tcp-echo
spec:
hosts:
– "*"
gateways:
– tcp-echo-gateway
tcp:
– match:
– port: 31400
route:
– destination:
host: tcp-echo
port:
number: 9000
subset: v1
weight: 80
– destination:
host: tcp-echo
port:
number: 9000
subset: v2
weight: 20
[root@k8s-master ~/istio]# for i in `seq 10`; do kubectl exec sleep-65f688f8f5-jxrzc — sh -c "(date; sleep 1) | nc 10.98.106.118 31400"; done
one Wed Dec 24 08:54:05 UTC 2025
one Wed Dec 24 08:54:06 UTC 2025
one Wed Dec 24 08:54:07 UTC 2025
two Wed Dec 24 08:54:08 UTC 2025
one Wed Dec 24 08:54:09 UTC 2025
one Wed Dec 24 08:54:10 UTC 2025
one Wed Dec 24 08:54:11 UTC 2025
two Wed Dec 24 08:54:12 UTC 2025
one Wed Dec 24 08:54:14 UTC 2025
one Wed Dec 24 08:54:15 UTC 2025
查看Envoy代理
[root@k8s-master ~/istio]# istioctl -n istio-system proxy-config listener istio-ingressgateway-7b787c97fc-h9ww9 –port 31400 -oyaml
– accessLog:
– filter:
responseFlagFilter:
flags:
– NR
name: envoy.access_loggers.file
typedConfig:
…
path: /dev/stdout
address:
socketAddress:
address: 0.0.0.0
portValue: 31400
filterChains:
– filters:
…
path: /dev/stdout
statPrefix: tcp-echo.default
weightedClusters:
clusters:
– name: outbound|9000|v1|tcp-echo.default.svc.cluster.local
weight: 80
– name: outbound|9000|v2|tcp-echo.default.svc.cluster.local
weight: 20
transportSocketConnectTimeout: 15s
maxConnectionsToAcceptPerSocketEvent: 1
name: 0.0.0.0_31400
trafficDirection: OUTBOUND
2.7 istio实现K8S-ingress功能
创建测试Httpbin
[root@k8s-master ~/istio]# cat samples/httpbin/httpbin.yaml
# Copyright Istio Authors
#
# Licensed under the Apache License, Version 2.0 (the "License");
# you may not use this file except in compliance with the License.
# You may obtain a copy of the License at
#
# http://www.apache.org/licenses/LICENSE-2.0
#
# Unless required by applicable law or agreed to in writing, software
# distributed under the License is distributed on an "AS IS" BASIS,
# WITHOUT WARRANTIES OR CONDITIONS OF ANY KIND, either express or implied.
# See the License for the specific language governing permissions and
# limitations under the License.
##################################################################################################
# httpbin service
##################################################################################################
apiVersion: v1
kind: ServiceAccount
metadata:
name: httpbin
—
apiVersion: v1
kind: Service
metadata:
name: httpbin
labels:
app: httpbin
service: httpbin
spec:
ports:
– name: http
port: 8000
targetPort: 8080
selector:
app: httpbin
—
apiVersion: apps/v1
kind: Deployment
metadata:
name: httpbin
spec:
replicas: 1
selector:
matchLabels:
app: httpbin
version: v1
template:
metadata:
labels:
app: httpbin
version: v1
spec:
serviceAccountName: httpbin
containers:
– image: docker.io/mccutchen/go-httpbin:v2.15.0
imagePullPolicy: IfNotPresent
name: httpbin
ports:
– containerPort: 8080
创建ingressclass与ingress
[root@k8s-master ~/istio]# cat istio-ingress.yaml
# 创建istio-ingressclass.yaml
apiVersion: networking.k8s.io/v1
kind: IngressClass
metadata:
name: istio # 名称要和Ingress里的ingressClassName一致
spec:
controller: istio.io/ingress-controller # 指定由Istio控制器处理
—
apiVersion: networking.k8s.io/v1
kind: Ingress
metadata:
name: httpbin
spec:
ingressClassName: istio # 指定使用Istio的Ingress Controller处理该Ingress
rules:
– host: httpbin.k8s.local
http:
paths:
– path: /status
pathType: Prefix
backend:
service:
name: httpbin
port:
number: 8000
测试访问
httpbin.k8s.local:31721/status/302
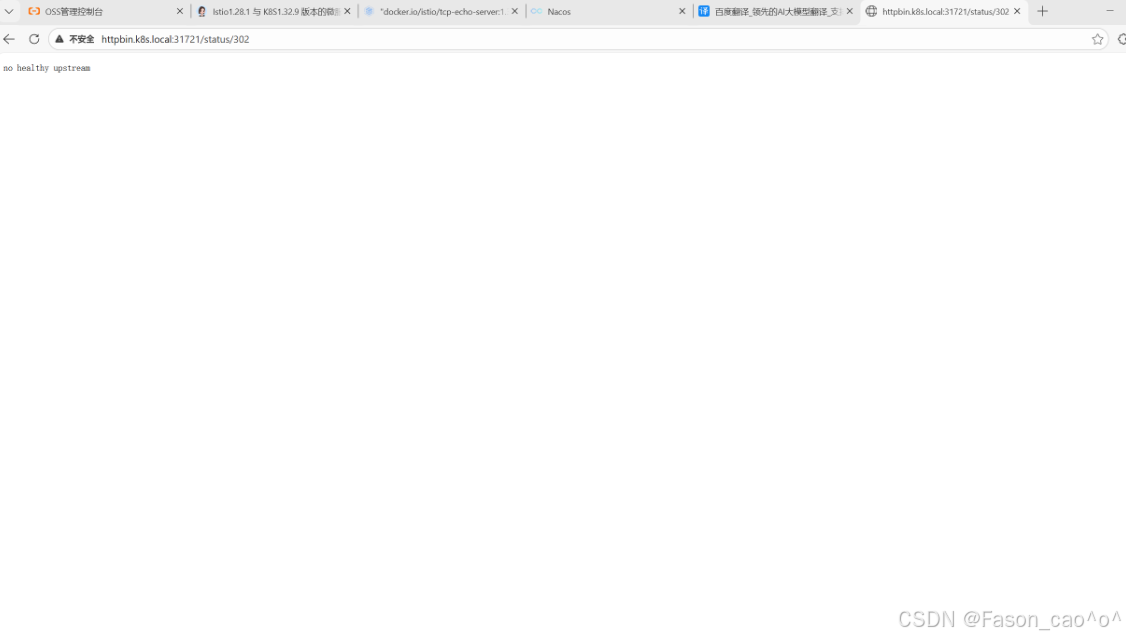
为什么要加31721端口?
我的 Istio IngressGateway 是LoadBalancer类型,但自建 K8s 集群无法分配外部 IP(EXTERNAL-IP 显示<pending>),因此只能通过 NodePort 端口(31721)访问 IngressGateway 的 80 端口。
[root@k8s-master ~/istio]# kubectl get svc -n istio-system
NAME TYPE CLUSTER-IP EXTERNAL-IP PORT(S) AGE
istio-egressgateway ClusterIP 10.110.249.147 <none> 80/TCP,443/TCP 2d3h
istio-ingressgateway LoadBalancer 10.98.106.118 <pending> 15021:30228/TCP,80:31721/TCP,443:30145/TCP,31400:30778/TCP,15443:31494/TCP 2d3h
2.8 istioHTTPS安全网关
创建自签证书
1. OpenSSL 生成证书 / CSR / 私钥的命令
(1)生成 example_certs1 目录的根 CA 证书 + 私钥
openssl req -x509 -sha256 -nodes -days 365 -newkey rsa:2048 -subj '/O=example Inc./CN=example.com' -keyout example_certs1/example.com.key -out example_certs1/example.com.crt
(2)生成 example_certs1/httpbin.example.com的 CSR + 私钥
openssl req -out example_certs1/httpbin.example.com.csr -newkey rsa:2048 -nodes -keyout example_certs1/httpbin.example.com.key -subj "/CN=httpbin.example.com/O=httpbin organization"
(3)用 CA 签名生成 example_certs1/httpbin.example.com证书
openssl x509 -req -sha256 -days 365 -CA example_certs1/example.com.crt -CAkey example_certs1/example.com.key -set_serial 0 -in example_certs1/httpbin.example.com.csr -out example_certs1/httpbin.example.com.crt
(4)生成 example_certs1/helloworld.example.com的 CSR + 私钥
openssl req -out example_certs1/helloworld.example.com.csr -newkey rsa:2048 -nodes -keyout example_certs1/helloworld.example.com.key -subj "/CN=helloworld.example.com/O=helloworld organization"
(5)用 CA 签名生成 example_certs1/helloworld.example.com证书
openssl x509 -req -sha256 -days 365 -CA example_certs1/example.com.crt -CAkey example_certs1/example.com.key -set_serial 1 -in example_certs1/helloworld.example.com.csr -out example_certs1/helloworld.example.com.crt
(6)生成 example_certs1/client.example.com的 CSR + 私钥
openssl req -out example_certs1/client.example.com.csr -newkey rsa:2048 -nodes -keyout example_certs1/client.example.com.key -subj "/CN=client.example.com/O=client organization"
(7)用 CA 签名生成 example_certs1/client.example.com证书
openssl x509 -req -sha256 -days 365 -CA example_certs1/example.com.crt -CAkey example_certs1/example.com.key -set_serial 1 -in example_certs1/client.example.com.csr -out example_certs1/client.example.com.crt
(8)生成 example_certs2 目录的根 CA 证书 + 私钥
openssl req -x509 -sha256 -nodes -days 365 -newkey rsa:2048 -subj '/O=example Inc./CN=example.com' -keyout example_certs2/example.com.key -out example_certs2/example.com.crt
(9)生成 example_certs2/httpbin.example.com的 CSR + 私钥
openssl req -out example_certs2/httpbin.example.com.csr -newkey rsa:2048 -nodes -keyout example_certs2/httpbin.example.com.key -subj "/CN=httpbin.example.com/O=httpbin organization"
(10)用 CA 签名生成 example_certs2/httpbin.example.com证书
openssl x509 -req -sha256 -days 365 -CA example_certs2/example.com.crt -CAkey example_certs2/example.com.key -se
example_certs1 目录(核心业务证书集)
| 自签 CA 证书 | example.com.crt | 根 CA 证书,用于签名所有业务域名证书 |
| 自签 CA 私钥 | example.com.key | 根 CA 私钥,签名业务证书时使用 |
| httpbin 域名 CSR | httpbin.example.com.csr | httpbin.example.com的证书签名请求 |
| httpbin 域名私钥 | httpbin.example.com.key | httpbin.example.com对应的私钥 |
| httpbin 域名证书(CA 签) | httpbin.example.com.crt | 由根 CA 签名的 httpbin 域名证书 |
| helloworld 域名 CSR | helloworld.example.com.csr | helloworld.example.com的证书签名请求(已修正O=笔误) |
| helloworld 域名私钥 | helloworld.example.com.key | helloworld.example.com对应的私钥 |
| helloworld 域名证书(CA 签) | helloworld.example.com.crt | 由根 CA 签名的 helloworld 域名证书 |
| client 域名 CSR | client.example.com.csr | client.example.com的证书签名请求(已修正O=笔误) |
| client 域名私钥 | client.example.com.key | client.example.com对应的私钥 |
| client 域名证书(CA 签) | client.example.com.crt | 由根 CA 签名的 client 域名证书 |
example_certs2 目录(备用 / 重复生成的证书集)
| 自签 CA 证书 | example.com.crt | 第二套根 CA 证书(与 example_certs1 内容一致) |
| 自签 CA 私钥 | example.com.key | 第二套根 CA 私钥(与 example_certs1 内容一致) |
| httpbin 域名 CSR | httpbin.example.com.csr | 第二套httpbin.example.com的证书签名请求 |
| httpbin 域名私钥 | httpbin.example.com.key | 第二套httpbin.example.com对应的私钥 |
| httpbin 域名证书(CA 签) | httpbin.example.com.crt | 第二套由根 CA 签名的 httpbin 域名证书 |
创建TLS网关与VS
# K8S将证书和私钥封装成secret资源
[root@k8s-master ~/istio]# kubectl create -n istio-system secret tls httpbin-credential \\
–key=example_certs1/httpbin.example.com.key \\
–cert=example_certs1/httpbin.example.com.crt
[root@k8s-master ~/istio]# cat tls-gateway.yaml
apiVersion: networking.istio.io/v1alpha3
kind: Gateway
metadata:
name: mygateway
spec:
selector:
istio: ingressgateway # use istio default ingress gateway
servers:
– port:
number: 443
name: https
protocol: HTTPS
tls:
mode: SIMPLE
credentialName: httpbin-credential # 必须和 secret 对象名称一致
hosts:
– httpbin.example.com
—
apiVersion: networking.istio.io/v1alpha3
kind: VirtualService
metadata:
name: httpbin
spec:
hosts:
– "httpbin.example.com"
gateways:
– mygateway
http:
– match:
– uri:
prefix: /status
– uri:
prefix: /delay
route:
– destination:
port:
number: 8000
host: httpbin
测试访问
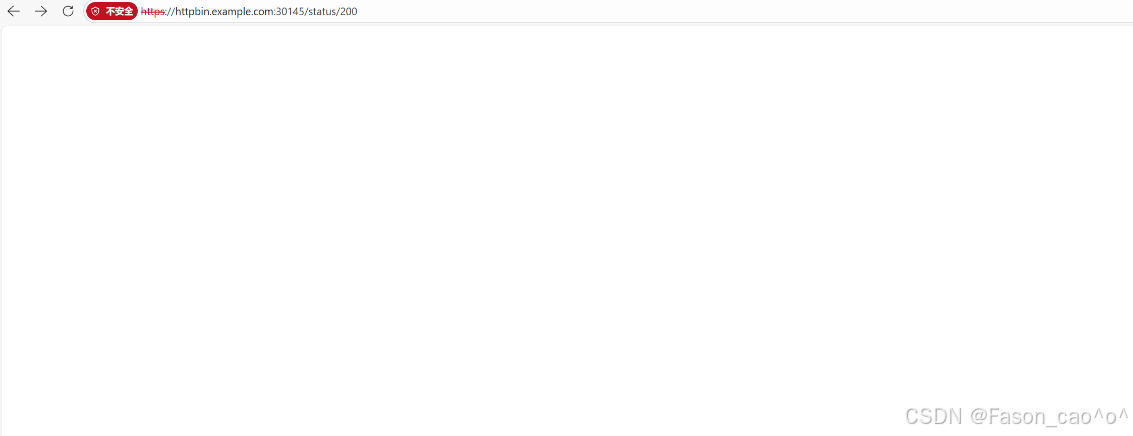
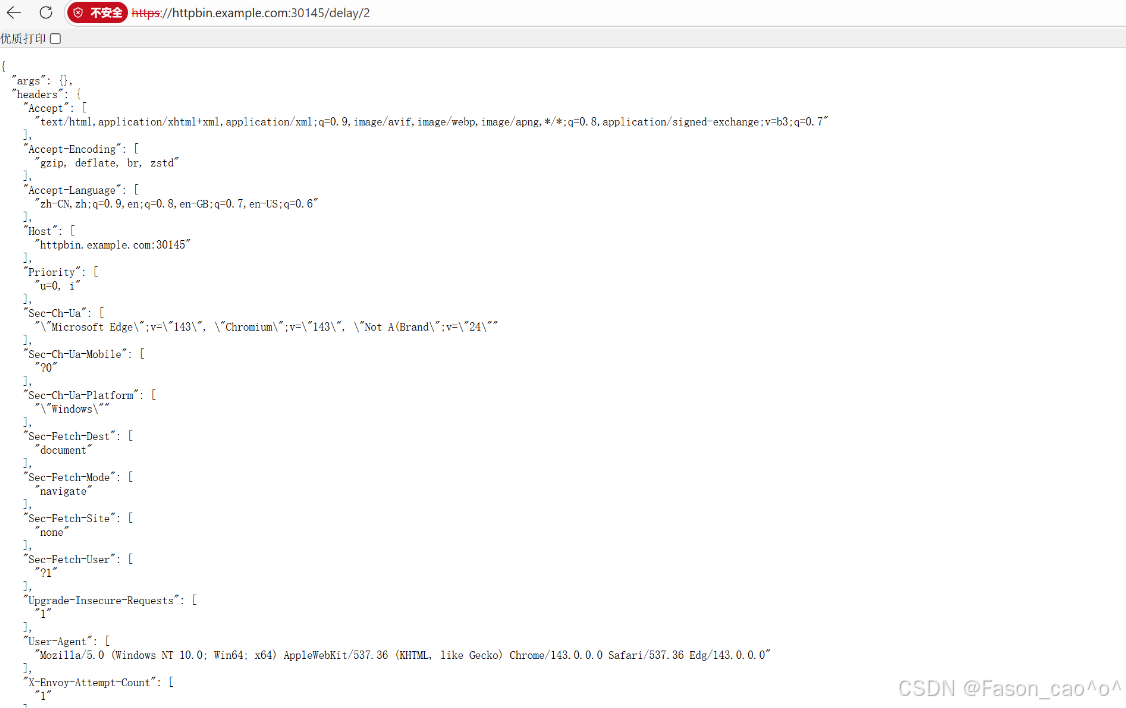
多主机多证书案例
[root@k8s-master ~/istio]# cat tls-hello-gateway.yaml
apiVersion: networking.istio.io/v1alpha3
kind: Gateway
metadata:
name: mygateway
spec:
selector:
istio: ingressgateway # use istio default ingress gateway
servers:
– port:
number: 443
name: https
protocol: HTTPS
tls:
mode: SIMPLE
credentialName: httpbin-credential # 必须和 secret 对象名称一致
hosts:
– httpbin.example.com
– port:
number: 443
name: hello-https
protocol: HTTPS
tls:
mode: SIMPLE
credentialName: hello-credential # 必须和 secret 对象名称一致
hosts:
– helloworld.example.com
—
apiVersion: networking.istio.io/v1alpha3
kind: VirtualService
metadata:
name: httpbin
spec:
hosts:
– "helloworld.example.com"
gateways:
– mygateway
http:
– match:
– uri:
exact: /hello
route:
– destination:
port:
number: 5000
host: helloworld
—
apiVersion: networking.istio.io/v1alpha3
kind: VirtualService
metadata:
name: httpbin
spec:
hosts:
– "httpbin.example.com"
gateways:
– mygateway
http:
– match:
– uri:
prefix: /status
– uri:
prefix: /delay
route:
– destination:
port:
number: 8000
host: httpbin
# K8S根据标签创建单独资源
kubectl apply -f samples/helloworld/helloworld.yaml -l service=helloworld
kubectl apply -f samples/helloworld/helloworld.yaml -l version=v1
[root@k8s-master ~/istio]# kubectl get po,svc -l app=helloworld
NAME READY STATUS RESTARTS AGE
pod/helloworld-v1-5787f49bd8-4zm89 2/2 Running 0 14m
NAME TYPE CLUSTER-IP EXTERNAL-IP PORT(S) AGE
service/helloworld ClusterIP 10.96.57.148 <none> 5000/TCP 15m
# 仅包含 –cacert(验证服务端的 CA 根证书),无客户端证书 / 私钥
[root@k8s-master ~/istio]# curl -v -HHost:helloworld.example.com –resolve "helloworld.example.com:443:10.98.106.118" –cacert example_certs1/example.com.crt "https://helloworld.example.com:30145/hello"
* Added helloworld.example.com:443:10.98.106.118 to DNS cache
* Host helloworld.example.com:30145 was resolved.
* IPv6: (none)
* IPv4: 10.0.0.8
* Trying 10.0.0.8:30145…
* ALPN: curl offers h2,http/1.1
* TLSv1.3 (OUT), TLS handshake, Client hello (1):
* CAfile: example_certs1/example.com.crt
* CApath: /etc/ssl/certs
* TLSv1.3 (IN), TLS handshake, Server hello (2):
* TLSv1.3 (IN), TLS change cipher, Change cipher spec (1):
* TLSv1.3 (IN), TLS handshake, Encrypted Extensions (8):
* TLSv1.3 (IN), TLS handshake, Certificate (11):
* TLSv1.3 (IN), TLS handshake, CERT verify (15):
* TLSv1.3 (IN), TLS handshake, Finished (20):
* TLSv1.3 (OUT), TLS change cipher, Change cipher spec (1):
* TLSv1.3 (OUT), TLS handshake, Finished (20):
* SSL connection using TLSv1.3 / TLS_AES_256_GCM_SHA384 / x25519 / RSASSA-PSS
* ALPN: server accepted h2
* Server certificate:
* subject: CN=helloworld.example.com; O=helloworld organization
* start date: Dec 25 01:22:45 2025 GMT
* expire date: Dec 25 01:22:45 2026 GMT
* common name: helloworld.example.com (matched)
* issuer: O=example Inc.; CN=example.com
* SSL certificate verify ok.
* Certificate level 0: Public key type RSA (2048/112 Bits/secBits), signed using sha256WithRSAEncryption
* Certificate level 1: Public key type RSA (2048/112 Bits/secBits), signed using sha256WithRSAEncryption
* Connected to helloworld.example.com (10.0.0.8) port 30145
* using HTTP/2
* [HTTP/2] [1] OPENED stream for https://helloworld.example.com:30145/hello
* [HTTP/2] [1] [:method: GET]
* [HTTP/2] [1] [:scheme: https]
* [HTTP/2] [1] [:authority: helloworld.example.com]
* [HTTP/2] [1] [:path: /hello]
* [HTTP/2] [1] [user-agent: curl/8.14.1]
* [HTTP/2] [1] [accept: */*]
> GET /hello HTTP/2
> Host:helloworld.example.com
> User-Agent: curl/8.14.1
> Accept: */*
>
* Request completely sent off
* TLSv1.3 (IN), TLS handshake, Newsession Ticket (4):
* TLSv1.3 (IN), TLS handshake, Newsession Ticket (4):
< HTTP/2 200
< server: istio-envoy
< date: Thu, 25 Dec 2025 02:17:25 GMT
< content-type: text/html; charset=utf-8
< content-length: 60
< x-envoy-upstream-service-time: 63
<
Hello version: v1, instance: helloworld-v1-5787f49bd8-4zm89
* Connection #0 to host helloworld.example.com left intact
为什么端口是30154?
因为上面的gateway配置了
spec: selector: istio: ingressgateway # use istio default ingress gateway
测试
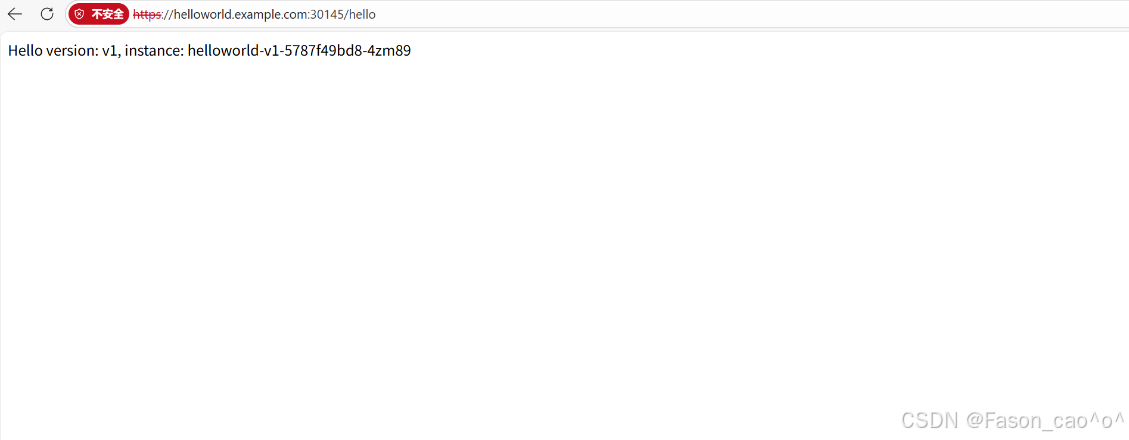
再测试httpbin
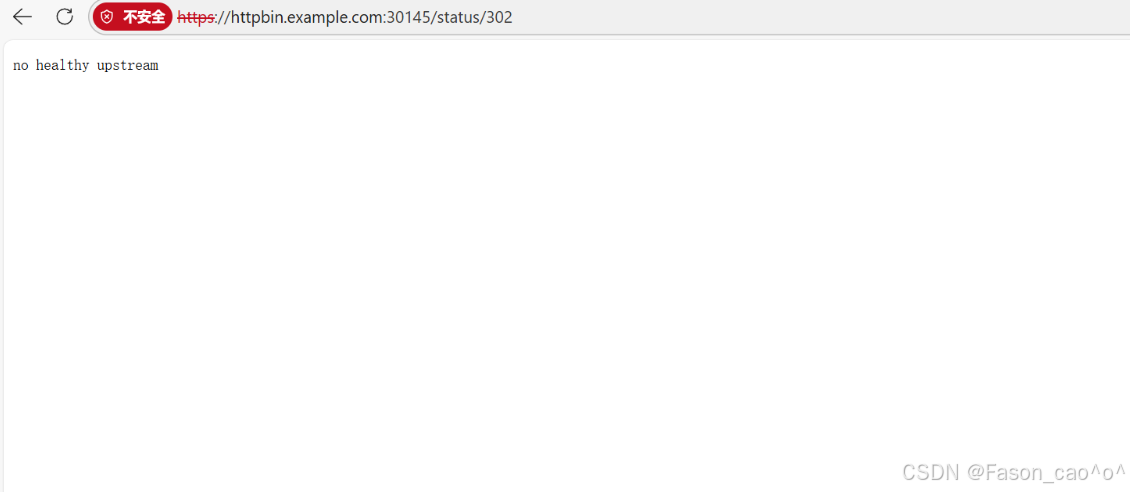
mTLS双向认证案例
# 先删除之前的secret,并重新封装
[root@k8s-master ~/istio]# kubectl -n istio-system delete secret httpbin-credential
secret "httpbin-credential" deleted
# 这里封装就要加上根证书了
[root@k8s-master ~/istio]# kubectl create -n istio-system secret generic httpbin-credential \\
–from-file=tls.key=example_certs1/httpbin.example.com.key \\
–from-file=tls.crt=example_certs1/httpbin.example.com.crt \\
–from-file=ca.crt=example_certs1/example.com.crt
secret/httpbin-credential created
[root@k8s-master ~/istio]# cat mtls.yaml
apiVersion: networking.istio.io/v1alpha3
kind: Gateway
metadata:
name: mygateway
spec:
selector:
istio: ingressgateway # use istio default ingress gateway
servers:
– port:
number: 443
name: https
protocol: HTTPS
tls:
mode: MUTUAL # 设置为 MUTUAL, 双向 TLS
credentialName: httpbin-credential
hosts:
– httpbin.example.com
测试
# 包含 –cert(客户端证书)+ –key(客户端私钥),用于服务端验证客户端身份和cacert服务端的CA证书
[root@k8s-master ~/istio]# curl -v -HHost:httpbin.example.com \\
–resolve "httpbin.example.com:30145:10.0.0.8" \\
–cacert example_certs1/example.com.crt \\
–cert example_certs1/client.example.com.crt \\
–key example_certs1/client.example.com.key \\
"https://httpbin.example.com:30145/delay/2"
* Added httpbin.example.com:30145:10.0.0.8 to DNS cache
* Hostname httpbin.example.com was found in DNS cache
* Trying 10.0.0.8:30145…
* ALPN: curl offers h2,http/1.1
* TLSv1.3 (OUT), TLS handshake, Client hello (1):
* CAfile: example_certs1/example.com.crt
* CApath: /etc/ssl/certs
* TLSv1.3 (IN), TLS handshake, Server hello (2):
* TLSv1.3 (IN), TLS change cipher, Change cipher spec (1):
* TLSv1.3 (IN), TLS handshake, Encrypted Extensions (8):
* TLSv1.3 (IN), TLS handshake, Request CERT (13):
* TLSv1.3 (IN), TLS handshake, Certificate (11):
* TLSv1.3 (IN), TLS handshake, CERT verify (15):
* TLSv1.3 (IN), TLS handshake, Finished (20):
* TLSv1.3 (OUT), TLS change cipher, Change cipher spec (1):
* TLSv1.3 (OUT), TLS handshake, Certificate (11):
* TLSv1.3 (OUT), TLS handshake, CERT verify (15):
* TLSv1.3 (OUT), TLS handshake, Finished (20):
* SSL connection using TLSv1.3 / TLS_AES_256_GCM_SHA384 / x25519 / RSASSA-PSS
双向&单向认证抽象概念
单向认证:你去银行取钱
银行展示营业执照(.crt)
-
银行窗口会给你看营业执照(服务器证书.crt),上面写着:"我们是XX银行,总部在XX地"
-
营业执照里包含了银行的公钥(类似公开的加密算法)
-
你不需要出示任何证件,但需要确认:
-
营业执照是否盖了总行的公章(由CA签发)
-
总行的公章是否真实(CA证书cacert)
-
验证流程
-
你收到银行的.crt → 用预装的cacert验证 → 确认银行身份
-
之后你输入密码(用银行的公钥加密),银行用私钥(.key)解密
双向认证:你去银行开保险箱
双方都要出示证件
-
银行给你看营业执照(.crt)和总行公章(cacert)
-
你需要出示自己的身份证(客户端证书.crt)和复印件(由CA盖章的)
-
你的身份证包含:你的照片+公钥(别人用这个加密信息给你)
验证流程
-
银行收到你的.crt → 用CA证书验证 → 确认你是张三
-
你收到银行的.crt → 用cacert验证 → 确认是XX银行
-
之后双方都用私钥(.key)解密对方发来的加密信息
Ingress Gateway TLS透传
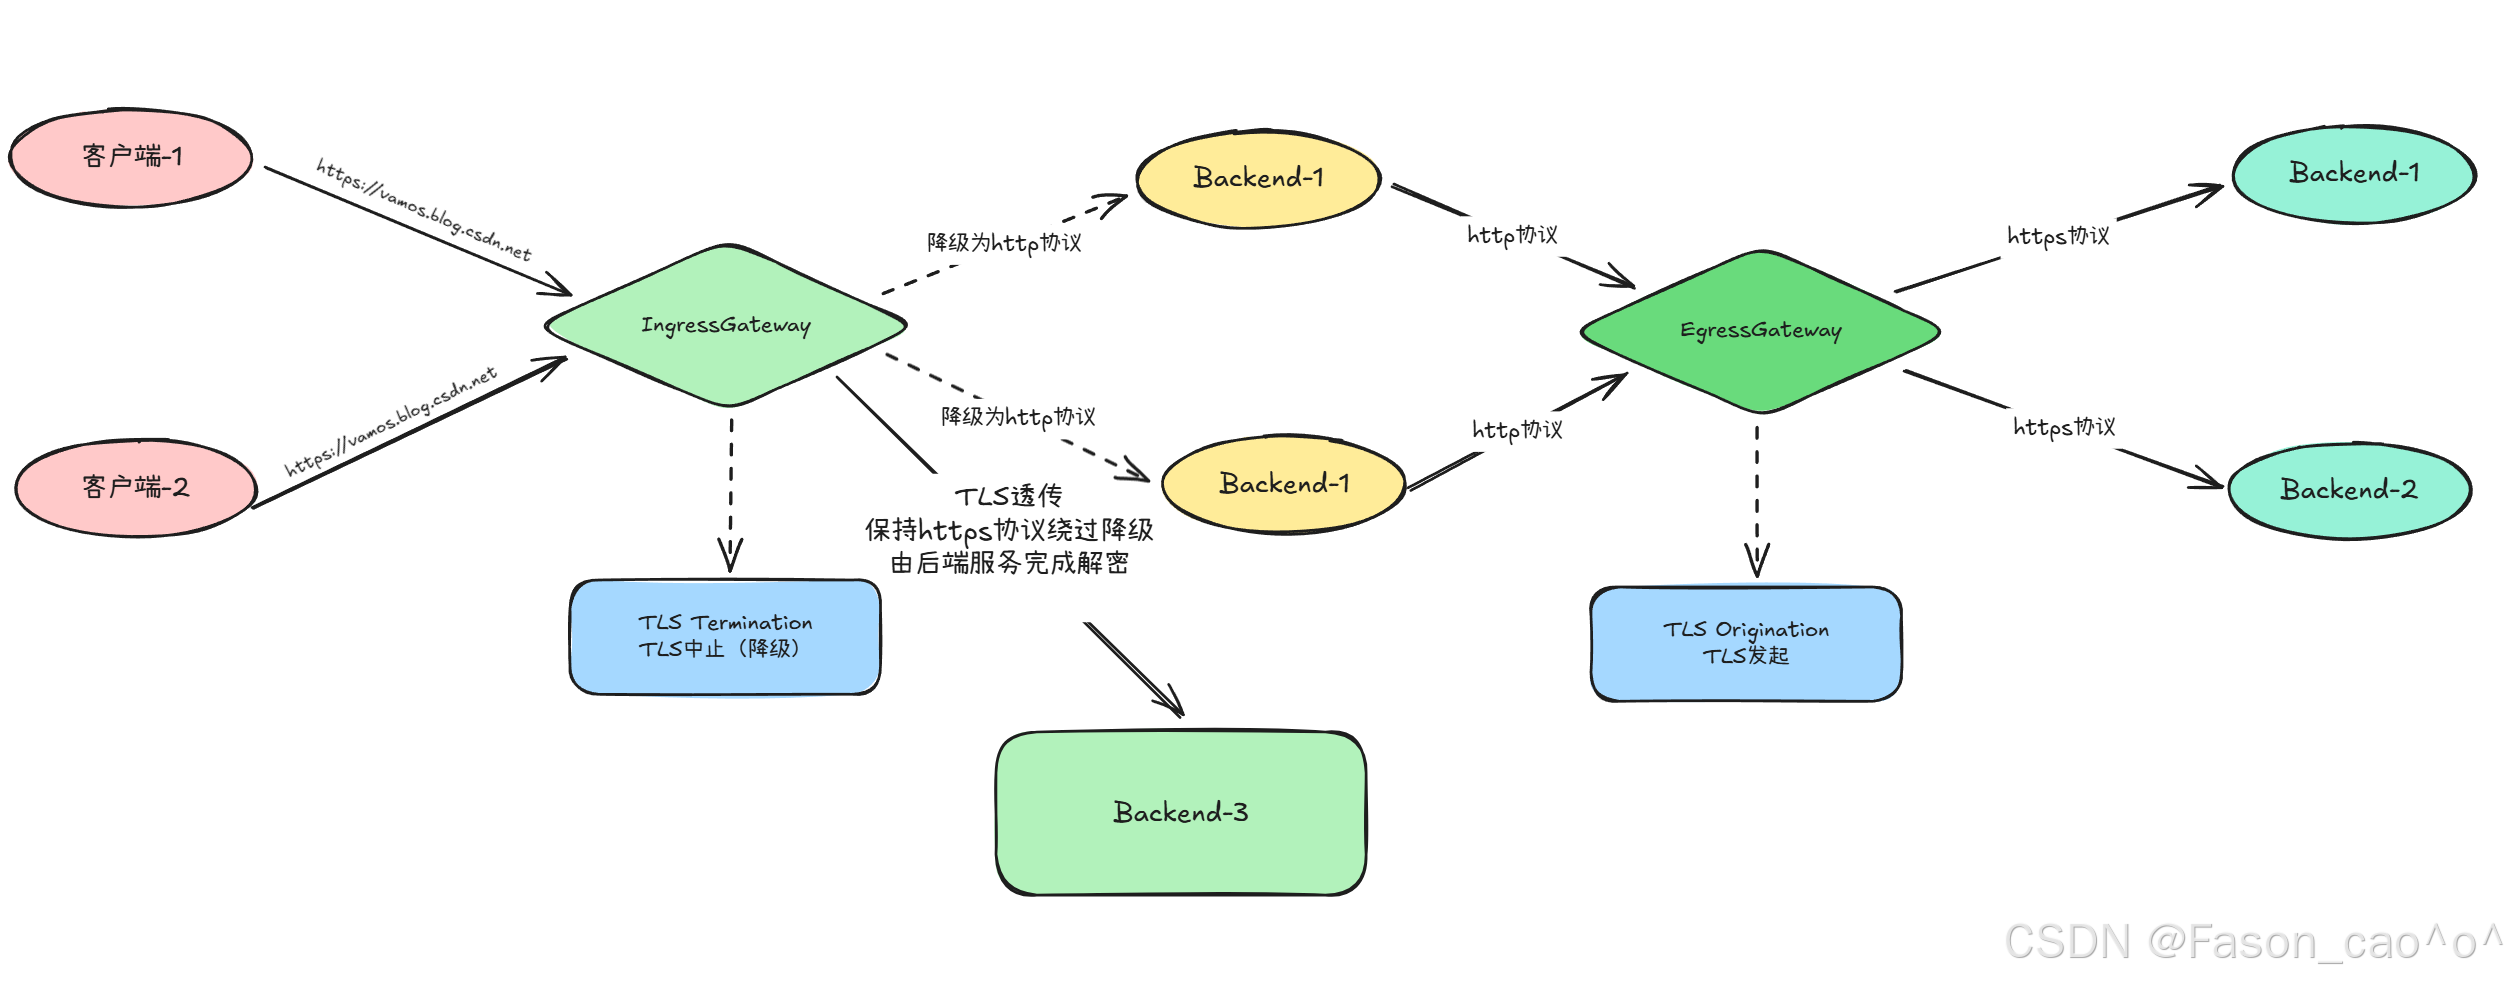
用一个 NGINX 服务来演示下 TLS 透传的配置。
TLS 中止(TLS Termination):网关(如 Istio Ingress Gateway)解密 TLS 流量,将明文转发给后端,后端无需配置 TLS;
TLS 透传(TLS Passthrough):网关不解密,直接转发原始 TLS 流量给后端,由后端(如 nginx)完成解密,网关仅靠 SNI 识别路由。
SNI
-
全称:Server Name Indication(服务器名称指示)
-
本质:TLS 协议的扩展功能
-
核心作用:在 TLS 握手阶段,客户端告诉服务端「自己要访问的具体域名」,让服务端能在同一 IP + 端口下,为不同域名提供对应的 TLS 证书(解决单 IP 多域名的 TLS 证书复用问题)。
-
你之前的 Istio VirtualService 中配置了snIHosts: nginx.example.com:当客户端访问nginx.example.com的 443 端口时,会在 TLS 握手时携带 “nginx.example.com” 的 SNI 信息;Istio Gateway(TLS 透传模式)通过这个 SNI,就能识别出该流量要转发给后端的 nginx 服务。
| TLS 解密位置 | 网关(Istio Ingress Gateway) | 后端服务(如 nginx) |
| 网关需服务端证书 | 是(如 httpbin-credential 的 tls.crt/key) | 否 |
| 后端需配置 TLS | 否 | 是(如 nginx 配置 ssl_certificate/key) |
| 网关能否看请求内容 | 能(明文) | 不能(仅识别 SNI) |
| 配置示例 | httpbin.example.com(mode:MUTUAL) | nginx.example.com(mode:PASSTHROUGH) |
2.9 访问外部服务
默认情况下,Istio网关中 Pod 的所有出站流量都会重定向到其 Sidecar代理,集群外部 URL的可访问性取决于代理的配置。默认情况下,lstio将Envoy代理配置为允许传递未知服务的请求,这样当然是非常方便的,但是有的时候可能我们也需要更加严格的控制。
Envoy转发流量到外部服务
Istio有一个安装选项 global.outboundTrafficPolicy.mode,它配置 Sidecar 对外部服务(没有在Istio的内部服务注册中定义的服务)的处理方式。如果这个选项设置为ALLOW_ANY,Istio代理允许调用未知的服务。如果这个选项设置为REGISTRY_ONLY,那么Istio 代理会阻止任何没有在网格中定义的HTTP 服务或 Service Entry 的主机。 ALLOW_ANY 是默认值,不控制对外部服务的访问。
这里说的外部/内部服务指的是服务网格的外部和内部,简单说就是没有注入SideCar的服务就是外部服务,www.baidu.com也是外部服务。
[root@k8s-master ~/istio]# kubectl exec sleep-65f688f8f5-jxrzc -c sleep — curl -sSI https://www.baidu.com |grep "HTTP/"
HTTP/1.1 200 OK
如果得到 20O状态码,说明我们成功地从网格中发送了Egress流量,这是因为我们的网格中的Sidecar 代理允许访问任何外部服务。
控制对外部的访问
要控制对外部服务的访问,我们需要用到 Istio 提供的 ServiceEntry 这个 CRD 对象,它用来定义网格中的服务。接下来我们将来了解下如何在不丢失lstio的流量监控和控制特性的情况下,配置对外部 HTTP 服务(httpbin.org) 和外部 HTTPS 服务(www.baidu.com )的访问。
为了控制对外部服务的访问,我们需要将 global.outboundTrafficPolicy·mode 选项,从ALLOW_ANY模式改为REGISTRY_ONLY 模式。
[root@k8s-master ~/istio]# istioctl install –set profile=demo -set meshConfig.outboundTrafficPolicy.mode=ReGISTRY_ONLY
|\\
| \\
| \\
| \\
/|| \\
/ || \\
/ || \\
/ || \\
/ || \\
/ || \\
/______||__________\\
____________________
\\__ _____/
\\_____/
❗ detected Calico CNI with 'bpfConnectTimeLoadBalancing=TCP'; this must be set to 'bpfConnectTimeLoadBalancing=Disabled' in the Calico configuration
This will install the Istio 1.28.1 profile "demo" into the cluster. Proceed? (y/N) y
✔ Istio core installed ⛵️
✔ Istiod installed 🧠
✔ Ingress gateways installed 🛬
✔ Egress gateways installed 🛫
✔ Installation complete
# 查看模式
[root@k8s-master ~/istio]# kubectl get cm istio -n istio-system -o jsonpath='{.data.mesh}' > mesh.yaml
cat mesh.yaml | grep -A 5 outboundTrafficPolicy
outboundTrafficPolicy:
mode: REGISTRY_ONLY
rootNamespace: istio-system
trustDomain: cluster.local
# 再次访问外部服务查看
[root@k8s-master ~/istio]# kubectl exec sleep-65f688f8f5-jxrzc -c sleep — curl -sSI https://www.baidu.com |grep "HTTP/"
curl: (35) OpenSSL SSL_connect: SSL_ERROR_SYSCALL in connection to www.baidu.com:443
command terminated with exit code 35
[root@k8s-master ~/istio]# kubectl exec sleep-65f688f8f5-jxrzc -c sleep — curl -sSI https://www.91tv.com |grep "HTTP/"
curl: (35) OpenSSL SSL_connect: SSL_ERROR_SYSCALL in connection to www.91tv.com:443
command terminated with exit code 35
[root@k8s-master ~/istio]#
ServiceEntry
接下来我们就可以自己定义ServiceEntry 对象来配置对外部服务的访问了。使用 服务条目资源( ServiceEntry )可以将条目添加到Istio内部维护的服务注册表中,添加服务条目后,Envoy代理可以将流量发送到该服务,就好像该服务条目是网格中的服务一样。通过配置服务条目,可以管理在网格外部运行的服务的流量。此外,还可以配置虚拟服务(VS)和目标规则(DR),以更精细的方式控制到服务条目的流量,就像为网格中的其他任何服务配置流量一样。说白了我们可以控制将外部服务的一个访问纳入到我们的网格中进行访问管理。
# 控制访问外部的HTTP服务,创建ServiceEntry资源
[root@k8s-master ~/istio]# cat se.yaml
apiVersion: networking.istio.io/v1alpha3
kind: ServiceEntry
metadata:
name: httpbin-ext
spec:
hosts:
– httpbin.org
ports:
– number: 80
name: http
protocol: HTTP
resolution: DNS # 服务发现模式:通过DNS解析httpbin.org的IP
location: MESH_EXTERNAL # 标记该服务是网格外部服务
# 再次curl就发现通了,可以外部服务了
[root@k8s-master ~/istio]# kubectl exec sleep-65f688f8f5-jxrzc -c sleep — curl -sS http://httpbin.org/headers
{
"headers": {
"Accept": "*/*",
"Host": "httpbin.org",
"User-Agent": "curl/8.9.1",
"X-Amzn-Trace-Id": "Root=1-694ce963-175f79f3074b1e1234a50f57",
"X-Envoy-Attempt-Count": "1",
"X-Envoy-Decorator-Operation": "httpbin.org:80/*",
"X-Envoy-Peer-Metadata": "ChoKCkNMVVNURVJfSUQSDBoKS3ViZXJuZXRlcwp5CgZMQUJFTFMSbyptCg4KA2FwcBIHGgVzbGVlcAoqCh9zZXJ2aWNlLmlzdGlvLmlvL2Nhbm9uaWNhbC1uYW1lEgcaBXNsZWVwCi8KI3NlcnZpY2UuaXN0aW8uaW8vY2Fub25pY2FsLXJldmlzaW9uEggaBmxhdGVzdAogCgROQU1FEhgaFnNsZWVwLTY1ZjY4OGY4ZjUtanhyemMKFgoJTkFNRVNQQUNFEgkaB2RlZmF1bHQKSQoFT1dORVISQBo+a3ViZXJuZXRlczovL2FwaXMvYXBwcy92MS9uYW1lc3BhY2VzL2RlZmF1bHQvZGVwbG95bWVudHMvc2xlZXAKGAoNV09SS0xPQURfTkFNRRIHGgVzbGVlcA==",
"X-Envoy-Peer-Metadata-Id": "sidecar~10.200.36.124~sleep-65f688f8f5-jxrzc.default~default.svc.cluster.local"
}
}
# 这里也可以看到proxy的日志了
[root@k8s-master ~/istio]# kubectl logs sleep-65f688f8f5-jxrzc -c istio-proxy |tail
2025-12-25T06:33:24.078335Z info xdsproxy connected to delta upstream XDS server: istiod.istio-system.svc:15012 id=14
2025-12-25T07:01:33.790342Z info xdsproxy connected to delta upstream XDS server: istiod.istio-system.svc:15012 id=15
[2025-12-25T07:05:22.822Z] "- – -" 0 – – – "-" 780 5548 57 – "-" "-" "-" "-" "180.101.51.73:443" PassthroughCluster 10.200.36.124:58530 180.101.51.73:443 10.200.36.124:58524 – –
[2025-12-25T07:05:26.339Z] "- – -" 0 – – – "-" 780 5548 44 – "-" "-" "-" "-" "180.101.49.44:443" PassthroughCluster 10.200.36.124:47420 180.101.49.44:443 10.200.36.124:47412 – –
[2025-12-25T07:13:27.666Z] "- – -" 0 UH – – "-" 0 0 0 – "-" "-" "-" "-" "-" BlackHoleCluster – 180.101.49.44:443 10.200.36.124:53424 – –
[2025-12-25T07:13:40.941Z] "- – -" 0 UH – – "-" 0 0 0 – "-" "-" "-" "-" "-" BlackHoleCluster – 221.228.32.13:443 10.200.36.124:40378 – –
[2025-12-25T07:27:20.717Z] "GET /headers HTTP/1.1" 502 – direct_response – "-" 0 0 0 – "-" "curl/8.9.1" "ea925893-1f80-914c-b59e-c886cf8286e7" "httpbin.org" "-" – – 3.232.43.25:80 10.200.36.124:56154 – block_all
2025-12-25T07:33:52.611765Z info xdsproxy connected to delta upstream XDS server: istiod.istio-system.svc:15012 id=16
[2025-12-25T07:34:06.277Z] "GET /headers HTTP/1.1" 200 – via_upstream – "-" 0 828 510 509 "-" "curl/8.9.1" "138777ca-3bc4-9a55-abf2-8f8d1810efc3" "httpbin.org" "98.85.201.92:80" outbound|80||httpbin.org 10.200.36.124:40796 54.205.230.94:80 10.200.36.124:55560 – default
[2025-12-25T07:36:03.459Z] "GET /headers HTTP/1.1" 200 – via_upstream – "-" 0 828 467 467 "-" "curl/8.9.1" "f4ca1059-a42e-9c71-a272-d75c19121fc7" "httpbin.org" "54.158.135.159:80" outbound|80||httpbin.org 10.200.36.124:51418 98.85.201.92:80 10.200.36.124:39686 – default
# 控制访问外部的HTTPS服务,创建ServiceEntry资源
[root@k8s-master ~/istio]# cat se-https.yaml
apiVersion: networking.istio.io/v1alpha3
kind: ServiceEntry
metadata:
name: baidu
spec:
hosts:
– www.baidu.com
ports:
– number: 443
name: https
protocol: HTTPS
resolution: DNS
location: MESH_EXTERNAL
# 测试
[root@k8s-master ~/istio]# kubectl apply -f se-https.yaml
serviceentry.networking.istio.io/baidu created
[root@k8s-master ~/istio]# kubectl exec sleep-65f688f8f5-jxrzc -c sleep — curl -sS https://www.baidu.com
<!DOCTYPE html>
<!–STATUS OK–><html> <head><meta http-equiv=content-type content=text/html;charset=utf-8><meta http-equiv=X-UA-Compatible content=IE=Edge><meta content=always name=referrer><link rel=stylesheet type=text/css href=https://ss1.bdstatic.com/5eN1bjq8AAUYm2zgoY3K/r/www/cache/bdorz/baidu.min.css><title>百度一下,你就知道</title></head> <body link=#0000cc> <div id=wrapper> <div id=head> <div class=head_wrapper> <div class=s_form> <div class=s_form_wrapper> <div id=lg> <img hidefocus=true src=//www.baidu.com/img/bd_logo1.png width=270 height=129> </div> <form id=form name=f action=//www.baidu.com/s class=fm> <input type=hidden name=bdorz_come value=1> <input type=hidden name=ie value=utf-8> <input type=hidden name=f value=8> <input type=hidden name=rsv_bp value=1> <input type=hidden name=rsv_idx value=1> <input type=hidden name=tn value=baidu><span class="bg s_ipt_wr"><input id=kw name=wd class=s_ipt value maxlength=255 autocomplete=off autofocus=autofocus></span><span class="bg s_btn_wr"><input type=submit id=su value=百度一下 class="bg s_btn" autofocus></span> </form> </div> </div> <div id=u1> <a href=http://news.baidu.com name=tj_trnews class=mnav>新闻</a> <a href=https://www.hao123.com name=tj_trhao123 class=mnav>hao123</a> <a href=http://map.baidu.com name=tj_trmap class=mnav>地图</a> <a href=http://v.baidu.com name=tj_trvideo class=mnav>视频</a> <a href=http://tieba.baidu.com name=tj_trtieba class=mnav>贴吧</a> <noscript> <a href=http://www.baidu.com/bdorz/login.gif?login&tpl=mn&u=http%3A%2F%2Fwww.baidu.com%2f%3fbdorz_come%3d1 name=tj_login class=lb>登录</a> </noscript> <script>document.write('<a href="http://www.baidu.com/bdorz/login.gif?login&tpl=mn&u='+ encodeURIComponent(window.location.href+ (window.location.search === "" ? "?" : "&")+ "bdorz_come=1")+ '" name="tj_login" class="lb">登录</a>');
</script> <a href=//www.baidu.com/more/ name=tj_briicon class=bri style="display: block;">更多产品</a> </div> </div> </div> <div id=ftCon> <div id=ftConw> <p id=lh> <a href=http://home.baidu.com>关于百度</a> <a href=http://ir.baidu.com>About Baidu</a> </p> <p id=cp>©2017 Baidu <a href=http://www.baidu.com/duty/>使用百度前必读</a> <a href=http://jianyi.baidu.com/ class=cp-feedback>意见反馈</a> 京ICP证030173号 <img src=//www.baidu.com/img/gs.gif> </p> </div> </div> </div> </body> </html>
[root@k8s-master ~/istio]# kubectl exec sleep-65f688f8f5-jxrzc -c sleep — curl -I https://www.baidu.com
% Total % Received % Xferd Average Speed Time Time Time Current
Dload Upload Total Spent Left Speed
0 0 0 0 0 0 0 0 –:–:– –:–:– –:–:– 0
HTTP/1.1 200 OK
# 查看日志我们可以发现有一个BlackHoleCluster字段,因为再此之前没加入白名单去访问就会被拒绝,出现此字段。
[root@k8s-master ~/istio]# kubectl logs sleep-65f688f8f5-jxrzc -c istio-proxy |tail
[2025-12-25T07:05:26.339Z] "- – -" 0 – – – "-" 780 5548 44 – "-" "-" "-" "-" "180.101.49.44:443" PassthroughCluster 10.200.36.124:47420 180.101.49.44:443 10.200.36.124:47412 – –
[2025-12-25T07:13:27.666Z] "- – -" 0 UH – – "-" 0 0 0 – "-" "-" "-" "-" "-" BlackHoleCluster – 180.101.49.44:443 10.200.36.124:53424 – –
[2025-12-25T07:13:40.941Z] "- – -" 0 UH – – "-" 0 0 0 – "-" "-" "-" "-" "-" BlackHoleCluster – 221.228.32.13:443 10.200.36.124:40378 – –
[2025-12-25T07:27:20.717Z] "GET /headers HTTP/1.1" 502 – direct_response – "-" 0 0 0 – "-" "curl/8.9.1" "ea925893-1f80-914c-b59e-c886cf8286e7" "httpbin.org" "-" – – 3.232.43.25:80 10.200.36.124:56154 – block_all
2025-12-25T07:33:52.611765Z info xdsproxy connected to delta upstream XDS server: istiod.istio-system.svc:15012 id=16
[2025-12-25T07:34:06.277Z] "GET /headers HTTP/1.1" 200 – via_upstream – "-" 0 828 510 509 "-" "curl/8.9.1" "138777ca-3bc4-9a55-abf2-8f8d1810efc3" "httpbin.org" "98.85.201.92:80" outbound|80||httpbin.org 10.200.36.124:40796 54.205.230.94:80 10.200.36.124:55560 – default
[2025-12-25T07:36:03.459Z] "GET /headers HTTP/1.1" 200 – via_upstream – "-" 0 828 467 467 "-" "curl/8.9.1" "f4ca1059-a42e-9c71-a272-d75c19121fc7" "httpbin.org" "54.158.135.159:80" outbound|80||httpbin.org 10.200.36.124:51418 98.85.201.92:80 10.200.36.124:39686 – default
[2025-12-25T07:44:13.606Z] "- – -" 0 UH – – "-" 0 0 0 – "-" "-" "-" "-" "-" BlackHoleCluster – 180.101.51.73:443 10.200.36.124:36924 – –
[2025-12-25T07:44:27.369Z] "- – -" 0 – – – "-" 779 8177 64 – "-" "-" "-" "-" "180.101.51.73:443" outbound|443||www.baidu.com 10.200.36.124:53312 180.101.49.44:443 10.200.36.124:44676 www.baidu.com –
[2025-12-25T07:44:47.504Z] "- – -" 0 – – – "-" 780 5548 60 – "-" "-" "-" "-" "180.101.49.44:443" outbound|443||www.baidu.com 10.200.36.124:44592 180.101.51.73:443 10.200.36.124:47746 www.baidu.com –
除了上面直接通过ServiceEntry 来声明对外部服务的访问之外,我们也可以使用VirtualService 和 DestinationRule 来声明对外部服务的路由访问规则,以更精细的方式控制到服务条目的流量,这样可以更加灵活的控制对外部服务的访问。
[root@k8s-master ~/istio]# kubectl exec sleep-65f688f8f5-jxrzc -c sleep — time curl -o /dev/null -sS -w "%{http_code}\\n" http://httpbin.org/delay/5
200
real 0m 5.23s
user 0m 0.00s
sys 0m 0.00s
这个请求大约在 5 秒内返回 200 (OK)。然后我们可以使用VirtualService来设置对httpbin.org服务访问的超时规则:
[root@k8s-master ~/istio]# cat se-http-vs.yaml
apiVersion: networking.istio.io/v1alpha3
kind: VirtualService
metadata:
name: httpbin-ext-vs
spec:
hosts:
– httpbin.org
http:
– timeout: 3s # 设置HTTP请求的超时时间为3秒
route:
– destination:
host: httpbin.org
weight: 100
[root@k8s-master ~/istio]# kubectl exec sleep-65f688f8f5-jxrzc -c sleep — time curl -o /dev/null -sS -w "%{http_code}\\n" http://httpbin.org/delay/5
504
real 0m 3.03s
user 0m 0.00s
sys 0m 0.00s
这一次,在 3 秒后出现了 504 (Gateway Timeout),Istio 在 3 秒后切断了响应时间为 5 秒的 httpbin.org服务的请求,证明上面我们配置的超时规则已经生效了。
直接访问外部服务
此外我们还可以让特定范围的 IP 完全绕过 Istio,可以通过配置 Envoy Sidecar 来防止它们拦截外部请求。要设置绕过 Istio,需进行以下配置:
更改 global.proxy.includeIPRanges 或 global.proxy.excludeIPRanges 配置参数,再更新 istio-sidecar-injector 配置;
也可在 Pod 上设置注解进行配置,例如 traffic.sidecar.istio.io/includeOutboundIPRanges
补充说明:istio-sidecar-injector 配置的更新,仅影响新部署应用的 Pod。
排除所有外部 IP 重定向到 Sidecar 代理的一种简单方法是:将 global.proxy.includeIPRanges 配置选项,设置为内部集群服务使用的 IP 范围(该 IP 范围值取决于集群所在的平台)。
例如:使用 Kubeadm 搭建的集群,此配置的默认值为 10.100.0.0/12(但该值并非固定),可通过对应命令确定实际值。
[root@k8s-master ~/istio]# kubectl describe po kube-apiserver -n kube-system |grep 'service-cluster-ip-range'
–service-cluster-ip-range=10.100.0.0/12
然后使用 –set global.proxy.includeIPRanges="10.100.0.0/12"参数来更新配置即可:
istioctl install –set profile=demo -y –set global.proxy.includeIPRanges="10.100.0.0/12"
没尝试过这种IP段的方法,一般SE资源使用的多一些。
总结这里我们学习了从 Istio 网格调用外部服务的三种方法:
-
配置 Envoy 以允许访问任何外部服务。
-
使用 ServiceEntry 将一个可访问的外部服务注册到网格中,这是推荐的方法。
-
配置 Istio Sidecar 以从其重新映射的 IP 表中排除外部 IP。
2.10 EgressGateway
前文了解了服务网格内部应用访问网格外部 HTTP 和 HTTPS 服务的方式:可通过 ServiceEntry 对象配置 Istio,以受控方式访问外部服务(该方式由 Sidecar 直接调用外部服务);但有时需通过专用的 Egress Gateway 服务调用外部服务,这种方式能更好地控制对外部服务的访问。
Istio 借助 Ingress 和 Egress Gateway 配置服务网格边缘的负载均衡:
-
Ingress Gateway:定义网格所有入站流量的入口;
-
Egress Gateway:与 Ingress Gateway 对称,定义网格的出站出口,可将 Istio 的功能(如监控、路由规则)应用于网格的出站流量。
使用场景
高安全要求场景:对安全要求严格的团队,要求服务网格所有出站流量必须经过一组专用节点;这些节点运行在专门机器上,与集群内其他应用节点隔离,用于实施 Egress 流量策略,且监控力度比其余节点更严密。
应用节点无公网 IP 场景:集群中的应用节点没有公有 IP,导致网格服务无法访问互联网时,可通过定义 Egress Gateway,将公有 IP 分配给 Egress Gateway 节点,由它引导所有出站流量,使应用节点以受控方式访问外部服务。
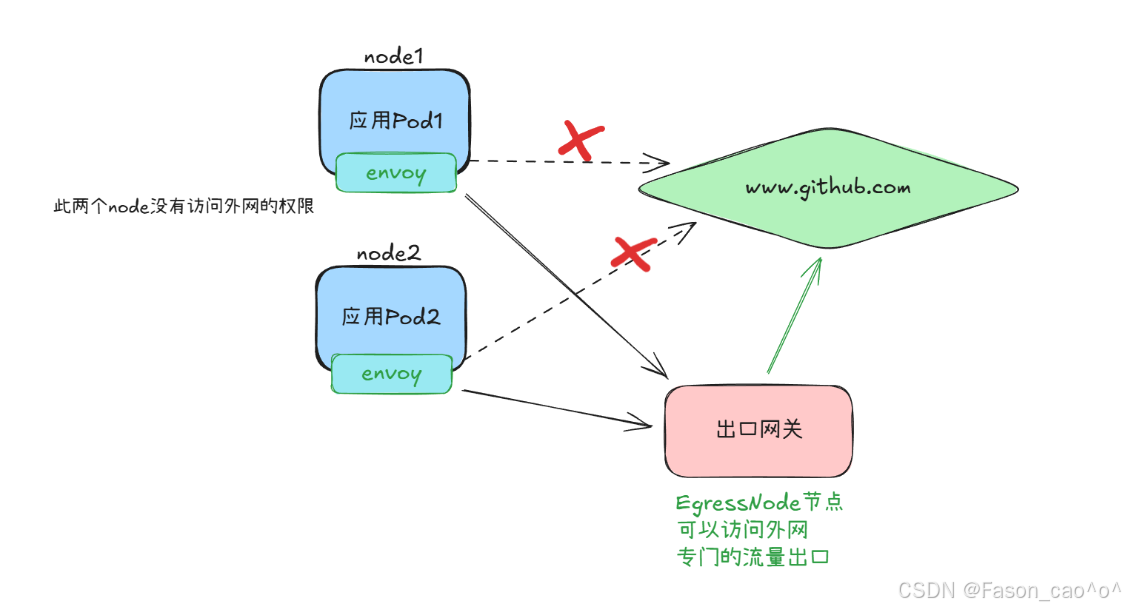
# 确保egressgateway已经安装
[root@k8s-master ~/istio]# kubectl get po -n istio-system
NAME READY STATUS RESTARTS AGE
istio-egressgateway-6f6bb8f7f9-r8x9z 1/1 Running 3 (7h38m ago) 31h
用EgressGateway发起HTTP请求
# 如果没有做任何配置去访问肯定是访问不通的,因为在上面我们启用了REGISTRY_ONLY模式
[root@k8s-master ~/istio]# kubectl exec sleep-65f688f8f5-jxrzc -c sleep — curl -sSI -D – http://edition.cnn.com/politics
HTTP/1.1 502 Bad Gateway
date: Thu, 25 Dec 2025 08:49:28 GMT
server: envoy
transfer-encoding: chunked
# 创建ServiceEntry资源,没有指定localtion默认就是外部服务
apiVersion: networking.istio.io/v1alpha3
kind: ServiceEntry
metadata:
name: cnn
spec:
hosts:
– edition.cnn.com
ports:
– number: 80
name: http-port
protocol: HTTP
– number: 443
name: https
protocol: HTTPS
resolution: DNS
# 再次测试,可以看到访问80跳转到443服务了,所以上面的se需要写HTTPS的一个访问协议。
[root@k8s-master ~/istio]# kubectl exec sleep-65f688f8f5-jxrzc -c sleep — curl -sSI -o /dev/null -D – http://edition.cnn.com/politics
HTTP/1.1 301 Moved Permanently
content-length: 0
retry-after: 0
cache-control: max-age=300, public
location: https://edition.cnn.com/politics
accept-ranges: bytes
date: Thu, 25 Dec 2025 08:53:16 GMT
via: 1.1 varnish
set-cookie: countryCode=CN; Domain=.cnn.com; Path=/; SameSite=Lax
set-cookie: stateCode=JS; Domain=.cnn.com; Path=/; SameSite=Lax
set-cookie: geoData=nanjing|JS|215004|CN|AS|800|broadband|31.300|120.550|156074; Domain=.cnn.com; Path=/; SameSite=Lax
x-served-by: cache-tyo11933-TYO
x-cache: HIT
x-cache-hits: 0
x-timer: S1766652796.206945,VS0,VE1
vary: Origin
alt-svc: h3=":443";ma=86400,h3-29=":443";ma=86400,h3-27=":443";ma=86400
x-envoy-upstream-service-time: 10145
server: envoy
然后为edition.cnn.com的 80 端口创建一个 egress Gateway,并为指向 Egress Gateway的流量创建一个DestinationRule规则,如下所示:
[root@k8s-master ~/istio]# cat cnn-egress-gateway.yaml
apiVersion: networking.istio.io/v1alpha3
kind: Gateway
metadata:
name: istio-egressgateway
spec:
selector:
istio: egressgateway # 匹配 Egress Gateway Pod 的标签
servers:
– port:
number: 80
name: http
protocol: HTTP
hosts:
– edition.cnn.com # 也支持通配符 * 的形式
—
apiVersion: networking.istio.io/v1alpha3
kind: DestinationRule
metadata:
name: egressgateway-for-cnn
spec:
host: istio-egressgateway.istio-system.svc.cluster.local # 目标服务为istio-system命名空间下的Egress Gateway服务
subsets:
– name: cnn # 定义名为cnn的子集(未指定labels时,该子集包含Egress Gateway服务的所有实例)
这里的子集名称是cnn,但没有指定labels。这意味着,这个 subset 会涵盖所有属于istio-egressgateway.istio-system.svc.cluster.local服务的 Pod。这种情况下,subset 的作用主要是为了在其他 Istio 配置中提供一个方便的引用名称,而不是为了区分不同的 Pod 子集。
-
Gateway 负责接收并匹配edition.cnn.com的出站 HTTP 请求;
-
该 DestinationRule 为 Egress Gateway 服务(istio-egressgateway.istio-system.svc.cluster.local)定义了cnn子集;
-
后续可通过 VirtualService 将edition.cnn.com的流量先路由到 Egress Gateway 的cnn子集,再由 Egress Gateway 转发至实际外部服务edition.cnn.com,实现 “出站流量必经 Egress Gateway” 的管控。
apiVersion: networking.istio.io/v1alpha3
kind: DestinationRule
metadata:
name: egressgateway-for-cnn
spec:
host: istio-egressgateway.istio-system.svc.cluster.local # 目标服务为istio-system命名空间下的Egress Gateway服务
subsets:
– name: cnn # 定义名为cnn的子集(未指定labels时,该子集包含Egress Gateway服务的所有实例)
—
apiVersion: networking.istio.io/v1alpha3
kind: VirtualService
metadata:
name: direct-cnn-through-egress-gateway
spec:
hosts:
– edition.cnn.com
gateways:
– istio-egressgateway # Egress Gateway
– mesh # 网格内部的流量
http:
– match:
– gateways:
– mesh # 这条规则适用于从服务网格内发出的流量
port: 80
route:
– destination:
host: istio-egressgateway.istio-system.svc.cluster.local # 流量将被路由到 egress gateway
subset: cnn
port:
number: 80
weight: 100
– match:
– gateways:
– istio-egressgateway # 这条规则适用于通过 istio-egressgateway 的流量
port: 80
route:
– destination:
host: edition.cnn.com # 流量将被路由到外部服务
port:
number: 80
weight: 100
mesh是 Istio 中的特殊关键字,它表示服务网格内的所有 Sidecar 代理。
当将mesh作为网关使用时,意味着VirtualService中定义的路由规则,会适用于服务网格内的所有服务(即所有已注入 Istio sidecar 代理的服务)。
# 再次请求
[root@k8s-master ~/istio]# kubectl exec sleep-65f688f8f5-jxrzc -c sleep — curl -sSI -o /dev/null -D – http://edition.cnn.com/politics
HTTP/1.1 301 Moved Permanently
content-length: 0
retry-after: 0
cache-control: max-age=300, public
location: https://edition.cnn.com/politics
accept-ranges: bytes
date: Fri, 26 Dec 2025 06:04:37 GMT
via: 1.1 varnish
# 查看egressgateway日志
[root@k8s-master ~/istio]# kubectl -n istio-system logs istio-egressgateway-6f6bb8f7f9-r8x9z
2025-12-26T05:49:12.926106Z info FLAG: –concurrency="0"
2025-12-26T05:49:12.926754Z info FLAG: –domain="istio-system.svc.cluster.local"
……
[2025-12-26T06:04:37.190Z] "HEAD /politics HTTP/2" 301 – via_upstream – "-" 0 0 161 160 "10.200.36.82" "curl/8.9.1" "02198d34-4a49-9879-b28f-2cb397f32ffe" "edition.cnn.com" "151.101.195.5:80" outbound|80||edition.cnn.com 10.200.169.138:39316 10.200.169.138:8080 10.200.36.82:33080 – –
# 查看sidecar代理日志
[root@k8s-master ~/istio]# kubectl logs sleep-65f688f8f5-jxrzc -c istio-proxy |tail
2025-12-26T05:49:40.667969Z info cache returned workload trust anchor from cache ttl=23h59m59.332031806s
2025-12-26T05:49:40.718120Z info ads ADS: new connection for node:1
2025-12-26T05:49:40.718182Z info cache returned workload certificate from cache ttl=23h59m59.281819454s
2025-12-26T05:49:40.719317Z info ads ADS: new connection for node:2
2025-12-26T05:49:40.719363Z info cache returned workload trust anchor from cache ttl=23h59m59.280638239s
2025-12-26T05:49:41.654033Z info Readiness succeeded in 32.412222976s
2025-12-26T05:49:41.654273Z info Envoy proxy is ready
[2025-12-26T05:52:58.249Z] "HEAD /politics HTTP/1.1" 301 – via_upstream – "-" 0 0 346 346 "-" "curl/8.9.1" "a0d83090-a222-972d-8921-77c6bd3c0eeb" "edition.cnn.com" "151.101.195.5:80" outbound|80||edition.cnn.com 10.200.36.82:33482 151.101.3.5:80 10.200.36.82:40928 – default
[2025-12-26T06:04:37.182Z] "HEAD /politics HTTP/1.1" 301 – via_upstream – "-" 0 0 169 167 "-" "curl/8.9.1" "21734259-9107-9e45-a2ee-7f889fc4a927" "edition.cnn.com" "10.200.169.138:8080" outbound|80|cnn|istio-egressgateway.istio-system.svc.cluster.local 10.200.36.82:33080 151.101.3.5:80 10.200.36.82:56098 – –
[2025-12-26T06:07:33.254Z] "HEAD /politics HTTP/1.1" 301 – via_upstream – "-" 0 0 165 164 "-" "curl/8.9.1" "5f252f01-51d3-9633-9cb8-3c51cfb11fe4" "edition.cnn.com" "10.200.169.138:8080" outbound|80|cnn|istio-egressgateway.istio-system.svc.cluster.local 10.200.36.82:57722 151.101.67.5:80 10.200.36.82:56202 – –
这样我们就完成了一份 Istio 中实现 “网格内服务访问外部服务edition.cnn.com时,必须通过 Egress Gateway 统一转发(禁止直接访问)” 的完整流量管控配置,由Gateway、DestinationRule、VirtualService三个 Istio 核心自定义资源协同工作,实现了出站流量的统一入口、可管控、可监控。
完整流量流转路径
网格内 Pod(如 sleep,已注入 Istio Sidecar) → 本地 Sidecar 代理(拦截 Pod 的出站流量) → 匹配 VirtualService 第一个路由规则 → 路由到 Istio Egress Gateway(cnn子集,80 端口) → Egress Gateway Pod 接收流量 → 匹配 VirtualService 第二个路由规则 → 转发到外部服务edition.cnn.com:80 → 外部服务响应 → 按原路径反向返回(Egress Gateway → 网格内 Pod Sidecar → Pod 内部)
用EgressGateway发起HTTPS请求
[root@k8s-master ~/istio]# cat cnn-se.yaml
apiVersion: networking.istio.io/v1alpha3
kind: ServiceEntry
metadata:
name: cnn
spec:
hosts:
– edition.cnn.com
ports:
– number: 443
name: tls
protocol: TLS
resolution: DNS
[root@k8s-master ~/istio]# kubectl exec sleep-65f688f8f5-jxrzc -c sleep — curl -sSI -o /dev/null -D – https://edition.cnn.com/politics
HTTP/2 200
x-last-modified: Fri, 19 Dec 2025 19:19:07 GMT
access-control-allow-origin: *
x-xss-protection: 1; mode=block
content-type: text/html; charset=utf-8
content-security-policy: default-src 'self' blob: https://*.cnn.com:* http://*.cnn.com:* *.cnn.io:* *.cnn.net:* *.turner.com:* *.turner.io:* *.ugdturner.com:* courageousstudio.com *.vgtf.net:*; script-src 'unsafe-eval' 'unsafe-inline' 'self' *; style-src 'unsafe-inline' 'self' blob: *; child-src 'self' blob: *; frame-src 'self' *; object-src 'self' *; img-src 'self' data: blob: *; media-src 'self' data: blob: *; font-src 'self' data: *; connect-src 'self' data: *; frame-ancestors 'self' https://*.cnn.com:* http://*.cnn.com https://*.cnn.io:* http://*.cnn.io:* *.turner.com:* courageousstudio.com;
cache-control: max-age=60
x-content-hub: build-env=prod; unique-deployment-key=rn11206n; build-version=v6.11.40-0-gddc514b10d; build-commit-hash=ddc514b10df30178540fd0936cb19e5a91756aa2
x-content-type-options: nosniff
via: 1.1 varnish, 1.1 varnish
accept-ranges: bytes
date: Fri, 26 Dec 2025 06:10:38 GMT
age: 3174
set-cookie: SecGpc=0; Domain=.cnn.com; Path=/; SameSite=None; Secure
set-cookie: countryCode=CN; Domain=.cnn.com; Path=/; SameSite=None; Secure
set-cookie: stateCode=JS; Domain=.cnn.com; Path=/; SameSite=None; Secure
set-cookie: geoData=nanjing|JS|215004|CN|AS|800|broadband|31.300|120.550|156074; Domain=.cnn.com; Path=/; SameSite=None; Secure
set-cookie: FastAB=0=973,1=571,2=936,3=044,4=266,5=452,6=876,7=237,8=280,9=482,10=768,11=012,12=435,13=751,14=219,15=839,16=906,17=720,18=653,19=226,h=70,c=694e26de,u=694e26de; Domain=.cnn.com; Path=/; Expires=Sat, 26 Dec 2026 06:10:38 GMT; HttpOnly; SameSite=None; Secure
set-cookie: wbdFch=bb3578631698b2483cfb2251865a356de51b9b75; Domain=edition.cnn.com; Path=/politics; Max-Age=30; SameSite=None; Secure
x-served-by: cache-iad-kjyo7100138-IAD, cache-iad-kjyo7100147-IAD, cache-tyo11982-TYO
x-cache: MISS, HIT, HIT
x-cache-hits: 0, 3, 3
x-timer: S1766729438.018128,VS0,VE1
vary: Accept-Encoding,Origin,Accept-Language
alt-svc: h3=":443";ma=86400,h3-29=":443";ma=86400,h3-27=":443";ma=86400
content-length: 4602390
[root@k8s-master ~/istio]# cat cnn-https.yaml
apiVersion: networking.istio.io/v1alpha3
kind: ServiceEntry
metadata:
name: cnn
spec:
hosts:
– edition.cnn.com
ports:
– number: 443
name: tls
protocol: TLS
resolution: DNS
—
apiVersion: networking.istio.io/v1alpha3
kind: Gateway
metadata:
name: istio-egressgateway
spec:
selector:
istio: egressgateway
servers:
– port:
number: 443
name: tls
protocol: TLS
hosts:
– edition.cnn.com
tls:
mode: PASSTHROUGH # 透传模式
—
apiVersion: networking.istio.io/v1alpha3
kind: DestinationRule
metadata:
name: egressgateway-for-cnn
spec:
host: istio-egressgateway.istio-system.svc.cluster.local
subsets:
– name: cnn
—
apiVersion: networking.istio.io/v1alpha3
kind: VirtualService
metadata:
name: direct-cnn-through-egress-gateway
spec:
hosts:
– edition.cnn.com
gateways:
– mesh
– istio-egressgateway
tls:
– match:
– gateways:
– mesh
port: 443
sniHosts:
– edition.cnn.com
route:
– destination:
host: istio-egressgateway.istio-system.svc.cluster.local
subset: cnn
port:
number: 443
– match:
– gateways:
– istio-egressgateway
port: 443
sniHosts:
– edition.cnn.com
route:
– destination:
host: edition.cnn.com
port:
number: 443
weight: 100
# 请求
[root@k8s-master ~/istio]# kubectl exec sleep-65f688f8f5-jxrzc -c sleep — curl -sSI -o /dev/null -D – https://edition.cnn.com/politics
HTTP/2 200
x-xss-protection: 1; mode=block
x-content-type-options: nosniff
content-type: text/html; charset=utf-8
cache-control: max-age=60
x-last-modified: Fri, 19 Dec 2025 19:19:07 GMT
access-control-allow-origin: *
# 查看出口网关日志出现了443
[root@k8s-master ~/istio]# kubectl -n istio-system logs istio-egressgateway-6f6bb8f7f9-r8x9z |tail
2025-12-26T05:49:38.493470Z info ads ADS: new connection for node:1
2025-12-26T05:49:38.493863Z info cache returned workload certificate from cache ttl=23h59m59.506137974s
2025-12-26T05:49:38.497486Z info ads ADS: new connection for node:2
2025-12-26T05:49:38.497558Z info cache returned workload trust anchor from cache ttl=23h59m59.502443181s
2025-12-26T05:49:40.380191Z info Readiness succeeded in 27.457846382s
2025-12-26T05:49:40.380894Z info Envoy proxy is ready
[2025-12-26T06:04:37.190Z] "HEAD /politics HTTP/2" 301 – via_upstream – "-" 0 0 161 160 "10.200.36.82" "curl/8.9.1" "02198d34-4a49-9879-b28f-2cb397f32ffe" "edition.cnn.com" "151.101.195.5:80" outbound|80||edition.cnn.com 10.200.169.138:39316 10.200.169.138:8080 10.200.36.82:33080 – –
[2025-12-26T06:07:33.258Z] "HEAD /politics HTTP/2" 301 – via_upstream – "-" 0 0 160 160 "10.200.36.82" "curl/8.9.1" "bc7f1215-e50f-9aaf-b871-09b07361a99f" "edition.cnn.com" "151.101.3.5:80" outbound|80||edition.cnn.com 10.200.169.138:32978 10.200.169.138:8080 10.200.36.82:57722 – –
[2025-12-26T06:10:29.902Z] "HEAD /politics HTTP/2" 503 NC cluster_not_found – "-" 0 0 0 – "10.200.36.82" "curl/8.9.1" "8bde7f01-53e8-9b47-917e-989a18427ab8" "edition.cnn.com" "-" – – 10.200.169.138:8080 10.200.36.82:33080 – –
[2025-12-26T06:18:21.007Z] "- – -" 0 – – – "-" 843 4268 347 – "-" "-" "-" "-" "151.101.67.5:443" outbound|443||edition.cnn.com 10.200.169.138:56048 10.200.169.138:8443 10.200.36.82:58946 edition.cnn.com –
# 查看sidecar代理日志出现了443
[root@k8s-master ~/istio]# kubectl logs sleep-65f688f8f5-jxrzc -c istio-proxy |tail
2025-12-26T05:49:40.719363Z info cache returned workload trust anchor from cache ttl=23h59m59.280638239s
2025-12-26T05:49:41.654033Z info Readiness succeeded in 32.412222976s
2025-12-26T05:49:41.654273Z info Envoy proxy is ready
[2025-12-26T05:52:58.249Z] "HEAD /politics HTTP/1.1" 301 – via_upstream – "-" 0 0 346 346 "-" "curl/8.9.1" "a0d83090-a222-972d-8921-77c6bd3c0eeb" "edition.cnn.com" "151.101.195.5:80" outbound|80||edition.cnn.com 10.200.36.82:33482 151.101.3.5:80 10.200.36.82:40928 – default
[2025-12-26T06:04:37.182Z] "HEAD /politics HTTP/1.1" 301 – via_upstream – "-" 0 0 169 167 "-" "curl/8.9.1" "21734259-9107-9e45-a2ee-7f889fc4a927" "edition.cnn.com" "10.200.169.138:8080" outbound|80|cnn|istio-egressgateway.istio-system.svc.cluster.local 10.200.36.82:33080 151.101.3.5:80 10.200.36.82:56098 – –
[2025-12-26T06:07:33.254Z] "HEAD /politics HTTP/1.1" 301 – via_upstream – "-" 0 0 165 164 "-" "curl/8.9.1" "5f252f01-51d3-9633-9cb8-3c51cfb11fe4" "edition.cnn.com" "10.200.169.138:8080" outbound|80|cnn|istio-egressgateway.istio-system.svc.cluster.local 10.200.36.82:57722 151.101.67.5:80 10.200.36.82:56202 – –
[2025-12-26T06:10:29.901Z] "HEAD /politics HTTP/1.1" 503 – via_upstream – "-" 0 0 3 3 "-" "curl/8.9.1" "a452aab0-c4df-9d00-9a4f-db943b2eb514" "edition.cnn.com" "10.200.169.138:8080" outbound|80|cnn|istio-egressgateway.istio-system.svc.cluster.local 10.200.36.82:33080 151.101.195.5:80 10.200.36.82:41184 – –
[2025-12-26T06:10:37.853Z] "- – -" 0 – – – "-" 843 4261 251 – "-" "-" "-" "-" "151.101.131.5:443" outbound|443||edition.cnn.com 10.200.36.82:41950 151.101.195.5:443 10.200.36.82:58394 edition.cnn.com –
[2025-12-26T06:18:21.002Z] "- – -" 0 – – – "-" 843 4268 352 – "-" "-" "-" "-" "10.200.169.138:8443" outbound|443|cnn|istio-egressgateway.istio-system.svc.cluster.local 10.200.36.82:58946 151.101.3.5:443 10.200.36.82:49312 edition.cnn.com –
2025-12-26T06:18:58.393720Z info xdsproxy connected to delta upstream XDS server: istiod.istio-system.svc:15012 id=4
需要注意的是,Istio 无法强制让所有出站流量都经过 Egress Gateway,它只是通过 Sidecar 代理实现这种流向;攻击者若绕过 Sidecar 代理,就能不经 Egress Gateway 直接与网格外服务通信,避开 Istio 的控制和监控。
出于安全考虑,集群管理员和云供应商必须确保网格所有出站流量都经过 Egress Gateway,这需要通过 Istio 之外的机制实现,例如:
配置防火墙,拒绝 Egress Gateway 以外的所有流量;
利用 Kubernetes NetworkPolicy 禁止所有非 Egress Gateway 发起的出站流量(需 CNI 插件支持);
对网络进行限制:仅给 Gateway Pod 分配公网 IP,并配置 NAT 设备丢弃来自 Egress Gateway Pod 之外的所有流量。
TLS Origination发起
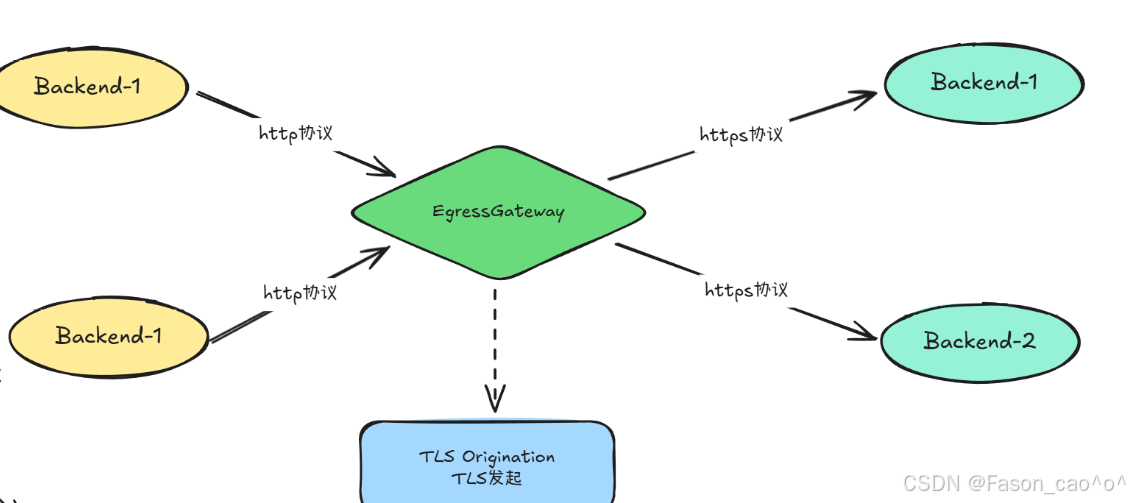
[root@k8s-master ~/istio]# cat tls-orig.yaml
apiVersion: networking.istio.io/v1alpha3
kind: ServiceEntry
metadata:
name: edition-cnn-com
spec:
hosts:
– edition.cnn.com
ports:
– number: 80
name: http-port
protocol: HTTP
– number: 443
name: https-port
protocol: HTTPS
resolution: DNS
—
apiVersion: networking.istio.io/v1alpha3
kind: Gateway
metadata:
name: istio-egressgateway
spec:
selector:
istio: egressgateway
servers:
– port:
number: 80
name: tls-origination-port
protocol: HTTP
hosts:
– edition.cnn.com
—
apiVersion: networking.istio.io/v1alpha3
kind: DestinationRule
metadata:
name: egressgateway-for-cnn
spec:
host: istio-egressgateway.istio-system.svc.cluster.local
subsets:
– name: cnn
—
apiVersion: networking.istio.io/v1alpha3
kind: VirtualService
metadata:
name: direct-cnn-through-egress-gateway
spec:
hosts:
– edition.cnn.com
gateways:
– istio-egressgateway # Egress Gateway
– mesh # 网格内部的流量
http:
– match:
– gateways:
– mesh
port: 80
route:
– destination:
host: istio-egressgateway.istio-system.svc.cluster.local
subset: cnn
port:
number: 80
weight: 100
– match:
– gateways:
– istio-egressgateway
port: 80
route:
– destination:
host: edition.cnn.com
port:
number: 443 # 443 端口
weight: 100
—
apiVersion: networking.istio.io/v1alpha3
kind: DestinationRule
metadata:
name: originate-tls-for-edition-cnn-com
spec:
host: edition.cnn.com
trafficPolicy:
loadBalancer:
simple: ROUND_ROBIN
portLevelSettings:
– port:
number: 443
tls:
mode: SIMPLE # initiates HTTPS for connections to edition.cnn.com
上述案例中我们使用的edition.cnn.com,实际上是访问http会默认跳转到https上,
这里我们使用了tls发起核心是服务器直接返回内容而无需重定向,这消除了客户端与服务器之间的请求余,使网格保持加密状态隐藏了你的应用获取edition.cnn.com中politics端点的信息。让网格内服务用简单的 HTTP 通信,由 Egress Gateway 统一将流量转换为 HTTPS 后访问外部服务 ,其好处主要体现在安全、简化开发、集中管控、流量治理这几个维度。
tls Origination核心逻辑
网格内服务发HTTP 请求 → 经 Egress Gateway 统一转换为HTTPS → 访问外部 HTTPS 服务(如edition.cnn.com)
配置组成(5 个 Istio 资源)
-
ServiceEntry:注册外部服务(edition.cnn.com)的 80/443 端口
-
Gateway:Egress Gateway 监听 80 端口 HTTP 流量
-
DestinationRule1:给 Egress Gateway 定义 “cnn” 子集(方便引用)
-
VirtualService:流量路由(网格内→Egress Gateway→外部服务 443 端口)
-
DestinationRule2:配置外部服务 443 端口的 TLS 模式(SIMPLE,发起 HTTPS)
核心好处
安全:出网流量加密,避免公网数据泄露
简化:内部服务只用 HTTP,不用处理 HTTPS 配置
集中:TLS 策略(协议 / 证书)统一在 Istio 资源里管控
易治理:可对出网流量做监控、限流、日志审计
兼容:老服务无需改造即可安全访问外部 HTTPS 服务
2.11 WorkloadEntry与WorkloadGroup
| WorkloadEntry | 单个 “外部工作负载” 的入网配置(比如物理机 / VM / 其他集群的服务),让 Istio 把它当成网格内服务管理(可配置 mTLS、流量路由)。 |
| WorkloadGroup | 批量管理 WorkloadEntry 的 “模板配置”(比如一组 VM 服务的统一 Sidecar 配置、健康检查规则),避免重复配置。 |
简单拓展案例(了解即可)
简单说:如果所有服务都跑在 K8s 集群里(纯容器化),这俩几乎用不上;如果有 VM / 物理机 / 跨集群服务要接入 Istio,这俩是核心。
# 使用nerdctl启动一个容器
nerdctl run -d -p 8888:80 –name whoami docker.io/traefik/whoami:latest –verbose
[root@k8s-master ~/istio]# cat whoami-we.yaml
# whoami-we.yaml
apiVersion: networking.istio.io/v1alpha3
kind: WorkloadEntry
metadata:
name: whoami-we
spec:
address: 10.0.0.6
labels:
app: whoami
instance-id: vm1
WorkloadEntry是 Istio 用来将网格外的工作负载(比如 VM、物理机)“注册” 到服务网格的资源,相当于给外部实例发一张 “网格准入凭证”。
-
告诉 Istio:“10.0.0.6 这台 VM 是咱们网格的一员,标签是 app:whoami”;
-
是外部工作负载接入网格的 “身份登记”,让 Istio 能识别并管理这台 VM。
[root@k8s-master ~/istio]# cat whoami-se.yaml
# whoami-se.yaml
apiVersion: networking.istio.io/v1beta1
kind: ServiceEntry
metadata:
name: whoami-se
spec:
hosts:
– whoami.internal.com # 这里的域名可以自定义
ports:
– number: 80
name: http
targetPort: 8888
protocol: HTTP
location: MESH_INTERNAL
resolution: STATIC # 静态解析
workloadSelector:
labels:
app: whoami
| MESH_INTERNAL | 该服务是网格的一部分(即使部署在 K8s 集群外,比如 VM、物理机),属于网格 “内部资产”。 |
| EXTERNAL | 该服务是完全在网格之外的第三方服务(比如公网 API、其他企业的外部服务),不属于网格资产。 |
ServiceEntry是 Istio 用来 将 “已注册的外部工作负载” 包装成 “网格内可访问的服务” 的资源,相当于给外部实例分配一个 “网格内域名 + 端口”,让网格内 Pod 能像访问 K8s Service 一样访问它。
[root@k8s-master ~/istio]# cat whoami-istio.yaml
# whoami-istio.yaml
apiVersion: networking.istio.io/v1beta1
kind: Gateway
metadata:
name: whoami-gw
spec:
selector:
istio: ingressgateway
servers:
– port:
number: 8080
name: http
protocol: HTTP
hosts:
– whoami.internal.com
—
# VirtualService 配置
apiVersion: networking.istio.io/v1beta1
kind: VirtualService
metadata:
name: whoami-vs
spec:
hosts:
– whoami.internal.com
gateways:
– whoami-gw
http:
– route:
– destination:
host: whoami.internal.com
port:
number: 80
—
# DestinationRule 配置
apiVersion: networking.istio.io/v1alpha3
kind: DestinationRule
metadata:
name: whoami-dr
spec:
host: whoami.internal.com
trafficPolicy:
loadBalancer:
simple: ROUND_ROBIN
Gateway-入口网关的监听规则告诉 Ingress Gateway:“你要监听 8080 端口的 HTTP 流量,只接收访问whoami.internal.com的请求”;
VirtualService-流量路由规则把通过whoami-gw网关进来的、访问whoami.internal.com的流量,转发到whoami.internal.com服务的 80 端口;
DestinationRule-目标服务的流量策略当whoami.internal.com服务有多个实例(比如多台 VM/K8s Pod)时,用 “轮询” 的方式把流量分发到不同实例;
外部请求 → whoami-gw网关(监听 8080 端口、接收whoami.internal.com的请求) → whoami-vs(把流量路由到whoami.internal.com:80) → whoami-dr(用轮询方式把流量分发到服务实例),最终完成 “外部请求→网格内服务” 的流量管控。
# Windows解析域名
修改Windows的hosts文件…
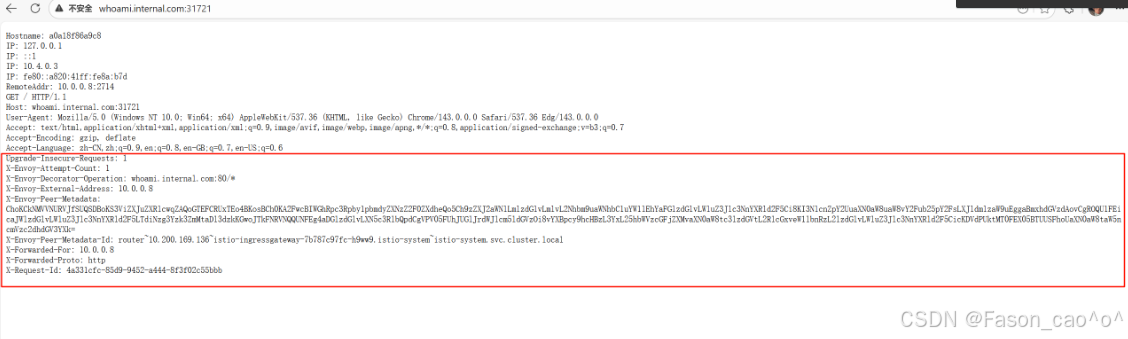
和我们直接访问是有区别的

三、istio安全
3.1 安全架构

图展示了 Istio 网格的安全架构核心逻辑,通过 “控制面 + 数据面” 的协同,从身份认证、流量加密、权限管控三个维度实现安全防护:
核心安全组件分工
-
控制面(istiod):安全策略的 “大脑”,负责证书签发、认证 / 鉴权策略配置、网络规则定义(图中 istiod 模块包含证书颁发机构、认证 / 鉴权策略等功能);
-
数据面(Sidecar 代理):安全策略的 “执行者”,每个服务(Service A/B)旁的代理容器,负责流量的加密、认证、权限校验。
具体安全实现方式
(1)流量加密:全链路 mTLS
-
服务间通信(Service A→Service B)、外部与网格通信(API 内容→网格→外部 API),均通过mTLS(双向 TLS) 加密(图中绿色锁标识);
-
原理:控制面(istiod)为每个 Sidecar 代理签发身份证书,代理间通信时自动完成证书校验 + 流量加密,抵御中间人攻击。
(2)身份认证:多维度身份校验
-
外部请求认证:外部 API / 用户访问网格时,通过JWT + TLS 完成身份校验(图中入口 / 出口处的 JWT+TLS 标识);
-
服务间认证:服务间通信时,Sidecar 代理自动基于 istiod 签发的证书完成身份认证(无需服务代码改造)。
(3)权限管控:细粒度访问策略
-
控制面(istiod)配置鉴权策略,数据面代理会基于策略,校验 “当前请求是否有权访问目标服务 / 接口”(图中代理模块的 “本地鉴权” 标识);
-
支持按服务、接口、请求来源等维度,实现细粒度的访问控制。
安全优势
整个流程无需修改服务代码,由 Istio 的控制面 + 数据面代理 “无侵入式” 完成全链路安全防护,覆盖通信加密、身份认证、权限管控三大安全需求。
3.2 请求认证
Istio 请求认证的核心是 “以统一身份为基础,在代理层无侵入式完成认证”,具体拆解为 3 个关键维度:
核心基础:统一身份标识体系
Istio 为网格内的所有服务 / 请求分配标准化身份,作为认证的 “唯一凭证”:
-
网格内服务:以 K8s 的ServiceAccount为身份标识(由控制面istiod签发证书,证书中嵌入ServiceAccount信息);
-
外部请求:以JWT(JSON Web Token)为身份凭证(包含用户 / 应用的身份信息)。
核心执行:Sidecar 代理层的无侵入式认证
认证逻辑完全由服务旁的 Sidecar 代理 “代劳”,业务服务无需修改任何代码:
-
服务间请求:代理自动通过mTLS完成身份校验(验证对方证书中的ServiceAccount身份);
-
外部请求:代理自动解析请求中的JWT,并与控制面配置的认证策略比对,完成身份合法性校验。
核心管控:控制面统一配置认证策略
所有认证规则由控制面(istiod)集中管理,通过RequestAuthentication等 CRD 配置策略,实现:
-
支持多认证方式(mTLS、JWT)的按需切换 / 组合;
-
精准绑定目标服务(比如仅对app: sleep的服务启用 JWT 认证);
-
认证结果与后续鉴权、审计等安全能力联动。
简言之,Istio 请求认证的核心是 “身份标准化 + 代理代执行 + 策略集中控”,既实现了安全防护,又避免了业务代码的安全改造成本。
在 Istio 的请求认证(JWT 认证)中,JWKS 是关键:
-
当外部请求携带 JWT 访问网格服务时,Istio 的 Sidecar 代理需要验证 JWT 的签名是否合法;
-
此时代理不会本地存储验证密钥,而是通过配置的jwksUri(比如https://your-auth-server/jwks.json)拉取 JWKS,从中找到对应kid的 JWK(公钥),完成 JWT 的签名验证。
验证请求中的 JWT Token
作用:要求访问目标服务的请求必须携带有效的 JWT Token,否则拒绝请求(常用于用户 / 客户端身份认证)。
# 创建测试案例
[root@k8s-master ~/istio/jwk]# kubectl get po,svc,gateway -n foo
NAME READY STATUS RESTARTS AGE
pod/httpbin-686d6fc899-phwpd 2/2 Running 0 17m
pod/sleep-65f688f8f5-cbsh6 2/2 Running 0 109m
NAME TYPE CLUSTER-IP EXTERNAL-IP PORT(S) AGE
service/httpbin ClusterIP 10.99.171.188 <none> 8000/TCP 17m
service/sleep ClusterIP 10.104.115.17 <none> 80/TCP 109m
NAME AGE
gateway.networking.istio.io/httpbin-gateway 17m
# 测试环境使用jwx创建符合标准的jwk(Java web key)和jwks(组)
jwx jwk generate –keysize 4096 –type RSA –template '{"kid":"youdianzhishi-key"}' -o rsa.jwk
jwx jwk fmt –public-key -o rsa-public.wk rsa.jwk
jwx jws sign –key rsa.jwk –alg RS256 –header '{"typ":"JWT"}' -o token.txt – <<EOF
{
"iss": "testing@secure.istio.io",
"sub": "cnych001",
"iat": 1766992236,
"exp": 1776992236,
"name": "Yang Ming"
}
EOF
[root@k8s-master ~/istio/jwk]# ll
total 20
-rw-r–r– 1 root root 757 Dec 29 17:41 rsa-public.jwk
-rw-r–r– 1 root root 3219 Dec 29 17:40 rsa.jwk
-rw-r–r– 1 root root 923 Dec 29 17:43 token.txt
# 验证token是否生效
[root@k8s-master ~/istio/jwk]# jwx jws verify –alg RS256 –key rsa-public.jwk token.txt
{
"iss": "testing@secure.istio.io",
"sub": "cnych001",
"iat": 1766992236,
"exp": 1776992236,
"name": "Yang Ming"
}
[root@k8s-master ~/istio/jwk]# date +%s
1767002782
# 创建请求认证资源清单
[root@k8s-master ~/istio/jwk]# cat jwt.yaml
apiVersion: "security.istio.io/v1"
kind: RequestAuthentication
metadata:
name: jwt-example
namespace: istio-system
spec:
selector:
matchLabels:
istio: ingressgateway # 匹配入口网关
jwtRules:
– issuer: "testing@secure.istio.io" # 签发者(与你的Token一致)
jwks: |
{
"keys": [
{
"e": "AQAB",
"kid": "youdianzhishi-key",
"kty": "RSA",
"n": "wO5H_ebGlLdNbokd2Jm2wQRfqWNRWFvXWi-pA9xb-Xic4I64pl9Q2tNRq0MBPRVbn56N8bQWP1UpPlkTr98FfzaH4kDJiRgY9LmLeWAudgIQtt2RZdJYp48QLx9c_kgK-_FEGkgmcxq5itMqoTAQij3sQVHcVVmrYVIy1fwMRGkBzB109FcEM_9BYv8OiAPO8Q5ft3qwB1KpLKkPMmk836LJlmufIcECSvLwOeIsj1tL4feseYHWK1unV-BUcEAd6NiikZXBKO5zWehwbLop6egPmejORqxEWCrvprCaDXlJR-gLA39Cehml31fmuPyv5d9Nn4uOKyl01eypTyGb6d_7EAiM-0F3dBAT3tnAKB7lBEs-og8T0OOZyd0-0OxfL5GVdBCc6e5d53MGVITIm5igS_PCpbCEFMBeOwwzQ41ILRW-mtpJghlBDh4XQ4PPBXwDw7gzrU2jHDtZG4fqHQOJ_wTJeFejqONG-0qXwo4FH-TTcBNOPlV93fMF4Q4Bib7fLR1VScAmiOeZmRidWePB13QqcEV-vQoXnjTie1PK4S6vepi_hkUvV2SmeCuzQ4qo5SVGuommesGQwgPPUOl57LwSM8ADbv0Ci3KpVxNSiViEOb-Nvhh8OGwcxR8vclTpKWq81iCKwkWbm4k1S01RJf4Exe1h4Ou5NduuGLs"
}
]
}
该请求认证策略绑定到istio-system命名空间下的 Istio 入口网关,通过指定的签发者(testing@secure.istio.io)和 RSA 公钥,验证通过网关的请求中 JWT Token 的有效性,仅允许携带合法 Token 的请求进入集群。
# 携带请求头但是是无效的TOKEN就会被拒绝
[root@k8s-master ~/istio/jwk]# curl –header "Authorization: Bearer adensmv" "10.0.0.8:31721/headers" -s -o /dev/null -w "%{http_code}\\n"
401
# 携带正确的TOKEN
[root@k8s-master ~/istio/jwk]# TOKEN=$(cat token.txt)
[root@k8s-master ~/istio/jwk]# curl –header "Authorization: Bearer $TOKEN" "10.0.0.8:31721/headers" -s -o /dev/null -w "%{http_code}\\n"
200
默认情况下,Istio 在完成了身份验证之后,会去掉 Authorization 请求头再进行转发。这将导致我们的后端服务获取不到对应的 Payload,无法判断终端用户的身份。因此我们需要启用 Istio 的 Authorization 请求头的转发功能,只需要在上面的资源对象中添加一个 forwardOriginalToken: true 字段即可。
apiVersion: "security.istio.io/v1"
kind: RequestAuthentication
metadata:
name: jwt-example
namespace: istio-system
spec:
selector:
matchLabels:
istio: ingressgateway # 匹配入口网关
forwardOriginalToken: true
jwtRules:
– issuer: "testing@secure.istio.io" # 签发者(与你的Token一致)
jwks: |
{
"keys": [
{
"e": "AQAB",
"kid": "youdianzhishi-key",
"kty": "RSA",
"n": "wO5H_ebGlLdNbokd2Jm2wQRfqWNRWFvXWi-pA9xb-Xic4I64pl9Q2tNRq0MBPRVbn56N8bQWP1UpPlkTr98FfzaH4kDJiRgY9LmLeWAudgIQtt2RZdJYp48QLx9c_kgK-_FEGkgmcxq5itMqoTAQij3sQVHcVVmrYVIy1fwMRGkBzB109FcEM_9BYv8OiAPO8Q5ft3qwB1KpLKkPMmk836LJlmufIcECSvLwOeIsj1tL4feseYHWK1unV-BUcEAd6NiikZXBKO5zWehwbLop6egPmejORqxEWCrvprCaDXlJR-gLA39Cehml31fmuPyv5d9Nn4uOKyl01eypTyGb6d_7EAiM-0F3dBAT3tnAKB7lBEs-og8T0OOZyd0-0OxfL5GVdBCc6e5d53MGVITIm5igS_PCpbCEFMBeOwwzQ41ILRW-mtpJghlBDh4XQ4PPBXwDw7gzrU2jHDtZG4fqHQOJ_wTJeFejqONG-0qXwo4FH-TTcBNOPlV93fMF4Q4Bib7fLR1VScAmiOeZmRidWePB13QqcEV-vQoXnjTie1PK4S6vepi_hkUvV2SmeCuzQ4qo5SVGuommesGQwgPPUOl57LwSM8ADbv0Ci3KpVxNSiViEOb-Nvhh8OGwcxR8vclTpKWq81iCKwkWbm4k1S01RJf4Exe1h4Ou5NduuGLs"
}
]
}
直接忽略不带请求头的请求
该 AuthorizationPolicy 绑定到istio-system命名空间下的 Istio 入口网关,核心作用是强制拒绝不带合法 JWT Token 的请求:通过notRequestPrincipals: ["*"]匹配 “没有请求身份(即未通过 JWT 验证)” 的流量,结合action: DENY直接拒绝这类流量进入网格,实现 “所有请求必须携带有效 JWT Token” 的强制校验。
[root@k8s-master ~/istio/jwk]# cat deap.yaml
apiVersion: security.istio.io/v1
kind: AuthorizationPolicy
metadata:
name: deny-requests-without-authorization
namespace: istio-system
spec:
selector:
matchLabels:
istio: ingressgateway
action: DENY # 拒绝
rules:
– from:
– source:
notRequestPrincipals: ["*"] # 不存在任何请求身份(Principal)
[root@k8s-master ~/istio/jwk]# curl "10.0.0.8:31721/headers" -s -o /dev/null -w "%{http_code}\\n"
403
Istio 默认 JWT 验证会允许不带 Authorization 请求头的流量进入网格,但这类流量后续会因无法识别身份被拒绝;若要强制禁止不带 JWT 的流量,需通过配置 AuthorizationPolicy 来实现。
精准限制特定请求必须携带 JWT Token
当然有限制也会有ALLOW。
apiVersion: security.istio.io/v1
kind: AuthorizationPolicy
metadata:
name: deny-requests-without-authorization
namespace: istio-system
spec:
selector:
matchLabels:
istio: ingressgateway
action: DENY # 拒绝
rules:
– from:
– source:
notRequestPrincipals: ["*"] # 不存在任何请求身份的请求
# 仅强制要求如下 host/path 相关的请求,必须带上 JWT token
to:
– operation:
hosts: ["another-host.com"]
paths: ["/headers"]
该 AuthorizationPolicy 绑定到 Istio 入口网关,核心作用是精准限制特定请求必须携带 JWT Token:仅对访问another-host.com域名下/headers路径的请求生效,若这些请求没有合法的请求身份(即未携带有效 JWT Token),则直接拒绝访问,实现 “特定接口强制 JWT 校验” 的精细化权限管控。
jwksURL配置
由 认证服务(JWT 签发者) 提供的公共 URL,用于存放最新的 JWK Set(公钥集合),比如:
-
开源认证服务:Keycloak 默认提供 https://<keycloak-ip>/realms/<你的领域>/protocol/openid-connect/certs
-
自研认证服务:自行开发接口,返回 JWK Set 格式数据,暴露为公共 URL(如 https://auth.your-domain.com/jwks)
-
Istio 官方示例 URL:https://raw.githubusercontent.com/istio/istio/release-1.20/security/tools/jwt/samples/jwks.json
简言之:JWK是 “单个密钥的 JSON 格式”,JWKS是 “多个 JWK 的集合 URL”,二者配合实现 JWT 签名验证的密钥分发,是 Istio(及所有 JWT 认证场景)的核心依赖。
3.3 强制服务间 mTLS 通信
作用:让服务间的通信强制使用加密的 mTLS(基于服务身份的认证 + 加密),防止未授权服务冒充通信。
配置文件(peer-auth-strict.yaml):
apiVersion: security.istio.io/v1
kind: PeerAuthentication
metadata:
name: bookinfo-peer-auth
namespace: default
spec:
selector:
matchLabels:
app: productpage # 绑定到productpage服务(可改为*匹配命名空间所有服务)
mtls:
mode: STRICT # 严格模式:强制服务间使用mTLS通信,拒绝非mTLS请求
对等认证的核心是:以ServiceAccount为服务身份、以 mTLS 为通信加密手段、以集中策略为管控方式、以自动证书为安全支撑,最终实现 “服务间通信的身份合法、流量加密、无侵入式安全”,是 Istio 保障网格内部服务通信安全的基础能力。
3.4 HTTP请求授权案例
bookinfo案例
先拒绝所有的请求
这个 Istio 的AuthorizationPolicy资源(命名为allow-nothing,作用于default命名空间)是 “拒绝所有请求” 的鉴权策略,因spec无任何允许规则,会拦截该命名空间下所有服务的访问请求。
[root@k8s-master ~/istio]# cat deny-all.yaml
apiVersion: security.istio.io/v1
kind: AuthorizationPolicy
metadata:
name: allow-nothing
namespace: default
spec: {}
[root@k8s-master ~/istio]# kubectl get authorizationpolicies.security.istio.io
NAME ACTION AGE
allow-nothing 4s

放开productpage请求
这个 Istio 的AuthorizationPolicy资源(命名为productpage-viewer,作用于default命名空间)是针对标签为app: productpage的服务的鉴权策略,允许对该服务的 GET 请求访问。
[root@k8s-master ~/istio]# cat allow-productpage.yaml
apiVersion: security.istio.io/v1
kind: AuthorizationPolicy
metadata:
name: productpage-viewer
namespace: default
spec:
selector:
matchLabels:
app: productpage
action: ALLOW
rules:
– to:
– operation:
methods: ["GET"]

放开Reviews请求
这个 Istio 的AuthorizationPolicy资源(命名为reviews-viewer,作用于default命名空间)是针对标签为app: reviews的服务的鉴权策略,仅允许来自default命名空间下bookinfo-productpage这个 ServiceAccount 的请求,对该服务发起 GET 访问。
[root@k8s-master ~/istio]# cat allow-reviews.yaml
apiVersion: security.istio.io/v1
kind: AuthorizationPolicy
metadata:
name: reviews-viewer
namespace: default
spec:
selector:
matchLabels:
app: reviews
action: ALLOW
rules:
– from:
– source:
principals: ["cluster.local/ns/default/sa/bookinfo-productpage"]
to:
– operation:
methods: ["GET"]
[root@k8s-master ~/istio]# kubectl get po productpage-v1-54bb874995-f8jf5 -oyaml |grep -i 'serviceAccountName'
fieldPath: spec.serviceAccountName
serviceAccountName: bookinfo-productpage
reviews会出现两个页面,其中v1页面不需要调用ratings


放开details请求
这个 Istio 的AuthorizationPolicy资源(命名为details-viewer,作用于default命名空间)是针对标签为app: details的服务的鉴权策略,仅允许来自default命名空间下bookinfo-productpage这个 ServiceAccount 的请求,对该服务发起 GET 访问。
[root@k8s-master ~/istio]# cat allow-details.yaml
apiVersion: security.istio.io/v1
kind: AuthorizationPolicy
metadata:
name: details-viewer
namespace: default
spec:
selector:
matchLabels:
app: details
action: ALLOW
rules:
– from:
– source:
principals: ["cluster.local/ns/default/sa/bookinfo-productpage"]
to:
– operation:
methods: ["GET"]

放开ratings请求
这个 Istio 的AuthorizationPolicy资源(命名为ratings-viewer,作用于default命名空间)是针对标签为app: ratings的服务的鉴权策略,仅允许来自default命名空间下bookinfo-reviews这个 ServiceAccount 的请求,对该服务发起 GET 访问。
[root@k8s-master ~/istio]# cat allow-ratings.yaml
apiVersion: security.istio.io/v1
kind: AuthorizationPolicy
metadata:
name: "ratings-viewer"
namespace: default
spec:
selector:
matchLabels:
app: ratings
action: ALLOW
rules:
– from:
– source:
principals: ["cluster.local/ns/default/sa/bookinfo-reviews"]
to:
– operation:
methods: ["GET"]

[root@k8s-master ~/istio]# kubectl get authorizationpolicies.security.istio.io
NAME ACTION AGE
allow-nothing 5m9s
details-viewer ALLOW 93s
productpage-viewer ALLOW 4m20s
ratings-viewer ALLOW 58s
reviews-viewer ALLOW 3m49s
| metadata.name | 字符串 | 定义策略资源的唯一名称,用于标识该授权规则 | allow-nothing、productpage-viewer | 常用 |
| metadata.namespace | 字符串 | 指定策略生效的 K8s 命名空间,仅对该命名空间内的服务起作用 | default | 常用 |
| spec.selector.matchLabels | 键值对(对象) | 匹配目标服务的标签,将策略绑定到对应标签的服务上 | {app: productpage, version: v1} | 常用 |
| spec.action | 字符串 | 策略执行的动作,可选ALLOW(允许请求)或DENY(拒绝请求) | ALLOW | 常用 |
| spec.rules | 数组(对象) | 授权规则集合,定义 “哪些来源可以访问哪些目标” 的具体条件 | – from: […]``- to: […] | 常用 |
| spec.rules.from | 数组(对象) | 请求来源的约束条件,限定请求的发起方 | – source: {principals: […]} | 常用 |
| spec.rules.from.source.principals | 字符串数组 | 允许的请求来源身份(格式为cluster.local/ns/<命名空间>/sa/<ServiceAccount>) | ["cluster.local/ns/default/sa/bookinfo-productpage"] | 常用 |
| spec.rules.to | 数组(对象) | 请求目标的约束条件,限定请求的接收方(服务、接口等) | – operation: {methods: […]} | 常用 |
| spec.rules.to.operation.methods | 字符串数组 | 允许的 HTTP 请求方法(如 GET/POST 等) | ["GET", "POST"] | 常用 |
| spec.rules.to.operation.paths | 字符串数组 | 允许的请求路径(支持通配符匹配) | ["/api/v1/*", "/details"] | 常用 |
| spec.rules.when | 数组(对象) | 请求的附加条件(如请求头、参数等),满足条件才执行策略 |
3.5 TCP请求授权
kubectl create ns foo
kubectl label ns foo istio-injection=enabled
kubectl apply -f samples/sleep/sleep.yaml -n foo
kubectl apply -f samples/tcp-echo/tcp-echo.yaml -n foo
[root@k8s-master ~/istio]# kubectl get po -n foo
NAME READY STATUS RESTARTS AGE
sleep-65f688f8f5-cbsh6 2/2 Running 0 17m
tcp-echo-6cd5d67976-drxbk 2/2 Running 0 16m
# tcp的Pod默认启动会暴露9001和9002端口但是启动时会存在9000,9001,90023个端口
现在请求9001和9002端口肯定是可以请求的
[root@k8s-master ~/istio]# kubectl exec "$(kubectl get pod -l app=sleep -n foo -o jsonpath={.items..metadata.name})" -c sleep -n foo — sh -c 'echo "port 9000" | nc tcp-echo 9000' | grep "hello" && echo 'connection succeeded' || echo 'connection rejected'
hello port 9000
connection succeeded
[root@k8s-master ~/istio]# kubectl exec "$(kubectl get pod -l app=sleep -n foo -o jsonpath={.items..metadata.name})" -c sleep -n foo — sh -c 'echo "port 9001" | nc tcp-echo 9001' | grep "hello" && echo 'connection succeeded' || echo 'connection rejected'
hello port 9001
connection succeeded
允许9001和9002端口
这个 Istio 的AuthorizationPolicy资源(命名为tcp-policy,作用于foo命名空间)是针对标签为app: tcp-echo的服务的鉴权策略,允许访问该服务的 9000 和 9001 端口。
[root@k8s-master ~/istio]# cat tcp-port-policy.yaml
apiVersion: security.istio.io/v1
kind: AuthorizationPolicy
metadata:
name: tcp-policy
namespace: foo
spec:
selector:
matchLabels:
app: tcp-echo
action: ALLOW
rules:
– to:
– operation:
ports: ["9000", "9001"]
[root@k8s-master ~/istio]# kubectl exec "$(kubectl get pod -l app=sleep -n foo -o jsonpath={.items..metadata.name})" -c sleep -n foo — sh -c 'echo "port 9000" | nc tcp-echo 9000' | grep "hello" && echo 'connection succeeded' || echo 'connection rejected'
hello port 9000
connection succeeded
[root@k8s-master ~/istio]# kubectl exec "$(kubectl get pod -l app=sleep -n foo -o jsonpath={.items..metadata.name})" -c sleep -n foo — sh -c 'echo "port 9001" | nc tcp-echo 9001' | grep "hello" && echo 'connection succeeded' || echo 'connection rejected'
hello port 9001
connection succeeded
TCP特殊性
apiVersion: security.istio.io/v1
kind: AuthorizationPolicy
metadata:
name: tcp-policy
namespace: foo
spec:
selector:
matchLabels:
app: tcp-echo
action: ALLOW
rules:
– to:
– operation:
methods: ["GET"]
ports: ["9000"]
DENY字段
这个 Istio 的AuthorizationPolicy资源(命名为tcp-policy,作用于foo命名空间)试图针对标签为app: tcp-echo的服务,拒绝其 GET 请求,但因该服务是 TCP 流量,使用了 HTTP 专属的methods字段,此规则会被 Istio 判定为无效。
[root@k8s-master ~/istio]# cat tcp-po3.yaml
apiVersion: security.istio.io/v1
kind: AuthorizationPolicy
metadata:
name: tcp-policy
namespace: foo
spec:
selector:
matchLabels:
app: tcp-echo
action: DENY
rules:
– to:
– operation:
methods: ["GET"]
[root@k8s-master ~/istio]# cat tcp-po3.yaml |kubectl apply -f –
Warning: configured AuthorizationPolicy will deny all traffic to TCP ports under its scope due to the use of only HTTP attributes in a DENY rule; it is recommended to explicitly specify the port
authorizationpolicy.security.istio.io/tcp-policy configured
但是还是无法请求端口,为什么呢,因为动作为deny,rules无效,那就是DENY ALL了。
[root@k8s-master ~/istio]# kubectl exec "$(kubectl get pod -l app=sleep -n foo -o jsonpath={.items..metadata.name})" -c sleep -n foo — sh -c 'echo "port 9000" | nc tcp-echo 9000' | grep "hello" && echo 'connection succeeded' || echo 'connection rejected'
connection rejected
加上端口也是一样的道理,因为rules就是无效的了。
rules:
– to:
– operation:
methods: ["GET"]
ports: ["9000"]
四、istio可观测性
4.1 三大核心模块
Metrics 指标(量化监控)
定义:数值化、可聚合数据,反映网格运行状态
核心来源:Envoy 数据面 + Istiod 控制面
核心概念 & 关键
-
核心体系:四维黄金指标(监控核心)
✔ 延迟:请求耗时(p50/p90/p99)
✔ 流量:QPS、连接数、协议类型
✔ 错误:4xx/5xx、mTLS/JWT 认证失败率
✔ 饱和度:Envoy CPU / 内存、连接池使用率
-
特有指标:服务调用成功率、网关转发率、规则命中数
存储可视化:Prometheus + Grafana,支撑告警
价值:实时掌握网格健康,异常及时告警
Logging 日志(事件追溯)
定义:结构化明细日志,记录每一次通信事件
核心来源:Envoy 访问日志(核心)+ Istiod 控制面日志
核心概念 & 关键
-
核心类型:访问日志(源 / 目标服务、请求路径、响应码、耗时、mTLS 状态)、审计日志(认证授权失败)
-
特性:JSON 结构化、无侵入采集、粒度可配
价值:精准追溯问题根因,满足合规审计
Tracing 分布式追踪(链路串联)
定义:采集跨服务链路数据,串联单次请求全路径
核心实现:Envoy 自动埋点,传递追踪上下文,兼容 OTel/Jaeger
核心概念 & 关键(必记术语)
-
Trace:单次请求完整链路
-
Span:单个服务调用节点
-
TraceID:链路唯一标识;SpanID:节点标识
-
上下文传递:请求头自动传递,无需业务处理
可视化:Jaeger(链路拓扑)
价值:定位跨服务延迟 / 异常,梳理服务依赖
4.2 Prometheus监控方案
[root@k8s-master ~/istio/samples/addons]# pwd
/root/istio/samples/addons
[root@k8s-master ~/istio/samples/addons]# ll
total 300
-rw-r–r– 1 root root 5441 Nov 28 02:03 README.md
drwxr-xr-x 2 root root 4096 Dec 30 09:45 extras/
-rw-r–r– 1 root root 239317 Dec 30 09:42 grafana.yaml
-rw-r–r– 1 root root 2604 Dec 30 09:44 jaeger.yaml
-rw-r–r– 1 root root 10585 Dec 30 09:43 kiali.yaml
-rw-r–r– 1 root root 706 Dec 30 09:17 loki-storage-pv.yaml
-rw-r–r– 1 root root 10057 Nov 28 02:03 loki.yaml
-rw-r–r– 1 root root 16680 Dec 30 09:42 prometheus.yaml
[root@k8s-master ~/istio/samples/addons]# kubectl apply -f .
# 这里的PV和service的Nodeport的类型都是自己自定义的
[root@k8s-master ~/istio/samples/addons]# kubectl get po,svc,pv -n istio-system
NAME READY STATUS RESTARTS AGE
pod/grafana-cdb9db549-lzwxb 1/1 Running 0 50m
pod/istio-egressgateway-6f6bb8f7f9-r8x9z 1/1 Running 11 (65m ago) 6d
pod/istio-ingressgateway-7b787c97fc-h9ww9 1/1 Running 11 (65m ago) 6d
pod/istiod-cd86994b8-gzfdj 1/1 Running 11 (65m ago) 6d
pod/jaeger-84b9c75d5f-5w2g8 1/1 Running 0 50m
pod/kiali-7b58697666-rm4gl 1/1 Running 15 (65m ago) 6d
pod/loki-0 2/2 Running 0 42m
pod/prometheus-7c48c5c5c7-5rhbv 2/2 Running 0 50m
NAME TYPE CLUSTER-IP EXTERNAL-IP PORT(S) AGE
service/grafana NodePort 10.106.224.2 <none> 3000:32426/TCP 50m
service/istio-egressgateway ClusterIP 10.110.249.147 <none> 80/TCP,443/TCP 7d19h
service/istio-ingressgateway LoadBalancer 10.98.106.118 <pending> 15021:30228/TCP,80:31721/TCP,443:30145/TCP,31400:30778/TCP,15443:31494/TCP 7d19h
service/istiod ClusterIP 10.107.9.107 <none> 15010/TCP,15012/TCP,443/TCP,15014/TCP 7d19h
service/istiod-revision-tag-default ClusterIP 10.108.192.121 <none> 15010/TCP,15012/TCP,443/TCP,15014/TCP 7d19h
service/jaeger-collector ClusterIP 10.98.93.254 <none> 14268/TCP,14250/TCP,9411/TCP,4317/TCP,4318/TCP 50m
service/kiali NodePort 10.108.79.200 <none> 20001:30922/TCP,9090:32721/TCP 6d19h
service/loki ClusterIP 10.109.99.255 <none> 3100/TCP,9095/TCP 50m
service/loki-headless ClusterIP None <none> 3100/TCP 50m
service/loki-memberlist ClusterIP None <none> 7946/TCP 50m
service/prometheus NodePort 10.101.25.81 <none> 9090:32601/TCP 50m
service/tracing NodePort 10.100.131.167 <none> 80:31571/TCP,16685:30137/TCP 50m
service/zipkin ClusterIP 10.100.4.64 <none> 9411/TCP 50m
NAME CAPACITY ACCESS MODES RECLAIM POLICY STATUS CLAIM STORAGECLASS VOLUMEATTRIBUTESCLASS REASON AGE
persistentvolume/loki-storage-pv 10Gi RWO Retain Bound istio-system/storage-loki-0 <unset> 45m


4.3 Telemetry API自定义资源
Istio Telemetry(对应 API 版本 telemetry.istio.io/v1alpha1)是专门用于配置可观测性数据采集规则的核心 CRD 资源,替代旧版零散配置(如 meshConfig、EnvoyFilter 零散配置),统一管控 Metrics、Logging、Tracing 三类可观测数据的「采集开关、粒度、规则」,无需修改业务代码或 Sidecar 镜像。
核心功能
统一配置入口:一站式管控 Metrics(指标)、Logging(日志)、Tracing(分布式追踪)的采集规则,无需分别配置多个组件,简化可观测性配置流程。
精细化采集管控
-
Metrics:开启 / 关闭指定指标(如仅保留黄金四维指标)、过滤无用指标、调整指标采集频率;
-
Logging:配置访问日志的字段(如是否保留请求头 / 响应头)、输出格式、采集粒度(全量 / 部分服务);
-
Tracing:调整采样率(如从 1% 调整为 10%)、指定追踪上下文传递头、开启 / 关闭特定服务的追踪。
无侵入动态调整:配置修改后自动下发到 Sidecar 代理(Envoy)和网关,实时生效,无需重启服务或重建 Sidecar。
差异化配置:通过 selector.matchLabels 按服务标签、命名空间,为不同服务配置不同采集规则(如核心服务开启全量日志,非核心服务开启精简日志)。
核心特性
声明式配置:遵循 K8s CRD 标准,配置即代码,可版本控制。
简化运维:替代复杂的 EnvoyFilter 自定义配置,降低可观测性配置门槛。
灵活扩展:支持自定义指标、自定义日志字段,满足个性化可观测性需求。
Telemetry 还在学习中,,,
4.4 分布式链路追踪
上下文传递基础
分布式追踪可以让用户对跨多个分布式服务网格的请求进行追踪分析,可以通过可视化的方式更加深入地了解请求的延迟,序列化和并行度。Istio利用Envoy的分布式追踪功能提供了开箱即用的追踪集成,Istio提供了安装各种追踪后端服务的选项,并且通过配置代理来自动发送追踪 Span 到分布式追踪系统服务,比如 Zipkin、Jaeger、Lightstep、Skywalking等后端服务。
链路追踪标准定义统一的追踪上下文格式 + 传递规则,请求头是追踪上下文的载体,确保异构系统间追踪链路不中断
一次完整的链路是由多个span 组成的,每个span 代表了一次请求的一部分,每个span 都有一个唯一的 ID,这个 ID 用来标识这个 span,同时还有一个父 span 的 ID,用来标识这个 span 的父 span,这样就可以将多个 span 组成一个链路了。将不同的 span关联到一起的方式是通过将父 span 的 ID 传递给子 span,这样就可以将多个 span 关联起来了,也就是上下文传递。
链路追踪要标准(如 W3C) ✅ 通俗:统一格式不混乱,跨组件能串联,少走弯路省成本 ✅ 官方:定义统一追踪上下文格式与传递规则,保障分布式链路连续性、兼容性,降低集成成本 2. 追踪请求头的作用 ✅ 通俗:传 “身份证”(TraceID)和 “父子关系”(SpanID),让链路能串起来,还不用改业务代码 ✅ 官方:作为追踪上下文的无侵入载体,实现全链路 Trace 串联、父子 Span 关联,支撑跨组件无侵入追踪 3. Istio 核心关键 ✅ 遵循 W3C Trace Context 标准,核心头是traceparent ✅ 所有头由 Sidecar 自动加 / 传,业务零感知、零改造
尽管Istio代理能够自动发送Span,但需要一些附加信息才能将这些Span加到同一个调用链,所以当代理发送Span信息的时候,应用程序需要附加适当的HTTP请求头信息,这样才能够把多个 Span 加到同一个调用链。要做到这一点换海原应用程序必须从每个传入的请求中收集请求头(Header),并将这些请求头转发到传入请求所触发的所有传出请求。具体选择转发哪些请求头取决于所配置的跟踪后端。
Span 就是分布式链路里「单个服务的一次独立调用 / 处理」,是链路的最小单位
✅ 通俗定义:Span 是分布式链路里单次独立操作,比如 1 个服务处理请求、1 个网关转发请求,是链路最小追踪单元 ✅ 官方定义:Span 是分布式追踪中表示具有开始时间和执行时长的独立工作单元,包含操作名、耗时、关联 ID、状态等核心元数据
模拟场景:浏览器 → Istio网关 → httpbin服务 Trace(完整链路):1 个唯一 TraceID(比如 abc123) Span1(网关 Span):ID=span01,父 ID = 无(入口第一个 Span),耗时 5ms,状态 200(网关接收并转发) Span2(httpbin Span):ID=span02,父 ID=span01(父 Span 是网关),耗时 10ms,状态 200(httpbin 处理并响应) 核心:通过 TraceID 找到 2 个 Span,通过父 ID 看出网关调用 httpbin,通过耗时看出 httpbin 处理更久
istio集成Jaeger
[root@k8s-master ~]# kubectl get po -n istio-system
NAME READY STATUS RESTARTS AGE
grafana-cdb9db549-lzwxb 1/1 Running 2 (30m ago) 24h
istio-egressgateway-6f6bb8f7f9-r8x9z 1/1 Running 13 (30m ago) 6d23h
istio-ingressgateway-7b787c97fc-h9ww9 1/1 Running 13 (30m ago) 6d23h
istiod-cd86994b8-gzfdj 1/1 Running 13 (30m ago) 6d23h
jaeger-84b9c75d5f-5w2g8 1/1 Running 2 (30m ago) 24h
kiali-7b58697666-rm4gl 1/1 Running 17 (30m ago) 6d23h
loki-0 2/2 Running 4 (30m ago) 23h
prometheus-7c48c5c5c7-5rhbv 2/2 Running 4 (30m ago) 24h
安装 Jaeger 完毕后,需配置 Istio Envoy Proxy 向 Jaeger 发送追踪流量,同时可调整采样率,具体配置方式:
指定追踪流量接收地址(Jaeger 兼容 Zipkin 协议,因此用 zipkin 配置项):、
–set meshConfig.defaultConfig.tracing.zipkin.address=jaeger-collector:9411
调整采样率:
-
默认采样率:1%
-
修改采样率(示例为 100%):
–set meshConfig.defaultConfig.tracing.sampling=100
[root@k8s-master ~/istio]# istioctl install \\
–set profile=demo \\
–set meshConfig.defaultConfig.tracing.zipkin.address=jaeger-collector.istio-system.svc.cluster.local:9411 \\
–set meshConfig.defaultConfig.tracing.sampling=100 -y
|\\
| \\
| \\
| \\
/|| \\
/ || \\
/ || \\
/ || \\
/ || \\
/ || \\
/______||__________\\
____________________
\\__ _____/
\\_____/
❗ detected Calico CNI with 'bpfConnectTimeLoadBalancing=TCP'; this must be set to 'bpfConnectTimeLoadBalancing=Disabled' in the Calico configuration
✔ Istio core installed ⛵️
✔ Istiod installed 🧠
✔ Egress gateways installed 🛫
✔ Ingress gateways installed 🛬
✔ Installation complete
[root@k8s-master ~/istio]# kubectl get configmap istio -n istio-system -o yaml | grep -C 20 "tracing"
apiVersion: v1
data:
mesh: |-
accessLogFile: /dev/stdout
defaultConfig:
discoveryAddress: istiod.istio-system.svc:15012
tracing:
sampling: 100
zipkin:
address: jaeger-collector:9411
defaultProviders:
metrics:
– prometheus
enablePrometheusMerge: true
extensionProviders:
– envoyOtelAls:
port: 4317
service: opentelemetry-collector.observability.svc.cluster.local
name: otel
– name: skywalking
skywalking:
port: 11800
service: tracing.istio-system.svc.cluster.local
– name: otel-tracing
opentelemetry:
port: 4317
service: opentelemetry-collector.observability.svc.cluster.local
– name: jaeger
opentelemetry:
port: 4317
service: jaeger-collector.istio-system.svc.cluster.local
rootNamespace: istio-system
trustDomain: cluster.local
meshNetworks: 'networks: {}'
[root@k8s-master ~/istio]# kubectl rollout restart deployment -n default
deployment.apps/details-v1 restarted
deployment.apps/fortio-deploy restarted
deployment.apps/httpbin restarted
deployment.apps/my-nginx restarted
deployment.apps/productpage-v1 restarted
deployment.apps/ratings-v1 restarted
deployment.apps/reviews-v1 restarted
deployment.apps/reviews-v2 restarted
deployment.apps/reviews-v3 restarted
deployment.apps/sleep restarted
deployment.apps/whoami restarted
访问测试
http://10.0.0.6:31571/jaeger/search

请求几次book info就可以看到对应的Service了


4.5 
4.5 Loki集成Istio日志
# 确认日志已经开启
apiVersion: v1
data:
mesh: |-
accessLogFile: /dev/stdout
# 服务正常
[root@k8s-master ~/istio/samples/addons]# kubectl get po -n istio-system
NAME READY STATUS RESTARTS AGE
grafana-cdb9db549-lzwxb 1/1 Running 2 (87m ago) 24h
istio-egressgateway-6f6bb8f7f9-r8x9z 1/1 Running 13 (87m ago) 7d
istio-ingressgateway-7b787c97fc-h9ww9 1/1 Running 13 (87m ago) 7d
istiod-cd86994b8-gzfdj 1/1 Running 13 (87m ago) 7d
jaeger-84b9c75d5f-gmvpv 1/1 Running 0 47m
kiali-7b58697666-rm4gl 1/1 Running 17 (87m ago) 7d
loki-0 2/2 Running 4 (87m ago) 24h
prometheus-7c48c5c5c7-5rhbv 2/2 Running 4 (87m ago) 24h

OpenTelemetry(简称 OTel)是一个开源的可观测框架,用于生成、收集和描述应用程序的观测数据。它提供了一组 API、库、Agent 和 Collector,用于捕获分布式跟踪和度量数据,并将其发送到分析软件、存储库或其他服务。OTel 的目标是提供一套标准化、与厂商无关的 SDK、API 和工具集,用于将数据摄取、转换和发送到可观测性后端(开源或商业厂商)。
OpenTelemetry Collector 提供了一个与厂商无关的实现方式,用于接收、处理和导出遥测数据,它消除了运行、操作和维护多个代理 / 收集器的需求。
OpenTelemetry Collector 本身部署起来也非常灵活,可以将其部署为代理或网关。区别在于作为代理时,收集器实例与应用程序在同一主机上运行(sidecar 容器、daemonset 等)。此外一个或多个收集器实例也可以作为独立服务以每个集群、数据中心地区的网关形式运行。
一般来说建议新应用选择代理部署,现有应用选择网关部署的方式,如果是Kubernetes环境,当然更建议部署为守护进程(代理模式)的方式。
OpenTelemetry Collector 部署
[root@k8s-master ~/istio]# cat samples/open-telemetry/loki/otel.yaml
apiVersion: v1
kind: ConfigMap
metadata:
name: opentelemetry-collector-conf
labels:
app: opentelemetry-collector
data:
opentelemetry-collector-config: |
receivers:
otlp:
protocols:
grpc:
http:
processors:
batch:
attributes:
actions:
– action: insert
key: loki.attribute.labels
value: pod, namespace,cluster,mesh
exporters:
loki:
endpoint: "http://loki.istio-system.svc:3100/loki/api/v1/push"
logging:
loglevel: debug
extensions:
health_check:
service:
extensions:
– health_check
pipelines:
logs:
receivers: [otlp]
processors: [attributes]
exporters: [loki, logging]
—
apiVersion: v1
kind: Service
metadata:
name: opentelemetry-collector
labels:
app: opentelemetry-collector
spec:
ports:
– name: grpc-opencensus
port: 55678
protocol: TCP
targetPort: 55678
– name: grpc-otlp # Default endpoint for OpenTelemetry receiver.
port: 4317
protocol: TCP
targetPort: 4317
selector:
app: opentelemetry-collector
—
apiVersion: apps/v1
kind: Deployment
metadata:
name: opentelemetry-collector
spec:
selector:
matchLabels:
app: opentelemetry-collector
strategy:
rollingUpdate:
maxSurge: 1
maxUnavailable: 1
type: RollingUpdate
template:
metadata:
labels:
app: opentelemetry-collector
sidecar.istio.io/inject: "false" # do not inject
spec:
containers:
– command:
– "/otelcol-contrib"
– "–config=/conf/opentelemetry-collector-config.yaml"
env:
– name: POD_NAME
valueFrom:
fieldRef:
apiVersion: v1
fieldPath: metadata.name
– name: POD_NAMESPACE
valueFrom:
fieldRef:
apiVersion: v1
fieldPath: metadata.namespace
image: docker.io/otel/opentelemetry-collector-contrib:0.73.0
imagePullPolicy: IfNotPresent
name: opentelemetry-collector
ports:
– containerPort: 4317
protocol: TCP
– name: grpc-opencensus
containerPort: 55678
protocol: TCP
resources:
limits:
cpu: "2"
memory: 4Gi
requests:
cpu: 200m
memory: 400Mi
terminationMessagePath: /dev/termination-log
terminationMessagePolicy: File
volumeMounts:
– name: opentelemetry-collector-config-vol
mountPath: /conf
dnsPolicy: ClusterFirst
restartPolicy: Always
schedulerName: default-scheduler
terminationGracePeriodSeconds: 30
volumes:
– configMap:
defaultMode: 420
items:
– key: opentelemetry-collector-config
path: opentelemetry-collector-config.yaml
name: opentelemetry-collector-conf
name: opentelemetry-collector-config-vol
通过extensionProviders配置 Istio 的扩展能力,让 Envoy 代理把服务网格内的访问日志,以 OpenTelemetry 的格式发送到指定的opentelemetry-collector服务,同时给日志加自定义标签(Pod 名、命名空间等)。
IstioOperator部署
[root@k8s-master ~/istio]# cat istio-logging.yaml
# iop.yaml
apiVersion: install.istio.io/v1alpha1
kind: IstioOperator
spec:
profile: demo
meshConfig:
extensionProviders:
– name: otel
envoyOtelAls:
service: opentelemetry-collector.istio-system.svc.cluster.local
port: 4317
logFormat:
labels:
pod: "%ENVIRONMENT(POD_NAME)%"
namespace: "%ENVIRONMENT(POD_NAMESPACE)%"
cluster: "%ENVIRONMENT(ISTIO_META_CLUSTER_ID)%"
mesh: "%ENVIRONMENT(ISTIO_META_MESH_ID)%"
这个IstioOperator配置是 给 Istio 配置「基于 OpenTelemetry(OTel)的访问日志采集扩展」,核心作用是让 Istio 的 Envoy Sidecar 把访问日志发送到 OpenTelemetry Collector,同时自定义日志里的标签字段.
| name: otel | 给这个扩展起个名字(叫 “otel”),后续可以通过这个名字引用该扩展 |
| envoyOtelAls | 表示用 Envoy 的 OpenTelemetry Access Log Service(ALS)协议发送访问日志 |
| service: opentelemetry-collector.istio-system.svc.cluster.local | 日志要发送到的目标服务(OpenTelemetry Collector 的集群内地址) |
| port: 4317 | OpenTelemetry Collector 接收日志的端口(4317 是 OTel 的 gRPC 默认端口) |
| logFormat.labels | 自定义日志里的标签字段:- pod: "%ENVIRONMENT(POD_NAME)%":把 Pod 名加到日志标签- namespace: "%ENVIRONMENT(POD_NAMESPACE)%":把命名空间加到日志标签- 同理,cluster/mesh是网格集群、Mesh ID 的标签 |
配置生效后:
Istio 的 Envoy Sidecar 会自动采集服务间的访问日志;
日志会以 OTel 格式(兼容 OpenTelemetry 生态)发送到opentelemetry-collector.istio-system.svc:4317;
日志里会包含你自定义的pod、namespace等标签,方便后续在日志系统(如 Elasticsearch、Loki)中筛选分析。
Telemetry部署
[root@k8s-master ~/istio]# cat als-otel.yaml
apiVersion: telemetry.istio.io/v1alpha1
kind: Telemetry
metadata:
name: mesh-logging
namespace: istio-system
spec:
accessLogging:
– providers:
– name: otel
这份Telemetry配置的核心是 启用上一份配置中定义的「otel」日志扩展提供器,让 Istio 全网格(或指定范围)的 Envoy Sidecar / 网关,按照之前定义的规则发送访问日志到 OpenTelemetry Collector。
实际效果
无需重复配置 OTel Collector 地址、日志标签等信息(已在 IstioOperator 中定义);
Istio 全网格的所有服务(Sidecar)和网关,都会自动按规则采集访问日志,并发送到opentelemetry-collector.istio-system.svc:4317;
日志中会包含pod、namespace等自定义标签,兼容 OpenTelemetry 生态。
# 我们访问服务,对应的opentelemetry就会出现日志。
[root@k8s-master ~/istio]# kubectl -n istio-system logs -f opentelemetry-collector-56849cc85d-t7jz2
2025-12-31T05:33:40.346Z info ResourceLog #0
Resource SchemaURL:
ScopeLogs #0
ScopeLogs SchemaURL:
InstrumentationScope
LogRecord #0
ObservedTimestamp: 1970-01-01 00:00:00 +0000 UTC
Timestamp: 2025-12-31 05:33:39.397768 +0000 UTC
SeverityText:
SeverityNumber: Unspecified(0)
Body: Str([2025-12-31T05:33:39.397Z] "GET /static/img/izzy.png HTTP/1.1" 304 – via_upstream – "-" 0 0 3 2 "10.0.0.6" "Mozilla/5.0 (Windows NT 10.0; Win64; x64) AppleWebKit/537.36 (KHTML, like Gecko) Chrome/143.0.0.0 Safari/537.36 Edg/143.0.0.0" "a3b0f6a2-97e6-999b-b518-20a44664db83" "10.0.0.6:31721" "10.200.36.109:9080" inbound|9080|| 127.0.0.6:35009 10.200.36.109:9080 10.0.0.6:0 outbound_.9080_._.productpage.default.svc.cluster.local default
)
Attributes:
-> cluster: Str(Kubernetes)
-> mesh: Str(cluster.local)
-> namespace: Str(default)
-> pod: Str(productpage-v1-dbdcc9b88-6d26r)
-> loki.attribute.labels: Str(pod, namespace,cluster,mesh)
Trace ID: 9ac0e6b068dcaec9545771e1cbba0723
Span ID:
Flags: 0
{"kind": "exporter", "data_type": "logs", "name": "logging"}

剩下的操作就跟Grafana一样啦~
五、总结
燃尽了…
本文全面介绍了Istio服务网格的核心功能与实践案例。主要内容包括:
Istio架构与安装:详细解析了Istio控制平面和数据平面的核心组件,并提供了1.28.1版本的安装步骤。
流量管理:深入讲解了Envoy代理架构、请求路由、故障注入、流量拆分、熔断机制以及TCP流量管理等核心功能。
安全机制:系统阐述了Istio的安全架构,包括请求认证、强制mTLS通信、HTTP/TCP请求授权等安全特性。
可观测性:介绍了Prometheus监控方案、Telemetry API、分布式链路追踪(Jaeger集成)以及Loki日志系统的集成方法。
高级功能:涵盖了外部服务访问、EgressGateway配置以及WorkloadEntry等高级用法。
文章通过大量实践案例(如Bookinfo应用)展示了Istio在生产环境中的实际应用,并提供了详细的YAML配置示例和命令行操作步骤,为读者提供了全面的Istio学习与实践指南。