摘要
在 AI 对话应用中,传统同步响应模式会导致秒级阻塞,严重影响用户体验。本文聚焦 Spring AI 流式响应核心技术,基于 WebFlux+SSE 构建低延迟实时交互方案,从 Reactive 编程原理切入,深度解析 ChatClient.stream () API 设计逻辑,对比 EventSource 与 WebSocket 两种前端集成方案,并提供可直接落地的 Vue3/React 实战代码,完整实现「打字机」逐字渲染效果。方案具备高并发支撑能力,可广泛应用于 AI 对话、实时内容生成等场景,兼顾技术深度与工程实用性。
1. 引言:AI 交互的延迟痛点与流式响应的价值
在生成式 AI 应用中,当用户发起长文本生成、复杂推理等请求时,传统「请求 – 等待 – 全量返回」的同步模式会导致 3-10 秒的阻塞等待。这种交互体验不仅违背了自然对话的即时性,还可能引发用户重复提交、连接超时等问题。
流式响应技术的出现彻底改变了这一现状 —— 通过将 AI 模型生成的内容分批次、增量返回给客户端,首字符响应时间从秒级压缩至毫秒级,实现类似 ChatGPT 的「边思考边输出」效果。Spring AI 作为 Spring 生态的 AI 原生开发框架,基于 Project Reactor 响应式编程模型,提供了优雅的流式 API 支持;而 WebFlux 的非阻塞特性与 SSE(Server-Sent Events)的实时推送能力相结合,构成了高性能、低门槛的实时 AI 交互解决方案。
本文将从原理到实战,完整拆解 Spring AI 流式响应的技术链路,帮助开发者快速掌握「后端流式输出 + 前端逐字渲染」的全栈实现方案。
2. 流式响应核心原理:Reactive 编程与 Flux 数据流
2.1 响应式编程核心特性
响应式编程是一种基于异步数据流的编程范式,核心目标是构建即时响应、弹性伸缩、消息驱动的系统(响应式宣言核心思想)。与传统同步阻塞编程相比,其关键特性包括:
- 非阻塞 I/O:通过事件驱动架构,少量线程即可处理数千并发连接,避免线程等待开销
- 函数式组合:通过 map、filter、flatMap 等高阶函数构建数据处理流水线
- 故障隔离:通过独立的错误处理通道,避免单个流的异常影响整个系统
- 背压控制:订阅者可动态调节数据接收速率,防止生产者过载导致内存溢出
Spring WebFlux 作为 Spring 生态的响应式 Web 框架,原生集成 Reactor 3.x 库,为流式响应提供了底层技术支撑。
2.2 Flux 数据流处理机制
Reactor 框架通过Flux和Mono两种核心类型构建异步序列处理模型:
- Flux:代表 0 到 N 个元素的异步序列,适用于多元素流式输出场景(如 AI 文本生成)
- Mono:代表 0 或 1 个元素的异步结果,适用于单个结果的异步返回(如用户信息查询)
Spring AI 的流式响应本质上是通过 Flux 数据流承载 AI 模型的增量输出,其处理流程如下:
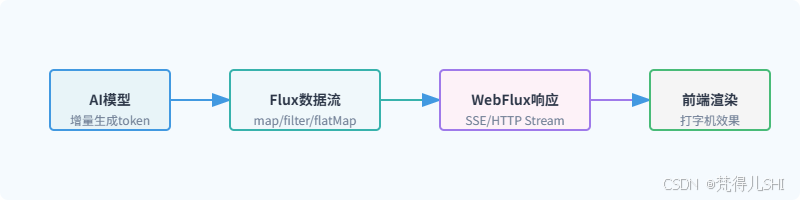
Flux 的核心优势在于将数据处理建模为「流转换」过程,而非传统的「状态变更」,每个操作符(如 map、filter)都会返回新的 Flux 实例,形成链式处理流水线,最终通过订阅(subscribe)触发数据流的流动。
2.3 背压控制:解决生产消费速率不匹配
背压(Backpressure)是响应式编程区别于传统回调模式的核心特性,也是流式响应稳定运行的关键保障。当 AI 模型生成数据的速度超过前端渲染速度时,背压机制会让生产者(AI 模型)根据消费者(前端)的处理能力动态调整生成速率,避免内存溢出。
Reactor 实现背压的核心机制的是:
在 Spring AI 流式响应中,背压机制通过 Reactor 自动生效,开发者无需手动处理,仅需在特殊场景(如大数据量生成)下调整缓冲大小即可:
// 配置背压缓冲策略
chatClient.stream(prompt)
.onBackpressureBuffer(1000) // 缓冲1000个数据块
.onBackpressureDrop(unused -> log.warn("丢弃超量数据块"))
.subscribe(…);
3. Spring AI 流式 API 深度解析:ChatClient.stream ()
3.1 API 设计理念与核心参数
Spring AI 的 ChatClient 是对外提供流式交互的核心入口,其stream()方法基于 Project Reactor 实现,将 AI 模型的响应转换为 Flux 数据流,支持增量返回。与同步的call()方法相比,stream()方法更适合长文本生成、实时对话等场景。
核心设计理念:
- 统一 API 抽象:屏蔽不同 AI 模型(OpenAI、Anthropic、智谱等)的流式实现差异
- 响应式原生支持:直接返回 Flux 类型,无缝集成 Spring WebFlux
- 灵活配置扩展:通过 ChatOptions 支持温度、最大 token 等参数动态调整
API 方法签名:
// 核心流式方法,返回StreamResponseSpec用于指定响应粒度
StreamResponseSpec stream(Prompt prompt);
// StreamResponseSpec提供三种响应粒度选择
Flux<ChatClientResponse> chatClientResponses(); // 完整响应对象(包含元数据)
Flux<ChatResponse> chatResponses(); // 聊天响应对象(包含消息列表)
Flux<String> content(); // 仅返回文本内容(最常用)
3.2 三种流式响应粒度详解
Spring AI 提供三种不同粒度的流式响应,开发者可根据需求灵活选择:
| 完整响应 | Flux<ChatClientResponse> | 需要获取请求 ID、模型信息等元数据 | 最高(包含请求 / 响应完整信息) |
| 聊天响应 | Flux<ChatResponse> | 需要处理多轮对话、消息角色等 | 中等(包含消息列表和基本配置) |
| 文本内容 | Flux<String> | 仅需展示 AI 生成的文本 | 最低(仅纯文本内容) |
实战示例:
// 1. 仅获取文本内容(最常用,适合打字机效果)
Flux<String> contentFlux = chatClient.prompt("介绍Spring AI流式响应")
.stream()
.content();
// 2. 获取聊天响应对象(包含消息角色)
Flux<ChatResponse> chatResponseFlux = chatClient.prompt("介绍Spring AI流式响应")
.stream()
.chatResponses();
// 3. 获取完整响应对象(包含元数据)
Flux<ChatClientResponse> clientResponseFlux = chatClient.prompt("介绍Spring AI流式响应")
.stream()
.chatClientResponses();
3.3 高级特性:超时重试与性能优化
ChatClient.stream () 提供了丰富的高级特性,确保流式响应的稳定性和性能:
3.3.1 超时与重试配置
通过withTimeout()和retry()方法处理网络波动或模型响应缓慢问题:
Flux<String> contentFlux = chatClient.prompt("生成详细的技术文档")
.options(ChatOptions.builder()
.withTemperature(0.7)
.withMaxTokens(2048)
.build())
.stream()
.content()
.timeout(Duration.ofSeconds(30)) // 30秒超时
.retry(3) // 最多重试3次
.onErrorResume(e -> Flux.just("请求超时,请稍后重试")); // 错误兜底
3.3.2 线程调度优化
AI 模型调用属于 I/O 密集型操作,通过publishOn()切换线程池,避免阻塞 Netty 事件循环线程:
Flux<String> contentFlux = chatClient.stream(prompt)
.content()
.publishOn(Schedulers.boundedElastic()) // 切换到弹性线程池
.doOnNext(content -> log.info("生成内容片段:{}", content));
3.3.3 性能监控
集成 Micrometer 监控流式响应性能,如响应时间、吞吐量等:
Flux<String> contentFlux = chatClient.stream(prompt)
.content()
.timed() // 记录每个数据块的处理时间
.doOnNext(timed -> meterRegistry.counter("spring.ai.stream.content", "model", modelName)
.increment())
.map(Timed::get);
4. 前端对接方案:EventSource vs WebSocket
Spring AI 流式响应的前端集成主要有两种方案:EventSource(SSE)和 WebSocket。两者基于不同的通信模式,适用于不同的业务场景,下面详细解析其实现方式和技术选型。
4.1 单向通信优选:EventSource(SSE)实现
SSE(Server-Sent Events)是基于 HTTP 协议的单向通信技术,专门用于服务器向客户端实时推送数据。其核心优势是无需额外协议支持、兼容性好、自动重连,非常适合 AI 对话这种「客户端发一次请求,服务器持续返回结果」的场景。
4.1.1 SSE 核心特性
- 基于 HTTP 协议,无需额外端口或协议
- 单向通信:仅服务器→客户端推送数据
- 自动重连:连接断开后客户端自动重试
- 轻量级:协议头部小,数据传输效率高
- 支持事件类型:可按事件分类处理数据
4.1.2 前端 EventSource 基础实现
// 创建SSE连接,指定后端流式接口
const eventSource = new EventSource('/api/ai/stream?prompt=介绍Spring AI');
// 监听数据接收事件
eventSource.onmessage = (event) => {
const content = event.data;
// 逐字渲染到页面(打字机效果核心)
renderTypingEffect(content);
};
// 监听连接打开事件
eventSource.onopen = () => {
console.log('SSE连接已建立');
};
// 监听错误事件
eventSource.onerror = (error) => {
console.error('SSE连接错误:', error);
if (eventSource.readyState === EventSource.CLOSED) {
console.log('SSE连接已关闭');
}
};
// 手动关闭连接(如页面卸载时)
window.addEventListener('beforeunload', () => {
eventSource.close();
});
4.2 双向交互必备:WebSocket 方案
WebSocket 是一种全双工通信协议,通过一次 TCP 握手建立持久连接,支持服务器和客户端双向实时通信。适用于需要客户端持续发送消息(如多轮对话中实时打断 AI 生成)的场景。
4.2.1 WebSocket 核心特性
- 全双工通信:服务器和客户端可同时发送数据
- 持久连接:一次握手后保持连接,避免重复建连开销
- 低延迟:无 HTTP 头部开销,数据实时传输
- 跨域支持:可通过配置支持跨域通信
4.2.2 前端 WebSocket 基础实现
// 创建WebSocket连接
const socket = new WebSocket(`ws://localhost:8080/api/ai/websocket`);
// 监听连接打开事件
socket.onopen = () => {
console.log('WebSocket连接已建立');
// 发送用户请求
socket.send(JSON.stringify({ prompt: '介绍Spring AI' }));
};
// 监听数据接收事件
socket.onmessage = (event) => {
const data = JSON.parse(event.data);
// 逐字渲染AI响应
renderTypingEffect(data.content);
};
// 监听错误事件
socket.onerror = (error) => {
console.error('WebSocket连接错误:', error);
};
// 监听连接关闭事件
socket.onclose = (event) => {
console.log('WebSocket连接已关闭:', event.code, event.reason);
};
// 发送新消息(多轮对话)
const sendMessage = (prompt) => {
if (socket.readyState === WebSocket.OPEN) {
socket.send(JSON.stringify({ prompt }));
}
};
4.3 两种方案技术选型对比
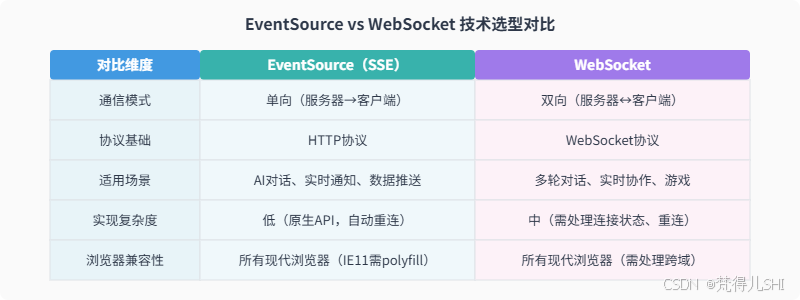
选型建议:
- 若仅需实现 AI「打字机」效果,无双向交互需求,优先选择 EventSource(实现简单、稳定性高)
- 若需要多轮对话中实时打断 AI 生成、客户端持续发送指令等双向交互,选择 WebSocket
- 考虑兼容性和开发效率,大多数 AI 对话场景推荐 EventSource 方案
5. 实战:前后端分离的实时对话界面
本节将实现一个完整的前后端分离实时对话系统,后端基于 Spring Boot+Spring AI+WebFlux 构建流式接口,前端分别提供 Vue3(EventSource)和 React(WebSocket)两种实现,完整实现「打字机」逐字渲染效果。
5.1 后端实现:Spring Boot+WebFlux+Spring AI
5.1.1 依赖配置(pom.xml)
<!– Spring Boot WebFlux依赖 –>
<dependency>
<groupId>org.springframework.boot</groupId>
<artifactId>spring-boot-starter-webflux</artifactId>
</dependency>
<!– Spring AI核心依赖 –>
<dependency>
<groupId>org.springframework.ai</groupId>
<artifactId>spring-ai-spring-boot-starter</artifactId>
</dependency>
<!– 选择对应的AI模型依赖(以智谱为例) –>
<dependency>
<groupId>org.springframework.ai</groupId>
<artifactId>spring-ai-zhipuai-spring-boot-starter</artifactId>
</dependency>
<!– 跨域支持 –>
<dependency>
<groupId>org.springframework.boot</groupId>
<artifactId>spring-boot-starter-web</artifactId>
</dependency>
5.1.2 配置文件(application.yml)
spring:
ai:
zhipuai:
api-key: 你的智谱API密钥 # 替换为实际API密钥
model: glm-4 # 模型名称
chat:
options:
temperature: 0.7 # 随机性
max-tokens: 2048 # 最大生成token数
# 跨域配置
server:
port: 8080
cors:
allowed-origins: "*"
allowed-methods: GET,POST,OPTIONS
allowed-headers: "*"
5.1.3 后端核心代码
跨域配置类
import org.springframework.context.annotation.Bean;
import org.springframework.context.annotation.Configuration;
import org.springframework.web.cors.CorsConfiguration;
import org.springframework.web.cors.reactive.CorsWebFilter;
import org.springframework.web.cors.reactive.UrlBasedCorsConfigurationSource;
@Configuration
public class CorsConfig {
@Bean
public CorsWebFilter corsWebFilter() {
CorsConfiguration config = new CorsConfiguration();
config.addAllowedOrigin("*");
config.addAllowedMethod("*");
config.addAllowedHeader("*");
config.setMaxAge(3600L);
UrlBasedCorsConfigurationSource source = new UrlBasedCorsConfigurationSource();
source.registerCorsConfiguration("/**", config);
return new CorsWebFilter(source);
}
}
流式控制器(支持 SSE 和 WebSocket)
import org.springframework.ai.chat.client.ChatClient;
import org.springframework.ai.chat.model.ChatResponse;
import org.springframework.http.MediaType;
import org.springframework.web.bind.annotation.*;
import org.springframework.web.reactive.socket.WebSocketHandler;
import org.springframework.web.reactive.socket.WebSocketSession;
import org.springframework.web.reactive.socket.server.support.WebSocketHandlerAdapter;
import reactor.core.publisher.Flux;
import reactor.core.publisher.Mono;
import java.time.Duration;
@RestController
@RequestMapping("/api/ai")
public class AiStreamController {
private final ChatClient chatClient;
// 注入ChatClient(Spring AI自动配置)
public AiStreamController(ChatClient chatClient) {
this.chatClient = chatClient;
}
/**
* SSE流式接口(EventSource对接)
*/
@GetMapping(value = "/stream", produces = MediaType.TEXT_EVENT_STREAM_VALUE)
public Flux<String> streamChat(@RequestParam String prompt) {
// 调用ChatClient.stream()获取Flux数据流
return chatClient.prompt(prompt)
.stream()
.content()
.delayElements(Duration.ofMillis(50)) // 控制输出速度,优化打字机效果
.onErrorResume(e -> Flux.just("生成出错:" + e.getMessage()));
}
/**
* WebSocket流式接口
*/
@Bean
public WebSocketHandler webSocketHandler() {
return new WebSocketHandler() {
@Override
public Mono<Void> handle(WebSocketSession session) {
// 接收客户端消息
Flux<String> clientMessages = session.receive()
.map(msg -> new String(msg.getPayloadAsByteArray()))
.map(payload -> {
// 解析客户端发送的prompt(简化处理,实际可解析JSON)
return payload;
});
// 发送AI响应
Flux<String> aiResponses = clientMessages
.flatMap(prompt -> chatClient.prompt(prompt)
.stream()
.content()
.delayElements(Duration.ofMillis(50)));
// 向客户端发送数据
return session.send(aiResponses
.map(session::textMessage)
.onErrorResume(e -> Mono.just(session.textMessage("生成出错:" + e.getMessage()))));
}
};
}
/**
* 注册WebSocket适配器
*/
@Bean
public WebSocketHandlerAdapter webSocketHandlerAdapter() {
return new WebSocketHandlerAdapter();
}
}
5.2 Vue3 前端实现(EventSource 版)
5.2.1 组件完整代码(Vue3 + Setup 语法)
<template>
<div class="chat-container">
<h2>Spring AI 流式对话(Vue3+EventSource)</h2>
<!– 对话消息列表 –>
<div class="message-list" ref="messageList">
<div v-for="(msg, index) in messages" :key="index" :class="['message', msg.role]">
<div class="avatar">{{ msg.role === 'user' ? '我' : 'AI' }}</div>
<div class="content">{{ msg.content }}</div>
</div>
</div>
<!– 输入区域 –>
<div class="input-area">
<textarea
v-model="prompt"
placeholder="输入你的问题…"
@keydown.enter.prevent="sendMessage"
></textarea>
<button @click="sendMessage" :disabled="!prompt.trim()">发送</button>
</div>
</div>
</template>
<script setup>
import { ref, onUnmounted, nextTick } from 'vue';
// 对话消息列表
const messages = ref([
{ role: 'ai', content: '你好!我是基于Spring AI的流式对话助手,有什么可以帮你?' }
]);
// 用户输入
const prompt = ref('');
// 消息列表DOM引用(用于滚动到底部)
const messageList = ref(null);
// EventSource实例
const eventSourceRef = ref(null);
/**
* 发送消息并建立SSE连接
*/
const sendMessage = () => {
const input = prompt.value.trim();
if (!input) return;
// 添加用户消息到列表
messages.value.push({ role: 'user', content: input });
prompt.value = '';
// 滚动到底部
scrollToBottom();
// 关闭之前的SSE连接
if (eventSourceRef.value) {
eventSourceRef.value.close();
}
// 添加AI正在输入的占位消息
const aiMessageIndex = messages.value.length;
messages.value.push({ role: 'ai', content: '' });
// 建立新的SSE连接
const eventSource = new EventSource(`http://localhost:8080/api/ai/stream?prompt=${encodeURIComponent(input)}`);
eventSourceRef.value = eventSource;
// 接收AI响应
eventSource.onmessage = (event) => {
// 逐字拼接内容(打字机效果核心)
const currentContent = messages.value[aiMessageIndex – 1].content;
messages.value[aiMessageIndex – 1].content = currentContent + event.data;
scrollToBottom();
};
// 连接错误处理
eventSource.onerror = (error) => {
console.error('SSE连接错误:', error);
if (eventSource.readyState === EventSource.CLOSED) {
const currentContent = messages.value[aiMessageIndex – 1].content;
messages.value[aiMessageIndex – 1].content = currentContent + '\\n\\n(连接已断开)';
}
};
};
/**
* 滚动到消息列表底部
*/
const scrollToBottom = () => {
nextTick(() => {
if (messageList.value) {
messageList.value.scrollTop = messageList.value.scrollHeight;
}
});
};
/**
* 组件卸载时关闭SSE连接
*/
onUnmounted(() => {
if (eventSourceRef.value) {
eventSourceRef.value.close();
}
});
</script>
<style scoped>
.chat-container {
max-width: 800px;
margin: 0 auto;
padding: 20px;
}
.message-list {
height: 500px;
border: 1px solid #e5e7eb;
border-radius: 8px;
padding: 16px;
overflow-y: auto;
margin-bottom: 16px;
background-color: #f9fafb;
}
.message {
display: flex;
margin-bottom: 12px;
max-width: 80%;
}
.message.user {
flex-direction: row-reverse;
margin-left: auto;
}
.avatar {
width: 36px;
height: 36px;
border-radius: 50%;
background-color: #4299e1;
color: white;
display: flex;
align-items: center;
justify-content: center;
font-size: 14px;
font-weight: 600;
margin-right: 8px;
}
.message.user .avatar {
background-color: #38b2ac;
margin-right: 0;
margin-left: 8px;
}
.content {
padding: 10px 16px;
border-radius: 16px;
background-color: #ffffff;
box-shadow: 0 1px 2px rgba(0, 0, 0, 0.05);
font-size: 14px;
line-height: 1.5;
white-space: pre-wrap;
}
.message.user .content {
background-color: #e6f7ff;
}
.input-area {
display: flex;
gap: 8px;
}
textarea {
flex: 1;
padding: 12px;
border: 1px solid #e5e7eb;
border-radius: 8px;
font-size: 14px;
resize: none;
min-height: 80px;
}
button {
padding: 0 16px;
background-color: #4299e1;
color: white;
border: none;
border-radius: 8px;
font-size: 14px;
font-weight: 600;
cursor: pointer;
transition: background-color 0.2s;
}
button:disabled {
background-color: #94a3b8;
cursor: not-allowed;
}
button:hover:not(:disabled) {
background-color: #3182ce;
}
</style>
5.3 React 前端实现(WebSocket 版)
5.3.1 组件完整代码(React 18 + Hooks)
import { useState, useRef, useEffect } from 'react';
import './AiChat.css';
const AiChat = () => {
// 对话消息列表
const [messages, setMessages] = useState([
{ role: 'ai', content: '你好!我是基于Spring AI的WebSocket流式助手~' }
]);
// 用户输入
const [inputValue, setInputValue] = useState('');
// WebSocket实例引用
const socketRef = useRef(null);
// 消息列表底部引用(滚动用)
const messagesEndRef = useRef(null);
/**
* 初始化WebSocket连接
*/
useEffect(() => {
// 创建WebSocket连接
const socket = new WebSocket('ws://localhost:8080/api/ai/websocket');
socketRef.current = socket;
// 连接打开事件
socket.onopen = () => {
console.log('WebSocket连接已建立');
};
// 接收消息事件(AI响应)
socket.onmessage = (event) => {
const content = event.data;
// 更新最后一条AI消息(逐字拼接)
setMessages(prev => {
const lastMsg = prev[prev.length – 1];
if (lastMsg.role === 'ai') {
return […prev.slice(0, -1), { …lastMsg, content: lastMsg.content + content }];
} else {
return […prev, { role: 'ai', content }];
}
});
};
// 错误事件
socket.onerror = (error) => {
console.error('WebSocket错误:', error);
setMessages(prev => […prev, { role: 'system', content: '连接出错,请刷新页面重试' }]);
};
// 关闭事件
socket.onclose = (event) => {
console.log('WebSocket连接关闭:', event.code);
if (event.code !== 1000) { // 非正常关闭
setMessages(prev => […prev, { role: 'system', content: '连接已断开,正在尝试重连…' }]);
// 重连逻辑(简单实现)
setTimeout(initWebSocket, 3000);
}
};
// 组件卸载时关闭连接
return () => {
socketRef.current.close();
};
}, []);
/**
* 滚动到消息列表底部
*/
useEffect(() => {
messagesEndRef.current?.scrollIntoView({ behavior: 'smooth' });
}, [messages]);
/**
* 发送消息
*/
const handleSendMessage = () => {
const prompt = inputValue.trim();
if (!prompt || !socketRef.current || socketRef.current.readyState !== WebSocket.OPEN) {
return;
}
// 添加用户消息
setMessages(prev => […prev, { role: 'user', content: prompt }]);
// 发送到WebSocket服务器
socketRef.current.send(prompt);
// 清空输入框
setInputValue('');
};
/**
* 处理回车发送(Shift+Enter换行)
*/
const handleKeyDown = (e) => {
if (e.key === 'Enter' && !e.shiftKey) {
e.preventDefault();
handleSendMessage();
}
};
return (
<div className="chat-container">
<h2>Spring AI 流式对话(React+WebSocket)</h2>
<div className="message-list">
{messages.map((msg, index) => (
<div key={index} className={`message-item ${msg.role}`}>
<div className="message-avatar">
{msg.role === 'user' ? '我' : msg.role === 'ai' ? 'AI' : '系统'}
</div>
<div className="message-content">{msg.content}</div>
</div>
))}
<div ref={messagesEndRef} />
</div>
<div className="input-container">
<textarea
value={inputValue}
onChange={(e) => setInputValue(e.target.value)}
onKeyDown={handleKeyDown}
placeholder="输入消息,按Enter发送,Shift+Enter换行…"
className="input-textarea"
/>
<button onClick={handleSendMessage} disabled={!inputValue.trim()}>
发送
</button>
</div>
</div>
);
};
export default AiChat;
5.3.2 配套 CSS 样式(AiChat.css)
.chat-container {
max-width: 850px;
margin: 20px auto;
padding: 0 16px;
font-family: -apple-system, BlinkMacSystemFont, 'Segoe UI', Roboto, sans-serif;
}
.chat-container h2 {
text-align: center;
color: #2d3748;
margin-bottom: 24px;
}
.message-list {
height: 520px;
border: 1px solid #e2e8f0;
border-radius: 12px;
padding: 16px;
overflow-y: auto;
background-color: #f8fafc;
margin-bottom: 16px;
}
.message-item {
display: flex;
margin-bottom: 12px;
max-width: 85%;
animation: fadeIn 0.3s ease;
}
@keyframes fadeIn {
from { opacity: 0; transform: translateY(10px); }
to { opacity: 1; transform: translateY(0); }
}
.message-item.user {
flex-direction: row-reverse;
margin-left: auto;
}
.message-avatar {
width: 34px;
height: 34px;
border-radius: 50%;
display: flex;
align-items: center;
justify-content: center;
font-size: 12px;
font-weight: 600;
color: white;
margin-right: 8px;
flex-shrink: 0;
}
.message-item.user .message-avatar {
background-color: #6366f1;
margin-right: 0;
margin-left: 8px;
}
.message-item.ai .message-avatar {
background-color: #10b981;
}
.message-item.system .message-avatar {
background-color: #94a3b8;
}
.message-content {
padding: 10px 14px;
border-radius: 18px;
font-size: 14px;
line-height: 1.6;
white-space: pre-wrap;
}
.message-item.user .message-content {
background-color: #ede9fe;
color: #4f46e5;
border-top-right-radius: 4px;
}
.message-item.ai .message-content {
background-color: #ecfdf5;
color: #065f46;
border-top-left-radius: 4px;
}
.message-item.system .message-content {
background-color: #f1f5f9;
color: #64748b;
font-size: 12px;
border-radius: 8px;
}
.input-container {
display: flex;
gap: 10px;
align-items: flex-end;
}
.input-textarea {
flex: 1;
padding: 12px 16px;
border: 1px solid #cbd5e1;
border-radius: 8px;
font-size: 14px;
resize: none;
min-height: 70px;
max-height: 180px;
transition: border-color 0.2s;
}
.input-textarea:focus {
outline: none;
border-color: #6366f1;
box-shadow: 0 0 0 2px rgba(99, 102, 241, 0.1);
}
.input-container button {
padding: 12px 24px;
background-color: #6366f1;
color: white;
border: none;
border-radius: 8px;
font-size: 14px;
font-weight: 600;
cursor: pointer;
transition: background-color 0.2s;
height: 48px;
}
.input-container button:disabled {
background-color: #cbd5e1;
cursor: not-allowed;
}
.input-container button:hover:not(:disabled) {
background-color: #4f46e5;
}
5.4 「打字机」效果核心逻辑拆解
无论是 Vue3 还是 React 实现,打字机效果的核心逻辑一致,主要包含三个关键步骤:
优化技巧:
- 后端通过delayElements(Duration.ofMillis(50))控制数据推送速度,避免文本生成过快。
- 前端添加消息列表自动滚动到底部逻辑,确保用户能看到最新生成的内容。
- 处理连接异常和错误兜底,提升用户体验(如显示错误提示、自动重连)。
6. 生产环境优化与问题排查
6.1 性能优化建议
netty:
threads:
worker: 16 # 工作线程数,建议为CPU核心数的2倍
compression:
enabled: true
mime-types: text/event-stream,application/json
.content()
.limitRate(10) // 每秒最多推送10个数据块
.delayElements(Duration.ofMillis(50));
6.2 常见问题排查
const es = new EventSource(`/api/ai/stream?prompt=${prompt}`);
es.onerror = () => {
setTimeout(() => createEventSource(prompt), 3000); // 3秒后重连
};
return es;
};
requestAnimationFrame(() => {
currentText.value += content;
});
};
7. 总结与扩展方向
本文基于 Spring AI+WebFlux+SSE/WebSocket 实现了 AI 流式响应与前端集成,核心价值在于通过响应式编程模型解决了传统同步响应的延迟痛点,实现了低延迟、高体验的「打字机」效果。关键技术点包括:
- Reactive 编程与 Flux 数据流的异步非阻塞处理
- Spring AI ChatClient.stream () 的多粒度流式 API 使用
- EventSource 与 WebSocket 的前端对接方案选型
- Vue3/React 的逐字渲染逻辑实现
扩展方向:
流式响应是 AI 应用提升用户体验的关键技术,而 Spring AI 与 WebFlux 的深度集成,为 Java 开发者提供了低门槛、高性能的实现方案。希望本文的技术解析和实战代码能帮助你快速落地实时 AI 交互功能。
8. 参考文献