pt端环境部署:
下载安装源码:
https://github.com/ultralytics/ultralytics/
1.创建环境
conda create -n yolo26 python=3.10
conda activate yolo26
2.安装ultralytics8.4.0
pip install ultralytics -i https://pypi.tuna.tsinghua.edu.cn/simple
3.验证环境部署
from ultralytics import YOLO
# 加载预训练的 YOLO26n 模型
model = YOLO('yolo26n.pt')
source = '/home/xx/yolo26/ultralytics/assets/bus.jpg' #更改为自己的图片路径
# 运行推理,并附加参数
model.predict(source, save=True)

planA:pt转onnx转rknn,这个方法带我写的后处理,官方的我暂时还没验证。
参考的大佬的csdn:里面也有大佬转化onnx和rknn的github代码地址
https://blog.csdn.net/zhangqian_1/article/details/142722526?spm=1001.2014.3001.5502
1.注意点:记得修改一下onnx模型保存路径:
/root/zhangqian/ultralytics-main/yolov11n_80class_ZQ.onnx改成./yolov26.onnx
就能保存到你运行转化代码的目录下面
torch.onnx.export(self.model, dummy_input, "./yolov26.onnx", verbose=False, input_names=input_names, output_names=output_names, opset_version=11)
2.转化成功了onnx但是报错:
我用下面这个去验证onnx
先要装一个转化onnx的和查看模型的netron:
# 安装 ONNX 和 ONNX Runtime(使用清华源加速)
pip install onnx onnxruntime -i https://pypi.tuna.tsinghua.edu.cn/simple
# 安装netron看模型
pip install netron -i https://pypi.tuna.tsinghua.edu.cn/simple
from ultralytics import YOLO
print("=========== onnx ===========")
# 加载模型(自动识别 task)
model = YOLO('yolo26n.pt')
# 推理
results = model(source='./test.jpg', save=True)
print("Inference completed!")

netron显示的模型好像又没错:
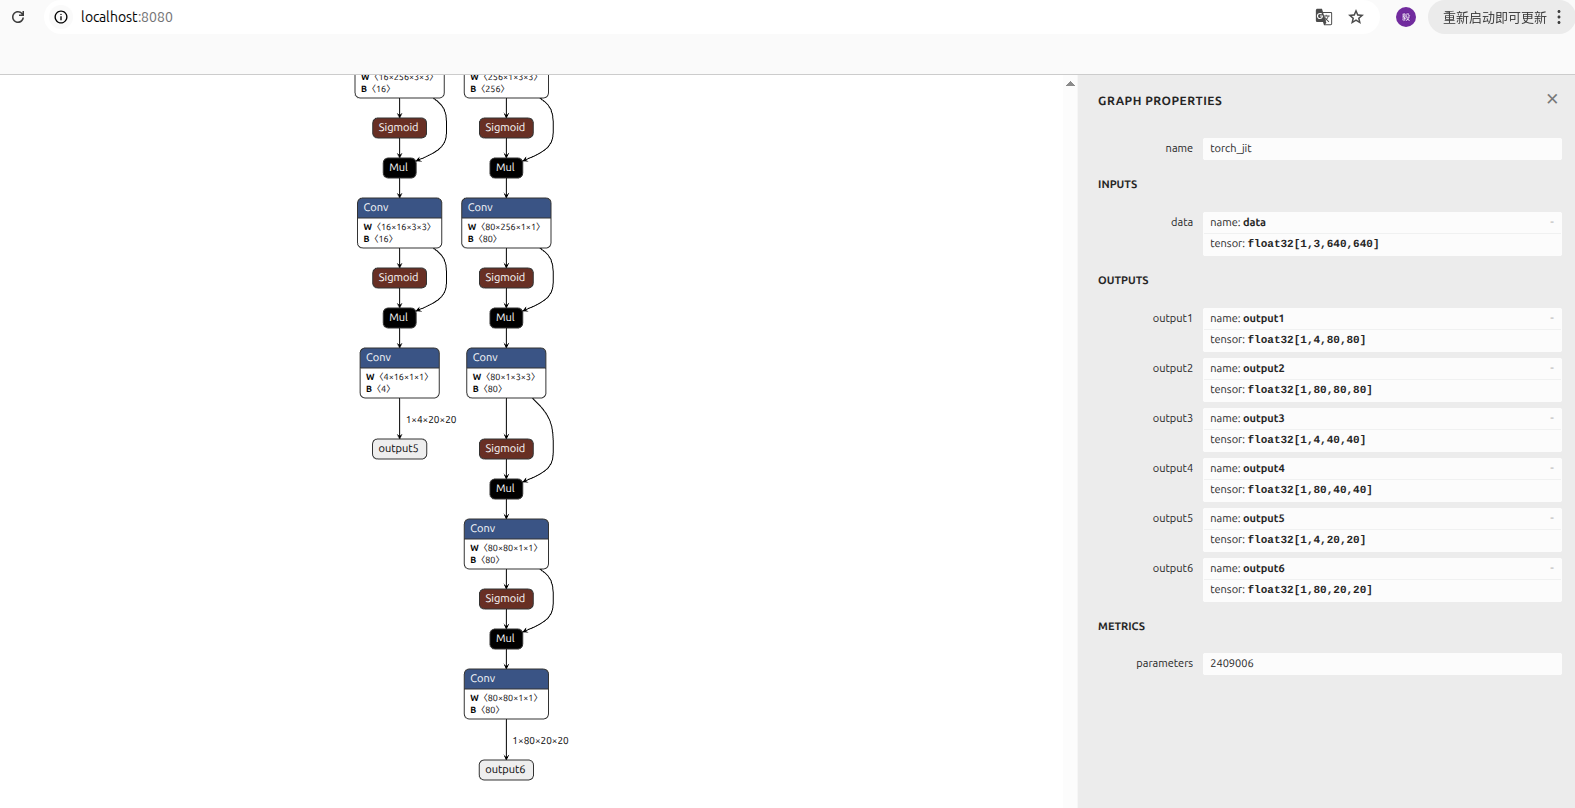
3.去下载大佬的转化onnx和rknn的github代码里面有测试代码
先复制自己的onnx在文件夹yolo26n_onnx下面
test_onnx_demo.py文件把测试的模型换成自己的onnx
ort_session = ort.InferenceSession('./yolo26.onnx', providers=['AzureExecutionProvider', 'CPUExecutionProvider'])
运行结果,说明转化的模型是对的:
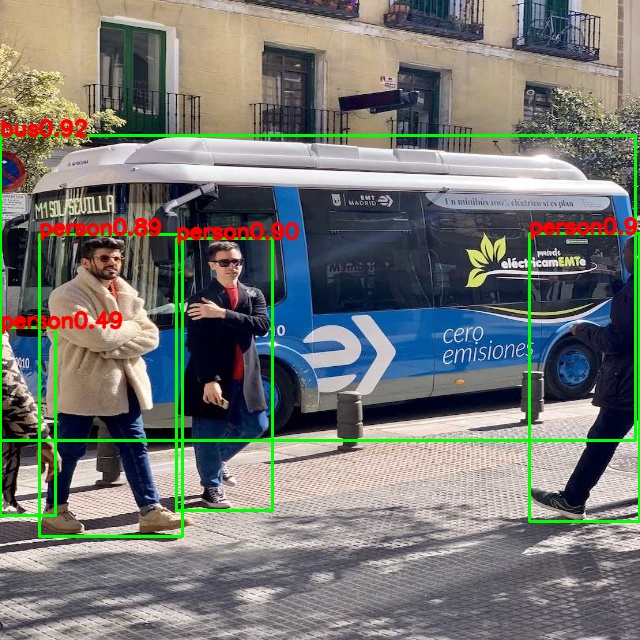
3.onnx转化rknn
继续用yolo26n_rknn文件夹里的onnx2rknn_zq.py
因为是新环境,我把rknn_toolkit又下载安装了一遍放一起
如果之前你有独立的转化环境就没必要多此一举
去github下载whi和requirem:记得我们是python3.10版本的
https://github.com/airockchip/rknn-toolkit2/blob/master/rknn-toolkit2/packages/x86_64/rknn_toolkit2-2.3.2-cp310-cp310-manylinux_2_17_x86_64.manylinux2014_x86_64.whl
pip install rknn_toolkit2-2.3.2-cp310-cp310-manylinux_2_17_x86_64.manylinux2014_x86_64.whl
转化成功:
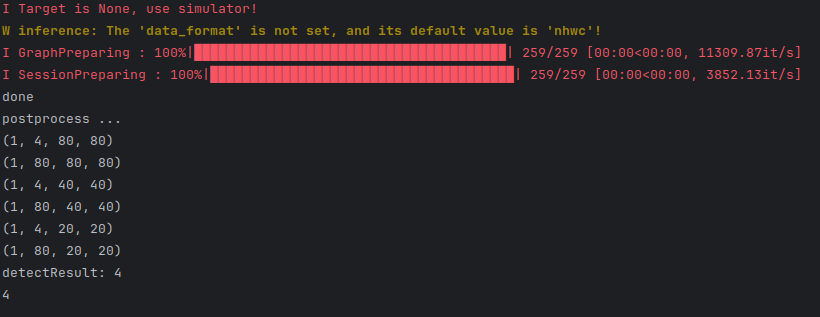
netron:
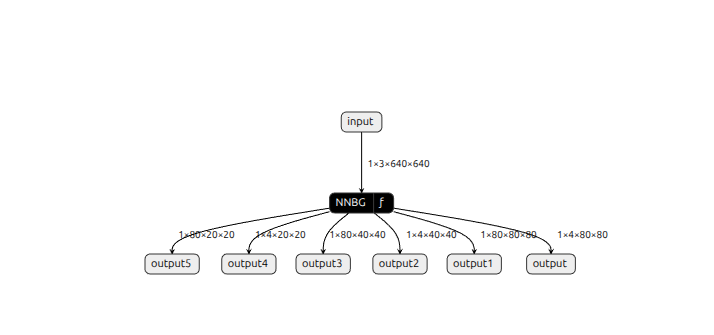
4.rknn验证
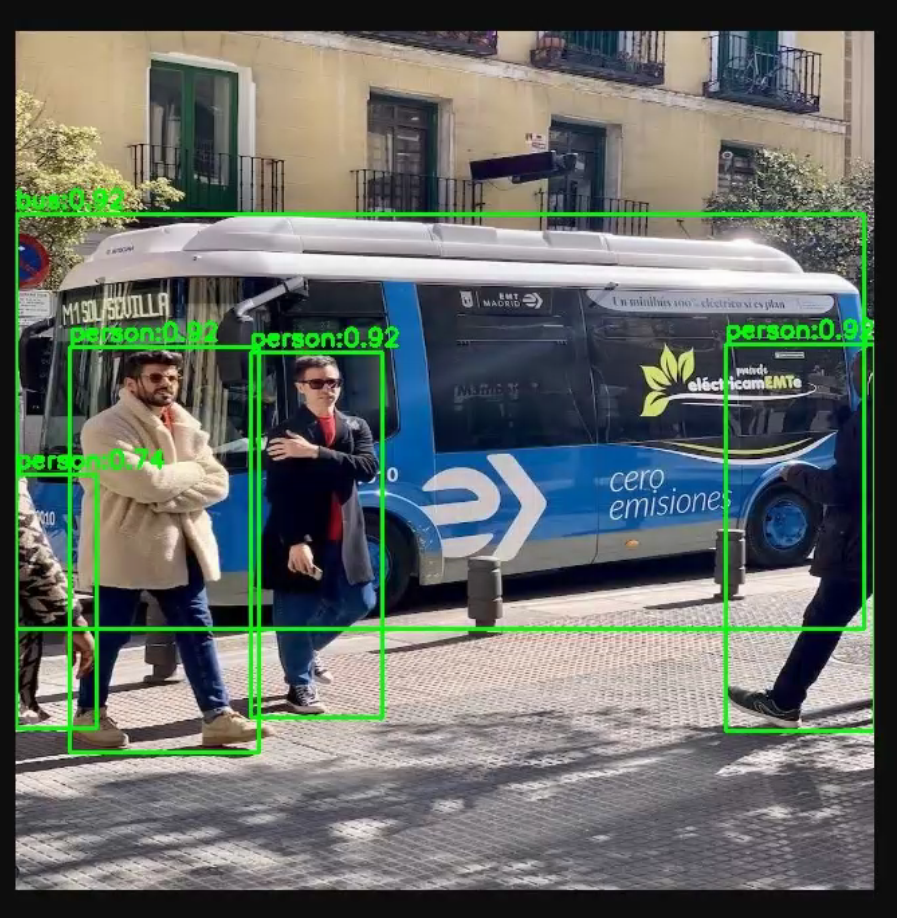
是对的!成功了!
附上我写的后处理python代码:
import os
import cv2
import numpy as np
from rknnlite.api import RKNNLite
# ====================== 配置 ======================
MODEL_PATH = "yolo26.rknn"
IMG_SIZE = (640, 640) # (width, height)
OBJ_THRESH = 0.25
NMS_THRESH = 0.45
CLASS_NAME = ["person", "bicycle", "car","motorbike ","aeroplane ","bus ","train","truck ","boat","traffic light",
"fire hydrant","stop sign ","parking meter","bench","bird","cat","dog ","horse ","sheep","cow","elephant",
"bear","zebra ","giraffe","backpack","umbrella","handbag","tie","suitcase","frisbee","skis","snowboard","sports ball","kite",
"baseball bat","baseball glove","skateboard","surfboard","tennis racket","bottle","wine glass","cup","fork","knife ",
"spoon","bowl","banana","apple","sandwich","orange","broccoli","carrot","hot dog","pizza ","donut","cake","chair","sofa",
"pottedplant","bed","diningtable","toilet ","tvmonitor","laptop","mouse","remote ","keyboard ","cell phone","microwave ",
"oven ","toaster","sink","refrigerator ","book","clock","vase","scissors ","teddy bear ","hair drier", "toothbrush "]
# ✅ 去除类别名尾随空格
CLASS_NAME = [name.strip() for name in CLASS_NAME]
# ====================== 工具函数 ======================
def letterbox_resize(image, size, bg_color=114):
target_w, target_h = size
h, w = image.shape[:2]
scale = min(target_w / w, target_h / h)
new_w, new_h = int(w * scale), int(h * scale)
resized = cv2.resize(image, (new_w, new_h))
canvas = np.full((target_h, target_w, 3), bg_color, dtype=np.uint8)
dx = (target_w – new_w) // 2
dy = (target_h – new_h) // 2
canvas[dy:dy + new_h, dx:dx + new_w] = resized
return canvas, scale, dx, dy
def sigmoid(x):
# 防止溢出
return 1 / (1 + np.exp(-np.clip(x, -88.72, 88.72)))
def softmax(x, axis):
x_max = np.max(x, axis=axis, keepdims=True)
exp_x = np.exp(x – x_max)
return exp_x / np.sum(exp_x, axis=axis, keepdims=True)
def dfl(x):
"""
Distribution Focal Loss (DFL) in pure NumPy.
Input: x of shape [16, H, W] or [16, N]
Output: [4, H, W] or [4, N]
"""
assert x.shape[0] == 16, f"DFL expects 16 channels, got {x.shape[0]}"
x = x.reshape(4, 4, -1) # [4 coords, 4 bins, N]
x = softmax(x, axis=1) # softmax over the 4 bins
acc = np.arange(4, dtype=np.float32).reshape(1, 4, 1) # [1, 4, 1]
x = np.sum(x * acc, axis=1) # weighted sum → [4, N]
return x
# ====================== NMS ======================
def nms(boxes, scores, thresh):
if len(boxes) == 0:
return []
boxes = np.array(boxes, dtype=np.float32)
scores = np.array(scores, dtype=np.float32)
x1 = boxes[:, 0]
y1 = boxes[:, 1]
x2 = boxes[:, 2]
y2 = boxes[:, 3]
areas = (x2 – x1) * (y2 – y1)
order = scores.argsort()[::-1]
keep = []
while order.size > 0:
i = order[0]
keep.append(i)
xx1 = np.maximum(x1[i], x1[order[1:]])
yy1 = np.maximum(y1[i], y1[order[1:]])
xx2 = np.minimum(x2[i], x2[order[1:]])
yy2 = np.minimum(y2[i], y2[order[1:]])
inter = np.maximum(0, xx2 – xx1) * np.maximum(0, yy2 – yy1)
iou = inter / (areas[i] + areas[order[1:]] – inter)
order = order[1:][iou <= thresh]
return keep
# ====================== YOLOv8 后处理(官方公式)======================
def post_process(outputs, scale, dx, dy):
boxes_list, scores_list, classes_list = [], [], []
strides = [8, 16, 32]
for i in range(3):
reg = outputs[i * 2 + 0][0] # [4, H, W] ← 确认是这个 shape
cls = outputs[i * 2 + 1][0] # [num_classes, H, W]
_, H, W = reg.shape
stride = strides[i]
# 展平
reg_flat = reg.reshape(4, -1) # [4, N]
cls_flat = cls.reshape(cls.shape[0], -1).T # [N, num_classes]
grid_x, grid_y = np.meshgrid(np.arange(W), np.arange(H))
grid_x = grid_x.astype(np.float32).flatten() # [N]
grid_y = grid_y.astype(np.float32).flatten() # [N]
# ⭐⭐⭐ 关键:完全照搬 C++ 公式 ⭐⭐⭐
tx = reg_flat[0] # 注意:C++ 里是 -box[0]
ty = reg_flat[1] # -box[1]
tw = reg_flat[2] # +box[2]
th = reg_flat[3] # +box[3]
x1 = (-tx + grid_x + 0.5) * stride
y1 = (-ty + grid_y + 0.5) * stride
x2 = (tw + grid_x + 0.5) * stride
y2 = (th + grid_y + 0.5) * stride
w = x2 – x1
h = y2 – y1
# 过滤极小框(可选)
# valid_wh = (w > 1e-4) & (h > 1e-4)
# if not np.any(valid_wh): continue
boxes = np.stack([x1, y1, w, h], axis=1) # [N, 4] → (x1, y1, w, h)
# 分类
cls_prob = sigmoid(cls_flat)
scores = np.max(cls_prob, axis=1)
class_ids = np.argmax(cls_prob, axis=1)
valid_mask = scores >= OBJ_THRESH
if not np.any(valid_mask):
continue
boxes_v = boxes[valid_mask]
scores_v = scores[valid_mask]
classes_v = class_ids[valid_mask]
# 转为 (x1, y1, x2, y2) 用于 NMS
boxes_xyxy = np.copy(boxes_v)
boxes_xyxy[:, 2] = boxes_v[:, 0] + boxes_v[:, 2] # x2 = x1 + w
boxes_xyxy[:, 3] = boxes_v[:, 1] + boxes_v[:, 3] # y2 = y1 + h
# 还原到原图
boxes_xyxy[:, [0, 2]] = (boxes_xyxy[:, [0, 2]] – dx) / scale
boxes_xyxy[:, [1, 3]] = (boxes_xyxy[:, [1, 3]] – dy) / scale
boxes_list.append(boxes_xyxy)
scores_list.append(scores_v)
classes_list.append(classes_v)
if not boxes_list:
return None, None, None
boxes_all = np.concatenate(boxes_list, axis=0)
scores_all = np.concatenate(scores_list, axis=0)
classes_all = np.concatenate(classes_list, axis=0)
keep = nms(boxes_all, scores_all, NMS_THRESH)
if len(keep) == 0:
return None, None, None
return boxes_all[keep], classes_all[keep], scores_all[keep]
# ====================== RKNN 初始化 ======================
print(">>> 正在加载 RKNN 模型…")
_rknn = RKNNLite()
ret = _rknn.load_rknn(MODEL_PATH)
if ret != 0:
raise RuntimeError(f"Failed to load RKNN model: {ret}")
ret = _rknn.init_runtime()
if ret != 0:
raise RuntimeError(f"Failed to init runtime: {ret}")
print("\\n=== 模型加载成功 ===")
# ====================== 推理接口 ======================
def detect_objects(img, return_vis=False):
img_r, scale, dx, dy = letterbox_resize(img, IMG_SIZE)
input_data = np.expand_dims(img_r, 0)
outputs = _rknn.inference(inputs=[input_data])
# 打印输出形状(仅首次)
if not hasattr(detect_objects, '_printed'):
print(f"\\n>>> 输出数量: {len(outputs)}")
for i, out in enumerate(outputs):
print(f" output[{i}].shape = {out.shape}")
detect_objects._printed = True
boxes, cls_ids, scores = post_process(outputs, scale, dx, dy)
if boxes is None or len(scores) == 0:
if return_vis:
return [], [], [], img.copy()
return [], [], []
if return_vis:
vis = img.copy()
h_img, w_img = vis.shape[:2]
for box, cls_id, conf in zip(boxes, cls_ids, scores):
x1, y1, x2, y2 = box
x1 = int(np.clip(x1, 0, w_img))
y1 = int(np.clip(y1, 0, h_img))
x2 = int(np.clip(x2, 0, w_img))
y2 = int(np.clip(y2, 0, h_img))
cls_name = CLASS_NAME[int(cls_id)]
cv2.rectangle(vis, (x1, y1), (x2, y2), (0, 255, 0), 2)
cv2.putText(
vis,
f"{cls_name}:{conf:.2f}",
(x1, max(y1 – 5, 0)),
cv2.FONT_HERSHEY_SIMPLEX,
0.6,
(0, 255, 0),
2
)
return boxes.tolist(), cls_ids.tolist(), scores.tolist(), vis
return boxes.tolist(), cls_ids.tolist(), scores.tolist()
# ====================== 测试 ======================
if __name__ == "__main__":
IMG_PATH = "test.jpg"
OUTPUT_DIR = "./result"
os.makedirs(OUTPUT_DIR, exist_ok=True)
img = cv2.imread(IMG_PATH)
if img is None:
raise FileNotFoundError(f"图像未找到: {IMG_PATH}")
boxes, cls_ids, scores, vis = detect_objects(img, return_vis=True)
if len(scores) == 0:
print("未检测到目标")
else:
print(f"检测到 {len(scores)} 个目标:")
for i, (cls_id, conf) in enumerate(zip(cls_ids, scores)):
cls_name = CLASS_NAME[int(cls_id)]
print(f" [{i+1}] 类别: {cls_name}, 置信度: {conf:.4f}")
save_path = os.path.join(OUTPUT_DIR, "vis_result.jpg")
cv2.imwrite(save_path, vis)
print(f"可视化结果已保存: {save_path}")
planB:用官方直接转rknn
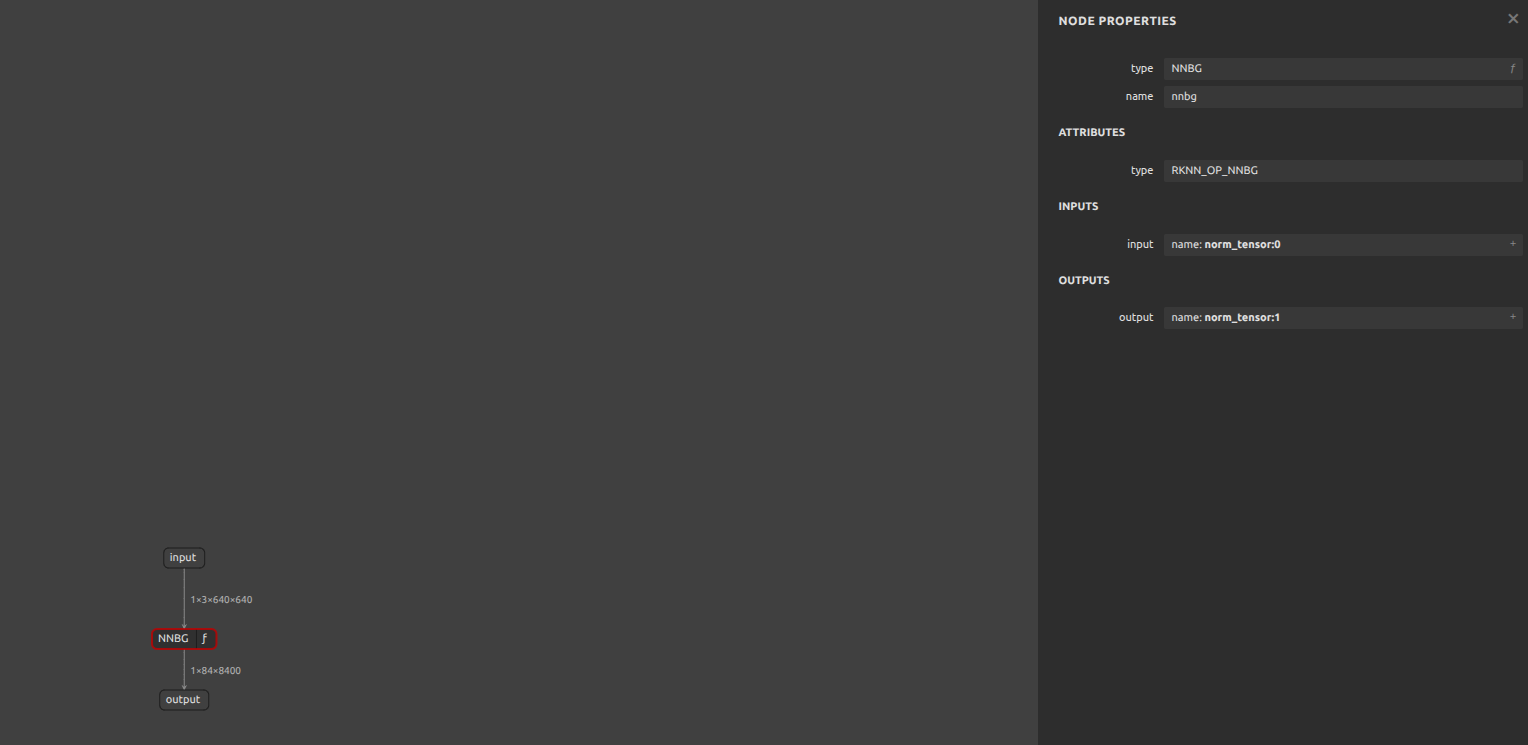
https://docs.ultralytics.com/zh/integrations/rockchip-rknn/
from ultralytics import YOLO
# Load the YOLO26 model
model = YOLO("yolo26n.pt")
# Export the model to RKNN format
# 'name' can be one of rk3588, rk3576, rk3566, rk3568, rk3562, rv1103, rv1106, rv1103b, rv1106b, rk2118, rv1126b
model.export(format="rknn", name="rk3588") # creates '/yolo26n_rknn_model'
官方的也转化成功了,但是只有一个输出头:
netron:
踩坑日记:
1.踩坑一:
就是准备偷懒把模型加载yolo11环境里面更新环境,千万不要弄,一堆报错不说还会弄乱已经弄好的yolo11环境,最好还是一个yolo一个环境。但是我之前v11的里面是能和v8互用的。
2.踩坑二:
装的cuda版本太高了装了个12.8,又得降级,numpy也跟着降级
pip install torch==2.0.0+cu118 torchvision==0.15.1+cu118 torchaudio==2.0.0+cu118 -i https://pypi.tuna.tsinghua.edu.cn/simple –extra-index-url https://download.pytorch.org/whl/cu118
pip install "numpy<2" -i https://pypi.tuna.tsinghua.edu.cn/simple
装完验证一下:
import torch
print(torch.__version__) # e.g., 2.0.0+cu118
print(torch.version.cuda) # e.g., 11.8
print(torch.cuda.is_available()) # True?
输出如下:
2.0.0+cu118 11.8 True
3.安装rknn版本的时候报错
ONNX ≥ 1.12.0 开始移除了 onnx.mapping 模块,会导致 RKNN 报错:
AttributeError: module 'onnx' has no attribute 'mapping'
所以onnx得安装1.12.0版本,装1.11.0因为没有whl折腾了我好一会
pip uninstall -y onnx
pip install onnx==1.12.0 –only-binary=all -i https://pypi.org/simple/