文章目录
-
- 引言
- 1. SpringAI框架概述与核心架构
-
- 1.1 SpringAI框架简介与发展背景
-
- 1.1.1 SpringAI的核心价值
- 1.1.2 技术架构概览
- 1.2 SpringAI核心组件解析
-
- 1.2.1 模型管理器(Model Manager)
- 1.2.2 提示模板引擎(Prompt Template Engine)
- 2. SpringAI中的机器学习模型集成与管理
-
- 2.1 多模型集成策略
-
- 2.1.1 模型配置与加载
- 2.1.2 智能模型路由
- 2.2 模型版本管理与A/B测试
-
- 2.2.1 模型版本控制
- 2.2.2 A/B测试框架
- 3. SpringAI对话系统与NLP应用开发
-
- 3.1 智能对话系统架构设计
-
- 3.1.1 多轮对话管理
- 3.1.2 个性化对话系统
- 3.2 高级NLP应用开发
-
- 3.2.1 文本摘要与情感分析
- 4. SpringAI图像识别与计算机视觉实战
-
- 4.1 图像处理基础架构
-
- 4.1.1 图像预处理管道
- 4.2 计算机视觉应用实战
-
- 4.2.1 智能图像分类系统
- 4.2.2 OCR文档识别系统
- 5. SpringAI生产部署与性能优化
-
- 5.1 生产环境部署策略
-
- 5.1.1 容器化部署
- 5.1.2 配置管理与监控
- 5.2 性能优化策略
-
- 5.2.1 缓存优化
- 5.2.2 连接池与并发优化
- 6. 总结与展望
-
- 6.1 知识点总结与扩展
-
- 6.1.1 核心技术要点回顾
- 6.1.2 技术深度扩展
- 6.2 扩展阅读资料推荐
-
- 6.2.1 官方文档与规范
- 6.2.2 技术博客与教程
- 6.2.3 在线学习平台
- 6.3 深度思考问题探讨
-
- 6.3.1 技术架构挑战
- 6.3.2 业务应用场景
- 6.3.3 技术发展趋势
引言
在人工智能技术快速发展的今天,如何将AI能力无缝集成到企业级应用中成为了开发者面临的重要挑战。SpringAI作为Spring生态系统中的人工智能框架,为Java开发者提供了简洁而强大的AI应用开发解决方案。本文将深入解析SpringAI框架的核心架构、技术特性和实战应用,帮助开发者快速构建智能化的企业级应用。
1. SpringAI框架概述与核心架构
1.1 SpringAI框架简介与发展背景
SpringAI是Spring官方推出的AI应用开发框架,旨在简化Java应用与AI服务的集成。它提供了统一的API抽象,支持多种主流AI平台,包括OpenAI、Hugging Face、Azure OpenAI等。
1.1.1 SpringAI的核心价值
- 统一API:提供一致的编程模型,屏蔽不同AI平台差异
- 模块化设计:支持按需引入,降低系统复杂度
- 企业级特性:集成Spring生态的安全、监控、事务等能力
- 生产就绪:提供完善的错误处理、重试机制和性能监控
1.1.2 技术架构概览
// SpringAI核心架构示例
@SpringBootApplication
@EnableAI
public class SpringAIApplication {
public static void main(String[] args) {
SpringApplication.run(SpringAIApplication.class, args);
}
}
// AI客户端配置
@Configuration
public class AIConfig {
@Bean
public OpenAIClient openAIClient() {
return OpenAIClient.builder()
.apiKey("${openai.api.key}")
.baseUrl("${openai.base.url}")
.timeout(Duration.ofSeconds(30))
.build();
}
}
1.2 SpringAI核心组件解析
1.2.1 模型管理器(Model Manager)
模型管理器负责AI模型的生命周期管理,包括模型加载、配置、调用和监控。 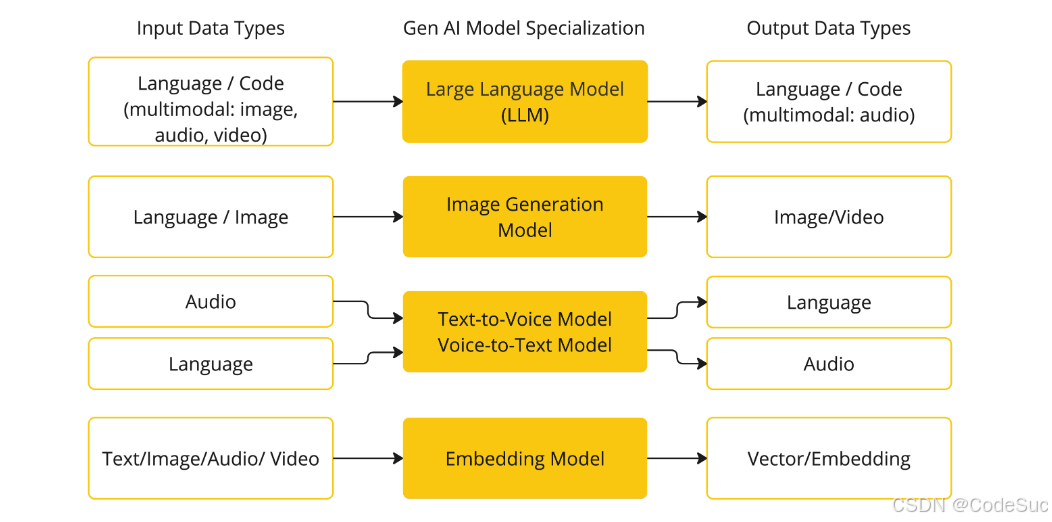
@Service
public class ModelManagerService {
@Autowired
private AIModelRegistry modelRegistry;
// 注册AI模型
public void registerModel(String modelId, AIModelConfig config) {
AIModel model = AIModel.builder()
.id(modelId)
.type(ModelType.TEXT_GENERATION)
.provider(ModelProvider.OPENAI)
.config(config)
.build();
modelRegistry.register(model);
}
// 获取模型信息
public AIModelInfo getModelInfo(String modelId) {
return modelRegistry.getModelInfo(modelId);
}
}
1.2.2 提示模板引擎(Prompt Template Engine)
提示模板引擎支持动态生成AI提示词,提高AI交互的灵活性和可维护性。 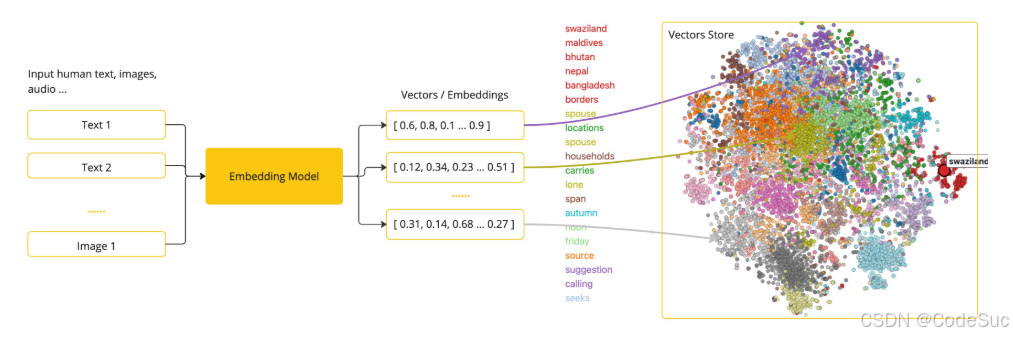
@Component
public class PromptTemplateService {
private final Map<String, PromptTemplate> templates = new ConcurrentHashMap<>();
// 定义提示模板
@PostConstruct
public void initTemplates() {
templates.put("codeReview", PromptTemplate.builder()
.template("请作为资深代码审查员,分析以下代码的质量:\\n\\n代码语言:{language}\\n代码内容:\\n{code}\\n\\n请从以下维度进行评估:\\n1. 代码规范性\\n2. 性能优化建议\\n3. 安全性分析\\n4. 可读性评价")
.build());
templates.put("sqlOptimization", PromptTemplate.builder()
.template("请作为数据库专家,优化以下SQL查询:\\n\\n数据库类型:{dbType}\\nSQL语句:\\n{sql}\\n\\n请提供:\\n1. 性能瓶颈分析\\n2. 优化后的SQL\\n3. 索引建议\\n4. 执行计划分析")
.build());
}
// 渲染提示模板
public String renderTemplate(String templateName, Map<String, Object> variables) {
PromptTemplate template = templates.get(templateName);
if (template == null) {
throw new IllegalArgumentException("Template not found: " + templateName);
}
return template.render(variables);
}
}
2. SpringAI中的机器学习模型集成与管理
2.1 多模型集成策略
2.1.1 模型配置与加载
SpringAI支持同时集成多个AI模型,实现不同场景下的最优选择。
@Configuration
public class MultiModelConfig {
// OpenAI GPT模型配置
@Bean("gptModel")
public ChatModel gptModel() {
return OpenAiChatModel.builder()
.modelName("gpt-4")
.temperature(0.7)
.maxTokens(2048)
.apiKey("${openai.api.key}")
.build();
}
// Hugging Face模型配置
@Bean("hfModel")
public ChatModel huggingFaceModel() {
return HuggingFaceChatModel.builder()
.modelId("microsoft/DialoGPT-large")
.accessToken("${hf.access.token}")
.timeout(Duration.ofMinutes(2))
.build();
}
// 本地模型配置
@Bean("localModel")
public ChatModel localModel() {
return LocalAiChatModel.builder()
.baseUrl("http://localhost:8080")
.modelName("llama2")
.temperature(0.8)
.build();
}
}
2.1.2 智能模型路由
根据请求特征智能选择最适合的AI模型,平衡性能与成本。
@Service
public class SmartModelRouter {
@Autowired
private Map<String, ChatModel> availableModels;
@Autowired
private ModelPerformanceMonitor performanceMonitor;
// 智能路由算法
public ChatModel routeModel(AIRequest request) {
// 基于请求复杂度选择模型
double complexity = calculateComplexity(request);
if (complexity < 0.3) {
// 简单任务使用本地模型
return availableModels.get("localModel");
} else if (complexity < 0.7) {
// 中等复杂度使用Hugging Face
return availableModels.get("hfModel");
} else {
// 复杂任务使用GPT-4
return availableModels.get("gptModel");
}
}
// 计算请求复杂度
private double calculateComplexity(AIRequest request) {
String text = request.getInput();
// 多维度复杂度评估
double lengthScore = Math.min(text.length() / 1000.0, 1.0);
double domainScore = detectDomainComplexity(text);
double languageScore = detectLanguageComplexity(text);
return (lengthScore * 0.4 + domainScore * 0.4 + languageScore * 0.2);
}
private double detectDomainComplexity(String text) {
// 检测专业术语密度
String[] technicalTerms = {"算法", "架构", "优化", "并发", "分布式"};
int count = 0;
for (String term : technicalTerms) {
if (text.contains(term)) count++;
}
return Math.min(count / 5.0, 1.0);
}
private double detectLanguageComplexity(String text) {
// 检测语言复杂度(中英文混合等)
boolean hasChinese = text.matches(".*[\\u4e00-\\u9fa5].*");
boolean hasEnglish = text.matches(".*[a-zA-Z].*");
return (hasChinese && hasEnglish) ? 0.8 : 0.3;
}
}
2.2 模型版本管理与A/B测试
2.2.1 模型版本控制
实现AI模型的版本管理,支持灰度发布和快速回滚。
@Entity
@Table(name = "ai_model_versions")
public class AIModelVersion {
@Id
@GeneratedValue(strategy = GenerationType.UUID)
private String id;
private String modelId;
private String version;
private String description;
private ModelStatus status;
private double trafficPercentage;
private LocalDateTime createdAt;
private Map<String, Object> metrics;
// 构造函数、getter、setter省略
}
@Service
public class ModelVersionService {
@Autowired
private ModelVersionRepository versionRepository;
// 发布新版本
public AIModelVersion publishVersion(String modelId, String version,
ModelConfig config, double initialTraffic) {
AIModelVersion modelVersion = new AIModelVersion();
modelVersion.setModelId(modelId);
modelVersion.setVersion(version);
modelVersion.setStatus(ModelStatus.DEPLOYING);
modelVersion.setTrafficPercentage(initialTraffic);
modelVersion.setCreatedAt(LocalDateTime.now());
// 保存版本信息
return versionRepository.save(modelVersion);
}
// 调整流量分配
public void adjustTraffic(String versionId, double newPercentage) {
AIModelVersion version = versionRepository.findById(versionId)
.orElseThrow(() -> new RuntimeException("Version not found"));
// 验证流量百分比
validateTrafficPercentage(version.getModelId(), newPercentage);
version.setTrafficPercentage(newPercentage);
versionRepository.save(version);
// 更新负载均衡配置
updateLoadBalancerConfig(version.getModelId());
}
// 验证流量分配
private void validateTrafficPercentage(String modelId, double newPercentage) {
List<AIModelVersion> activeVersions = versionRepository
.findByModelIdAndStatus(modelId, ModelStatus.ACTIVE);
double totalPercentage = activeVersions.stream()
.mapToDouble(AIModelVersion::getTrafficPercentage)
.sum();
if (totalPercentage + newPercentage > 100.0) {
throw new IllegalArgumentException("Total traffic percentage cannot exceed 100%");
}
}
}
2.2.2 A/B测试框架
实现AI模型的A/B测试,对比不同版本的性能表现。
@Service
public class ABTestService {
@Autowired
private ExperimentRepository experimentRepository;
@Autowired
private MetricsCollector metricsCollector;
// 创建A/B测试实验
public Experiment createExperiment(String modelId, String experimentName,
List<String> versionIds, ABTestConfig config) {
Experiment experiment = new Experiment();
experiment.setName(experimentName);
experiment.setModelId(modelId);
experiment.setStartTime(LocalDateTime.now());
experiment.setEndTime(LocalDateTime.now().plusDays(config.getDurationDays()));
experiment.setStatus(ExperimentStatus.RUNNING);
experiment.setVersions(versionIds);
experiment.setSuccessMetric(config.getSuccessMetric());
return experimentRepository.save(experiment);
}
// 分配实验分组
public String assignExperimentGroup(String experimentId, String userId) {
Experiment experiment = experimentRepository.findById(experimentId)
.orElseThrow(() -> new RuntimeException("Experiment not found"));
// 基于用户ID的一致性哈希分组
int hash = Math.abs(userId.hashCode());
int groupIndex = hash % experiment.getVersions().size();
String assignedVersion = experiment.getVersions().get(groupIndex);
// 记录分组信息
recordExperimentAssignment(experimentId, userId, assignedVersion);
return assignedVersion;
}
// 收集实验数据
public void collectExperimentData(String experimentId, String userId,
String versionId, Map<String, Object> metrics) {
ExperimentData data = new ExperimentData();
data.setExperimentId(experimentId);
data.setUserId(userId);
data.setVersionId(versionId);
data.setMetrics(metrics);
data.setTimestamp(LocalDateTime.now());
metricsCollector.collect(data);
}
// 分析实验结果
public ABTestResult analyzeExperiment(String experimentId) {
Experiment experiment = experimentRepository.findById(experimentId)
.orElseThrow(() -> new RuntimeException("Experiment not found"));
List<ExperimentData> allData = metricsCollector.getExperimentData(experimentId);
ABTestResult result = new ABTestResult();
result.setExperimentId(experimentId);
result.setAnalysisDate(LocalDateTime.now());
// 按版本分组分析
Map<String, List<ExperimentData>> dataByVersion = allData.stream()
.collect(Collectors.groupingBy(ExperimentData::getVersionId));
for (String versionId : experiment.getVersions()) {
VersionPerformance performance = calculateVersionPerformance(
dataByVersion.get(versionId), experiment.getSuccessMetric());
result.addVersionPerformance(versionId, performance);
}
// 统计显著性检验
result.setStatisticalSignificance(calculateStatisticalSignificance(result));
result.setWinner(determineWinner(result));
return result;
}
private VersionPerformance calculateVersionPerformance(List<ExperimentData> data,
String successMetric) {
VersionPerformance performance = new VersionPerformance();
if (data == null || data.isEmpty()) {
return performance;
}
// 计算关键指标
double totalSuccess = data.stream()
.mapToDouble(d -> getMetricValue(d, successMetric))
.sum();
performance.setSampleSize(data.size());
performance.setSuccessRate(totalSuccess / data.size());
performance.setConfidenceInterval(calculateConfidenceInterval(data, successMetric));
return performance;
}
}
3. SpringAI对话系统与NLP应用开发
3.1 智能对话系统架构设计
3.1.1 多轮对话管理
实现上下文感知的智能对话系统,支持复杂的多轮交互。
@Service
public class ConversationalAIService {
@Autowired
private ChatMemory chatMemory;
@Autowired
private IntentClassifier intentClassifier;
@Autowired
private ResponseGenerator responseGenerator;
// 处理用户消息
public ChatResponse processMessage(String sessionId, String userMessage) {
// 1. 加载会话历史
ConversationHistory history = chatMemory.loadHistory(sessionId);
// 2. 意图识别
Intent intent = intentClassifier.classify(userMessage, history);
// 3. 实体提取
Map<String, Object> entities = extractEntities(userMessage, intent);
// 4. 上下文管理
ConversationContext context = updateContext(history, intent, entities);
// 5. 生成响应
String response = responseGenerator.generateResponse(context, intent);
// 6. 更新历史记录
history.addUserMessage(userMessage);
history.addAssistantMessage(response);
chatMemory.saveHistory(sessionId, history);
return ChatResponse.builder()
.message(response)
.intent(intent.getName())
.entities(entities)
.context(context.getCurrentState())
.build();
}
// 意图分类器实现
@Component
public class IntentClassifier {
@Autowired
private ChatModel chatModel;
public Intent classify(String message, ConversationHistory history) {
// 构建分类提示
String classificationPrompt = buildClassificationPrompt(message, history);
// 调用AI模型进行分类
String classificationResult = chatModel.call(classificationPrompt);
// 解析分类结果
return parseIntent(classificationResult);
}
private String buildClassificationPrompt(String message, ConversationHistory history) {
return String.format("""
请分析以下用户消息,识别其意图类别。
支持的意图类别:
– greeting: 问候语
– question: 提问
– complaint: 投诉
– praise: 表扬
– request: 请求
– goodbye: 告别
– other: 其他
历史对话:
%s
当前消息:%s
请返回JSON格式:
{
"intent": "意图类别",
"confidence": 0.95,
"reasoning": "分类理由"
}
""", formatHistory(history), message);
}
private Intent parseIntent(String classificationResult) {
try {
JsonNode result = new ObjectMapper().readTree(classificationResult);
return Intent.builder()
.name(result.get("intent").asText())
.confidence(result.get("confidence").asDouble())
.reasoning(result.get("reasoning").asText())
.build();
} catch (Exception e) {
return Intent.builder()
.name("unknown")
.confidence(0.0)
.reasoning("Classification failed")
.build();
}
}
}
}
3.1.2 个性化对话系统
基于用户画像和历史行为,提供个性化的对话体验。
@Service
public class PersonalizedChatService {
@Autowired
private UserProfileService userProfileService;
@Autowired
private PreferenceLearningService preferenceService;
// 个性化对话处理
public PersonalizedResponse generatePersonalizedResponse(
String userId, String message) {
// 1. 获取用户画像
UserProfile profile = userProfileService.getUserProfile(userId);
// 2. 分析用户偏好
UserPreferences preferences = preferenceService.analyzePreferences(userId);
// 3. 构建个性化提示
String personalizedPrompt = buildPersonalizedPrompt(message, profile, preferences);
// 4. 生成个性化响应
String response = generateAIResponse(personalizedPrompt);
// 5. 学习用户反馈
preferenceService.learnFromInteraction(userId, message, response);
return PersonalizedResponse.builder()
.response(response)
.personalizationLevel(calculatePersonalizationLevel(preferences))
.usedPreferences(preferences.getActivePreferences())
.build();
}
// 构建个性化提示
private String buildPersonalizedPrompt(String message, UserProfile profile,
UserPreferences preferences) {
StringBuilder prompt = new StringBuilder();
// 基础角色设定
prompt.append("你是一个智能助手,");
// 个性化角色调整
if (preferences.isTechnicalUser()) {
prompt.append("用户是技术专业人士,");
prompt.append("请使用准确的技术术语,");
prompt.append("可以提供详细的实现细节。");
} else {
prompt.append("用户是普通用户,");
prompt.append("请使用通俗易懂的语言,");
prompt.append("避免过多的技术细节。");
}
// 沟通风格调整
switch (preferences.getCommunicationStyle()) {
case FORMAL:
prompt.append("请使用正式、专业的沟通方式。");
break;
case CASUAL:
prompt.append("请使用轻松、友好的沟通方式。");
break;
case HUMOROUS:
prompt.append("可以适当使用幽默,让对话更有趣。");
break;
}
// 领域偏好
if (!preferences.getPreferredDomains().isEmpty()) {
prompt.append("用户特别关注的领域包括:")
.append(String.join("、", preferences.getPreferredDomains()))
.append("。");
}
// 历史上下文
if (preferences.hasRecentTopics()) {
prompt.append("最近的对话主题:")
.append(String.join("、", preferences.getRecentTopics()))
.append("。");
}
prompt.append("\\n\\n用户消息:").append(message);
prompt.append("\\n\\n请根据以上信息,提供个性化的回复:");
return prompt.toString();
}
// 用户画像服务
@Service
public class UserProfileService {
@Autowired
private UserProfileRepository profileRepository;
@Autowired
private BehaviorAnalysisService behaviorService;
public UserProfile getUserProfile(String userId) {
UserProfile profile = profileRepository.findByUserId(userId);
if (profile == null) {
// 创建默认用户画像
profile = createDefaultProfile(userId);
}
// 更新动态特征
updateDynamicFeatures(profile);
return profile;
}
private void updateDynamicFeatures(UserProfile profile) {
// 分析用户最近的行为
UserBehavior behavior = behaviorService.analyzeRecentBehavior(profile.getUserId());
// 更新技术专业度
profile.setTechnicalLevel(calculateTechnicalLevel(behavior));
// 更新活跃度
profile.setActivityLevel(calculateActivityLevel(behavior));
// 更新兴趣领域
profile.setInterestDomains(extractInterestDomains(behavior));
profileRepository.save(profile);
}
private double calculateTechnicalLevel(UserBehavior behavior) {
// 基于技术关键词使用频率计算
long technicalWords = behavior.getMessages().stream()
.flatMap(msg -> Arrays.stream(msg.split("\\\\s+")))
.filter(word -> isTechnicalTerm(word))
.count();
return Math.min(technicalWords / 100.0, 1.0);
}
private boolean isTechnicalTerm(String word) {
String[] techTerms = {"API", "算法", "数据库", "架构", "优化", "并发"};
return Arrays.stream(techTerms).anyMatch(term -> word.contains(term));
}
}
}
3.2 高级NLP应用开发
3.2.1 文本摘要与情感分析
实现企业级的文本分析功能,支持文档摘要、情感分析等应用场景。
@Service
public class NLPAnalysisService {
@Autowired
private ChatModel chatModel;
@Autowired
private EmbeddingModel embeddingModel;
// 智能文本摘要
public TextSummary generateSummary(String text, SummaryConfig config) {
// 根据文本长度选择合适的摘要策略
SummaryStrategy strategy = selectStrategy(text.length(), config);
switch (strategy) {
case EXTRACTIVE:
return generateExtractiveSummary(text, config);
case ABSTRACTIVE:
return generateAbstractiveSummary(text, config);
case HYBRID:
return generateHybridSummary(text, config);
default:
throw new IllegalArgumentException("Unknown strategy: " + strategy);
}
}
// 生成式摘要
private TextSummary generateAbstractiveSummary(String text, SummaryConfig config) {
String prompt = String.format("""
请为以下文本生成简洁的摘要:
原文:
%s
要求:
– 摘要长度:%d字以内
– 保留关键信息和核心观点
– 语言简洁明了
– 使用中文表达
请直接返回摘要内容,不要包含其他解释。
""", text, config.getMaxLength());
String summary = chatModel.call(prompt);
return TextSummary.builder()
.summary(summary.trim())
.strategy(SummaryStrategy.ABSTRACTIVE)
.originalLength(text.length())
.summaryLength(summary.length())
.compressionRatio((double) summary.length() / text.length())
.build();
}
// 情感分析
public SentimentAnalysis analyzeSentiment(String text) {
String prompt = String.format("""
请对以下文本进行情感分析,返回JSON格式结果:
文本:"%s"
分析要求:
1. 识别整体情感倾向(积极、消极、中性)
2. 评估情感强度(0-1的数值)
3. 识别主要情感关键词
4. 分析情感变化趋势(如果文本较长)
返回格式:
{
"overall_sentiment": "positive|negative|neutral",
"confidence": 0.95,
"keywords": ["开心", "满意"],
"intensity": 0.8,
"aspects": [
{
"aspect": "产品质量",
"sentiment": "positive",
"confidence": 0.9
}
]
}
""", text);
try {
String result = chatModel.call(prompt);
JsonNode sentimentData = new ObjectMapper().readTree(result);
return SentimentAnalysis.builder()
.overallSentiment(sentimentData.get("overall_sentiment").asText())
.confidence(sentimentData.get("confidence").asDouble())
.keywords(extractKeywords(sentimentData.get("keywords")))
.intensity(sentimentData.get("intensity").asDouble())
.aspects(extractAspects(sentimentData.get("aspects")))
.build();
} catch (Exception e) {
throw new RuntimeException("Sentiment analysis failed", e);
}
}
// 批量情感分析
public List<SentimentAnalysis> batchAnalyzeSentiment(List<String> texts) {
return texts.parallelStream()
.map(this::analyzeSentiment)
.collect(Collectors.toList());
}
// 实体识别与关系抽取
public EntityExtraction extractEntities(String text) {
String prompt = String.format("""
请从以下文本中提取实体和关系,返回JSON格式:
文本:"%s"
提取要求:
1. 识别人名、地名、组织名、时间、数字等实体
2. 识别实体之间的关系
3. 标注实体的类型和位置
返回格式:
{
"entities": [
{
"text": "张三",
"type": "PERSON",
"start": 0,
"end": 2,
"confidence": 0.95
}
],
"relations": [
{
"subject": "张三",
"predicate": "工作于",
"object": "阿里巴巴",
"confidence": 0.9
}
]
}
""", text);
try {
String result = chatModel.call(prompt);
JsonNode extractionData = new ObjectMapper().readTree(result);
return EntityExtraction.builder()
.entities(extractEntityList(extractionData.get("entities")))
.relations(extractRelationList(extractionData.get("relations")))
.build();
} catch (Exception e) {
throw new RuntimeException("Entity extraction failed", e);
}
}
}
4. SpringAI图像识别与计算机视觉实战
4.1 图像处理基础架构
4.1.1 图像预处理管道
构建高效的图像预处理流程,为后续的AI分析做准备。
@Component
public class ImagePreprocessingPipeline {
private final List<ImageProcessor> processors;
public ImagePreprocessingPipeline() {
this.processors = Arrays.asList(
new ResizeProcessor(800, 600),
new NormalizeProcessor(),
new NoiseReductionProcessor(),
new EnhancementProcessor()
);
}
// 图像预处理
public ProcessedImage preprocessImage(InputImage inputImage) {
BufferedImage image = inputImage.getImage();
ProcessingContext context = new ProcessingContext();
// 应用处理器链
for (ImageProcessor processor : processors) {
image = processor.process(image, context);
}
return ProcessedImage.builder()
.image(image)
.metadata(context.getMetadata())
.processingSteps(context.getSteps())
.build();
}
// 自适应预处理
public ProcessedImage adaptivePreprocess(InputImage inputImage,
ImageAnalysis analysis) {
List<ImageProcessor> adaptiveProcessors = selectProcessors(analysis);
BufferedImage image = inputImage.getImage();
ProcessingContext context = new ProcessingContext();
// 应用自适应处理器
for (ImageProcessor processor : adaptiveProcessors) {
image = processor.process(image, context);
}
return ProcessedImage.builder()
.image(image)
.metadata(context.getMetadata())
.processingSteps(context.getSteps())
.build();
}
// 根据图像分析结果选择处理器
private List<ImageProcessor> selectProcessors(ImageAnalysis analysis) {
List<ImageProcessor> selected = new ArrayList<>();
// 亮度调整
if (analysis.getBrightness() < 0.3) {
selected.add(new BrightnessProcessor(1.3));
} else if (analysis.getBrightness() > 0.8) {
selected.add(new BrightnessProcessor(0.8));
}
// 对比度调整
if (analysis.getContrast() < 0.4) {
selected.add(new ContrastProcessor(1.2));
}
// 锐化处理
if (analysis.getSharpness() < 0.5) {
selected.add(new SharpenProcessor());
}
// 噪声去除
if (analysis.getNoiseLevel() > 0.6) {
selected.add(new AdvancedNoiseReductionProcessor());
}
return selected;
}
}
// 图像处理器接口
public interface ImageProcessor {
BufferedImage process(BufferedImage image, ProcessingContext context);
String getName();
Map<String, Object> getParameters();
}
// 尺寸调整处理器
public class ResizeProcessor implements ImageProcessor {
private final int targetWidth;
private final int targetHeight;
private final boolean maintainAspectRatio;
public ResizeProcessor(int width, int height) {
this(width, height, true);
}
public ResizeProcessor(int width, int height, boolean maintainAspectRatio) {
this.targetWidth = width;
this.targetHeight = height;
this.maintainAspectRatio = maintainAspectRatio;
}
@Override
public BufferedImage process(BufferedImage image, ProcessingContext context) {
int originalWidth = image.getWidth();
int originalHeight = image.getHeight();
// 计算目标尺寸
Dimension targetSize = calculateTargetSize(originalWidth, originalHeight);
// 执行缩放
BufferedImage resizedImage = Scalr.resize(image,
Scalr.Method.ULTRA_QUALITY, Scalr.Mode.FIT_EXACT,
targetSize.width, targetSize.height);
// 记录处理信息
context.addStep("resize", Map.of(
"originalSize", originalWidth + "x" + originalHeight,
"targetSize", targetSize.width + "x" + targetSize.height,
"method", "ULTRA_QUALITY"
));
return resizedImage;
}
private Dimension calculateTargetSize(int originalWidth, int originalHeight) {
if (!maintainAspectRatio) {
return new Dimension(targetWidth, targetHeight);
}
// 保持宽高比
double aspectRatio = (double) originalWidth / originalHeight;
if (originalWidth > originalHeight) {
int newHeight = (int) (targetWidth / aspectRatio);
return new Dimension(targetWidth, Math.min(newHeight, targetHeight));
} else {
int newWidth = (int) (targetHeight * aspectRatio);
return new Dimension(Math.min(newWidth, targetWidth), targetHeight);
}
}
@Override
public String getName() {
return "resize";
}
@Override
public Map<String, Object> getParameters() {
return Map.of(
"width", targetWidth,
"height", targetHeight,
"maintainAspectRatio", maintainAspectRatio
);
}
}
4.2 计算机视觉应用实战
4.2.1 智能图像分类系统
构建企业级的图像分类解决方案,支持自定义模型和实时推理。
@Service
public class ImageClassificationService {
@Autowired
private ImageEmbeddingService embeddingService;
@Autowired
private ClassificationModel classificationModel;
@Autowired
private ClassificationCache classificationCache;
// 单张图像分类
public ClassificationResult classifyImage(MultipartFile imageFile) {
try {
// 1. 图像预处理
ProcessedImage processedImage = preprocessImage(imageFile);
// 2. 生成图像嵌入
float[] embeddings = embeddingService.generateEmbeddings(processedImage);
// 3. 检查缓存
String cacheKey = generateCacheKey(embeddings);
ClassificationResult cachedResult = classificationCache.get(cacheKey);
if (cachedResult != null) {
return cachedResult;
}
// 4. 模型推理
ClassificationResult result = classificationModel.classify(embeddings);
// 5. 后处理
result = postProcessResult(result, processedImage);
// 6. 缓存结果
classificationCache.put(cacheKey, result);
return result;
} catch (Exception e) {
throw new ImageClassificationException("Failed to classify image", e);
}
}
// 批量图像分类
public List<ClassificationResult> batchClassifyImages(List<MultipartFile> imageFiles) {
return imageFiles.parallelStream()
.map(this::classifyImage)
.collect(Collectors.toList());
}
// 自定义分类模型
public CustomModel trainCustomModel(List<LabeledImage> trainingData,
ModelConfig config) {
// 1. 数据预处理
List<ProcessedImage> processedImages = trainingData.stream()
.map(data -> preprocessImage(data.getImage(), data.getLabel()))
.collect(Collectors.toList());
// 2. 特征提取
List<float[]> embeddings = processedImages.stream()
.map(embeddingService::generateEmbeddings)
.collect(Collectors.toList());
// 3. 模型训练
CustomModel model = trainModel(embeddings, trainingData, config);
// 4. 模型评估
ModelEvaluation evaluation = evaluateModel(model, processedImages);
// 5. 保存模型
saveModel(model, evaluation);
return model;
}
// 实时分类服务
@Service
public class RealTimeClassificationService {
private final ExecutorService executorService = Executors.newFixedThreadPool(10);
private final Map<String, CompletableFuture<ClassificationResult>> pendingTasks =
new ConcurrentHashMap<>();
// 异步分类
public CompletableFuture<ClassificationResult> classifyAsync(
String imageId, byte[] imageData) {
CompletableFuture<ClassificationResult> future =
CompletableFuture.supplyAsync(() -> {
try {
return classifyImage(imageData);
} catch (Exception e) {
throw new CompletionException(e);
}
}, executorService);
pendingTasks.put(imageId, future);
// 清理完成的任务
future.whenComplete((result, throwable) -> {
pendingTasks.remove(imageId);
});
return future;
}
// 获取分类结果
public ClassificationResult getClassificationResult(String imageId,
long timeout,
TimeUnit unit) {
CompletableFuture<ClassificationResult> future = pendingTasks.get(imageId);
if (future == null) {
throw new IllegalArgumentException("No pending classification for image: " + imageId);
}
try {
return future.get(timeout, unit);
} catch (TimeoutException e) {
future.cancel(true);
throw new RuntimeException("Classification timeout", e);
} catch (Exception e) {
throw new RuntimeException("Classification failed", e);
}
}
// 批量异步处理
public Map<String, ClassificationResult> batchClassifyAsync(
Map<String, byte[]> imageDataMap) {
List<CompletableFuture<Pair<String, ClassificationResult>>> futures =
imageDataMap.entrySet().stream()
.map(entry -> CompletableFuture.supplyAsync(() -> {
try {
ClassificationResult result = classifyImage(entry.getValue());
return Pair.of(entry.getKey(), result);
} catch (Exception e) {
throw new CompletionException(e);
}
}, executorService))
.collect(Collectors.toList());
// 等待所有任务完成
CompletableFuture<Void> allOf = CompletableFuture.allOf(
futures.toArray(new CompletableFuture[0]));
try {
allOf.get(30, TimeUnit.SECONDS);
return futures.stream()
.filter(future -> future.isDone() && !future.isCompletedExceptionally())
.map(future -> {
try {
Pair<String, ClassificationResult> pair = future.get();
return pair;
} catch (Exception e) {
return null;
}
})
.filter(Objects::nonNull)
.collect(Collectors.toMap(
Pair::getKey,
Pair::getValue
));
} catch (Exception e) {
throw new RuntimeException("Batch classification failed", e);
}
}
}
}
4.2.2 OCR文档识别系统
实现企业级OCR解决方案,支持多种文档格式和复杂场景。
@Service
public class OCRDocumentService {
@Autowired
private OCRModel ocrModel;
@Autowired
private DocumentPreprocessor documentPreprocessor;
@Autowired
private TextPostProcessor textPostProcessor;
// 通用OCR识别
public OCRResult extractText(MultipartFile document) {
try {
// 1. 文档预处理
ProcessedDocument processedDoc = documentPreprocessor.preprocess(document);
// 2. 页面分割
List<Page> pages = splitPages(processedDoc);
// 3. 逐页OCR
List<PageResult> pageResults = pages.parallelStream()
.map(this::processPage)
.collect(Collectors.toList());
// 4. 文本后处理
OCRResult finalResult = postProcessResults(pageResults);
return finalResult;
} catch (Exception e) {
throw new OCRProcessingException("OCR extraction failed", e);
}
}
// 处理单个页面
private PageResult processPage(Page page) {
// 1. 布局分析
LayoutAnalysis layout = analyzeLayout(page);
// 2. 文本区域检测
List<TextRegion> textRegions = detectTextRegions(page, layout);
// 3. 区域OCR
List<RegionResult> regionResults = textRegions.stream()
.map(region -> extractTextFromRegion(region, page))
.collect(Collectors.toList());
// 4. 结构化重建
PageStructure structure = rebuildPageStructure(regionResults, layout);
return PageResult.builder()
.pageNumber(page.getNumber())
.textRegions(regionResults)
.structure(structure)
.confidence(calculateOverallConfidence(regionResults))
.build();
}
// 表格识别与提取
public TableExtraction extractTables(MultipartFile document) {
ProcessedDocument processedDoc = documentPreprocessor.preprocess(document);
// 1. 表格检测
List<TableRegion> tables = detectTables(processedDoc);
// 2. 表格结构分析
List<TableStructure> structures = tables.stream()
.map(this::analyzeTableStructure)
.collect(Collectors.toList());
// 3. 单元格内容提取
List<TableData> tableData = structures.stream()
.map(this::extractTableData)
.collect(Collectors.toList());
return TableExtraction.builder()
.tables(tableData)
.totalTables(tables.size())
.processingTime(Duration.between(startTime, Instant.now()))
.build();
}
// 手写体识别
@Service
public class HandwritingRecognitionService {
@Autowired
private HandwritingModel handwritingModel;
@Autowired
private CharacterSegmentationService segmentationService;
// 手写文本识别
public HandwritingResult recognizeHandwriting(MultipartFile imageFile) {
try {
// 1. 图像预处理
BufferedImage image = ImageIO.read(imageFile.getInputStream());
BufferedImage processedImage = preprocessHandwritingImage(image);
// 2. 文本行分割
List<TextLine> textLines = segmentationService.segmentLines(processedImage);
// 3. 字符分割
List<CharacterSegmentation> segmentations = textLines.stream()
.map(segmentationService::segmentCharacters)
.flatMap(List::stream)
.collect(Collectors.toList());
// 4. 字符识别
List<CharacterRecognition> recognitions = segmentations.stream()
.map(this::recognizeCharacter)
.collect(Collectors.toList());
// 5. 后处理与纠错
HandwritingResult result = postProcessRecognition(recognitions);
return result;
} catch (IOException e) {
throw new HandwritingRecognitionException("Failed to process handwriting image", e);
}
}
// 单个字符识别
private CharacterRecognition recognizeCharacter(CharacterSegmentation segmentation) {
BufferedImage charImage = segmentation.getImage();
// 1. 特征提取
float[] features = extractCharacterFeatures(charImage);
// 2. 模型推理
CharacterPrediction prediction = handwritingModel.predict(features);
// 3. 置信度评估
double confidence = evaluateConfidence(prediction);
// 4. 上下文优化
CharacterRecognition recognition = applyContextOptimization(
prediction, segmentation.getContext());
return recognition;
}
// 特征提取
private float[] extractCharacterFeatures(BufferedImage image) {
// 1. 几何特征
float[] geometricFeatures = extractGeometricFeatures(image);
// 2. 纹理特征
float[] textureFeatures = extractTextureFeatures(image);
// 3. 笔画特征
float[] strokeFeatures = extractStrokeFeatures(image);
// 4. 组合特征向量
return combineFeatures(geometricFeatures, textureFeatures, strokeFeatures);
}
// 几何特征提取
private float[] extractGeometricFeatures(BufferedImage image) {
int width = image.getWidth();
int height = image.getHeight();
// 宽高比
float aspectRatio = (float) width / height;
// 笔画密度
float strokeDensity = calculateStrokeDensity(image);
// 重心位置
float[] centroid = calculateCentroid(image);
// 笔画方向分布
float[] directionHistogram = calculateDirectionHistogram(image);
return ArrayUtils.addAll(
new float[]{aspectRatio, strokeDensity},
centroid,
directionHistogram
);
}
}
}
5. SpringAI生产部署与性能优化
5.1 生产环境部署策略
5.1.1 容器化部署
使用Docker和Kubernetes实现SpringAI应用的容器化部署。
# Dockerfile
FROM openjdk:17–jdk–slim
# 安装必要的依赖
RUN apt–get update && apt–get install –y \\
curl \\
&& rm –rf /var/lib/apt/lists/*
# 设置工作目录
WORKDIR /app
# 复制应用jar包
COPY target/spring–ai–application.jar app.jar
# 复制模型文件
COPY models/ /app/models/
# 设置JVM参数
ENV JAVA_OPTS="–Xms2g –Xmx4g –XX:+UseG1GC –XX:+UseStringDeduplication"
# 健康检查
HEALTHCHECK ––interval=30s ––timeout=10s ––start–period=60s ––retries=3 \\
CMD curl –f http://localhost:8080/actuator/health || exit 1
# 暴露端口
EXPOSE 8080
# 启动应用
ENTRYPOINT ["sh", "-c", "java $JAVA_OPTS -jar app.jar"]
# Kubernetes部署配置
apiVersion: apps/v1
kind: Deployment
metadata:
name: spring–ai–deployment
labels:
app: spring–ai
spec:
replicas: 3
selector:
matchLabels:
app: spring–ai
template:
metadata:
labels:
app: spring–ai
spec:
containers:
– name: spring–ai
image: spring–ai:latest
ports:
– containerPort: 8080
env:
– name: SPRING_PROFILES_ACTIVE
value: "production"
– name: OPENAI_API_KEY
valueFrom:
secretKeyRef:
name: ai–api–secrets
key: openai–api–key
resources:
requests:
memory: "2Gi"
cpu: "1000m"
limits:
memory: "4Gi"
cpu: "2000m"
livenessProbe:
httpGet:
path: /actuator/health
port: 8080
initialDelaySeconds: 60
periodSeconds: 30
readinessProbe:
httpGet:
path: /actuator/health
port: 8080
initialDelaySeconds: 30
periodSeconds: 10
volumeMounts:
– name: model–storage
mountPath: /app/models
– name: cache–storage
mountPath: /app/cache
volumes:
– name: model–storage
persistentVolumeClaim:
claimName: model–pvc
– name: cache–storage
emptyDir:
sizeLimit: 10Gi
—
apiVersion: v1
kind: Service
metadata:
name: spring–ai–service
spec:
selector:
app: spring–ai
ports:
– protocol: TCP
port: 80
targetPort: 8080
type: ClusterIP
—
apiVersion: autoscaling/v2
kind: HorizontalPodAutoscaler
metadata:
name: spring–ai–hpa
spec:
scaleTargetRef:
apiVersion: apps/v1
kind: Deployment
name: spring–ai–deployment
minReplicas: 2
maxReplicas: 10
metrics:
– type: Resource
resource:
name: cpu
target:
type: Utilization
averageUtilization: 70
– type: Resource
resource:
name: memory
target:
type: Utilization
averageUtilization: 80
behavior:
scaleUp:
stabilizationWindowSeconds: 60
policies:
– type: Percent
value: 100
periodSeconds: 60
scaleDown:
stabilizationWindowSeconds: 300
policies:
– type: Percent
value: 10
periodSeconds: 60
5.1.2 配置管理与监控
@Configuration
@Profile("production")
public class ProductionConfig {
@Bean
public MeterRegistry meterRegistry() {
return new PrometheusMeterRegistry(PrometheusConfig.DEFAULT);
}
@Bean
public TimedAspect timedAspect(MeterRegistry registry) {
return new TimedAspect(registry);
}
@Bean
public AiPerformanceMonitor performanceMonitor(MeterRegistry registry) {
return new AiPerformanceMonitor(registry);
}
}
@Component
public class AiPerformanceMonitor {
private final MeterRegistry meterRegistry;
private final Counter requestCounter;
private final Timer responseTimer;
private final Gauge activeConnectionsGauge;
public AiPerformanceMonitor(MeterRegistry meterRegistry) {
this.meterRegistry = meterRegistry;
this.requestCounter = Counter.builder("ai_requests_total")
.description("Total number of AI requests")
.tag("service", "spring-ai")
.register(meterRegistry);
this.responseTimer = Timer.builder("ai_response_duration")
.description("AI response duration")
.tag("service", "spring-ai")
.register(meterRegistry);
this.activeConnectionsGauge = Gauge.builder("ai_active_connections")
.description("Number of active AI connections")
.tag("service", "spring-ai")
.register(meterRegistry, this, AiPerformanceMonitor::getActiveConnections);
}
public void recordRequest(String model, String operation) {
requestCounter.increment("model", model, "operation", operation);
}
public void recordResponseTime(String model, String operation, long durationMs) {
responseTimer.record(durationMs, TimeUnit.MILLISECONDS,
"model", model, "operation", operation);
}
private int getActiveConnections() {
// 返回当前活跃连接数
return ConnectionPool.getActiveConnections();
}
}
5.2 性能优化策略
5.2.1 缓存优化
@Configuration
@EnableCaching
public class CacheConfig {
@Bean
public CacheManager cacheManager() {
return new ConcurrentMapCacheManager("ai-responses", "embeddings", "classifications");
}
@Bean
public RedisCacheManager redisCacheManager(RedisConnectionFactory connectionFactory) {
RedisCacheConfiguration config = RedisCacheConfiguration.defaultCacheConfig()
.entryTtl(Duration.ofHours(24))
.serializeKeysWith(RedisSerializationContext.SerializationPair
.fromSerializer(new StringRedisSerializer()))
.serializeValuesWith(RedisSerializationContext.SerializationPair
.fromSerializer(new GenericJackson2JsonRedisSerializer()));
return RedisCacheManager.builder(connectionFactory)
.cacheDefaults(config)
.build();
}
}
@Service
public class CachedAIService {
@Autowired
private ChatModel chatModel;
@Autowired
private CacheManager cacheManager;
// 带缓存的AI调用
@Cacheable(value = "ai-responses", key = "#prompt.hashCode()")
public String generateCachedResponse(String prompt, String model) {
// 生成缓存键
String cacheKey = generateCacheKey(prompt, model);
// 检查缓存
Cache cache = cacheManager.getCache("ai-responses");
Cache.ValueWrapper cached = cache.get(cacheKey);
if (cached != null) {
return (String) cached.get();
}
// 调用AI模型
String response = chatModel.call(prompt);
// 缓存结果
cache.put(cacheKey, response);
return response;
}
// 智能缓存策略
public String generateSmartCachedResponse(String prompt, Map<String, Object> context) {
// 1. 分析提示相似性
String similarKey = findSimilarPrompt(prompt);
if (similarKey != null) {
Cache cache = cacheManager.getCache("ai-responses");
Cache.ValueWrapper cached = cache.get(similarKey);
if (cached != null) {
String cachedResponse = (String) cached.get();
// 2. 适应性修改
return adaptResponse(cachedResponse, context);
}
}
// 3. 生成新响应
String response = chatModel.call(prompt);
// 4. 缓存并建立相似性关系
cacheSimilarPrompt(prompt, response);
return response;
}
// 相似性匹配
private String findSimilarPrompt(String prompt) {
// 使用嵌入向量计算相似性
float[] promptEmbedding = generateEmbedding(prompt);
// 搜索相似的提示
return embeddingService.findMostSimilar(promptEmbedding, 0.9);
}
// 响应适应性修改
private String adaptResponse(String response, Map<String, Object> context) {
String adaptationPrompt = String.format("""
基于以下上下文信息,请适应性修改提供的响应:
原始响应:
%s
上下文信息:
%s
请保持核心信息不变,仅根据上下文进行必要的调整。
""", response, formatContext(context));
return chatModel.call(adaptationPrompt);
}
}
5.2.2 连接池与并发优化
@Configuration
public class AIClientConfiguration {
@Bean
public RestTemplate aiRestTemplate() {
HttpComponentsClientHttpRequestFactory factory =
new HttpComponentsClientHttpRequestFactory();
// 连接池配置
PoolingHttpClientConnectionManager connectionManager =
new PoolingHttpClientConnectionManager();
connectionManager.setMaxTotal(200);
connectionManager.setDefaultMaxPerRoute(50);
HttpClient httpClient = HttpClientBuilder.create()
.setConnectionManager(connectionManager)
.setDefaultRequestConfig(RequestConfig.custom()
.setSocketTimeout(60000)
.setConnectTimeout(10000)
.setConnectionRequestTimeout(5000)
.build())
.build();
factory.setHttpClient(httpClient);
RestTemplate restTemplate = new RestTemplate(factory);
// 添加拦截器
restTemplate.getInterceptors().add(new AIRequestInterceptor());
return restTemplate;
}
@Bean
public ThreadPoolTaskExecutor aiTaskExecutor() {
ThreadPoolTaskExecutor executor = new ThreadPoolTaskExecutor();
executor.setCorePoolSize(10);
executor.setMaxPoolSize(50);
executor.setQueueCapacity(1000);
executor.setThreadNamePrefix("AI-Worker-");
executor.setRejectedExecutionHandler(new ThreadPoolExecutor.CallerRunsPolicy());
executor.initialize();
return executor;
}
}
// 异步AI服务
@Service
public class AsyncAIProcessingService {
@Autowired
private ThreadPoolTaskExecutor taskExecutor;
@Autowired
private MeterRegistry meterRegistry;
private final Map<String, CompletableFuture<AIResult>> processingTasks =
new ConcurrentHashMap<>();
// 异步批处理
public CompletableFuture<List<AIResult>> processBatchAsync(List<AIRequest> requests) {
List<CompletableFuture<AIResult>> futures = requests.stream()
.map(request -> CompletableFuture.supplyAsync(() -> {
return processAIRequest(request);
}, taskExecutor))
.collect(Collectors.toList());
// 组合所有异步任务
CompletableFuture<Void> allDone = CompletableFuture.allOf(
futures.toArray(new CompletableFuture[0]));
return allDone.thenApply(v ->
futures.stream()
.map(CompletableFuture::join)
.collect(Collectors.toList())
);
}
// 流式处理
public Flux<AIResult> streamProcess(List<AIRequest> requests) {
return Flux.fromIterable(requests)
.parallel()
.runOn(Schedulers.fromExecutor(taskExecutor))
.map(this::processAIRequest)
.ordered((a, b) -> Long.compare(a.getRequestId(), b.getRequestId()));
}
// 背压处理
public Flow.Publisher<AIResult> processWithBackpressure(List<AIRequest> requests) {
return subscriber -> {
AtomicLong pendingRequests = new AtomicLong(requests.size());
requests.forEach(request -> {
// 检查系统负载
if (getSystemLoad() > 0.8) {
// 应用背压,延迟处理
try {
Thread.sleep(100);
} catch (InterruptedException e) {
Thread.currentThread().interrupt();
}
}
// 异步处理
CompletableFuture.supplyAsync(() -> {
return processAIRequest(request);
}, taskExecutor).thenAccept(result -> {
subscriber.onNext(result);
// 检查是否完成
if (pendingRequests.decrementAndGet() == 0) {
subscriber.onComplete();
}
});
});
};
}
private double getSystemLoad() {
// 获取系统负载指标
return meterRegistry.find("system.cpu.usage")
.gauge()
.map(g -> g.value())
.orElse(0.0);
}
}
6. 总结与展望
6.1 知识点总结与扩展
通过本文的深入学习,我们全面掌握了SpringAI框架的核心技术和实战应用。让我们系统梳理一下所学的重要知识点:
6.1.1 核心技术要点回顾
1. SpringAI框架架构理解
- 统一API设计模式,屏蔽不同AI平台差异
- 模块化架构支持按需集成,降低系统复杂度
- 企业级特性集成,包括安全、监控、事务管理
- 生产就绪的错误处理和重试机制
2. 多模型集成与管理
- 智能模型路由算法,基于请求特征选择最优模型
- A/B测试框架,支持模型性能对比和优化
- 版本管理机制,实现灰度发布和快速回滚
- 性能监控和自适应调整策略
3. 对话系统与NLP应用
- 上下文感知的多轮对话管理
- 个性化对话系统,基于用户画像提供定制化服务
- 高级NLP应用,包括文本摘要、情感分析、实体识别
- 意图识别和实体提取的深度学习实现
4. 计算机视觉实战
- 图像预处理管道,支持自适应处理策略
- 智能图像分类系统,支持实时推理和批量处理
- OCR文档识别,包含手写体识别和表格提取
- 多模态AI集成,结合文本和图像处理能力
5. 生产部署与性能优化
- 容器化部署策略,使用Docker和Kubernetes
- 多层次缓存优化,包括Redis缓存和智能缓存策略
- 连接池管理和并发优化
- 实时监控和性能指标收集
6.1.2 技术深度扩展
1. 高级AI算法集成
// 强化学习集成示例
@Service
public class ReinforcementLearningService {
public RLModel trainModel(RLEnvironment environment, RLConfig config) {
// 实现Q-learning算法
QLearningAgent agent = new QLearningAgent(config.getLearningRate(),
config.getDiscountFactor());
// 训练循环
for (int episode = 0; episode < config.getMaxEpisodes(); episode++) {
State state = environment.reset();
while (!environment.isTerminal(state)) {
Action action = agent.selectAction(state);
Reward reward = environment.step(action);
State nextState = environment.getCurrentState();
agent.update(state, action, reward, nextState);
state = nextState;
}
}
return agent.getModel();
}
}
2. 联邦学习实现
@Service
public class FederatedLearningService {
public GlobalModel federatedTraining(List<ClientData> clientDataList) {
GlobalModel globalModel = new GlobalModel();
for (int round = 0; round < config.getRounds(); round++) {
List<LocalModel> localModels = clientDataList.parallelStream()
.map(client -> trainLocalModel(client, globalModel))
.collect(Collectors.toList());
// 聚合本地模型
globalModel = aggregateModels(localModels);
// 评估全局模型
double accuracy = evaluateModel(globalModel);
if (accuracy > config.getTargetAccuracy()) {
break;
}
}
return globalModel;
}
}
6.2 扩展阅读资料推荐
为了进一步深化对SpringAI及相关技术的理解,我为大家推荐以下优质学习资源:
6.2.1 官方文档与规范
1. SpringAI官方文档
- SpringAI参考指南
- API文档
2. 相关Spring项目
- Spring Boot官方文档
- Spring Cloud微服务
6.2.2 技术博客与教程
1. AI技术博客
- OpenAI技术博客:https://openai.com/research
- Hugging Face博客:https://huggingface.co/blog
- Google AI研究:https://ai.google/research
2. Spring生态技术文章
推荐我之前创作的相关技术文章:
– 《SpringBoot @Async异步注解深度解析》- 深入理解Spring异步处理机制
– 《SpringBoot_SpringSecurity深度解析》- 企业级安全框架实战指南
6.2.3 在线学习平台
1. 视频教程
- B站SpringAI系列教程
- 慕课网人工智能实战课程
- 极客时间AI应用开发专栏
2. 互动学习
- LeetCode AI算法练习
- Kaggle机器学习竞赛
- GitHub开源项目贡献
6.3 深度思考问题探讨
为了促进技术交流和创新思维,我提出以下几个值得深入探讨的问题:
6.3.1 技术架构挑战
1. 多模态AI集成架构设计
挑战:如何设计一个统一的多模态AI处理架构,能够同时处理文本、图像、音频、视频等不同类型的数据?
思考方向:
– 统一的数据表示和转换机制
– 模态间的注意力机制设计
– 异构计算资源调度优化
– 实时流处理能力
2. 大规模AI服务性能优化
挑战:在面对百万级并发请求时,如何保持AI服务的低延迟和高可用性?
思考方向:
– 模型压缩与量化技术
– 边缘计算与云边协同
– 智能负载均衡算法
– 自适应缓存策略
6.3.2 业务应用场景
1. AI驱动的个性化推荐系统
场景:构建基于SpringAI的电商推荐系统
技术要点:
– 用户行为序列建模
– 多模态商品特征提取
– 实时兴趣漂移检测
– 推荐解释性生成
讨论问题:
– 如何平衡推荐的准确性和多样性?
– 如何处理新用户和新商品的冷启动问题?
– 如何提供可解释的推荐理由?
2. 智能客服对话系统优化
场景:企业级智能客服系统的设计与实现
技术要点:
– 多轮对话状态管理
– 领域知识图谱构建
– 情感识别与响应调节
– 人工接管无缝切换
讨论问题:
– 如何评估对话系统的用户体验?
– 如何处理用户的情绪化表达?
– 如何实现知识库的自动更新?
6.3.3 技术发展趋势
1. 大语言模型(LLM)的应用落地
趋势分析:
– 从通用模型向领域专用模型发展
– 模型压缩和边缘部署技术成熟
– 多模态大模型成为新的研究热点
– 模型可解释性和安全性要求提高
讨论方向:
– 如何在企业应用中有效利用大模型能力?
– 如何解决大模型部署的资源消耗问题?
– 如何保证大模型输出的可靠性和安全性?
2. AI工程化与MLOps实践
发展趋势:
– AI模型生命周期管理标准化
– 自动化模型训练和部署流程
– AI应用的可观测性和监控体系
– 联邦学习和隐私保护技术
实践挑战:
– 如何建立完整的AI工程化流程?
– 如何实现模型的持续集成和持续部署?
– 如何评估和监控AI系统的业务价值?