MOSS-Transcribe-Diarize部署指南:本地环境与云端服务器的完整配置
【免费下载链接】MOSS-Transcribe-Diarize MOSS-Transcribe-Diarize 是 OpenMOSS 团队推出的开源语音转写与说话人分离模型。它对长音频、多说话人音频进行统一建模,支持自动语音识别、带说话人标识的转写、说话人分离、时间戳预测以及简洁转录文本生成。  项目地址: https://ai.gitcode.com/OpenMOSS/MOSS-Transcribe-Diarize
MOSS-Transcribe-Diarize是OpenMOSS团队推出的开源语音转写与说话人分离模型,它能够对长音频、多说话人音频进行统一建模,支持自动语音识别、带说话人标识的转写、说话人分离、时间戳预测以及简洁转录文本生成。这篇终极部署指南将为您详细介绍如何在本地环境和云端服务器上快速配置这一强大的语音处理工具。🚀
📋 系统环境要求与准备工作
在开始部署之前,请确保您的系统满足以下基本要求:
硬件要求
- GPU:推荐NVIDIA GPU(8GB+显存)以获得最佳性能
- CPU:多核处理器(建议8核以上)
- 内存:至少16GB RAM
- 存储:10GB以上可用空间
软件要求
- 操作系统:Linux(Ubuntu 20.04+)、macOS或Windows(WSL2)
- Python版本:Python 3.12(推荐)
- CUDA版本:11.8或更高(GPU环境)
- FFmpeg:音频/视频解码支持
🚀 本地环境快速部署步骤
步骤1:克隆项目仓库
首先从官方仓库克隆项目代码:
git clone https://gitcode.com/OpenMOSS/MOSS-Transcribe-Diarize
cd MOSS-Transcribe-Diarize
步骤2:创建Python虚拟环境
使用Conda或venv创建独立的Python环境:
# 使用Conda(推荐)
conda create -n moss-transcribe-diarize python=3.12 -y
conda activate moss-transcribe-diarize
# 或者使用venv
python -m venv venv
source venv/bin/activate # Linux/macOS
# 或 venv\\Scripts\\activate # Windows
步骤3:安装系统依赖
安装FFmpeg用于音频/视频解码:
# Ubuntu/Debian
sudo apt-get update
sudo apt-get install ffmpeg
# macOS
brew install ffmpeg
# Windows(WSL2)
sudo apt-get update
sudo apt-get install ffmpeg
步骤4:安装Python依赖
根据您的硬件环境选择合适的安装方式:
基础安装(CPU/GPU通用):
pip install –extra-index-url https://download.pytorch.org/whl/cu128 -e ".[torch-runtime]"
GPU加速安装(支持FlashAttention 2):
pip install –extra-index-url https://download.pytorch.org/whl/cu128 -e ".[torch-runtime,flash-attn]"
🏗️ 云端服务器部署配置
云平台选择建议
- AWS:推荐使用g4dn.xlarge或p3.2xlarge实例
- Google Cloud:推荐使用n1-standard-8 with T4/V100 GPU
- Azure:推荐使用NC6s_v3或NDasr_v4系列
- 阿里云:推荐使用ecs.gn6i-c8g1.2xlarge
Docker容器化部署
创建Dockerfile进行容器化部署:
FROM nvidia/cuda:12.1.1-cudnn8-runtime-ubuntu22.04
# 安装系统依赖
RUN apt-get update && apt-get install -y \\
python3.12 \\
python3-pip \\
ffmpeg \\
&& rm -rf /var/lib/apt/lists/*
# 设置工作目录
WORKDIR /app
# 复制项目文件
COPY . .
# 安装Python依赖
RUN pip3 install –no-cache-dir –extra-index-url https://download.pytorch.org/whl/cu121 \\
-e ".[torch-runtime,flash-attn]"
# 设置入口点
CMD ["python3", "inference_script.py"]
Kubernetes部署配置
对于生产环境,可以使用Kubernetes进行弹性部署:
apiVersion: apps/v1
kind: Deployment
metadata:
name: moss-transcribe-diarize
spec:
replicas: 2
selector:
matchLabels:
app: moss-transcribe
template:
metadata:
labels:
app: moss-transcribe
spec:
containers:
– name: moss-container
image: your-registry/moss-transcribe-diarize:latest
resources:
limits:
nvidia.com/gpu: 1
memory: "16Gi"
requests:
nvidia.com/gpu: 1
memory: "8Gi"
ports:
– containerPort: 8000
🔧 模型架构与核心文件
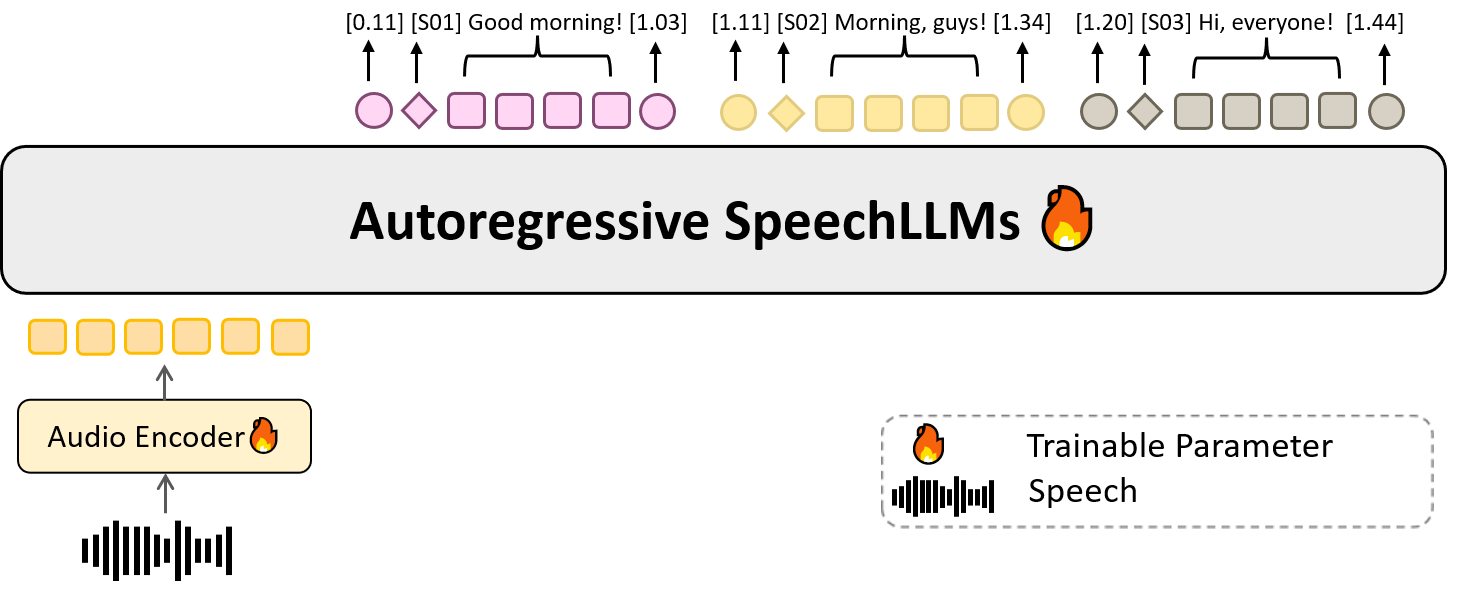
MOSS-Transcribe-Diarize采用模块化音频-语言设计,包含三个核心组件:音频编码器、模态适配器和因果语言模型。以下是项目中的关键配置文件:
核心配置文件:
- 模型配置:configuration_moss_transcribe_diarize.py – 定义模型架构参数
- 模型实现:modeling_moss_transcribe_diarize.py – 核心模型实现
- 数据处理:processing_moss_transcribe_diarize.py – 音频数据处理逻辑
配置文件说明:
- config.json – 主配置文件
- preprocessor_config.json – 预处理器配置
- processor_config.json – 处理器配置
- generation_config.json – 生成参数配置
🎯 快速测试与验证
命令行推理测试
使用内置的推理脚本进行快速测试:
# 基础推理(贪婪解码)
python -c "
from transformers import AutoModelForCausalLM, AutoProcessor
import torch
model_id = 'OpenMOSS-Team/MOSS-Transcribe-Diarize'
device = 'cuda' if torch.cuda.is_available() else 'cpu'
dtype = torch.bfloat16 if device == 'cuda' else torch.float32
model = AutoModelForCausalLM.from_pretrained(
model_id,
trust_remote_code=True,
dtype='auto',
).to(dtype=dtype).to(device).eval()
processor = AutoProcessor.from_pretrained(
model_id,
trust_remote_code=True,
fix_mistral_regex=True,
)
print('✅ 模型加载成功!')
print(f'设备:{device}')
print(f'精度:{dtype}')
"
音频文件测试
准备一个测试音频文件进行完整推理:
import torch
from transformers import AutoModelForCausalLM, AutoProcessor
from moss_transcribe_diarize.inference_utils import (
build_transcription_messages,
generate_transcription,
resolve_device,
)
# 配置模型路径和音频文件
model_id = "OpenMOSS-Team/MOSS-Transcribe-Diarize"
audio_path = "test_audio.mp3" # 替换为您的音频文件
# 自动选择设备
device = resolve_device("auto")
dtype = torch.bfloat16 if device.type == "cuda" else torch.float32
# 加载模型和处理器
model = AutoModelForCausalLM.from_pretrained(
model_id,
trust_remote_code=True,
dtype="auto",
).to(dtype=dtype).to(device).eval()
processor = AutoProcessor.from_pretrained(
model_id,
trust_remote_code=True,
fix_mistral_regex=True,
)
# 构建消息并生成转录
messages = build_transcription_messages(audio_path)
result = generate_transcription(
model,
processor,
messages,
max_new_tokens=2048,
do_sample=False,
device=device,
dtype=dtype,
)
print("转录结果:")
print(result["text"])
⚡ 性能优化技巧
GPU内存优化
# 使用半精度推理减少内存占用
model = AutoModelForCausalLM.from_pretrained(
model_id,
trust_remote_code=True,
torch_dtype=torch.float16, # 使用半精度
low_cpu_mem_usage=True,
).to(device).eval()
# 启用梯度检查点(适用于长音频)
model.gradient_checkpointing_enable()
批处理优化
对于批量处理多个音频文件:
from concurrent.futures import ThreadPoolExecutor
import os
def process_audio_file(audio_file):
"""处理单个音频文件"""
messages = build_transcription_messages(audio_file)
result = generate_transcription(
model, processor, messages,
max_new_tokens=2048,
do_sample=False,
device=device,
dtype=dtype,
)
return result["text"]
# 批量处理
audio_files = ["audio1.mp3", "audio2.mp3", "audio3.mp3"]
with ThreadPoolExecutor(max_workers=2) as executor:
results = list(executor.map(process_audio_file, audio_files))
🔍 常见问题排查
问题1:CUDA内存不足
解决方案:
- 减小批处理大小
- 使用torch.cuda.empty_cache()清理缓存
- 启用梯度检查点
- 使用CPU模式进行推理
问题2:音频格式不支持
解决方案:
- 确保已安装FFmpeg
- 将音频转换为支持的格式(MP3、WAV、MP4)
- 检查音频采样率(支持16kHz)
问题3:模型加载失败
解决方案:
- 检查网络连接
- 验证模型文件完整性
- 确保使用正确的trust_remote_code=True参数
📊 输出格式说明
MOSS-Transcribe-Diarize的标准输出格式为:
[start_time][Sxx]transcribed speech[end_time]
示例输出:
[0.48][S01]Welcome everyone[1.66][12.26][S02]The new transcription pipeline is ready for evaluation[13.81][14.36][S01]Great, include the diarization results in the report[18.76]
格式说明:
- start_time和end_time:时间戳(秒)
- [S01]、[S02]:匿名说话人标签
- 说话人标签是相对标签,不代表真实说话人身份
🎉 部署成功验证
完成部署后,运行以下命令验证系统状态:
# 验证Python环境
python -c "import torch; print(f'PyTorch版本: {torch.__version__}')"
python -c "import transformers; print(f'Transformers版本: {transformers.__version__}')"
# 验证CUDA(如果使用GPU)
python -c "import torch; print(f'CUDA可用: {torch.cuda.is_available()}'); print(f'GPU数量: {torch.cuda.device_count()}')"
# 验证FFmpeg
ffmpeg -version | head -1
📈 生产环境最佳实践
监控与日志
- 使用Prometheus和Grafana监控GPU使用率
- 设置结构化日志记录(JSON格式)
- 实现健康检查端点
扩展性考虑
- 使用Redis或RabbitMQ进行任务队列管理
- 实现水平扩展支持
- 添加负载均衡器
安全建议
- 限制API访问权限
- 实现请求速率限制
- 定期更新依赖包
通过本指南,您已经掌握了MOSS-Transcribe-Diarize在本地环境和云端服务器的完整部署流程。这个强大的语音转写与说话人分离工具将为您的音频处理需求提供专业级的解决方案!🎤✨
【免费下载链接】MOSS-Transcribe-Diarize MOSS-Transcribe-Diarize 是 OpenMOSS 团队推出的开源语音转写与说话人分离模型。它对长音频、多说话人音频进行统一建模,支持自动语音识别、带说话人标识的转写、说话人分离、时间戳预测以及简洁转录文本生成。 项目地址: https://ai.gitcode.com/OpenMOSS/MOSS-Transcribe-Diarize
创作声明:本文部分内容由AI辅助生成(AIGC),仅供参考