前提
操作步骤
1、从Cygwin官网下载安装程序,并安装以下组件:gcc-core、gcc-g++、make、libpcre-devel、zlib-devel、openssl-devel、wget、git。(安装步骤可参考https://blog.csdn.net/ZHOUPUYU/article/details/144184665)
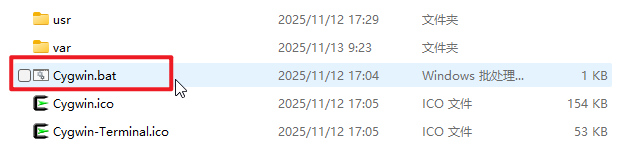
2、下载后打开Cygwin终端(管理员运行)
3、下载Nginx
mkdir tmp/nginx_build #创建目录
cd tmp/nginx_build #进入nginx存放目录
wget http://nginx.org/download/nginx-1.27.1.tar.gz
tar -zxvf nginx-1.27.1.tar.gz
4、下载ngx_http_proxy_connect_module模块
git clone https://github.com/chobits/ngx_http_proxy_connect_module.git
5、进入Nginx目录下并应用补丁(注意nginx版本与补丁的版本要匹配)
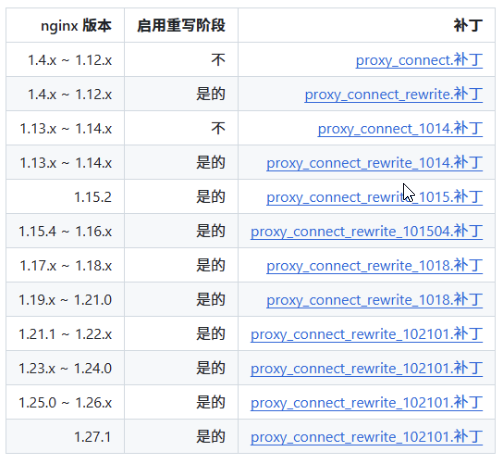
cd nginx-1.20.1
patch -p1 < tmp/nginx_build/ngx_http_proxy_connect_module/patch/proxy_connect_rewrite_102101.patch
6、非常重要的一步!配置文件中的路径字符转换在执行configure之前,需要确保所有路径都使用Unix风格的斜杠(/)而不是Windows风格的反斜杠(\\)
sed -i 's/\\r$//' /tmp/nginx_build/nginx-1.27.1/src/http/modules/ngx_http_proxy_connect_module/config
否则配置会报错:
adding module in /tmp/nginx_build/nginx-1.27.1/src/http/modules/ngx_http_proxy_connect_module
/tmp/nginx_build/nginx-1.27.1/src/http/modules/ngx_http_proxy_connect_module/config: line 2: $'\\r': command not found
/tmp/nginx_build/nginx-1.27.1/src/http/modules/ngx_http_proxy_connect_module/config: line 15: syntax error: unexpected end of file
7、配置Nginx,然后编译、安装
#配置
./configure \\
–add-module=/tmp/nginx_build/ngx_http_proxy_connect_module \\
–prefix=/usr/local/nginx
#编译
make
#安装(需要管理员权限)
make install
8、检查ngx_http_proxy_connect_module模块是否正常编译到nginx
nginx -V
#命令的结果中有显示“–add-module=/tmp/nginx_build/ngx_http_proxy_connect_module”
9、配置nginx 正向代理,然后检查配置文件语法,再启动nginx。注意配置文件的地址,不是nginx-1.20.1下的配置文件,是configure时“–prefix”后的地址:/usr/local/nginx
server {
listen 3129; #端口号随便
# dns resolver used by forward proxying
resolver 114.114.114.114 ipv6=off;
# forward proxy for CONNECT requests
proxy_connect;
proxy_connect_allow 443 80;
proxy_connect_connect_timeout 10s;
proxy_connect_data_timeout 10s;
# defined by yourself for non-CONNECT requests
# Example: reverse proxy for non-CONNECT requests
location / {
proxy_pass http://$host;
proxy_set_header Host $host;
}
}
nginx -t #检查配置文件语法
nginx -s reload #重新加载配置
/usr/local/nginx/sbin/nginx #启动
10、测试https请求
curl -x http://localhost:3129 https://httpbin.org/ip
#返回本地IP地址
可能会遇到的问题
unknown directive "proxy_connect" in /usr/local/nginx/conf/nginx.conf
执行以下检查:
grep -n "proxy_connect" /tmp/nginx_build/nginx-1.27.1/objs/Makefile
#正确应该返回:…ngx_http_proxy_connect_module/ngx_http_proxy_connect_module.c…
cat /tmp/nginx_build/nginx-1.27.1/objs/ngx_modules.c | grep -i proxy_connect
#正确应该返回:extern ngx_module_t ngx_http_proxy_connect_module;……
grep -n "NGX_HTTP_PROXY_CONNECT" /tmp/nginx_build/nginx-1.27.1/objs/ngx_auto_config.h
#正确应该返回:…NGX_HTTP_PROXY_CONNECT…
如果没有:在“/tmp/nginx_build/nginx-1.27.1/src/http/modules”目录下手动新建一个“ngx_http_proxy_connect_module”文件夹,再把git下来的ngx_http_proxy_connect_module文件夹内的文件全复制进去,或者用命令:
mkdir -p /tmp/nginx_build/nginx-1.27.1/src/http/modules/ngx_http_proxy_connect_module
cp -r /tmp/nginx_build/ngx_http_proxy_connect_module/* /tmp/nginx_build/nginx-1.27.1/src/http/modules/ngx_http_proxy_connect_module/
然后重新编译:
make clean #先清理之前的编译文件
rm -rf objs/*
#编译步骤同上
./configure \\
–prefix=/usr/local/nginx \\
–with-http_ssl_module \\
–add-module=/tmp/nginx_build/nginx-1.27.1/src/http/modules/ngx_http_proxy_connect_module
……
编译完成后可再检查一下
/usr/local/nginx/sbin/nginx -T 2>&1 | grep -i proxy_connect
#正确返回:
#proxy_connect;
#proxy_connect_allow 443 80;
#proxy_connect_connect_timeout 10s;
#proxy_connect_data_timeout 10s;