绪论

每日激励:“不设限和自我肯定的心态:I can do all things。 — Stephen Curry”
绪论:
本章是线程的第三篇章,前两章带你了解了线程以及线程原生库中的操作,本章主要结合前两章的基础,学习入门c++中的线程函数,了解其底层是什么,并且自己封装一个线程库来使用并巩固。
————————
早关注不迷路,话不多说安全带系好,发车啦(建议电脑观看)。
站在语言角度再理解pthread库
C++中的多线程
#include<unistd.h>
#include<thread>
#include<iostream>
using namespace std;
void myrun()
{
while(true)
{
cout << "i am thread" << endl;
sleep(1);
}
}
int main()
{
thread t(myrun);
t.join();
return 0;
}
其中使用到的c++中封装的线程函数 thread、join,他们在编译的时候即使看起来没有使用到原生线程库,但同样要加-lpthread,因为c++的多线程本质上就是封装了Linux(或Windows)的多线程,所以同样要包括pthread库。
也就是说:c++的库中的函数本质是对pthread库中系统调用函数(pthread_create)的封装(C++11内部的多线程,本质就是对原生线程库的封装)
线程属性的局部存储
含线程代码中的全局变量,在多个线程中是共享的。
代码:
#include<iostream>
#include<unistd.h>
#include<cstdlib>
#include<string>
#include<pthread.h>
#include <thread>
using namespace std;
int g_val = 100;
void* ThreadRountine(void * args)
{
string name = static_cast<const char *>(args);
while(true)
{
sleep(1);
cout << name <<": g_val:" << g_val << " &g_val: " << &g_val << endl;
g_val—;
}
return nullptr;
}
int main()
{
pthread_t tid;
pthread_create(&tid,nullptr,ThreadRountine,(void*)"thread1");
while(true)
{
sleep(1);
cout << "main thread:"<<" g_val: " << g_val << " &g_val: " << &g_val << endl;
}
pthread_join(tid,nullptr);
}
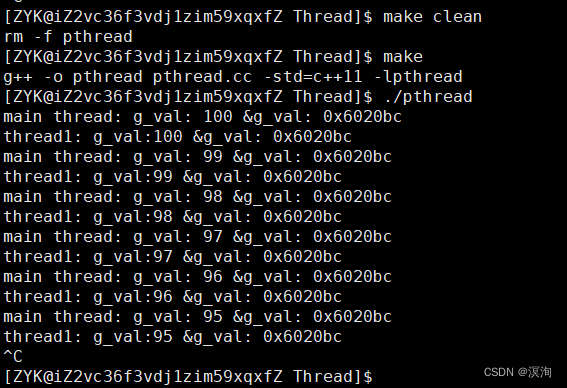
此处线程中进行了递减操作,发现外部主线程中同样也减少了:也就说明他们是共享的资源!
__thread
线程的局部存储:当给全局变量前加上__thread编译选项,这样就能实现线程的局部存储,每个线程都有自己的该全局变量。
注意点:__thread只能针对内置类型
__thread int g_val = 100;
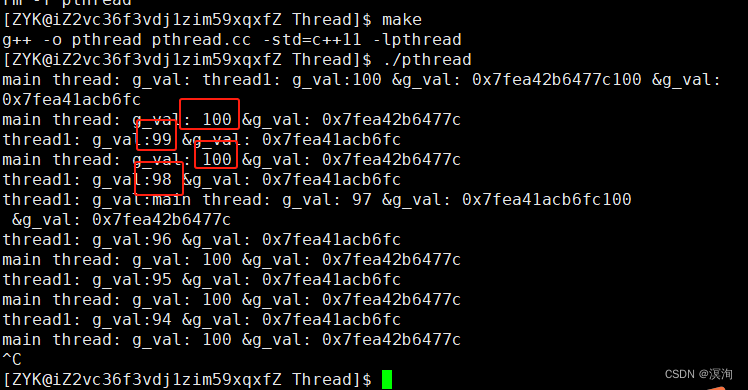
上面的g_val就各自有一份了!
注:
线程中可以进行fork吗?虽然是可以在多线程程序中调用 fork(),但这种做法可能会导致程序的行为不稳定。尤其是如果你在多线程中使用 fork() 然后调用 exec() 来替换程序,可能会破坏多线程环境,因为 exec() 会终止所有线程。因此,除非非常必要,否则在多线程环境中使用 fork() 一般是不推荐的,特别是如果你打算进行进程替换。
模拟实现封装c++中的线程:
根据之前所知:c++的线程库底层本质就是封装了原始线程库的,所以自己也能通过面向对象的封装来自己实现,从而让自己更加了解
(很多细节请看注释)
thread.hpp:
#pragma once
#include<iostream>
#include<string>
#include<functional>
#include<pthread.h>
using namespace std;
//typedef function<void()> func_t
using func_t = function<void()>;//返回值void 参数为空;
class Thread
{
public:
Thread(func_t func,const string& name)
:_tid(0),_name(name),_isrunning(false),_func(func)
{}
//因为在类内的函数默认是有this指针的这样就会导致pthread_create的threadrotine的类型不匹配而导致的无法传参
//所以解决方法就是改成静态函数,但此时又不能使用成员变量了
//所哟把参数args改成this传递进来!
static void *ThreadRotine(void* args)
{
Thread *ts = static_cast<Thread*>(args);//安全的类型转换
ts->_func();//执行函数
return nullptr;
}
bool Start()
{
int n = pthread_create(&_tid,nullptr,ThreadRotine,this);//创建线程
if(n == 0)
{
_isrunning = true;
return true;
}
else return false;
}
string Threadname()
{
return _name;
}
bool Join()
{
if(!_isrunning) return true;
int n = pthread_join(_tid,nullptr);//等待线程
if(n==0)
{
_isrunning = false;
return true;
}
return false;
}
bool Isrunning()
{
return _isrunning;
}
~Thread()
{}
private:
string _name;
func_t _func;
pthread_t _tid;//创建自动形成
bool _isrunning;
};
main.cpp:
#include<iostream>
#include<thread>
#include<cstdlib>
#include "Thread.hpp"
#include<unistd.h>
#include<vector>
using namespace std;
string GetThreadname()
{
static int number = 1;//本质就是全局变量
char name[64];
snprintf(name,sizeof(name),"thread-%d",number++);
return name;
}
void Print()
{
while(true)
{
cout << "hello Linux"" << endl;
sleep(1);
}
}
int main()
{
const int num = 5;
vector<Thread> threads;
for(int i = 0 ; i < num ;i++)
{
threads.push_back(Thread(Print,GetThreadname()));
}
//此时并没有启动线程
for(auto &t : threads)
{
cout << t.Threadname() << " is,running:" << t.Isrunning() <<endl;//打印线程名称即运行状态
}
sleep(5);
for(auto &t:threads)
{
t.Start();
}
//启动线程后
for(auto &t : threads)
{
cout << t.Threadname() << " is,running:" << t.Isrunning() <<endl;
}
for(auto &t : threads)
{
t.Join();
}
// Thread t(Print,GetThreadname());
// cout << "is thread running?: " << t.Isrunning() << endl;
// t.Start();
// cout << "is thread running?: " << t.Isrunning() << endl;
// t.Join();
return 0;
}
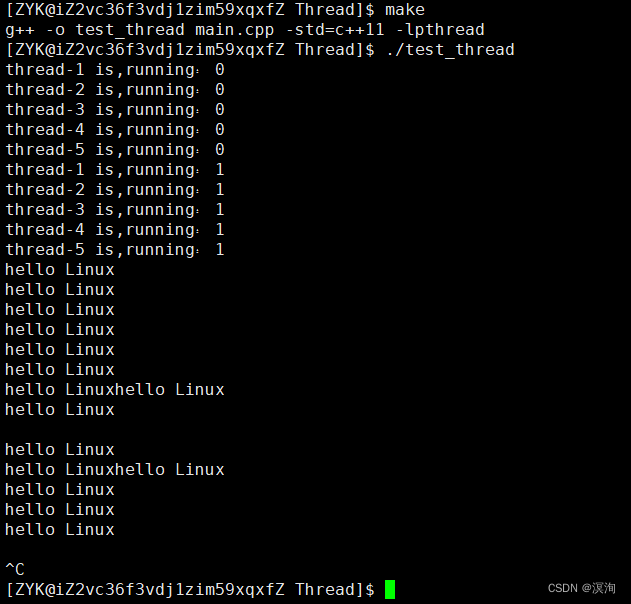
线程从未启动->启动->执行所对应的任务:
加入模板:写成能传参自定义函数和参数
//thread.hpp
#pragma once
#include<iostream>
#include<string>
#include<functional>
#include<pthread.h>
using namespace std;
//注意!!
//此处的修改,因为带有模板所以后面用该类型变成fun_t<T>
template<class T>
using func_t = function<void(T)>;//返回值void 参数为;
//加上模板,这个类型是给传进来的参数数据data的!
template<class T>
class Thread
{
public:
Thread(T data,func_t<T> func,const string& name)//此处从fun_t -> fun_t<T>
:_tid(0),_name(name),_isrunning(false),_func(func),_data(data)
{}
//因为在类内的函数默认是有this指针的这样就会导致pthread_create的threadrotine的类型不匹配而导致的无法传参
//所以解决方法就是改成静态函数,但此时又不能使用成员变量了,所哟把参数args改成this传递进来!
static void *ThreadRotine(void* args)
{
Thread *ts = static_cast<Thread*>(args);
ts->_func(ts->_data);
return nullptr;
}
//…和上面一样就省略了
private:
string _name;
func_t<T> _func;//此处从fun_t -> fun_t<T>
pthread_t _tid;//创建自动形成
bool _isrunning;
T _data;
};
// ———————————
//main.cpp
#include<iostream>
#include<thread>
#include<cstdlib>
#include"Thread.hpp"
#include<unistd.h>
#include<vector>
using namespace std;
string GetThreadname()
{
static int number = 1;//本质就是全局变量
char name[64];
snprintf(name,sizeof(name),"thread-%d",number++);
return name;
}
void Print(int num)
{
while(num)
{
cout << "hello Linux: " << num— << endl;
sleep(1);
}
}
int main()
{
Thread<int> t(10,Print,GetThreadname());
t.Start();
t.Join();
return 0;
}
本章完。预知后事如何,暂听下回分解。
如果有任何问题欢迎讨论哈!
如果觉得这篇文章对你有所帮助的话点点赞吧!
持续更新大量Linux细致内容,早关注不迷路。