yolo web端检测系统成品源代码 可以替换自己的模型 
使用Django和vue前后端分离 功能包含有注册,登录,图片检测,视频检测,摄像头检测,用户管理,历史检测图片管理,历史检测视频管理,历史检测摄像头管理等功能 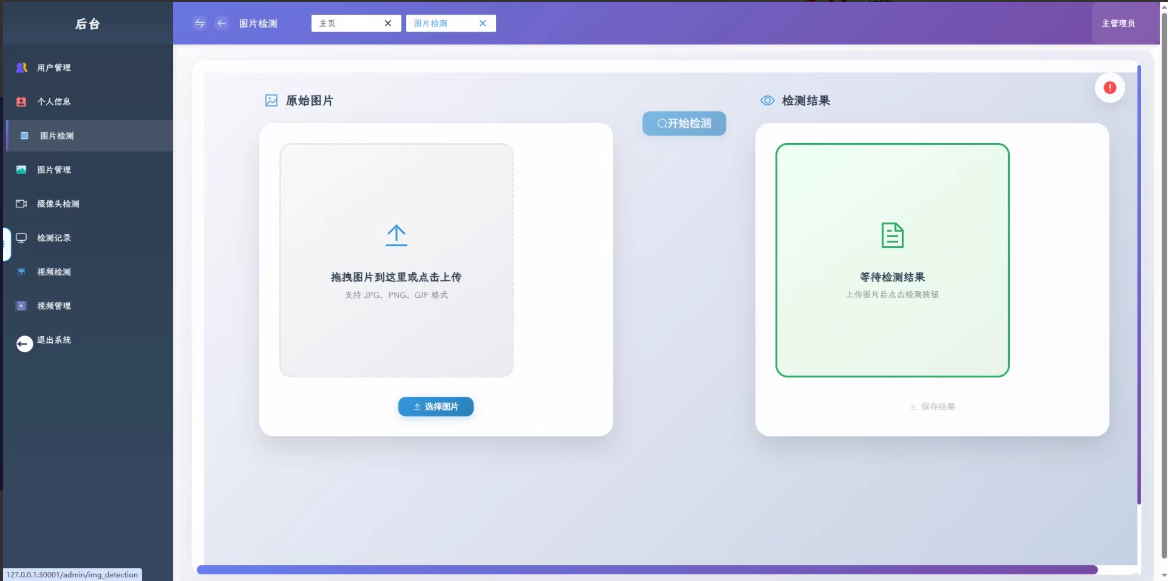
使用mysql数据库或sqlite数据库,可切换 默认使用yolov8默认模型 可以替换为你自己的模型 实现不同的检测功能 支持yolov5,yolov8 ,yolov9 , yolov10 ,yolo11 ,yolov12等版本的模型 支持警报功能+邮件功能 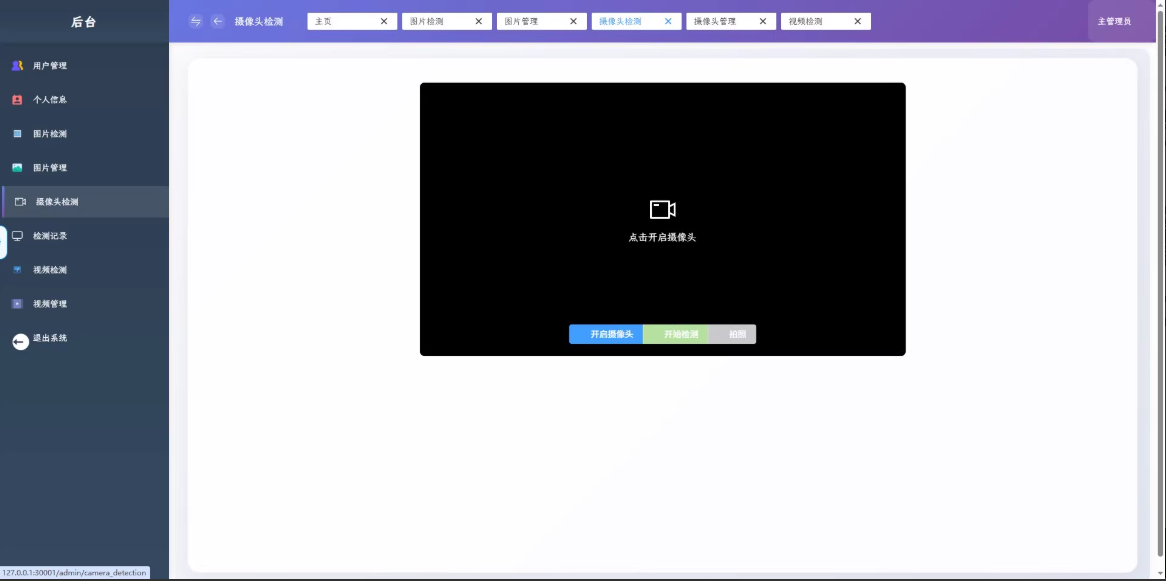 1
1 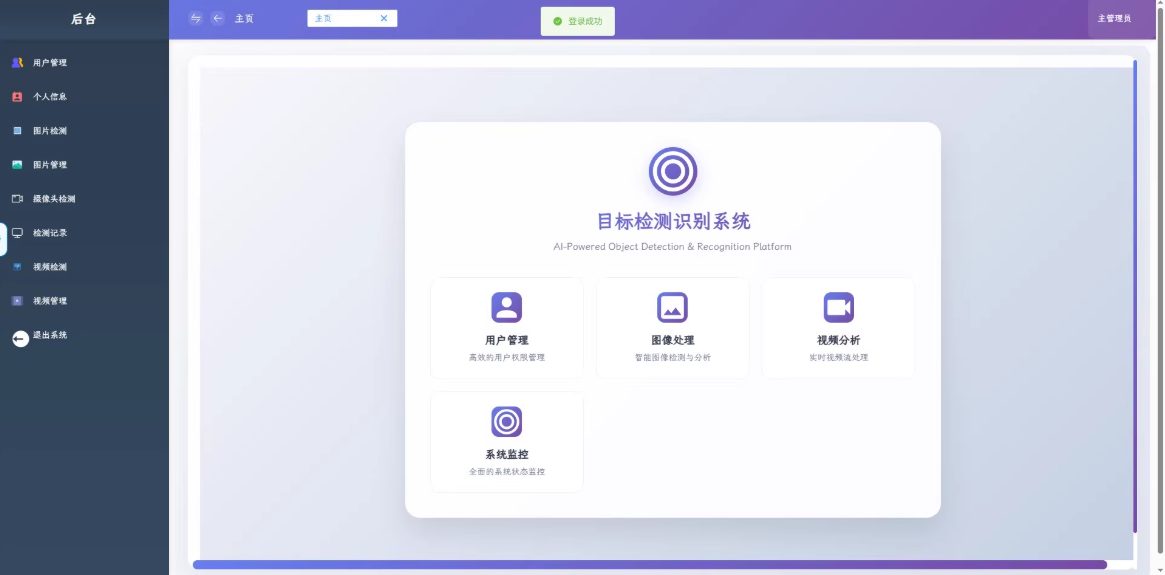 1
1 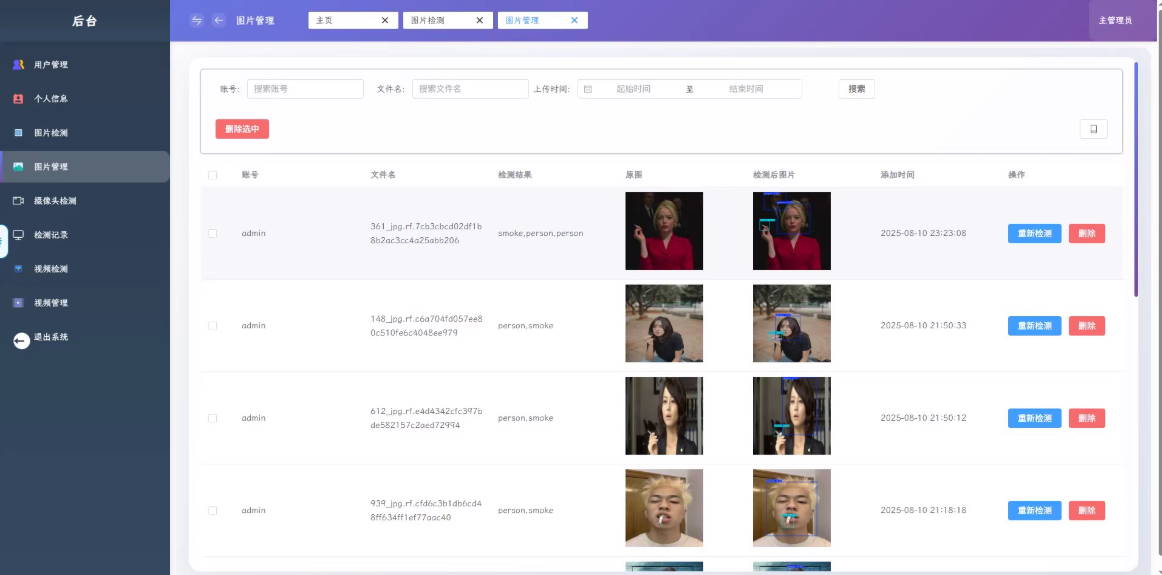 “基于Django + Vue的YOLO Web端通用检测系统”。该系统采用前后端分离架构,支持多种YOLO模型版本(v5/v8/v9/v10/v11/v12),并具备完善的用户管理、历史记录管理和实时摄像头检测功能。
以下是构建该系统的核心简易代码方案。
🏗️ 1. 项目结构概览
yolo_web_system/
├── backend/ # Django 后端
│ ├── manage.py
│ ├── core/ # 核心配置
│ ├── app/ # 业务应用
│ │ ├── models.py # 数据库模型
│ │ ├── views.py # API 接口 (检测、用户、记录)
│ │ ├── urls.py # 路由
│ │ └── utils.py # YOLO 推理工具类
│ └── requirements.txt
├── frontend/ # Vue 前端
│ ├── src/
│ │ ├── views/ # 页面 (Login, ImageDetect, Camera…)
│ │ ├── components/ # 组件 (Upload, VideoPlayer…)
│ │ ├── api/ # Axios 请求
│ │ └── router/ # 路由
│ └── package.json
└── weights/ # 模型权重目录
└── yolov8n.pt # 默认模型
🛠️ 2. 后端实现 (Django + YOLO)
A. 环境依赖 (backend/requirements.txt)
django>=4.0
djangorestframework
django-cors-headers
ultralytics>=8.0.0 # 支持 YOLOv8/v9/v10/v11
opencv-python
numpy
pillow
mysqlclient # 如果使用 MySQL
B. 数据库模型 (app/models.py)
用于存储检测历史记录。
from django.db import models
from django.contrib.auth.models import User
class DetectionRecord(models.Model):
DETECT_TYPE_CHOICES = [
('IMAGE', '图片'),
('VIDEO', '视频'),
('CAMERA', '摄像头'),
]
user = models.ForeignKey(User, on_delete=models.CASCADE)
detect_type = models.CharField(max_length=10, choices=DETECT_TYPE_CHOICES)
original_file = models.ImageField(upload_to='uploads/original/')
result_file = models.ImageField(upload_to='uploads/result/', null=True, blank=True)
result_labels = models.CharField(max_length=255) # 存储检测到的标签,如 "person,smoke"
confidence = models.FloatField(default=0.0)
created_at = models.DateTimeField(auto_now_add=True)
def __str__(self):
return f"{self.user.username} – {self.detect_type} – {self.created_at}"
C. YOLO 推理工具类 (app/utils.py)
核心逻辑:加载模型并推理,支持动态切换模型版本。
from ultralytics import YOLO
import cv2
import numpy as np
import os
# 全局模型实例 (启动时加载,避免重复加载)
MODEL_PATH = os.path.join(os.path.dirname(__file__), '../weights/yolov8n.pt')
model = YOLO(MODEL_PATH)
def run_detection(image_path, conf_threshold=0.5):
"""
执行检测
:param image_path: 图片路径或 numpy 数组
:param conf_threshold: 置信度阈值
:return: (annotated_image_path, labels_string, max_confidence)
"""
results = model.predict(source=image_path, conf=conf_threshold, verbose=False)
labels = []
max_conf = 0.0
for r in results:
for box in r.boxes:
cls_id = int(box.cls[0])
conf = float(box.conf[0])
class_name = model.names[cls_id]
labels.append(class_name)
if conf > max_conf:
max_conf = conf
# 保存绘制了框的图片
output_path = image_path.replace('original', 'result') if isinstance(image_path, str) else 'temp_result.jpg'
os.makedirs(os.path.dirname(output_path), exist_ok=True)
r.save(filename=output_path)
unique_labels = list(set(labels))
return output_path, ",".join(unique_labels), max_conf
def run_camera_detection(frame):
"""
处理摄像头单帧画面 (用于视频流)
:param frame: numpy 数组 (BGR)
:return: annotated_frame (bytes), labels
"""
results = model.predict(source=frame, conf=0.5, verbose=False)
annotated_frame = results[0].plot() # ultralytics 自带绘图
labels = [model.names[int(box.cls[0])] for r in results for box in r.boxes]
return annotated_frame, list(set(labels))
D. 核心视图接口 (app/views.py)
from rest_framework.decorators import api_view, permission_classes
from rest_framework.permissions import IsAuthenticated
from rest_framework.response import Response
from .models import DetectionRecord
from .utils import run_detection
from django.core.files.base import ContentFile
import base64
import cv2
import numpy as np
@api_view(['POST'])
@permission_classes([IsAuthenticated])
def detect_image(request):
"""图片检测接口"""
file_obj = request.FILES.get('file')
if not file_obj:
return Response({"error": "No file"}, status=400)
# 1. 保存原图
record = DetectionRecord.objects.create(
user=request.user,
detect_type='IMAGE',
original_file=file_obj
)
# 2. 运行检测
result_path, labels, conf = run_detection(record.original_file.path)
# 3. 保存结果图到模型
with open(result_path, 'rb') as f:
record.result_file.save(f"result_{file_obj.name}", ContentFile(f.read()))
record.result_labels = labels
record.confidence = conf
record.save()
return Response({
"id": record.id,
"original_url": request.build_absolute_uri(record.original_file.url),
"result_url": request.build_absolute_uri(record.result_file.url),
"labels": labels,
"confidence": conf
})
@api_view(['GET'])
@permission_classes([IsAuthenticated])
def camera_stream(request):
"""摄像头视频流接口 (MJPEG)"""
from django.http import StreamingHttpResponse
cap = cv2.VideoCapture(0) # 打开默认摄像头
def generate():
while True:
success, frame = cap.read()
if not success: break
# 调用 YOLO 检测
annotated_frame, _ = run_camera_detection(frame)
# 编码为 JPEG
ret, buffer = cv2.imencode('.jpg', annotated_frame)
frame_bytes = buffer.tobytes()
yield (b'–frame\\r\\n'
b'Content-Type: image/jpeg\\r\\n\\r\\n' + frame_bytes + b'\\r\\n')
cap.release()
return StreamingHttpResponse(generate(), content_type='multipart/x-mixed-replace; boundary=frame')
🎨 3. 前端实现 (Vue 3 + Element Plus)
A. 图片检测页面 (src/views/ImageDetect.vue)
<template>
<div class="detect-container">
<el-row :gutter="20">
<!– 左侧:上传区 –>
<el-col :span="12">
<el-card class="box-card">
<template #header>原始图片</template>
<el-upload
drag
action="#"
:http-request="handleUpload"
:show-file-list="false"
accept="image/*"
>
<el-icon class="el-icon–upload"><upload-filled /></el-icon>
<div class="el-upload__text">拖拽图片到此处或 <em>点击上传</em></div>
</el-upload>
<div v-if="originalImg" style="margin-top: 20px;">
<img :src="originalImg" style="width: 100%; border-radius: 4px;" />
</div>
</el-card>
</el-col>
<!– 右侧:结果区 –>
<el-col :span="12">
<el-card class="box-card">
<template #header>检测结果</template>
<div v-loading="loading" class="result-area">
<img v-if="resultImg" :src="resultImg" style="width: 100%; border-radius: 4px;" />
<div v-else class="empty-text">等待检测结果…</div>
<div v-if="labels.length > 0" class="info-tag">
<el-tag v-for="label in labels" :key="label" type="success" style="margin-right: 5px;">
{{ label }}
</el-tag>
<span>置信度: {{ confidence }}</span>
</div>
</div>
</el-card>
</el-col>
</el-row>
</div>
</template>
<script setup>
import { ref } from 'vue';
import { UploadFilled } from '@element-plus/icons-vue';
import axios from 'axios';
import { ElMessage } from 'element-plus';
const loading = ref(false);
const originalImg = ref('');
const resultImg = ref('');
const labels = ref([]);
const confidence = ref(0);
const handleUpload = async (options) => {
const file = options.file;
const formData = new FormData();
formData.append('file', file);
// 显示原图预览
originalImg.value = URL.createObjectURL(file);
loading.value = true;
try {
const res = await axios.post('/api/detect/image/', formData, {
headers: { 'Content-Type': 'multipart/form-data', 'Authorization': 'Token YOUR_TOKEN' }
});
resultImg.value = res.data.result_url;
labels.value = res.data.labels.split(',');
confidence.value = res.data.confidence.toFixed(4);
ElMessage.success('检测完成');
} catch (e) {
ElMessage.error('检测失败');
} finally {
loading.value = false;
}
};
</script>
<style scoped>
.detect-container { padding: 20px; }
.result-area { min-height: 300px; display: flex; flex-direction: column; align-items: center; justify-content: center; }
.empty-text { color: #999; }
.info-tag { margin-top: 15px; width: 100%; text-align: left; }
</style>
B. 摄像头检测页面 (src/views/CameraDetect.vue)
<template>
<div class="camera-container">
<el-card>
<template #header>实时摄像头检测</template>
<div class="video-box">
<!– 直接嵌入后端返回的视频流 –>
<img
v-if="isStreaming"
src="http://localhost:8000/api/camera/stream/"
alt="Camera Stream"
style="width: 100%; border-radius: 4px;"
/>
<div v-else class="placeholder">
<el-icon :size="50"><video-camera /></el-icon>
<p>点击开启摄像头</p>
</div>
</div>
<div style="margin-top: 20px; text-align: center;">
<el-button type="primary" @click="toggleStream" v-if="!isStreaming">开启摄像头</el-button>
<el-button type="danger" @click="toggleStream" v-else>关闭摄像头</el-button>
</div>
</el-card>
</div>
</template>
<script setup>
import { ref } from 'vue';
import { VideoCamera } from '@element-plus/icons-vue';
const isStreaming = ref(false);
const toggleStream = () => {
isStreaming.value = !isStreaming.value;
};
</script>
<style scoped>
.camera-container { padding: 20px; }
.video-box { height: 500px; background: #000; display: flex; align-items: center; justify-content: center; color: #fff; }
.placeholder { text-align: center; }
</style>
🚀 4. 如何运行与配置
1. 后端启动 (Django)
cd backend
pip install -r requirements.txt
python manage.py migrate
python manage.py runserver
注意:在 settings.py 中配置好 MEDIA_URL 和 MEDIA_ROOT 以便访问上传的图片。
2. 前端启动 (Vue)
cd frontend
npm install
npm run dev
3. 替换模型
只需将训练好的模型(如 yolov5m.pt, yolov11x.pt)放入 backend/weights/ 目录,并修改 app/utils.py 中的 MODEL_PATH 变量即可。系统无需重启即可支持新的检测任务(如烟雾、火焰、安全帽等)。
4. 数据库切换
在 backend/core/settings.py 中修改 DATABASES 配置:
- SQLite (默认): 无需配置,直接使用文件。
- MySQL:DATABASES = {
'default': {
'ENGINE': 'django.db.backends.mysql',
'NAME': 'yolo_db',
'USER': 'root',
'PASSWORD': 'your_password',
'HOST': 'localhost',
'PORT': '3306',
}
}
这套代码提供了一个功能完备的 Web 检测系统骨架。同学你可以直接在此基础上扩展警报功能和邮件通知功能。