文章目录
- 前言
- 一、简介
-
- 1.1.正向代理
- 1.2.反向代理
- 1.3.负载均衡
-
- 1.3.1.Nginx负载均衡算法有哪些
- 1.4.动静分离
- 二、安装
- 三、常用基本命令
-
- 3.1.基本控制命令
- 3.2.状态检查命令
- 3.3.版本与帮助
- 3.4.信号控制(高级)
- 3.5.其他实用命令
- 3.6.常用场景示例
- 四、配置详解、问题排查
-
- 4.1.Nginx核心架构
- 4.2.HTTP核心配置
- 4.3.核心应用场景配置
- 4.4.高级功能配置
- 4.6.故障排查案例
- 五、案例
-
- 5.1.电商案例
-
- 5.1.1.业务需求:
- 5.1.2.完整配置示例:
- 5.1.3.关键配置解析
- 5.2.反向代理 & 负载均衡(高并发必备)
- 5.3.静态资源处理 & 动静分离(网页加载速度起飞)
- 5.4.限流防刷 & IP 黑白名单(防恶意攻击)
- 5.5.HTTPS 配置(数据加密传输)
- 5.6.总结
前言
Nginx (engine x) 是一个高性能的HTTP和反向代理web服务器 ,同时也提供了IMAP/POP3/SMTP服务。Nginx是由伊戈尔·赛索耶夫为俄罗斯访问量第二的Rambler.ru站点(俄文:Рамблер)开发的,公开版本1.19.6发布于2020年12月15日。 其将源代码以类BSD许可证的形式发布,因它的稳定性、丰富的功能集、简单的配置文件和低系统资源的消耗而闻名。2022年01月25日,nginx 1.21.6发布。 Nginx是一款轻量级的Web 服务器/反向代理服务器及电子邮件(IMAP/POP3)代理服务器,在BSD-like 协议下发行。其特点是占有内存少,并发能力强,事实上nginx的并发能力在同类型的网页服务器中表现较好。
一、简介
1.1.正向代理
如果我们把google想象成为一个资源库,则大陆局域网的客户端要访问这个资源库,就需要通过代理服务器来访问,这种代理服务就叫做正向代理。 简单说就是:在客户端(浏览器)配置代理服务器,通过代理服务器进行互联网访问。 
1.2.反向代理
反向代理,其实客户端对代理是无感知的,因为客户端不需要任何配置就可以访问,我们只需要将请求发送到反向代理服务器,反向代理服务器去选择目标服务器获取数据后,再返回给客户端,此时反向代理服务器和目标服务器对外就是一个服务器,暴露的是代理服务器地址,隐藏了真实服务器IP地址。 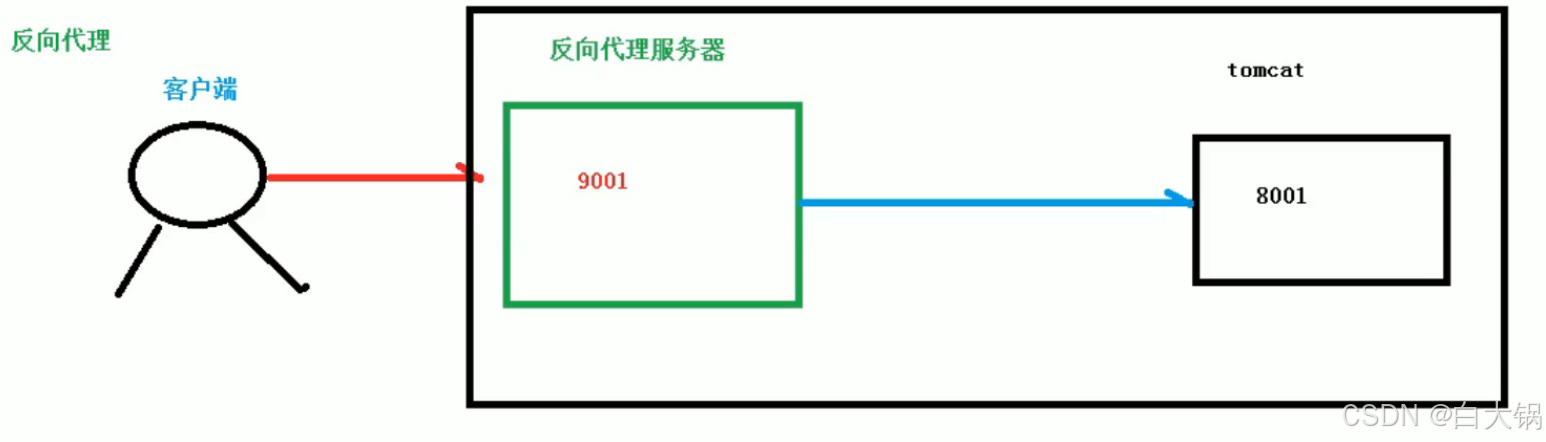
1.3.负载均衡
当请求变多,单体应用不能满足,我们增加服务器的数量,然后将请求分发到不同服务器上解决高并发,就是负载均衡。 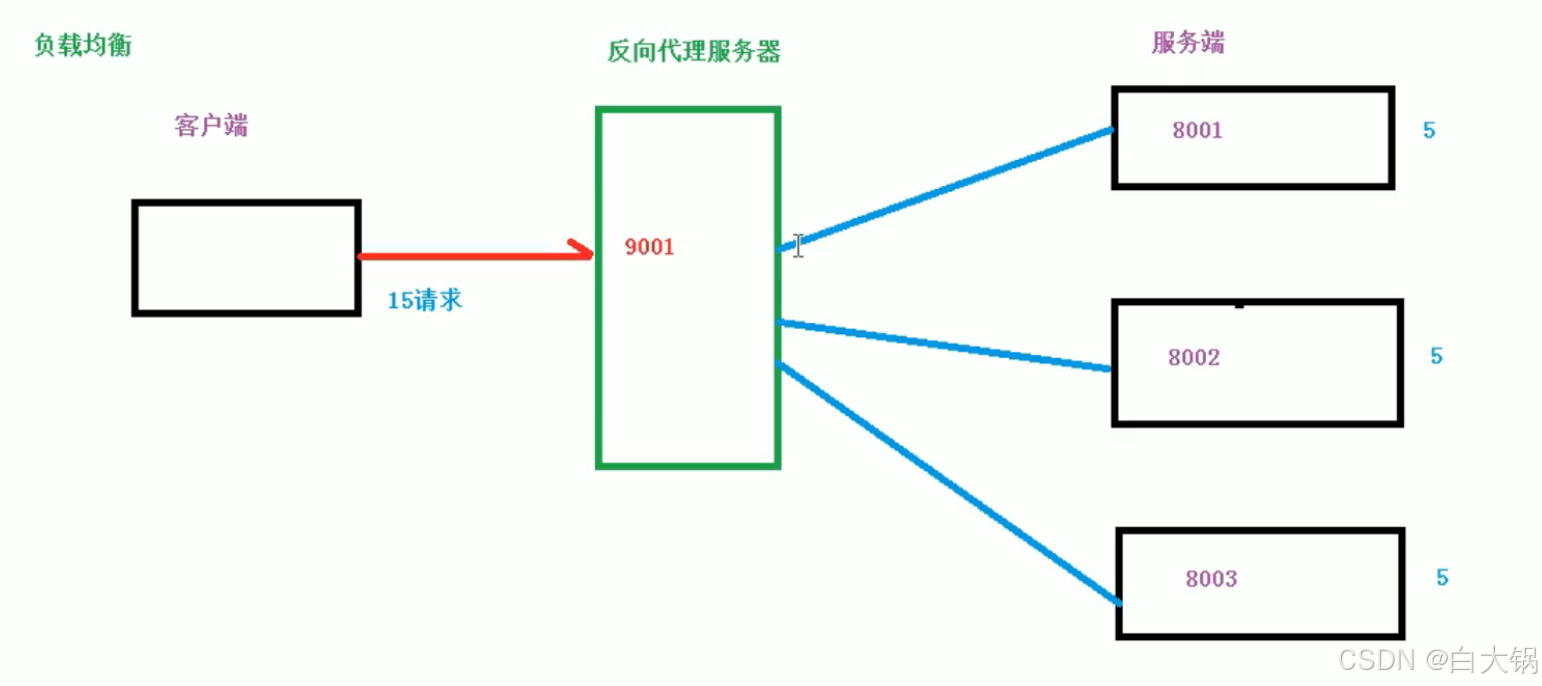
1.3.1.Nginx负载均衡算法有哪些
upstream backend {
server backend1.example.com;
server backend2.example.com;
}
特点:按顺序依次将请求分配给后端服务器,默认算法。 适用场景:后端服务器性能相近的场景。
upstream backend {
server backend1.example.com weight=5;
server backend2.example.com weight=2;
}
特点:根据 weight 参数指定权重,权重越高分配的请求越多。 适用场景:后端服务器性能差异较大时,按性能比例分配请求。
upstream backend {
ip_hash;
server backend1.example.com;
server backend2.example.com;
}
特点:根据客户端 IP 的哈希值分配服务器,确保同一客户端始终访问同一服务器。 适用场景:需要 session 会话保持的场景(如购物车、登录状态)。
upstream backend {
least_conn;
server backend1.example.com;
server backend2.example.com;
}
特点:将请求分配给当前连接数最少的服务器。 适用场景:处理请求耗时差异较大的场景(如动态内容与静态内容混合)。
upstream backend {
least_conn;
server backend1.example.com weight=5;
server backend2.example.com weight=2;
}
特点:在最少连接的基础上考虑权重,优先选择连接数少且权重高的服务器。 适用场景:结合服务器性能差异和连接状态的场景。
upstream backend {
hash $request_uri consistent;
server backend1.example.com;
server backend2.example.com;
}
特点:根据自定义 key(如 URL、用户 ID)的哈希值分配服务器。 参数: consistent:启用一致性哈希,减少服务器增减时的缓存失效问题。 适用场景:缓存集群、分布式系统中需要固定请求路由的场景。
upstream backend {
random two least_conn;
server backend1.example.com;
server backend2.example.com;
}
特点:随机选择两台服务器,再根据 least_conn 或 weight 选择最优。 参数: two:随机选择两台服务器。 least_conn/weight:进一步筛选的策略。 适用场景:需要随机化且兼顾负载的场景。
upstream backend {
sticky cookie srv_id expires=1h domain=.example.com path=/;
server backend1.example.com;
server backend2.example.com;
}
特点:通过 Cookie 实现会话保持,需编译 ngx_http_upstream_sticky_module 模块。 适用场景:需要会话保持但不依赖客户端 IP 的场景。
总结:
| 轮询 | 按顺序分配 | 服务器性能相近 |
| 加权轮询 | 按权重比例分配 | 服务器性能差异大 |
| IP 哈希 | 同一 IP 固定到同一服务器 | 需要会话保持 |
| 最少连接 | 优先分配连接数少的服务器 | 请求耗时差异大 |
| 通用哈希 | 自定义 key 哈希路由 | 缓存集群、分布式系统 |
| 随机 | 随机 + 筛选 | 需要随机化的场景 |
| 粘性会话 | 通过 Cookie 固定服务器 | 不依赖 IP 的会话保持 |
1.4.动静分离
为了加快网站的解析速度,可以把动态页面和静态页面由不同的服务器来解析,加快解析速度。降低原来单个服务器的压力。 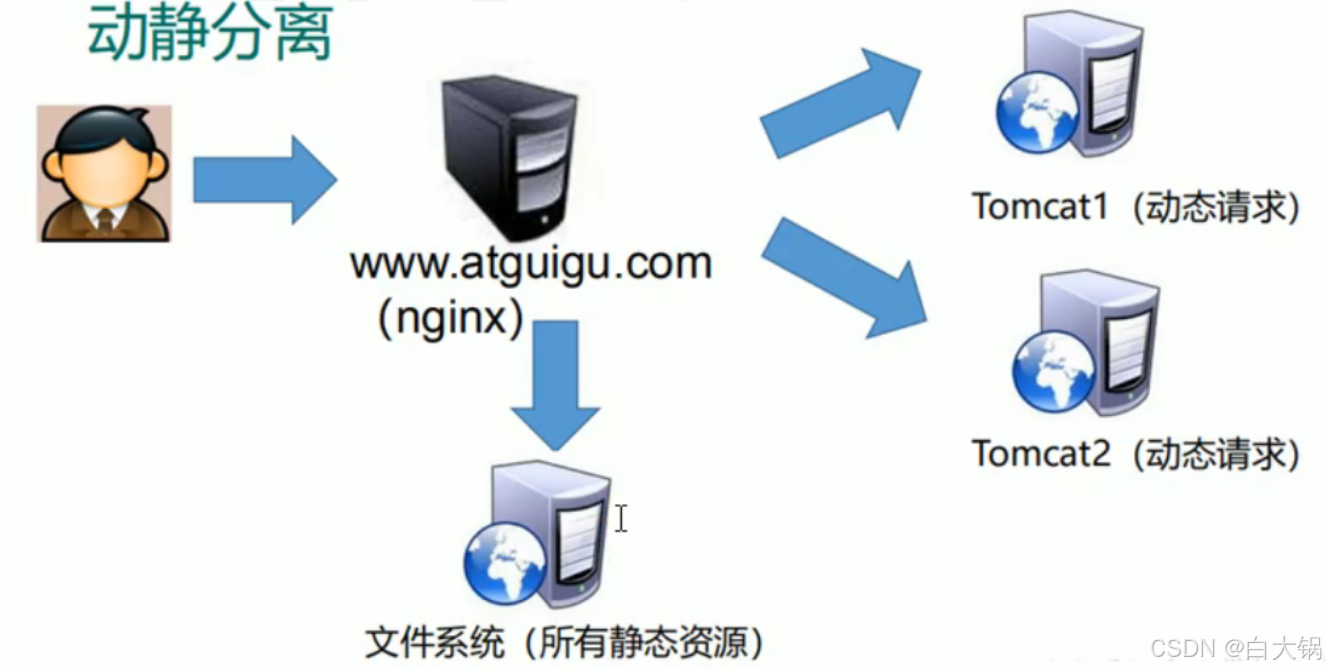
二、安装
(1)安装 pcre 依赖#1、自行下载pcre依赖包(https://sourceforge.net/projects/pcre/files/pcre/8.37/)[root@ldk src]# ll
total 2008
drwxr–xr–x. 2 root root 4096 Apr 11 2018 debug
drwxr–xr–x. 2 root root 4096 Apr 11 2018 kernels
–rw–r—r— 1 root root 2041593 Jun 21 22:38 pcre–8.37.tar.gz#2、解压依赖包
[root@ldk src]# tar –xvf pcre–8.37.tar.gz
#3、进入检查
[root@ldk src]# cd pcre–8.37
[root@ldk pcre–8.37]# ./configurechecking for a BSD–compatible install... /usr/bin/install –cchecking whether build environment is sane... yeschecking for a thread–safe mkdir –p... /usr/bin/mkdir –p
...
#注意:检查过程中,有些小伙伴的服务器可能会报错(缺少c++环境)
configure: error: You need a C++ compiler for C++ support.
#4、如果报错执行(不报错直接略过本步骤)
[root@ldk pcre–8.37]# yum –y install gcc–c++
#5、安装
[root@ldk pcre–8.37]# make && make installrm –f pcre_chartables.cln –s ./pcre_chartables.c.dist pcre_chartables.cmake all–ammake[1]: Entering directory `/usr/src/pcre–8.37' CC libpcre_la–pcre_byte_order.lo CC libpcre_la–pcre_compile.lo CC libpcre_la–pcre_config.lo CC libpcre_la–pcre_dfa_exec.lo CC libpcre_la–pcre_exec.lo CC libpcre_la–pcre_fullinfo.lo CC libpcre_la–pcre_get.lo
...
make[3]: Leaving directory `/usr/src/pcre–8.37'make[2]: Leaving directory `/usr/src/pcre-8.37'make[1]: Leaving directory `/usr/src/pcre–8.37'[root@ldk pcre–8.37]#
#查看版本
[root@ldk pcre–8.37]# pcre–config —version8.37[root@ldk pcre–8.37]#
(2)安装 openssl、zlib 依赖
[root@ldk pcre–8.37]# yum –y install make zlib zlib–devel gcc–c++ libtool openssl openssl–develLoaded plugins: fastestmirrorLoading mirror speeds from cached hostfilePackage 1:make–3.82–24.el7.x86_64 already installed and latest versionPackage zlib–1.2.7–18.el7.x86_64 already installed and latest versionPackage gcc–c++–4.8.5–39.el7.x86_64 already installed and latest versionPackage 1:openssl–1.0.2k–19.el7.x86_64 already installed and latest versionResolving Dependencies—> Running transaction check—-> Package libtool.x86_64 0:2.4.2–22.el7_3 will be installed
...
Dependency Updated: e2fsprogs.x86_64 0:1.42.9–17.el7 e2fsprogs–libs.x86_64 0:1.42.9–17.el7 krb5–libs.x86_64 0:1.15.1–46.el7 libcom_err.x86_64 0:1.42.9–17.el7 libselinux.x86_64 0:2.5–15.el7 libselinux–python.x86_64 0:2.5–15.el7 libselinux–utils.x86_64 0:2.5–15.el7 libss.x86_64 0:1.42.9–17.el7
Complete![root@ldk pcre–8.37]#
(3)安装Nginx#下载nginx:https://nginx.org/download/#解压压缩包
[root@ldk nginx]# tar –xvf nginx–1.12.2.tar.gz
#检查配置
[root@ldk nginx]# ./configure
#安装
[root@ldk nginx]# make && make install
#启动测试
[root@ldk /]# cd /usr/local/nginx/sbin/[root@ldk sbin]# ./nginx
[root@ldk sbin]# ps –ef|grep nginxroot 11280 1 0 23:07 ? 00:00:00 nginx: master process ./nginxnobody 11281 11280 0 23:07 ? 00:00:00 nginx: worker processroot 11283 3063 0 23:08 pts/0 00:00:00 grep —color=auto nginx[root@ldk sbin]#
#注意:如果有的小伙伴不能访问,可能是服务器端口没打开
阿里云服务器参考:https://blog.csdn.net/Abaneo/article/details/72853513
一般就是: 1、查看开放端口:firewall–cmd —list–all 2、设置开放端口好:firewall–cmd —add–port=80/tcp —perman 3、重启防火墙:firewall–cmd —reload
三、常用基本命令
3.1.基本控制命令
sudo systemctl start nginx # 适用于 systemd 系统(CentOS 7+、Ubuntu 16.04+)
sudo service nginx start # 适用于 SysVinit 系统(CentOS 6、Ubuntu 14.04)
sudo /usr/local/nginx/sbin/nginx # 源码安装方式
sudo systemctl stop nginx
sudo service nginx stop
sudo /usr/local/nginx/sbin/nginx -s stop # 快速停止
sudo /usr/local/nginx/sbin/nginx -s quit # 优雅停止(处理完现有请求后停止)
sudo systemctl restart nginx
sudo service nginx restart
sudo systemctl reload nginx
sudo service nginx reload
sudo /usr/local/nginx/sbin/nginx -s reload
作用:在不中断服务的情况下应用新配置。
3.2.状态检查命令
sudo systemctl status nginx
sudo service nginx status
ps -ef | grep nginx
正常运行时会看到 master 和 worker 进程。 3. 检查配置文件语法
nginx -t
nginx -t -c /path/to/nginx.conf # 指定配置文件路径
3.3.版本与帮助
nginx -v # 精简版本信息
nginx -V # 详细版本及编译参数
nginx -h
3.4.信号控制(高级)
sudo kill -QUIT `cat /var/run/nginx.pid`
sudo kill –TERM `cat /var/run/nginx.pid`
sudo kill -INT `cat /var/run/nginx.pid` # 同上
sudo kill -HUP `cat /var/run/nginx.pid`
sudo kill -USR1 `cat /var/run/nginx.pid`
3.5.其他实用命令
nginx -T # 输出合并后的完整配置(含 include 文件)
nginx -c /etc/nginx/nginx.conf
nginx -p /usr/local/nginx/
3.6.常用场景示例
修改配置后验证并加载
nginx -t && sudo systemctl reload nginx
日志切割(每日零点自动执行)
mv /var/log/nginx/access.log /var/log/nginx/access_$(date +%Y%m%d).log
sudo kill -USR1 `cat /var/run/nginx.pid` # 重新打开日志文件
查看实时访问日志
tail -f /var/log/nginx/access.log
四、配置详解、问题排查
4.1.Nginx核心架构
# main全局配置段
user nginx; # 运行用户
worker_processes auto; # 工作进程数(建议=CPU核心数)
error_log /var/log/nginx/error.log warn; # 错误日志级别
pid /run/nginx.pid; # 进程ID文件
events {
worker_connections 1024; # 单个进程最大连接数
use epoll; # Linux高性能事件模型
multi_accept on; # 同时接受多个连接
}
4.2.HTTP核心配置
http {
include mime.types; # 文件扩展名与MIME映射
default_type application/octet-stream;
# 日志格式
log_format main '$remote_addr – $remote_user [$time_local] "$request" '
'$status $body_bytes_sent "$http_referer" '
'"$http_user_agent" "$http_x_forwarded_for"';
access_log /var/log/nginx/access.log main;
sendfile on; # 零拷贝传输
tcp_nopush on; # 优化数据包发送
keepalive_timeout 65; # 长连接超时
gzip on; # 启用压缩
}
4.3.核心应用场景配置
server {
listen 80;
server_name static.example.com;
location / {
root /data/www;
index index.html;
# 缓存控制
expires 30d;
add_header Cache-Control "public";
# 防盗链
valid_referers none blocked *.example.com;
if ($invalid_referer) {
return 403;
}
}
# 禁止访问隐藏文件
location ~ /\\. {
deny all;
}
}
upstream backend {
server 10.0.0.1:8080 weight=5;
server 10.0.0.2:8080;
server 10.0.0.3:8080 backup;
# 健康检查
health_check interval=5s fails=3 passes=2;
}
server {
listen 80;
server_name api.example.com;
location / {
proxy_pass http://backend;
# 关键代理头
proxy_set_header Host $host;
proxy_set_header X-Real-IP $remote_addr;
proxy_set_header X-Forwarded-For $proxy_add_x_forwarded_for;
# 超时控制
proxy_connect_timeout 3s;
proxy_read_timeout 5s;
}
}
server {
listen 443 ssl http2;
server_name secure.example.com;
ssl_certificate /etc/ssl/certs/example.com.crt;
ssl_certificate_key /etc/ssl/private/example.com.key;
# 安全协议配置
ssl_protocols TLSv1.2 TLSv1.3;
ssl_ciphers ECDHE-ECDSA-AES128-GCM-SHA256:ECDHE-RSA-AES128-GCM-SHA256;
ssl_prefer_server_ciphers on;
ssl_session_cache shared:SSL:10m;
ssl_session_timeout 10m;
# HSTS增强安全
add_header Strict-Transport-Security "max-age=63072000" always;
location / {
root /data/secure;
}
}
4.4.高级功能配置
upstream app_cluster {
# 策略选择
least_conn; # 最少连接
# ip_hash; # IP哈希会话保持
# hash $request_uri; # URI哈希
server 10.0.1.1:8000 fail_timeout=30s;
server 10.0.1.2:8000 max_fails=3;
# 长连接优化
keepalive 32;
}
server {
location / {
proxy_pass http://app_cluster;
proxy_http_version 1.1;
proxy_set_header Connection "";
}
}
# 限流配置(每秒10个请求)
limit_req_zone $binary_remote_addr zone=api_limit:10m rate=10r/s;
server {
location /api/ {
limit_req zone=api_limit burst=20 nodelay;
proxy_pass http://backend;
}
# 带宽限制
location /download/ {
limit_rate_after 10m; # 10MB后开始限速
limit_rate 100k; # 限制为100KB/s
}
}
# 自定义日志格式
log_format json_analytics escape=json
'{"time":"$time_iso8601",'
'"host":"$host",'
'"status":"$status",'
'"request_time":"$request_time"}';
# 条件日志记录
map $status $loggable {
~^[23] 0; # 不记录2xx/3xx
default 1; # 记录其他状态
}
server {
access_log /var/log/nginx/error_requests.log combined if=$loggable;
}
五、性能调优指南
# 调整系统参数(/etc/sysctl.conf)
net.core.somaxconn = 65535
net.ipv4.tcp_max_syn_backlog = 65536
net.ipv4.tcp_tw_reuse = 1
# 高效文件传输
sendfile_max_chunk 1m;
aio threads; # 异步IO(Linux 4.18+)
# 连接优化
reset_timedout_connection on; # 关闭超时连接
client_header_timeout 3s; # 客户端头超时
client_body_timeout 5s;
4.6.故障排查案例
l
ocation / {
# 增加调试信息
proxy_next_upstream error timeout invalid_header http_500;
proxy_intercept_errors on;
# 显示详细错误
proxy_set_header X-Debug-IP $upstream_addr;
add_header X-Backend-Status $upstream_status;
}
# 监控Nginx内存使用
watch -n 1 "ps -eo pid,rss,comm | grep nginx"
五、案例
5.1.电商案例
5.1.1.业务需求:
我们有一个电商平台,需要配置Nginx作为API网关,实现以下功能: 1.将不同微服务的API路由到不同的后端服务器 2.对商品服务进行负载均衡 3.用户服务的WebSocket连接支持 4.支付服务需要特殊的超时设置 5.静态资源缓存
5.1.2.完整配置示例:
# 全局配置
user nginx;
worker_processes auto;
error_log /var/log/nginx/error.log;
pid /run/nginx.pid;
events {
worker_connections 1024;
}
http {
# 负载均衡配置
upstream product_service {
least_conn;
server 10.0.1.10:8000 weight=3;
server 10.0.1.11:8000;
server 10.0.1.12:8000 backup;
}
upstream user_service {
server 10.0.2.10:9000;
}
upstream payment_service {
server 10.0.3.10:7000;
}
# 共享内存区域用于缓存
proxy_cache_path /var/cache/nginx levels=1:2 keys_zone=static_cache:10m inactive=60m;
server {
listen 80;
server_name api.shop.com;
# 商品服务路由 – 带负载均衡
location /api/products {
proxy_pass http://product_service;
proxy_set_header Host $host;
proxy_set_header X-Real-IP $remote_addr;
proxy_set_header X-Forwarded-For $proxy_add_x_forwarded_for;
# 商品查询API需要更长的缓存
proxy_cache static_cache;
proxy_cache_valid 200 302 10m;
proxy_cache_key "$scheme$request_method$host$request_uri";
# 限制请求速率防止刷API
limit_req zone=product_limit burst=20;
}
# 用户服务路由 – 支持WebSocket
location /api/users/ws {
proxy_pass http://user_service/ws;
proxy_http_version 1.1;
proxy_set_header Upgrade $http_upgrade;
proxy_set_header Connection "upgrade";
proxy_read_timeout 86400s; # WebSocket长连接
# 用户认证信息传递
proxy_set_header Authorization $http_authorization;
}
# 支付服务路由 – 特殊超时设置
location /api/payment {
proxy_pass http://payment_service;
# 支付需要更长的超时时间
proxy_connect_timeout 300s;
proxy_read_timeout 300s;
proxy_send_timeout 300s;
# 禁止缓存支付相关请求
proxy_no_cache 1;
proxy_cache_bypass 1;
# 安全设置
proxy_set_header X-Secure-Payment "true";
}
# 静态资源路由 – 启用缓存
location /static {
alias /var/www/static;
# 缓存静态资源
expires 30d;
add_header Cache-Control "public";
# 启用gzip压缩
gzip on;
gzip_types text/plain text/css application/json application/javascript;
}
# 全局错误处理
error_page 500 502 503 504 /50x.html;
location = /50x.html {
root /usr/share/nginx/html;
}
}
# 限流区域定义
limit_req_zone $binary_remote_addr zone=product_limit:10m rate=10r/s;
}
5.1.3.关键配置解析
商品服务负载均衡:
使用least_conn算法实现更公平的负载分配 主服务器权重设置为3,备份服务器平时不参与负载 启用API响应缓存10分钟 限流设置防止恶意刷API
用户服务WebSocket支持:
配置HTTP 1.1协议 设置Upgrade头实现协议切换 超时设置为24小时维持长连接 传递原始认证头信息
支付服务特殊配置:
超时时间延长至5分钟 禁用缓存确保交易数据实时性 添加自定义安全头
静态资源优化:
本地文件系统直接服务 设置30天浏览器缓存 启用gzip压缩减少传输量
5.2.反向代理 & 负载均衡(高并发必备)
场景:多个后端服务负载不均,大促时部分服务器被压爆 配置目标:让 Nginx 把请求均匀转发到 3 台后端服务器,隐藏真实 IP,还能自动剔除挂掉的节点
# 全局配置:定义Nginx运行的基本参数
user nginx; # 运行用户,默认就行
worker_processes 1; # 工作进程数,一般设为CPU核心数,摸鱼主机设1也行
# 错误日志和PID文件
error_log /var/log/nginx/error.log warn;
pid /var/run/nginx.pid;
# 负载均衡配置:定义后端服务器列表
upstream backend_servers {
# 轮询策略:默认按顺序转发请求
server 192.168.1.10:8080; # 后端服务器A
server 192.168.1.11:8080; # 后端服务器B
server 192.168.1.12:8080; # 后端服务器C
# 进阶配置:健康检查(服务器挂了自动踢掉)
least_conn; # 最小连接数策略,哪个服务器空闲就转发给谁
keepalive 32; # 保持32个长连接,减少TCP三次握手开销
proxy_next_upstream error timeout http_500; # 转发失败时,自动重试下一台服务器
}
# 服务器配置:定义Nginx对外提供服务的端口和规则
server {
listen 80; # 监听80端口(HTTP)
server_name www.yourdomain.com; # 域名,改成你的域名或IP
# 反向代理规则:所有以/api/开头的请求转发到后端服务器
location /api/ {
proxy_pass http://backend_servers/; # 转发到upstream定义的服务器组
# 传递客户端真实IP(后端需要获取用户IP时用)
proxy_set_header Host $host;
proxy_set_header X-Real-IP $remote_addr;
proxy_set_header X-Forwarded-For $proxy_add_x_forwarded_for;
# 超时配置:防止某个请求长时间阻塞
proxy_connect_timeout 30s;
proxy_read_timeout 60s;
proxy_send_timeout 60s;
}
}
关键点:
后端服务器 IP 全藏在 Nginx 里,外部只能访问 Nginx 的公网 IP 大促时流量均匀分散到 3 台服务器,再也不用担心自己写的接口被压崩
5.3.静态资源处理 & 动静分离(网页加载速度起飞)
场景:前端小姐姐抱怨图片 / JS 加载慢,甩锅说后端接口卡 配置目标:让 Nginx 直接处理图片、CSS、JS 等静态文件,减轻后端压力
http {
# 定义上游服务器组
upstream backend_servers {
server backend1.example.com;
server backend2.example.com;
}
server {
listen 80;
server_name www.yourdomain.com;
# 静态资源
location /static/ {
root /data/; # 根路径,实际文件路径是/data/static/…
autoindex off; # 禁止列出目录(安全考虑)
expires 30d; # 浏览器缓存30天,减少重复请求
gzip on; # 开启压缩,减小文件传输大小
gzip_types text/css application/javascript image/png;
}
# 图片服务与防盗链:防止其他网站盗用你的图片
location /images/ {
root /data/;
valid_referers none blocked www.yourdomain.com;
if ($invalid_referer) {
return 403; # 非法引用返回403错误
}
}
## 动态请求(如登录接口)还是转发给后端
location /api/ {
proxy_pass http://backend_servers/;
# 建议添加的代理头
proxy_set_header Host $host;
proxy_set_header X-Real-IP $remote_addr;
proxy_set_header X-Forwarded-For $proxy_add_x_forwarded_for;
proxy_set_header X-Forwarded-Proto $scheme;
}
}
}
关键点:
静态文件直接由 Nginx 返回,速度比后端处理快 10 倍以上 浏览器缓存 + 压缩,用户第二次访问秒加载,前端小姐姐再也不甩锅
5.4.限流防刷 & IP 黑白名单(防恶意攻击)
场景:接口被恶意 IP 高频访问,服务器日志爆满 配置目标:限制单个 IP 的并发连接数和请求频率,拉黑恶意 IP
http {
# 1. 并发连接限制
limit_conn_zone $binary_remote_addr zone=ip_conn:10m;
# 2. 请求频率限制
limit_req_zone $binary_remote_addr zone=ip_req:10m rate=5r/s;
# 3. 精确 IP 白名单(使用 geo 模块)
geo $allowed_ip {
default 0;
192.168.1.0/24 1; # 允许的内网 IP 段
}
}
server {
listen 80;
server_name www.yourdomain.com;
location /api/login {
# 并发连接限制:每个 IP 最多 10 个并发连接
limit_conn ip_conn 10;
# 请求频率限制:每秒 5 个请求,允许突发 10 个
limit_req zone=ip_req burst=10 nodelay;
# 精确 IP 白名单检查
if ($allowed_ip = 0) {
return 403;
}
# 代理设置
proxy_pass http://backend_servers/;
proxy_set_header Host $host;
proxy_set_header X-Real-IP $remote_addr;
}
# 自定义 503 错误页
error_page 503 @backend_overload;
location @backend_overload {
rewrite ^ /static/overload.html break;
}
}
关键点:
恶意 IP 频繁刷接口?直接返回 403,服务器日志再也不会爆了 登录接口限流后,再也不用担心被 CC 攻击打崩
5.5.HTTPS 配置(数据加密传输)
场景:用户反馈登录时浏览器提示「不安全」,被产品经理骂哭 配置目标:启用 HTTPS,让数据加密传输,浏览器显示小绿锁
# HTTP 服务器(监听 80 端口):仅用于重定向到 HTTPS
server {
listen 80;
server_name www.yourdomain.com;
return 301 https://$host$request_uri; # 正确的 HTTP 转 HTTPS
}
# HTTPS 服务器(监听 443 端口)
server {
listen 443 ssl;
server_name www.yourdomain.com;
# SSL 证书配置
ssl_certificate /etc/nginx/ssl/yourdomain.crt;
ssl_certificate_key /etc/nginx/ssl/yourdomain.key;
# 安全协议与加密
ssl_protocols TLSv1.2 TLSv1.3;
ssl_ciphers ECDHE-RSA-AES256-GCM-SHA384:ECDHE-ECDSA-AES256-GCM-SHA384;
ssl_prefer_server_ciphers on;
# 代理设置
location / {
proxy_pass http://backend_servers/;
# 建议添加的代理头(根据需求调整)
proxy_set_header Host $host;
proxy_set_header X-Real-IP $remote_addr;
proxy_set_header X-Forwarded-For $proxy_add_x_forwarded_for;
proxy_set_header X-Forwarded-Proto $scheme;
}
}
# 上游服务器组定义(需在 http 块中)
upstream backend_servers {
server backend1.example.com;
server backend2.example.com;
}
关键点:
小绿锁一亮,产品经理再也挑不出毛病 数据加密传输,用户密码不怕被中间人窃取
5.6.总结
反向代理:藏好后端 IP,安心摸鱼不怕攻击 负载均衡:流量均分,再也不用背锅服务器崩了 静态资源:让 Nginx 处理图片 JS,后端专注写接口 限流防刷:恶意请求全拦下,日志清净心情好 HTTPS:小绿锁一挂,产品经理笑哈哈 记住:Nginx 配置不是一次性的!上线后要根据服务器压力、用户反馈动态调整,比如大促时加大限流阈值,发现恶意 IP 及时拉黑。