开始使用
使用规则
1、命名规则
1).py文件:文件名称以test_开头(或以_test结尾)。
例如login_test.py、test_login.py
2)测试类:类名以Test开头且不能带init方法。
例如class TestTestPaper
3)函数:方法名以test_开头
运行参数
pytest -q:简洁输出运行结果信息
pytest -k:TODO
-v:输出详细信息
-s:输出调试信息
-x:出现一个用例失败则停止测试
–maxfail:出现几个失败才终止,如:pytest –maxfail=2
-n:多线程运行 (插件:pytest-xdist) 如:pytest -vs -n=2
–reruns num:失败重跑 (插件:pytest-rerunfailures)如:pytest -reruns=2
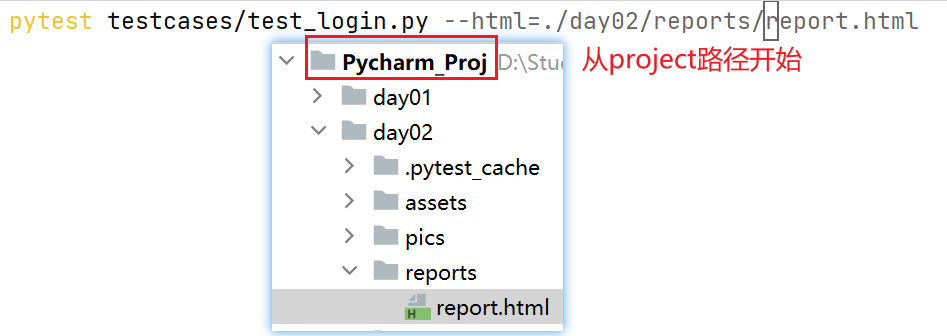
–html:生成html的测试报告 (插件:pytest_html)
-k:运行名称中包含关键字的测试用例 如:
单个关键字:pytest -k "baili"
多个关键字or:pytest -k "baili or xingyao"
-m:运行指定标记的测试用例。支持 and、or 、not 等表达式
-m login or logout
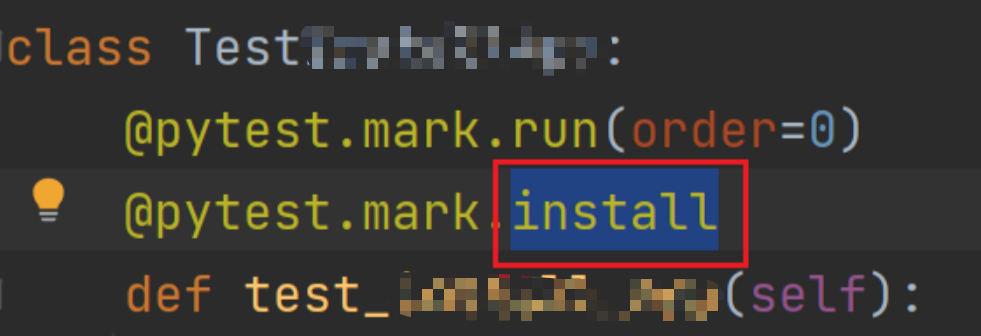
装饰器mark
分为内置装饰器、自定义装饰器
下面是自定义的名为slow的mark装饰器,所有被这种标注的函数都会被执行测试
@pytest.mark.slow
def test_a():
xxx
运行:pytest -m slow
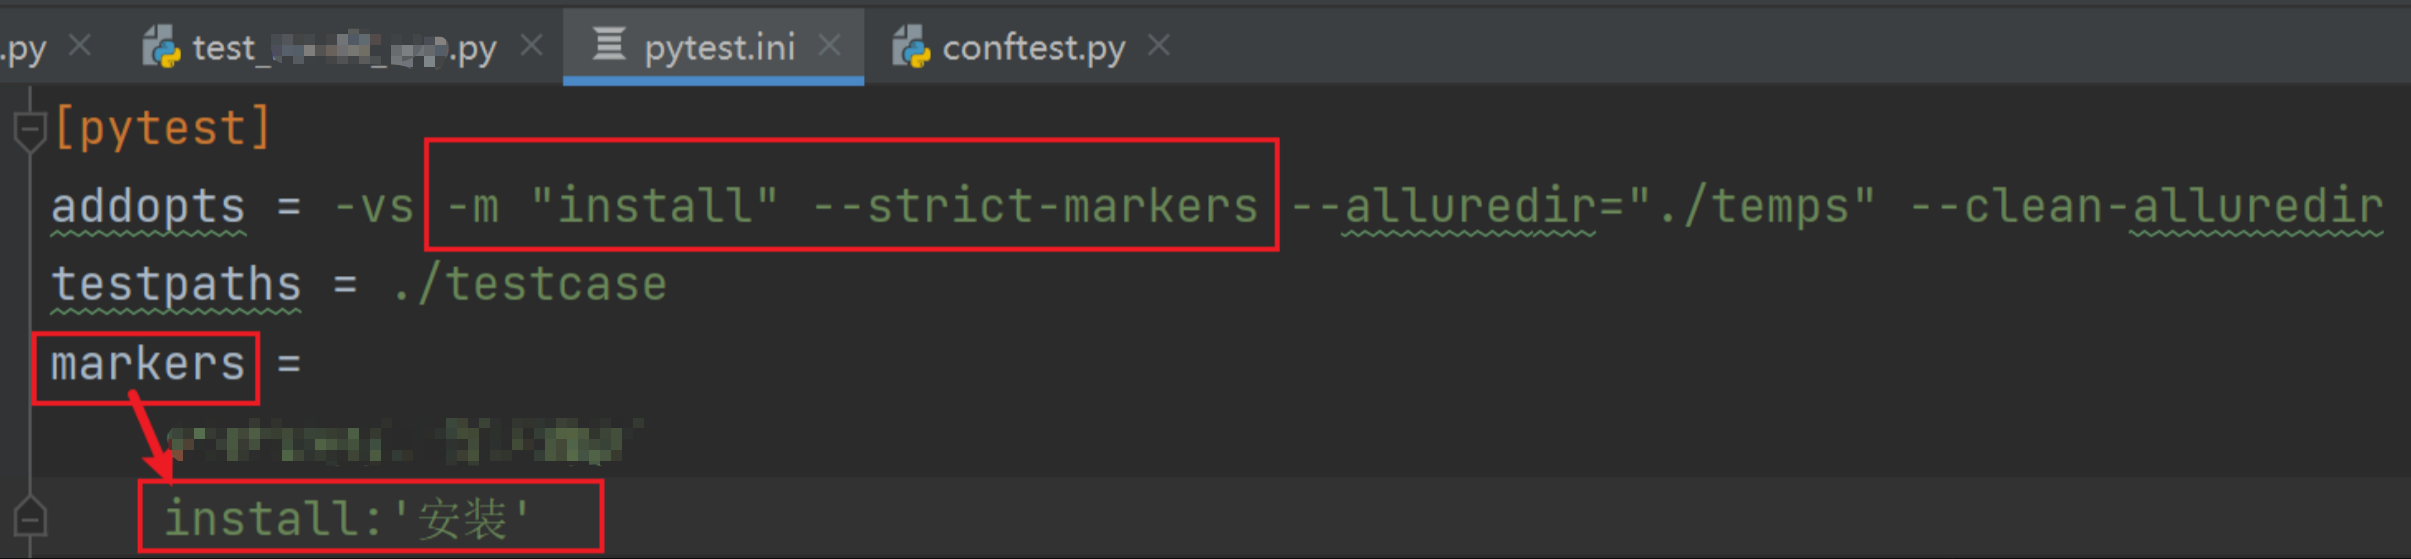
通过pytest.ini文件设置参数时,文件内容如下
运行方式
命令行运行方式
1、运行指定测试文件
pytest test_login.py
2、运行指定文件夹路径下的所有测试文件
pytest testcase/test_login.py
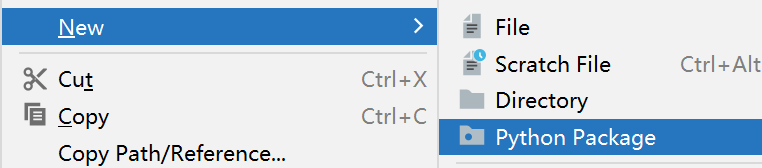
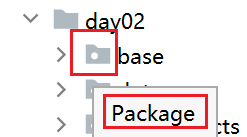
3、运行指定python包下的所有测试文件
pytest –pyargs pkg.testing
4、运行测试文件指定的Class、function
pytest test_mod.py::test_func
pytest test_mod.py::TestClass::test_method
从Python代码调用
前面提到的比如pytest –pyargs pkg.testing,都是直接在命令行中运行
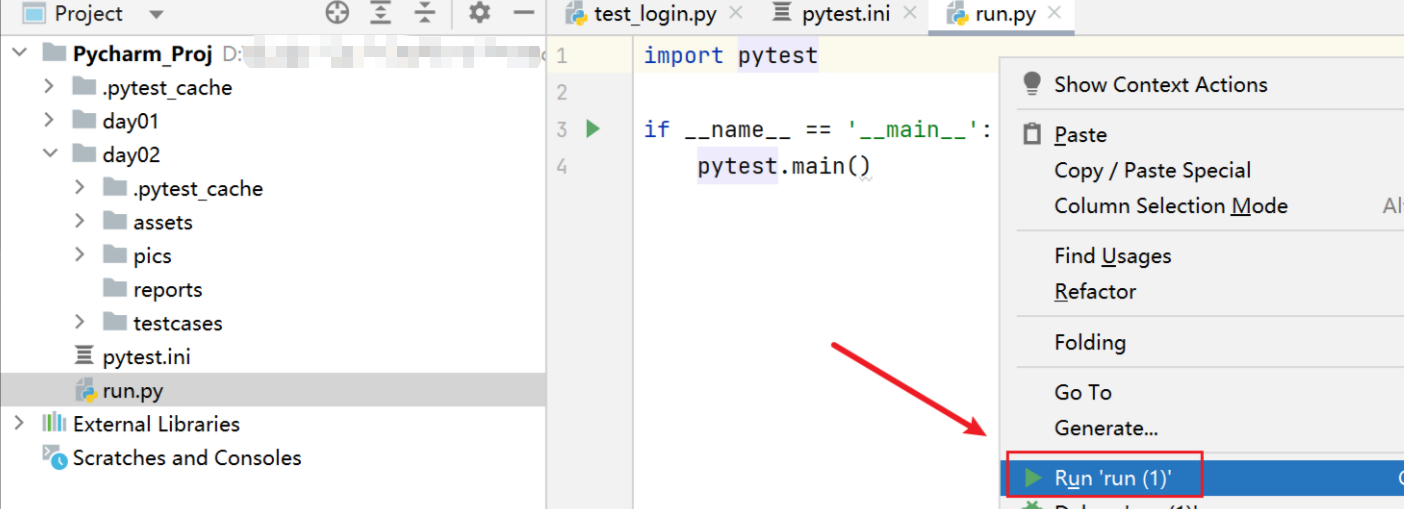
也可以在python代码中运行。通常在项目根目录下新建run.py进行调用,不会在测试用例文件中写main方法
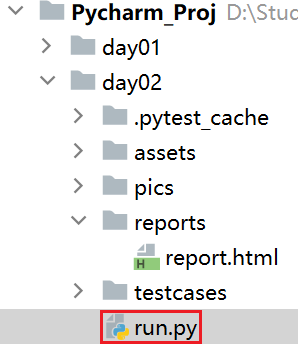
import pytest
if __name__ == '__main__':
pytest.main(['-vs'])
通过全局配置文件pytest.ini运行
1、一般放在项目根目录,名称必须是pytest.ini
2、当有中文时,可以将文件编码修改成ANSI
3、pytest.ini文件可以改变默认的测试用例规则
4、不管是命令行运行,还是主函数运行,都会加载这个配置文件
addopts:运行参数,详细见前文
testpaths:指定测试用例所在路径
python_files:.py文件的命名可以被pytest识别的规则,默认test_*.py。可自定义的意思
python_classes:类的命名可以被pytest识别的规则,默认Test*。可自定义的意思
python_functions:函数命名可以被pytest识别的规则,默认test_*。可自定义的意思
marker:标记
[pytest]
# 参数
addopts = -vs
testpaths = ./testcases
python_files = test_*.py
python_classes = Test*
python_functions = test_*
# 标记
makers =
smoke:冒烟用例
product_manage:商品管理
标记的使用场景:如果只运行冒烟用例
最好搭配–strict,如果代码中标记打错了,还能提示找不到xx标记
1、修改pytest.ini:addopts = -vs -m "smoke" –strict
[pytest]
# 参数
addopts = -vs -m "smoke"
2、给测试类、函数添加@pytest.mark.smoke
@pytest.mark.smoke
Test_firstpage():
xxx
def test_register():
xxx
@pytest.mark.smoke
def test_login():
xxx
核心功能
断言
就是使用python自己的断言
关键字:>、<、==、in、is
有以下几种类型:
assert 0 == 1
assert 0 < 1, "判断0小于1"
assert 'a' in 'abc'
flag = True
assert flag is True
def f():
return 3
def test_function():
assert f() == 4
跳过测试用例
无条件跳过
@pytest.mark.skip(reason='无条件跳过')
def test_one():
有条件跳过
workage = 8
@pytest.mark.skipif(workage < 10, reason='工作经验小于10年,跳过')
def test_one():
前后置操作
继承方式
class类下的用例都会应用,不能对部分函数应用
项目结构
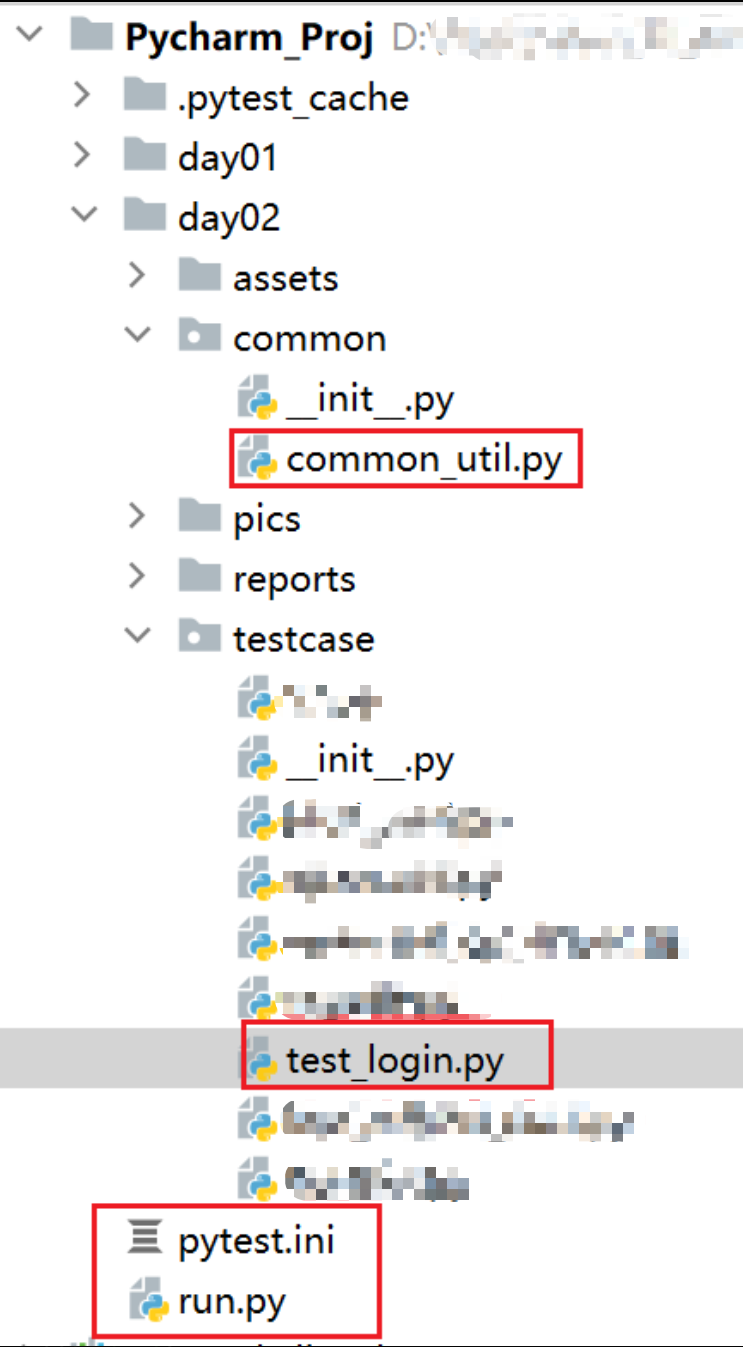
class CommonUtil:
def setup(self):
print('setup')
def teardown(self):
print('teardown')
def setup_class(self):
print('setup_class')
def teardown_class(self):
print('teardown_class')
class TestLogin(CommonUtil):#继承CommonUtil类
def test_a(self):
print('test_a')
import pytest
if __name__ == '__main__':
pytest.main()
[pytest]
addopts = -vs –html=./day02/reports/report.html
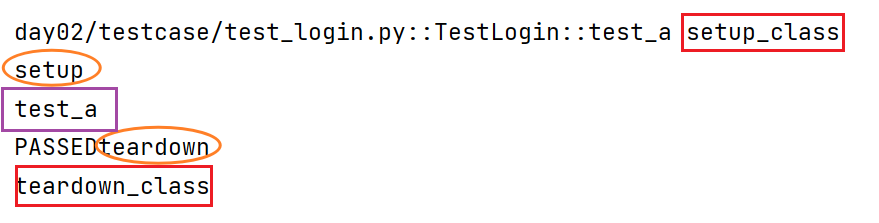
运行结果
fixture方式
相比继承方式更加灵活,可以实现全部、部分测试用例前后置
scope参数:作用域。默认None,枚举值有function、class、session/package、module
autouse参数:自动执行。默认False,
params参数:
ids参数:
name参数:
scope参数
前置操作
给前后置函数connect_app,加上@pytest.fixture(scope='function'),function表示作用域为函数级别。到此只完成了前后置函数的定义
import pytest
@pytest.fixture(scope='function')
def connect_app():
print('connect_app')
class TestLogin():
def test_a(self):
print('test_a')
def test_b(self):
print('test_b')
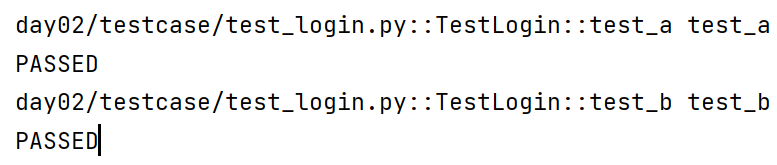
由于并没有函数调用,所以没有函数会执行前后置函数。输出如下
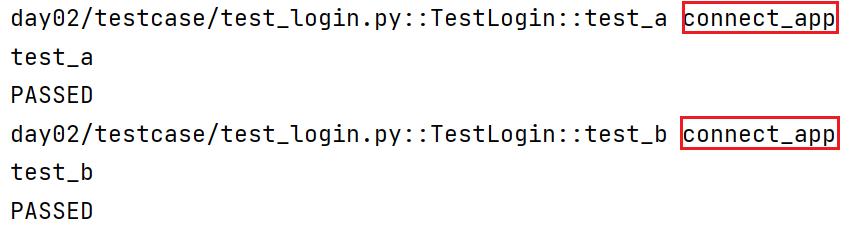
如何让当前.py文件下的所有函数都执行前后置操作?
@pytest.fixture(scope='function', autouse=True),autouse默认是False
import pytest
@pytest.fixture(scope='function', autouse=True)
def connect_app():
print('connect_app')
class TestLogin():
def test_a(self):
print('test_a')
def test_b(self):
print('test_b')
输出如下
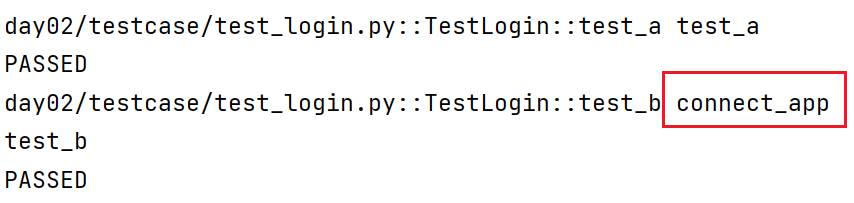
如何只让test_b函数执行前后置函数?
def test_b(self, connect_app)
import pytest
@pytest.fixture(scope='function')
def connect_app():
print('connect_app')
class TestLogin():
def test_a(self):
print('test_a')
def test_b(self, connect_app): #在函数的入参中加上前后置函数名称
print('test_b')
输出如下
后置操作
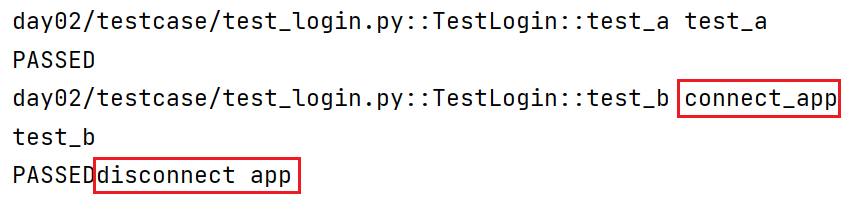
yield关键字,在connect_app函数加上后置操作
import pytest
@pytest.fixture(scope='function')
def connect_app():
print('connect_app')
yield
print('disconnect app')
class TestLogin():
def test_a(self):
print('test_a')
def test_b(self, connect_app): #在函数的入参中加上前后置函数名称
print('test_b')
输出如下
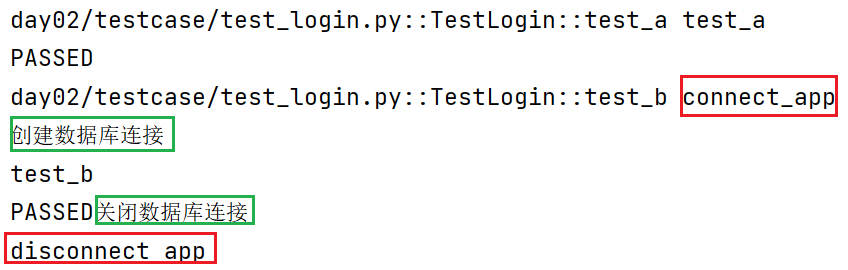
支持多个前后置函数
给test_b函数添加2个前后置操作,def test_b(self, connect_app, exe_sql)
import pytest
@pytest.fixture(scope='function')
def connect_app():
print('connect_app')
yield
print('disconnect app')
@pytest.fixture(scope='function')
def exe_sql():
print('创建数据库连接')
yield
print('关闭数据库连接')
class TestLogin():
def test_a(self):
print('test_a')
def test_b(self, connect_app, exe_sql): #在函数的入参中加上前后置函数名称
print('test_b')
输出如下
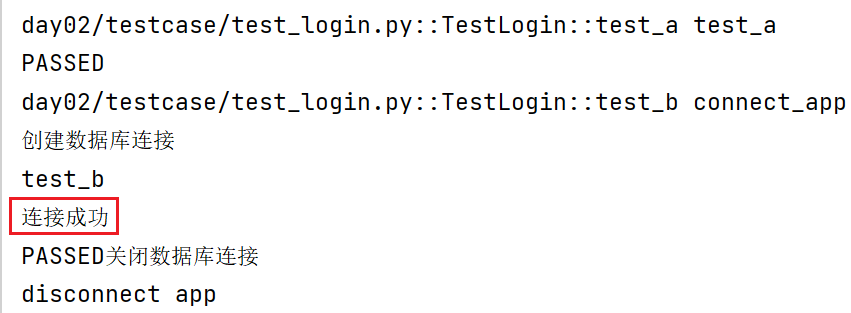
前后置操作可以传递返回值
yield还支持返回值传递
yield '连接成功':返回'连接成功'
print(exe_sql):打印前置操作返回值
import pytest
@pytest.fixture(scope='function')
def exe_sql():
print('创建数据库连接')
yield '连接成功'
print('关闭数据库连接')
class TestLogin():
def test_a(self):
print('test_a')
def test_b(self, exe_sql): #在函数的入参中加上前后置函数名称
print('test_b')
print(exe_sql)
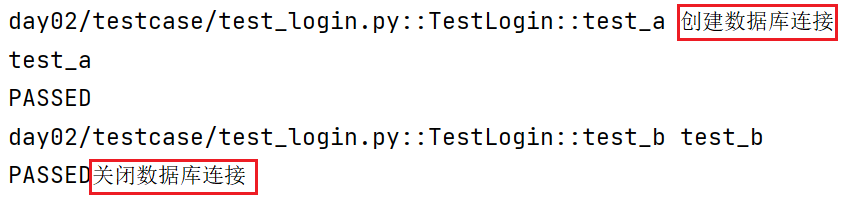
类如何调用
@pytest.fixture(scope='class')
import pytest
@pytest.fixture(scope='class')
def exe_sql():
print('创建数据库连接')
yield '连接成功'
print('关闭数据库连接')
@pytest.mark.usefixtures("exe_sql")
class TestLogin():
def test_a(self):
print('test_a')
def test_b(self): #在函数的入参中加上前后置函数名称
print('test_b')
print(exe_sql)
输出如下
params参数
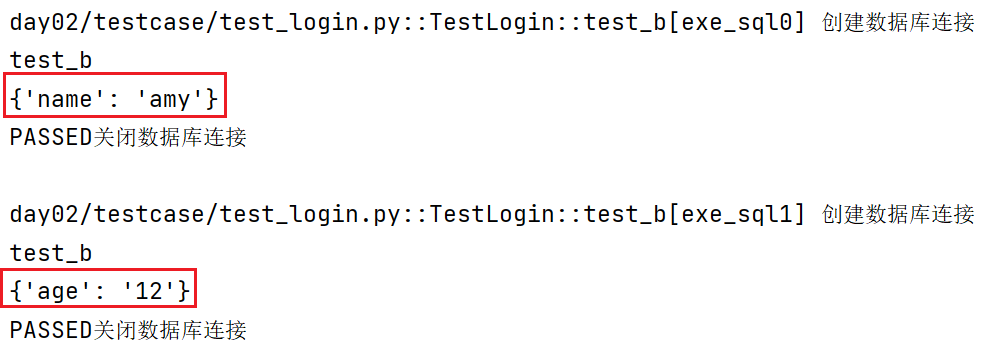
list中有n组数据test_b函数就会执行n次
request、request.param:固定写法,不能重命名
import pytest
# 这里假装读取ymal文件
def read_yaml():
return [{"name": "amy"}, {"age": "12"}]
@pytest.fixture(scope='function', params=read_yaml())
def exe_sql(request):
print('创建数据库连接')
yield request.param
print('关闭数据库连接')
def test_b(self, exe_sql):
print('test_b')
print(str(exe_sql)) # list需要转换一下
输出结果
ids参数
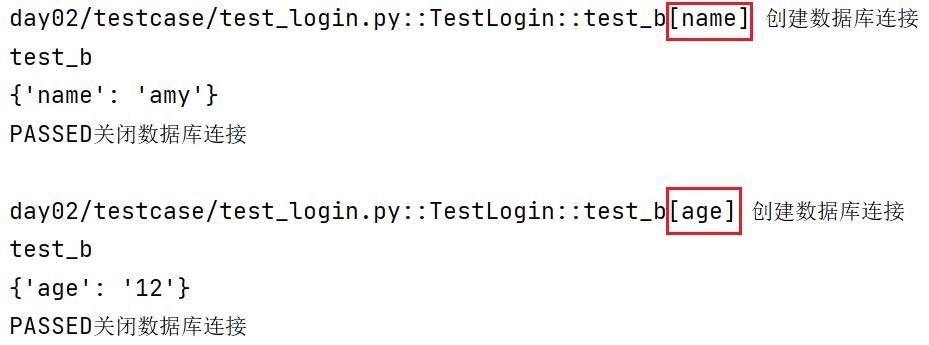
不能单独使用,必须和params一起使用,作用是给参数起别名
@pytest.fixture(scope='function', params=read_yaml(), ids=['name', 'age'])
name参数
给fixture起别名
注意:使用了别名,fixture名称就不能用了,只能用别名
@pytest.fixture(scope='function', params=read_yaml(), ids=['name', 'age'], name='db')
def test_b(self, db):
print('test_b')
print(str(db))
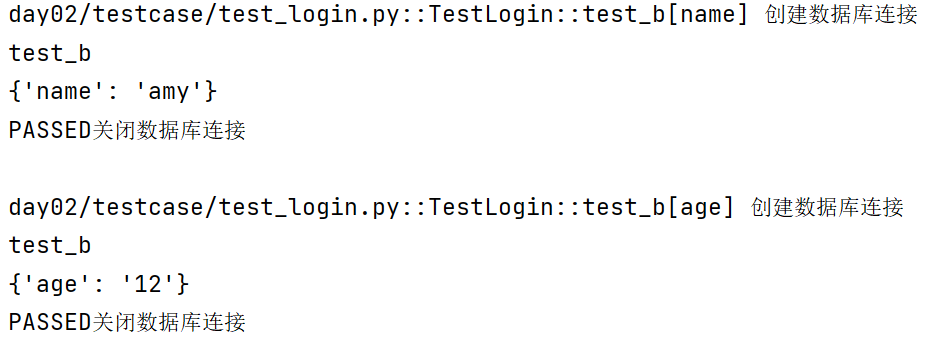
fixture结合conftest.py文件使用
1、conftest.py文件名称固定,不能变。测试用例调用fixture时不需要导包。
2、conftest.py文件中fixture可以被多个测试用例调用;一个测试用例可以调用多个fixture。
3、conftest.py文件中的fixture放在项目根目录时,全局可用。
4、每个测试用例所在文件夹都可以有自己的conftest.py文件。
5、conftest.py文件中的fixture,autouse参数一般都会把它设置为True。
下面的例子基于autouse=True
项目结构
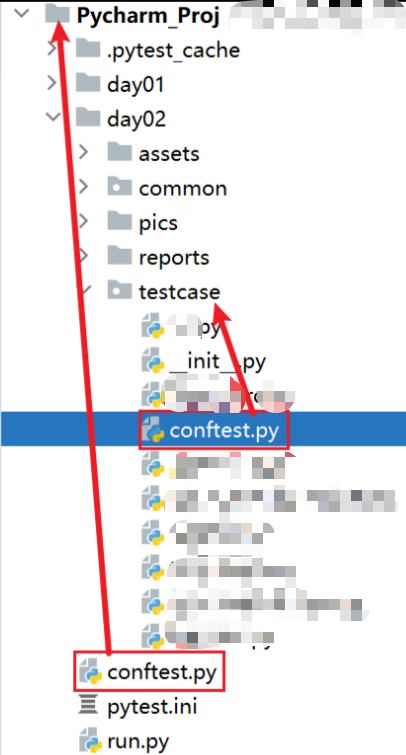
全局conftest.py
import pytest
def read_yaml():
return [{"name": "amy"}, {"age": "12"}]
@pytest.fixture(scope='function', autouse=True, params=read_yaml(), ids=['name', 'age'], name='db')
def exe_sql(request):
print('创建数据库连接')
yield request.param
print('关闭数据库连接')
testcase文件夹下的conftest.py
import pytest
@pytest.fixture(scope='function', autouse=True, name='connect')
def connect_app():
print('connect_app')
yield
print('disconnect app')
测试用例有2个,如下
class TestLogin:
def test_a(self):
print('test_a')
def test_b(self):
print('test_b')
print(str(db))
import pytest
def test_unbind_card():
print('unbind_card')
输出如下
day02/testcase/test_login.py::TestLogin::test_a[name] 创建数据库连接
connect_app
test_a
PASSEDdisconnect app
关闭数据库连接
day02/testcase/test_login.py::TestLogin::test_a[age] 创建数据库连接
connect_app
test_a
PASSEDdisconnect app
关闭数据库连接
day02/testcase/test_login.py::TestLogin::test_b[name] 创建数据库连接
connect_app
test_b
{'name': 'amy'}
PASSEDdisconnect app
关闭数据库连接
day02/testcase/test_login.py::TestLogin::test_b[age] 创建数据库连接
connect_app
test_b
{'age': '12'}
PASSEDdisconnect app
关闭数据库连接
day02/testcase/test_unbind_card.py::test_unbind_card[name] 创建数据库连接
connect_app
unbind_card
PASSEDdisconnect app
关闭数据库连接
day02/testcase/test_unbind_card.py::test_unbind_card[age] 创建数据库连接
connect_app
unbind_card
PASSEDdisconnect app
关闭数据库连接
多线程,scope='session'的fixture也只会执行一次
@pytest.fixture(scope='session', autouse=True, name='connect')
setup、setup_class、fixture、conftest.py优先级
全局conftest.py优先级高于局部conftest.py
1、会话:fixture的scope=session的优先级最高。
2、类:fixture的scope=class优先级高于setup_class。
3、函数:fixture的scope=function优先级高于setup。
总排行榜
NO1:[全局]conftest.py的fixture的scope=session
NO2:[局部]conftest.py的fixture的scope=session
NO3:[全局]conftest.py的fixture的scope=class
NO4:[局部]conftest.py的fixture的scope=class
NO5:setup_class
NO6:[全局]conftest.py的fixture的scope=function
NO7:[局部]conftest.py的fixture的scope=function
NO8:setup
总结:pytest的执行过程
1、查找[全局]conftest.py文件。
2、查找pytest.ini文件,找出测试用例位置。
3、根据测试用例位置,查找[局部]conftest.py文件。
4、查找[局部]conftest.py文件中的setup_class、teardown_class、setup、teardown
4、根据pytest.ini文件中(如有,没有则使用pytest默认的)命名规则,找出测试用例并执行
数据驱动
@pytest.mark.parametrize(args_name,args_value)
虽然前后置操作中也提到了params参数,但常用parametrize
1个参数,使用场景:
1)元祖
2)list
@pytest.mark.parametrize('name', {"夏利", "王柏"})
def test_c(self, name):
print('test_c:' + name)
@pytest.mark.parametrize('age', ["12", "18"])
def test_d(self, age):
print('test_d:' + age)

2个参数,需要解包,使用场景:
1)list中包了元组
2)list中包了list
@pytest.mark.parametrize('name,age', [{"小李", "12"}])
def test_a(self, name, age):
print('test_a:' + name + ' ' + age)
@pytest.mark.parametrize('name,age', [["小李", "12"], ["小王", "18"]])
def test_b(self, name, age):
print('test_b:' + name + ' ' + age)

结果可以看出list中的元祖使用不是从前到后的顺序
pytest使用yaml格式测试用例实现读、写、清除的封装
安装插件pyyaml
pip install pyyaml
1、什么是yaml?
1)yaml是一种数据格式,扩展名可以是yaml、yml
2)支持#注释
3)通过缩进表示层级
4)区分大小写

2、用途
1)配置文件(yaml、ini)
2)编写自动化测试用例
3、数据组成
1)、map对象:键:(空格)值
name: 小李
2)、数组(list),使用“-”表示列表
users:
– name1: 毛毛
– name2:
– name3: 小丽
– age: 18
– name4: 灰灰
读取yaml文件
项目结构

import os
import yaml
def get_path():
# return os.getcwd().split("common")[0]
return os.path.dirname(__file__).split("common")[0]
def read_yaml(yamlpath):
with open(get_path()+yamlpath, mode='r', encoding='utf-8') as f:
value = yaml.load(stream=f, Loader=yaml.FullLoader)
return value
if __name__ == '__main__':
print(read_yaml('testcase/userInfo.yaml'))
运行yaml_util.py,输出结果
{'users': [{'name1': '毛毛'}, {'name2': [{'name3': '小丽'}, {'age': 18}]}, {'name4': '灰灰'}]}
划分层次后:
{'users': [
{'name1': '毛毛'},
{'name2': [
{'name3': '小丽'},
{'age': 18}
]},
{'name4': '灰灰'}
]}
想要取到集合中的集合,需要注意用到索引。
@pytest.mark.parametrize('caseinfo', read_yaml('testcase/userInfo.yaml'))
def test_a(self, caseinfo):
print('test_a')
name1 = caseinfo['users'][0]['name1']
print(str(name1))
输出结果
day02/testcase/test_login.py::TestLogin::test_a[caseinfo0] test_a
毛毛
一般不要这么用,数据这么组装就可以了,见下图
–
users:
name1: 毛毛
name2:
name3: 小丽
age: 18
name4: 灰灰
@pytest.mark.parametrize('caseinfo', read_yaml('testcase/userInfo.yaml'))
def test_a(self, caseinfo):
print('test_a')
name1 = caseinfo['users']['name1']
print(str(name1))
多组数据进行迭代,可以这么写
–
users:
name1: 毛毛
name2:
name3: 小丽
age: 18
name4: 灰灰
–
users:
name1: 天天
name2:
name3: 莱德
age: 8
name4: 阿奇
@pytest.mark.parametrize('caseinfo', read_yaml('testcase/userInfo.yaml'))
def test_a(self, caseinfo):
print('test_a')
name1 = caseinfo['users']['name1']
print(str(name1))

小功能汇总
显示最慢的10个测试步骤
pytest ‐‐durations=10
默认情况下,如果测试时间很短(<0.01s),这里不会显示执行时常,如果需要显示,在命令行中追加 **-vv**参数
实战经验
指定运行部分测试用例
这种方式还会根据运行测试用例yaml文件的排列顺序进行测试,非常好用。下面的案例会以此执行test_A、test_B,但不会执行test_B。这样可以保留所有用例,在需要时将值设置成‘1’便可加入运行
run.testcase.yaml文件,内容如下:
# 设置是否运行测试用例 1: 运行 0:不运行
test_A: '1'
test_B: '1'
test_C: '0'
在run.py中,写一个方法,用于修改pytest.ini文件

效果:
修改前:

修改后:

内置fixture之request参数
@pytest.fixture(autouse=True)
def print_request(request):
print("\\n=======================request start=================================")
print(request.module)
print(request.function)
print(request.cls)
print(request.fspath) # 可以获得当前testcase用例名称
print(request.fixturenames)
print(request.fixturename)
print(request.scope)
print("\\n=======================request end=================================")
输出
=======================request start=================================
1 <module'web.cases.module2.test_1'from'D:\\\\web\\\\cases\\\\module2\\\\test_1.py'>
2 <function test_answer_1 at0x0000012D1C9FD9D8>
3 None
4 D:\\web\\cases\\module2\\test_1.py
5 ['_verify_url', 'base_url', '__pytest_repeat_step_number', 'show_request', 'request']
6 show_request
7 function
=======================request end=================================