目录
#用户管理
1.Linux操作系统开机启动流程
面试题:描述 linux 系统从开机到登陆界面的启动过程
2.服务器开机自动运行
3.用户类型
4..用户相关的文件passwd
创建用户的流程:
面试题: 如果出现了bash版本号如何解决?
5.用户相关命令
案例1.创建一个普通用户lyh
案例2 创建一个用户 lyh
删除用户 userdel
passwd修改密码
案例3 免交户更改密码
chown 修改文件的属主和属组
递归修改目录及目录以下所有文件的属主属组
su – 切换目录
#用户管理
1.Linux操作系统开机启动流程
面试题:描述 linux 系统从开机到登陆界面的启动过程
面试题:
描述 linux 系统从开机到登陆界面的启动过程
解答:
开机 BIOS 自检
MBR 引导
grub 引导菜单
加载内核 kernel
启动 init 进程
读取 inittab 文件,执行 rc.sysinit,rc 等脚本
启动 mingetty,进入系统登陆界面
开机bios自检,检测硬件的问题
主板
CPU
内存
硬盘
电源
在企业中出问题最多的硬件: 硬件服务器 IDC机房 自建机房
1.磁盘 出了怎么办? 磁盘的详细属性
互联网公司: 表现的有经验
1).是否在保质期内( 3年 )
如果保质期3年内,联系售后直接换新的
1.1).在质保期内更好流程
a.联系售后
b.联系IDC机房 定时间 身份证
2).过了保质期,有库存吗 直接采购
问领导: 更换硬盘的流程 2.内存 内存不会坏
a.兼容性问题 关机重启 或者刚开机无法启动服务器
重新插拔内存,擦拭金手指
全部拔下一根根插 插一根启动一下
一根一根往下拔 拔一根启动一下
3.电源 坏了直接换 服务器支持两块电源
4.主板 坏了换
5.CPU 风扇
2.服务器开机自动运行
centos7.X
方法1.
被systemctl所管理的服务 直接可以使用enable
systemctl stop NetworkManager # 关闭
systemctl enable NetworkManager # 开机自动运行
方法2.
不被systemctl所管理的服务
写入/etc/rc.local #开机自启脚本文件
方法3.写入/etc/profile 环境变量
不建议 centos6.X 管理服务的是 chkconfig 了解
chkconfig network on|off
etc/inittab/network start
3.用户类型
用户类型: 作用
root 管理员 拥有最高权限
oldboy 普通用户 拥有个人用户的最高权限 登录系统(优化系统,更加安全)
虚拟用户 傀儡用户 启动进程必须使用一个用户来运行,此用户不需要登录操作系统,只为了运行程序而存在
系统分类表示方式: 使用UID表示
UID号码(系统默认)
管理员 0
普通用户 1000+
虚拟用户: 1-999
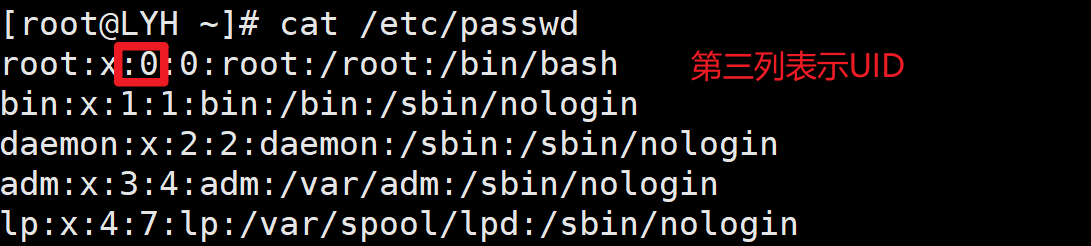
4..用户相关的文件passwd
cat /etc/passwd
root:x:0:0:root:/root:/bin/bash
以冒号分隔:
第一列: 用户名称 管理员 普通用户和虚拟用户体现的位置
第二列: x 用户的密码 #哈希的方式加密 #cat /etc/shadow (忘记密码 覆盖进去)
第三列: 0 用户的UID号
第四列: 0 用户的GID号
第五列: root 描述信息
第六列: /root 用户的家目录 管理员/root 普通该用户家LYH目录—>/home/LYH/
第七列: 命令解释器
/bin/bash 普通用户包括root,允许登录操作系统
/sbin/nologin 虚拟用户 不允许登录操作系统
/etc/skel/ 作用: 所有用户的家模版
/etc/shadoww 用户密码信息
/etc/group 用户的 用户组信息
/etc/gshadow 用户组密码信息
创建用户的流程:
创建用户的流程:
1.创建用户(useradd LYH)
2.系统会将/etc/skel/隐藏的环境变量文件 复制到/home/LYH/家目录中隐藏文件
3.系统将隐藏文件属主属组修改为普通用户
面试题: 如果出现了bash版本号如何解决?
面试题: 如果出现了bash版本号如何解决?
第一步: 注释掉/etc/profile中的PS1变量(如果有PS1变量,如果没有,直接第二步)
vim /etc/profile
第二步: 删除隐藏文件重新登录系统
[root@LYH ~]# rm -rf .bash_profile .bash
Connecting to 10.0.0.200:22…
Connection established.
To escape to local shell, press 'Ctrl+Alt+]'.
Last login: Mon Mar 2 22:06:43 2026 from 10.0.0.1
-bash-4.2#
-bash-4.2#
-bash-4.2#
-bash-4.2#
-bash-4.2#
-bash-4.2#
第三步: 解决方法 复制模版文件到家目录
-bash-4.2# cp /etc/skel/.* .
#omitting directory 忽略目录
查看是否复制成功 .bash_profile和.bashrc
-bash-4.2# ll .bash*
-rw——-. 1 root root 7273 Mar 2 22:16 .bash_history
-rw-r–r–. 1 root root 18 Mar 2 22:16 .bash_logout
-rw-r–r–. 1 root root 193 Mar 2 22:16 .bash_profile
-rw-r–r–. 1 root root 231 Mar 2 22:16 .bashrc
#查看下面俩个文件
第四步: 退出重新连接操作系统
exit
第四步: 如果不退出可以让profile直接运行一次
使用. 或者source
-bash-4.2# . .bash_profile
[root@LYH ~]# echo $PS1 [\\u@\\h \\W]\\$ [root@LYH ~]# [root@LYH ~]#
ps:[\\u@\\h \\W]\\$
\\d 英文格式日期
\\H 主机全名
\\h 取主机名称的第一个名字,大部分是linux
\\t 显示 时间24小时
\\T 显示 时间 12小时
\\u 当前用户
\\v bash 版本信息
\\w 完整的工作目录名
\\W 显示最后一个目录名
\\$ 普通用户显示$ root显示#
PS1变量: 临时修改
[root@LYH ~]# PS1='[\\u \\t@\\h \\w]\\$'
[root 22:23:46@LYH ~]#
[root 22:23:46@LYH ~]#cd /etc/sysconfig/network-scripts
[root 22:24:32@LYH /etc/sysconfig/network-scripts]#
永久修改写入/etc/profile
5.用户相关命令
1.useradd 添加用户
语法格式: useradd [参数选项] 用户名称
参数选项:
-s 指定解释器 /bin/bash /sbin/no login
-u 指定UID
-g 指定GID
-M 不创建家目录 如果不适用 -M 创建家目录
-G 附加组
案例1.创建一个普通用户lyh
默认不加任何参数 #默认1000往后排
[root@LYH ~]# useradd lyh
[root@LYH ~]#
#查看普通用户 uid gid
[root@LYH ~]# id lyh
uid=1000(lyh) gid=1000(lyh) groups=1000(lyh)
[root@LYH ~]#
#查看和用户相关的数据
[root@LYH ~]# grep 'lyh' /etc/passwd
lyh:x:1000:1000::/home/lyh:/bin/bash
[root@LYH ~]#
[root@LYH ~]#
[root@LYH ~]# ll /home
total 0
drwx——. 2 lyh lyh 62 Mar 3 13:15 lyh
[root@LYH ~]#
案例2 创建一个用户 lyh
指定uid 666 不创建 家目录 不允许登录
[root@LYH ~]# userdel -r lyh
[root@LYH ~]# useradd -u 666 -M -s /sbin/nologin lyh
[root@LYH ~]# id lyh
uid=666(lyh) gid=1000(lyh) groups=1000(lyh)
[root@LYH ~]#
案例 3 创建一个虚拟用户 uid888 gid 888 不创建家目录 不允许登录系统
[root@LYH ~]# useradd -u 888 -g 888 -M -s /sbin/nologin
useradd: group '888' does not exist
[root@LYH ~]#
#必须先创建组
第一步 创建组
第二步 创建用户
#创建组
[root@LYH ~]# groupadd -g 888 test01
#查看组文件
[root@LYH ~]# grep test01 /etc/group
test01:x:888:
[root@LYH ~]#
[root@LYH ~]# useradd -u 888 -g 888 -M -s /sbin/nologin test01
[root@LYH ~]#
[root@LYH ~]#
[root@LYH ~]# id test01
uid=888(test01) gid=888(test01) groups=888(test01)
[root@LYH ~]#
删除用户 userdel
-r 删除用户相关的所有文件 #每次只能删除一个用户
#创建test02用户
[root@LYH ~]# useradd test02
[root@LYH ~]# grep 'test02' /etc/passwd
test02:x:1000:1001::/home/test02:/bin/bash
[root@LYH ~]# ll /home/
total 0
drwx——. 2 test02 test02 62 Mar 3 13:33 test02
[root@LYH ~]#
并未完全删除
[root@LYH ~]# userdel test02
[root@LYH ~]# grep 'test02' /etc/passwd
[root@LYH ~]# ll /home/
total 0
drwx——. 2 1000 1001 62 Mar 3 13:33 test02
[root@LYH ~]# id test02
id: test02: no such user
[root@LYH ~]#
#
#再次创建时候 容易引起问题
[root@LYH ~]#
[root@LYH ~]# useradd test02
useradd: warning: the home directory already exists.
Not copying any file from skel directory into it.
Creating mailbox file: File exists
[root@LYH ~]#
[root@LYH ~]# ll /home/
total 0
drwx——. 2 test02 test02 62 Mar 3 13:33 test02
[test02@LYH ~]$ ll /var/spool/mail/
total 0
-rw-rw—-. 1 lyh mail 0 Mar 3 13:22 lyh
-rw-rw—-. 1 test01 mail 0 Mar 3 13:30 test01
-rw-rw—-. 1 test02 mail 0 Mar 3 13:33 test02
[test02@LYH ~]$
[root@LYH ~]# su – test02
[test02@LYH ~]$ ll -a
total 12
drwx——. 2 test02 test02 62 Mar 3 13:33 .
drwxr-xr-x. 3 root root 20 Mar 3 13:33 ..
-rw-r–r–. 1 test02 test02 18 Apr 1 2020 .bash_logout
-rw-r–r–. 1 test02 test02 193 Apr 1 2020 .bash_profile
-rw-r–r–. 1 test02 test02 231 Apr 1 2020 .bashrc
[test02@LYH ~]$
[root@LYH ~]# grep 'test02' /etc/passwd
test02:x:1000:1001::/home/test02:/bin/bash
#后续容易产生权限问题
[test02@LYH ~]$
[test02@LYH ~]$ userdel -r test02
userdel: user test02 is currently used by process 10403
[test02@LYH ~]$
passwd修改密码
案例1 给root用户设置密码
passwd修改密码
[root@LYH ~]# passwd
Changing password for user root.
New password: #输入新的密码
BAD PASSWORD: The password is a palindrome
Retype new password: #再次输入新的密码
passwd: all authentication tokens updated successfully.
[root@LYH ~]#
案例2 给普通用户 passwd修改密码
[root@LYH ~]# passwd test02
Changing password for user test02.
New password:
BAD PASSWORD: The password is a palindrome
Retype new password:
passwd: all authentication tokens updated successfully.
[root@LYH ~]#
[root@LYH ~]#
#切换用户
su – root
案例3 免交户更改密码
[root@LYH ~]#
[root@LYH ~]# echo 1 | passwd –stdin test02
Changing password for user test02.
passwd: all authentication tokens updated successfully.
[root@LYH ~]#
chown 修改文件的属主和属组
[root@LYH ~]# ll
total 28
-rw-r–r–. 1 root root 21 Feb 18 20:22 A1.txt
[root@LYH ~]#
[root@LYH ~]# chown test02.test02 A1.txt
[root@LYH ~]# ll
total 28
-rw-r–r–. 1 test02 test02 21 Feb 18 20:22 A1.txt
递归修改目录及目录以下所有文件的属主属组
[root@LYH ~]# mkdir lyh
[root@LYH ~]# mkdir lyh/{1..3}.test
[root@LYH ~]# ll lyh/
total 0
drwxr-xr-x. 2 root root 6 Mar 3 14:38 1.test
drwxr-xr-x. 2 root root 6 Mar 3 14:38 2.test
drwxr-xr-x. 2 root root 6 Mar 3 14:38 3.test
[root@LYH ~]#
####直接修改目录的属主 属组 并不能直接修改其目录下文件的属主和属组
[root@LYH ~]# chown test02.test02 lyh
[root@LYH ~]# ll lyh/
total 0
drwxr-xr-x. 2 root root 6 Mar 3 14:38 1.test
drwxr-xr-x. 2 root root 6 Mar 3 14:38 2.test
drwxr-xr-x. 2 root root 6 Mar 3 14:38 3.test
[root@LYH ~]# ll
total 28
drwxr-xr-x. 5 test02 test02 48 Mar 3 14:38 lyh
###-R
[root@LYH ~]# chown -r test02.test02 lyh
chown: invalid option — 'r'
Try 'chown –help' for more information.
[root@LYH ~]# chown -R test02.test02 lyh
[root@LYH ~]# ll lyh/
total 0
drwxr-xr-x. 2 test02 test02 6 Mar 3 14:38 1.test
drwxr-xr-x. 2 test02 test02 6 Mar 3 14:38 2.test
drwxr-xr-x. 2 test02 test02 6 Mar 3 14:38 3.test
[root@LYH ~]#
su – 切换目录
su – 用户
su 用户
root 切换普通用户 不需要密码
普通用户切换到root 需要root 密码
普通用户切换到普通用户需要密码
1.root 切换普通用户
[root@LYH ~]# su – test02
Last login: Tue Mar 3 13:38:17 CST 2026 on pts/0
[test02@LYH ~]$ exit
logout
[root@LYH ~]# su test02
[test02@LYH root]$ pwd
/root
[test02@LYH root]$ ll
ls: cannot open directory .: Permission denied
[test02@LYH root]$
[test02@LYH root]$ cd
[test02@LYH ~]$ pwd
/home/test02
2.普通用户切换到普通用户需要密码
[test03@LYH ~]$ su – test02
Password: #密码
Last login: Tue Mar 3 19:01:49 CST 2026 on pts/1
[test02@LYH ~]$
3.普通用户切换到root 需要root 密码
[test02@LYH ~]$ su – root
Password:
Last login: Tue Mar 3 18:54:50 CST 2026 from 10.0.0.1 on pts/1
[root@LYH ~]#