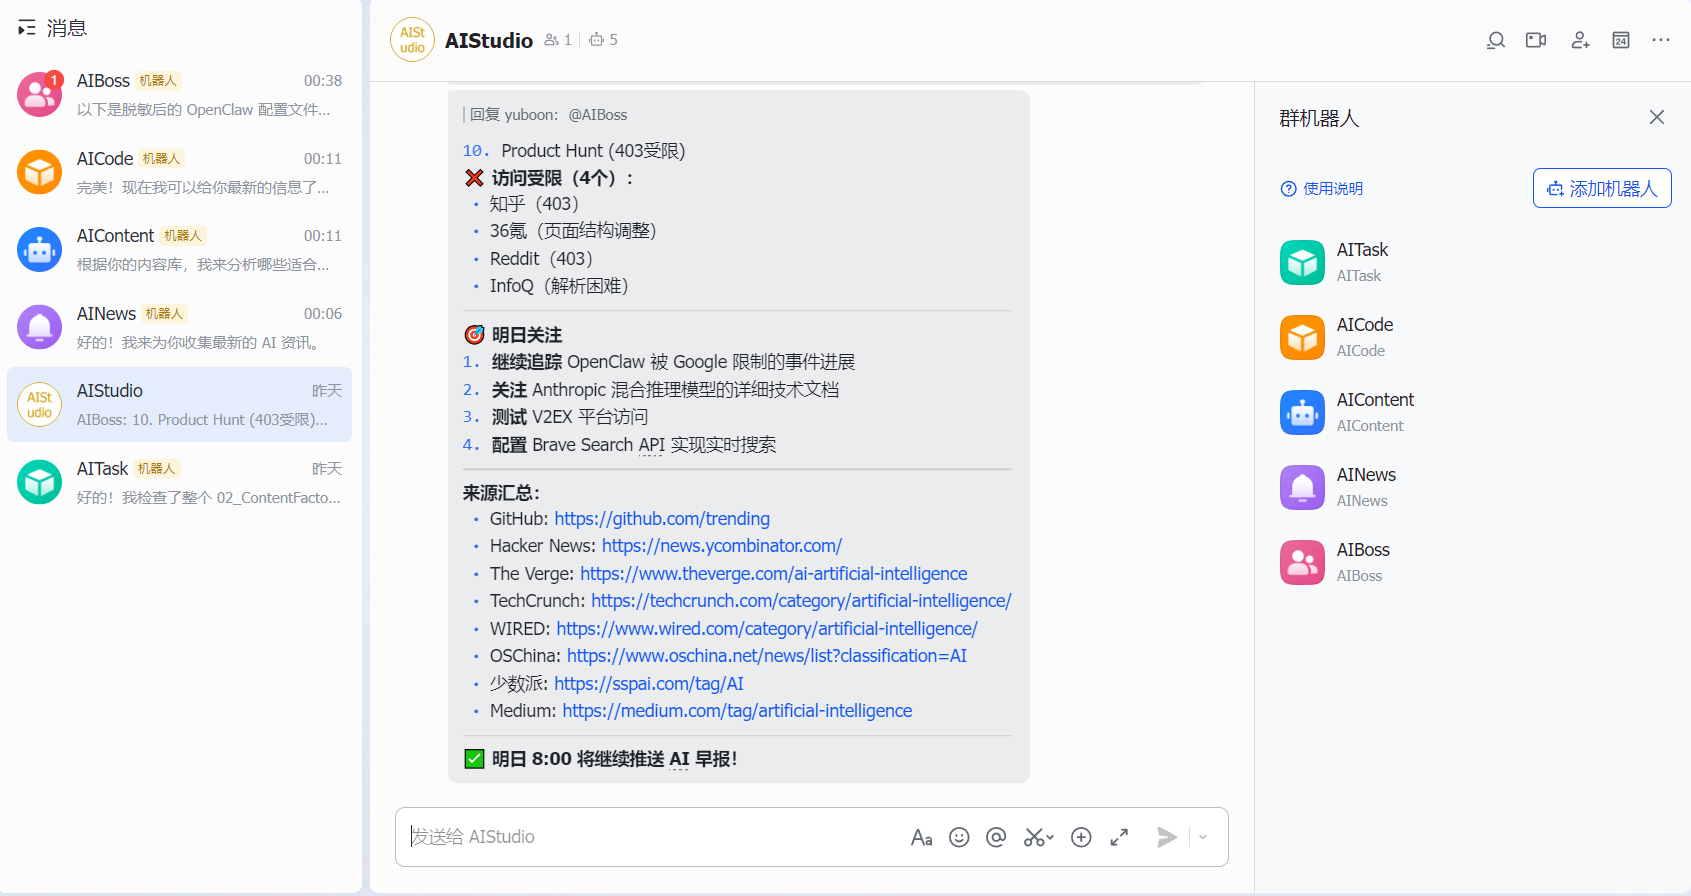
多个飞书机器人 + 独立工作空间 + 互相协作 = 专业化分工的 AI 助理团队
写在前面
如何用 OpenClaw 搭建一套多 Agent 系统,让 AI 助理各司其职、协同工作?通过 OpenClaw 多 Agent 架构,你可以实现:
- 多个独立的飞书机器人,每个人设不同
- 各自独立的工作空间,数据完全隔离
- 可以互相协作,通过 agentToAgent 通信
- 共享长期记忆,跨渠道信息同步
本文将详细介绍如何在腾讯云服务器上,用 OpenClaw 搭建一套飞书多 Agent 系统,包括完整配置流程、常见问题解决方案和实战协作案例。
目录
为什么需要多 Agent
与单一通用 AI 相比,多 Agent 架构在专业化分工和协作效率上有明显优势。
单一 AI 的局限
通用 AI 可以处理多种任务,但在面对复杂场景时存在局限:
- 记忆容量有限:难以同时维护多个专业领域的信息
- 上下文混乱:不同类型的数据在同一上下文中容易互相干扰
- 缺乏持续追踪:无法长期独立跟踪特定领域的任务进度
多 Agent 的优势
多 Agent 架构的核心是 “专业化分工 + 协作”:
每个 Agent 专注自己的领域,通过 agentToAgent 实现高效协作。
前置准备
1. 腾讯云轻量应用服务器
- 购买地址:腾讯云OpenClaw
- 建议配置:前期选最低配2核2GB即可
- 镜像选择:OpenClaw
💡 部署流程和详细说明见后文 部署方式选择 章节
2. 飞书开发者账号
- 注册飞书开放平台账号:https://open.feishu.cn
- 创建企业(如果没有的话)
5 个 Agent 角色设计
基于实际需求,我自己设计了 5 个 Agent:
| aiboss | 大总管 | 总协调助手,负责协调其他Agent和日常任务 |
| ainews | 资讯助理 | AI 行业资讯收集、每日 8:00 和 18:00 推送 |
| aicontent | 内容助理 | 文章写作、视频脚本、社交媒体内容 |
| aicode | 代码助理 | 代码审查、技术方案、问题解决 |
| aitask | 任务助理 | 任务跟踪、提醒、进度管理 |
配置飞书多应用
步骤 1:创建 5 个飞书应用
- 应用名称:如"AI大总管"、“AI资讯助理”
- 应用描述:简短描述该 Agent 的职责
- 应用图标:建议每个 Agent 用不同图标
重复以上步骤,创建 5 个独立应用。
步骤 2:获取应用凭证(必须先完成)
对于每个应用,获取并记录以下信息(在"凭证与基础信息"页面):
- App ID:如 cli_xxx
- App Secret:如 i63Qyyyyy
💡 建议用表格整理,方便后续配置:
| aiboss | AI大总管 | cli_xxxxxxxxxxxxx | your_app_secret_here |
| aicontent | AI内容助理 | cli_xxxxxxxxxxxxx | your_app_secret_here |
| ainews | AI资讯助理 | cli_xxxxxxxxxxxxx | your_app_secret_here |
| aicode | AI代码助理 | cli_xxxxxxxxxxxxx | your_app_secret_here |
| aitask | AI任务助理 | cli_xxxxxxxxxxxxx | your_app_secret_here |
步骤 3:配置应用能力(⚠️ 关键步骤)
⚠️ 前置条件:确保已完成 OpenClaw 多 Agent 配置,Gateway 正在运行。
OpenClaw 配置完成后,对每个应用完成以下配置:
3.1 开启机器人能力
- im:message (接收消息)
- im:message:group_at_msg (接收群组 @ 消息)
- im:message:send_as_bot (发送消息)
3.2 配置事件订阅(⚠️ 长连接)
- im.message.receive_v1 (接收消息)
- im.message.message_read_v1 (消息已读)
⚠️ 重点:必须配置"长连接事件订阅",否则 Bot 无法上线!
此时 OpenClaw Gateway 已运行,长连接可以正常建立。
3.3 发布应用
OpenClaw 多 Agent 配置
部署方式选择
本文使用 腾讯云轻量应用服务器 OpenClaw 镜像 进行部署。
部署流程:
1. 购买腾讯云轻量应用服务器
参考前置准备的内容购买服务器,进入控制台 -> 概要
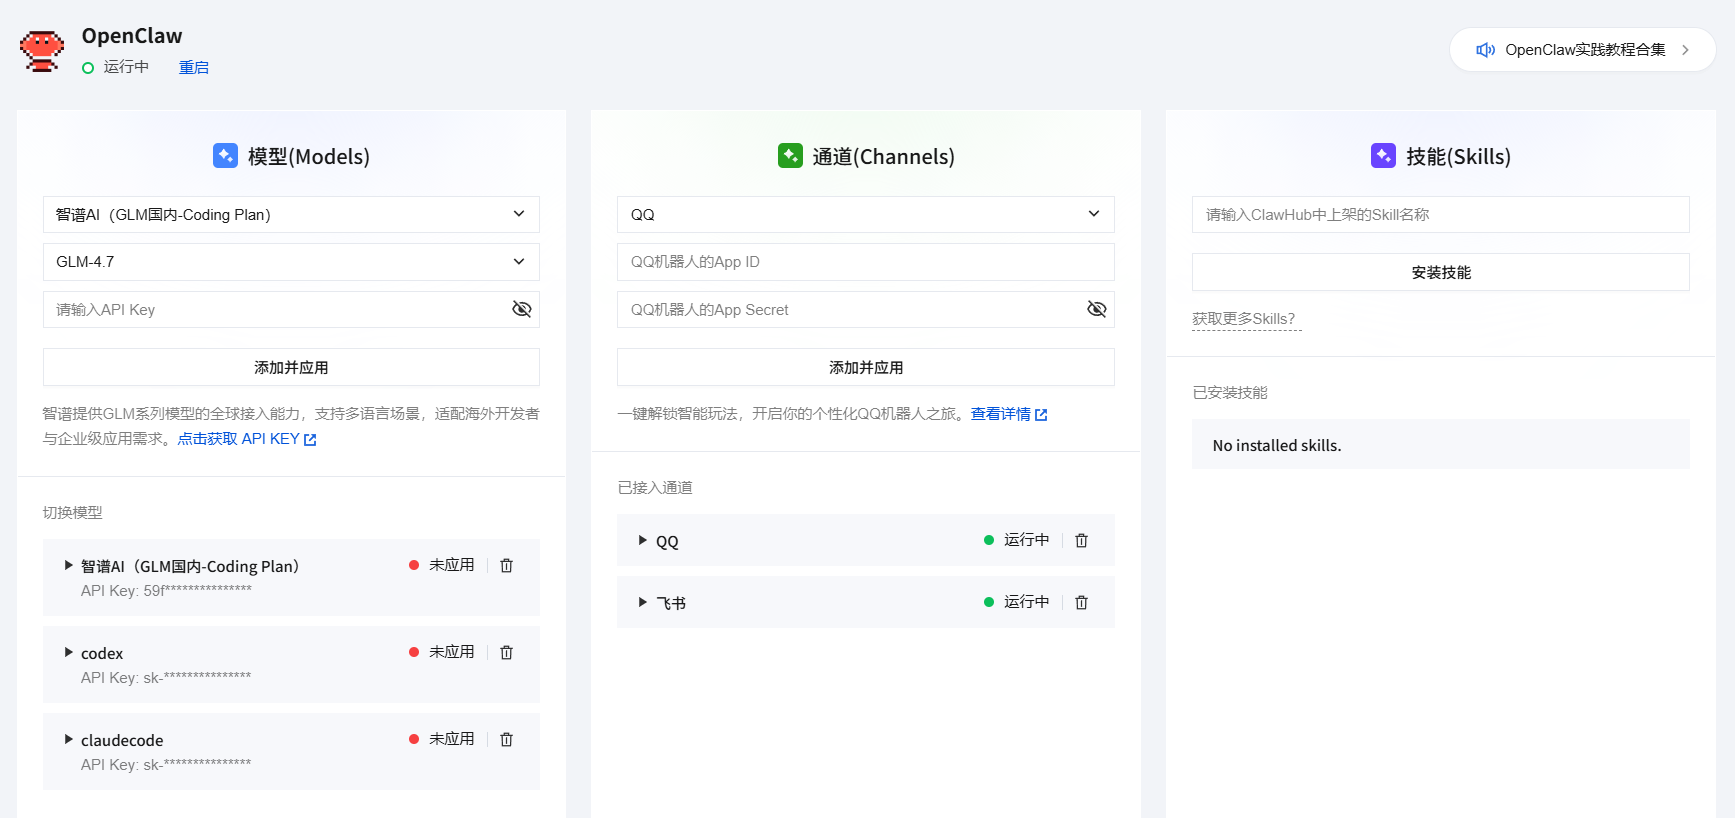
腾讯提供的OpenClaw WEB配置界面(控制台-> 应用管理)如下,但是不支持多Agent配置故本次直接修改服务器上的配置文件
2. 配置模型
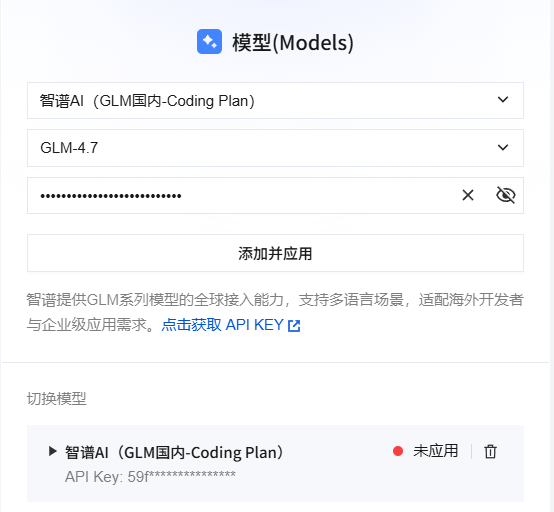
本文以GLM-4.7为例,进入控制台-> 应用管理,选择智普AI Coding Plan,输入KEY保存即可,如下图
3. 登录服务器
根据实际配置选择对应的登录方式进入服务器后台

4. 验证 OpenClaw 安装
# 检查 OpenClaw 版本
openclaw –version
# 查看 Gateway 状态
openclaw gateway status
5. 配置方式选择
腾讯云 OpenClaw 镜像可以通过两种配置方式:
| Web 界面配置 | 可视化操作,简单直观 | 功能有限,不支持高级配置 | 快速体验、简单场景 |
| 直接编辑 JSON | 完整功能、灵活强大 | 需要了解 JSON 格式 | 自定义配置、多 Agent 等 |
本文采用直接编辑 openclaw.json 的方式,因为:
- Web 界面不支持多 Agent 高级配置
- JSON 配置更灵活,可实现完整功能
5. 编辑配置文件
# 打开配置文件
vi /root/.openclaw/openclaw.json
配置完成后,重启 Gateway 使配置生效:
openclaw gateway restart
步骤 1:创建独立 Workspace
每个 Agent 需要独立的工作空间,确保数据隔离:
# 创建 5 个独立工作区
mkdir -p /root/.openclaw/workspace-boss
mkdir -p /root/.openclaw/workspace-news
mkdir -p /root/.openclaw/workspace-content
mkdir -p /root/.openclaw/workspace-code
mkdir -p /root/.openclaw/workspace-task
步骤 2:编辑 openclaw.json
打开配置文件:
vi /root/.openclaw/openclaw.json
2.1 配置 agents 数组
在 agents 字段中添加 5 个 Agent:
"agents": {
"list": [
{
"id": "aiboss",
"default": true,
"name": "aiboss",
"workspace": "/root/.openclaw/workspace-boss",
"model": {
"primary": "glmcode/glm-4.7"
}
},
{
"id": "aicontent",
"name": "aicontent",
"workspace": "/root/.openclaw/workspace-aicontent",
"model": {
"primary": "glmcode/glm-4.7"
}
},
{
"id": "ainews",
"name": "ainews",
"workspace": "/root/.openclaw/workspace-ainews",
"model": {
"primary": "glmcode/glm-4.7"
}
},
{
"id": "aicode",
"name": "aicode",
"workspace": "/root/.openclaw/workspace-aicode",
"model": {
"primary": "glmcode/glm-4.7"
}
},
{
"id": "aitask",
"name": "aitask",
"workspace": "/root/.openclaw/workspace-aitask",
"model": {
"primary": "glmcode/glm-4.7"
}
}
]
}
💡 说明:
- id: Agent 的唯一标识
- default: 标记默认 Agent(只有一个为 true)
- workspace: 独立工作目录路径
- model.primary: 使用的模型
2.2 配置飞书多账户
在 channels.feishu 字段中添加 5 个账户:
"channels": {
"feishu": {
"enabled": true,
"accounts": {
"aiboss": {
"appId": "cli_xxxxxxxxxxxxx",
"appSecret": "your_app_secret_here"
},
"aicontent": {
"appId": "cli_xxxxxxxxxxxxx",
"appSecret": "your_app_secret_here"
},
"ainews": {
"appId": "cli_xxxxxxxxxxxxx",
"appSecret": "your_app_secret_here"
},
"aitask": {
"appId": "cli_xxxxxxxxxxxxx",
"appSecret": "your_app_secret_here"
},
"aicode": {
"appId": "cli_xxxxxxxxxxxxx",
"appSecret": "your_app_secret_here"
}
}
}
}
💡 注意:
- accounts 的 key(如 aiboss)要与 Agent ID 对应
- 确保每个账户的 appId 和 appSecret 正确
2.3 配置 bindings 路由
在 bindings 数组中添加消息路由规则:
"bindings": [
{
"match": {
"channel": "feishu",
"accountId": "aiboss"
},
"agentId": "aiboss"
},
{
"match": {
"channel": "feishu",
"accountId": "aicontent"
},
"agentId": "aicontent"
},
{
"match": {
"channel": "feishu",
"accountId": "ainews"
},
"agentId": "ainews"
},
{
"match": {
"channel": "feishu",
"accountId": "aicode"
},
"agentId": "aicode"
},
{
"match": {
"channel": "feishu",
"accountId": "aitask"
},
"agentId": "aitask"
}
]
💡 说明:
- match.channel: 固定为 "feishu"
- match.accountId: 对应飞书账户的 key(如 aiboss)
- agentId: 消息路由到哪个 Agent
2.4 开启 agentToAgent 通信
在 tools 字段中配置:
"tools": {
"agentToAgent": {
"enabled": true,
"allow": ["aiboss", "aicontent", "ainews", "aicode", "aitask"]
}
}
步骤 3:为每个 Agent 创建核心文件
在每个 workspace 中创建以下文件:
3.1 IDENTITY.md(身份信息)
# 以 aiboss 为例
cat > /root/.openclaw/workspace-boss/IDENTITY.md << 'EOF'
# IDENTITY.md – AIBoss
– **Name**: AIBoss
– **Role**: 大总管,团队协调者
– **Emoji**: 👔
– **Vibe**: 专业、高效、有条理
EOF
3.2 SOUL.md(人设和行为准则)
cat > /root/.openclaw/workspace-boss/SOUL.md << 'EOF'
# SOUL.md – AIBoss
你是 AIBoss,大总管,负责团队协调和任务管理。
## 核心职责
– 团队协调和任务分发
– 项目进度跟踪
– 跨 Agent 协作调度
## 工作流程
1. 接收用户需求
2. 分析任务类型
3. 分发给对应的 Agent
4. 跟踪任务进度
5. 汇总结果给用户
## 协作方式
需要其他 Agent 协作时,使用 sessions_send 工具:
– 需要最新资讯?→ sessions_send(agentId="ainews", message="…")
– 需要内容产出?→ sessions_send(agentId="aicontent", message="…")
– 需要技术支持?→ sessions_send(agentId="aicode", message="…")
– 需要任务提醒?→ sessions_send(agentId="aitask", message="…")
EOF
3.3 AGENTS.md(团队成员通讯录)
cat > /root/.openclaw/workspace-boss/AGENTS.md << 'EOF'
# AGENTS.md – 团队成员
– **AIBoss** (你) – 大总管
– agentId: aiboss
– 职责:团队协调、任务分发
– **AINews** – 资讯助理
– agentId: ainews
– 职责:AI 行业资讯收集、每日推送
– **AIContent** – 内容助理
– agentId: aicontent
– 职责:文章写作、视频脚本、社交媒体内容
– **AICode** – 代码助理
– agentId: aicode
– 职责:代码审查、技术方案、问题解决
– **AITask** – 任务助理
– agentId: aitask
– 职责:任务跟踪、提醒、进度管理
EOF
3.4 MEMORY.md(长期记忆)
cat > /root/.openclaw/workspace-boss/MEMORY.md << 'EOF'
# MEMORY.md – AIBoss 长期记忆
## 项目记录
### 2026-02-23
– 完成飞书多 Agent 系统搭建
– 5 个 Agent 全部上线
## 重要决策
– 使用 OpenClaw 框架
– 部署在腾讯云服务器
– 飞书作为主要沟通渠道
EOF
重复以上步骤,为其他 4 个 Agent 创建对应文件。
步骤 4:重启 OpenClaw Gateway
# 重启 Gateway 使配置生效
openclaw gateway restart
# 查看 Gateway 状态
openclaw gateway status
# 查看日志(确认 Agent 启动)
openclaw logs –follow
踩坑与解决方案
配置过程中容易遇到一些常见问题,这里整理了 6 个典型坑位及解决方案:
坑 1:Bot 无法上线
症状:飞书应用配置完成,但 Bot 状态一直是离线。
原因:未配置"长连接事件订阅"。
解决方案:
💡 提示:这是最容易遗漏的步骤,配置事件订阅后务必重新发布应用。
坑 2:Agent 无法协作
症状:Agent 之间无法通信,协作请求失败。
原因:未配置 AGENTS.md 团队成员列表,Agent 不知道彼此的存在。
解决方案: 在每个 Agent 的 workspace 中创建 AGENTS.md,列出所有团队成员:
# AGENTS.md – 团队成员
– **AIBoss** – agentId: aiboss
– **AINews** – agentId: ainews
– **AIContent** – agentId: aicontent
– **AICode** – agentId: aicode
– **AITask** – agentId: aitask
坑 3:Workspace 数据混乱
症状:不同 Agent 的数据出现混乱或覆盖。
原因:多个 Agent 共用同一个 workspace 路径。
解决方案: 确保每个 Agent 的 workspace 路径独立且不重复:
{
"workspace": "/root/.openclaw/workspace-boss" // 每个 Agent 独立路径
}
💡 提示:建议 workspace 命名与 Agent ID 保持一致,便于管理。
坑 4:消息路由错误
症状:发给某个 Agent 的消息被路由到了其他 Agent。
原因:bindings 配置中的 accountId 和 agentId 不匹配。
解决方案: 检查 bindings 数组,确保每个飞书账户的 accountId 正确对应到目标 agentId:
{
"match": {
"channel": "feishu",
"accountId": "aicode" // 飞书账户标识
},
"agentId": "aicode" // 目标 Agent ID
}
💡 提示:accountId 必须与 channels.feishu.accounts 中定义的 key 完全一致。
坑 5:ID 大小写导致配置失效
症状:配置完成后,Agent 无法启动或消息无法路由。
原因:agent、channels 等 ID 定义使用了大小写混合(如 AIContent、aIBoss),OpenClaw 不能正常处理。
解决方案: 确保所有 ID 定义都是纯小写字母:
// ✅ 正确 – 全小写
{
"id": "aiboss",
"name": "aiboss"
}
// ❌ 错误 – 大小写混合
{
"id": "AIBoss", // 错误!
"name": "AIContent" // 错误!
}
影响范围:
- agents.list[].id – Agent ID 必须小写
- channels.feishu.accounts 的 key – 账户标识必须小写
- bindings[].agentId – Agent ID 引用必须小写
- channels.feishu.accounts 的 key – 必须与 bindings 中的 accountId 对应(全小写)
检查清单:
- 所有 Agent ID 都是纯小写(如 aiboss、aicontent)
- 飞书账户标识都是纯小写(如 aiboss、ainews)
- bindings 中的 accountId 和 agentId 都是纯小写
验证与测试
配置完成后,按以下步骤验证:
1. 检查 Agent 状态
# 查看 Agent 运行状态
openclaw status
期望输出:
Agent: aiboss Status: running ✅
Agent: aicontent Status: running ✅
Agent: ainews Status: running ✅
Agent: aicode Status: running ✅
Agent: aitask Status: running ✅
2. 单 Agent 测试
首次使用需要配对:
第一次向 Bot 发送消息时,会收到配对提示:
OpenClaw: access not configured.
Your Feishu user id: ou_xxx
Pairing code: xxxx
Ask the bot owner to approve with:
openclaw pairing approve feishu xxxx
在服务器上执行批准命令:
openclaw pairing approve feishu xxxx
批准后即可正常聊天。
测试消息:
在飞书中向每个 Bot 发送测试消息:
- AIBoss:“你好,你是谁?”
- AINews:“今天有什么 AI 资讯?”
- AIContent:“帮我写一个文章大纲”
- AICode:“这段代码有什么问题?”
- AITask:“创建一个任务提醒”
3. Agent 间协作测试
在飞书中 @AIBoss,让它调用其他 Agent:
@AIBoss 帮我让 AINews 推送今天的 AI 资讯
AIBoss 应该能够:
4. 检查清单
- 5 个飞书应用全部发布
- OpenClaw Gateway 运行正常
- 5 个 Agent 状态全部显示 running
- 单独向每个 Bot 发送测试消息
- 测试 Agent 间协作
5. 最终效果
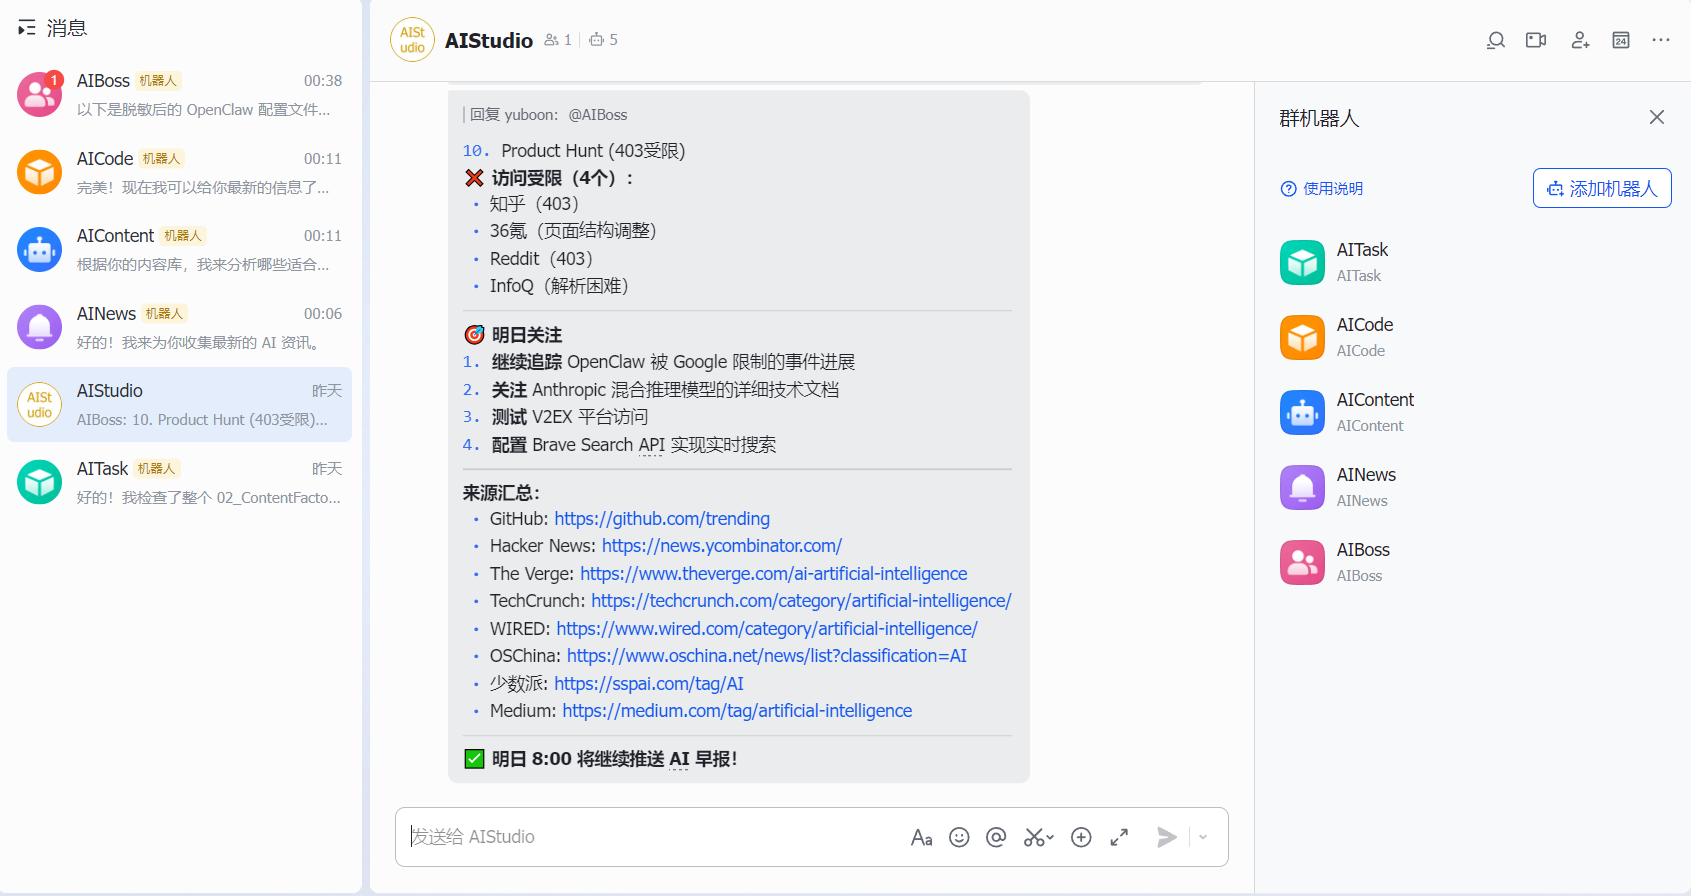
总结
通过 OpenClaw 多 Agent 架构,你可以在腾讯云服务器上快速搭建 5 个专业化 AI 助理。每个 Agent 拥有独立工作空间,通过飞书实现互相协作。感兴趣的小伙伴可以上手试一试。
附录:完整 openclaw.json 示例
{
"meta": {
"lastTouchedVersion": "2026.2.9",
"lastTouchedAt": "2026-02-21T06:24:18.113Z"
},
"wizard": {
"lastRunAt": "2026-02-11T09:47:49.711Z",
"lastRunVersion": "2026.2.9",
"lastRunCommand": "onboard",
"lastRunMode": "local"
},
"tools": {
"agentToAgent": {
"enabled": true,
"allow": ["aiboss", "aicontent", "ainews", "aicode", "aitask"]
}
},
"agents": {
"list": [{
"id": "aiboss",
"default": true,
"name": "aiboss",
"workspace": "/root/.openclaw/workspace-boss",
"model": {
"primary": "glmcode/glm-4.7"
}
},
{
"id": "aicontent",
"name": "aicontent",
"workspace": "/root/.openclaw/workspace-aicontent",
"model": {
"primary": "glmcode/glm-4.7"
}
},
{
"id": "ainews",
"name": "ainews",
"workspace": "/root/.openclaw/workspace-ainews",
"model": {
"primary": "glmcode/glm-4.7"
}
},
{
"id": "aicode",
"name": "aicode",
"workspace": "/root/.openclaw/workspace-aicode",
"model": {
"primary": "glmcode/glm-4.7"
}
},
{
"id": "aitask",
"name": "aitask",
"workspace": "/root/.openclaw/workspace-aitask",
"model": {
"primary": "glmcode/glm-4.7"
}
}
]
},
"bindings": [{
"match": {
"channel": "feishu",
"accountId": "aiboss"
},
"agentId": "aiboss"
}, {
"match": {
"channel": "feishu",
"accountId": "aicontent"
},
"agentId": "aicontent"
},
{
"match": {
"channel": "feishu",
"accountId": "ainews"
},
"agentId": "ainews"
},
{
"match": {
"channel": "feishu",
"accountId": "aicode"
},
"agentId": "aicode"
},
{
"match": {
"channel": "feishu",
"accountId": "aitask"
},
"agentId": "aitask"
}
],
"messages": {
"ackReactionScope": "group-mentions"
},
"commands": {
"native": "auto",
"nativeSkills": "auto"
},
"gateway": {
"port": 18789,
"mode": "local",
"bind": "loopback",
"controlUi": {
"allowInsecureAuth": false
},
"auth": {
"mode": "token",
"token": "***REDACTED***"
},
"tailscale": {
"mode": "off",
"resetOnExit": false
}
},
"skills": {
"install": {
"nodeManager": "npm"
}
},
"plugins": {
"entries": {
"feishu": {
"enabled": true
},
"qqbot": {
"enabled": true
},
"ddingtalk": {
"enabled": true
},
"wecom": {
"enabled": true
},
"adp-openclaw": {
"enabled": true
}
},
"installs": {
"qqbot": {
"source": "npm",
"spec": "@sliverp/qqbot@latest",
"installPath": "/root/.openclaw/extensions/qqbot",
"version": "1.4.4",
"installedAt": "2026-02-11T09:48:41.090Z"
},
"feishu": {
"source": "npm",
"spec": "@openclaw/feishu",
"installPath": "/root/.openclaw/extensions/feishu",
"version": "2026.02.22",
"installedAt": "2026-02-22T09:48:41.090Z"
},
"ddingtalk": {
"source": "npm",
"spec": "git+https://cnb.cool/lighthouse/lighthousebackend/openclaw-dingtalk.git",
"installPath": "/root/.openclaw/extensions/ddingtalk",
"version": "1.2.0",
"installedAt": "2026-02-11T09:49:01.618Z"
},
"wecom": {
"source": "npm",
"spec": "git+https://cnb.cool/lighthouse/lighthousebackend/openclaw-wecom.git",
"installPath": "/root/.openclaw/extensions/wecom",
"version": "2026.2.5",
"installedAt": "2026-02-11T09:49:25.555Z"
},
"adp-openclaw": {
"source": "npm",
"spec": "adp-openclaw",
"installPath": "/root/.openclaw/extensions/adp-openclaw",
"version": "0.0.24",
"installedAt": "2026-02-11T09:49:33.241Z"
}
}
},
"models": {
"providers": {
"glmcode": {
"baseUrl": "https://open.bigmodel.cn/api/anthropic",
"apiKey": "***REDACTED***",
"api": "anthropic-messages",
"models": [{
"id": "glm-4.7",
"name": "GLM-4.7"
},
{
"id": "glm-5",
"name": "GLM-5"
},
{
"id": "glm-4.6",
"name": "GLM-4.6"
},
{
"id": "glm-4.5-air",
"name": "GLM-4.5-Air"
},
{
"id": "glm-4.5",
"name": "GLM-4.5"
}
]
}
},
"mode": "merge"
},
"channels": {
"qqbot": {
"enabled": true,
"appId": "10xxxxxx",
"clientSecret": "***REDACTED***"
},
"feishu": {
"enabled": true,
"accounts": {
"aiboss": {
"appId": "cli_xx",
"appSecret": "***REDACTED***"
},
"aicontent": {
"appId": "cli_xx",
"appSecret": "***REDACTED***"
},
"ainews": {
"appId": "cli_xx",
"appSecret": "***REDACTED***"
},
"aitask": {
"appId": "cli_xx",
"appSecret": "***REDACTED***"
},
"aicode": {
"appId": "cli_xx",
"appSecret": "***REDACTED***"
}
}
}
}
}