来源引用网络知识与某站曹老师视频相互结合学习记录,仅供参考!
Django 视图定义与使用
HTTP 请求和 HttpRequest 请求类
建议可参考:API 接口自动化测试详细图文教程学习系列13–会话 Session 和 Cookie
超文本传输协议(Hypertext Transfer Protocol,HTTP)是一个简单的请求-响应协议,它通常运行在TCP之上;它指定了客户端可能发送给服务器什么样的消息以及得到什么样的响应;当在浏览器上访问某个网址时,其实质是向网站发送一个HTTP请求,HTTP请求分为8种请求方式;
|
请求方式 |
说明 |
|
OPTIONS |
返回服务器针对特定资源所支持的请求方法。 |
|
GET |
向特定资源发出请求(访问网页,请求网页网址)。 |
|
POST |
向指定资源提交数据处理请求(提交表单、上传文件)。 |
|
PUT |
向指定资源位置上传数据内容。 |
|
DELETE |
请求服务器删除request-URL所标示的资源。 |
|
HEAD |
与GET请求类似,返回的响应中没有具体内容,用于获取报头。 |
|
TRACE |
回复和显示服务器收到的请求,用于跟踪、测试和诊断。 |
|
CONNECT |
HTTP/1.1协议中能够将连接改为管道方式的代理服务器。 |
在HTTP请求方式里,最基本的是GET请求和POST 请求,网站开发者关心的也只有GET请求和POST请求;GET请求和 POST请求是可以设置请求参数的,两者的设置方式如下:
- GET:请求参数是在路由地址后添加“?”和参数内容,参数内容以key=value 形式表示,等号前面的是参数名,后面的是参数值,如果涉及多个参数,每个参数之间就使用“&”隔开;简单来说就是以“?”开头的 key:value 键值对形式,多个参数之间使用“&”符号;适合小数据量只有几个参数的;例如127.0.0.1:8000/?name=python3&pw=123456;
- POST:请求参数一般以表单的形式传递,常见的表单使用HTML的 form标签,并且form标签的method 属性设为POST;以 form 表单形式的,适合大数据量的提交;
在 Django 中,Http请求信息都被封装到了HttpRequest类中;
HttpRequest类中的常用属性有:
- COOKIE:获取客户端(浏览器)的Cookie信息,以字典形式表示,并且键值对都是字符串类型;
- FILES:django.http.request.QueryDict对象,包含所有的文件上传信息;
- GET:获取GET请求的请求参数,它是django.http.request.QueryDict对象,操作起来类似于字典;
- POST:获取POST请求的请求参数,它是django.http.request.QueryDict对象,操作起来类似于字典;
- META:获取客户端(浏览器)的请求头信息,以字典形式存储;
- method:获取当前请求的请求方式(GET请求或POST请求);
- path:获取当前请求的路由地址;
- session:一个类似于字典的对象,用来操作服务器的会话信息,可临时存放用户信息;
- user:当 Django启用AuthenticationMiddleware中间件时才可用;它的值是会内置数据模型User的对象,表示当前登录的用户;如果用户当前没有登录,那么user将设为django.contrib.auth.models.AnonymousUser的一个匿名实例;
HttpRequest类的方法比较多,其中常用方法有:
- is_secure():是否是采用HTTPS协议;
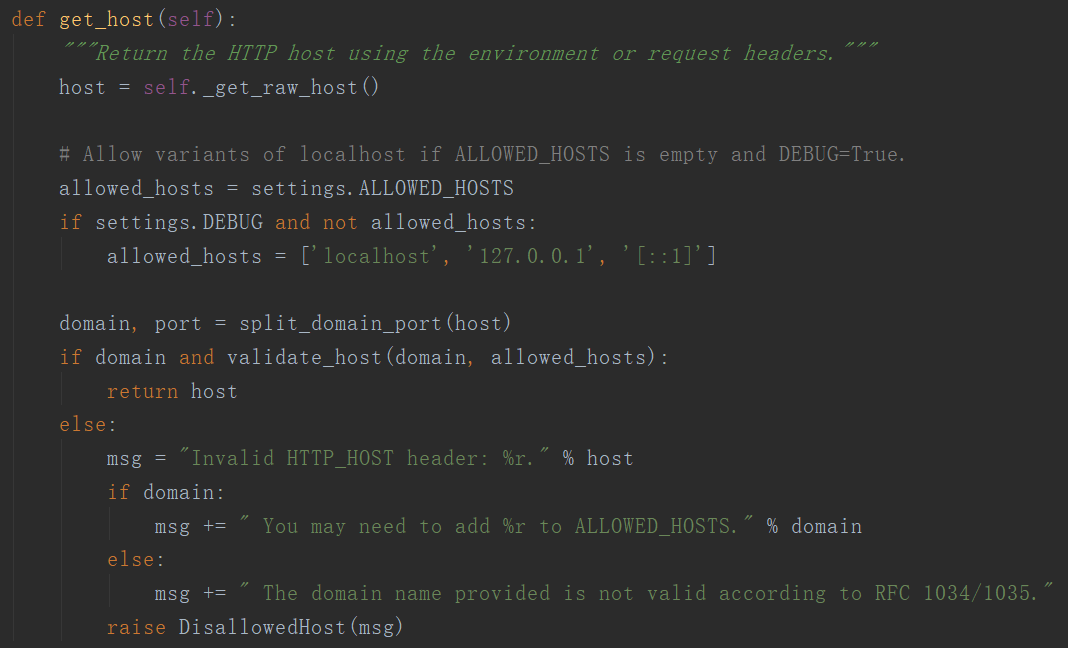
- get_host():获取服务器的域名;如果在访问的时候设有端口,就会加上端口号,如127.0.0.1:8000;
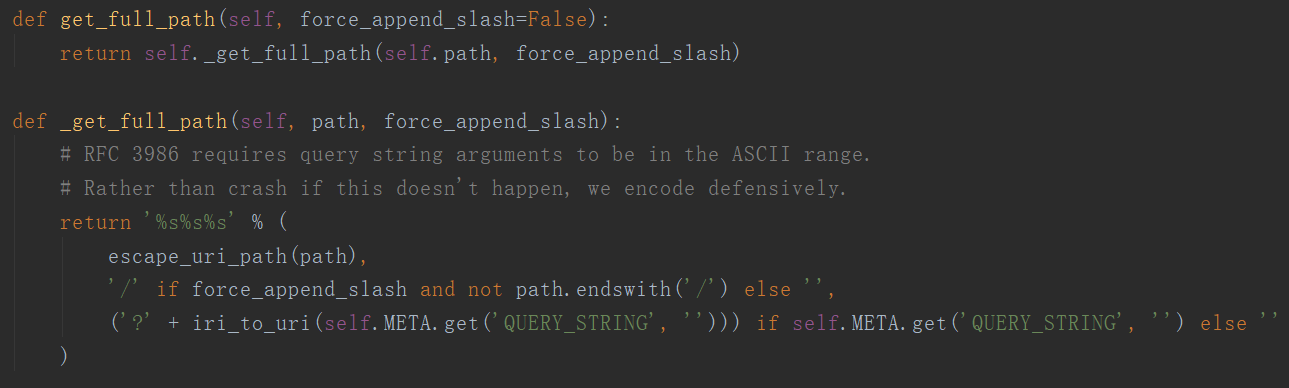
- et_full path():返回路由地址。如果该请求为GET请求并且设有请求参数,返回路由地址就会将请求参数返回,如/?name=python3&pw=123456 可以返回带上参数的地址;
实例说明
GET 请求方法
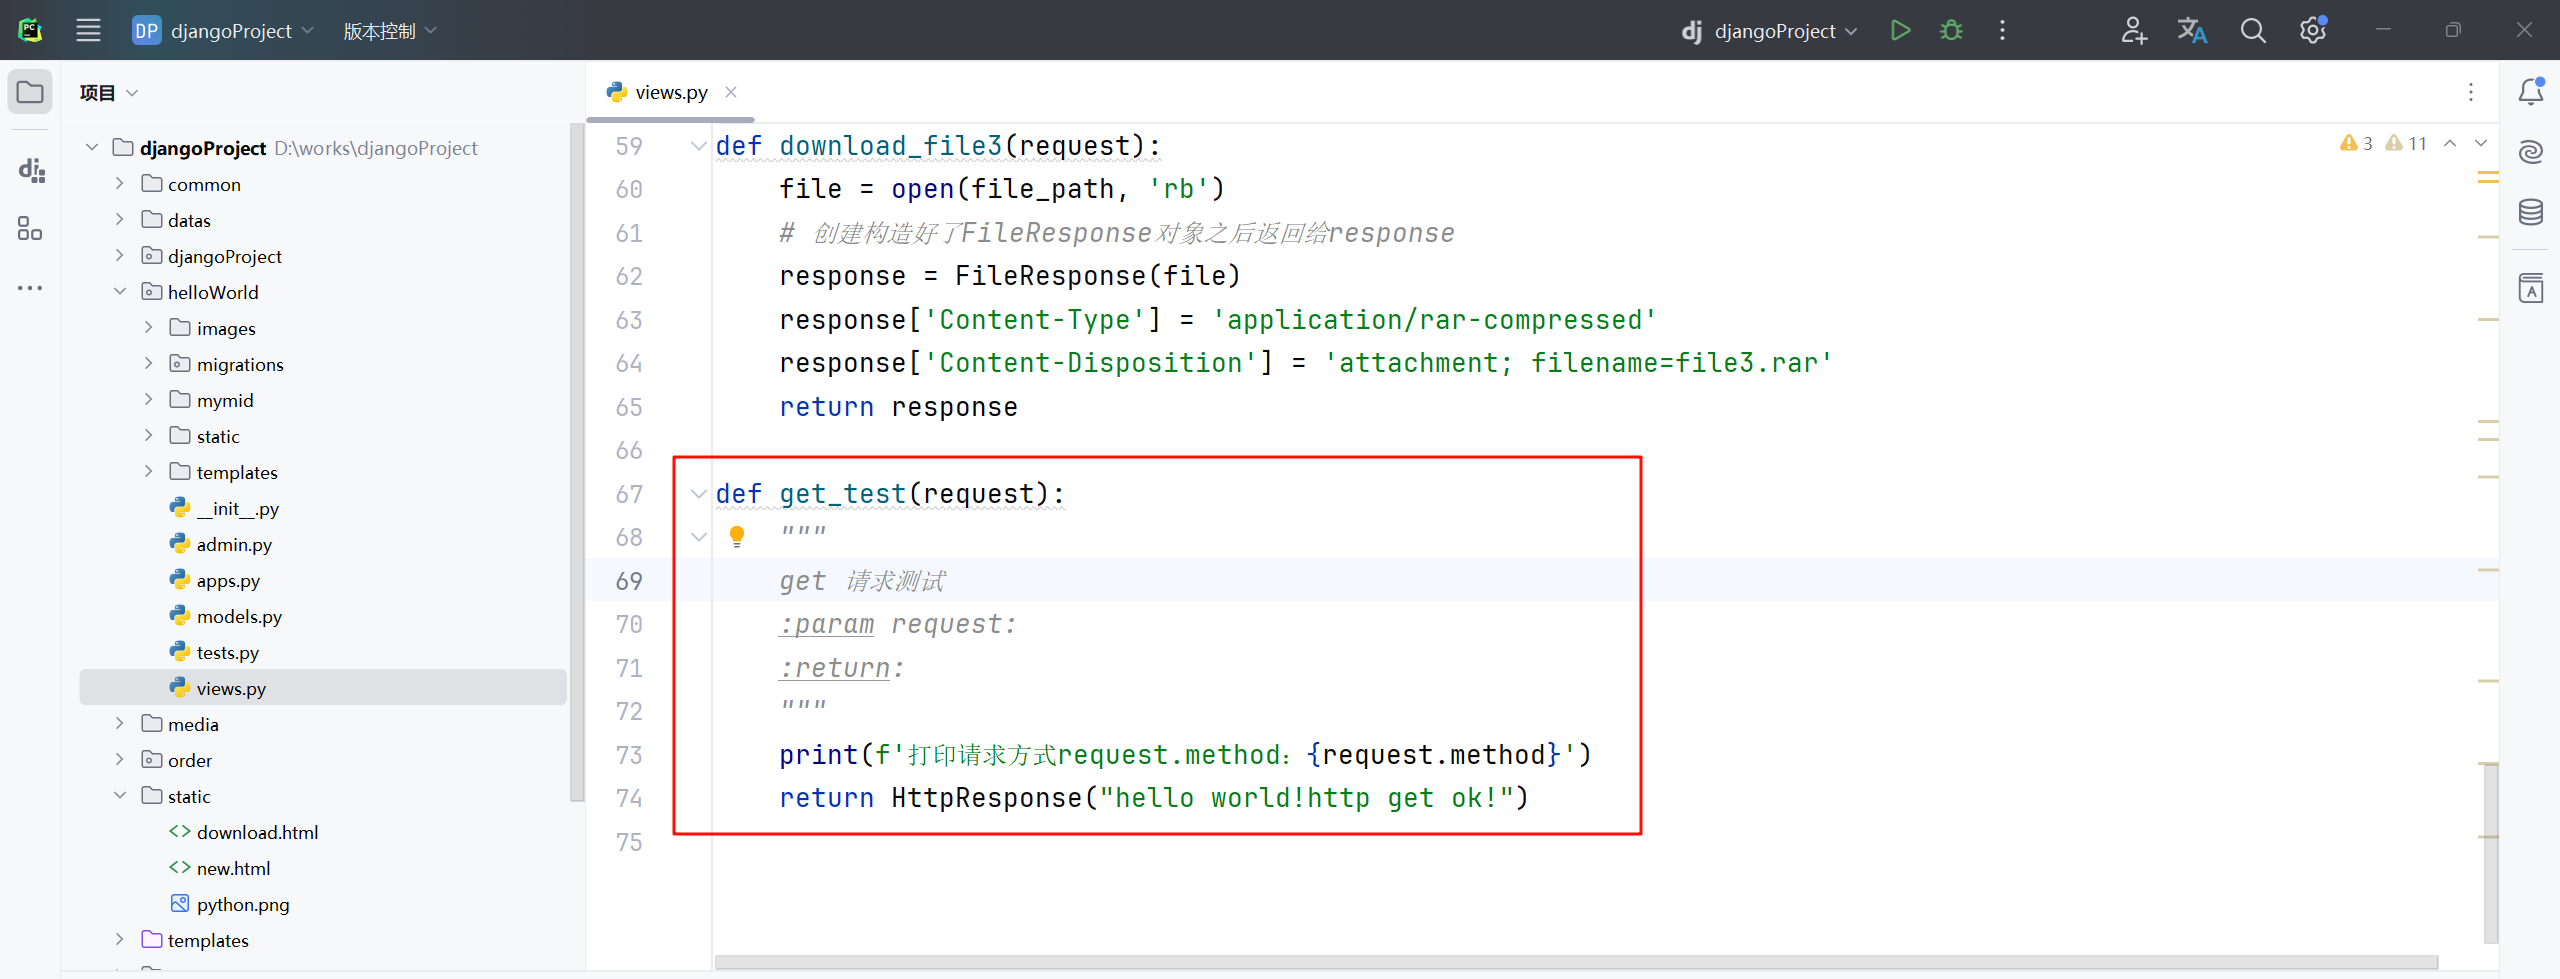
1、修改“djangoProject”项目“helloWorld”应用下的“views.py ”配置文件内容,新增定义get_test 请求测试;接着继续修改“index”函数方法,修改 index 跳转目标;
# 导包
from django.http import HttpResponse, HttpResponseNotFound, JsonResponse, StreamingHttpResponse, FileResponse
from django.shortcuts import render, redirect
# Create your views here.
# 自定义一个index方法,里面要加上request请求对象
def index(request):
# 修改“index”函数方法,修改 index 跳转目标为新建的http.html
return render(request, 'http.html')
# 定义index_id方法,里面第一个参数request请求对象,第二个参数 id
def index_id(request, id):
# 判断 id是否为0
if id == 0:
# 导包引入redirect模块,如果id等于0的话,重定向到一个目标静态地址
return redirect("/static/error.html")
else:
# 使用HttpResponse直接返回内容–因为id是int类型,里面得使用str()进行转换
return HttpResponse("id是" + str(id) + "的某某平台系统页面")
# 定义index_id方法,第一个参数request请求对象,里面继续跟多个路由变量“year, month, day, id”
def index_id02(request, year, month, day, id):
# 使用HttpResponse直接返回内容–因为id是int类型,里面得使用str()进行转换
return HttpResponse(str(year) + "/" + str(month) + "/" + str(day) + "/" +"id是" + str(id) + "的某某平台系统页面")
# 定义index_id方法,第一个参数request请求对象,后面跟多个路由变量“year, month, day”–注意,使用正则后不能与“id”再混合使用了
def index_id03(request, year, month, day):
# 使用HttpResponse直接返回内容–因为id是int类型,里面得使用str()进行转换
return HttpResponse(str(year) + '/' + str(month) + '/' + str(day) + "使用正则路由后的某某平台系统页面")
# 定义目标文件路径
file_path = "D:\\\\works\\\\djangoProject\\\\datas\\\\IDM.rar"
# 定义download_file1下载方法,请求需要带上request(所有的请求都要带上request)
def download_file1(request):
# 定义文件–使用open函数方法以“rb”二进制读取模式打开文件–然后返回一个file文件对象
file = open(file_path, 'rb')
# 创建构造好了HttpResponse对象之后返回给response
response = HttpResponse(file)
# 指定文件类型
response['Content-Type'] = 'application/rar-compressed'
# 扩展–指定附件及文件名字(可以动态拼接filename,并不建议使用原始名称)
response['Content-Disposition'] = 'attachment; filename=file1.rar'
return response
def download_file2(request):
file = open(file_path, 'rb')
# 创建构造好了StreamingHttpResponse对象之后返回给response
response = StreamingHttpResponse(file)
response['Content-Type'] = 'application/rar-compressed'
response['Content-Disposition'] = 'attachment; filename=file2.rar'
return response
def download_file3(request):
file = open(file_path, 'rb')
# 创建构造好了FileResponse对象之后返回给response
response = FileResponse(file)
response['Content-Type'] = 'application/rar-compressed'
response['Content-Disposition'] = 'attachment; filename=file3.rar'
return response
def get_test(request):
"""
get 请求测试
:param request:
:return:
"""
print(f'打印请求方式request.method:{request.method}')
return HttpResponse("hello world!http get ok!")
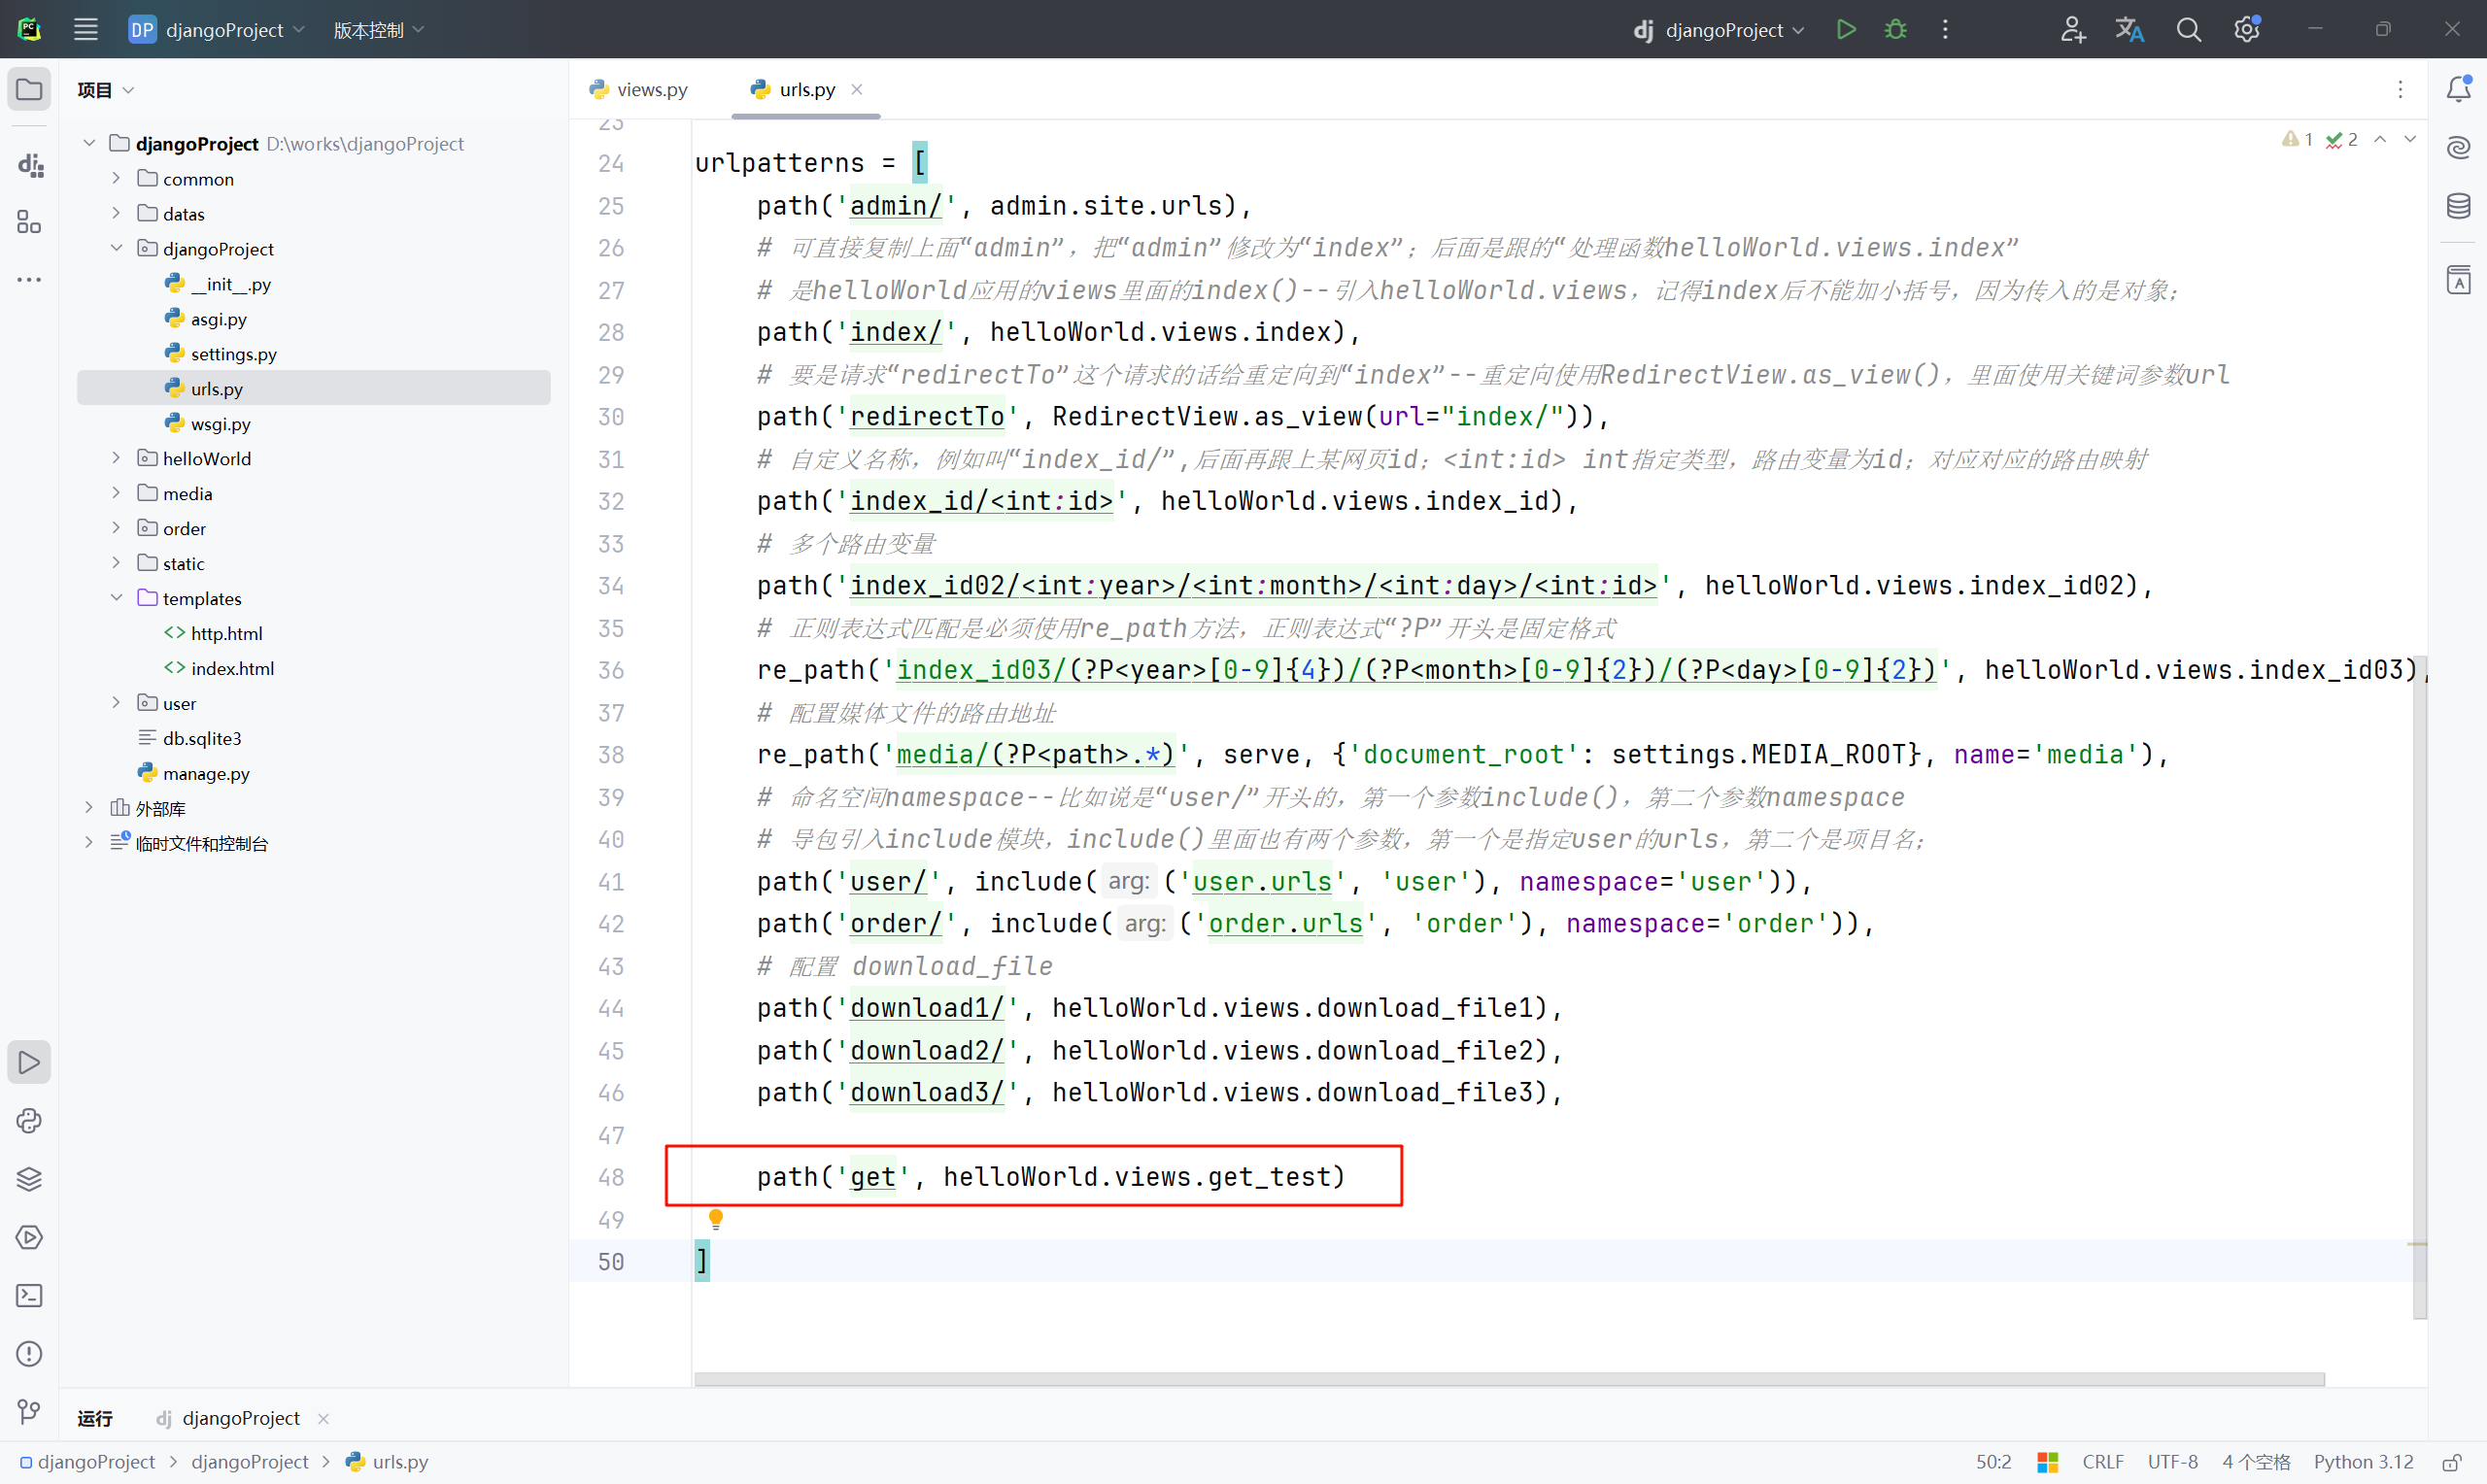
2、修改“djangoProject”应用下的“urls.py ”配置文件内容,配置定义映射关系;
"""
URL configuration for djangoProject project.
The `urlpatterns` list routes URLs to views. For more information please see:
https://docs.djangoproject.com/en/5.0/topics/http/urls/
Examples:
Function views
1. Add an import: from my_app import views
2. Add a URL to urlpatterns: path('', views.home, name='home')
Class-based views
1. Add an import: from other_app.views import Home
2. Add a URL to urlpatterns: path('', Home.as_view(), name='home')
Including another URLconf
1. Import the include() function: from django.urls import include, path
2. Add a URL to urlpatterns: path('blog/', include('blog.urls'))
"""
from django.conf import settings
from django.contrib import admin
from django.urls import path, re_path, include
from django.views.generic import RedirectView
from django.views.static import serve
import helloWorld.views
urlpatterns = [
path('admin/', admin.site.urls),
# 可直接复制上面“admin”,把“admin”修改为“index”;后面是跟的“处理函数helloWorld.views.index”
# 是helloWorld应用的views里面的index()–引入helloWorld.views,记得index后不能加小括号,因为传入的是对象;
path('index/', helloWorld.views.index),
# 要是请求“redirectTo”这个请求的话给重定向到“index”–重定向使用RedirectView.as_view(),里面使用关键词参数url
path('redirectTo', RedirectView.as_view(url="index/")),
# 自定义名称,例如叫“index_id/”,后面再跟上某网页id;<int:id> int指定类型,路由变量为id;对应对应的路由映射
path('index_id/<int:id>', helloWorld.views.index_id),
# 多个路由变量
path('index_id02/<int:year>/<int:month>/<int:day>/<int:id>', helloWorld.views.index_id02),
# 正则表达式匹配是必须使用re_path方法,正则表达式“?P”开头是固定格式
re_path('index_id03/(?P<year>[0-9]{4})/(?P<month>[0-9]{2})/(?P<day>[0-9]{2})', helloWorld.views.index_id03),
# 配置媒体文件的路由地址
re_path('media/(?P<path>.*)', serve, {'document_root': settings.MEDIA_ROOT}, name='media'),
# 命名空间namespace–比如说是“user/”开头的,第一个参数include(),第二个参数namespace
# 导包引入include模块,include()里面也有两个参数,第一个是指定user的urls,第二个是项目名;
path('user/', include(('user.urls', 'user'), namespace='user')),
path('order/', include(('order.urls', 'order'), namespace='order')),
# 配置 download_file
path('download1/', helloWorld.views.download_file1),
path('download2/', helloWorld.views.download_file2),
path('download3/', helloWorld.views.download_file3),
path('get', helloWorld.views.get_test)
]
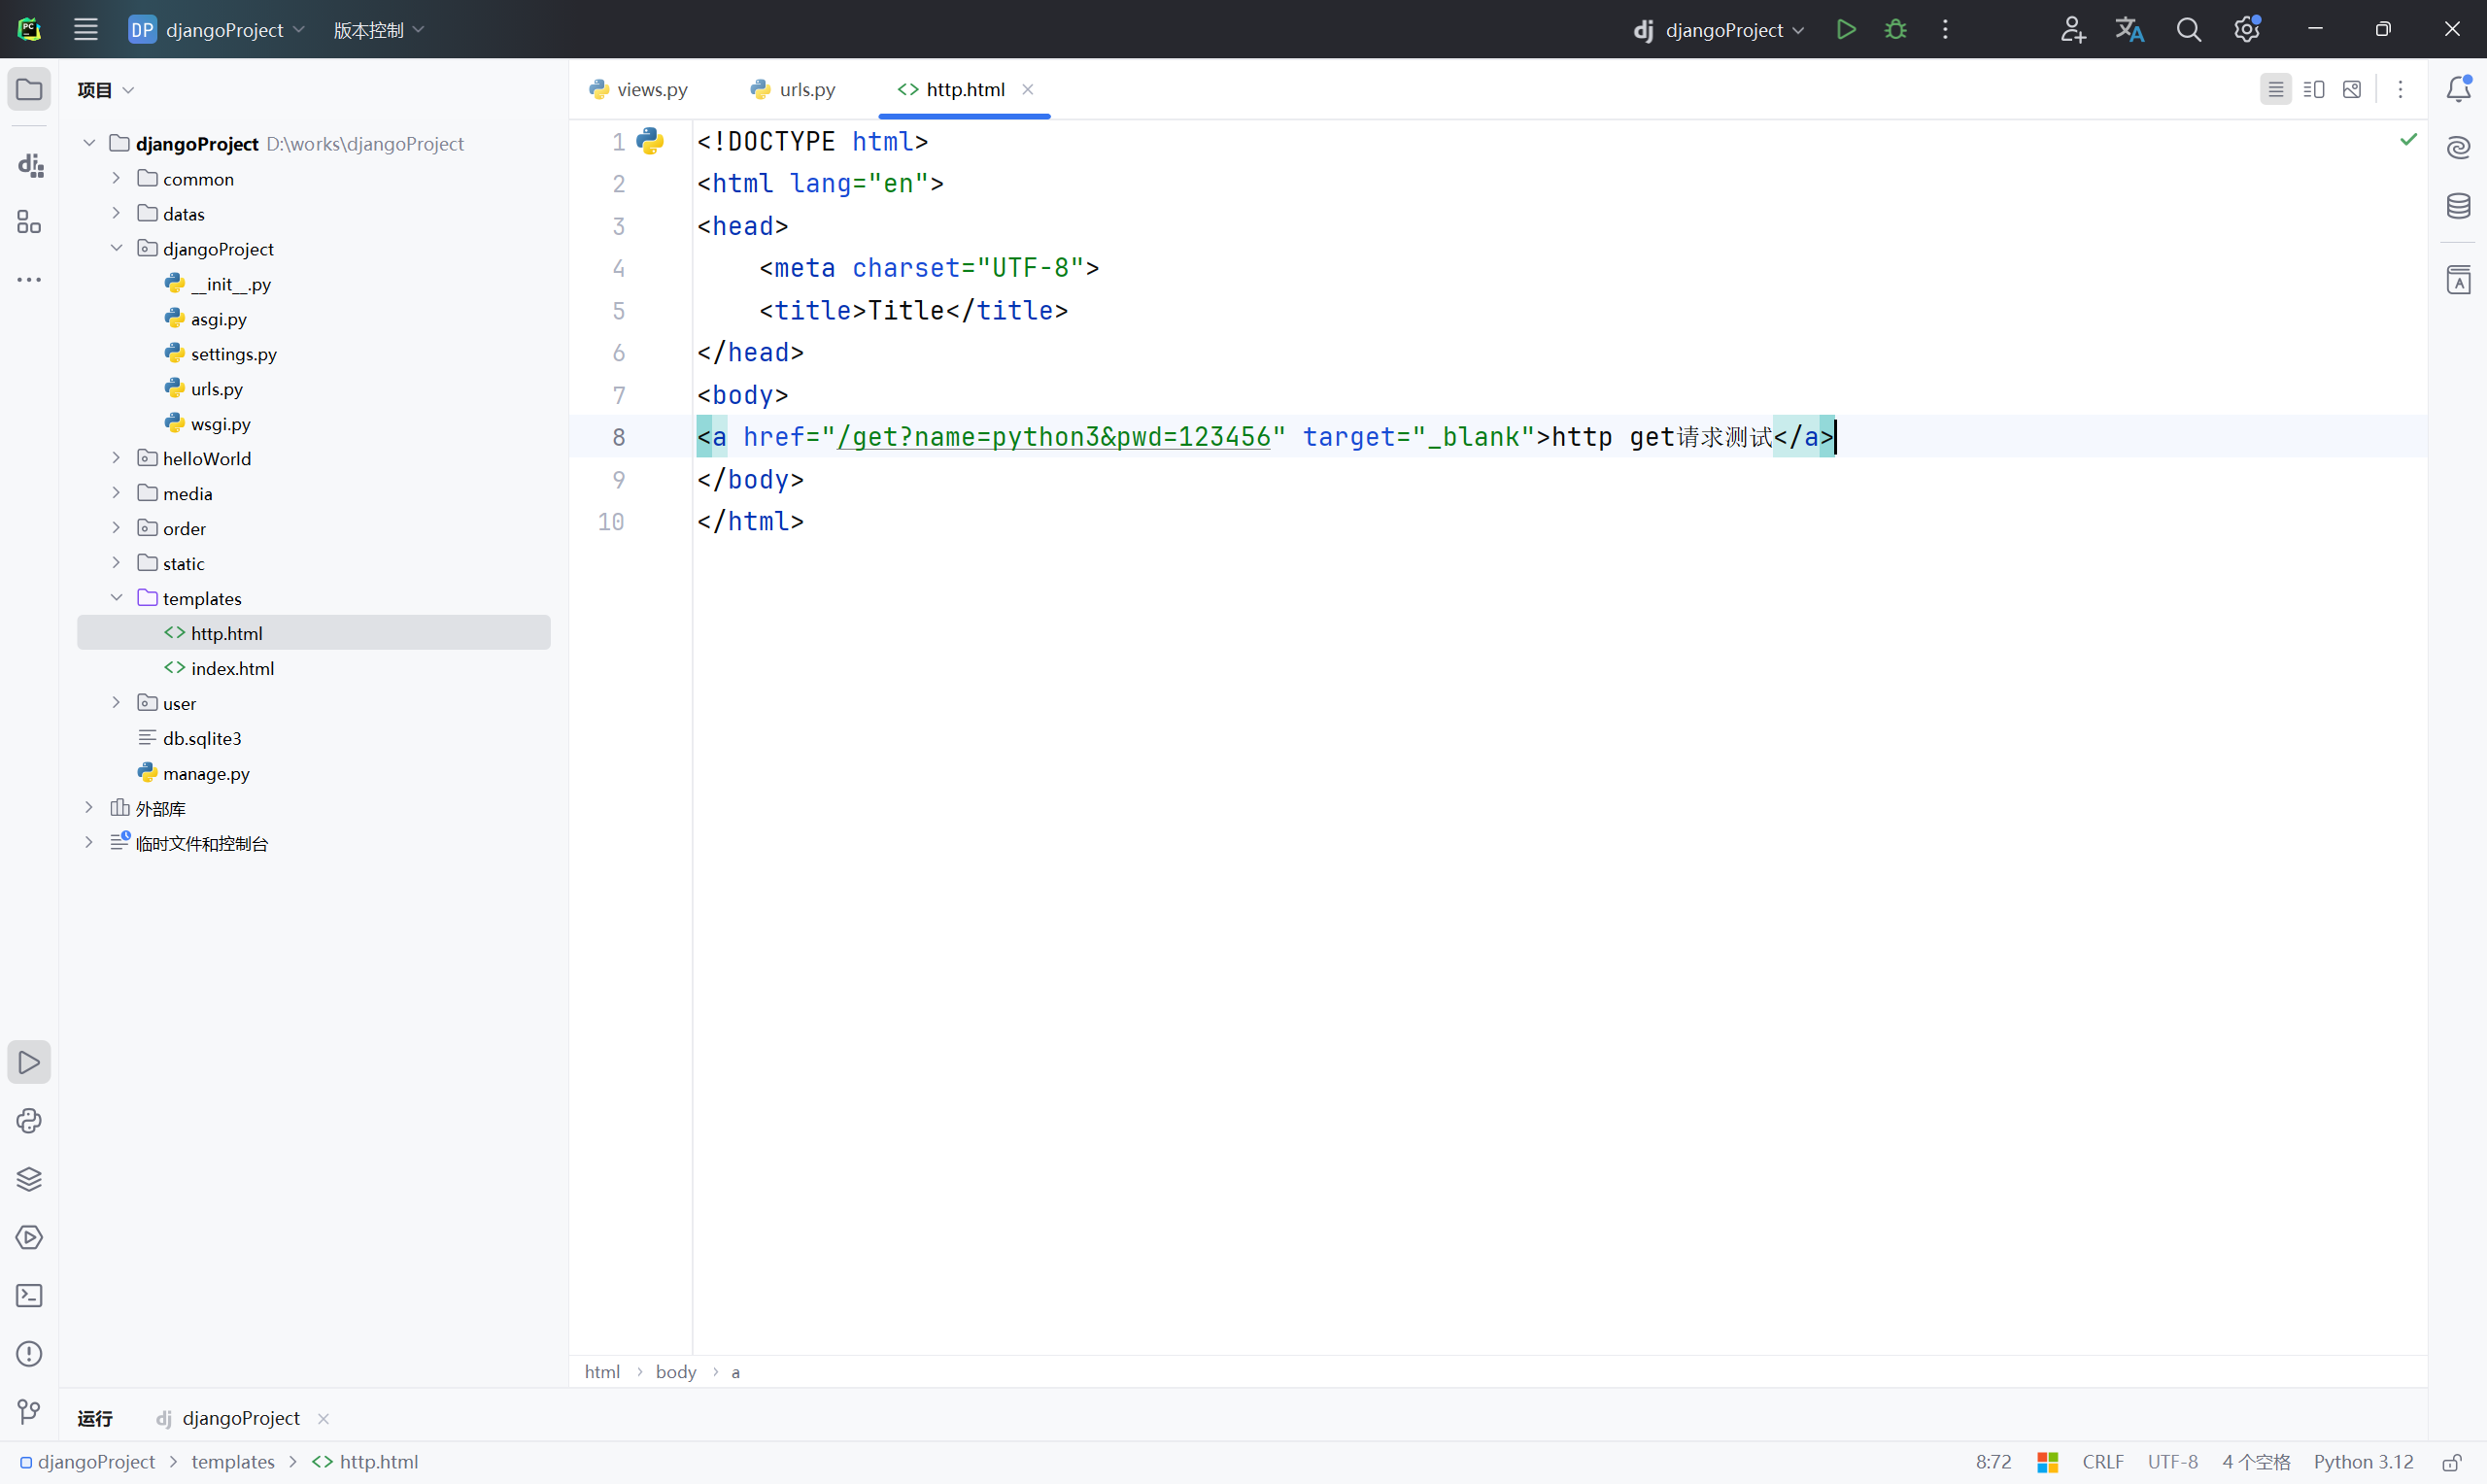
3、在项目“templates”目录文件路径下新建一个名称为“http”的 HTML 文件,简单输入内容以便区分;
<!DOCTYPE html>
<html lang="en">
<head>
<meta charset="UTF-8">
<title>Title</title>
</head>
<body>
<a href="/get?name=python3&pwd=123456" target="_blank">http get请求测试</a>
</body>
</html>
4、运行项目测试验证,浏览器输入“http://127.0.0.1:8000/index/”测试查看,然后鼠标点击“http get请求测试”,查看 PyCharm 工具控制台输出结果;
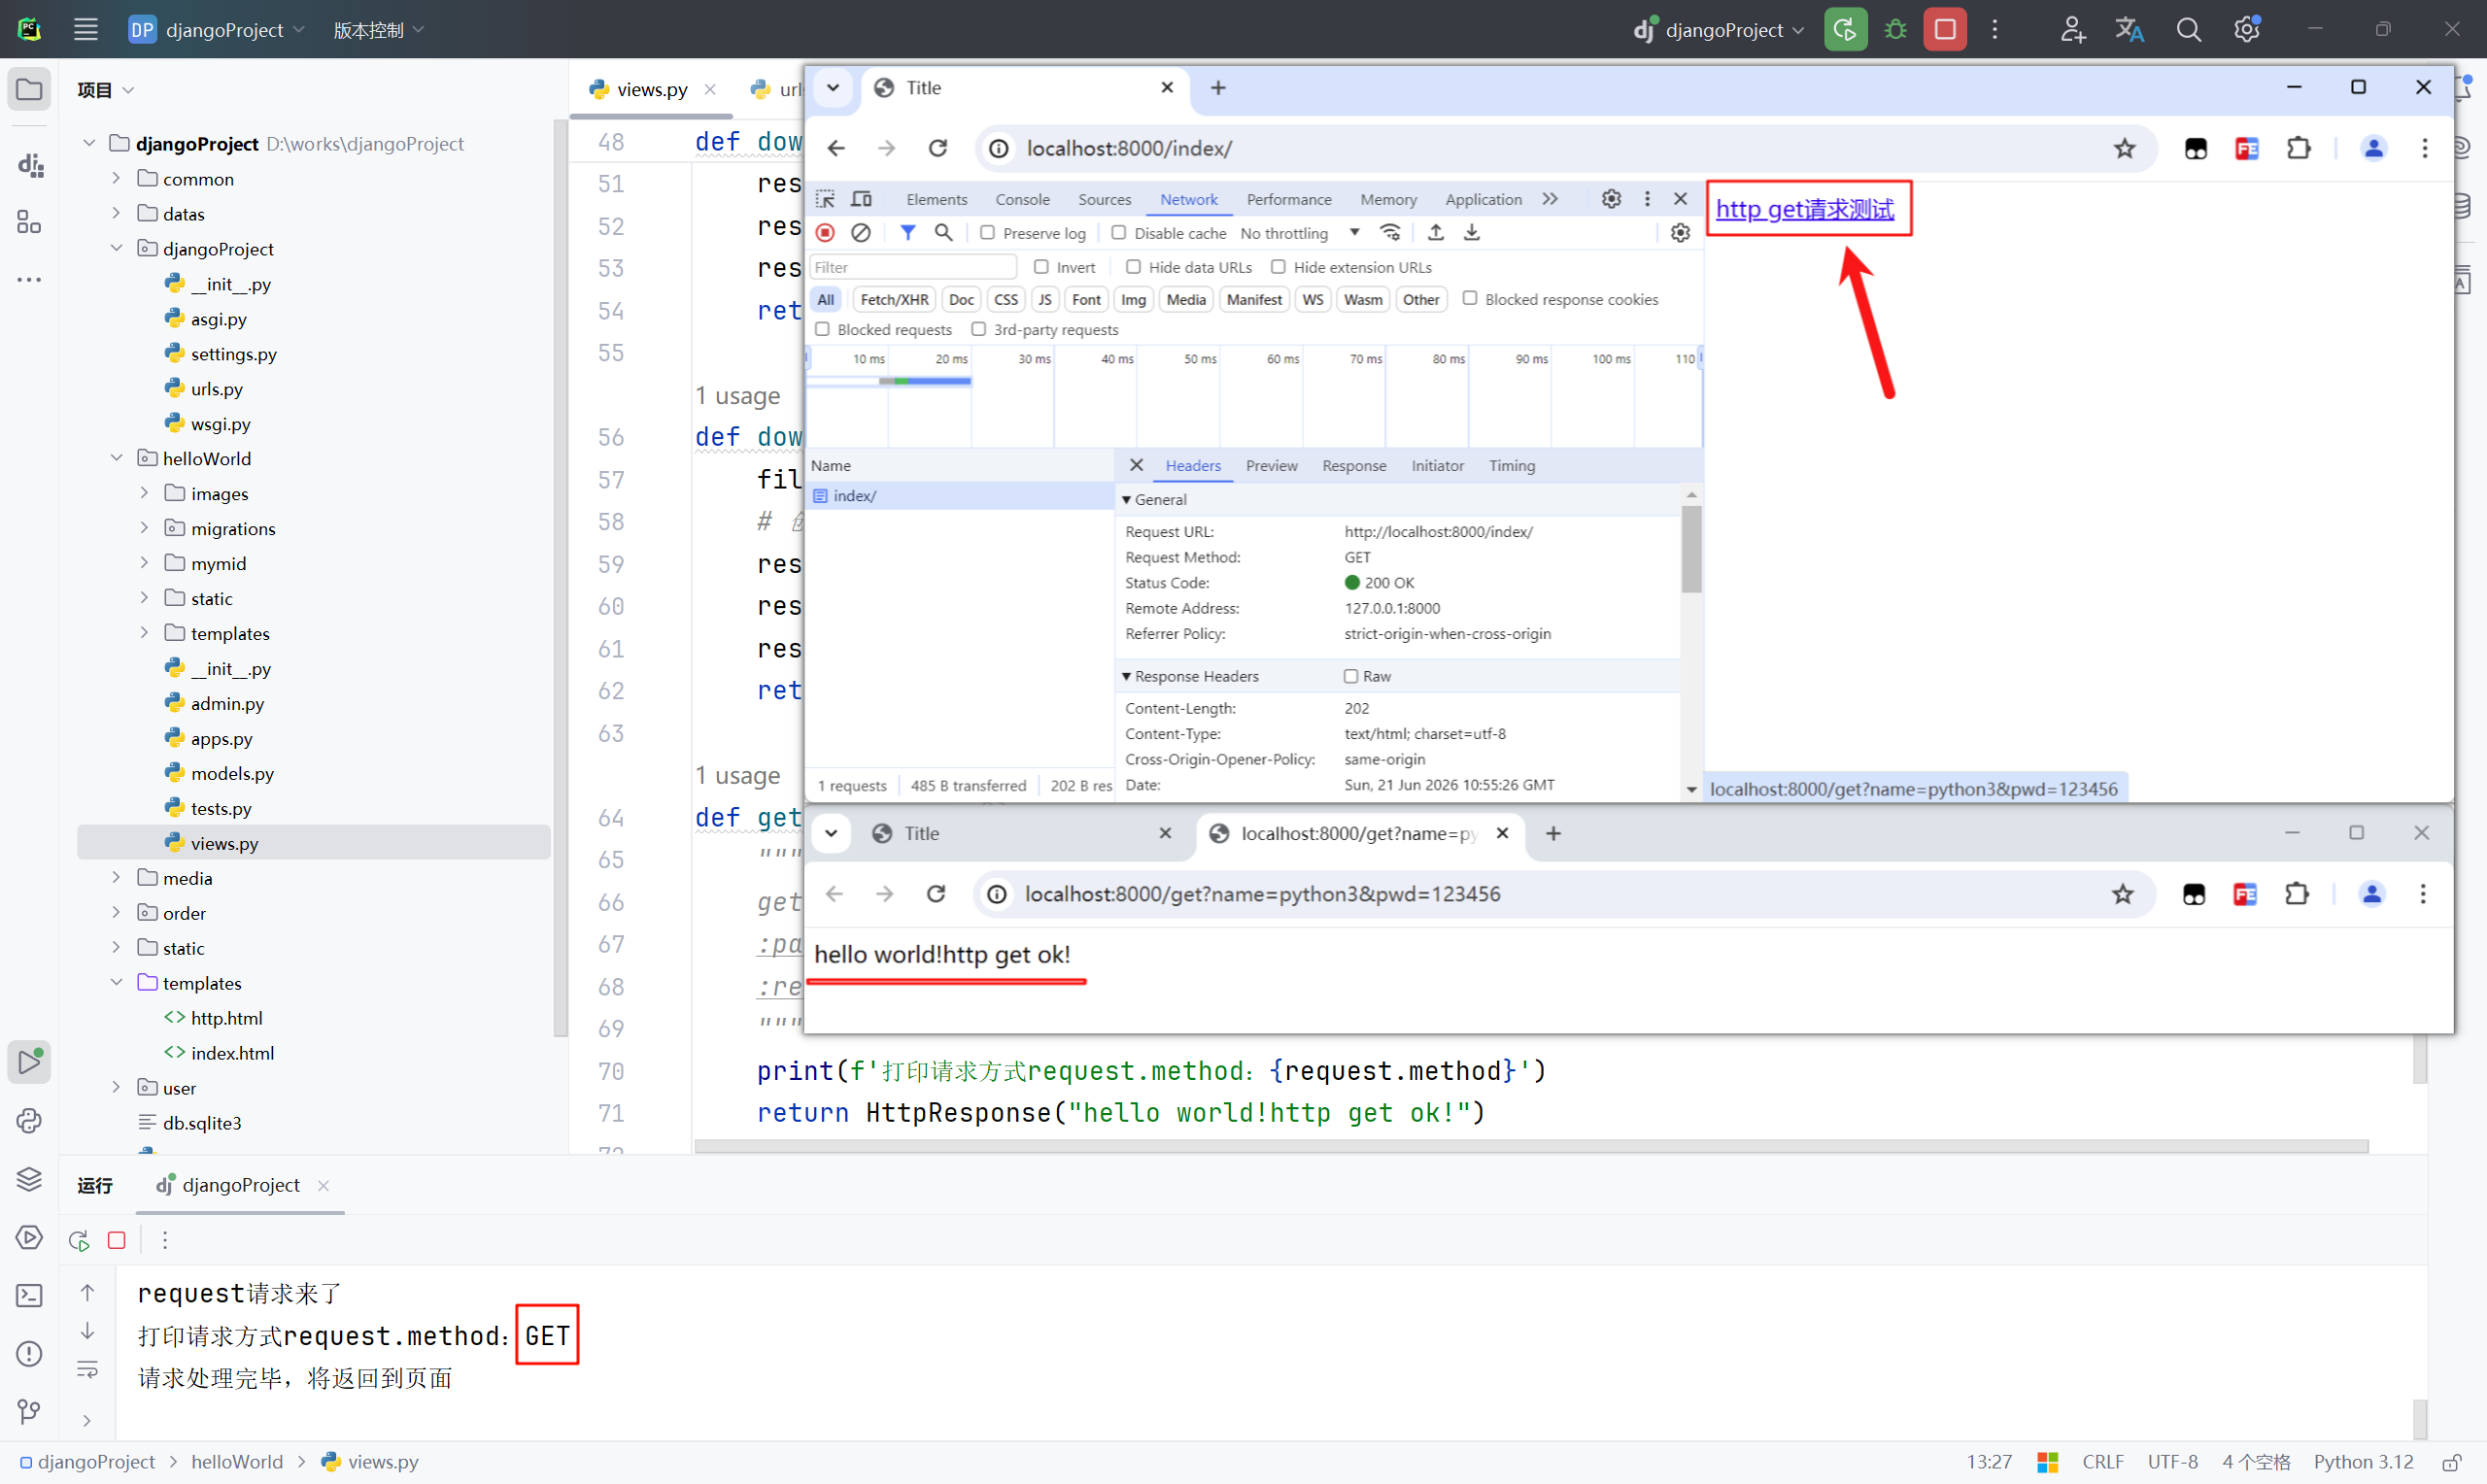
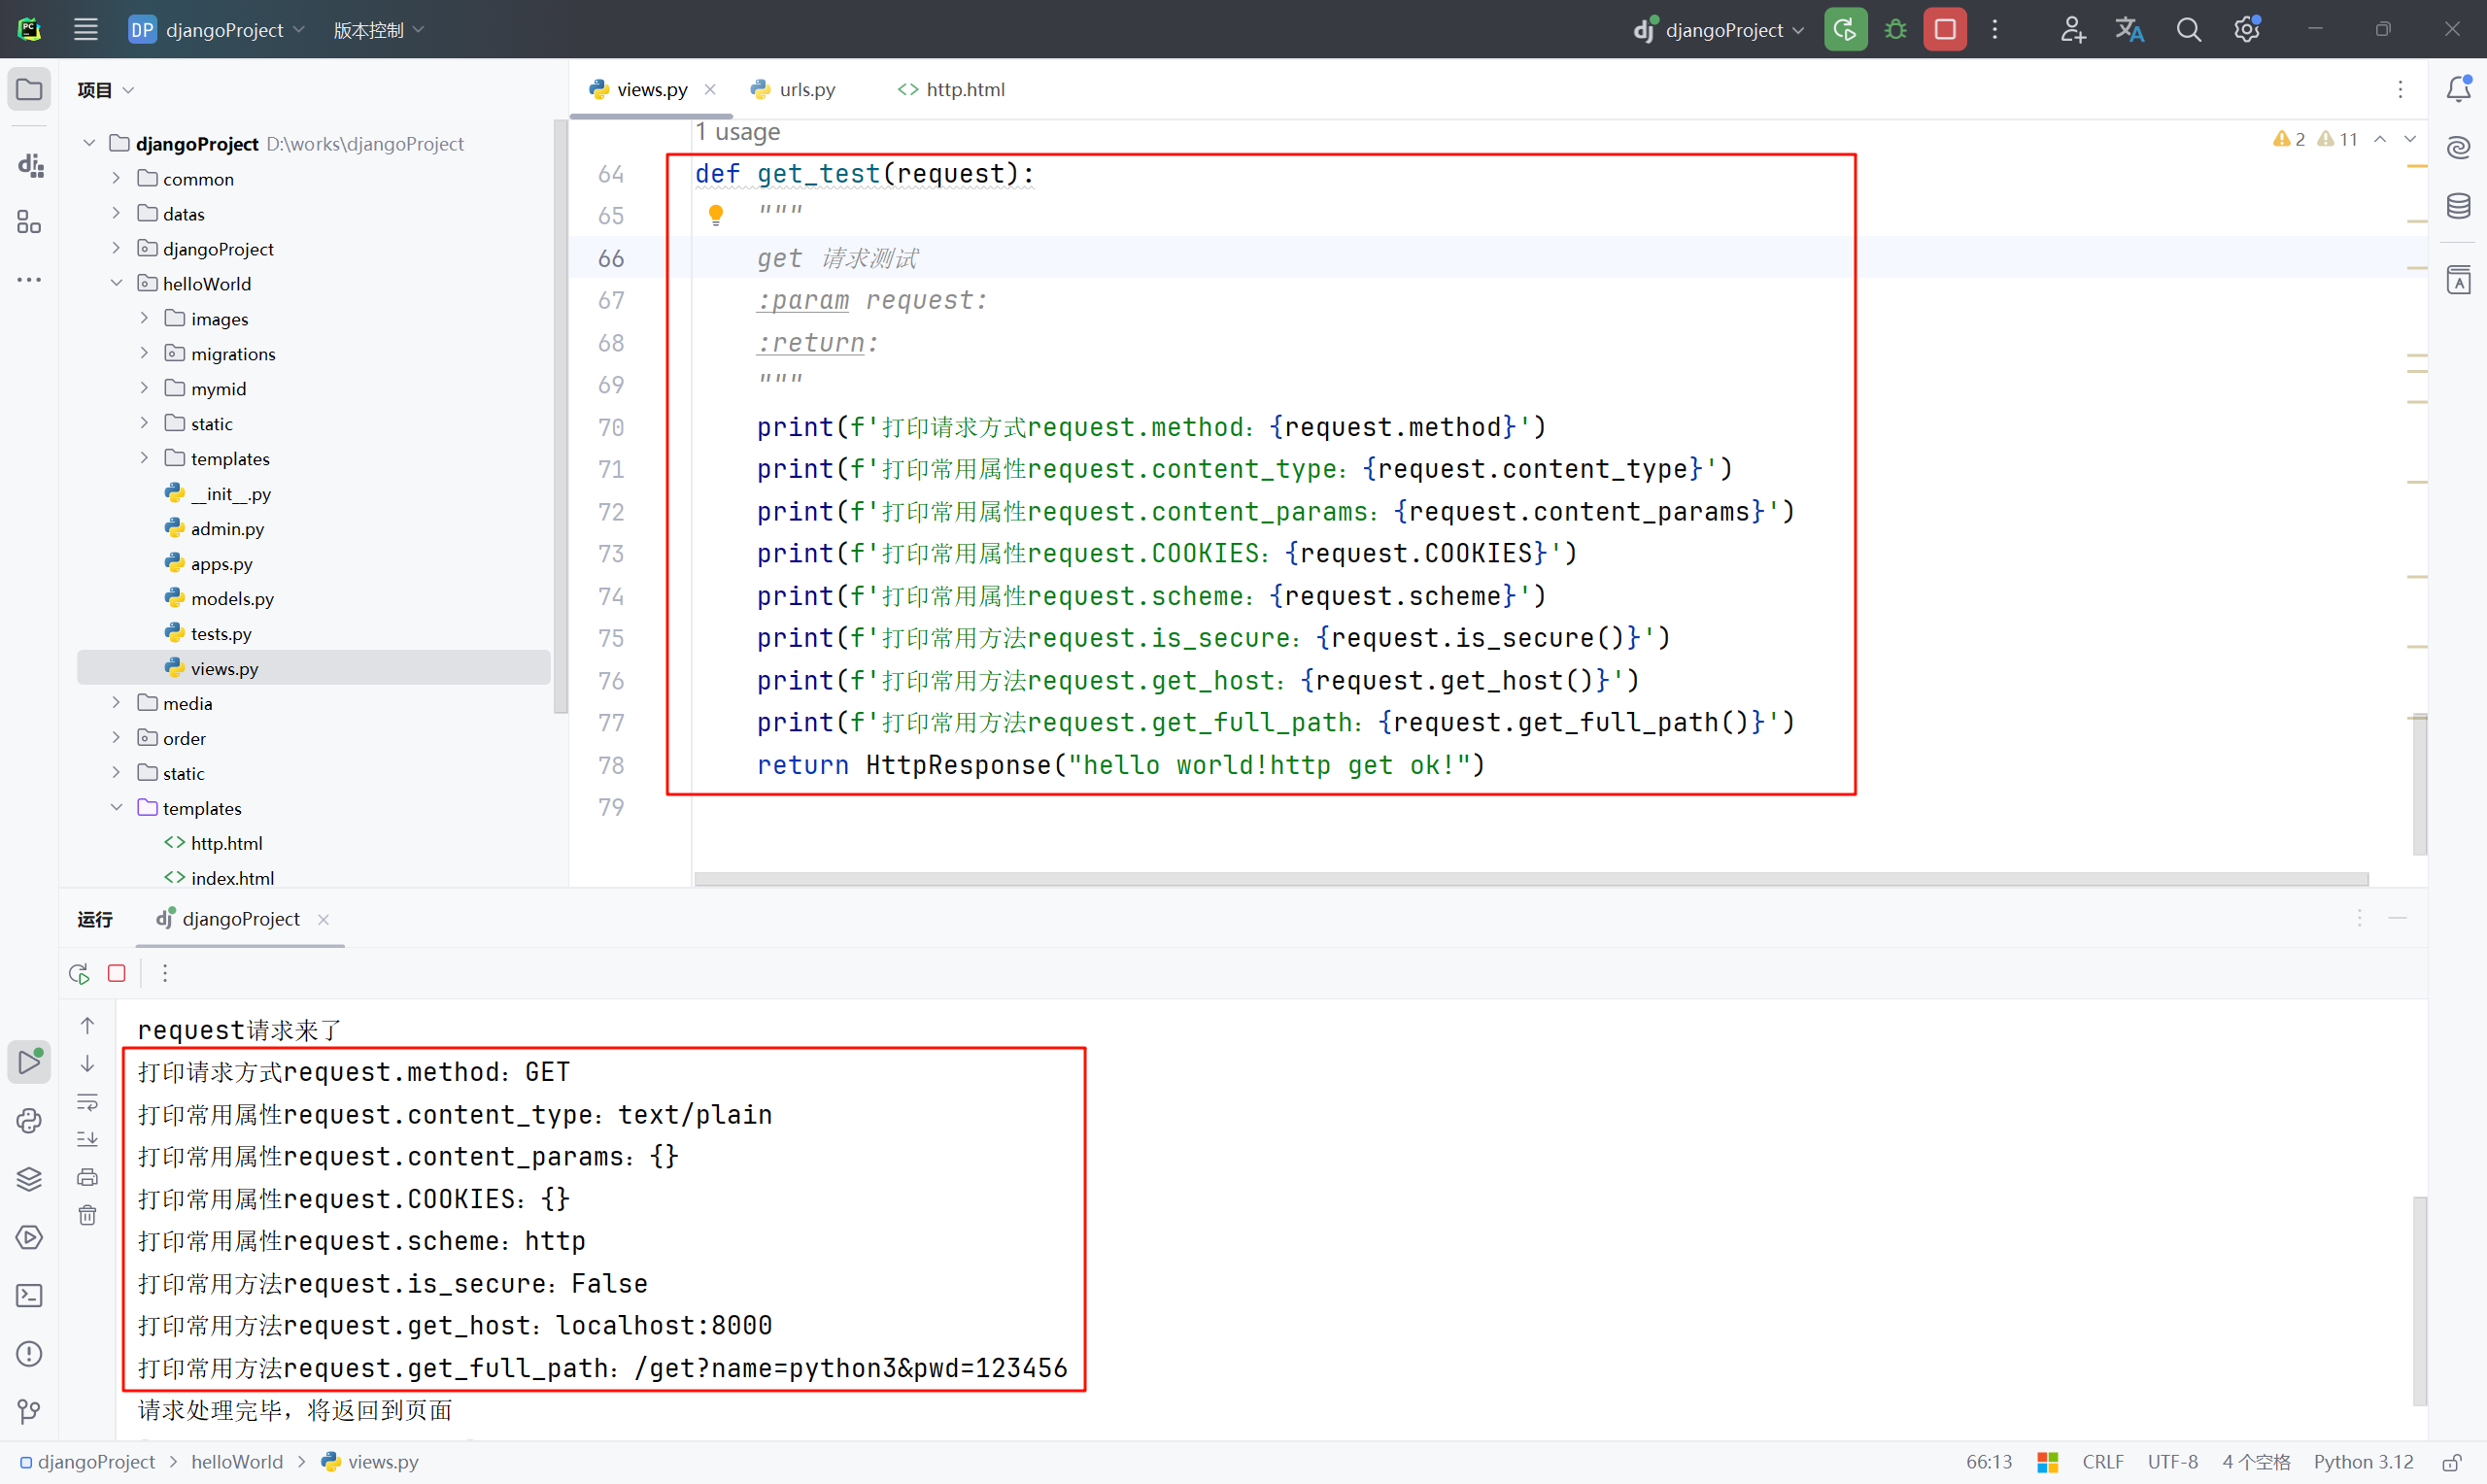
其他的在开发过程中一般情况下平时并不太会用到,但是在记录日志的时候需要使用到。
def get_test(request):
"""
get 请求测试
:param request:
:return:
"""
print(f'打印请求方式request.method:{request.method}')
print(f'打印常用属性request.content_type:{request.content_type}')
print(f'打印常用属性request.content_params:{request.content_params}')
print(f'打印常用属性request.COOKIES:{request.COOKIES}')
print(f'打印常用属性request.scheme:{request.scheme}')
print(f'打印常用方法request.is_secure:{request.is_secure()}')
print(f'打印常用方法request.get_host:{request.get_host()}')
print(f'打印常用方法request.get_full_path:{request.get_full_path()}')
return HttpResponse("hello world!http get ok!")
获取参数
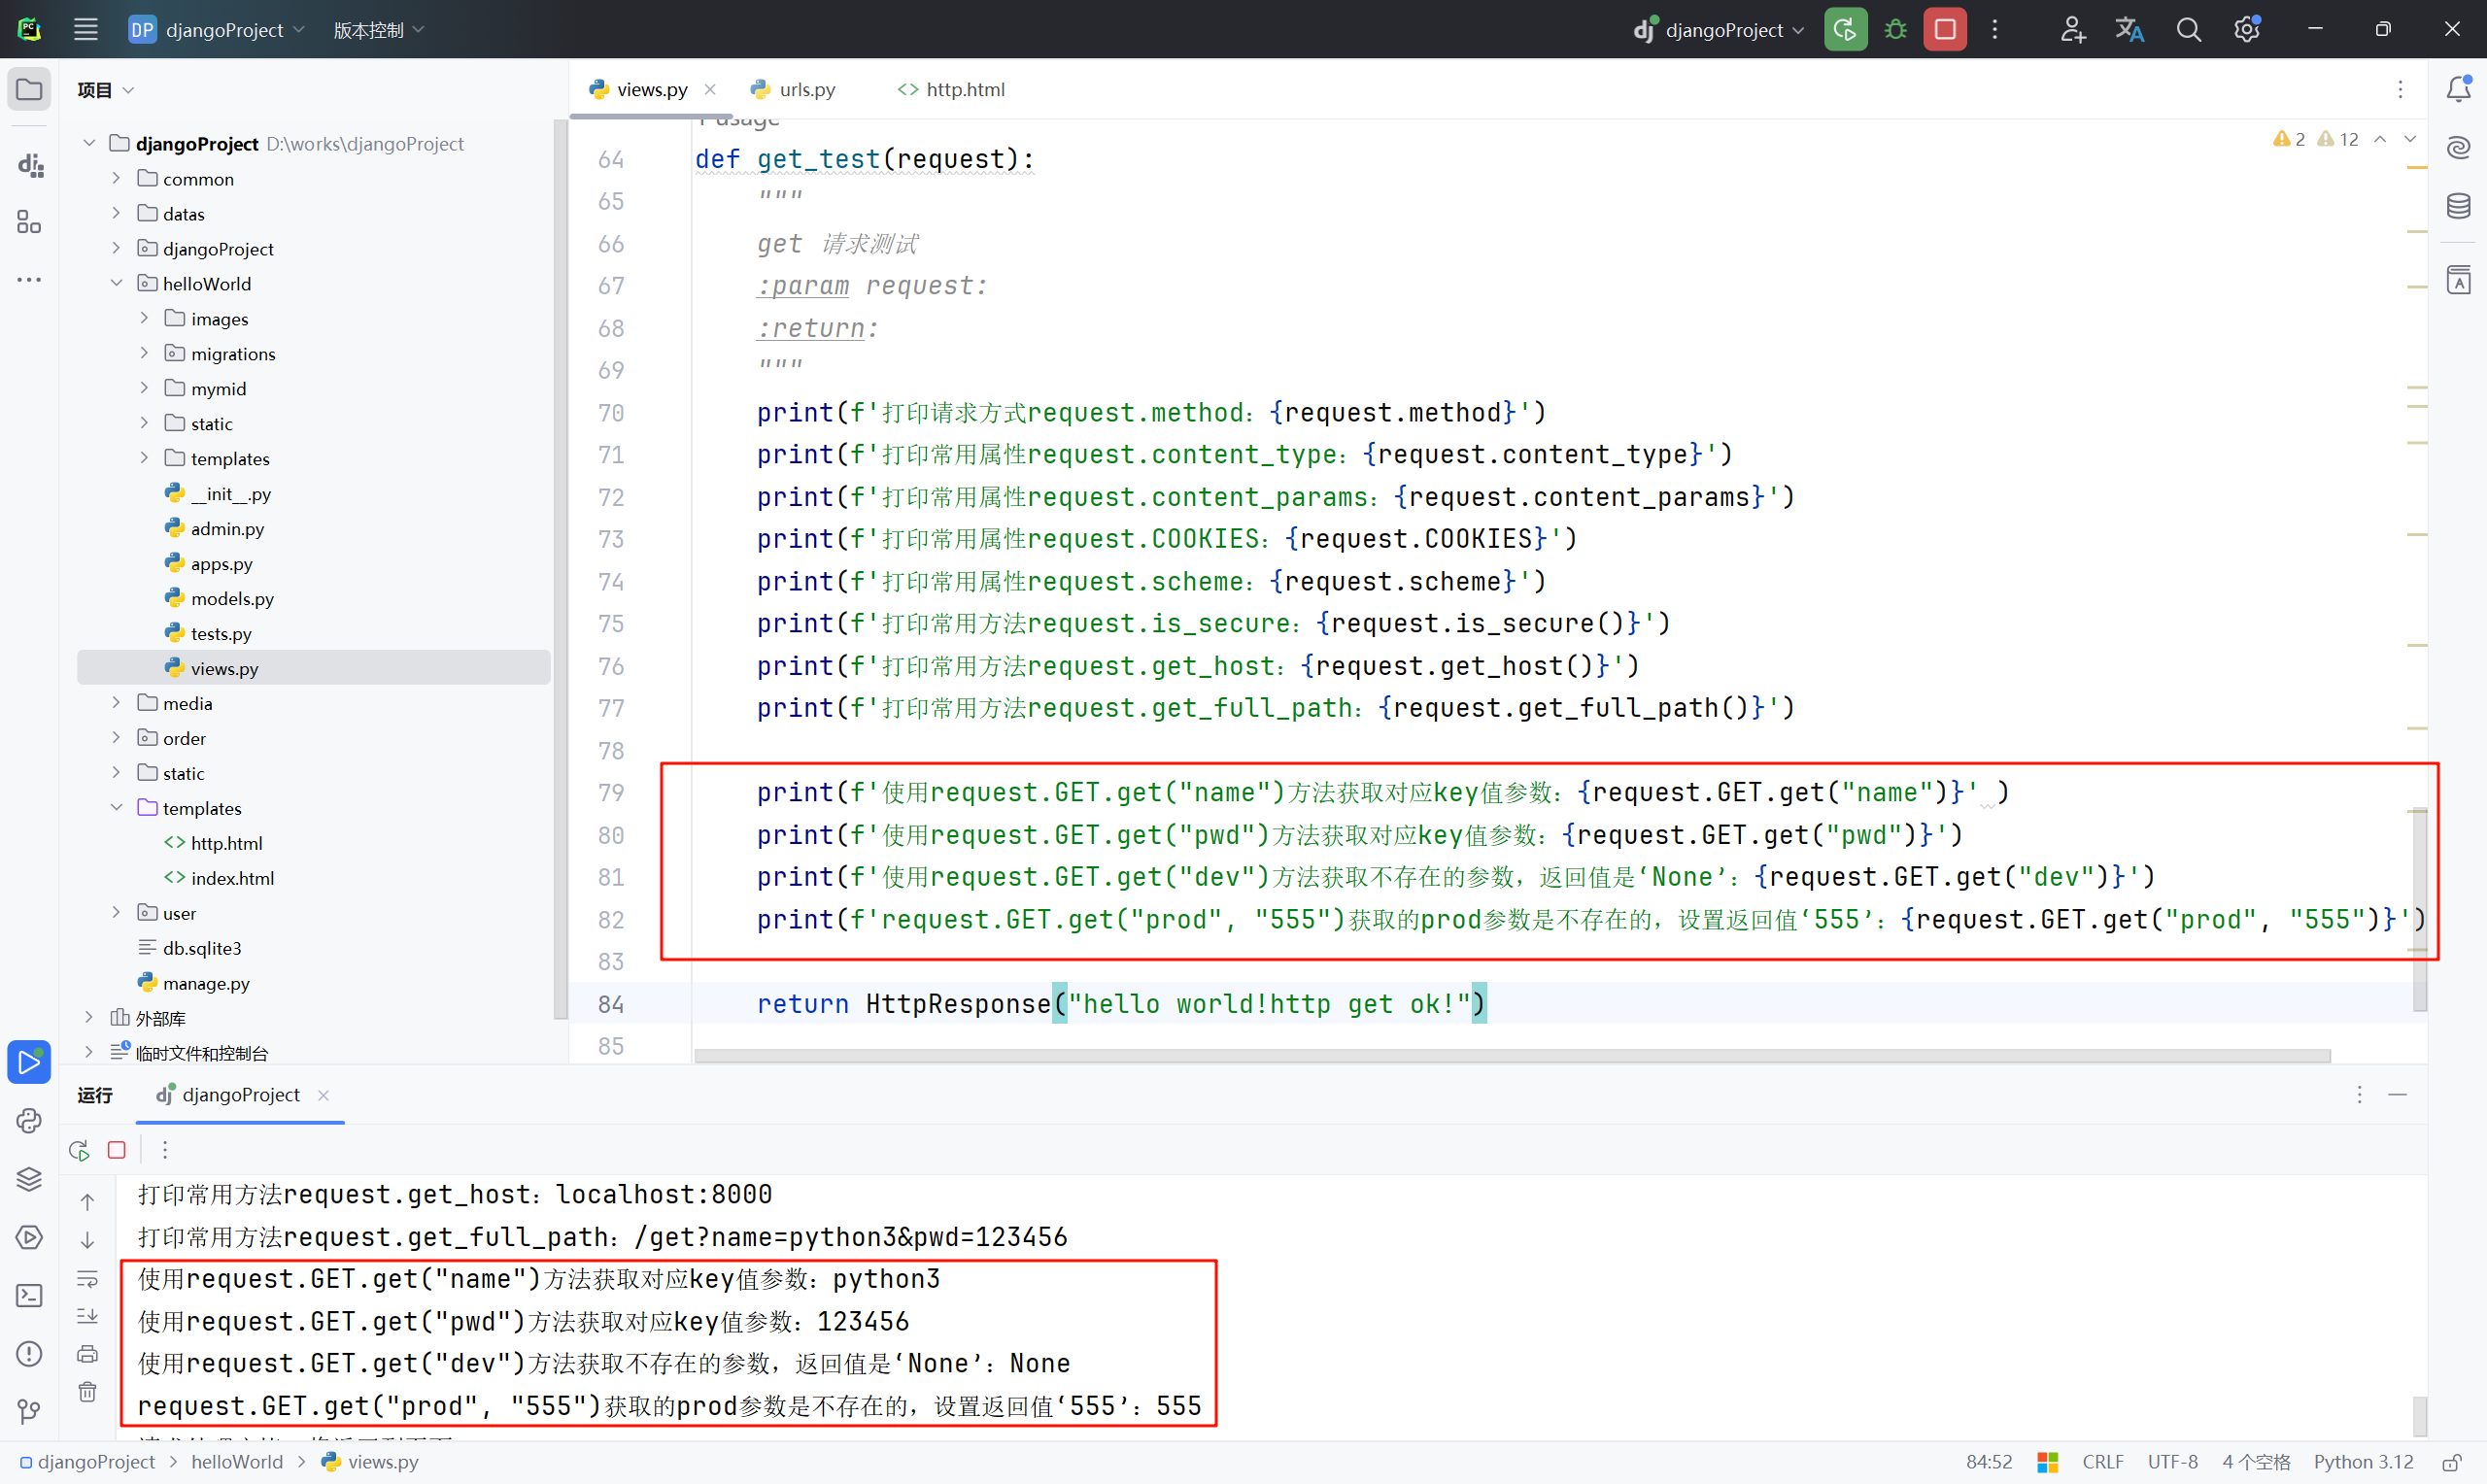
GET 请求怎么获取参数,在实际开发者过程中“如何获取到参数”才是业务所需要的;
def get_test(request):
"""
get 请求测试
:param request:
:return:
"""
print(f'打印请求方式request.method:{request.method}')
print(f'打印常用属性request.content_type:{request.content_type}')
print(f'打印常用属性request.content_params:{request.content_params}')
print(f'打印常用属性request.COOKIES:{request.COOKIES}')
print(f'打印常用属性request.scheme:{request.scheme}')
print(f'打印常用方法request.is_secure:{request.is_secure()}')
print(f'打印常用方法request.get_host:{request.get_host()}')
print(f'打印常用方法request.get_full_path:{request.get_full_path()}')
print(f'使用request.GET.get("name")方法获取对应key值参数:{request.GET.get("name")}' )
print(f'使用request.GET.get("pwd")方法获取对应key值参数:{request.GET.get("pwd")}')
print(f'使用request.GET.get("dev")方法获取不存在的参数,返回值是‘None’:{request.GET.get("dev")}')
print(f'request.GET.get("prod", "555")获取的prod参数是不存在的,设置返回值‘555’:{request.GET.get("prod", "555")}')
return HttpResponse("hello world!http get ok!")
POST 请求方法
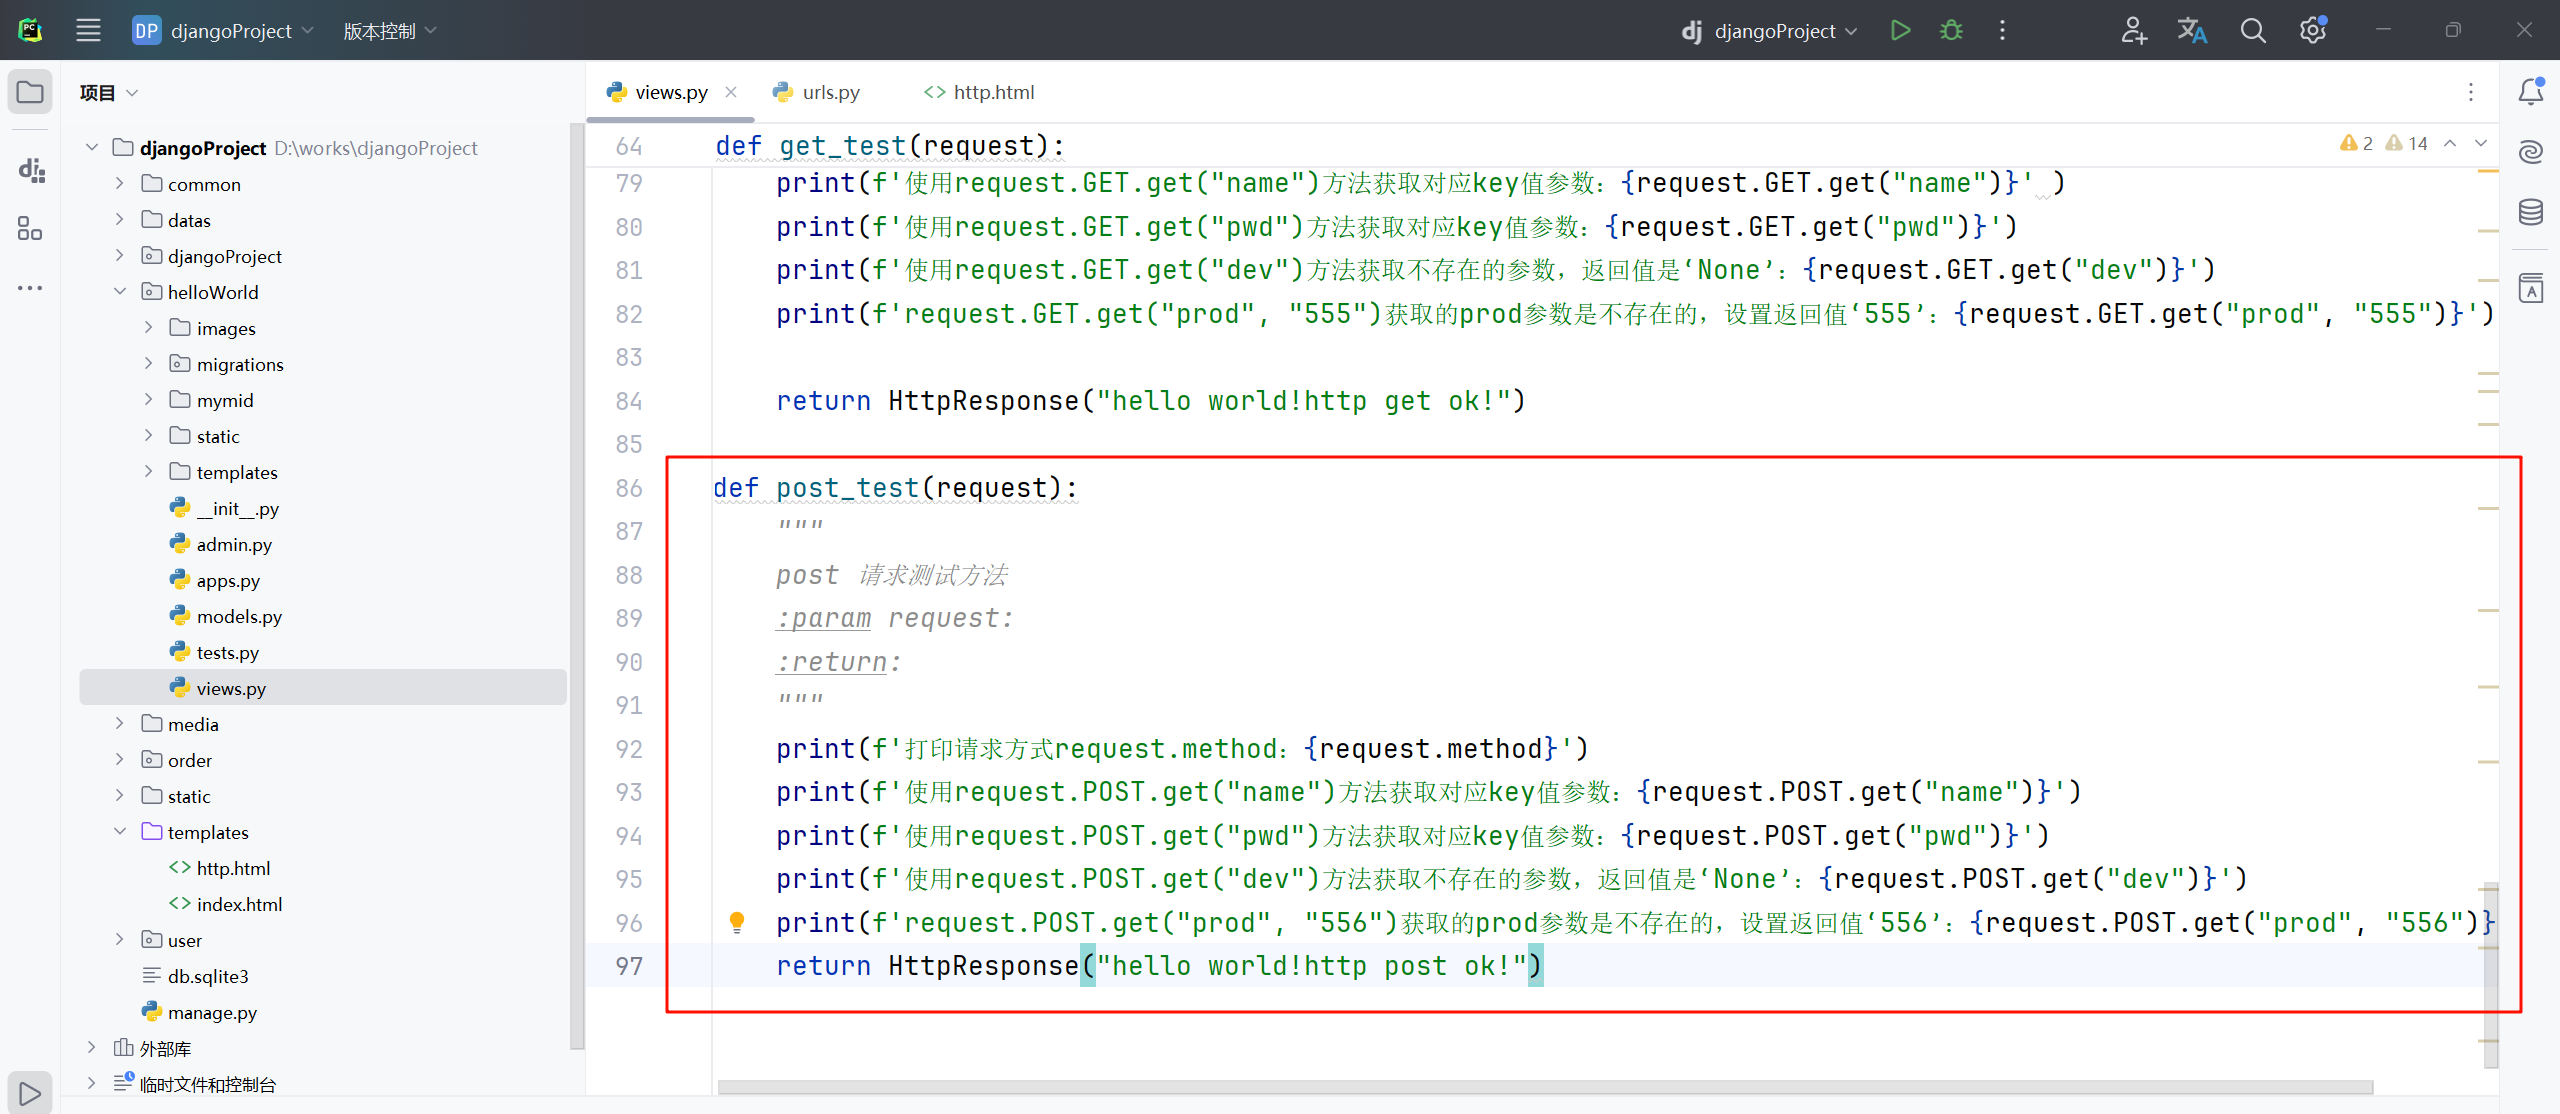
5、修改“djangoProject”项目“helloWorld”应用下的“views.py ”配置文件内容,新增定义 post_test 请求测试;
# 导包
from django.http import HttpResponse, HttpResponseNotFound, JsonResponse, StreamingHttpResponse, FileResponse
from django.shortcuts import render, redirect
# Create your views here.
# 自定义一个index方法,里面要加上request请求对象
def index(request):
# 修改“index”函数方法,修改 index 跳转目标为新建的http.html
return render(request, 'http.html')
# 定义index_id方法,里面第一个参数request请求对象,第二个参数 id
def index_id(request, id):
# 判断 id是否为0
if id == 0:
# 导包引入redirect模块,如果id等于0的话,重定向到一个目标静态地址
return redirect("/static/error.html")
else:
# 使用HttpResponse直接返回内容–因为id是int类型,里面得使用str()进行转换
return HttpResponse("id是" + str(id) + "的某某平台系统页面")
# 定义index_id方法,第一个参数request请求对象,里面继续跟多个路由变量“year, month, day, id”
def index_id02(request, year, month, day, id):
# 使用HttpResponse直接返回内容–因为id是int类型,里面得使用str()进行转换
return HttpResponse(str(year) + "/" + str(month) + "/" + str(day) + "/" +"id是" + str(id) + "的某某平台系统页面")
# 定义index_id方法,第一个参数request请求对象,后面跟多个路由变量“year, month, day”–注意,使用正则后不能与“id”再混合使用了
def index_id03(request, year, month, day):
# 使用HttpResponse直接返回内容–因为id是int类型,里面得使用str()进行转换
return HttpResponse(str(year) + '/' + str(month) + '/' + str(day) + "使用正则路由后的某某平台系统页面")
# 定义目标文件路径
file_path = "D:\\\\works\\\\djangoProject\\\\datas\\\\IDM.rar"
# 定义download_file1下载方法,请求需要带上request(所有的请求都要带上request)
def download_file1(request):
# 定义文件–使用open函数方法以“rb”二进制读取模式打开文件–然后返回一个file文件对象
file = open(file_path, 'rb')
# 创建构造好了HttpResponse对象之后返回给response
response = HttpResponse(file)
# 指定文件类型
response['Content-Type'] = 'application/rar-compressed'
# 扩展–指定附件及文件名字(可以动态拼接filename,并不建议使用原始名称)
response['Content-Disposition'] = 'attachment; filename=file1.rar'
return response
def download_file2(request):
file = open(file_path, 'rb')
# 创建构造好了StreamingHttpResponse对象之后返回给response
response = StreamingHttpResponse(file)
response['Content-Type'] = 'application/rar-compressed'
response['Content-Disposition'] = 'attachment; filename=file2.rar'
return response
def download_file3(request):
file = open(file_path, 'rb')
# 创建构造好了FileResponse对象之后返回给response
response = FileResponse(file)
response['Content-Type'] = 'application/rar-compressed'
response['Content-Disposition'] = 'attachment; filename=file3.rar'
return response
def get_test(request):
"""
get 请求测试
:param request:
:return:
"""
print(f'打印请求方式request.method:{request.method}')
print(f'打印常用属性request.content_type:{request.content_type}')
print(f'打印常用属性request.content_params:{request.content_params}')
print(f'打印常用属性request.COOKIES:{request.COOKIES}')
print(f'打印常用属性request.scheme:{request.scheme}')
print(f'打印常用方法request.is_secure:{request.is_secure()}')
print(f'打印常用方法request.get_host:{request.get_host()}')
print(f'打印常用方法request.get_full_path:{request.get_full_path()}')
print(f'使用request.GET.get("name")方法获取对应key值参数:{request.GET.get("name")}' )
print(f'使用request.GET.get("pwd")方法获取对应key值参数:{request.GET.get("pwd")}')
print(f'使用request.GET.get("dev")方法获取不存在的参数,返回值是‘None’:{request.GET.get("dev")}')
print(f'request.GET.get("prod", "555")获取的prod参数是不存在的,设置返回值‘555’:{request.GET.get("prod", "555")}')
return HttpResponse("hello world!http get ok!")
def post_test(request):
"""
post 请求测试方法
:param request:
:return:
"""
print(f'打印请求方式request.method:{request.method}')
print(f'使用request.POST.get("name")方法获取对应key值参数:{request.POST.get("name")}')
print(f'使用request.POST.get("pwd")方法获取对应key值参数:{request.POST.get("pwd")}')
print(f'使用request.POST.get("dev")方法获取不存在的参数,返回值是‘None’:{request.POST.get("dev")}')
print(f'request.POST.get("prod", "556")获取的prod参数是不存在的,设置返回值‘556’:{request.POST.get("prod", "556")}')
return HttpResponse("hello world!http post ok!")
6、修改“djangoProject”应用下的“urls.py ”配置文件内容,配置定义映射关系;
"""
URL configuration for djangoProject project.
The `urlpatterns` list routes URLs to views. For more information please see:
https://docs.djangoproject.com/en/5.0/topics/http/urls/
Examples:
Function views
1. Add an import: from my_app import views
2. Add a URL to urlpatterns: path('', views.home, name='home')
Class-based views
1. Add an import: from other_app.views import Home
2. Add a URL to urlpatterns: path('', Home.as_view(), name='home')
Including another URLconf
1. Import the include() function: from django.urls import include, path
2. Add a URL to urlpatterns: path('blog/', include('blog.urls'))
"""
from django.conf import settings
from django.contrib import admin
from django.urls import path, re_path, include
from django.views.generic import RedirectView
from django.views.static import serve
import helloWorld.views
urlpatterns = [
path('admin/', admin.site.urls),
# 可直接复制上面“admin”,把“admin”修改为“index”;后面是跟的“处理函数helloWorld.views.index”
# 是helloWorld应用的views里面的index()–引入helloWorld.views,记得index后不能加小括号,因为传入的是对象;
path('index/', helloWorld.views.index),
# 要是请求“redirectTo”这个请求的话给重定向到“index”–重定向使用RedirectView.as_view(),里面使用关键词参数url
path('redirectTo', RedirectView.as_view(url="index/")),
# 自定义名称,例如叫“index_id/”,后面再跟上某网页id;<int:id> int指定类型,路由变量为id;对应对应的路由映射
path('index_id/<int:id>', helloWorld.views.index_id),
# 多个路由变量
path('index_id02/<int:year>/<int:month>/<int:day>/<int:id>', helloWorld.views.index_id02),
# 正则表达式匹配是必须使用re_path方法,正则表达式“?P”开头是固定格式
re_path('index_id03/(?P<year>[0-9]{4})/(?P<month>[0-9]{2})/(?P<day>[0-9]{2})', helloWorld.views.index_id03),
# 配置媒体文件的路由地址
re_path('media/(?P<path>.*)', serve, {'document_root': settings.MEDIA_ROOT}, name='media'),
# 命名空间namespace–比如说是“user/”开头的,第一个参数include(),第二个参数namespace
# 导包引入include模块,include()里面也有两个参数,第一个是指定user的urls,第二个是项目名;
path('user/', include(('user.urls', 'user'), namespace='user')),
path('order/', include(('order.urls', 'order'), namespace='order')),
# 配置 download_file
path('download1/', helloWorld.views.download_file1),
path('download2/', helloWorld.views.download_file2),
path('download3/', helloWorld.views.download_file3),
path('get', helloWorld.views.get_test),
path('post', helloWorld.views.post_test)
]
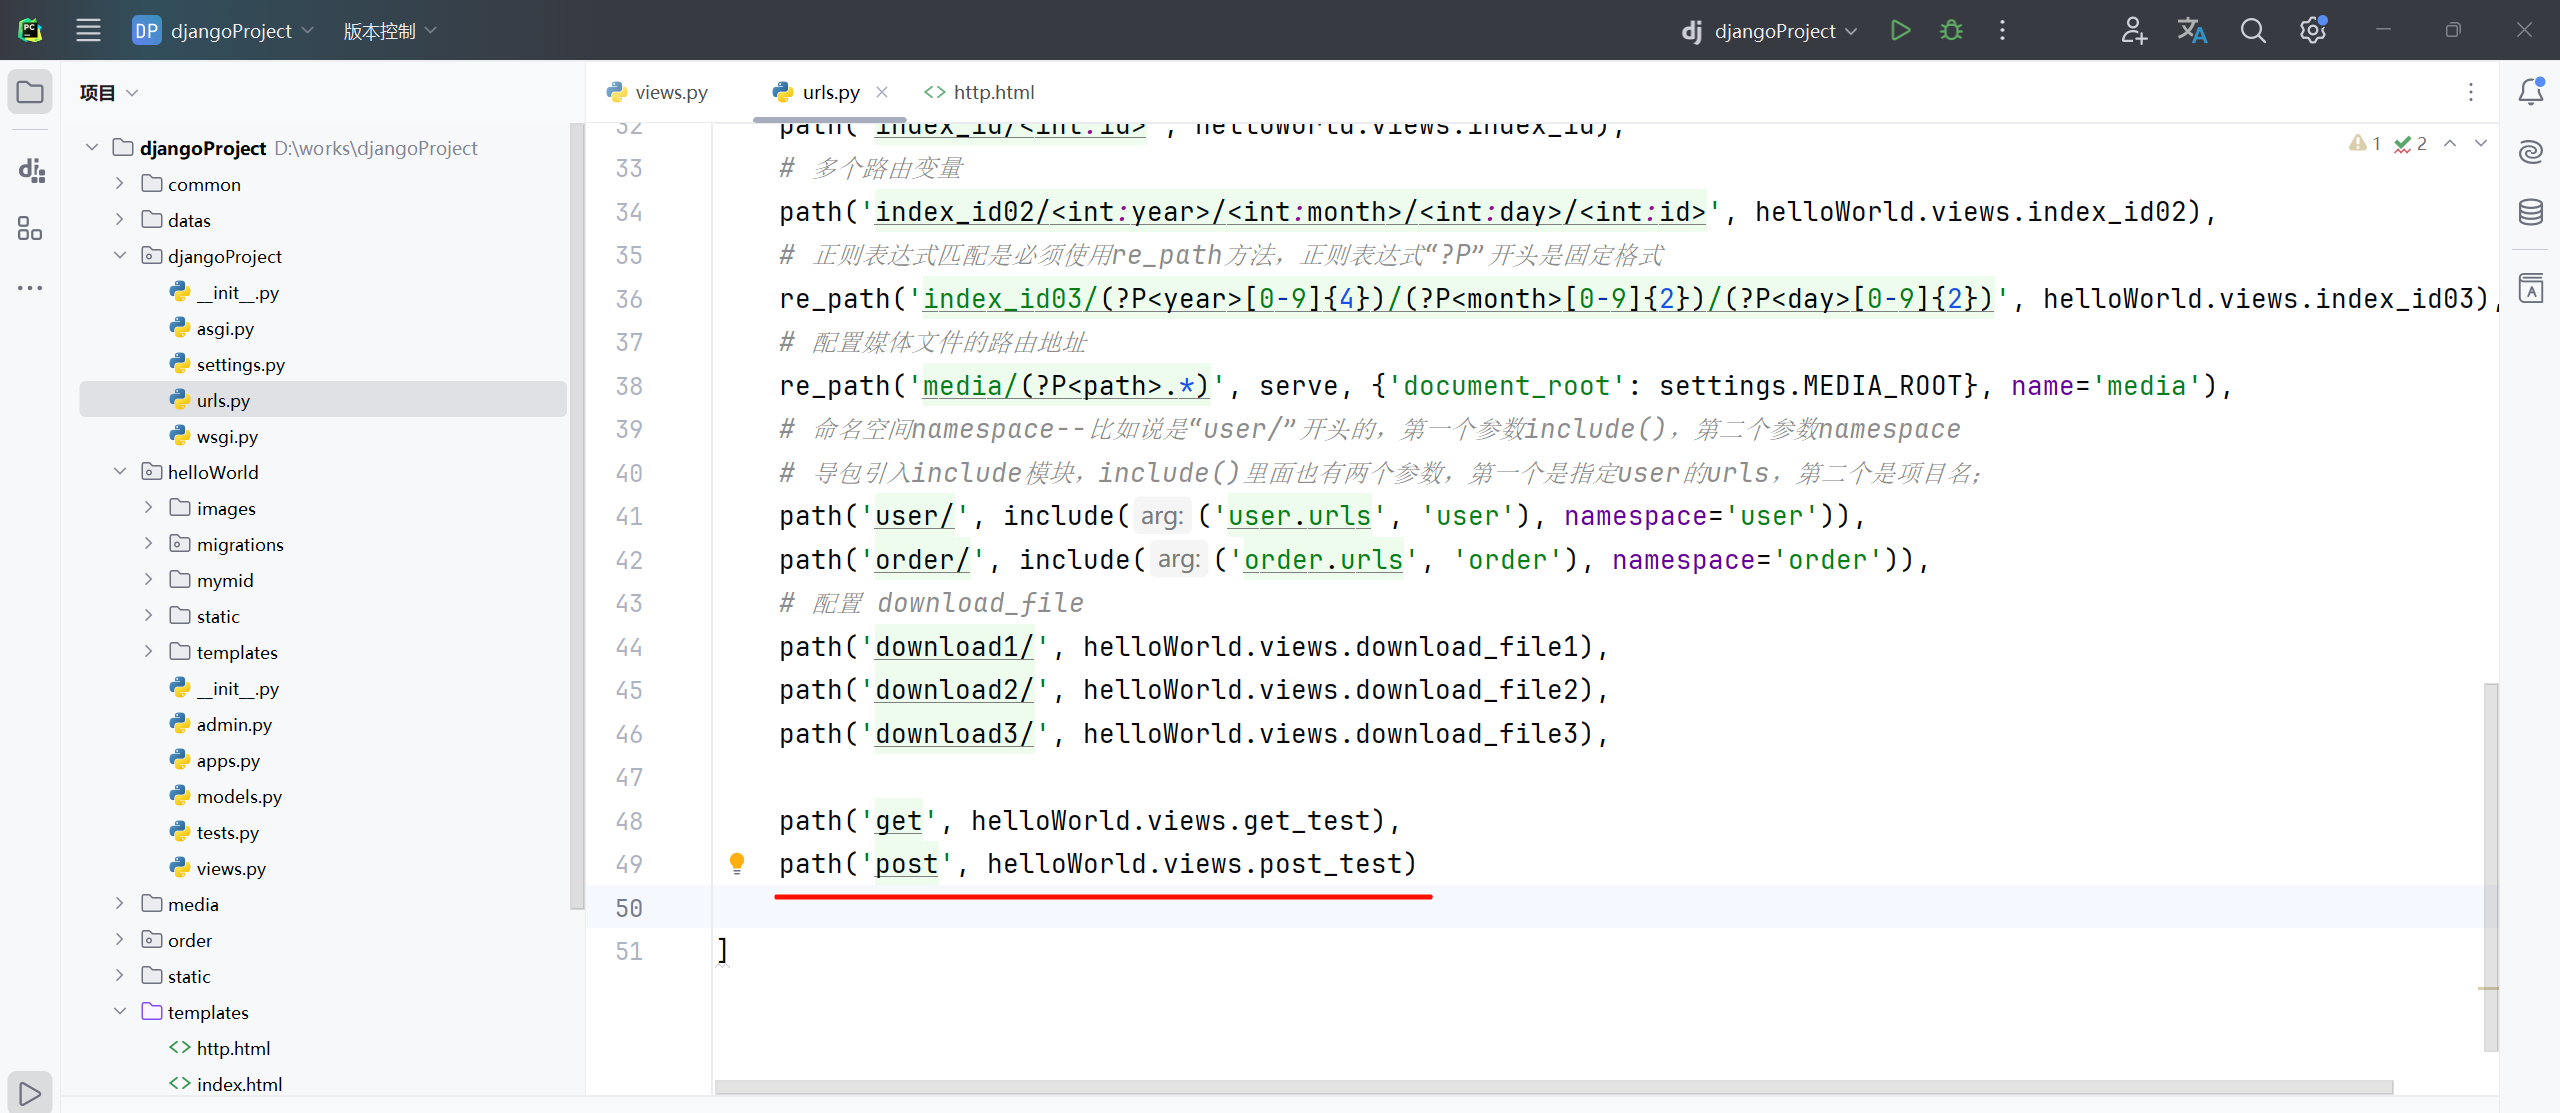
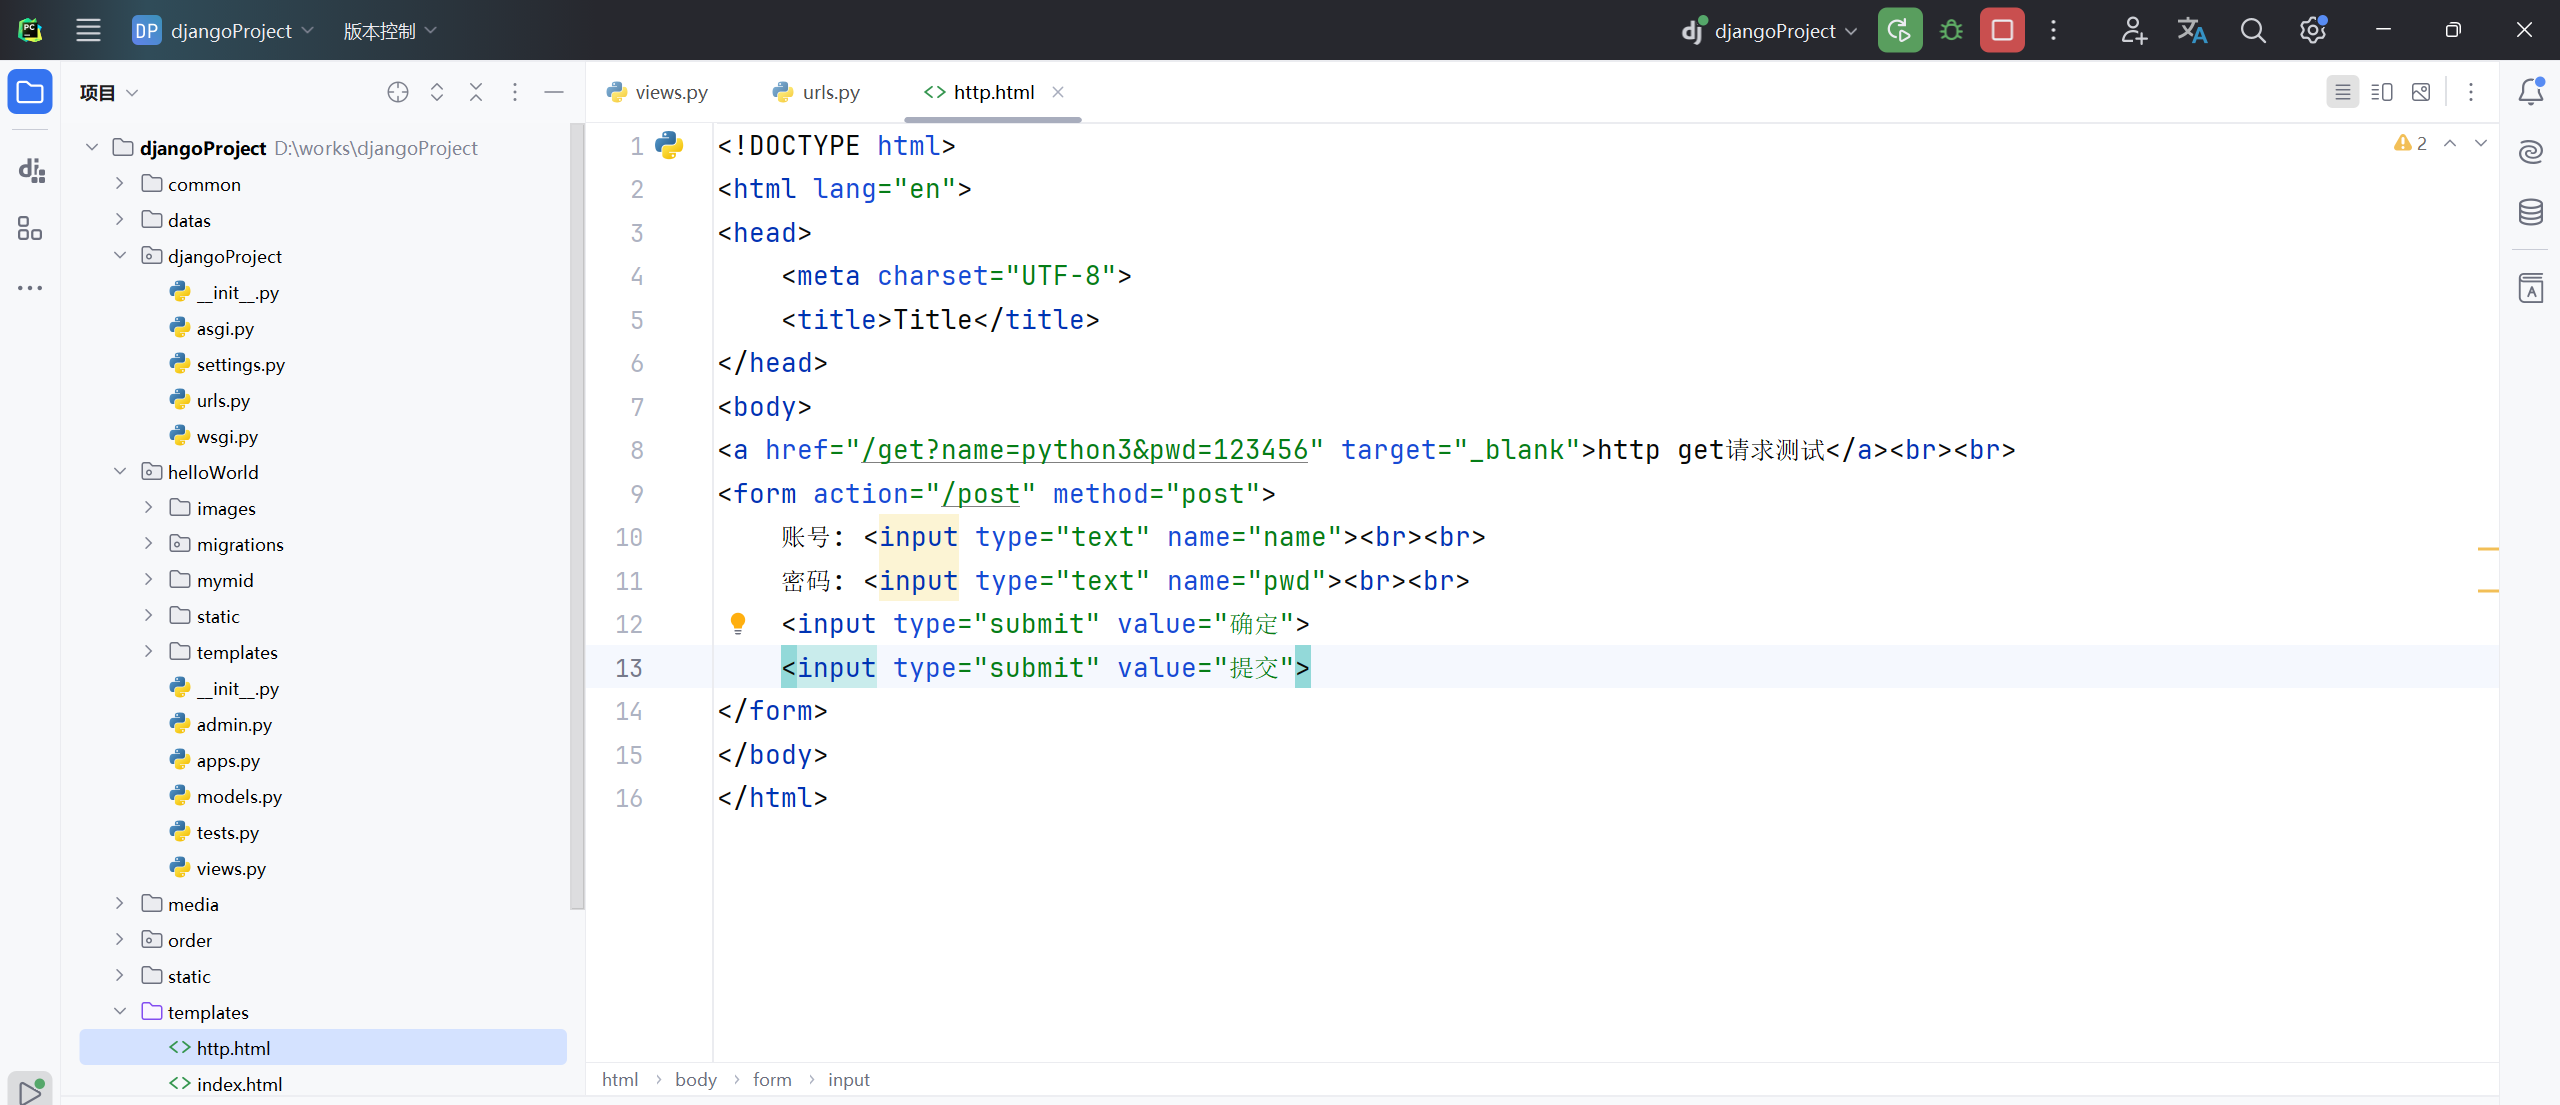
7、修改项目“templates”目录文件路径下“http.html”文件内容,书写静态页面,以 post 方式来提交两个参数;
<!DOCTYPE html>
<html lang="en">
<head>
<meta charset="UTF-8">
<title>Title</title>
</head>
<body>
<a href="/get?name=python3&pwd=123456" target="_blank">http get请求测试</a><br><br>
<form action="/post" method="post">
账号: <input type="text" name="name"><br><br>
密码: <input type="text" name="pwd"><br><br>
<input type="submit" value="确定">
<input type="submit" value="提交">
</form>
</body>
</html>
8、运行项目测试验证,浏览器输入“http://127.0.0.1:8000/index/”测试查看;
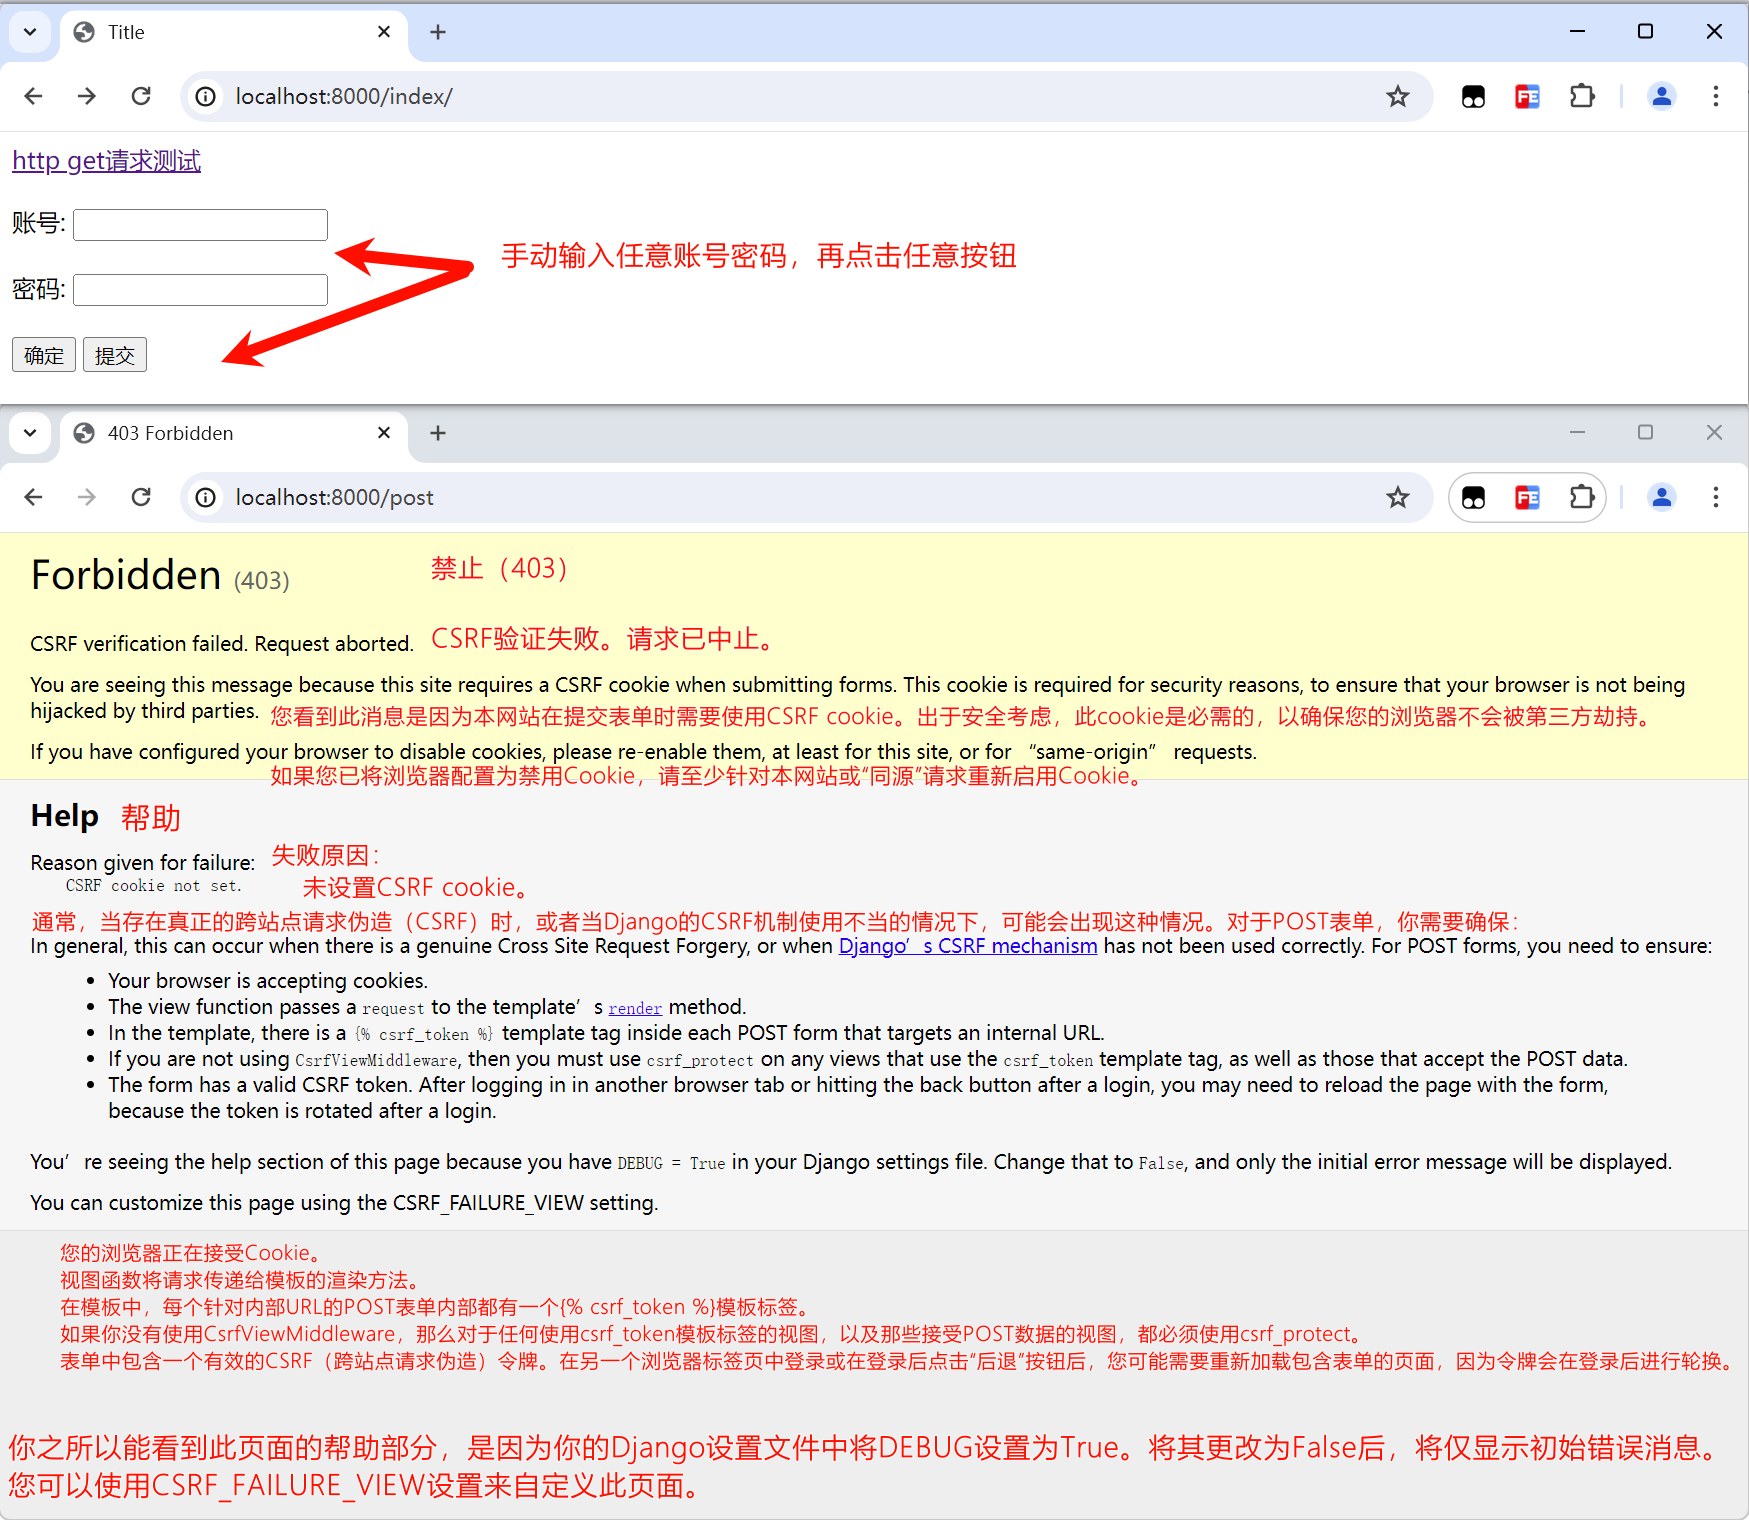
提示需要“CSRF cookie ”,在 Django 里面需要放入“token”,而这个“CSRF tiken”是在哪里获取的呢?只要是先请求了后端,然后再渲染转化到前端,它就会携带一个“CSRF tiken”,用于安全作用;如果是静态资源页面,直接访问静态页面的话,是不需要这个“CSRF tiken”的,它会直接带有“csrf_token”这个变量的;所以说这里是不能使用静态页面的,否则的话“csrf_token”是取不到值的;需要后端 server 来提供一个 CSRF 安全机制的 token,所以只能使用模板;
9、继续修改项目“templates”目录文件路径下“http.html”文件内容,添加模板固定语法“csrf_token”变量;
<!DOCTYPE html>
<html lang="en">
<head>
<meta charset="UTF-8">
<title>Title</title>
</head>
<body>
<a href="/get?name=python3&pwd=123456" target="_blank">http get请求测试</a><br><br>
<form action="/post" method="post">
{% csrf_token %}
账号: <input type="text" name="name"><br><br>
密码: <input type="text" name="pwd"><br><br>
<input type="submit" value="确定">
<input type="submit" value="提交">
</form>
</body>
</html>
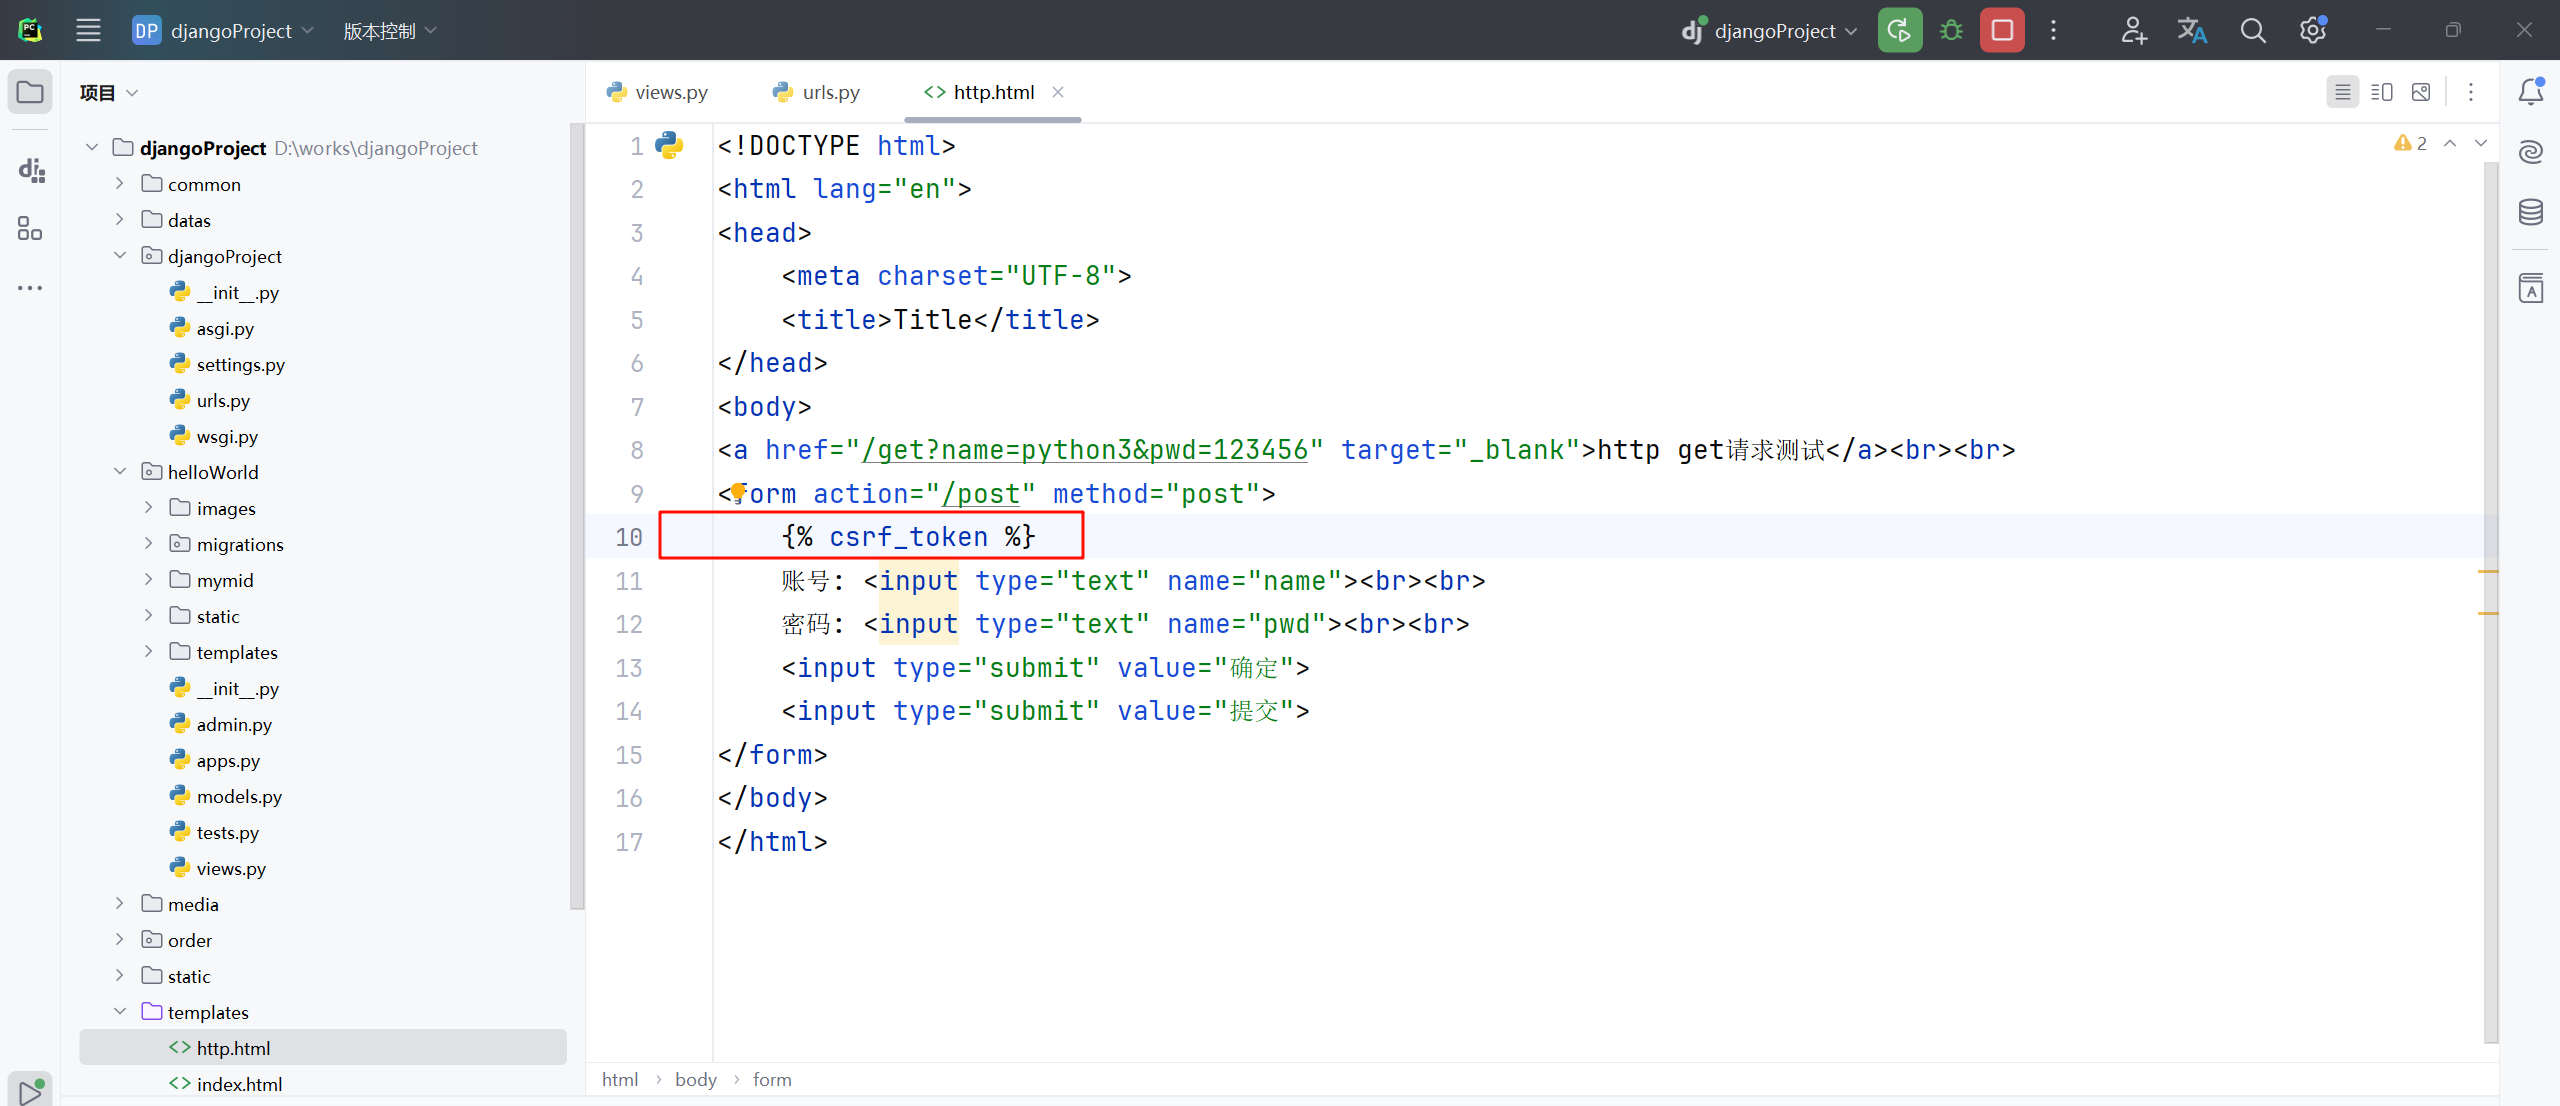
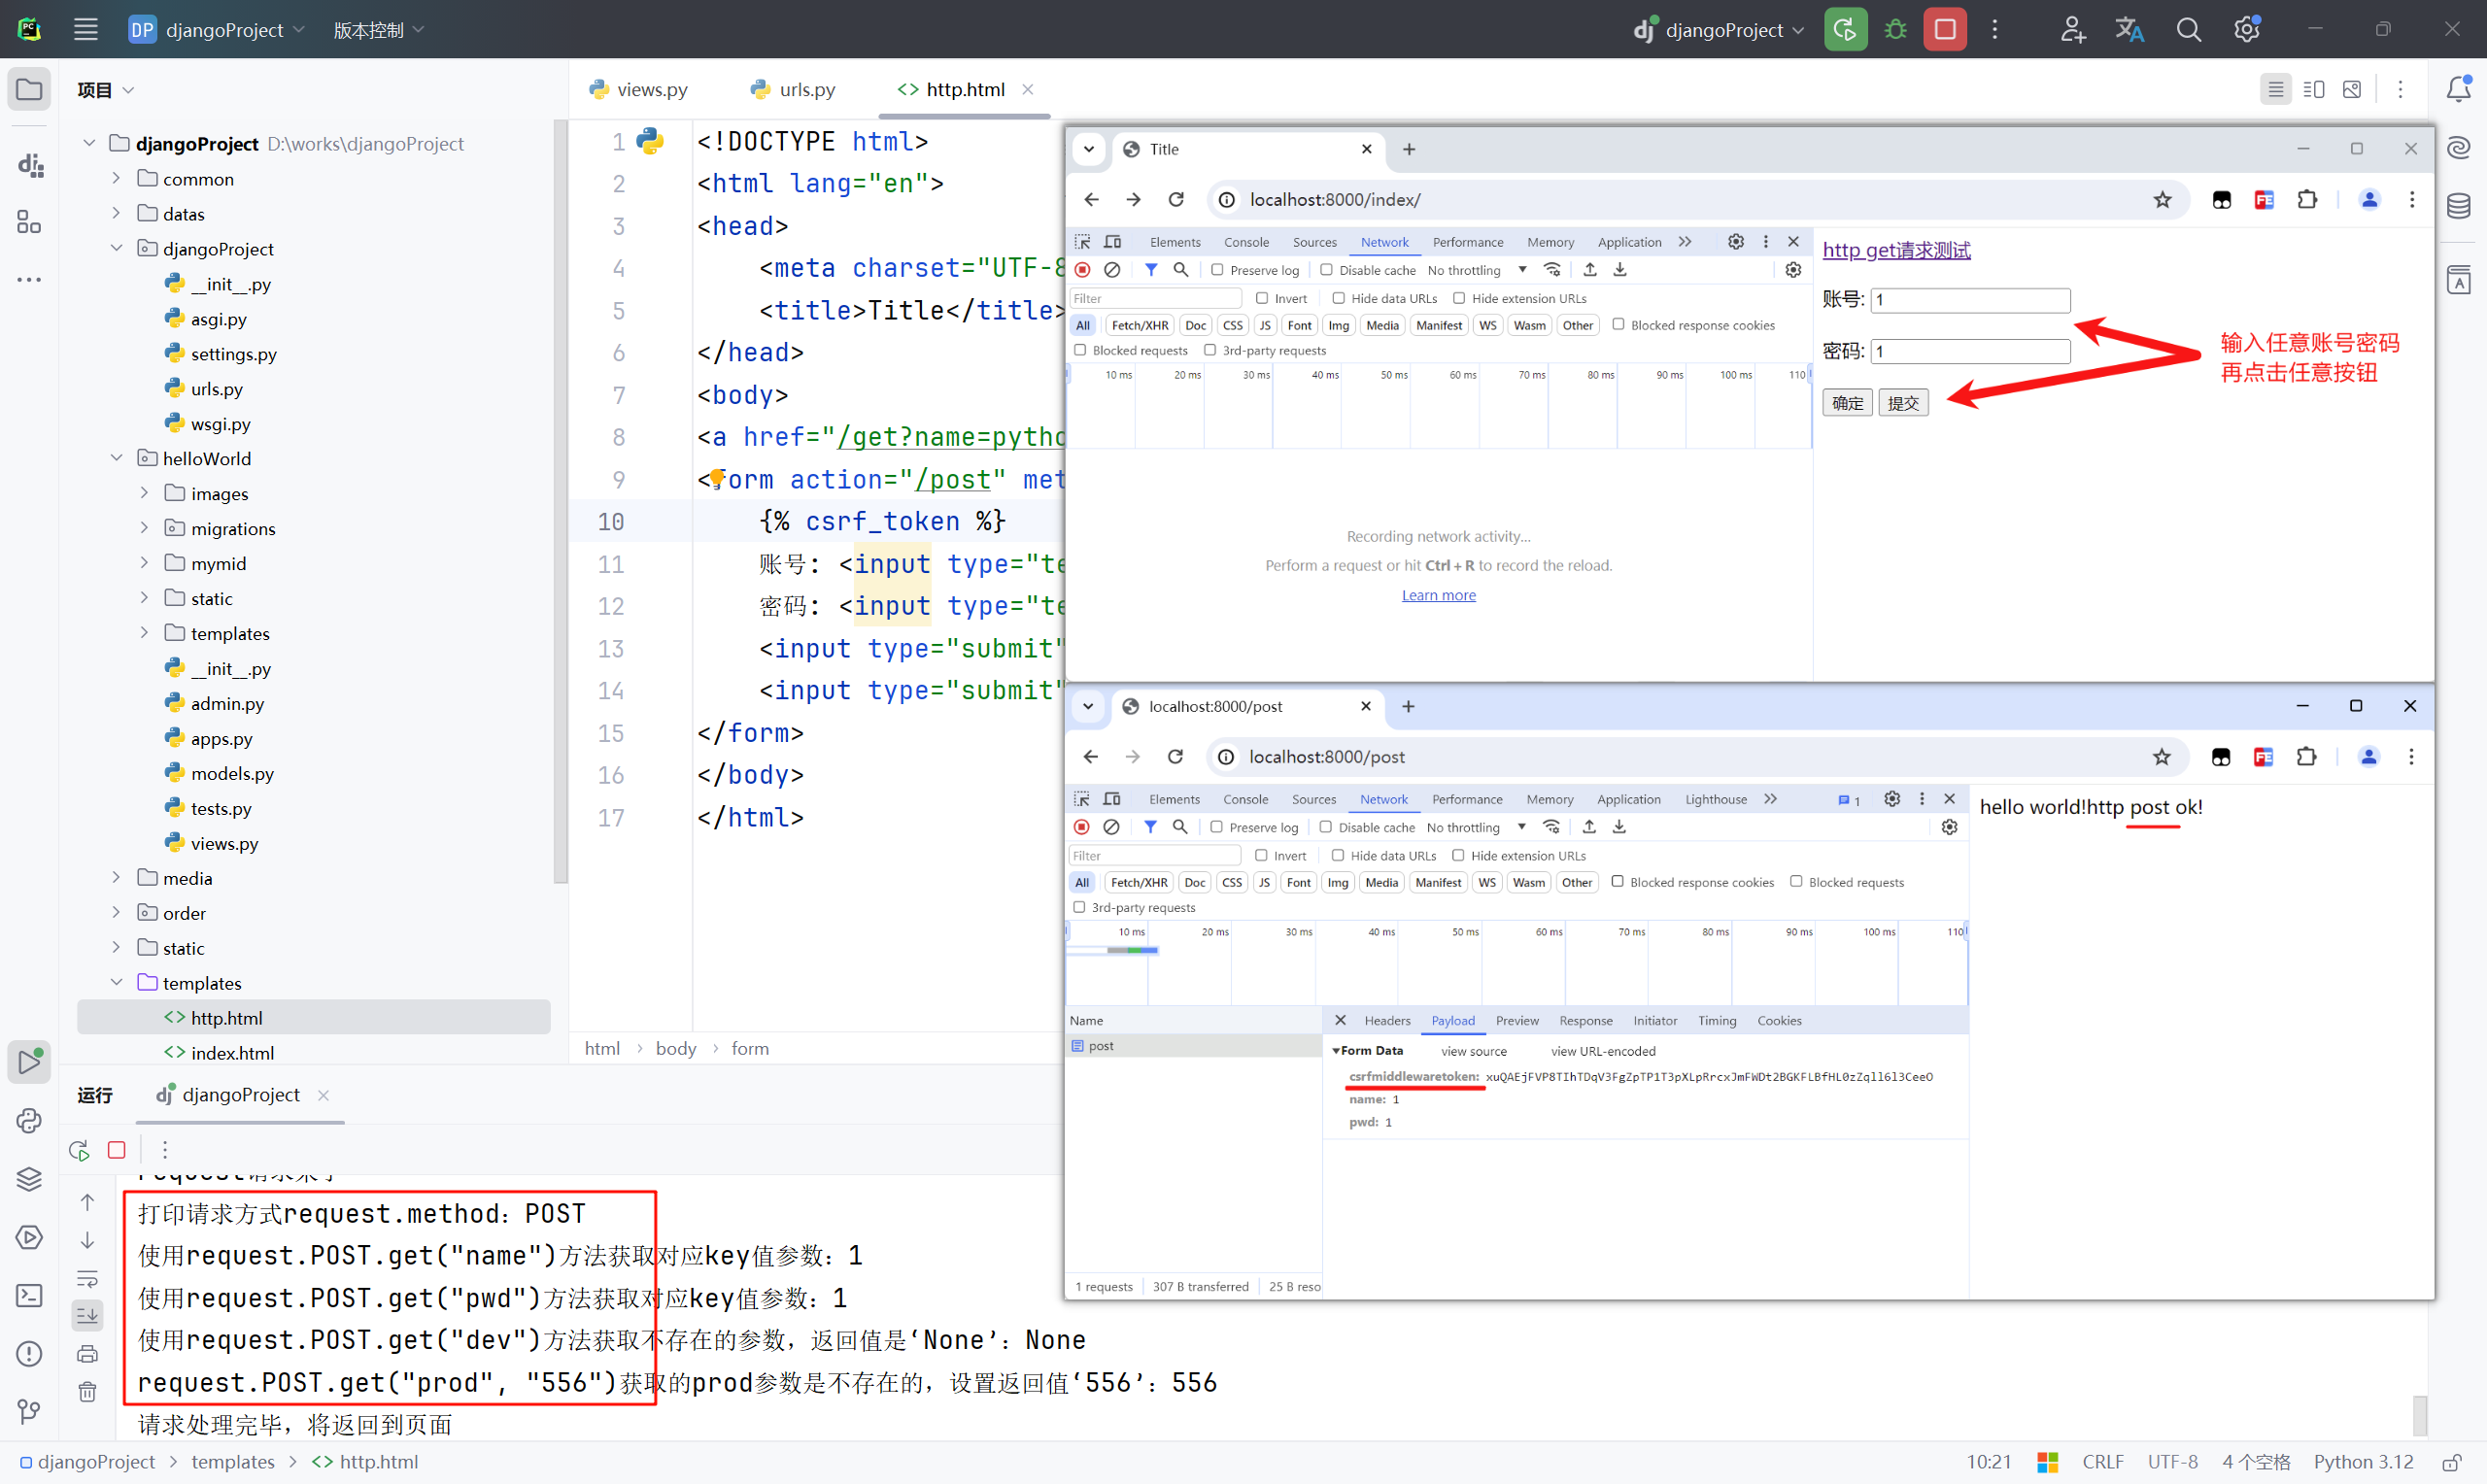
10、测试验证,浏览器输入“http://127.0.0.1:8000/index/”,输入账号密码(实际可直接单击任意按钮,无需手动输入账密),点击“确定”或者“提交”按钮,查看 PyCharm 工具控制台输出结果;
拓展(仅供参考)
其他 HttpRequest 对象常用参数介绍如下;
|
常用参数 |
描述说明 |
|
|
request.scheme |
请求的协议种类(http/https)。 |
|
|
request.path |
请求页面的完整路径(get_full_path()在path的基础上还有查询条件)。 |
|
|
request.method |
请求使用的http方法(POST,GET,DELETE,PUT…)。 |
|
|
request.content_type |
请求的MIME类型 。 |
|
|
request.GET/request.POST |
get/post请求中的所有参数,类似于字典的对象。 |
|
|
request.COOKIES |
请求包含的cookie字典。 |
|
|
request.FILES |
上载文件的类字典对象。 |
|
|
request.headers |
获取请求headers里面的内容,不区分大小写,类似字典的对象; request.headers["Cotent-Length"] 请求报文中实体主体的字节大小; request.headers["Content-Type"] 请求的MIME类型 ; request.headers["User-Agent"] 请求的用户代理。 |
|
|
request.META |
包含所有HTTP头部信息的字典;
|
|
|
request.user |
当前登录用户的实例。 |
|
|
request.session |
代表当前会话的可读可写,类似于字典的对象(删除用户登录的session,request.session.delete(session_key) )。 |
|
常用方法介绍
(1) request.get_host()–获取主机域名或者IP加端口号
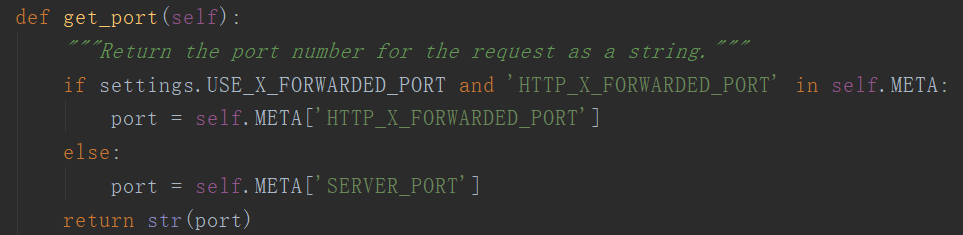
(2) request.get_port()–请求端口号
(3) request.is_secure()–如果使用的是Https,则返回True,表示连接是安全的

(4) request.get_full_path()–带有请求参数的完整path
会话管理(Cookies 和 Session)
HTTP(HyperText Transfer Protocol 超文本传输协议)是互联网上应用最为广泛的一种网络协议,它是由万维网协会(World Wide Web Consortium)制定发布;HTTP是一种无状态协议,每次客户端访问web页面时,客户端打开一个单独的浏览器窗口连接到web服务器,由于服务器不会自动保存之前客户端请求的相关信息,所有无法识别一个HTTP请求是否为第一次访问,这就引进了web客户端和服务器端之间的会话,就是会话管理;常用的会话跟踪技术是Cookie与Session,Cookie通过在客户端记录信息确定用户身份,Session通过在服务器端记录信息确定用户身份。
Cookies
cookie是某些网站为了辨别用户身份,进行Session跟踪而储存在用户本地终端上的数据(通常经过加密),由用户客户端计算机暂时或永久保存的信息(所以就是浏览器关闭之后,cookie 信息依然存在,一般根据 cookie 有效期设置);Cookie定义了一些HTTP请求头和HTTP响应头,通过这些HTTP头信息使服务器可以与客户进行状态交互;客户端请求服务器后,如果服务器需要记录用户状态,服务器会在响应信息中包含一个Set-Cookie的响应头,客户端会根据这个响应头存储Cookie信息;再次请求服务器时,客户端会在请求信息中包含一个Cookie请求头,而服务器会根据这个请求头进行用户身份、状态等较验;
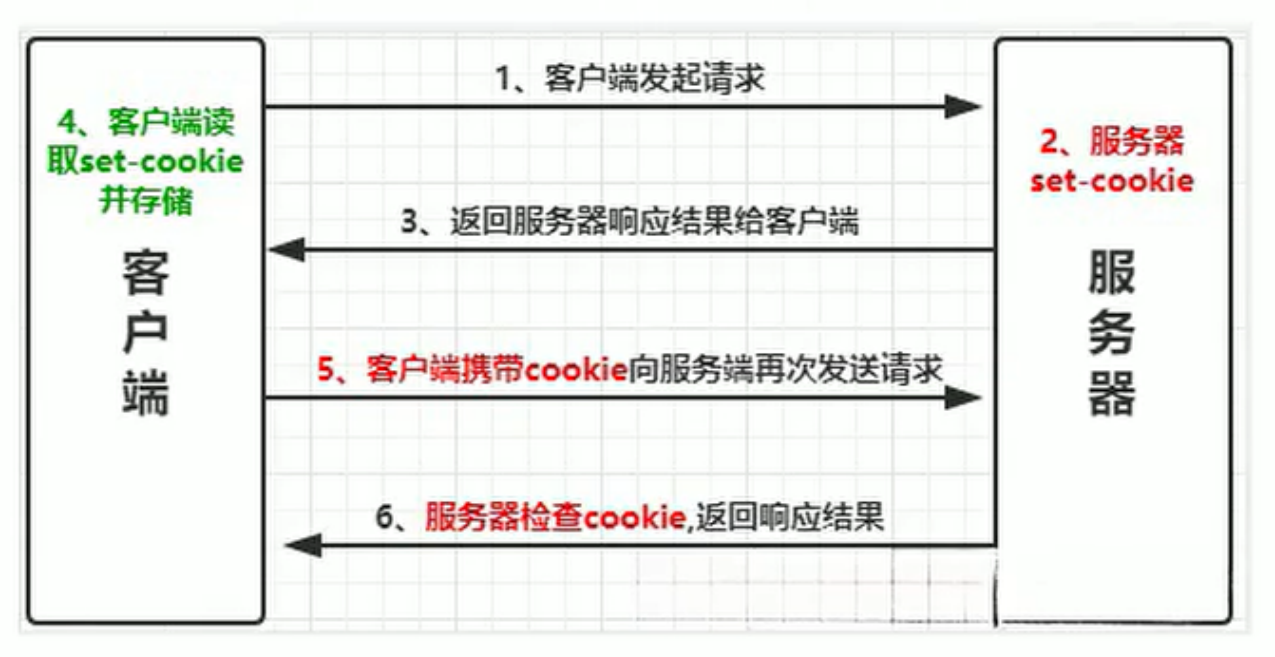
这是一个过程,当然里面也会涉及到Session;
Session
Session是另一种记录在服务器中客户状态的机制,不同的是Cookie保存在客户端浏览器中,而Session保存在服务器上;客户端浏览器访问服务器的时候,服务器把客户端信息以某种形式记录在服务器上,这就是Session,客户端浏览器再次访问时只需要从该Session中查找该客户的状态就可以了;当程序需要为某个客户端的请求创建一个session的时候,服务器首先检查这个客户端的请求里是否已包含了一个session标识,一般就称为session_id,如果已包含一个session_id则说明以前已经为此客户端创建过session,服务器就按照session_id把这个session检索出来使用(如果检索不到,可能会新建一个),如果客户端请求不包含session_id,则为此客户端创建一个session并且生成一个与此session相关联的session_id,session_id的值应该是一个既不会重复,又不容易被找到规律以仿造的字符串,这个session_id将被在本次响应中返回给客户端保存;
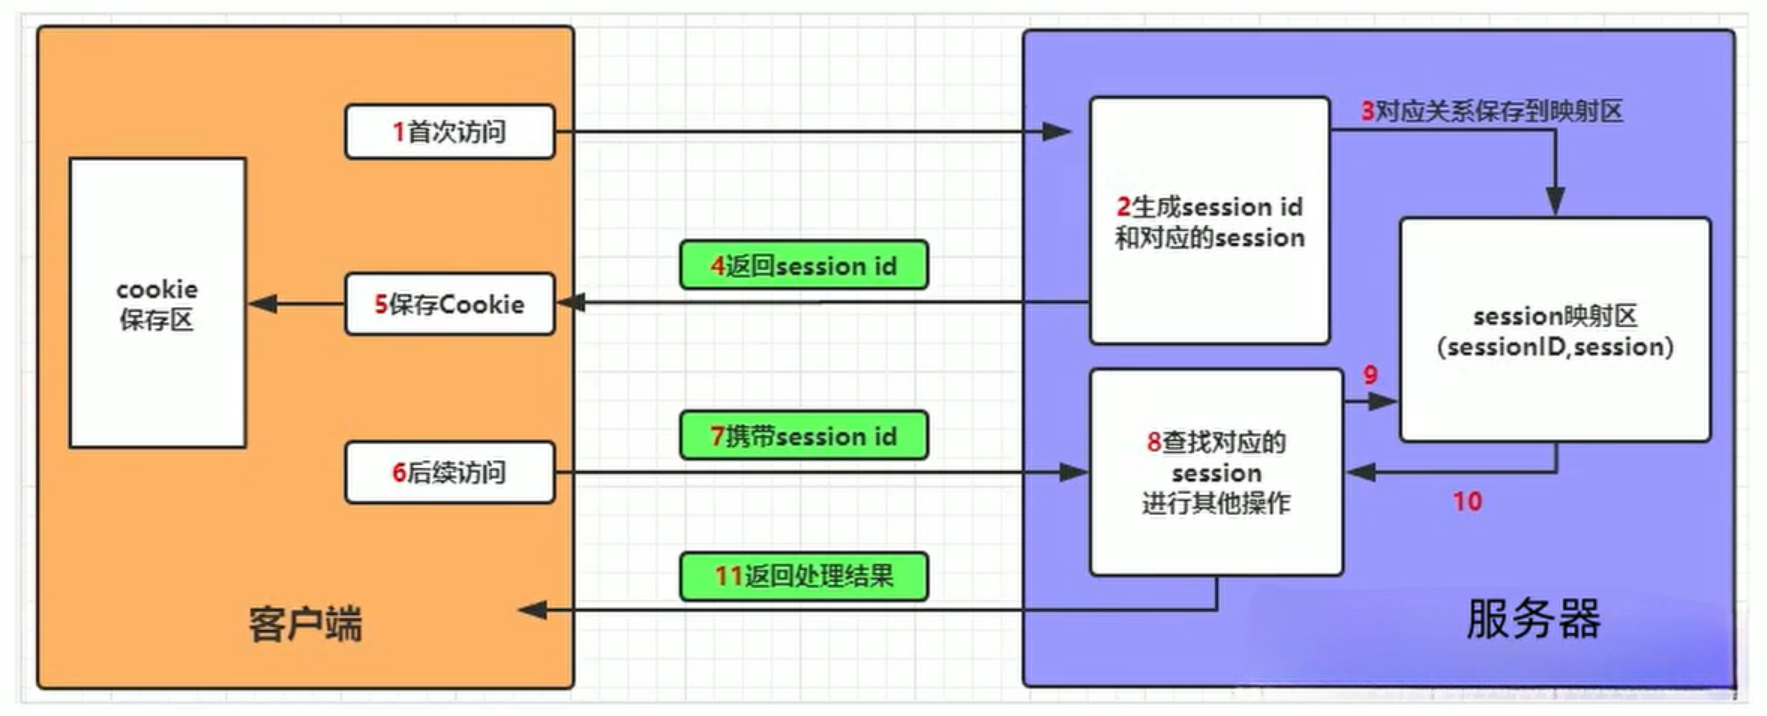
首先,客户端第一次访问服务器;服务器会生成一个session_id 和对应的session;然后对应关系会存到一个映射区中;服务器返回session_id 给客户端;客户端会保存Cookie;当客户端再次去访问服务端的话会携带session_id(其实就是Cookie);服务器去映射区里面查,找到之后就能识别是某个用户;最后再从服务端返回给客户端。
Cookies 和 Session 的区别
- 数据存储位置不同:大部分情况下cookie 数据存放在客户的浏览器上,session 数据放在服务器上;
- 数据大小不同:单个cookie保存的数据不能超过4K,很多浏览器都限制一个站点最多保存20个cookie,Session 一般情况下没有上限,不过建议不要存放太多东西会影响到系统性能;Cookie是以键值对的形式存储在客户端的文本文件中,每个Cookie都有名称、值、过期时间、域名等属性,Cookie的数据容量通常有限制,一般为几KB;Session将用户状态数据存储在服务器端的内存或数据库中,所以 Session可以存储更大量的数据,并且不受Cookie容量限制;
- 安全性不同:Cookie 存放在客户端,不是很安全,别人可以分析存放在本地的 Cookie 并进行Cookie 欺骗,所以并不安全;Session放在服务端,更加安全,考虑到安全应当使用session;Session 比 Cookie 安全,Session的用户信息是存储在服务器端的,浏览器端只会存储SessionId,Cookie则将用户信息存储在浏览器端的。
- 服务器性能不同:Cookie 存放本地,基本不存在服务端压力;Session 存放在服务端,会在一定时间内保存在服务器上,每个用户产生一个 Session,并发过多时非常占用内存,当访问增多,对服务器产生较大压力,会比较占用服务器的性能,考虑到减轻服务器性 能方面,应当使用cookie;
- 信息重要程度不同:Cookie 存放在客户端,不是很安全,别人可以分析存放在本地的 Cookie 并进行Cookie 欺骗,所以并不安全;Session放在服务端,更加安全,可以考虑将用户信息等重要信息存放为session,其他信息如果需要保留,可以放在cookie中;
- 有效期不同:Cookie 可以设置属性从而达到长期有效,在过期时间之前,Cookie会一直保留在客户端,除非被删除或过期;Session 依赖于Session_ID 中的 Cookie,若其设置过期时间默认为 -1,只需要关闭浏览器窗口 Session 就会失效,就算不依赖 Cookie,用 Url 重写也不能完成,如果 Session 超时时间过长,很容易导致内存溢出;Session的生命周期由服务器控制,通常在用户关闭浏览器或一段时间不活动后过期。过期后,服务器会清理掉相应的Session数据;
- 跨域方式不同:Cookie 支持跨域访问,Session 不支持跨域;
- 存取方式不同:Cookie 只能使用 ASCII 字符串(只支持存字符串数据,想要设置其他类型的数据,需要将其转换成字符串),通过编码方式获取 Unicode 字符或者二进制数据,不太好存储复杂的数据信息,Session 则能存储任何类型的数据信息(可以存任意数据类型);
Cookie和Session通常是结合使用,服务器使用Session来管理用户的状态和敏感信息,而将Session ID存储在Cookie中发送给客户端;客户端在后续的请求中会自动携带Cookie中的Session ID,服务器通过Session ID来识别和恢复对应的Session,从而实现跨请求的状态保持。
Cookies 和 Session 在 Django 中使用示例
基本操作
建议先了解基本操作;
获取 cookie
# 获取cookie方法一:可以获取指定键名的cookie–(一般情况下使用方法一即可)
request.COOKIES['key']
# 获取cookie方法二:通过get方法(key值)可以获取指定键名的cookie
request.COOKIES.get('key')
# 获取cookie方法三:
request.get_signed_cookie(key, default=RAISE_ERROR, salt='', max_age=None)
# 方法参数
default: 默认值
salt: 加密盐
max_age: 后台控制过期时间,默认是秒数
expires: 专门针对IE浏览器设置超时时间
设置 cookie
# 1.先获取HttpResponse对象方法一:
# rep = HttpResponse(…)
rep = render(request, …)
# 2.设置 cookie方法一:(一般情况下使用方法一即可)
rep.set_cookie(key,value,…)
# 设置 cookie方法二:
rep.set_signed_cookie(key,value,salt='加密盐', max_age=None, …)
# 方法参数比较多
key, 键
value='', 值
max_age=None, 超时时间
expires=None, 超时时间(IE requires expires, so set it if hasn't been already.)
path='/', Cookie生效的路径,/ 表示根路径,特殊的:根路径的cookie可以被任何url的页面访问
domain=None, Cookie生效的域名
secure=False, 是否为https传输
httponly=False 只能http协议传输,无法被JavaScript获取(不是绝对,底层抓包可以获取到也可以被覆盖)
删除 cookie
# 1.先获取HttpResponse对象
# rep = HttpResponse(…)
rep = render(request, …)
# 2.删除 cookie
rep.delete_cookie(key)
# 此方法会删除用户浏览器上之前设置的cookie值
Django 操作 session
1. 获取、设置、删除Session中数据
request.session['k1'] # 没有值会报错–获取方法1
request.session.get('k1',None)# 可以获取多组–获取方法2
request.session['k1'] = 123# 可以设置多组–设置session
request.session.setdefault('k1',123) # 存在则不设置
del request.session['k1']
2. 所有 键、值、键值对(获取)
request.session.keys()
request.session.values()
request.session.items()
request.session.iterkeys()
request.session.itervalues()
request.session.iteritems()
3. 会话session的key
request.session.session_key
4. 将所有Session失效日期小于当前日期的数据删除(清除session)
request.session.clear_expired()
5. 检查会话session的key在数据库中是否存在(在Django中,session有些信息会持久化存到数据库)
request.session.exists("session_key")
6. 删除当前会话的所有Session数据
request.session.delete()# 只删客户端
7. 删除当前的会话数据并删除会话的Cookie。(两种方法都是清空)
request.session.flush() # 服务端、客户端都删
这用于确保前面的会话数据不可以再次被用户的浏览器访问
例如,django.contrib.auth.logout() 函数中就会调用它。
8. 设置会话Session和Cookie的超时时间
'django默认的session失效时间是14天'
request.session.set_expiry(value)
* 如果value是个整数,session会在些秒数后失效。
* 如果value是个datatime或timedelta,session就会在这个时间后失效。
* 如果value是0,用户关闭浏览器session就会失效。
* 如果value是None,session会依赖全局session失效策略。
实例说明
11、在项目“templates”目录文件路径下新建一个名称为“login”的 HTML 文件,输入以下内容;
<!DOCTYPE html>
<html lang="en">
<head>
<meta charset="UTF-8">
<title>login登录页面</title>
</head>
<body>
<form action="/login" method="post">
{% csrf_token %}
<table>
<tr>
<th>login用户登录</th>
</tr>
<tr>
<td>用户名:</td>
<td><input type="text" name="user_name"></td>
</tr>
<tr>
<td>密码:</td>
<td><input type="password" name="pwd"></td>
</tr>
<tr>
<td>
<input type="submit" value="提交">
</td>
</tr>
<tr>
<td colspan="2"><font color="red">{{ error_info }}</font></td>
</tr>
</table>
</form>
</body>
</html>
12、在项目“templates”目录文件路径下新建一个名称为“main”的 HTML 文件,输入以下内容;
<!DOCTYPE html>
<html lang="en">
<head>
<meta charset="UTF-8">
<title>login主页面</title>
</head>
<body>
欢迎‘指定用户(当前登录用户)’,网页级联方式获取session:{{ request.session.currentUserName }}
</body>
</html>
13、 修改“djangoProject”项目“helloWorld”应用下的“views.py ”配置文件内容,新增定义 to_login(跳转到登录页面) 函数方法和 login(登录到主页面) 方法;
# 导包
from django.http import HttpResponse, HttpResponseNotFound, JsonResponse, StreamingHttpResponse, FileResponse
from django.shortcuts import render, redirect
# Create your views here.
# 自定义一个index方法,里面要加上request请求对象
def index(request):
# 修改“index”函数方法,修改 index 跳转目标为新建的http.html
return render(request, 'http.html')
# 定义index_id方法,里面第一个参数request请求对象,第二个参数 id
def index_id(request, id):
# 判断 id是否为0
if id == 0:
# 导包引入redirect模块,如果id等于0的话,重定向到一个目标静态地址
return redirect("/static/error.html")
else:
# 使用HttpResponse直接返回内容–因为id是int类型,里面得使用str()进行转换
return HttpResponse("id是" + str(id) + "的某某平台系统页面")
# 定义index_id方法,第一个参数request请求对象,里面继续跟多个路由变量“year, month, day, id”
def index_id02(request, year, month, day, id):
# 使用HttpResponse直接返回内容–因为id是int类型,里面得使用str()进行转换
return HttpResponse(str(year) + "/" + str(month) + "/" + str(day) + "/" +"id是" + str(id) + "的某某平台系统页面")
# 定义index_id方法,第一个参数request请求对象,后面跟多个路由变量“year, month, day”–注意,使用正则后不能与“id”再混合使用了
def index_id03(request, year, month, day):
# 使用HttpResponse直接返回内容–因为id是int类型,里面得使用str()进行转换
return HttpResponse(str(year) + '/' + str(month) + '/' + str(day) + "使用正则路由后的某某平台系统页面")
# 定义目标文件路径
file_path = "D:\\\\works\\\\djangoProject\\\\datas\\\\IDM.rar"
# 定义download_file1下载方法,请求需要带上request(所有的请求都要带上request)
def download_file1(request):
# 定义文件–使用open函数方法以“rb”二进制读取模式打开文件–然后返回一个file文件对象
file = open(file_path, 'rb')
# 创建构造好了HttpResponse对象之后返回给response
response = HttpResponse(file)
# 指定文件类型
response['Content-Type'] = 'application/rar-compressed'
# 扩展–指定附件及文件名字(可以动态拼接filename,并不建议使用原始名称)
response['Content-Disposition'] = 'attachment; filename=file1.rar'
return response
def download_file2(request):
file = open(file_path, 'rb')
# 创建构造好了StreamingHttpResponse对象之后返回给response
response = StreamingHttpResponse(file)
response['Content-Type'] = 'application/rar-compressed'
response['Content-Disposition'] = 'attachment; filename=file2.rar'
return response
def download_file3(request):
file = open(file_path, 'rb')
# 创建构造好了FileResponse对象之后返回给response
response = FileResponse(file)
response['Content-Type'] = 'application/rar-compressed'
response['Content-Disposition'] = 'attachment; filename=file3.rar'
return response
def get_test(request):
"""
get 请求测试
:param request:
:return:
"""
print(f'打印请求方式request.method:{request.method}')
print(f'打印常用属性request.content_type:{request.content_type}')
print(f'打印常用属性request.content_params:{request.content_params}')
print(f'打印常用属性request.COOKIES:{request.COOKIES}')
print(f'打印常用属性request.scheme:{request.scheme}')
print(f'打印常用方法request.is_secure:{request.is_secure()}')
print(f'打印常用方法request.get_host:{request.get_host()}')
print(f'打印常用方法request.get_full_path:{request.get_full_path()}')
print(f'使用request.GET.get("name")方法获取对应key值参数:{request.GET.get("name")}' )
print(f'使用request.GET.get("pwd")方法获取对应key值参数:{request.GET.get("pwd")}')
print(f'使用request.GET.get("dev")方法获取不存在的参数,返回值是‘None’:{request.GET.get("dev")}')
print(f'request.GET.get("prod", "555")获取的prod参数是不存在的,设置返回值‘555’:{request.GET.get("prod", "555")}')
return HttpResponse("hello world!http get ok!")
def post_test(request):
"""
post 请求测试方法
:param request:
:return:
"""
print(f'打印请求方式request.method:{request.method}')
print(f'使用request.POST.get("name")方法获取对应key值参数:{request.POST.get("name")}')
print(f'使用request.POST.get("pwd")方法获取对应key值参数:{request.POST.get("pwd")}')
print(f'使用request.POST.get("dev")方法获取不存在的参数,返回值是‘None’:{request.POST.get("dev")}')
print(f'request.POST.get("prod", "556")获取的prod参数是不存在的,设置返回值‘556’:{request.POST.get("prod", "556")}')
return HttpResponse("hello world!http post ok!")
def to_login(request):
"""
跳转到登录页面
:param request:
:return:
"""
# 跳转到登录页面可直接使用渲染render()方法
return render(request, 'login.html')
def login(request):
"""
登录到主页面
:param request:
:return:
"""
return render(request, 'main.html')
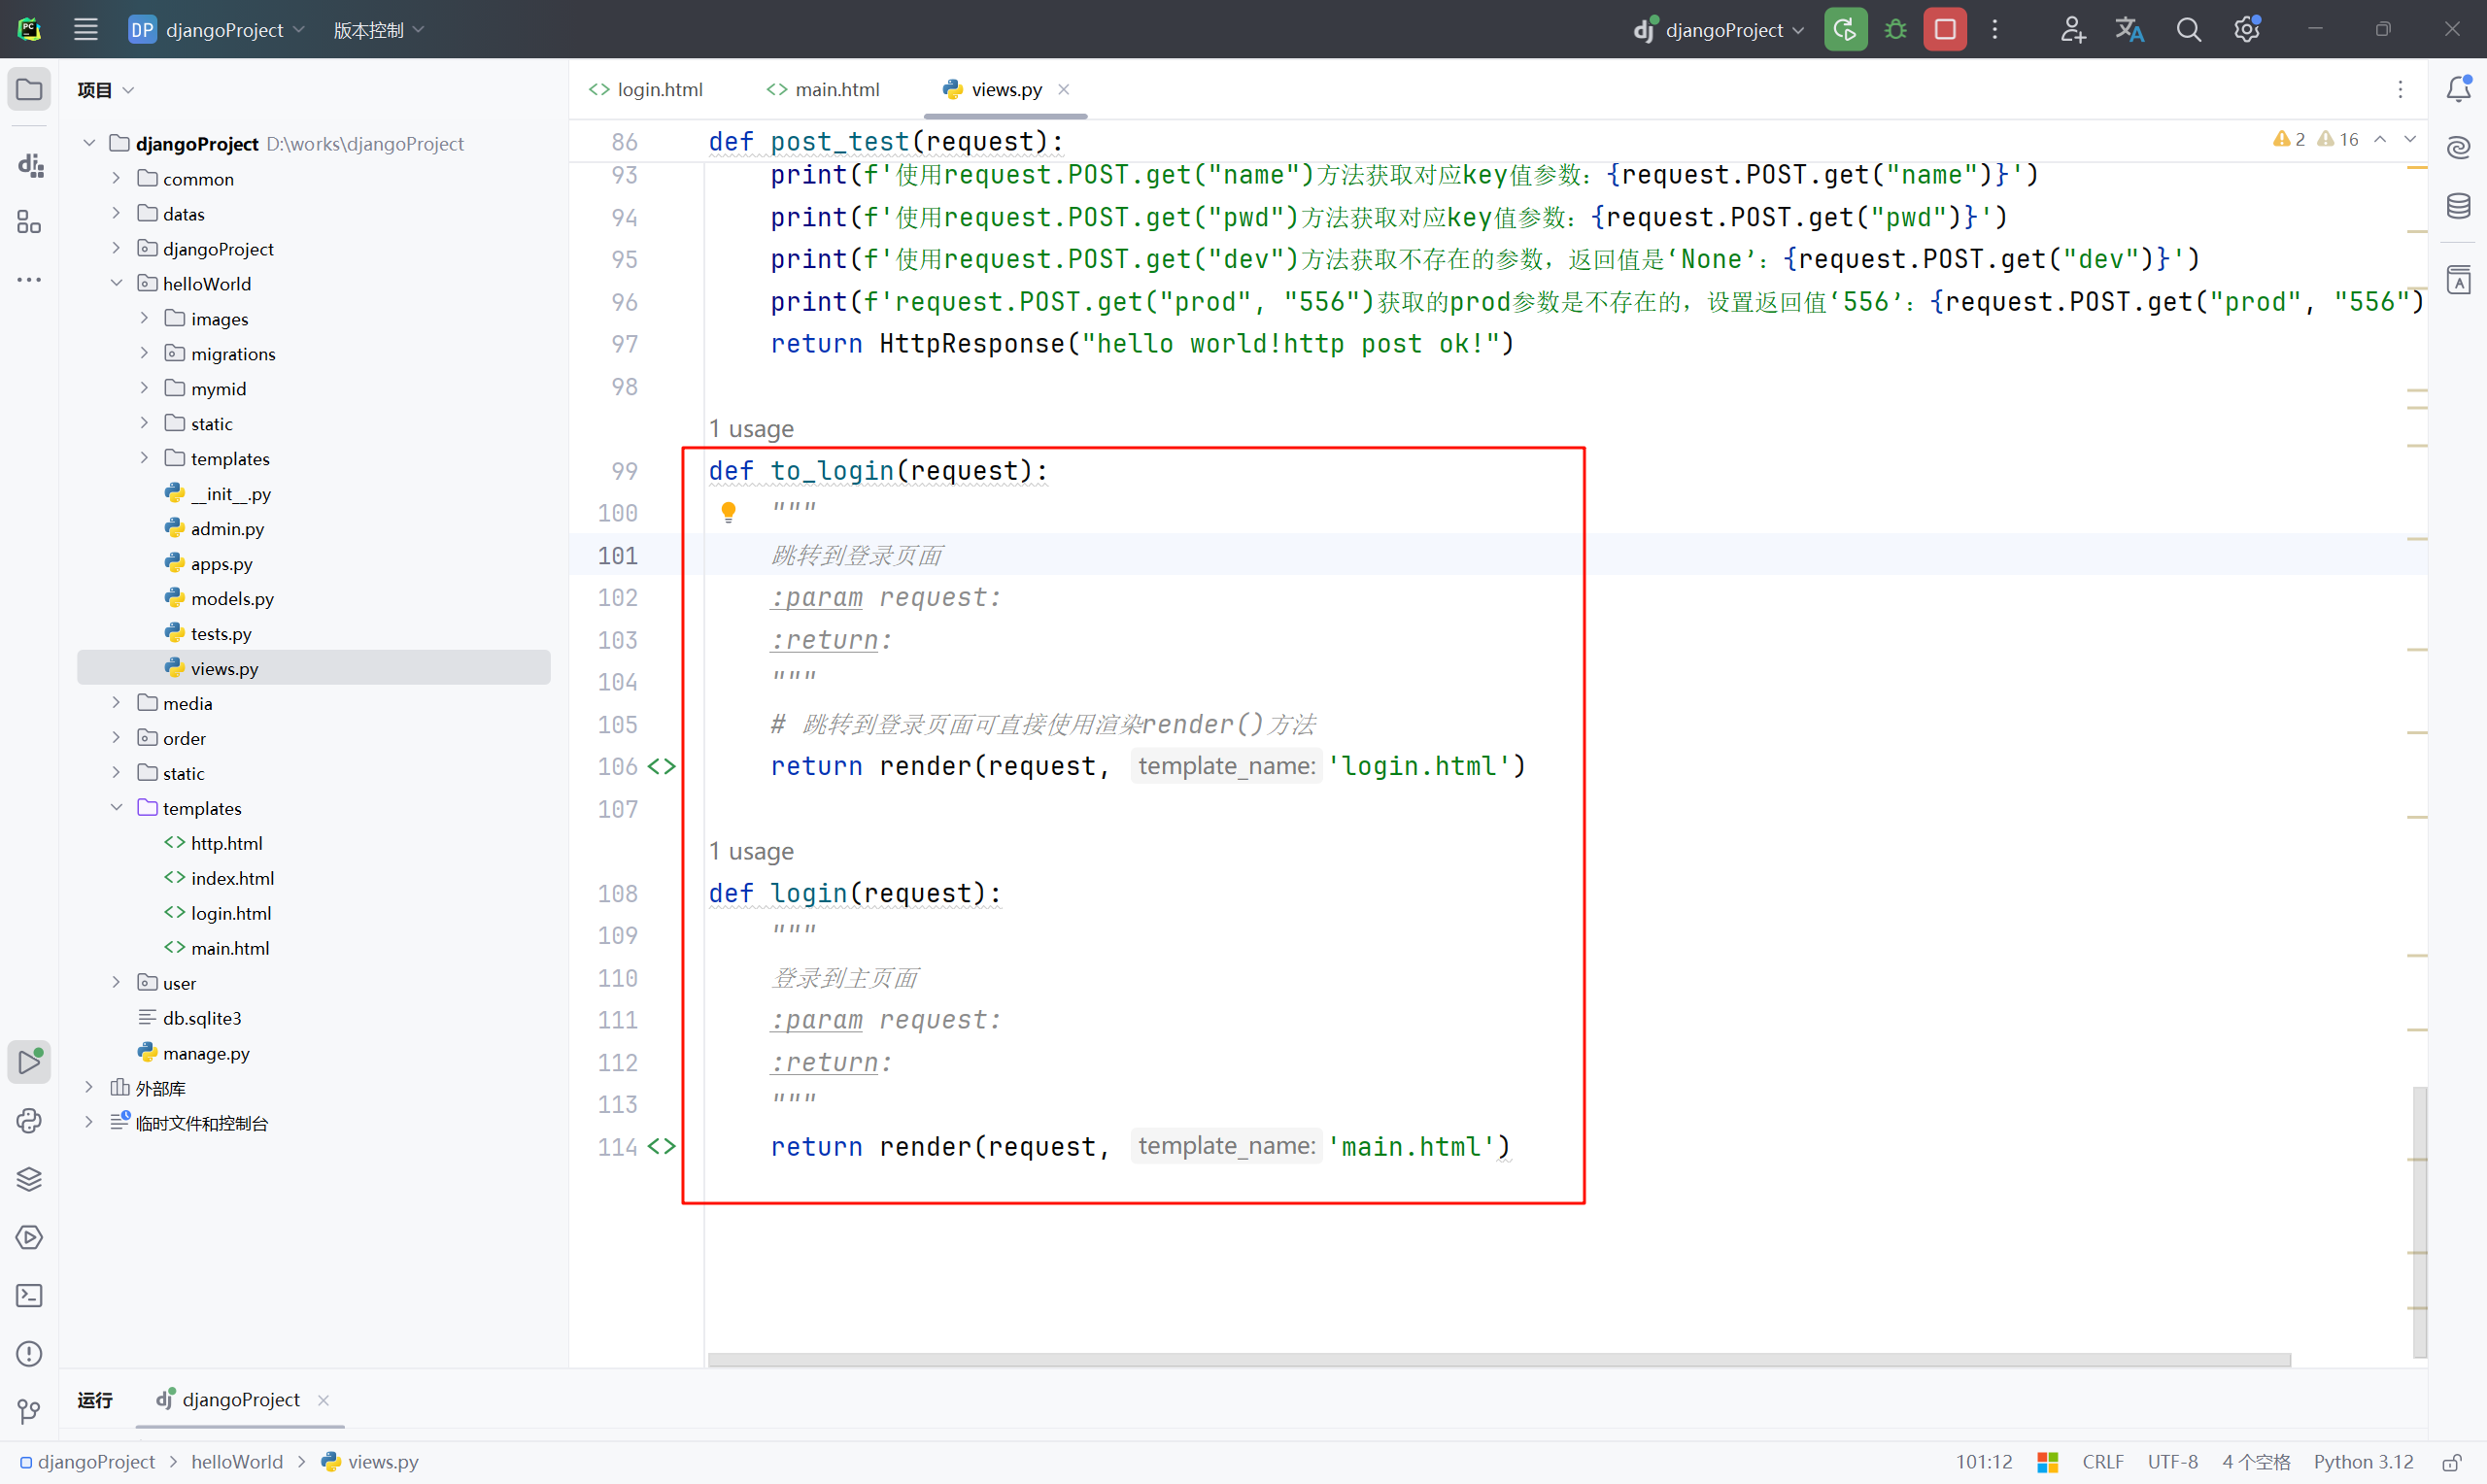
14、修改“djangoProject”应用下的“urls.py ”配置文件内容,配置定义映射关系;
"""
URL configuration for djangoProject project.
The `urlpatterns` list routes URLs to views. For more information please see:
https://docs.djangoproject.com/en/5.0/topics/http/urls/
Examples:
Function views
1. Add an import: from my_app import views
2. Add a URL to urlpatterns: path('', views.home, name='home')
Class-based views
1. Add an import: from other_app.views import Home
2. Add a URL to urlpatterns: path('', Home.as_view(), name='home')
Including another URLconf
1. Import the include() function: from django.urls import include, path
2. Add a URL to urlpatterns: path('blog/', include('blog.urls'))
"""
from django.conf import settings
from django.contrib import admin
from django.urls import path, re_path, include
from django.views.generic import RedirectView
from django.views.static import serve
import helloWorld.views
urlpatterns = [
path('admin/', admin.site.urls),
# 可直接复制上面“admin”,把“admin”修改为“index”;后面是跟的“处理函数helloWorld.views.index”
# 是helloWorld应用的views里面的index()–引入helloWorld.views,记得index后不能加小括号,因为传入的是对象;
path('index/', helloWorld.views.index),
# 要是请求“redirectTo”这个请求的话给重定向到“index”–重定向使用RedirectView.as_view(),里面使用关键词参数url
path('redirectTo', RedirectView.as_view(url="index/")),
# 自定义名称,例如叫“index_id/”,后面再跟上某网页id;<int:id> int指定类型,路由变量为id;对应对应的路由映射
path('index_id/<int:id>', helloWorld.views.index_id),
# 多个路由变量
path('index_id02/<int:year>/<int:month>/<int:day>/<int:id>', helloWorld.views.index_id02),
# 正则表达式匹配是必须使用re_path方法,正则表达式“?P”开头是固定格式
re_path('index_id03/(?P<year>[0-9]{4})/(?P<month>[0-9]{2})/(?P<day>[0-9]{2})', helloWorld.views.index_id03),
# 配置媒体文件的路由地址
re_path('media/(?P<path>.*)', serve, {'document_root': settings.MEDIA_ROOT}, name='media'),
# 命名空间namespace–比如说是“user/”开头的,第一个参数include(),第二个参数namespace
# 导包引入include模块,include()里面也有两个参数,第一个是指定user的urls,第二个是项目名;
path('user/', include(('user.urls', 'user'), namespace='user')),
path('order/', include(('order.urls', 'order'), namespace='order')),
# 配置 download_file
path('download1/', helloWorld.views.download_file1),
path('download2/', helloWorld.views.download_file2),
path('download3/', helloWorld.views.download_file3),
path('get', helloWorld.views.get_test),
path('post', helloWorld.views.post_test),
path('toLogin/', helloWorld.views.to_login),
path('login', helloWorld.views.login)
]
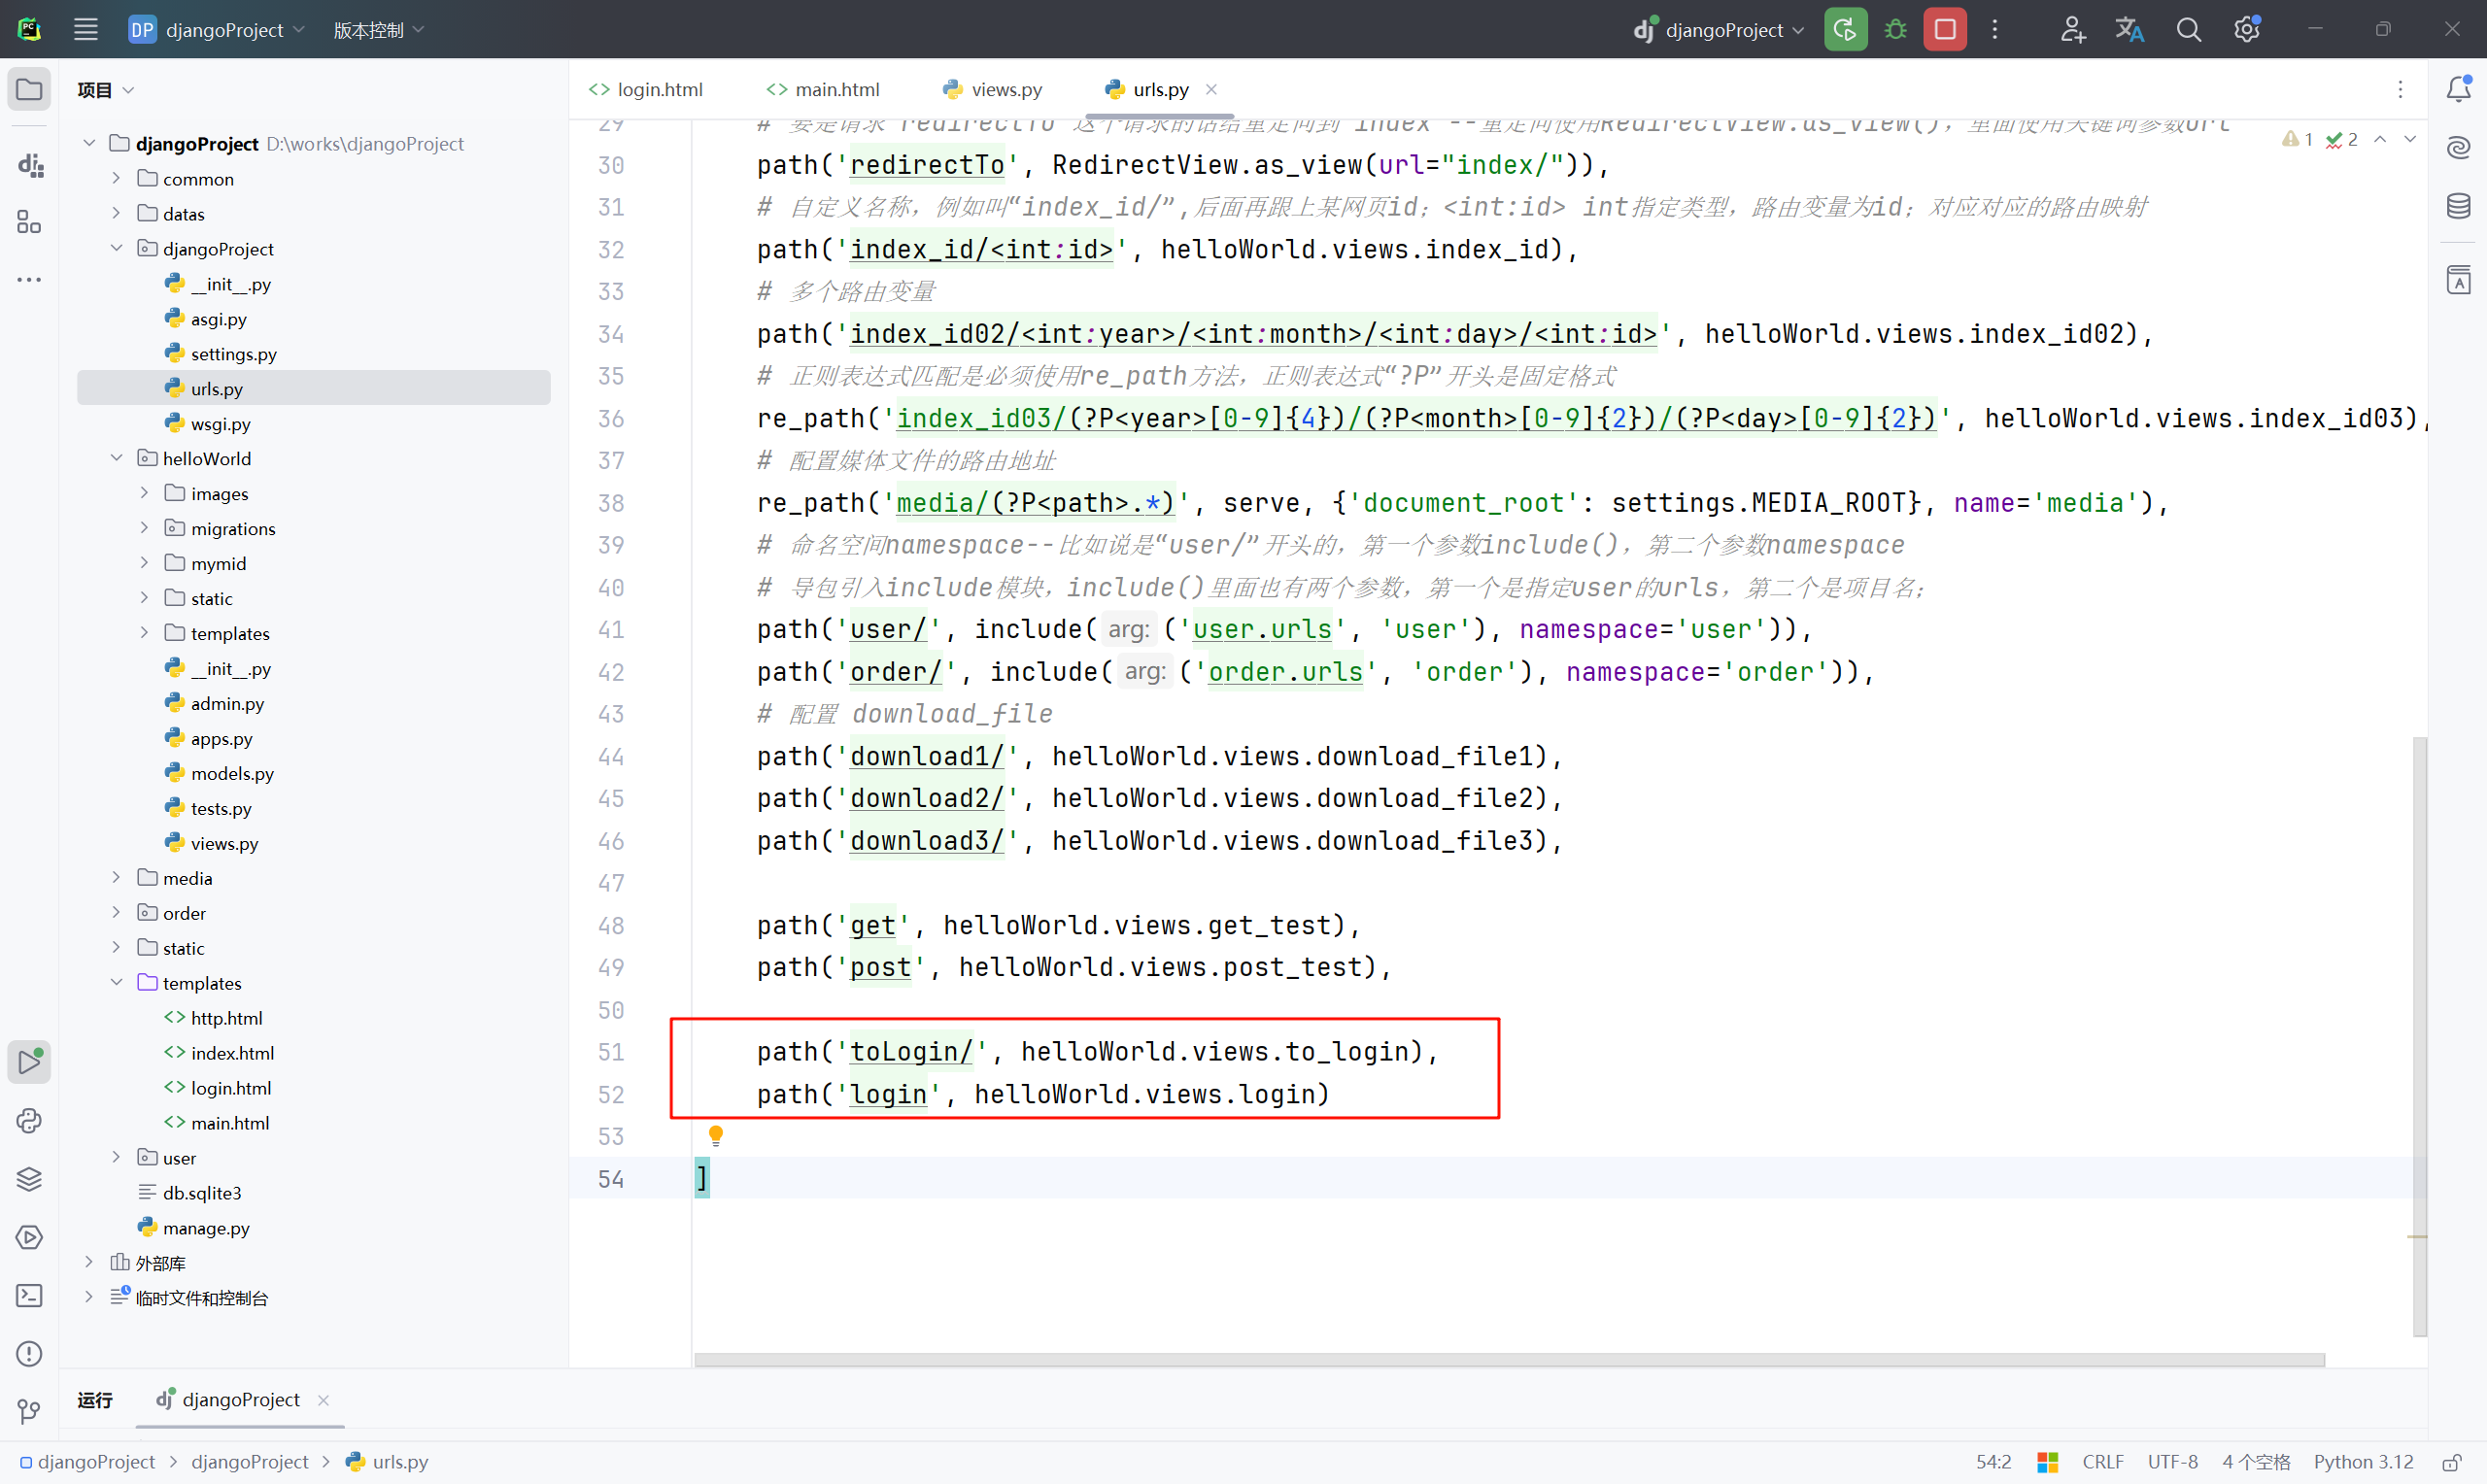
15、运行项目测试验证,浏览器输入“http://127.0.0.1:8000/toLogin/”测试查看,输入账号密码,实际上可直接点击“提交”按钮;这里是直接点击的提交按钮,建议手动输入账号密码;

16、修改“djangoProject”项目“helloWorld”应用下的“views.py ”配置文件内容,修改 login 方法;
# 导包
from django.http import HttpResponse, HttpResponseNotFound, JsonResponse, StreamingHttpResponse, FileResponse
from django.shortcuts import render, redirect
# Create your views here.
# 自定义一个index方法,里面要加上request请求对象
def index(request):
# 修改“index”函数方法,修改 index 跳转目标为新建的http.html
return render(request, 'http.html')
# 定义index_id方法,里面第一个参数request请求对象,第二个参数 id
def index_id(request, id):
# 判断 id是否为0
if id == 0:
# 导包引入redirect模块,如果id等于0的话,重定向到一个目标静态地址
return redirect("/static/error.html")
else:
# 使用HttpResponse直接返回内容–因为id是int类型,里面得使用str()进行转换
return HttpResponse("id是" + str(id) + "的某某平台系统页面")
# 定义index_id方法,第一个参数request请求对象,里面继续跟多个路由变量“year, month, day, id”
def index_id02(request, year, month, day, id):
# 使用HttpResponse直接返回内容–因为id是int类型,里面得使用str()进行转换
return HttpResponse(str(year) + "/" + str(month) + "/" + str(day) + "/" +"id是" + str(id) + "的某某平台系统页面")
# 定义index_id方法,第一个参数request请求对象,后面跟多个路由变量“year, month, day”–注意,使用正则后不能与“id”再混合使用了
def index_id03(request, year, month, day):
# 使用HttpResponse直接返回内容–因为id是int类型,里面得使用str()进行转换
return HttpResponse(str(year) + '/' + str(month) + '/' + str(day) + "使用正则路由后的某某平台系统页面")
# 定义目标文件路径
file_path = "D:\\\\works\\\\djangoProject\\\\datas\\\\IDM.rar"
# 定义download_file1下载方法,请求需要带上request(所有的请求都要带上request)
def download_file1(request):
# 定义文件–使用open函数方法以“rb”二进制读取模式打开文件–然后返回一个file文件对象
file = open(file_path, 'rb')
# 创建构造好了HttpResponse对象之后返回给response
response = HttpResponse(file)
# 指定文件类型
response['Content-Type'] = 'application/rar-compressed'
# 扩展–指定附件及文件名字(可以动态拼接filename,并不建议使用原始名称)
response['Content-Disposition'] = 'attachment; filename=file1.rar'
return response
def download_file2(request):
file = open(file_path, 'rb')
# 创建构造好了StreamingHttpResponse对象之后返回给response
response = StreamingHttpResponse(file)
response['Content-Type'] = 'application/rar-compressed'
response['Content-Disposition'] = 'attachment; filename=file2.rar'
return response
def download_file3(request):
file = open(file_path, 'rb')
# 创建构造好了FileResponse对象之后返回给response
response = FileResponse(file)
response['Content-Type'] = 'application/rar-compressed'
response['Content-Disposition'] = 'attachment; filename=file3.rar'
return response
def get_test(request):
"""
get 请求测试
:param request:
:return:
"""
print(f'打印请求方式request.method:{request.method}')
print(f'打印常用属性request.content_type:{request.content_type}')
print(f'打印常用属性request.content_params:{request.content_params}')
print(f'打印常用属性request.COOKIES:{request.COOKIES}')
print(f'打印常用属性request.scheme:{request.scheme}')
print(f'打印常用方法request.is_secure:{request.is_secure()}')
print(f'打印常用方法request.get_host:{request.get_host()}')
print(f'打印常用方法request.get_full_path:{request.get_full_path()}')
print(f'使用request.GET.get("name")方法获取对应key值参数:{request.GET.get("name")}' )
print(f'使用request.GET.get("pwd")方法获取对应key值参数:{request.GET.get("pwd")}')
print(f'使用request.GET.get("dev")方法获取不存在的参数,返回值是‘None’:{request.GET.get("dev")}')
print(f'request.GET.get("prod", "555")获取的prod参数是不存在的,设置返回值‘555’:{request.GET.get("prod", "555")}')
return HttpResponse("hello world!http get ok!")
def post_test(request):
"""
post 请求测试方法
:param request:
:return:
"""
print(f'打印请求方式request.method:{request.method}')
print(f'使用request.POST.get("name")方法获取对应key值参数:{request.POST.get("name")}')
print(f'使用request.POST.get("pwd")方法获取对应key值参数:{request.POST.get("pwd")}')
print(f'使用request.POST.get("dev")方法获取不存在的参数,返回值是‘None’:{request.POST.get("dev")}')
print(f'request.POST.get("prod", "556")获取的prod参数是不存在的,设置返回值‘556’:{request.POST.get("prod", "556")}')
return HttpResponse("hello world!http post ok!")
def to_login(request):
"""
跳转到登录页面
:param request:
:return:
"""
# 跳转到登录页面可直接使用渲染render()方法
return render(request, 'login.html')
def login(request):
"""
登录到主页面
:param request:
:return:
"""
# 首先获取用户名和密码
user_name = request.POST.get('user_name')
pwd = request.POST.get('pwd')
# 模拟用户登录(暂不连接数据库)
if user_name == "python3" and pwd == "123456":
return render(request, 'main.html')
else:
# 定义变量content_value为报错提示信息,里面是键值对格式的对象
content_value = {"error_info":"用户名或者密码错误!"}
return render(request, 'login.html', context=content_value)

17、浏览器输入“http://127.0.0.1:8000/toLogin/”,手动输入非“python3”的用户名和非“123456”的密码,输入错误的用户名密码,再点击“提交”按钮;

18、继续修改“djangoProject”项目“helloWorld”应用下的“views.py ”配置文件内容,修改 login 方法;
def login(request):
"""
登录到主页面
:param request:
:return:
"""
# 首先获取用户名和密码
user_name = request.POST.get('user_name')
pwd = request.POST.get('pwd')
# 模拟用户登录(暂不连接数据库)
if user_name == "python3" and pwd == "123456":
# session中存一个用户名
request.session['currentUserName'] = user_name
return render(request, 'main.html')
else:
# 定义变量content_value为报错提示信息,里面是键值对格式的对象
content_value = {"error_info":"用户名或者密码错误!"}
return render(request, 'login.html', context=content_value)
19、浏览器输入“http://127.0.0.1:8000/toLogin/”,手动输入用户名“python3”和密码“123456”,输入正确的用户名密码,点击“提交”按钮;测试验证携带错误信息参数,转发到登录页面,页面提示错误信息;输入一个正确的用户名和密码,则转发到main.html主页面;

20、最后修改“djangoProject”项目“helloWorld”应用下的“views.py ”配置文件内容,修改 login 方法,设置cookie;
def login(request):
"""
登录到主页面
:param request:
:return:
"""
# 首先获取用户名和密码
user_name = request.POST.get('user_name')
pwd = request.POST.get('pwd')
# 模拟用户登录(暂不连接数据库)
if user_name == "python3" and pwd == "123456":
# session中存一个用户名
request.session['currentUserName'] = user_name
print(f'代码脚本中session获取:{request.session['currentUserName']}')
# 获取HttpResponse
response = render(request, 'main.html')
# 通过response.set_Cookie()方法来设置cookie
response.set_Cookie('remember_me', True)
return response
else:
# 定义变量content_value为报错提示信息,里面是键值对格式的对象
content_value = {"error_info":"用户名或者密码错误!"}
return render(request, 'login.html', context=content_value)
21、浏览器输入“http://127.0.0.1:8000/toLogin/”,手动输入用户名“python3”和密码“123456”,输入正确的用户名密码,点击“提交”按钮;测试验证查看能不能再带回一个 cookie 值;测试可知,服务器会同时返回set-cookies信息,包括内置的sessionid以及自己设置的remember_me;

Django 中的 Session 配置
其实 Django 在存 session 的时候,有个 Django 的 session 在“django_session”数据库表中,它还会持久化把“session_key”存到数据库里面去;

在项目配置文件 settings.py 中的“APPS”列表里面有一个专门的配置,是专门用来做session 处理的;

session 还有许多的默认配置(仅供参考),其中有个默认的数据库,不过现在已经有了,因为之前已经配置过了“db_django5”数据库;
1. 数据库Session
# 引擎(默认)
SESSION_ENGINE = 'django.contrib.sessions.backends.db'
2. 缓存Session
# 引擎
SESSION_ENGINE = 'django.contrib.sessions.backends.cache'
# 使用的缓存别名(默认内存缓存,也可以是memcache),此处别名依赖缓存的设置
SESSION_CACHE_ALIAS = 'default'
3. 文件Session
# 引擎
SESSION_ENGINE = 'django.contrib.sessions.backends.file'
# 缓存文件路径,如果为None,则使用tempfile模块获取一个临时地址tempfile.gettempdir()
SESSION_FILE_PATH = None
4. 缓存+数据库
# 引擎
SESSION_ENGINE = 'django.contrib.sessions.backends.cached_db'
5. 加密Cookie Session
# 引擎
SESSION_ENGINE = 'django.contrib.sessions.backends.signed_cookies'
其他公用设置项:
# Session的cookie保存在浏览器上时的key,即:sessionid=随机字符串(默认)
SESSION_COOKIE_NAME = "sessionid" # 一般所有的技术语言都叫sessionid,可自行设置
SESSION_COOKIE_PATH = "/" # Session的cookie保存的路径(默认)
SESSION_COOKIE_DOMAIN = None # Session的cookie保存的域名(默认)
SESSION_COOKIE_SECURE = False # 是否Https传输cookie(默认)
SESSION_COOKIE_HTTPONLY = True # 是否Session的cookie只支持http传输(默认)
SESSION_COOKIE_AGE = 1209600 # Session的cookie失效日期(2周)(默认)
SESSION_EXPIRE_AT_BROWSER_CLOSE = False # 是否关闭浏览器使得Session过期(默认)
SESSION_SAVE_EVERY_REQUEST = False # 是否每次请求都保存Session,默认修改之后才保存(默认)
Django 文件上传实现
文件上传功能是网站开发或者业务系统常见的功能之一,例如上传图片(用户头像或文章配图)和导入文件(压缩包,视频,音乐);无论上传的文件是什么格式的,其上传原理都是将文件以二进制的数据格式读取并写入网站或者业务系统指定的目录里。
文件上传实例
22、首先,在项目“templates”目录文件路径下新建一个名称为“upload”的 HTML 文件,输入以下内容;这里为什么使用静态文件呢?因为需要使用“csrf_token”的,所以需要使用模板;
<!DOCTYPE html>
<html lang="en">
<head>
<meta charset="UTF-8">
<title>upload文件上传</title>
</head>
<body>
<form action="/upload" enctype="multipart/form-data" method="post">
{% csrf_token %}
<input type="file" name="myfile"><br><br>
<input type="submit" value="上传文件">
</form>
</body>
</html>

23、修改“djangoProject”项目“helloWorld”应用下的“views.py ”配置文件内容,新增定义 to_upload(跳转到文件上传页面) 函数方法和 upload(上传文件处理) 方法;文件上传路径烦请自定义创建(例如:在项目datas路径下新建一个名称为“myFile”的目录文件);
# 导包
import os
from django.http import HttpResponse, HttpResponseNotFound, JsonResponse, StreamingHttpResponse, FileResponse
from django.shortcuts import render, redirect
# Create your views here.
# 自定义一个index方法,里面要加上request请求对象
def index(request):
# 修改“index”函数方法,修改 index 跳转目标为新建的http.html
return render(request, 'http.html')
# 定义index_id方法,里面第一个参数request请求对象,第二个参数 id
def index_id(request, id):
# 判断 id是否为0
if id == 0:
# 导包引入redirect模块,如果id等于0的话,重定向到一个目标静态地址
return redirect("/static/error.html")
else:
# 使用HttpResponse直接返回内容–因为id是int类型,里面得使用str()进行转换
return HttpResponse("id是" + str(id) + "的某某平台系统页面")
# 定义index_id方法,第一个参数request请求对象,里面继续跟多个路由变量“year, month, day, id”
def index_id02(request, year, month, day, id):
# 使用HttpResponse直接返回内容–因为id是int类型,里面得使用str()进行转换
return HttpResponse(str(year) + "/" + str(month) + "/" + str(day) + "/" +"id是" + str(id) + "的某某平台系统页面")
# 定义index_id方法,第一个参数request请求对象,后面跟多个路由变量“year, month, day”–注意,使用正则后不能与“id”再混合使用了
def index_id03(request, year, month, day):
# 使用HttpResponse直接返回内容–因为id是int类型,里面得使用str()进行转换
return HttpResponse(str(year) + '/' + str(month) + '/' + str(day) + "使用正则路由后的某某平台系统页面")
# 定义目标文件路径
file_path = "D:\\\\works\\\\djangoProject\\\\datas\\\\IDM.rar"
# 定义download_file1下载方法,请求需要带上request(所有的请求都要带上request)
def download_file1(request):
# 定义文件–使用open函数方法以“rb”二进制读取模式打开文件–然后返回一个file文件对象
file = open(file_path, 'rb')
# 创建构造好了HttpResponse对象之后返回给response
response = HttpResponse(file)
# 指定文件类型
response['Content-Type'] = 'application/rar-compressed'
# 扩展–指定附件及文件名字(可以动态拼接filename,并不建议使用原始名称)
response['Content-Disposition'] = 'attachment; filename=file1.rar'
return response
def download_file2(request):
file = open(file_path, 'rb')
# 创建构造好了StreamingHttpResponse对象之后返回给response
response = StreamingHttpResponse(file)
response['Content-Type'] = 'application/rar-compressed'
response['Content-Disposition'] = 'attachment; filename=file2.rar'
return response
def download_file3(request):
file = open(file_path, 'rb')
# 创建构造好了FileResponse对象之后返回给response
response = FileResponse(file)
response['Content-Type'] = 'application/rar-compressed'
response['Content-Disposition'] = 'attachment; filename=file3.rar'
return response
def get_test(request):
"""
get 请求测试
:param request:
:return:
"""
print(f'打印请求方式request.method:{request.method}')
print(f'打印常用属性request.content_type:{request.content_type}')
print(f'打印常用属性request.content_params:{request.content_params}')
print(f'打印常用属性request.COOKIES:{request.COOKIES}')
print(f'打印常用属性request.scheme:{request.scheme}')
print(f'打印常用方法request.is_secure:{request.is_secure()}')
print(f'打印常用方法request.get_host:{request.get_host()}')
print(f'打印常用方法request.get_full_path:{request.get_full_path()}')
print(f'使用request.GET.get("name")方法获取对应key值参数:{request.GET.get("name")}' )
print(f'使用request.GET.get("pwd")方法获取对应key值参数:{request.GET.get("pwd")}')
print(f'使用request.GET.get("dev")方法获取不存在的参数,返回值是‘None’:{request.GET.get("dev")}')
print(f'request.GET.get("prod", "555")获取的prod参数是不存在的,设置返回值‘555’:{request.GET.get("prod", "555")}')
return HttpResponse("hello world!http get ok!")
def post_test(request):
"""
post 请求测试方法
:param request:
:return:
"""
print(f'打印请求方式request.method:{request.method}')
print(f'使用request.POST.get("name")方法获取对应key值参数:{request.POST.get("name")}')
print(f'使用request.POST.get("pwd")方法获取对应key值参数:{request.POST.get("pwd")}')
print(f'使用request.POST.get("dev")方法获取不存在的参数,返回值是‘None’:{request.POST.get("dev")}')
print(f'request.POST.get("prod", "556")获取的prod参数是不存在的,设置返回值‘556’:{request.POST.get("prod", "556")}')
return HttpResponse("hello world!http post ok!")
def to_login(request):
"""
跳转到登录页面
:param request:
:return:
"""
# 跳转到登录页面可直接使用渲染render()方法
return render(request, 'login.html')
def login(request):
"""
登录到主页面
:param request:
:return:
"""
# 首先获取用户名和密码
user_name = request.POST.get('user_name')
pwd = request.POST.get('pwd')
# 模拟用户登录(暂不连接数据库)
if user_name == "python3" and pwd == "123456":
# session中存一个用户名
request.session['currentUserName'] = user_name
print(f'代码脚本中session获取:{request.session['currentUserName']}')
# 获取HttpResponse
response = render(request, 'main.html')
# 通过response.set_Cookie()方法来设置cookie
response.set_cookie('remember_me', True)
return response
else:
# 定义变量content_value为报错提示信息,里面是键值对格式的对象
content_value = {"error_info":"用户名或者密码错误!"}
return render(request, 'login.html', context=content_value)
def to_upload(request):
"""
跳转到上传文件页面
:param request:
:return:
"""
return render(request, 'upload.html')
def upload(request):
"""
上传文件处理
:param request:
:return:
"""
# 获取上传的文件,如果没有文件,就默认为None(如果不写指定的None,也是默认None)
myFile = request.FILES.get("myfile", None)
# 判断如果是有myFile的情况,就是说明有文件
if myFile:
# 打开特定的文件进行二进制的写操作–上传文件路径烦请自行创建(例如:在项目datas路径下新建“myFile”目录文件)
f = open(os.path.join("D:\\\\works\\\\djangoProject\\\\datas\\\\myFile", myFile.name), "wb+")
# 分块写入文件
for chunk in myFile.chunks():
f.write(chunk)
f.close()
return HttpResponse("文件上传成功!")
else:
return HttpResponse("没有发现可以上传的文件!")

24、修改“djangoProject”应用下的“urls.py ”配置文件内容,配置定义映射关系;
"""
URL configuration for djangoProject project.
The `urlpatterns` list routes URLs to views. For more information please see:
https://docs.djangoproject.com/en/5.0/topics/http/urls/
Examples:
Function views
1. Add an import: from my_app import views
2. Add a URL to urlpatterns: path('', views.home, name='home')
Class-based views
1. Add an import: from other_app.views import Home
2. Add a URL to urlpatterns: path('', Home.as_view(), name='home')
Including another URLconf
1. Import the include() function: from django.urls import include, path
2. Add a URL to urlpatterns: path('blog/', include('blog.urls'))
"""
from django.conf import settings
from django.contrib import admin
from django.urls import path, re_path, include
from django.views.generic import RedirectView
from django.views.static import serve
import helloWorld.views
urlpatterns = [
path('admin/', admin.site.urls),
# 可直接复制上面“admin”,把“admin”修改为“index”;后面是跟的“处理函数helloWorld.views.index”
# 是helloWorld应用的views里面的index()–引入helloWorld.views,记得index后不能加小括号,因为传入的是对象;
path('index/', helloWorld.views.index),
# 要是请求“redirectTo”这个请求的话给重定向到“index”–重定向使用RedirectView.as_view(),里面使用关键词参数url
path('redirectTo', RedirectView.as_view(url="index/")),
# 自定义名称,例如叫“index_id/”,后面再跟上某网页id;<int:id> int指定类型,路由变量为id;对应对应的路由映射
path('index_id/<int:id>', helloWorld.views.index_id),
# 多个路由变量
path('index_id02/<int:year>/<int:month>/<int:day>/<int:id>', helloWorld.views.index_id02),
# 正则表达式匹配是必须使用re_path方法,正则表达式“?P”开头是固定格式
re_path('index_id03/(?P<year>[0-9]{4})/(?P<month>[0-9]{2})/(?P<day>[0-9]{2})', helloWorld.views.index_id03),
# 配置媒体文件的路由地址
re_path('media/(?P<path>.*)', serve, {'document_root': settings.MEDIA_ROOT}, name='media'),
# 命名空间namespace–比如说是“user/”开头的,第一个参数include(),第二个参数namespace
# 导包引入include模块,include()里面也有两个参数,第一个是指定user的urls,第二个是项目名;
path('user/', include(('user.urls', 'user'), namespace='user')),
path('order/', include(('order.urls', 'order'), namespace='order')),
# 配置 download_file
path('download1/', helloWorld.views.download_file1),
path('download2/', helloWorld.views.download_file2),
path('download3/', helloWorld.views.download_file3),
path('get', helloWorld.views.get_test),
path('post', helloWorld.views.post_test),
path('toLogin/', helloWorld.views.to_login),
path('login', helloWorld.views.login),
path('toUpload/', helloWorld.views.to_upload),
path('upload', helloWorld.views.upload)
]

25、运行项目测试验证,浏览器输入“http://127.0.0.1:8000/toUpload/”打开进入文件上传页面,先选择文件,再点击上传文件按钮,经过测试查看,是能够上传到指定文件目录中的:

注意事项
目前使用到的是“myFile.name”文件名,但是在实际开发过程中,文件名称是要根据日期之类的重新命名的;
文件对象myFile提供一下属性来获取文件信息:
- myFile.name:获取上传文件的文件名,包含文件后缀名;
- myFile.size:获取上传文件的文件大小;
- myFile.content_type:获取文件类型,通过后续名判断文件类型;
从文件对象myFile获取文件内容,Django提供了以下读取方式:
- myFile.read():从文件对象里读取整个文件上传的数据,这个方法只适合小文件;较大文件容易出事,所以不太可取,不怎么推荐;
- myFile.chunks():按流式响应方式读取文件,在for 循环中进行迭代,将大文件分块写入服务器所指定的保存位置;效率比较高,一般大部分情况下推荐使用此种方式;
- myFile.multiple_chunks():判断文件对象的文件大小,返回True或者False,当文件大于2.5MB(默认值为2.5MB)时,该方法返回True,否则返回False;因此,可以根据该方法来选择选用read方法读取还是采用chunks方法。
未完待续……