感觉好多不会啊,还是要多学习啊!
首先我们需要在服务器上安装和配置好Anaconda或者Miniconda的环境,下面我们以miniconda为例子,我们可以先通过which conda命令来查看服务器是否安装了conda环境,如果没有,我们可以进行安装:
基本Conda环境:
1.下载和配置miniconda环境:
wget https://repo.anaconda.com/miniconda/Miniconda3-latest-Linux-x86_64.sh -O ~/miniconda.sh
bash ~/miniconda.sh -b -p ~/miniconda3
当然在下载之前,我们可以配置上清华大学的镜像源以加快下载速度,具体配置代码如下:
conda config –add channels https://mirrors.tuna.tsinghua.edu.cn/anaconda/pkgs/main
conda config –add channels https://mirrors.tuna.tsinghua.edu.cn/anaconda/pkgs/r
conda config –add channels https://mirrors.tuna.tsinghua.edu.cn/anaconda/pkgs/msys2
conda config –set show_channel_urls yes
2.初始化你的 bash:
source ~/miniconda3/etc/profile.d/conda.sh
conda init bash
3.退出并重新登录服务器或者执行以下命令刷新配置:
source ~/.bashrc
4.通过which conda检查是否生效。

这样就表明已经生效了,基本的conda环境就已经配置好了。
下面我们以yolov12模型为例,进行测试:
1.我们创建一个名为yolov12的虚拟环境并激活:
conda create -n yolov12 python=3.11 -y # -y 参数可以自动接受 ToS 和安装提示,不用手动同意
2.查看conda环境:
conda env list
# 或者
conda info –envs
3.确定好要使用的conda虚拟环境,就可以进行激活了。
conda activate yolov12
4.使用git克隆yolov12项目到服务器上去:
git clone https://github.com/sunsmarterjie/yolov12.git
这里很可能会出现一些问题:
fatal: 无法访问 'https://github.com/sunsmarterjie/yolov12.git/':GnuTLS recv error (-110): The TLS connection was non-properly terminated.
很可能是 服务器端的 Git 或 SSL 组件出了问题(比如 GnuTLS 版本旧、握手超时、SSL 配置不兼容),这时我们对服务器上的git进行更新,因为低版本的Git (Ubuntu 20.04 系统默认 2.25.1),仍然使用 GnuTLS 作为 HTTPS 底层库,而这个库在访问 GitHub 的 TLS 1.3 连接时容易出现上述这种问题。
# 1. 更新包源
sudo apt update
# 2. 查看 git 可用版本
apt list -a git
# 3. 安装最新版本(强制从 PPA)
sudo apt install -y git
# 4. 验证是否生效
git –version
再次进行clone命令。
另外一种可以加速下载速度的就是配置代理:
针对情况:代理在本地电脑上(而服务器访问不了外网)
方案一:
如果你用的是vscode remote ssh插件连接服务器的:
"remote.SSH.remoteForward": [
{ "localPort": 7890, "remotePort": 7890 }
]
4.这样本地 7890 端口会被转发到远程服务器的 7890 端口。 然后服务器上同样执行:
git config –global http.proxy http://127.0.0.1:7890
git config –global https.proxy http://127.0.0.1:7890
注意:本地的代理软件已打开全局模式或允许外部访问。
方案二:通过 SSH 动态代理(SOCKS 模式)
如果你用命令行登录服务器,可以这样转发本地代理:
ssh -D 7890 zxj@server_ip
然后在服务器上设置 Git 使用 SOCKS 代理:
git config –global http.proxy socks5h://127.0.0.1:7890
git config –global https.proxy socks5h://127.0.0.1:7890
这样所有 Git 流量会经由你的本地代理转发。
方案三:配置镜像源
pip install flash-attn –no-build-isolation -i https://pypi.tuna.tsinghua.edu.cn/simple
环境差不多就准备好了,就可以正式进行yolov12项目的搭建了:
进入github,找到yolov12,通过git clone https://github.com/sunsmarterjie/yolov12.git将项目克隆到vscode的服务器里,同时下载预训练权重模型,下面以seg版为例:
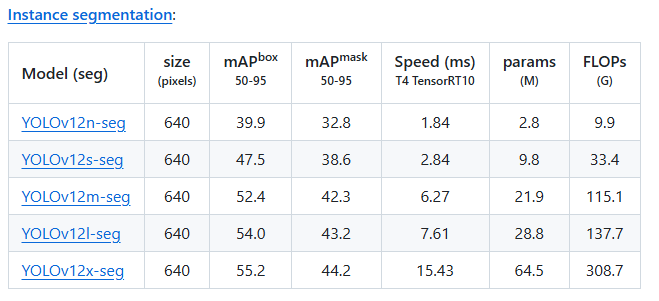
该族共5个模型,精度越来越高,但速度越来越慢,参数越来越多,模型也依次更复杂,FLOPS越大意味着推理更慢但精度更高。
关于将本地文件上传到vscode中关联的服务器,直接拖拽文件上传即可,当然你也可以通过终端软件进行上传到服务器。
关于该项目里面提到的flash_attn-2.7.3+cu11torch2.2cxx11abiFALSE-cp311-cp311-linux_x86_64.whl,该文件中包含了严格的环境匹配信息,每个字段都必须和你的环境完全一致,否则 pip 就拒绝安装。其实要不要这个算法,对项目的效果影响不是特别大,反而配置起来比较繁琐。
下一步在vscode终端,安装官方给出的命令安装必要的包:
wget https://github.com/Dao-AILab/flash-attention/releases/download/v2.7.3/flash_attn-2.7.3+cu11torch2.2cxx11abiFALSE-cp311-cp311-linux_x86_64.whl
conda create -n yolov12 python=3.11
conda activate yolov12
pip install -r requirements.txt
pip install -e .
现在已经将基本环境和必要的包安装配置好了,并且yolov12项目已经拉取到服务器,同时也配备好了yolov12的seg预训练模型,接下来该怎么做?
—-分别从官网给出的几个脚本来解释如何用yolov12进行实践:
首先我们查找官网可以看到,给出了一些参考的py代码:
1.用于验证模型性能的脚本 :
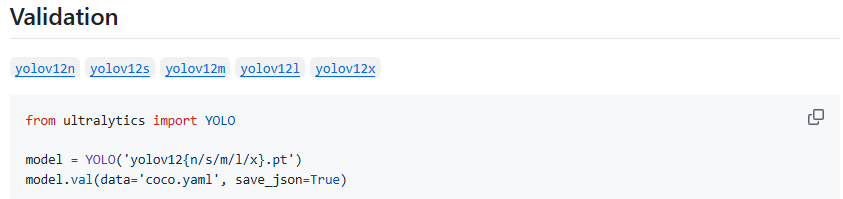
下面给出我自己的参考代码,命名为val.py:
from ultralytics import YOLO
model = YOLO('/home/zxj/code/yolov12/ultralytics/weights/yolov12l-seg.pt')
model.val(data='/home/zxj/code/yolov12/ultralytics/cfg/datasets/coco.yaml', save_json=True)
2.用于训练模型的脚本:
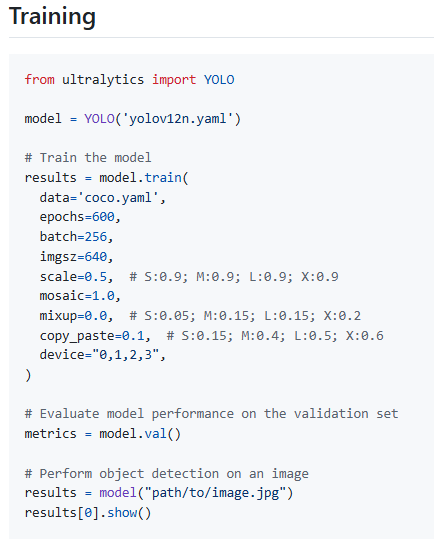
下面给出我自己的参考代码,命名为train.py:
from ultralytics import YOLO
#这里加载的是模型结构定义文件,不是预训练权重模型
# model = YOLO('yolov12n.yaml')
#换成预训练权重模型
model = YOLO('/home/zxj/code/yolov12/ultralytics/weights/yolov12l-seg.pt')
# Train the model
results = model.train(
data='coco.yaml',
epochs=600,
batch=256,
imgsz=640,
scale=0.5, # S:0.9; M:0.9; L:0.9; X:0.9
mosaic=1.0,
mixup=0.0, # S:0.05; M:0.15; L:0.15; X:0.2
copy_paste=0.1, # S:0.15; M:0.4; L:0.5; X:0.6
device="0,1,2,3",
)
# Evaluate model performance on the validation set
metrics = model.val()
# Perform object detection on an image
#具体的路径根据你的来变化
results = model("path/to/image.jpg")
results[0].show()
3.用于进行预测的脚本:
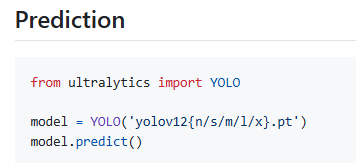
下面给出我自己的参考代码,命名为predict.py:
from ultralytics import YOLO
# 加载预训练的yolov12分割模型
model = YOLO(model=r'/home/zxj/code/yolov12/ultralytics/weights/yolov12l-seg.pt')
#执行预测
model.predict(source=r'/home/zxj/code/yolov12/ultralytics/assets',
save=True,
show=True,
)
4.用于进行导出模型的脚本:
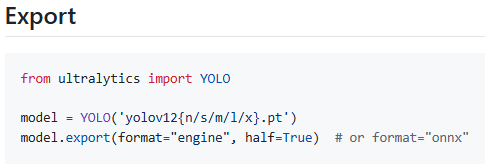
下面给出我自己的参考代码,命名为export.py:
#把训练好的 .pt 模型(PyTorch 格式)转成其他推理框架支持的格式,
# 比如 ONNX、TensorRT、CoreML、OpenVINO 等,方便部署到不同设备(如 Jetson、TensorRT、C++、移动端)
from ultralytics import YOLO
model = YOLO('/home/zxj/code/yolov12/ultralytics/weights/yolov12l-seg.pt')
model.export(format="engine", half=True) # or format="onnx"
5.用于运行YOLOv12模型进行目标检测和分割的Gradio应用程序,可在网站上上传图像或视频进行推理:
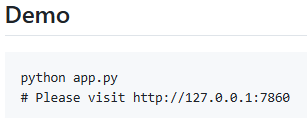
下面给出官方的参考代码,名为app.py:
# ——————————————————–
# Based on yolov10
# https://github.com/THU-MIG/yolov10/app.py
# ——————————————————–'
import gradio as gr
import cv2
import tempfile
from ultralytics import YOLO
def yolov12_inference(image, video, model_id, image_size, conf_threshold):
model = YOLO(model_id)
if image:
results = model.predict(source=image, imgsz=image_size, conf=conf_threshold)
annotated_image = results[0].plot()
return annotated_image[:, :, ::-1], None
else:
video_path = tempfile.mktemp(suffix=".webm")
with open(video_path, "wb") as f:
with open(video, "rb") as g:
f.write(g.read())
cap = cv2.VideoCapture(video_path)
fps = cap.get(cv2.CAP_PROP_FPS)
frame_width = int(cap.get(cv2.CAP_PROP_FRAME_WIDTH))
frame_height = int(cap.get(cv2.CAP_PROP_FRAME_HEIGHT))
output_video_path = tempfile.mktemp(suffix=".webm")
out = cv2.VideoWriter(output_video_path, cv2.VideoWriter_fourcc(*'vp80'), fps, (frame_width, frame_height))
while cap.isOpened():
ret, frame = cap.read()
if not ret:
break
results = model.predict(source=frame, imgsz=image_size, conf=conf_threshold)
annotated_frame = results[0].plot()
out.write(annotated_frame)
cap.release()
out.release()
return None, output_video_path
def yolov12_inference_for_examples(image, model_path, image_size, conf_threshold):
annotated_image, _ = yolov12_inference(image, None, model_path, image_size, conf_threshold)
return annotated_image
def app():
with gr.Blocks():
with gr.Row():
with gr.Column():
image = gr.Image(type="pil", label="Image", visible=True)
video = gr.Video(label="Video", visible=False)
input_type = gr.Radio(
choices=["Image", "Video"],
value="Image",
label="Input Type",
)
model_id = gr.Dropdown(
label="Model",
choices=[
"yolov12n.pt",
"yolov12s.pt",
"yolov12m.pt",
"yolov12l.pt",
"yolov12x.pt",
],
value="yolov12m.pt",
)
image_size = gr.Slider(
label="Image Size",
minimum=320,
maximum=1280,
step=32,
value=640,
)
conf_threshold = gr.Slider(
label="Confidence Threshold",
minimum=0.0,
maximum=1.0,
step=0.05,
value=0.25,
)
yolov12_infer = gr.Button(value="Detect Objects")
with gr.Column():
output_image = gr.Image(type="numpy", label="Annotated Image", visible=True)
output_video = gr.Video(label="Annotated Video", visible=False)
def update_visibility(input_type):
image = gr.update(visible=True) if input_type == "Image" else gr.update(visible=False)
video = gr.update(visible=False) if input_type == "Image" else gr.update(visible=True)
output_image = gr.update(visible=True) if input_type == "Image" else gr.update(visible=False)
output_video = gr.update(visible=False) if input_type == "Image" else gr.update(visible=True)
return image, video, output_image, output_video
input_type.change(
fn=update_visibility,
inputs=[input_type],
outputs=[image, video, output_image, output_video],
)
def run_inference(image, video, model_id, image_size, conf_threshold, input_type):
if input_type == "Image":
return yolov12_inference(image, None, model_id, image_size, conf_threshold)
else:
return yolov12_inference(None, video, model_id, image_size, conf_threshold)
yolov12_infer.click(
fn=run_inference,
inputs=[image, video, model_id, image_size, conf_threshold, input_type],
outputs=[output_image, output_video],
)
gr.Examples(
examples=[
[
"ultralytics/assets/bus.jpg",
"yolov12s.pt",
640,
0.25,
],
[
"ultralytics/assets/zidane.jpg",
"yolov12x.pt",
640,
0.25,
],
],
fn=yolov12_inference_for_examples,
inputs=[
image,
model_id,
image_size,
conf_threshold,
],
outputs=[output_image],
cache_examples='lazy',
)
gradio_app = gr.Blocks()
with gradio_app:
gr.HTML(
"""
<h1 style='text-align: center'>
YOLOv12: Attention-Centric Real-Time Object Detectors
</h1>
""")
gr.HTML(
"""
<h3 style='text-align: center'>
<a href='https://arxiv.org/abs/2502.12524' target='_blank'>arXiv</a> | <a href='https://github.com/sunsmarterjie/yolov12' target='_blank'>github</a>
</h3>
""")
with gr.Row():
with gr.Column():
app()
if __name__ == '__main__':
gradio_app.launch()
总的来说app.py实现了以下功能:
-
加载 YOLO 模型;
-
提供一个上传图片/视频的网页界面;
-
实时展示检测 / 分割结果;
-
可视化预测输出。
如何运行该程序?
1.首先安装必要的包:
pip install gradio==4.19.2
2.启动该程序:
python app.py –server_name 0.0.0.0 –server_port 7860
如果7860端口被占用,可以更换别的端口;运行成功后,就可以在浏览器进行访问了:
3.访问该项目:
http://0.0.0.0:7860
如果以这个命令python app.py –server_name 0.0.0.0 –server_port 7861 –share(其中share设置为true,在app.py里更改,可以生成公网链接)即:Running on public URL: 公网ip:7860
但是Gradio 内部在启用 share=True 时,会自动下载一个叫 frpc_linux_amd64_v0.2 的小程序,用来和 HuggingFace 的隧道服务通信,因此还需要安装该依赖的隧道组件 frpc_linux_amd64_v0.2。
1.下载
wget https://cdn-media.huggingface.co/frpc-gradio-0.2/frpc_linux_amd64 -O frpc_linux_amd64_v0.2
#由于这个文件来自外网,所有这样下载很可能失败,故一般在本地电脑下载好,再上传到服务器即可。
2.将该组件移动到 Gradio 安装目录
mv frpc_linux_amd64_v0.2 /home/zxj/.local/lib/python3.10/site-packages/gradio/
3.添加执行权限
chmod +x /home/zxj/.local/lib/python3.10/site-packages/gradio/frpc_linux_amd64_v0.2
4.重新运行你的命令
python app.py –server_name 0.0.0.0 –server_port 7860 –share
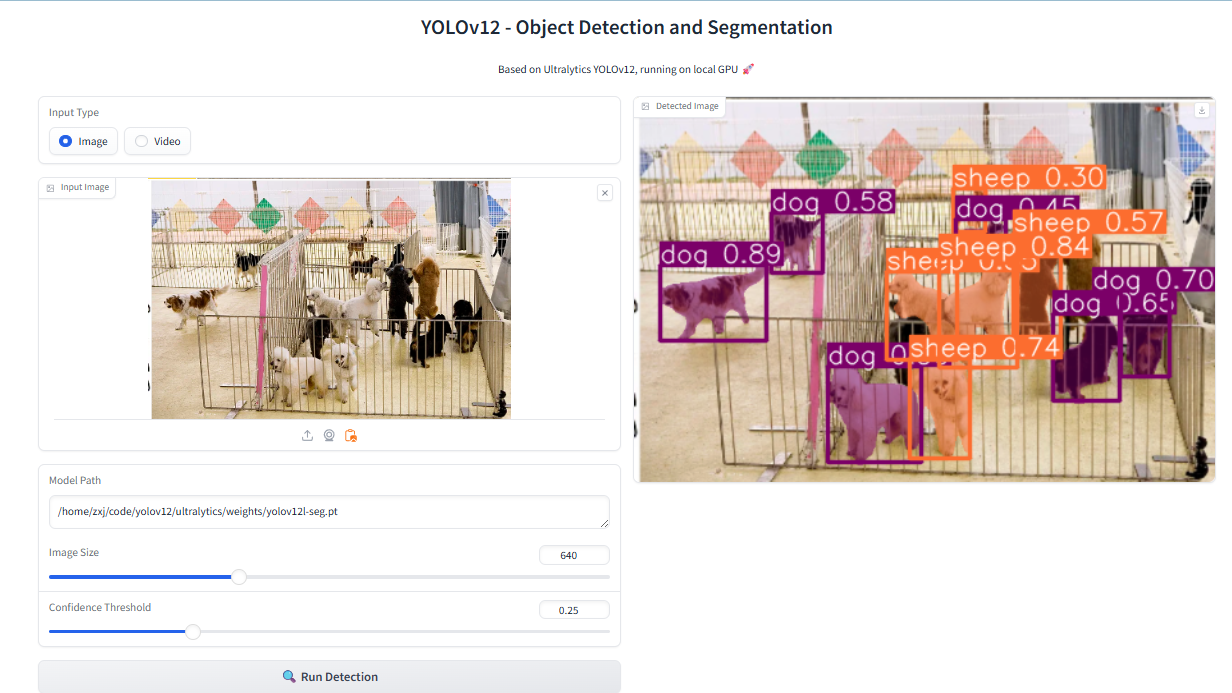
进行识别测试,发现该模型还是有些不准确,把那些白色的很像🐏的🐕识别成了sheep,因此还需要对该模型进行训练,才能更好地使用该模型。
总结:
本次关于yolov12项目的搭建与运行先介绍到这啦,后续有什么改进的仍会进行补充。最后,十分感谢yolo团队开发人员的辛勤工作,使得我们可以站在巨人的肩膀上不断向前。
附上yolov12链接;
@article{tian2025yolov12, title={YOLOv12: Attention-Centric Real-Time Object Detectors}, author={Tian, Yunjie and Ye, Qixiang and Doermann, David}, journal={arXiv preprint arXiv:2502.12524}, year={2025} }
时间过得真快,转眼间研究生开学以将近两个月了,吾日三省吾身:知识学了多少?今天锻炼了吗?今天早起了吗?—再过两个月就是元旦啦,研究生课程也基本上完课了,也就意味着要期末考试周啦,哎,课程真是什么都不会啊,想想后面还得疯狂补知识,就头疼,虽然现在也不松弛,天天上课,每个课程又来个小论文,好多😭。