C++基础入门(三)
1 函数
作用:将一段经常使用的代码封装起来,减少重复代码
1.1 函数的定义
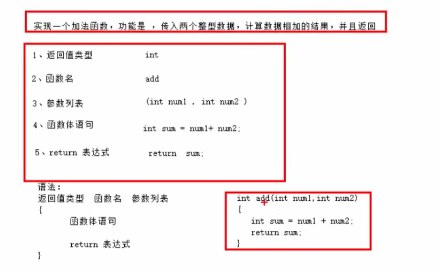
函数的定义一般有5个步骤:
语法:
返回值类型 函数名 (参数列表)
{
函数体语句
return表达式
}
1.2 函数的调用
功能:使用定义好的函数
语法:函数名(参数)
1.3 值传递
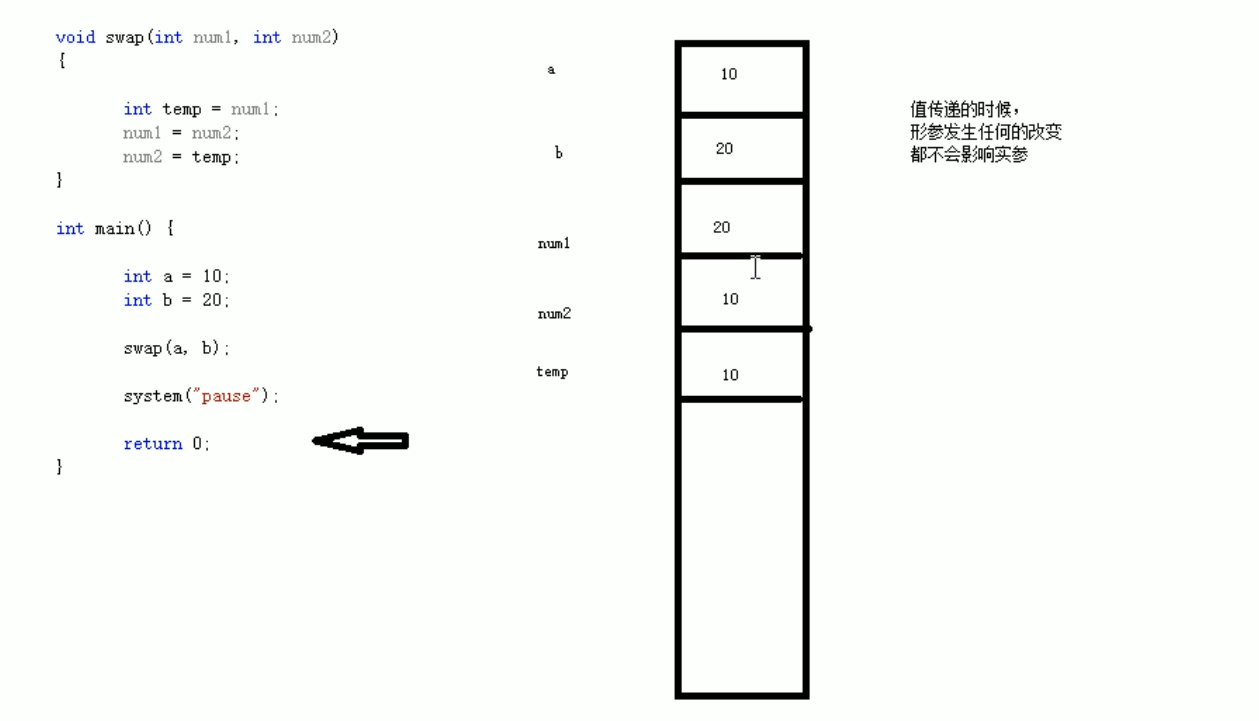
所谓值传递,就是函数调用时实参将数值传入给形参
值传递时,如果形参发生改变,并不会影响实参
1.4 函数的常见样式
常见的函数样式有种
#include<iostream>
using namespace std;
//函数常见样式
//1、无参无返
void test01() {
cout << "this is test01" << endl;
}
//2、有参无返
void test02(int a) {
cout << "this is test 02 a=" <<a<< endl;//100
}
//3、无参有返
int test03() {
cout << "this is test03" << endl;//1000
return 1000;
}
//4、有参有返
int test04(int a) {
cout << "this is test04 a=" << a << endl;//10000
return a;
}
int main() {
//无参无返的函数调用
test01();
//有参无返的函数调用
test02(100);
//无参有返的函数调用
int num1 = test03();
cout << "num1=" << num1 << endl;//1000
//有参有返函数调用
int num2 = test04(10000);//10000
cout << "num2=" << num2 << endl;
system("pause");
return 0;
}
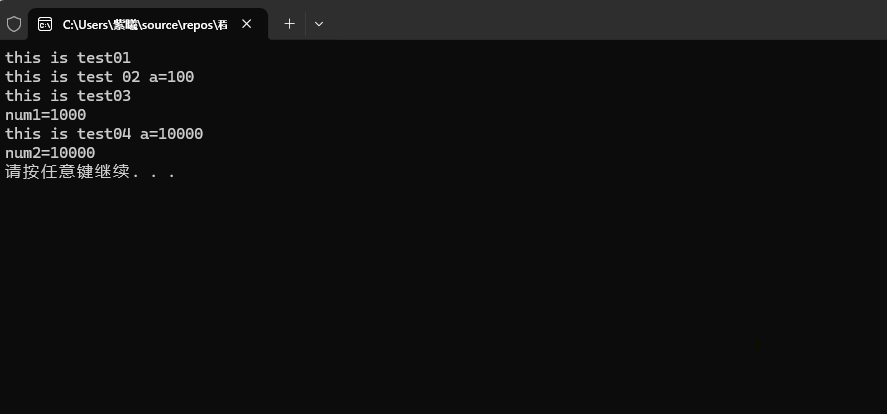
输出的结果为:
1.5 函数的声明
作用:告诉编译器函数名称以及如何调用函数。函数的实际主体可以单独定义。
函数的声明可以多次,但是函数的定义只能有一次
#include<iostream>
using namespace std;
//函数的声明
//比较函数,实现两个整型数字进行比较,返回较大的值
//提前告诉编译器函数的存在,可以利用函数的声明
//函数的声明,告诉编译器这个东西存在
//声明可以写多次,但是定义只能有一次
int max(int a, int b);
int max(int a, int b);
int max(int a, int b);
int main9() {
int a = 10;
int b = 20;
cout << max(a,b) << endl;//20
system("pause");
return 0;
}
//定义 有声明写在main函数后面
int max(int a, int b) {
return a > b ? a : b;
};
1.6 函数的分文件编写
作用:让代码结构更加清晰
函数分文件编写一般有4个步骤:
#include<iostream>
using namespace std;
#include"swap.h"
//函数的分文件编写
//实现两个数字进行交换的函数
//函数的声明
//void swap(int a, int b);
//函数的定义
//void swap(int a, int b) {
//int temp = a;
//a = b;
//b = temp;
//cout << "a=" << a << endl;
//cout << "b=" << b << endl;
//
//}
//1、创建.h后缀名的头文件
//2、创建.cpp后缀名的源文件
//3、在头文件中写函数的声明
//4、在源文件中写函数的定义
int main() {
int a = 10;
int b = 20;
swap(a, b);
system("pause");
return 0;
}
//swap.h文件
#include<iostream>
using namespace std;
//函数的声明
void swap(int a, int b);
//swap.cpp文件
#include"swap.h"
//函数的定义
void swap(int a, int b) {
int temp = a;
a = b;
b = temp;
cout << "a=" << a << endl;
cout << "b=" << b << endl;
}
2 指针
作用:可以通过指针间接访问内存,通过指针来保存一个地址
- 内存编号是从0开始记录的,一般用十六进制数字表示
- 可以利用指针变量保存地址
2.1 指针变量的定义和使用
指针变量定义的语法:数据类型*变量名;
#include<iostream>
using namespace std;
int main() {
//1、定义指针
int a = 10;
//指针定义的语法:数据类型*指针变量名;
int* p;
//让指针记录变量a的地址
p = &a;
cout << "a的地址为:" <<&a << endl;
cout << "指针p为:" << p << endl;
//2、使用指针
//可以通过解引用的方式来找到指针指向的内容
//指针前加*代表解引用,找到指针指向的内存中的数据
*p = 1000;
cout << "a=" << a << endl;
cout << "p=" << *p<< endl;
system("pause");
return 0;
}
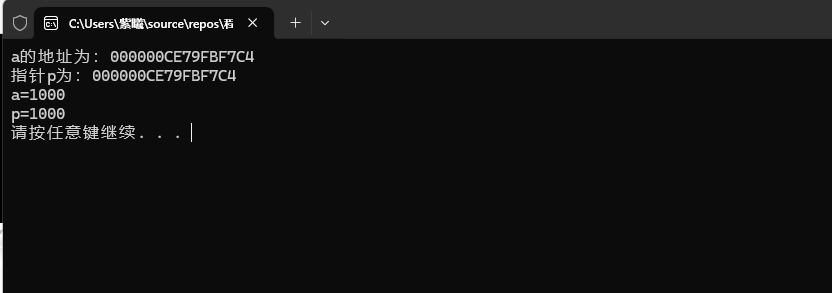
输出结果为:
2.2 指针所占内存空间
#include<iostream>
using namespace std;
int main() {
//指针所占内存空间
int a = 10;
//int* p;
//p = &a;
int* p = &a;
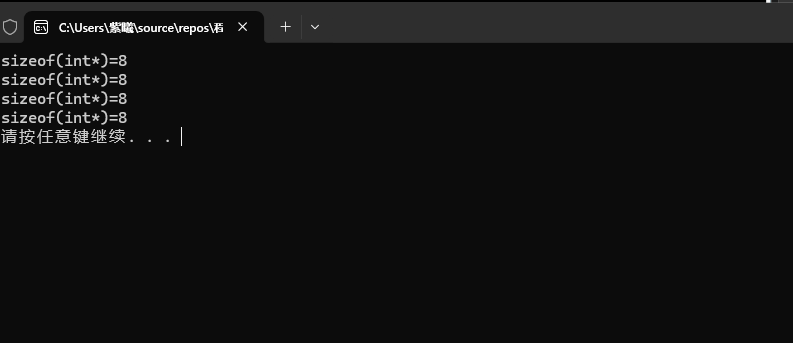
//在32位操作系统下,指针都是占4个字节空间大小,不管是什么数据类型
//在64位操作系统下,指针都是占8个字节空间大小,不管是什么数据类型
cout << "sizeof(int*)=" << sizeof(int*) << endl;
//cout << "sizeof(int*)=" << sizeof(p) << endl;
cout << "sizeof(int*)=" << sizeof(float*) << endl;
cout << "sizeof(int*)=" << sizeof(double*) << endl;
cout << "sizeof(int*)=" << sizeof(char*) << endl;
system("pause");
return 0;
}
输出结果为:
2.3 空指针和野指针
空指针:指针变量指向内存中编号为0的空间
用途:初始化指针变量
注意:空指针指向的内存是不可以访问的
#include<iostream>
using namespace std;
int main() {
//空指针
//空指针用于给指针变量初始化
int* p = NULL;
//2、空指针是不可以进行访问的
//0~255之间的内存编号是系统占用的,因此不可以访问
//*p = 100;会报错
system("pause");
return 0;
}
野指针:指针变量指向非法的内存空间
#include<iostream>
using namespace std;
int main() {
//野指针
//在程序中,尽量避免出现野指针
int* p =(int*) 0x1100;
//cout << *p << endl;会报错
//总结:空指针和野指针都不是我们申请的空间,因此不要访问
system("pause");
return 0;
}
2.4 const修饰指针
const修饰指针有三种情况:
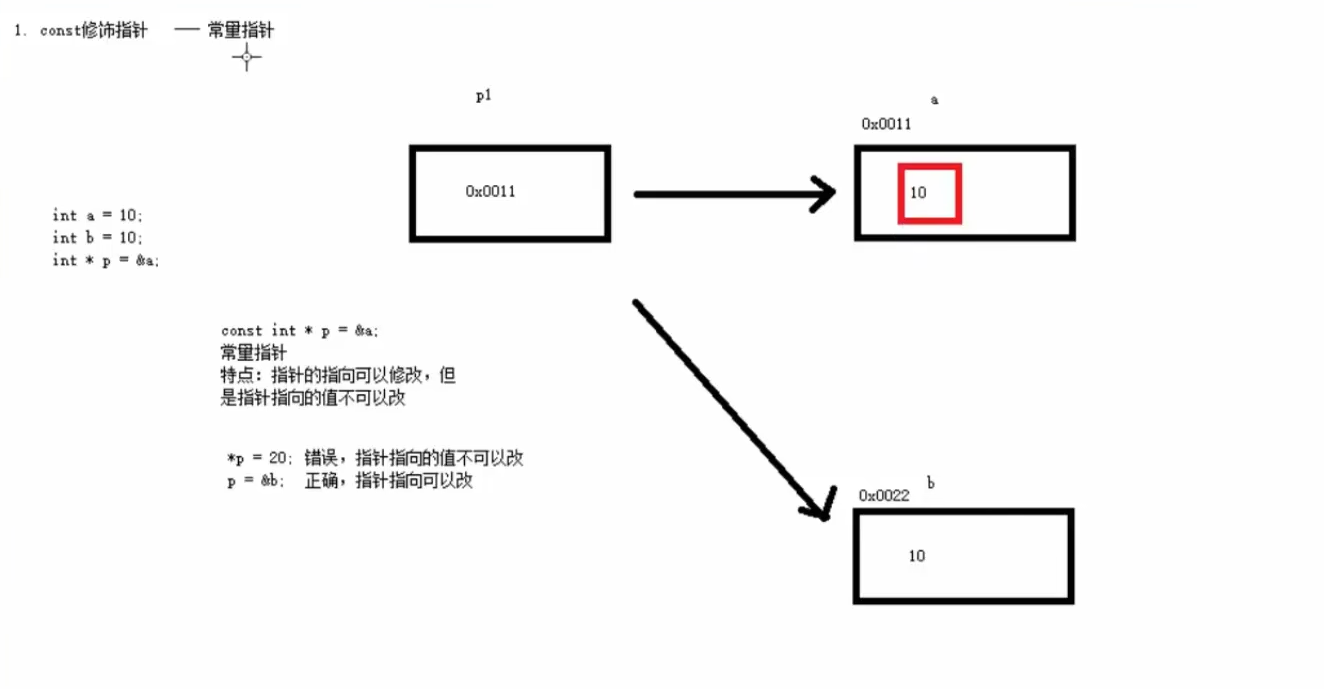
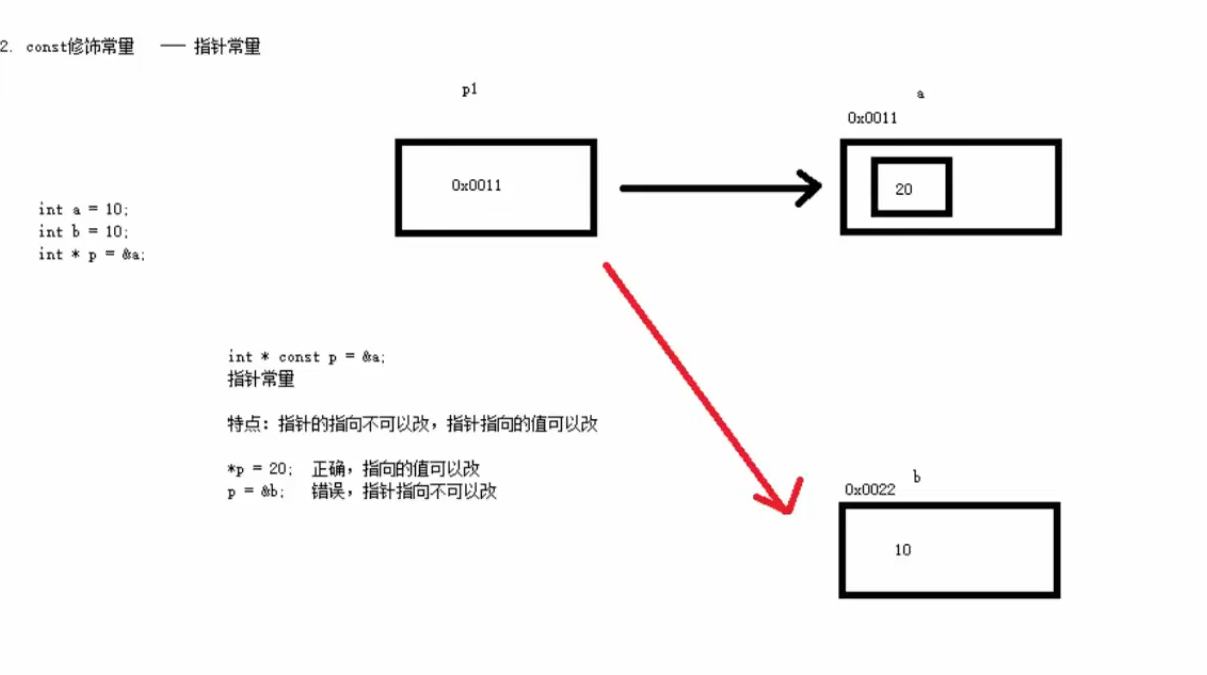
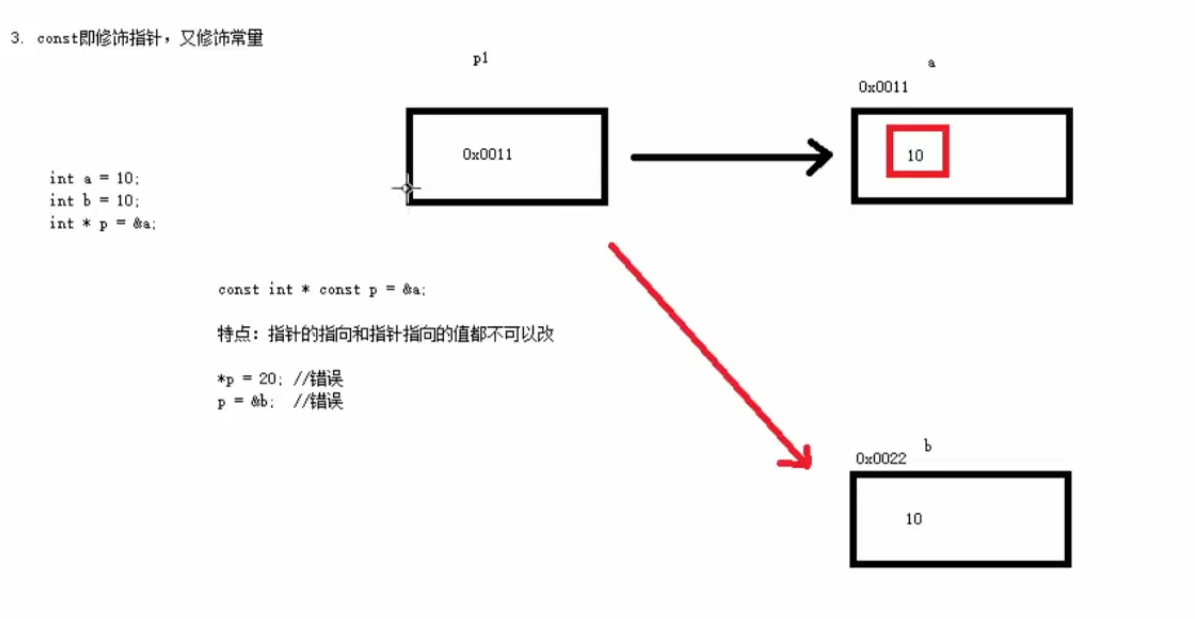
#include<iostream>
using namespace std;
int main() {
//1、const修饰指针
int a = 10;
int b = 10;
const int* p = &a;
//指针指向的值不可以改,指针的指向可以改
//*p = 20;报错
p = &b;//正确
//2、const修饰常量
int* const p2 = &a;
//指针指向的值可以改,指针的指向不可以改
*p2= 20;//正确
//p2 = &b;报错
//3、const修饰指针和出来那个
const int* const p3 = &a;
//指针的指向和指针指向的值都不可以改
//*p3 = 20;报错
//p3 = &b;报错
system("pause");
return 0;
}
2.5 指针和数组
作用:利用指针访问数组中的元素
#include<iostream>
using namespace std;
int main() {
//指针和数组
//利用指针访问数组中的元素
int arr[10] = { 1,2,3,4,5,6,7,8,9,10 };
cout << "第一个元素为:" << arr[0]<< endl;
int* p = arr;//arr就是数组的首地址
cout << "利用指针访问第一个元素:" << *p << endl;
p++;//让指针向后偏移4个字节
cout << "利用指针访问第二个元素" << *p << endl;
cout << "利用指针来遍历数组" << endl;
int* p2 = arr;
for (int i = 0; i < 10; i++) {
//cout << arr[i] << endl;
cout << *p2 << endl;
p2++;
}
system("pause");
return 0;
}
输出结果为:
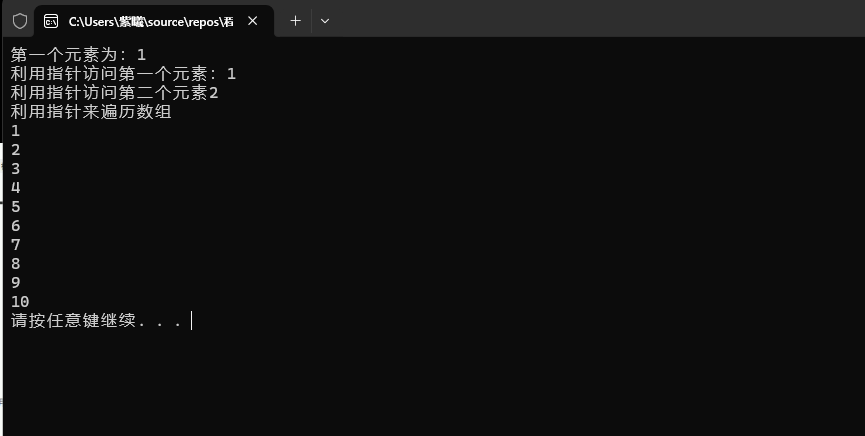
2.6 指针和函数
作用:利用指针作函数参数,可以修改实参的值
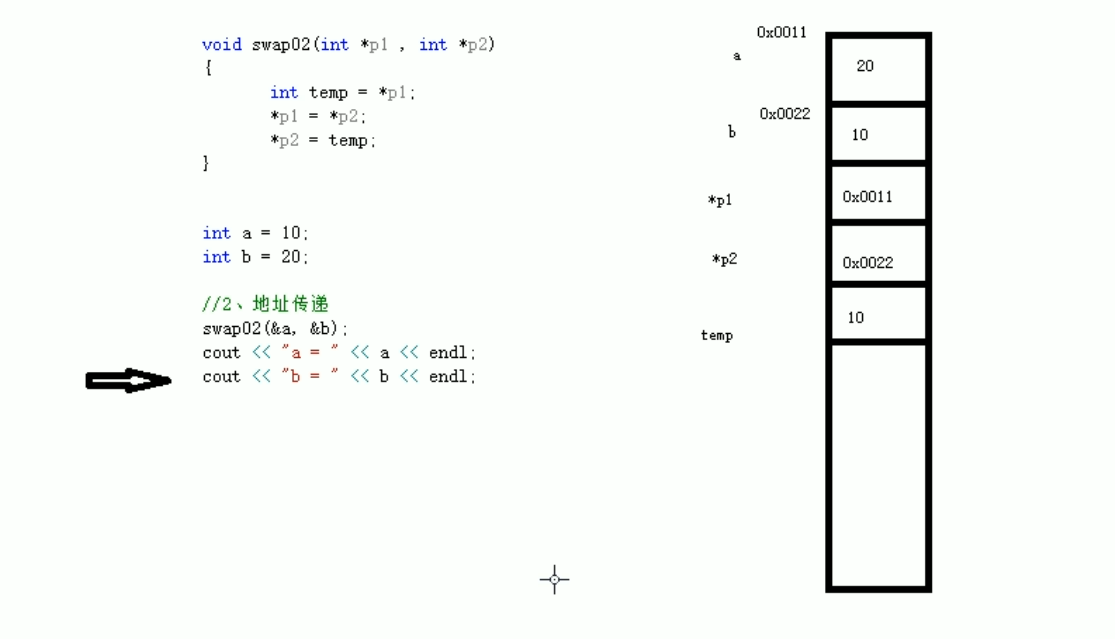
#include<iostream>
using namespace std;
//实现两个数字进行交换
void swap01(int a, int b) {
int temp = a;
a = b;
b = temp;
cout << "swap01 a=" << a << endl;
cout << "swap01 b=" << b << endl;
}
void swap02(int* p1, int* p2) {
int temp = *p1;
*p1 = *p2;
*p2 = temp;
}
int main() {
//指针和函数
//1、值传递,不会改变实参
int a = 10;
int b = 20;
//swap01(a, b);
//2、地址传递
//如果是地址传递,可以改变实参
swap02(&a, &b);
cout << "a=" << a << endl;
cout << "b=" << b << endl;
system("pause");
return 0;
}
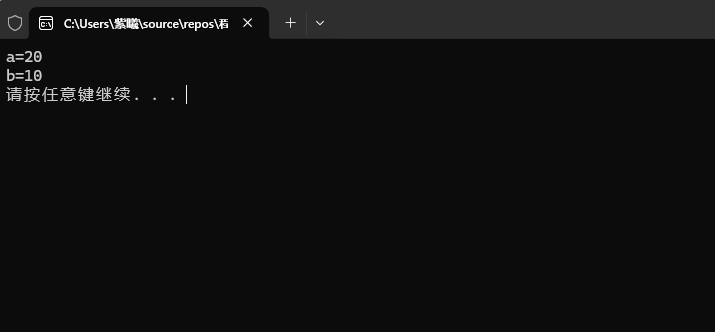
输出结果为:
2.7 指针、数组、函数
思考题:封装一个函数,利用冒泡排序,实现对整型数组的升序排列
例如数组:int arr[10]={4,3,6,9,1,2,10,8,7,5};
#include<iostream>
using namespace std;
//冒泡排序函数 参数1:数组的首地址 参数2:数组的长度
void bubbleSort(int* arr, int len) {
//i:排序总轮数=元素个数-1
for (int i = 0; i < len – 1; i++) {
//j:每轮对比次数=元素个数-排序轮数-1
for (int j = 0; j < len – i – 1; j++) {
//如果j>j+1的值 交换数字
if (arr[j] > arr[j + 1]) {
int temp = arr[j];
arr[j] = arr[j + 1];
arr[j + 1] = temp;
}
}
}
}
//打印数组
void printArray(int* arr, int len) {
for (int i = 0; i < len; i++) {
cout << arr[i] << endl;
}
}
int main() {
//1、先创建一个数组
int arr[10] = { 4,3,6,9, 1, 2, 10, 8, 7, 5 };
//数组长度
int len = sizeof(arr) / sizeof(arr[0]);
//2、创建函数,实现冒泡排序
bubbleSort(arr, len);
//3、打印排序后的1数组
printArray(arr, len);
system("pause");
return 0;
}
3 结构体
结构体属于用户自定义的数据类型,允许用户存储不同的数据类型
3.1 结构体定义和使用
语法:struct 结构体名 {结构体成员列表}
通过结构体创建变量的三种方式:
- struct 结构体名 变量名
- struct 结构体名 变量名={成员1值,成员2值…}
- 定义结构体时顺便创建变量
#include<iostream>
using namespace std;
#include<string>
int main() {
//1、创建学生数据类型:学生包括(姓名,年龄,分数)
//自定义数据类型,一些类型的集合组成的一个类型
//语法 struct 类型名称 {成员列表}
struct Student {
//成员列表
//姓名
string name;
//年龄
int age;
//分数
int score;
}s3;//顺便创建结构体变量
//2、通过学生类型创建具体的学生
//2.1 struct Student s1;
//struct 结构体变量创建时关键字可以省略,定义时不能省略
struct Student s1;
//给s1属性赋值,通过访问结构体变量中的属性
s1.name = "张三";
s1.age = 18;
s1.score =99;
cout << "姓名:" << s1.name << "年龄:" << s1.age << "分数:" << s1.score << endl;
//2.2 struct Student s2={…}
struct Student s2{"李四",19,88};
cout << "姓名:" << s2.name << "年龄:" << s2.age << "分数:" << s2.score << endl;
//2.3 在定义结构体时顺便创建结构变量
s3.name = "王五";
s3.age = 20;
s3.score = 79;
cout << "姓名:" << s3.name << "年龄:" << s3.age << "分数:" << s3.score << endl;
system("pause");
return 0;
}
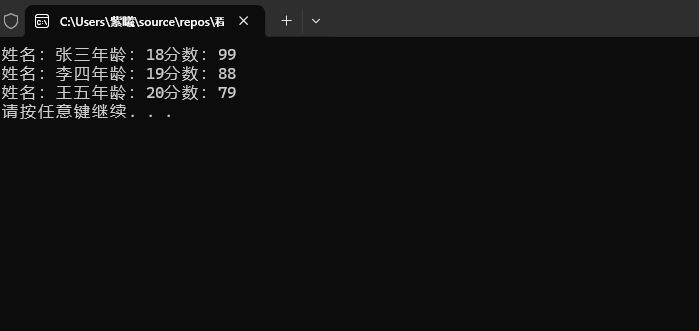
输出结果为:
3.2 结构体数组
作用:将自定义的结构体放入数组中方便维护
语法:struct 结构体名 数组名[元素个数]={{},…,{}}
#include<iostream>
#include<string>
using namespace std;
//结构体数组 如何创建?如何访问?
//1、定义结构体
struct Student {
//姓名
string name;
//年龄
int age;
//分数
int score;
};
int main() {
//2、创建结构体数组
struct Student stuArray[3] = {
{"张三",18,99},{"李四",33,55},{"王五",45,90}
};
//3、给结构体数组中的元素赋值
stuArray[2].name = "赵六";//改王五
stuArray[2].age = 10;
stuArray[2].score =66;
//4、遍历结构体数组
for (int i = 0; i < 3; i++) {
cout << "姓名:" << stuArray[i].name
<< "年龄:" << stuArray[i].age
<< "分数:" << stuArray[i].score<<endl;
}
system("pause");
return 0;
}
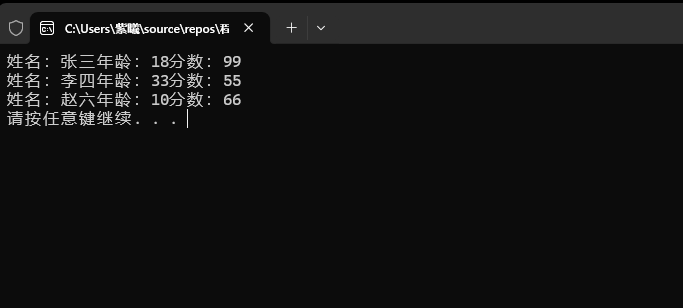
输出结果为:
3.3 结构体指针
作用:通过指针访问结构体中的成员
利用操作符->可以通过结构体指针访问结构体属性
#include<iostream>
#include<string>
using namespace std;
//结构体指针
//定义学生的结构体
struct student {
string name;
int age;
int score;
};
int main() {
//1、创建学生结构体变量
struct student s = { "张三",18,100 };
//2、通过指针指向结构体变量
struct student* p = &s;
//3、通过指针访问结构体变量中的数据
//通过结构体指针,访问结构体中的属性,需要利用‘->’
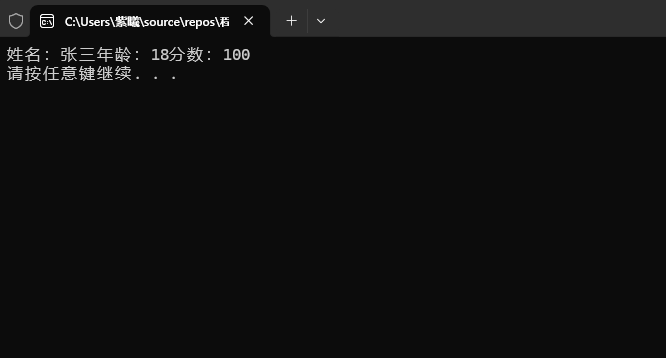
cout << "姓名:" << p->name << "年龄:" << p->age << "分数:" << p->score << endl;
system("pause");
return 0;
}
输出的结果为:
3.4 结构体嵌套结构体
作用:结构体中的成员可以是另一个结构体
#include<iostream>
#include<string>
using namespace std;
//定义学生结构体
struct student {
string name;
int age;
int score;
};
//定义老师结构体
struct teacher {
int id;//教师编号
string name;//教师姓名
int age;
struct student stu;//辅导的学生
};
int main() {
//结构体嵌套结构体
//创建老师
struct teacher t;
t.id = 1000;
t.name = "老王";
t.age = 78;
t.stu.name = "小明";
t.stu.age = 18;
t.stu.score = 99;
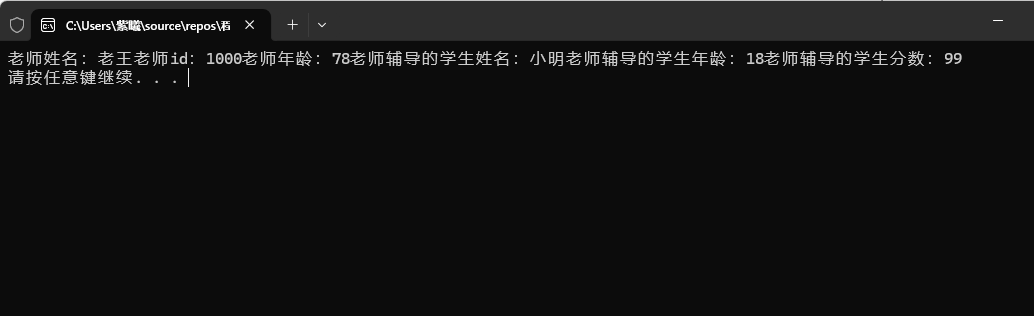
cout << "老师姓名:" << t.name << "老师id:" << t.id << "老师年龄:" << t.age
<< "老师辅导的学生姓名:" << t.stu.name << "老师辅导的学生年龄:" << t.stu.age
<< "老师辅导的学生分数:" << t.stu.score << endl;
system("pause");
return 0;
}
输出的结果为:
3.5 结构体做函数参数
作用:将结构体作为参数向函数中传递
传递方式有两种:
#include<iostream>
#include<string>
using namespace std;
//定义学生结构体
struct student {
string name;
int age;
int score;
};
//打印学生信息函数
//1、值传递
void printStudent1(struct student s){
s.age = 99;
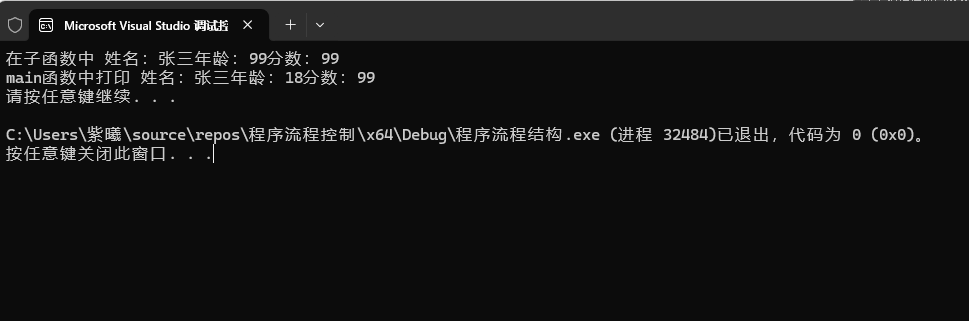
cout << "在子函数中 姓名:" << s.name << "年龄:" << s.age << "分数:" << s.score << endl;
}
//2、地址传递
void printStudent2(struct student*p){
p->age = 200;
cout << "子函数2中 姓名:" << p->name << "年龄:" << p->age << "分数:" << p->score << endl;
}
int main() {
//结构体做函数参数
//将学生传入到一个参数中,打印学生身上的所有信息
//创建结构体变量
struct student s;
s.name = "张三";
s.age = 18;
s.score = 99;
printStudent1(s);
//printStudent2(&s);
cout << "main函数中打印 姓名:" << s.name << "年龄:" << s.age << "分数:" << s.score << endl;
system("pause");
return 0;
}
输出结果为:
3.6 结构体中const使用场景
作用:用const防止误操作
#include<iostream>
#include<string>
using namespace std;
struct student {
string name;
int age;
int score;
};
//将函数中的形参改为指针,可以减少内存空间,而且不会复制新的副本出来
//const的使用场景
void printStudents(const struct student *s) {
//s->age = 99;加入const之后,一旦有修改的操作就会报错,可以防止我们的误操作
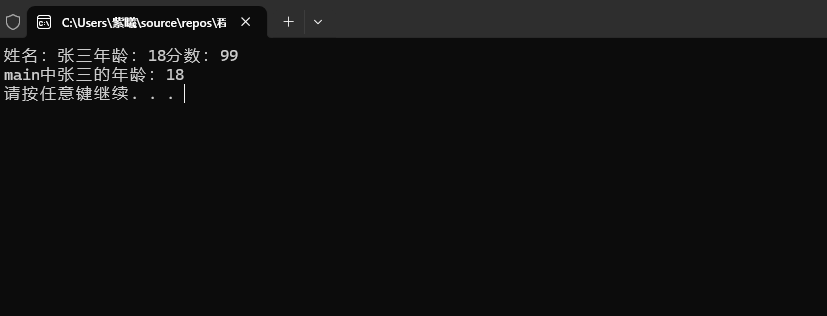
cout << "姓名:" << s->name << "年龄:" << s->age << "分数:" << s->score << endl;
}
int main() {
//创建结构体变量
struct student s = {"张三",18,99};
//通过函数打印结构体变量信息
printStudents(&s);
cout << "main中张三的年龄:" << s.age << endl;
system("pause");
return 0;
}
输出的结果为:
3.7 结构体案例
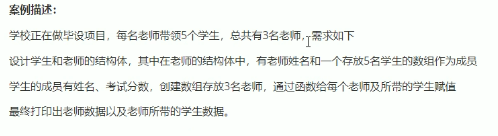
#include<iostream>
#include<string>
#include<ctime>
using namespace std;
//学生的结构体
struct student {
string sName;
int score;
};
//老师的结构体定义
struct Teacher {
string tName;
struct student sArray[5];
};
//给老师和学生赋值的函数
void allocateSpace(struct Teacher tArray[],int len) {
string nameSeed = "ABCDE";
//给老师开始赋值
for (int i = 0; i < len; i++) {
tArray[i].tName = "Teacher_";
tArray[i].tName += nameSeed[i];
//通过循环给每名老师所带的学生赋值
for (int j = 0; j < 5; j++) {
tArray[i].sArray[j].sName = "Student_";
tArray[i].sArray[j].sName += nameSeed[j];
int random = rand() % 61+40;//40~100
tArray[i].sArray[j].score = random;
}
}
}
//打印所有信息
void printInfo(struct Teacher tArray[],int len) {
for (int i = 0; i < len; i++) {
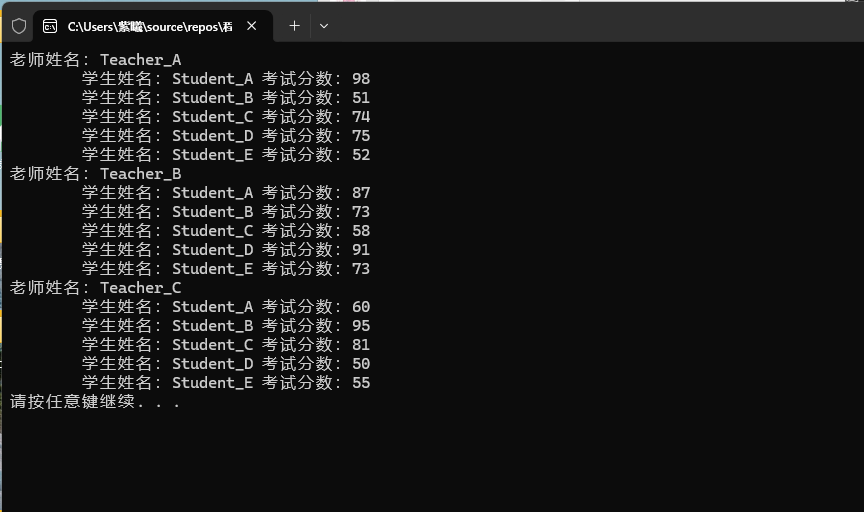
cout << "老师姓名:" << tArray[i].tName << endl;
for (int j = 0; j < 5; j++) {
cout << "\\t学生姓名:" << tArray[i].sArray[j].sName
<<" 考试分数:"<<tArray[i].sArray[j].score<<endl;
}
}
}
int main() {
//随机数种子
srand((unsigned int)time(NULL));
//1、创建3名老师的数组
struct Teacher tArray[3];
//2、通过函数给3名老师的信息赋值,并给老师带的学生信息赋值
int len = sizeof(tArray) / sizeof(tArray[0]);
allocateSpace(tArray,len);
//3、打印所有老师及所带学生信息
printInfo(tArray,len);
system("pause");
return 0;
}
输出结果为:
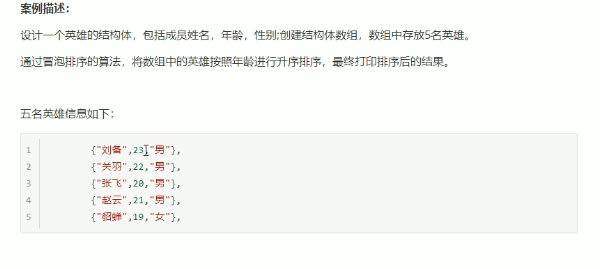
#include<iostream>
using namespace std;
#include<string>
//1、设计英雄结构体
struct Hero{
string name;
int age;
string sex;
};
//冒泡排序,实现年龄升序排列
void bubbleSort(struct Hero heroArray[], int len) {
for (int i = 0; i < len – 1; i++) {
for (int j = 0; j < len – i – 1; j++) {
if (heroArray[j].age > heroArray[j + 1].age) {
struct Hero temp = heroArray[j];
heroArray[j]= heroArray[j + 1];
heroArray[j + 1] = temp;
}
};
};
};
//打印排序后数组的信息
void printHero(struct Hero heroArray[], int len) {
cout << "排序后打印" << endl;
for (int i = 0; i < len; i++) {
cout << "姓名:" << heroArray[i].name << "年龄:" << heroArray[i].age
<< "性别:" << heroArray[i].sex << endl;
}
}
int main() {
//2、创建数组存放五名英雄
struct Hero heroArray[5] = {
{"刘备",23,"男"},
{"关羽",22,"男"},
{"张飞",20,"男"},
{"赵云",21,"男"},
{"貂蝉",19,"女"}
};
int len = sizeof(heroArray) / sizeof(heroArray[0]);
cout << "排序前打印" << endl;
for (int i = 0; i < len; i++) {
cout << "姓名:" << heroArray[i].name << "年龄:" << heroArray[i].age<< "性别:" << heroArray[i].sex << endl;
}
//3、对数组进行排序,按照年龄进行升序排列
bubbleSort(heroArray, len);
//4、将排序后的结果打印输出
printHero(heroArray, len);
system("pause");
return 0;
}
输出结果为: