nginx
ngnix负载均衡
轮询调度算法
ip哈希调度算法
sticky调度算法
nginx编译
静态编译
gcc
pcre-devel
openssl-devel
–prefix=/opt/nginx
动态编译
总结
nginx安全控制
nginx限制并发连接数
参数配置
压力测试
限制请求数
参数配置
压力测试
限制速率
参数配置
压力测试
自动索引
缓存配置
禁用日志记录
日志轮转
日志可视化
站点限制
中文乱码
虚拟主机
https配置
输出重定向
防盗链
php
php安装
libzip
openssl
PHP配置
启动
nginx与php结合
location ~ \\.php$
2. root html;
3. fastcgi_pass 127.0.0.1:9000;
4. fastcgi_index index.php;
php动态扩展模块
编译memcahe模块
openresty部署
nginx原生缓存
tomcat
nginx整合tomcat
nginx实现负载均衡和反向代理
负载均衡:
反向代理:
tomcat整合memcached
交叉存储
nginx
ngnix负载均衡
Nginx 负载均衡依靠 upstream 模块实现,属于七层负载均衡(应用层)。 整体架构分为两部分:
前端代理模块(proxy_pass):接收客户端请求,转发流量;
upstream 上游模块:维护一组后端服务器(RS,Real Server),按照预设算法挑选一台后端,完成转发。
数据流流程: 客户端 → Nginx(Proxy) → 根据调度算法从upstream挑选RS → 转发请求至后端RS → RS响应原路返回客户端
核心:所有流量经过 Nginx 中转,属于代理模式(反向代理负载均衡),区别于 LVS 的直接路由模式。
轮询调度算法
[root@server1 nginx]# vim conf/nginx.conf
将这个放在localhost下面,保证localhost在第一位,其他虚拟主机都在他后面,将 localhost 相关配置放置在最上方,确保其优先级高于后续所有虚拟主机配置,Nginx 虚拟主机匹配规则:当多个 server_name 同时满足匹配条件时,配置文件中先定义的 server 块优先生效;因此默认主机、localhost 这类兜底站点建议写在最上方。
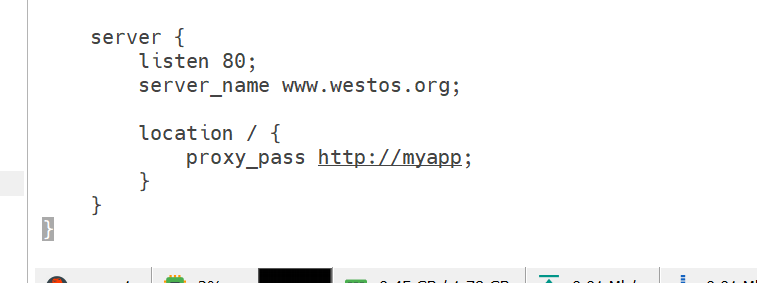
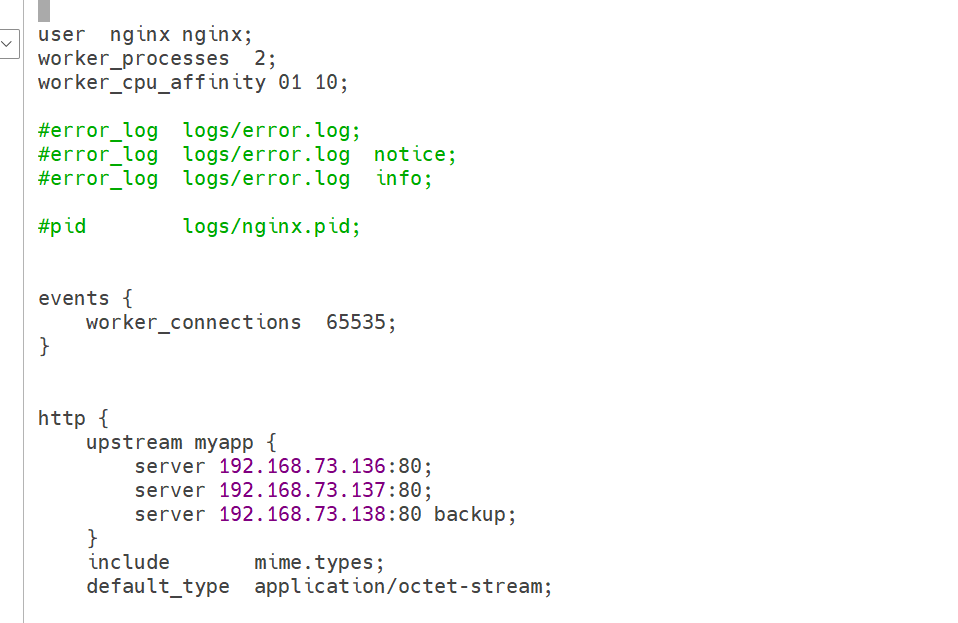
#检测语法
root@server1 nginx]# nginx -t nginx: the configuration file /usr/local/nginx/conf/nginx.conf syntax is ok nginx: configuration file /usr/local/nginx/conf/nginx.conf test is successful
#nginx重新加载 [root@server1 nginx]# nginx -s reload
测试端测试均衡效果
curl www.westos.org
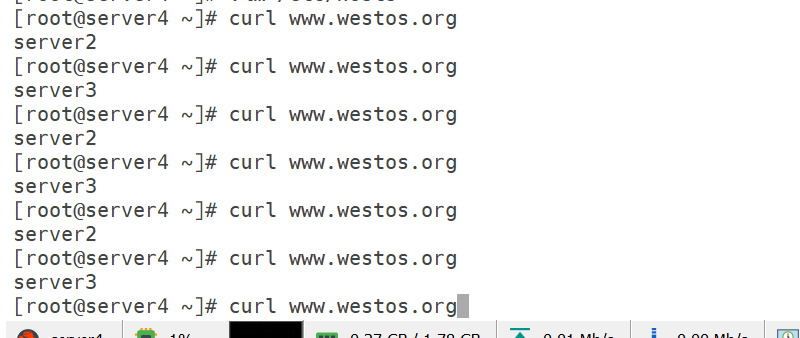
负载均衡已实现,也可以赋予不同客户端不同的权重
ip哈希调度算法
不支持backup算法
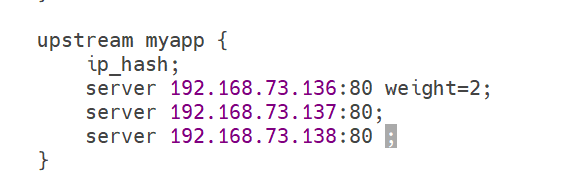
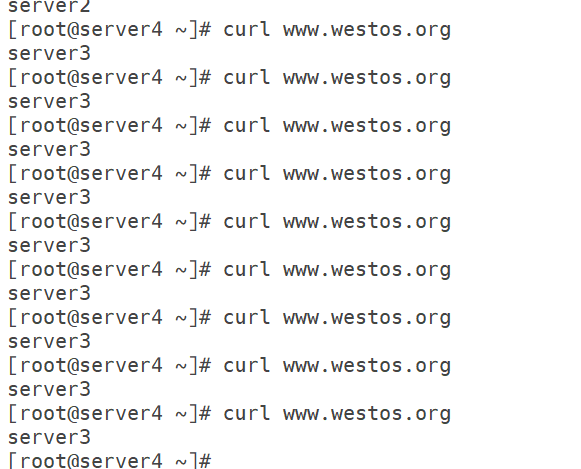
在 ip_hash 调度模式下,Nginx 会基于客户端源 IP 进行哈希计算;来自同一客户端 IP 的所有访问请求,会持续分配至同一个后端 RS,保证会话粘连。
sticky调度算法
sticky = 基于 Cookie 的会话保持
目标:同一客户端后续请求始终分配到同一台后端 RS,实现会话粘连。
工作原理:
简易流程
客户端 → Nginx(无 cookie,随机选 RS)→ 下发 route=rs标识 Cookie 客户端(携带 route Cookie)→ Nginx → 根据 route 直接路由到对应 RS
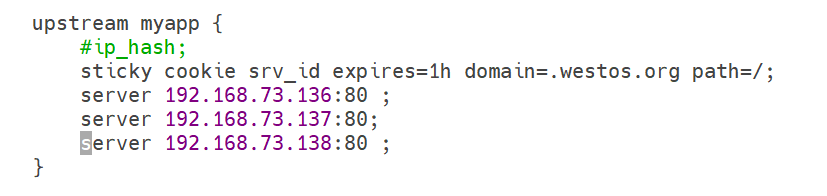
vim /usr/local/nginx/conf/nginx.conf
参数完整解读(Nginx sticky 模块下发的 Set-Cookie)
stickycookie=route Cookie 名称为stickycookie,值route对应后端 RS 节点标识,用来实现会话保持。
expires=1h Cookie 有效期 1 小时,超时后客户端重新发起新调度。
domain=.westos.org 作用域为westos.org所有子域名(泛域名),www.westos.org、a.westos.org均可携带此 Cookie。
path=/ 站点根路径全局生效,网站所有路径请求都会自动带上这条 Cookie。
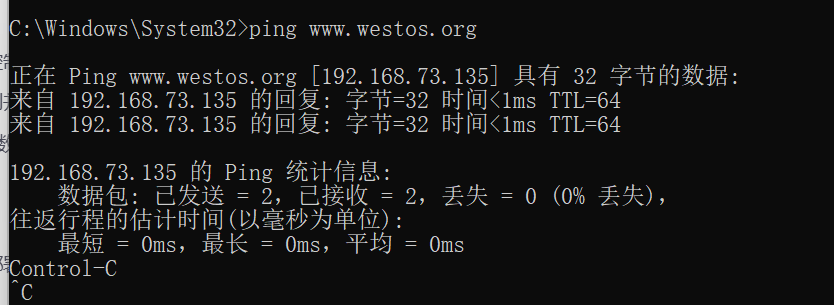
⚠️ 注意:务必在宿主机添加 hosts 解析,否则无法将域名指向对应服务器,访问测试会失败。
宿主机添加域名解析的方法:
以管理员身份打开windows终端
C:\\Windows\\System32\\drivers\\etc\\hosts
打开记事本,输入解析
192.168.73.135 www.westos.org
保存退出
#查看解析是否成功
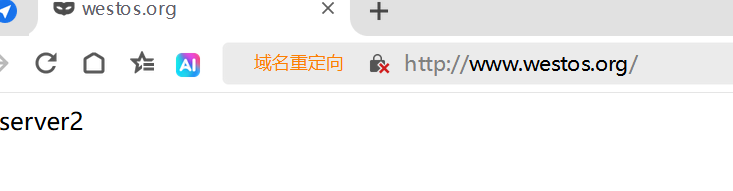
浏览器访问该域名,注意清除缓存,或者使用无痕浏览
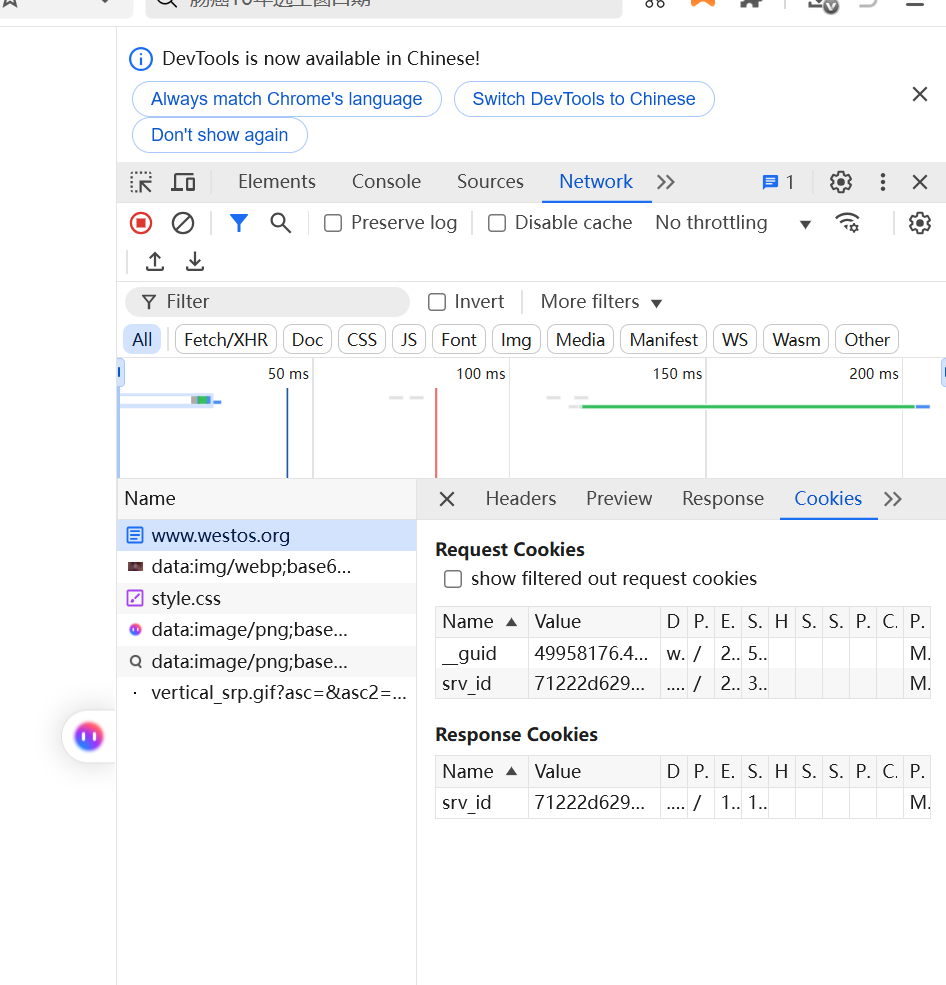
按Fn+F12查看cookies值
Cookie 是服务器下发、保存在浏览器本地的小型文本数据,浏览器后续访问同一网站时,会自动带上 Cookie 发给服务端。
nginx编译
静态编译
执行 ./configure –add-module=xxx 模块源码直接编译进 Nginx 二进制程序 nginx 内部。
编译完成后,模块永久内置到 /opt/nginx/sbin/nginx,无需额外配置。
[root@server4 ~]# wget https://nginx.org/download/nginx-1.28.3.tar.gz [root@server4 ~]# tar zxf nginx-1.28.3.tar.gz [root@server4 ~]# cd nginx-1.28.3/
gcc
作用:C 语言编译器 Nginx 是 C 语言写的。源码安装需要把 nginx 源代码编译成可执行程序,没有 gcc 就无法编译。
pcre-devel
PCRE:Perl Compatible Regular Expressions(正则表达式库)
nginx 配置里经常用到正则: location ~* \\.php$、rewrite 跳转规则全都依赖 PCRE 正则库
后缀 -devel = 开发头文件 + 库文件 只装 pcre 只有运行时库;编译源码必须装 pcre-devel
openssl-devel
OpenSSL 加密库 用途:开启 HTTPS(ssl 模块),支持 SSL/TLS 证书、https 网站。 不装这个,编译 nginx 无法启用 –with-http_ssl_module,不能搭建 https 站点。
[root@server4 nginx-1.28.3]# yum install -y gcc pcre-devel openssl-devel
–prefix=/opt/nginx
作用:指定 Nginx 安装目录
- 不指定默认路径:/usr/local/nginx
✅ 好处: 目录清晰,多个 nginx 版本互不冲突;卸载直接删除整个 /opt/nginx 文件夹即可,不用到处删文件。
[root@server4 nginx-1.28.3]# ./configure –prefix=/opt/nginx –with-http_ssl_module –with-http_stub_status_module –add-module=../nginx_sticky_module_ng-0.0.2 [root@server4 nginx-1.28.3]# make $$ make install [root@server4 nginx-1.28.3]# cd /opt/nginx/conf
[root@server4 conf]# vim nginx.conf
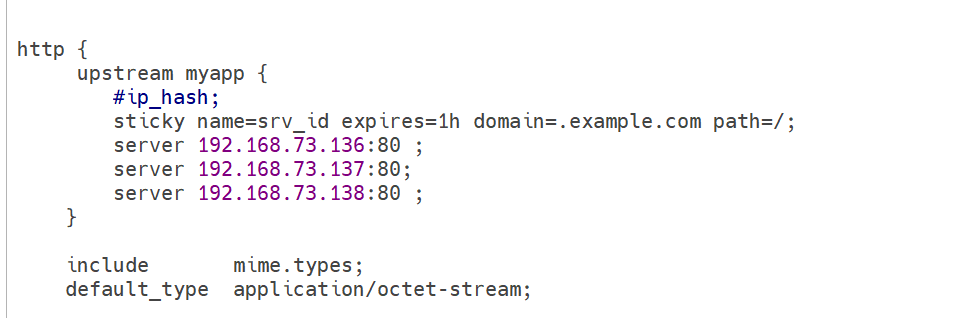
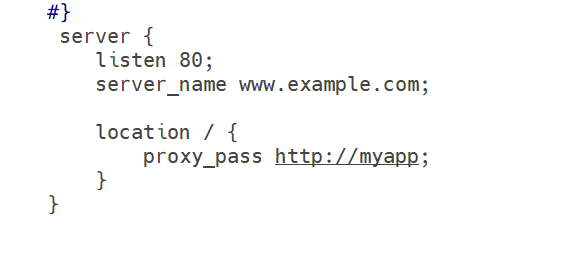
[root@server4 ~]# /opt/nginx/sbin/nginx -t [root@server4 ~]# /opt/nginx/sbin/nginx
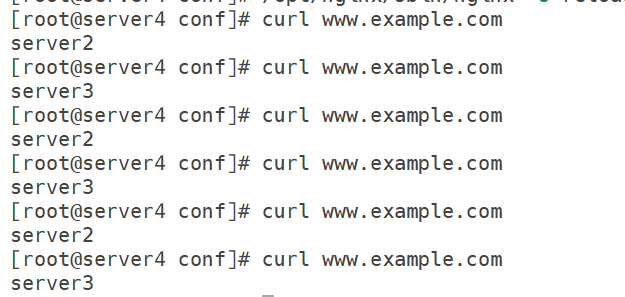
[root@server4 ~]# curl www.example.com
动态编译
-add-dynamic-module=xxx 模块编译生成独立 .so 文件,Nginx 启动时通过配置指令 load_module 动态加载。
编译后在 modules/ 目录生成:ngx_http_sticky_module.so
必须在 nginx.conf 最顶部加载模块
#停用先前静态编译的模块
[root@server4 ~]# /opt/nginx/sbin/nginx -s stop
#将二进制文件清除干净
[root@server4 ~]# make clean
[root@server4 ~]# cd nginx-1.28.3/ [root@server4 nginx-1.28.3]# vim auto/cc/gcc
关掉debug

重新编译运行
[root@server4 nginx-1.28.3]# ./configure –prefix=/opt/nginx –with-http_ssl_module –with-http_stub_status_module –with-compat –add-dynamic-module=../nginx_sticky_module_ng-0.0.2 [root@server4 nginx-1.28.3]# make
[root@server4 ~]# vim /opt/nginx/conf/nginx.conf
load_module modules/ngx_http_sticky_module.so;
Nginx 动态加载模块指令(动态模块 Dynamic Module) 作用:启动 Nginx 的时候,读取外部 .so 文件,加载 sticky 第三方模块。
和静态编译 –add-module 是两条完全不同的方案:
- 静态编译:–add-module → 模块代码直接打进 nginx 主程序二进制,不需要 .so、不需要 load_module
- 动态模块:–add-dynamic-module 编译生成独立 xxx.so 文件,运行时用 load_module 加载
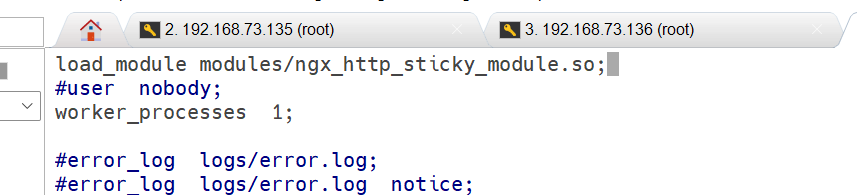
[root@server4 ~]# /opt/nginx/sbin/nginx -t nginx: the configuration file /opt/nginx/conf/nginx.conf syntax is ok nginx: configuration file /opt/nginx/conf/nginx.conf test is successful
总结
Nginx 模块分为静态编译与动态编译两种方式。静态编译通过–add-module将模块直接打包进 Nginx 主程序,部署简单,但新增 / 移除模块需要完整重新编译;动态编译使用–add-dynamic-module生成独立.so库,依靠load_module指令按需加载,扩容灵活,无需反复编译整套 Nginx,要求 Nginx 版本 ≥1.9.11。
nginx安全控制
nginx限制并发连接数
参数配置
[root@server1 nginx]# vim conf/nginx.conf


该配置实现下载目录单 IP 单连接限制:通过limit_conn_zone创建共享内存,在/download/路由中使用limit_conn addr 1,约束同一客户端仅允许同时发起一条下载连接,避免多线程下载抢占服务器带宽资源。
root@server1 nginx]# nginx -t nginx: the configuration file /usr/local/nginx/conf/nginx.conf syntax is ok nginx: configuration file /usr/local/nginx/conf/nginx.conf test is successful [root@server1 nginx]# nginx -s reload
压力测试
- -c 10:并发 10 个连接
- -n 10:总共发起 10 次请求
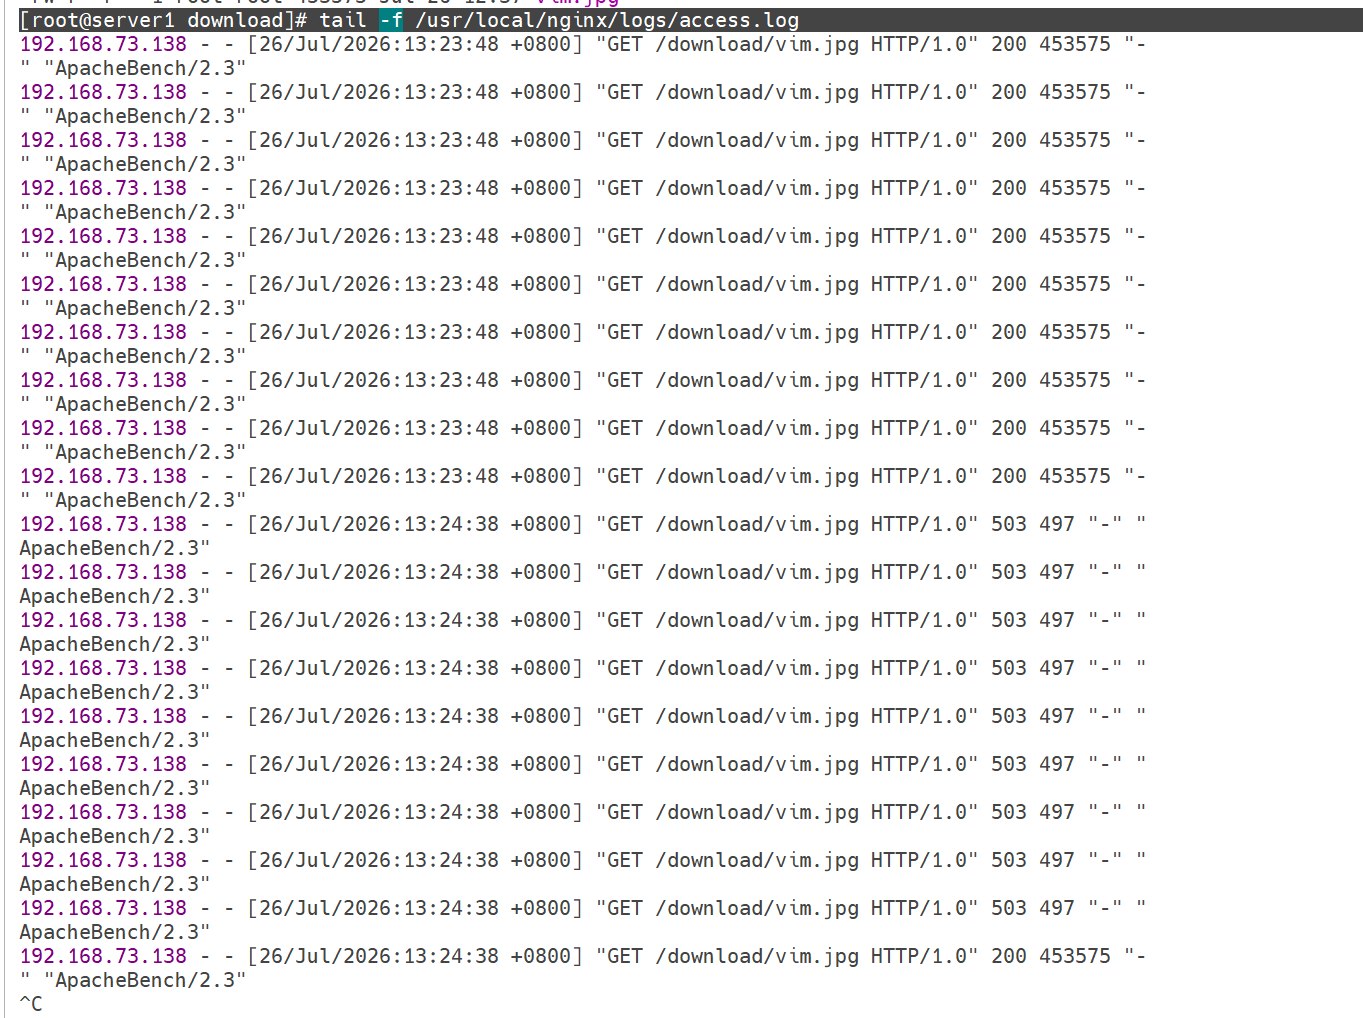
[root@server4 ~]# ab -c 10 -n 10 http://192.168.73.135/download/vim.jpg
[root@server1 download]# tail -f /usr/local/nginx/logs/access.log
正常请求状态码 200,被限流请求状态码 503
只有一条并发连接通过
限制请求数
参数配置
[root@server1 nginx]# vim conf/nginx.conf


limit_conn addr 1 同一客户端 IP,最多同时保持1 个活跃 TCP 连接,适合防止多线程下载抢占带宽。
limit_req zone=one burst=5 nodelay;
- rate=1r/s:基准限速,每秒最多放行 1 个请求;
- burst=5:最多容纳 5 个请求进入缓冲队列;
- nodelay:队列内请求立刻放行,不等待平滑延迟;
如果不带 nodelay,超出速率的请求会排队延时发放。
[root@server1 nginx]# nginx -t nginx: the configuration file /usr/local/nginx/conf/nginx.conf syntax is ok nginx: configuration file /usr/local/nginx/conf/nginx.conf test is successful [root@server1 nginx]# nginx -s reload
压力测试
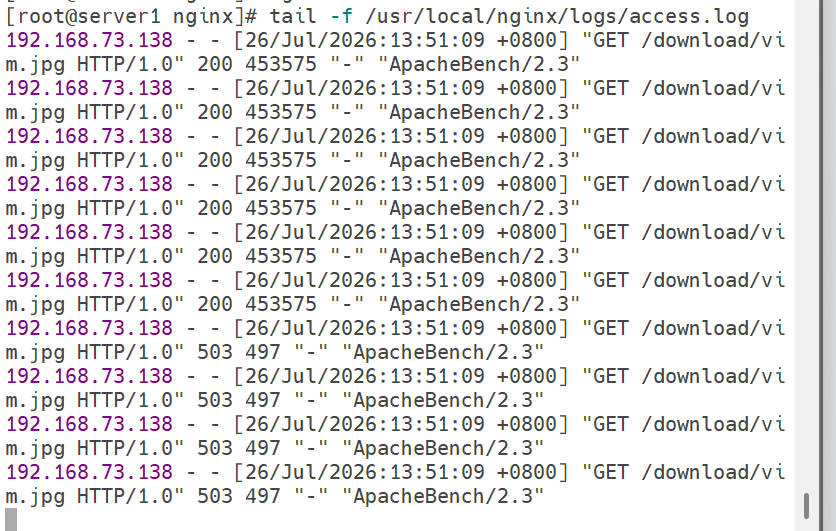
[root@server4 ~]# ab -c 1 -n 10 http://192.168.73.135/download/vim.jpg [root@server1 nginx]# tail -f /usr/local/nginx/logs/access.log
- 前 5 个请求:直接立刻放行
- 从第 6 个请求开始:超出速率 + 队列上限,直接返回 503
限制速率
参数配置
[root@server1 nginx]# vim conf/nginx.conf

-
limit_conn addr 1; 依靠提前定义的 limit_conn_zone addr,限制单个客户端 IP 最多同时保持 1 条活跃 TCP 连接,防止同一用户开启多线程并发下载抢占带宽。
-
limit_rate 100k; 单连接限速:每条 TCP 连接最大传输速率限制为 100KB/s。
root@server1 nginx]# nginx -t nginx: the configuration file /usr/local/nginx/conf/nginx.conf syntax is ok nginx: configuration file /usr/local/nginx/conf/nginx.conf test is successful [root@server1 nginx]# nginx -s reload
压力测试
[root@server4 ~]#ab -c 1 -n 5 http://192.168.36.132/download/vim.jpg


自动索引
utoindex on; 目录自动索引 访问 /download/ 目录时,如果没有 index.html,Nginx 自动列出目录下所有文件清单,提供在线浏览、文件下载链接。


缓存配置
- ~:开启正则匹配;
- 匹配所有以 .gif .jpg .png 结尾的图片资源请求。
expires 365d; 用于设置浏览器缓存,添加响应头 Cache-Control、Expires; 告知浏览器:该静态图片文件可以在本地缓存 365 天。 在有效期内,浏览器再次访问时,不会发起新 HTTP 请求,直接读取本地缓存,减轻服务器压力。

[root@server4 ~]# curl -I http://192.168.73.135/download/vim.jpg
只发送 HTTP 头部请求,不下载文件实体内容,用来查看服务器返回的响应头信息。
参数解释
- curl:网络请求工具
- -I(大写 i,–head):仅发起 HEAD 请求 HEAD 协议特性:服务器只返回响应头,不返回图片 / 文件正文,速度快,不消耗带宽。

禁用日志记录
access_log off; 作用:对当前 location 匹配到的请求,关闭访问日志记录。 匹配 gif/jpg/png 图片的请求不会写入access.log。

日志轮转
#编辑切割脚本
[root@server1 conf]# vim /opt/nginx_log.sh
#!/bin/bash
cd /usr/local/nginx/logs && mv access.log access_$(date +%F -d -1day).log
kill -USR1 `cat /usr/local/nginx/logs/nginx.pid`
#添加执行权限
[root@server1 ~]# chmod +x /opt/nginx_log.sh
执行测试脚本 [root@server1 ~]# /opt/nginx_log.sh [root@server1 ~]# cd /usr/local/nginx/logs/ [root@server1 logs]# ls access_2026-07-25.log access.log error.log nginx.pid
#编辑定时任务 [root@server1 logs]# crontab -e

日志可视化
[root@server1 ~]#wget https://tar.goaccess.io/goaccess-1.8.tar.gz [root@server1 ~]#tar xf goaccess-1.8.tar.gz
[root@server1 ~]#yum install -y ncurses-devel.x86_64 [root@server1 ~]#cd goaccess-1.8/ [root@server1 goaccess-1.8]# ./configure –enable-utf8 [root@server1 goaccess-1.8]# make
[root@server1 goaccess-1.8]# make install
[root@server1 goaccess-1.8]#goaccess /usr/local/nginx/logs/access.log -o /usr/local/nginx/html/report.html –log-format=COMBINED –real-time-html &
-
goaccess 开源实时 Nginx/Apache 日志分析工具,将 access 日志生成可视化统计报表。
-
/usr/local/nginx/logs/access.log 待分析的 Nginx 访问日志源文件。
-
-o /usr/local/nginx/html/report.html 输出报表文件,生成静态 html 页面,放在 nginx 网站根目录,可以直接浏览器访问。
-
–log-format=COMBINED 使用标准Nginx combined(组合日志格式,对应 nginx 默认main日志格式。
-
–real-time-html 实时 HTML 模式:持续监听日志文件变化,自动刷新报表,页面支持 websocket 实时更新数据。
-
& 命令末尾后台运行,脱离当前终端。

站点限制
stub_status on; 开启 Nginx 内置状态监控页面,提供连接数、请求数等运行指标。
-
allow 127.0.0.1; 仅允许本机(回环地址)访问 /status。
-
deny all; 拒绝所有其他 IP 地址访问。

[root@server1 conf]# nginx -t nginx: the configuration file /usr/local/nginx/conf/nginx.conf syntax is ok nginx: configuration file /usr/local/nginx/conf/nginx.conf test is successful [root@server1 conf]# nginx -s reload
[root@server1 ~]# curl localhost/status
[root@server4 ~]# curl 192.168.73.135/status

Active connections: 1 # 当前活跃连接总数
5138 5138 5065 accepts(总连接数)
handled(成功建立连接) requests(总请求数)
Reading: 0 # 正在读取请求的连接
Writing: 1 # 正在向客户端响应数据的连接
Waiting: 0 # 空闲keepalive长连接

server4处于黑名单,返回403拒绝访问
中文乱码

虚拟主机

[root@server1 conf]# nginx -t nginx: the configuration file /usr/local/nginx/conf/nginx.conf syntax is ok nginx: configuration file /usr/local/nginx/conf/nginx.conf test is successful [root@server1 conf]# nginx -s reload
https配置
#进入证书目录
[root@server1 ~]# cd /etc/pki/tls/certs/
#生成自签名证书 [root@server1 certs]# make cert.pem
生成一对 RSA 私钥 + 数字证书
- 证书:对外公开,包含域名、单位信息、公钥
- 私钥:服务器保密,用于加密通信解密
Country Name (2 letter code) [XX]:cn State or Province Name (full name) []:shaanxi Locality Name (eg, city) [Default City]:xi'an Organization Name (eg, company) [Default Company Ltd]:westos Organizational Unit Name (eg, section) []:linux Common Name (eg, your name or your server's hostname) []:web1.westos.org Email Address []:
#把证书放到 Nginx 配置目录,方便配置文件引用。
[root@server1 certs]# mv cert.pem /usr/local/nginx/conf/ [root@server1 certs]# cd /usr/local/nginx/conf/ [root@server1 conf]# vim nginx.conf
- listen 443 ssl:开启 443 端口 TLS 加密监听
- ssl_certificate 指定公钥证书
- ssl_certificate_key 指定私钥 客户端连接 443 端口时,自动启用 TLS 加密握手。

[root@server1 conf]# nginx -t nginx: the configuration file /usr/local/nginx/conf/nginx.conf syntax is ok nginx: configuration file /usr/local/nginx/conf/nginx.conf test is successful [root@server1 conf]# nginx -s reload
[root@server1 conf]# netstat -antlp

整条链路流程
- 客户端请求 https://web1.westos.org
- 和服务器 443 端口进行 TLS 握手
- 服务器下发证书给客户端
- 客户端验证证书(自签名这里校验失败,-k 跳过校验)
- 双方协商加密算法,建立加密通道
- 传输网页数据,所有流量密文传输

输出重定向
rewrite ^/bbs$ http://bbs.westos.org permanent;
- 正则 ^/bbs$:精确匹配访问地址 http://www.westos.org/bbs
- 作用:访问 /bbs 时,永久重定向跳转到 http://bbs.westos.org
rewrite ^/bbs/(.*)$ http://bbs.westos.org/$1 permanent;
- ^/bbs/(.*)$:匹配 /bbs/ 后面带任意路径
- $1:正则捕获分组,代表 /bbs/ 之后所有内容
- 示例: http://www.westos.org/bbs/post.html → 跳转 http://bbs.westos.org/post.html
两条配合实现:/bbs 和 /bbs/xxx 全部跳转到 bbs 子域名网站。

通过 rewrite 正则重定向,实现访问www.westos.org下 /bbs 相关路径自动跳转至bbs.westos.org子站点;使用 permanent 生成 301 永久重定向

防盗链
将server2的首页指向www.westos.org下面的vim.jpg图片

访问server2网址IP可以查看首页的vim.jpg照片

加防盗链,禁止外部服务器查看图片

location ~ \\.(jpg|png)$
匹配所有 jpg、png 图片资源,针对图片实现防盗链控制。
2. valid_referers none blocked www.westos.org;
valid_referers:配置合法的来源站点(Referer) 参数含义:
- none:允许直接在地址栏输入图片地址访问(没有 Referer 请求头)
- blocked:允许 Referer 被防火墙、代理隐藏(协议头被剥离)
- www.westos.org:只允许本站域名内页面引用图片
不在列表内的来源 → Nginx 自动赋值变量 $invalid_referer = 1
3. if ($invalid_referer)
判断:如果来源不合法(盗链),执行内部语句,两种方法二选一
盗链访问直接返回 403 Forbidden,拒绝加载图片。
不返回 403,重定向到一张防盗链提示图片(盗链占位图)。

php
php安装
[root@server1 ~]# tar xf php-8.3.32.tar.bz2
[root@server1 ~]# cd php-8.3.32/
执行./configure编译 PHP 时,程序会自动检测系统环境,出现依赖缺失报错时,按需安装对应开发库。
[root@server1 php-8.3.32]# ./configure –prefix=/usr/local/php –with-config-file-path=/usr/local/php/etc –enable-fpm –with-fpm-user=nginx –with-fpm-group=nginx –with-curl –with-iconv –with-mhash –with-zlib –with-openssl –enable-mysqlnd –with-mysqli –with-pdo-mysql –disable-debug –enable-sockets –enable-soap –enable-inline-optimization –enable-xml –enable-ftp –enable-gd –enable-exif –enable-mbstring –enable-bcmath –with-fpm-systemd
安装systemd-devel libxml2-devel sqlite-devel libpng-devel libcurl-devel
注意:编译过程后续会遇到两个软件版本达不到 PHP 8.3 最低要求,系统 yum 仓库提供的 rpm 包版本偏低,无法满足编译条件;不能直接使用 yum/rpm 方式安装,必须下载源码包手动编译安装对应高版本,安装完成后再重新执行 PHP 的./configure检测。
libzip
编译 libzip 需要 cmake3,系统默认 cmake 版本不足,先安装 cmake3 工具。
yum install -y cmake3
# 创建软链接,直接使用cmake调用cmake3
ln -s /usr/bin/cmake3 /usr/bin/cmake
[root@server1 ~]#tar -xf libzip-1.9.2.tar.gz
[root@server1 ~]#cd libzip-1.9.2
#创建独立编译目录
[root@server1 libzip-1.9.2]#mkdir build && cd build
#cmake编译配置
[root@server1 libzip-1.9.2]#cmake \\ -DCMAKE_INSTALL_PREFIX=/usr/local/libzip \\ -DBUILD_SHARED_LIBS=ON \\ ..
#编译安装
[root@server1 libzip-1.9.2]#make -j2 #这里的数等于cpu的内核数,使用lscpu查看
[root@server1 libzip-1.9.2]#make install
编译安装完成后,系统无法自动识别新安装的 libzip 动态库,需要写入配置并刷新缓存:
echo "/usr/local/libzip/lib64" > /etc/ld.so.conf.d/libzip.conf
ldconfig
PHP 的./configure通过 pkg-config 检索 libzip,需要指定 pkgconfig 路径:
export PKG_CONFIG_PATH=/usr/local/libzip/lib64/pkgconfig
openssl
编译 PHP 8.3 过程中,系统自带 OpenSSL 版本较低,无法满足–with-openssl编译条件,yum 源版本不达标,需要源码编译安装高版本 OpenSSL。
卸载老版本
yum remove -y openssl-devel
安装新版本
tar -xf openssl-1.1.1w.tar.gz
cd openssl-1.1.1w
编译配置
./config shared zlib –prefix=/usr/local/openssl
编译安装
make -j2
make install
写入配置并刷新缓存
echo "/usr/local/openssl/lib" > /etc/ld.so.conf.d/openssl.conf
ldconfig
环境变量
export PKG_CONFIG_PATH=/usr/local/openssl/lib/pkgconfig:$PKG_CONFIG_PATH
重新编译php
[root@server1 php-8.3.32]# ./configure –prefix=/usr/local/php –with-config-file-path=/usr/local/php/etc –enable-fpm –with-fpm-user=nginx –with-fpm-group=nginx –with-curl –with-iconv –with-mhash –with-zlib –with-openssl –enable-mysqlnd –with-mysqli –with-pdo-mysql –disable-debug –enable-sockets –enable-soap –enable-inline-optimization –enable-xml –enable-ftp –enable-gd –enable-exif –enable-mbstring –enable-bcmath –with-fpm-systemd
编译安装
make -j2
make instal
PHP配置
[root@server1 ~]# cd php-8.3.32/
#把源码包里生产版 php 配置模板复制到 PHP 程序读取配置文件的正式路径,命名为php.ini。
[root@server1 php-8.3.32]# cp php.ini-production /usr/local/php/etc/php.ini
#
php-fpm.service 在
PHP 源码包目录:sapi/fpm/
[root@server1 php-8.3.32# cd sapi/fpm
#复制systemd服务单元文件到系统服务目录
[root@server1 fpm]# cp php-fpm.service /usr/lib/systemd/system
[root@server1 fpm]# vim /usr/lib/systemd/system/php-fpm.servic
注释掉#ProtectSystem=full
ProtectSystem=full 只限制 /usr /etc /boot,安装到其他目录下 不用注释掉该行
ProtectSystem=full 会将 /usr 目录设置为只读。源码安装的 PHP 放置在 /usr/local/php 内,php-fpm 运行时需要在此路径写入 pid、日志等文件。目录只读会导致写入失败、服务无法启动,注释该配置就取消了这一层只读限制,保障 php-fpm 正常读写目录。

启动
systemd 会把所有 .service 文件加载到内存里运行。
如果你修改、新增、删除 /usr/lib/systemd/system/ 或者 /etc/systemd/system/ 下的服务配置文件,systemd 不会自动感知改动。 daemon-reload = 让 systemd 重新扫描、重新读取所有服务单元配置,刷新内存里的服务信息。
[root@server1 fpm]# systemctl daemon-reload
[root@server1 fpm]# systemctl start php-fpm.service
nginx与php结合
[root@server1 sapi]# cd /usr/local/nginx/conf/
[root@server1 conf]# vim nginx.conf
Nginx 本身不能解析 PHP 代码。当用户访问 .php 文件,Nginx 通过 FastCGI 协议,把 PHP 请求转发给 php-fpm(127.0.0.1:9000),由 PHP 进程执行代码,结果返回 Nginx,再响应浏览器。
location ~ \\.php$
- ~:正则匹配
- \\.php$:匹配所有以 .php 结尾的请求(例如 /index.php、/test.php) 只要访问地址后缀是.php,进入这个 location 块处理。
2. root html;
定义网页根目录:文件物理路径为 nginx安装目录/html/ php 文件放在 /usr/local/nginx/html/index.php 和这里对应。
3. fastcgi_pass 127.0.0.1:9000;
✅ 最重要指令 指定 php-fpm 的地址:Nginx 把 php 请求通过 FastCGI 转发到本机 9000 端口。
php-fpm 默认监听 127.0.0.1:9000。
4. fastcgi_index index.php;
如果访问路径是 /xxx/(目录),默认去找目录下 index.php。

[root@server1 conf]# vim /usr/local/nginx/html/index.php

浏览器访问192.168.73.135/index.php

php动态扩展模块
添加php环境变量
[root@server1 ~]# vim .bash_profile

[root@server1 ~]# source .bash_profile
编译memcahe模块
减轻 PHP-FPM 压力,高频动态页面不用重复执行 PHP 代码
[root@server1 ~]# tar xf memcache-8.2.tgz
[root@server1 ~]# cd memcache-8.2/
[root@server1 memcache-8.2]# yum install -y autoconf
[root@server1 memcache-8.2]# ./configure
[root@server1 memcache-8.2]# make
[root@server1 memcache-8.2]# make install
[root@server1 memcache-4.0.5.2]# cd /usr/local/php/etc
[root@server1 etc]# vim php.ini

[root@server1 etc]# systemctl reload php-fpm
- memcache.php:PHP 测试页面,代码一般用来: PHP 连接 memcached、写入缓存、读取缓存,验证 PHP 操作 Memcached 服务 是否正常。
- example.php:附属测试脚本。
[root@server1 memcache-8.2]# cp example.php memcache.php /usr/local/nginx/html/
[root@server1 html]# yum install -y memcached
[root@server1 html]# systemctl enable –now memcached
[root@server1 memcache-4.0.5.2]# cd /usr/local/nginx/html/
[root@server1 html]# vim memcache.php


openresty部署
openresty下的nginx
nginx -s stop
[root@server1 conf]# cd /etc/yum.repos.d/
[root@server1 yum.repos.d]# wget https://openresty.org/package/rhel/openresty.repo [root@server1 yum.repos.d]# ls CentOS-Base.repo epel.repo openresty.repo [root@server1 yum.repos.d]# yum install -y openresty [root@server1 conf]# cd /usr/local/openresty/nginx/sbin/ [root@server1 sbin]# ls nginx [root@server1 sbin]# du -h nginx 2.2M nginx
[root@server1 sbin]# cd /usr/local/nginx/ [root@server1 nginx]# cd conf/
#直接将之前配置好的nginx.conf文件拷贝一份过来 [root@server1 conf]# cp nginx.conf /usr/local/openresty/nginx/conf/
[root@server1 conf]# cd .. [root@server1 nginx]# cd html/
#将页面 缓存等也拷贝过来
[root@server1 html]# cp example.php memcache.php index.php /usr/ local/openresty/nginx/html/
#检测语法并启用
[root@server1 html]# openresty -t [root@server1 html]# openresty
正常生效


[root@server2 ~]# ab -c10 -n2000 http://192.168.73.135/example.php #压力测试

nginx原生缓存
[root@server1 nginx-1.30.4]# ./configure –with-http_ssl_module – -with-http_stub_status_module –add-module=../echo-nginx-module-m aster –add-module=../memc-nginx-module-master –add-module=../sr cache-nginx-module-master –with-cc-opt="-I/usr/local/openssl/inc lude" –with-ld-opt="-L/usr/local/openssl/lib -Wl,-rpath=/usr/loc al/openssl/lib"
[root@server1 nginx-1.30.4]# cd objs/ [root@server1 objs]# cp nginx /usr/local/nginx/sbin/ [root@server1 conf]# vim nginx.conf


tomcat
nginx整合tomcat
用户只能访问 Nginx,Nginx 把动态 Java 请求转发给后端 Tomcat;隐藏后端 Tomcat 服务器真实 IP,提升后端安全性。
后端部署多台 Tomcat,Nginx 分发用户请求,分摊服务器压力,实现集群水平扩展;一台 Tomcat 故障,自动分发流量至其他节点,提升服务可用性。
以下操作server2和server3相同
wget https://dlcdn.apache.org/tomcat/tomcat-9/v9.0.120/bin/apache-tomcat-9.0.120.tar.gz
#解压到 /usr/local下面
tar zxf apache-tomcat-9.0.120.tar.gz -C /usr/local cd apache-tomcat-9.0.120/
#建立软连接 ln -s apache-tomcat-9.0.120/ tomcat
- 源目录:apache-tomcat-9.0.120/(真实 tomcat 文件夹)
- 链接名:tomcat 之后 cd /xxx/tomcat 等价于直接进入 apache-tomcat-9.0.120,方便不用敲长版本名字。
yum install -y java-1.8.0-openjdk.x86_64
#启动软件
/usr/local/tomcat/bin/startup.sh
在/usr/local/tomcat/bin/下面有软件的启动(startup.sh)和关闭(shutdown.sh)脚本
访问192.168.73.136和192.168.73.138的:8080端口

nginx实现负载均衡和反向代理
负载均衡:

反向代理:

#在这个位置放入测试页面test.jsp
cd /usr/local/tomcat/webapps/ROOT/
浏览器访问server1192.168.73.135/test.jsp出现测试页面

提交用户,此时是192.168.73.136

关掉192.168.73.136
[root@server2 conf]# /usr/local/tomcat/bin/shutdown.sh
服务端自动跳转到192.168.73.138,但是之前的用户都没有了

tomcat整合memcached
交叉存储
注意以下操作server2 和 server3 操作相同
[root@server2 ~]# yum install -y memcached
[root@server2 ~]# systemctl enable –now memcached
#放入msm压缩包
[root@server2 ~]# yum install -y memcached
[root@server2 ~]# systemctl enable –now memcached
[root@server2 msm]# cp * /usr/local/tomcat/lib/
[root@server2 msm]# cd /usr/local/tomcat/conf
[root@server2 conf]# vim context.xml
server2为n1,server3为n2


重启生效
[root@server2 conf]# /usr/local/tomcat/bin/shutdown.sh [root@server2 conf]# /usr/local/tomcat/bin/startup.sh
此时ID为n1
关闭server2的mamcached服务
[root@server2 /]# systemctl stop memcached.service
ID自动跳转到n2