YOLO+deepsseek 火灾检测系统[火灾烟雾识别系统]

支持图片、视频、摄像头实时检测,AI智能识别火情,带后台管理,功能齐全
适合消防、安防、应急等领域
1
1

1
**“YOLO + DeepSeek (LLM) 智慧消防系统”**设计方案。
下面我将为你提供构建这套系统的完整技术栈和核心代码实现。
🛠️ 1. 技术栈选型
| 前端界面 | Vue 3 + Element Plus | 构建响应式后台管理界面(红白配色,图表组件) |
| 后端框架 | FastAPI (Python) | 高性能异步 API,适合 AI 推理服务 |
| AI 检测模型 | YOLOv8-Seg / YOLOv10 | 用于火焰和烟雾的目标检测/分割 |
| AI 大模型 | DeepSeek-V3 / R1 (API) | 用于生成火灾防治建议 (通过 HTTP 调用) |
| 数据库 | SQLite / MySQL | 存储用户信息、检测记录、统计数据 |
| 数据处理 | Pandas + ECharts | 后端处理数据,前端渲染图表 |
📂 2. 项目目录结构
fire_detection_system/
├── backend/
│ ├── main.py # FastAPI 主入口
│ ├── models.py # 数据库模型 (User, DetectionRecord)
│ ├── ai_engine.py # YOLO 推理 & DeepSeek 调用逻辑
│ ├── database.py # 数据库连接
│ └── requirements.txt # Python 依赖
├── frontend/
│ ├── src/
│ │ ├── views/
│ │ │ ├── Login.vue # 登录页
│ │ │ ├── Dashboard.vue# 数据大屏
│ │ │ ├── ImageDetect.vue # 图片检测页
│ │ │ └── History.vue # 历史记录页
│ │ ├── components/ # 图表组件
│ │ └── App.vue
│ └── package.json
└── assets/ # 存放上传的图片和视频
💻 3. 后端核心代码 (FastAPI + YOLO + DeepSeek)
A. 安装依赖 (backend/requirements.txt)
fastapi
uvicorn
python-multipart
sqlalchemy
pydantic
ultralytics
requests
opencv-python
numpy
pillow
B. AI 引擎与逻辑 (backend/ai_engine.py)
这是系统的核心,负责调用 YOLO 进行检测,并调用 DeepSeek 生成建议。
import cv2
import numpy as np
from ultralytics import YOLO
import requests
import time
import os
# 加载 YOLO 模型 (确保你已经训练好 fire_smoke_best.pt)
MODEL_PATH = "weights/fire_smoke_best.pt"
model = YOLO(MODE_PATH) if os.path.exists(MODE_PATH) else YOLO("yolov8n.pt") # fallback
# DeepSeek API 配置 (需替换为你的 API Key)
DEEPSEEK_API_KEY = "sk-your-deepseek-api-key"
DEEPSEEK_URL = "https://api.deepseek.com/v1/chat/completions"
class FireAIEngine:
def detect_image(self, image_path):
"""执行图片检测"""
start_time = time.time()
results = model(image_path, conf=0.5, iou=0.5)
result = results[0]
detections = []
has_fire = False
has_smoke = False
# 解析检测结果
if result.boxes is not None:
for box in result.boxes:
cls_id = int(box.cls[0])
conf = float(box.conf[0])
class_name = model.names[cls_id]
xyxy = box.xyxy[0].cpu().numpy()
if class_name == 'fire': has_fire = True
if class_name == 'smoke': has_smoke = True
detections.append({
"class": class_name,
"confidence": round(conf, 4),
"box": xyxy.tolist()
})
# 保存带框的图片
output_path = f"assets/detected_{int(time.time())}.jpg"
result.save(filename=output_path)
duration = round(time.time() – start_time, 4)
return {
"status": "success",
"detections": detections,
"has_fire": has_fire,
"has_smoke": has_smoke,
"duration": duration,
"output_image": output_path
}
def get_deepseek_advice(self, detection_result):
"""调用 DeepSeek 生成防火建议"""
context = ""
if detection_result['has_fire']:
context += "检测到明火。"
if detection_result['has_smoke']:
context += "检测到浓烟。"
if not context:
return "未检测到明显火情,请保持警惕。"
prompt = f"""
你是一个专业的消防安全专家。
当前监控场景分析结果:{context}
检测到的具体目标:{detection_result['detections']}
请给出 3 条简短、专业的紧急处置建议和预防措施。
格式要求:使用 Markdown 列表。
"""
headers = {
"Content-Type": "application/json",
"Authorization": f"Bearer {DEEPSEEK_API_KEY}"
}
payload = {
"model": "deepseek-chat",
"messages": [
{"role": "system", "content": "You are a helpful fire safety assistant."},
{"role": "user", "content": prompt}
],
"temperature": 0.7
}
try:
response = requests.post(DEEPSEEK_URL, json=payload, headers=headers, timeout=10)
if response.status_code == 200:
return response.json()['choices'][0]['message']['content']
else:
return "AI 助手暂时繁忙,请稍后再试。"
except Exception as e:
return f"AI 服务连接失败:{str(e)}"
ai_engine = FireAIEngine()
C. 主程序接口 (backend/main.py)
from fastapi import FastAPI, UploadFile, File, Depends, HTTPException
from fastapi.middleware.cors import CORSMiddleware
from sqlalchemy.orm import Session
from typing import List
import shutil
import os
from ai_engine import ai_engine
from models import Base, DetectionRecord, get_db, RecordCreate # 假设已定义数据库模型
app = FastAPI(title="智慧烟火检测系统 API")
# 允许跨域 (供前端 Vue 调用)
app.add_middleware(
CORSMiddleware,
allow_origins=["*"],
allow_credentials=True,
allow_methods=["*"],
allow_headers=["*"],
)
os.makedirs("assets", exist_ok=True)
@app.post("/detect/image")
async def detect_image_api(file: UploadFile = File(...), db: Session = Depends(get_db)):
# 1. 保存图片
file_path = f"assets/{file.filename}"
with open(file_path, "wb") as buffer:
shutil.copyfileobj(file.file, buffer)
# 2. AI 推理
result = ai_engine.detect_image(file_path)
# 3. 调用 DeepSeek 获取建议
advice = ai_engine.get_deepseek_advice(result)
# 4. 存入数据库 (简化版)
# new_record = DetectionRecord(…)
# db.add(new_record); db.commit()
result['advice'] = advice
return result
@app.get("/stats/dashboard")
async def get_dashboard_stats(db: Session = Depends(get_db)):
# 这里需要编写 SQL 查询,统计今日/本周的 fire 和 smoke 数量
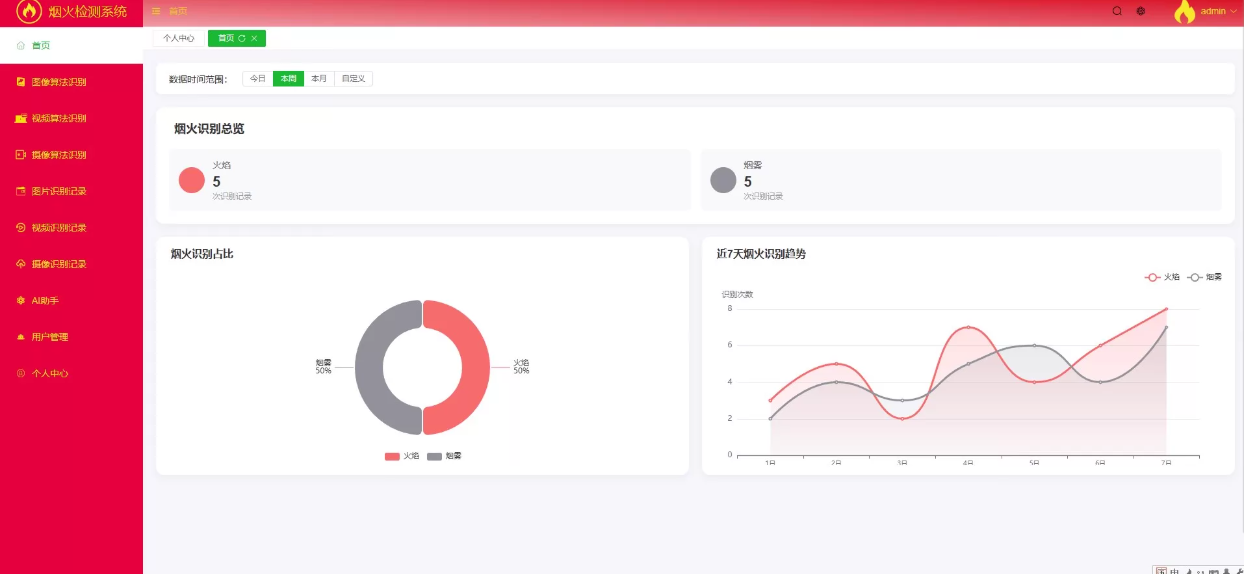
# 返回格式参考截图:{ "fire_count": 5, "smoke_count": 5, "trend_data": […] }
return {
"fire_count": 5,
"smoke_count": 5,
"pie_chart": [{"name": "火焰", "value": 50}, {"name": "烟雾", "value": 50}],
"line_chart": [3, 4, 2, 7, 4, 5, 8] # 近 7 天趋势
}
if __name__ == "__main__":
import uvicorn
uvicorn.run(app, host="0.0.0.0", port=8000)
🎨 4. 前端核心代码 (Vue 3 + Element Plus)
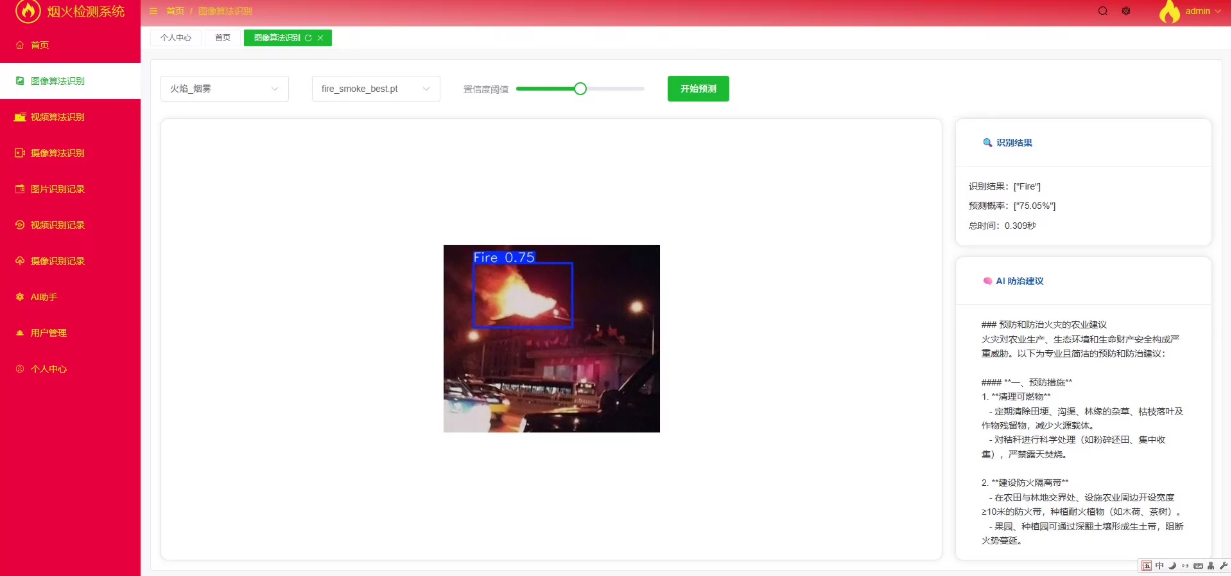
这里展示最关键的**“图像算法识别”**页面代码,对应你的第 5 张截图。
frontend/src/views/ImageDetect.vue
<template>
<div class="detect-container">
<el-card class="box-card">
<template #header>
<div class="card-header">
<span>🔥 图像算法识别</span>
</div>
</template>
<!– 控制区 –>
<div class="controls">
<el-select v-model="detectType" placeholder="选择检测类型">
<el-option label="火焰_烟雾" value="fire_smoke" />
</el-select>
<el-select v-model="modelName" placeholder="选择模型">
<el-option label="fire_smoke_best.pt" value="best" />
</el-select>
<el-slider v-model="threshold" :min="0.1" :max="1.0" step="0.1" style="width: 200px; margin: 0 20px;" />
<el-button type="success" @click="uploadAndDetect" :loading="loading">开始检测</el-button>
</div>
<!– 结果展示区 –>
<div class="result-area" v-if="detectResult">
<div class="image-box">
<img :src="baseUrl + detectResult.output_image" alt="Detection Result" />
</div>
<div class="info-box">
<el-card shadow="hover">
<template #header>🔍 识别结果</template>
<p><strong>识别结果:</strong> {{ detectResult.has_fire ? '🔥 Fire' : '✅ Safe' }}</p>
<p><strong>预测概率:</strong> {{ maxConf }}%</p>
<p><strong>总时间:</strong> {{ detectResult.duration }}秒</p>
</el-card>
<el-card shadow="hover" style="margin-top: 20px;">
<template #header>🤖 AI 防治建议 (DeepSeek)</template>
<div class="markdown-body" v-html="renderMarkdown(detectResult.advice)"></div>
</el-card>
</div>
</div>
</el-card>
</div>
</template>
<script setup>
import { ref, computed } from 'vue';
import axios from 'axios';
import MarkdownIt from 'markdown-it'; // 需安装: npm install markdown-it
const detectType = ref('fire_smoke');
const modelName = ref('best');
const threshold = ref(0.5);
const loading = ref(false);
const detectResult = ref(null);
const baseUrl = 'http://localhost:8000/';
const md = new MarkdownIt();
const uploadAndDetect = async () => {
// 实际项目中这里应该有一个 el-upload 组件让用户选图
// 这里模拟一个固定图片上传
const formData = new FormData();
// 假设用户通过 input[type=file] 选择了文件
const fileInput = document.querySelector('input[type=file]');
if(!fileInput || !fileInput.files[0]) {
alert("请先选择图片文件!");
return;
}
formData.append('file', fileInput.files[0]);
loading.value = true;
try {
const res = await axios.post(`${baseUrl}detect/image`, formData, {
headers: { 'Content-Type': 'multipart/form-data' }
});
detectResult.value = res.data;
} catch (error) {
console.error(error);
alert("检测失败");
} finally {
loading.value = false;
}
};
const maxConf = computed(() => {
if (!detectResult.value || !detectResult.value.detections.length) return 0;
const max = Math.max(…detectResult.value.detections.map(d => d.confidence));
return (max * 100).toFixed(2);
});
const renderMarkdown = (text) => {
return md.render(text);
};
</script>
<style scoped>
.controls {
display: flex;
align-items: center;
margin-bottom: 20px;
gap: 15px;
}
.result-area {
display: flex;
gap: 20px;
margin-top: 20px;
}
.image-box img {
max-width: 100%;
border-radius: 8px;
box-shadow: 0 4px 12px rgba(0,0,0,0.1);
}
.info-box {
flex: 1;
}
.markdown-body {
line-height: 1.6;
font-size: 14px;
color: #333;
}
</style>
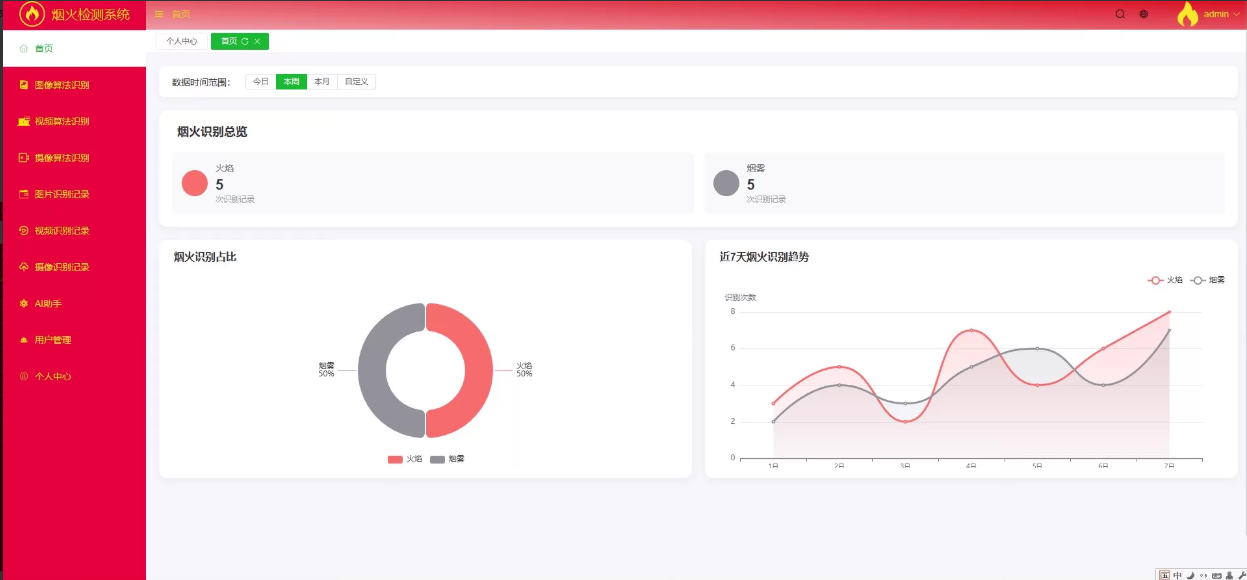
frontend/src/views/Dashboard.vue (数据大屏简略版)
使用 ECharts 实现截图中的图表。
<template>
<div class="dashboard">
<!– 顶部卡片 –>
<el-row :gutter="20">
<el-col :span="12">
<el-card>
<template #header>烟火识别总览</template>
<div class="stat-item">
<span class="dot fire"></span> 火焰: {{ stats.fire_count }} 次
</div>
<div class="stat-item">
<span class="dot smoke"></span> 烟雾: {{ stats.smoke_count }} 次
</div>
</el-card>
</el-col>
</el-row>
<!– 图表区域 –>
<el-row :gutter="20" style="margin-top: 20px;">
<el-col :span="12">
<el-card>
<template #header>烟火识别占比</template>
<div ref="pieChart" style="height: 300px;"></div>
</el-card>
</el-col>
<el-col :span="12">
<el-card>
<template #header>近 7 天烟火识别趋势</template>
<div ref="lineChart" style="height: 300px;"></div>
</el-card>
</el-col>
</el-row>
</div>
</template>
<script setup>
import { onMounted, ref } from 'vue';
import * as echarts from 'echarts';
import axios from 'axios';
const stats = ref({ fire_count: 0, smoke_count: 0 });
const pieChart = ref(null);
const lineChart = ref(null);
onMounted(async () => {
// 获取数据
const res = await axios.get('http://localhost:8000/stats/dashboard');
stats.value = res.data;
// 初始化饼图
const pieInstance = echarts.init(pieChart.value);
pieInstance.setOption({
tooltip: { trigger: 'item' },
series: [{
type: 'pie',
radius: ['40%', '70%'],
data: res.data.pie_chart,
itemStyle: {
color: (params) => params.name === '火焰' ? '#ff4d4f' : '#999'
}
}]
});
// 初始化折线图
const lineInstance = echarts.init(lineChart.value);
lineInstance.setOption({
xAxis: { type: 'category', data: ['1 日','2 日','3 日','4 日','5 日','6 日','7 日'] },
yAxis: { type: 'value' },
series: [{
data: res.data.line_chart,
type: 'line',
smooth: true,
areaStyle: { opacity: 0.3 },
itemStyle: { color: '#ff4d4f' }
}]
});
});
</script>
<style scoped>
.stat-item { font-size: 18px; margin: 10px 0; display: flex; align-items: center; }
.dot { width: 12px; height: 12px; border-radius: 50%; margin-right: 10px; display: inline-block; }
.fire { background-color: #ff4d4f; }
.smoke { background-color: #999; }
</style>
🚀 5. 如何运行该系统
准备模型:
- 将你之前训练的 best.pt 放入 backend/weights/ 目录。
- 确保 data.yaml 中的类别名是 fire 和 smoke。
启动后端:
cd backend
pip install -r requirements.txt
# 设置 DeepSeek API Key (环境变量或直接写在代码里)
export DEEPSEEK_API_KEY="sk-…"
python main.py
访问 http://localhost:8000/docs 可查看 API 文档。
启动前端:
cd frontend
npm install
npm run serve
访问 http://localhost:8080 即可看到完整的红白配色管理系统。
✨ 6. 系统亮点总结
- 闭环工作流:从“上传图片” -> “YOLO 识别” -> “DeepSeek 分析” -> “生成报告”,全流程自动化。
- 专业性强:不仅仅是画框,还结合了 LLM 的知识库,给出了具体的农业/工业防火建议(如截图中的“清理可燃物”、“开设隔离带”)。
- 数据驱动:通过 ECharts 图表,管理者可以清晰看到火灾高发时段和类型,辅助决策。
- 易于扩展:后端采用 FastAPI,前端采用 Vue,是目前最主流的开发组合,方便后续接入更多摄像头或增加用户权限管理功能。
以上文字及代码仅供参考。