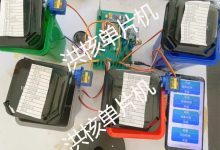
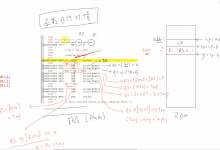
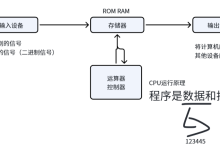
一、最终效果
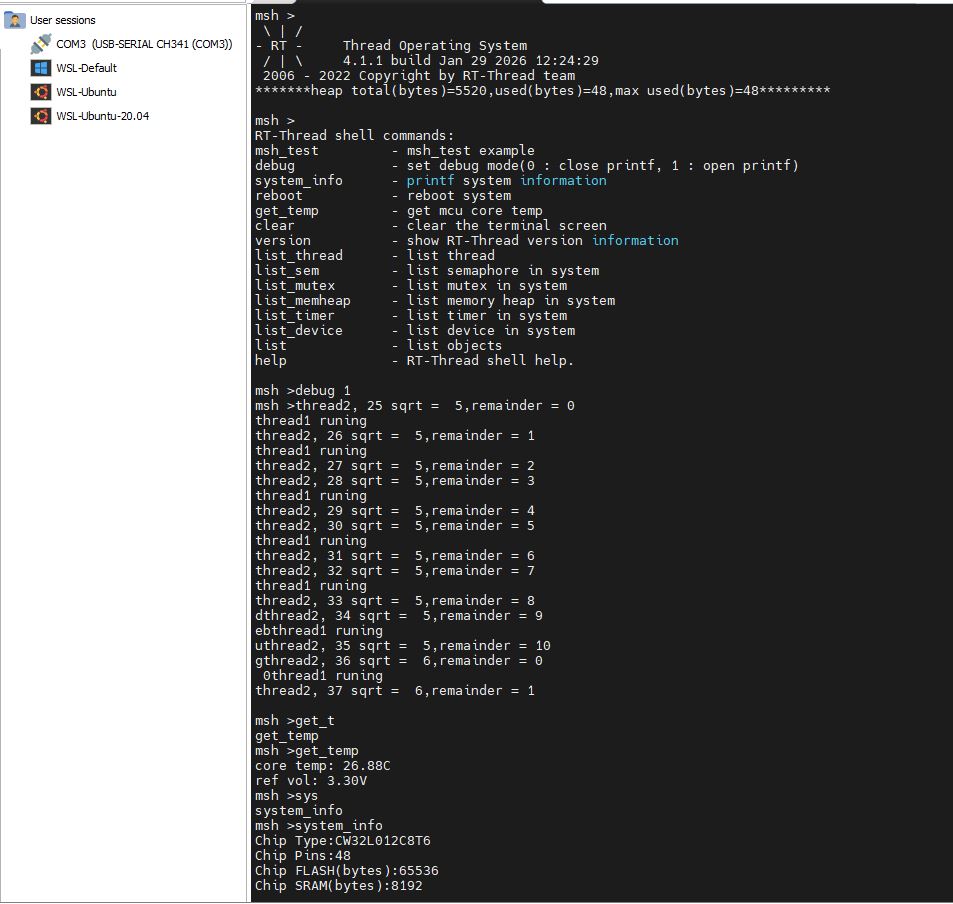
二、CW32L012规格
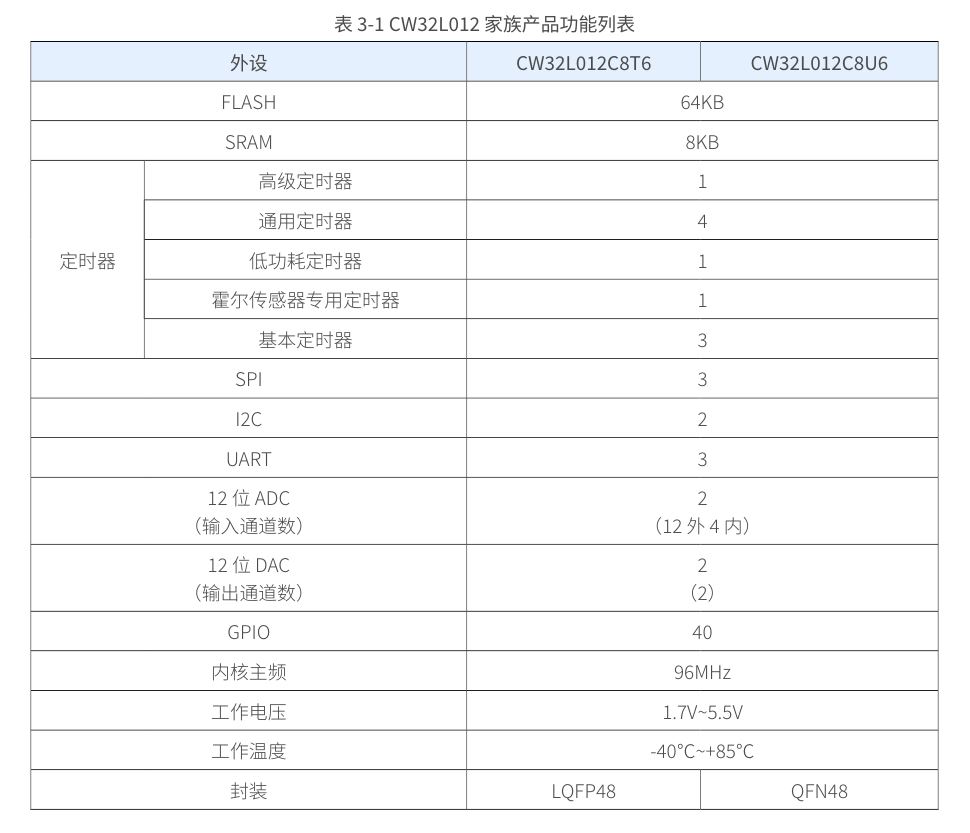
从下图可以看到RAM 8K是很小,所以移植rtthread nano较为合适
三、准备工作
1.RTthread nano 4.1.1下载
https://github.com/RT-Thread/rtthread-nano/archive/refs/tags/v4.1.1.zip
2.安装CW32L0的keil pack包
http://www.whxy.com/uploads/files/20251016/CW32L012_StandardPeripheralLib_V1.0.3.zip
3.创建keil工程
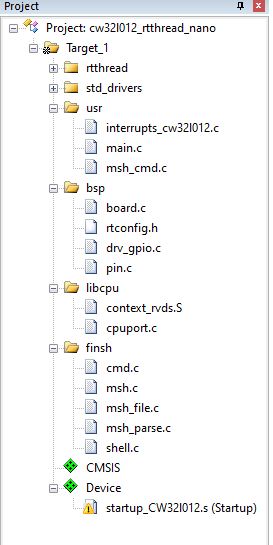
4.实际目录结构
C:.
├─rt-thread
│ ├─bsp
│ │ └─cw32l012
│ ├─components
│ │ ├─drivers
│ │ │ ├─include
│ │ │ │ ├─drivers
│ │ │ │ └─ipc
│ │ │ └─misc
│ │ └─finsh
│ ├─include
│ ├─libcpu
│ │ └─arm
│ │ ├─common
│ │ ├─cortex-m0
│ └─src
├─std_drivers
│ ├─inc
│ └─src
└─usr
├─inc
└─src
四、开始移植
1.注释下面这两个中断函数,这些中断rtos会接管
/**
* @brief This function handles Hard fault interrupt.
*/
void HardFault_Handler(void)
/**
* @brief This function handles Pendable request for system service.
*/
void PendSV_Handler(void)
2.实现节拍中断
void SysTick_Handler(void)
{
rt_interrupt_enter();
rt_tick_increase();
rt_interrupt_leave();
}
3.实现mcu频率初始化
SYSCTRL_HSI_Enable(HSIOSC_TO_HSI32MHZ);
SYSCTRL_HCLKPRS_Config(SYSCTRL_HCLK_DIV1);
SYSCTRL_PCLKPRS_Config(SYSCTRL_PCLK_DIV1);
SYSCTRL_SystemCoreClockUpdate(32000000);
SysTick_Config(SystemCoreClock / RT_TICK_PER_SECOND);
4.实现heap空间分配
#define CW32_SRAM1_SIZE (8)
#define CW32_SRAM1_START (0x20000000)
#define CW32_SRAM1_END (CW32_SRAM1_START + CW32_SRAM1_SIZE * 1024)
extern int Image$$RW_IRAM1$$ZI$$Limit;
#define HEAP_BEGIN ((void *)&Image$$RW_IRAM1$$ZI$$Limit)
#define HEAP_END CW32_SRAM1_END
#if defined(RT_USING_USER_MAIN) && defined(RT_USING_HEAP)
rt_system_heap_init((void *)HEAP_BEGIN, (void *)HEAP_END);
#endif
5.综合上述步骤
void rt_hw_board_init()
{
/* System Tick Configuration */
SYSCTRL_HSI_Enable(HSIOSC_TO_HSI32MHZ);
SYSCTRL_HCLKPRS_Config(SYSCTRL_HCLK_DIV1);
SYSCTRL_PCLKPRS_Config(SYSCTRL_PCLK_DIV1);
SYSCTRL_SystemCoreClockUpdate(32000000);
SysTick_Config(SystemCoreClock / RT_TICK_PER_SECOND);
NVIC_SetPriority(SysTick_IRQn, 0);
NVIC_EnableIRQ(SysTick_IRQn);
/* Call components board initial (use INIT_BOARD_EXPORT()) */
#ifdef RT_USING_COMPONENTS_INIT
rt_components_board_init();
#endif
#if defined(RT_USING_USER_MAIN) && defined(RT_USING_HEAP)
rt_system_heap_init((void *)HEAP_BEGIN, (void *)HEAP_END);
#endif
}
6.nano 4.1.1的坑在这儿
rtconfig.h关于heap的宏要define这些,按照3.1.3版本用RT_USING_SMALL_MEM无法分配到heap
#define RT_USING_USER_MAIN
// #define RT_USING_MEMPOOL
#define RT_USING_MEMHEAP
// #define RT_USING_SMALL_MEM
#define RT_USING_MEMHEAP_AS_HEAP
#define RT_USING_HEAP
然后如果有个变量类型报错要加上 #define RT_USING_LIBC
完整的rtconfig.h:
/* RT-Thread config file */
#ifndef __RTTHREAD_CFG_H__
#define __RTTHREAD_CFG_H__
// <<< Use Configuration Wizard in Context Menu >>>
// <h>Basic Configuration
// <o>Maximal level of thread priority <8-256>
// <i>Default: 32
#define RT_THREAD_PRIORITY_MAX 32
// <o>OS tick per second
// <i>Default: 1000 (1ms)
#define RT_TICK_PER_SECOND 1000
// <o>Alignment size for CPU architecture data access
// <i>Default: 4
#define RT_ALIGN_SIZE 4
// <o>the max length of object name<2-16>
// <i>Default: 8
#define RT_NAME_MAX 8
// <c1>Using RT-Thread components initialization
// <i>Using RT-Thread components initialization
#define RT_USING_COMPONENTS_INIT
// </c>
#define RT_USING_USER_MAIN
#define RT_USING_LIBC
//支持rt_kprintf打印浮点数
#define RT_VSNPRINTF_FULL_REPLACING_VSNPRINTF
// <o>the stack size of main thread<1-4086>
// <i>Default: 512
#define RT_MAIN_THREAD_STACK_SIZE 512
// </h>
// <h>Debug Configuration
// <c1>enable kernel debug configuration
// <i>Default: enable kernel debug configuration
// #define RT_DEBUG
// </c>
// <o>enable components initialization debug configuration<0-1>
// <i>Default: 0
#define RT_DEBUG_INIT 0
// <c1>thread stack over flow detect
// <i> Diable Thread stack over flow detect
#define RT_USING_OVERFLOW_CHECK
// </c>
// </h>
// <h>Hook Configuration
// <c1>using hook
// <i>using hook
// #define RT_USING_HOOK
// </c>
// <c1>using idle hook
// <i>using idle hook
// #define RT_USING_IDLE_HOOK
// </c>
// </h>
// <e>Software timers Configuration
// <i> Enables user timers
// #define RT_USING_TIMER_SOFT 0
// #if RT_USING_TIMER_SOFT == 0
// #undef RT_USING_TIMER_SOFT
// #endif
// <o>The priority level of timer thread <0-31>
// <i>Default: 4
#define RT_TIMER_THREAD_PRIO 4
// <o>The stack size of timer thread <0-8192>
// <i>Default: 512
#define RT_TIMER_THREAD_STACK_SIZE 512
// </e>
// <h>IPC(Inter-process communication) Configuration
// <c1>Using Semaphore
// <i>Using Semaphore
#define RT_USING_SEMAPHORE
// </c>
// <c1>Using Mutex
// <i>Using Mutex
#define RT_USING_MUTEX
// </c>
// <c1>Using Event
// <i>Using Event
// #define RT_USING_EVENT
// </c>
// <c1>Using MailBox
// <i>Using MailBox
// #define RT_USING_MAILBOX
// </c>
// <c1>Using Message Queue
// <i>Using Message Queue
// #define RT_USING_MESSAGEQUEUE
// </c>
// </h>
// <h>Memory Management Configuration
// <c1>Dynamic Heap Management
// <i>Dynamic Heap Management
// #define RT_USING_MEMPOOL
#define RT_USING_MEMHEAP
// #define RT_USING_SMALL_MEM
#define RT_USING_MEMHEAP_AS_HEAP
#define RT_USING_HEAP
// </c>
// <c1>using tiny size of memory
// <i>using tiny size of memory
// #define RT_USING_TINY_SIZE
// </c>
// </h>
/* Kernel Device Object */
#define RT_USING_DEVICE
#define RT_USING_CONSOLE
#define RT_CONSOLEBUF_SIZE 256
#define RT_USING_FINSH
#if defined(RT_USING_FINSH)
#define FINSH_USING_MSH
#define FINSH_USING_MSH_ONLY
#define FINSH_THREAD_NAME "tshell"
#define FINSH_THREAD_PRIORITY 21
// <o>the stack of finsh thread <1-4096>
// <i>the stack of finsh thread
// <i>Default: 4096 (4096Byte)
#define FINSH_THREAD_STACK_SIZE 1024
#define FINSH_USING_HISTORY
#define FINSH_HISTORY_LINES 5
#define FINSH_USING_SYMTAB
#define FINSH_USING_DESCRIPTION
#define FINSH_CMD_SIZE 80
#endif
#define RT_USING_PIN
#define RT_USING_DEVICE_IPC
// <<< end of configuration section >>>
#endif
7.适配日志打印函数rt_kprintf,这里有两种方式,一种就是注册完整的串口驱动,另一种是只实现打印功能,这里我用的是第二种,因为第一种要写许多代码,本着又不是不能用的原则,首选简单的
#define DEBUG_UARTx CW_UART1
#define DEBUG_UART_CLK SYSCTRL_APB1_PERIPH_UART1
#define DEBUG_UART_APBClkENx SYSCTRL_APBPeriphClk_Enable1
#define DEBUG_UART_BaudRate 115200
#define DEBUG_UART_UclkFreq 32000000
// UARTx GPIO
#define DEBUG_UART_GPIO_CLK (SYSCTRL_AHB_PERIPH_GPIOA)
#define DEBUG_UART_TX_GPIO_PORT CW_GPIOA
#define DEBUG_UART_TX_GPIO_PIN GPIO_PIN_9
#define DEBUG_UART_RX_GPIO_PORT CW_GPIOA
#define DEBUG_UART_RX_GPIO_PIN GPIO_PIN_10
// GPIO AF
#define DEBUG_UART_AFTX PA09_AFx_UART1TXD()
#define DEBUG_UART_AFRX PA10_AFx_UART1RXD()
#ifdef RT_USING_CONSOLE
void RCC_Configuration(void)
{
// 外设时钟使能
SYSCTRL_AHBPeriphClk_Enable(DEBUG_UART_GPIO_CLK, ENABLE);
DEBUG_UART_APBClkENx(DEBUG_UART_CLK, ENABLE);
}
void GPIO_Configuration(void)
{
GPIO_InitTypeDef GPIO_InitStructure;
GPIO_WritePin(DEBUG_UART_TX_GPIO_PORT, DEBUG_UART_TX_GPIO_PIN, GPIO_Pin_SET); // 设置TXD的默认电平为高,空闲
GPIO_InitStructure.Pins = DEBUG_UART_TX_GPIO_PIN;
GPIO_InitStructure.Mode = GPIO_MODE_OUTPUT_PP;
GPIO_Init(DEBUG_UART_TX_GPIO_PORT, &GPIO_InitStructure);
GPIO_InitStructure.Pins = DEBUG_UART_RX_GPIO_PIN;
GPIO_InitStructure.Mode = GPIO_MODE_INPUT_PULLUP;
GPIO_Init(DEBUG_UART_RX_GPIO_PORT, &GPIO_InitStructure);
// UART TX RX 复用
DEBUG_UART_AFTX;
DEBUG_UART_AFRX;
}
void UART_Configuration(void)
{
UART_InitTypeDef UART_InitStructure = {0};
UART_InitStructure.UART_BaudRate = DEBUG_UART_BaudRate;
UART_InitStructure.UART_Over = UART_Over_16;
UART_InitStructure.UART_Source = UART_Source_PCLK;
UART_InitStructure.UART_UclkFreq = DEBUG_UART_UclkFreq;
UART_InitStructure.UART_StartBit = UART_StartBit_FE;
UART_InitStructure.UART_StopBits = UART_StopBits_1;
UART_InitStructure.UART_Parity = UART_Parity_No;
UART_InitStructure.UART_HardwareFlowControl = UART_HardwareFlowControl_None;
UART_InitStructure.UART_Mode = UART_Mode_Rx | UART_Mode_Tx;
UART_Init(DEBUG_UARTx, &UART_InitStructure);
}
static int uart_init(void)
{
// init uart
RCC_Configuration();
// 配置GPIO
GPIO_Configuration();
// 配置UART
UART_Configuration();
return 0;
}
INIT_BOARD_EXPORT(uart_init);
void rt_hw_console_output(const char *str)
{
while (*str)
{
if (*str == '\\n')//rt_kprintf的换行'\\n'要手动加'\\r',原因请注释掉这个if自己看效果
{
UART_SendData(DEBUG_UARTx, (uint16_t)'\\r'); // 先发回车
while (UART_GetFlagStatus(DEBUG_UARTx, UART_FLAG_TXE) == RESET);
}
UART_SendData(DEBUG_UARTx, (uint16_t)*str); // 再发当前字符
while (UART_GetFlagStatus(DEBUG_UARTx, UART_FLAG_TXE) == RESET);
str++;
}
}
#endif
8.linux玩久了怎么能忍受没有控制台呢,MSH必须安排
msh要接收命令就要实现读串口功能,写串口都用简单的方式了,读咱也用简单的方式,直接实现char rt_hw_console_getchar(void)函数。轮询接收
#ifdef RT_USING_FINSH
char rt_hw_console_getchar(void)
{
// /* Note: the initial value of ch must < 0 */
int ch = -1;
while (UART_GetFlagStatus(DEBUG_UARTx, UART_FLAG_RC) != SET);
ch = UART_ReceiveData(DEBUG_UARTx);
UART_ClearITPendingBit(DEBUG_UARTx, UART_FLAG_RC);
return ch;
}
#endif
至此,不出意外的话,应该没什么意外了。。。
五、测试效果
写个main测试一下
#define THREAD_PRIORITY 15
#define THREAD_STACK_SIZE 512
#define THREAD_TIMESLICE 5
#define LED (2)
DEV_CFG_T dev_cfg;
static rt_thread_t tid1 = RT_NULL;
static rt_thread_t tid2 = RT_NULL;
/* 线程1的入口函数 */
static void thread1_entry(void *parameter)
{
while (1)
{
if (dev_cfg.debug_mode)
{
rt_kprintf("thread1 runing\\n");
}
rt_thread_mdelay(1000);
}
}
/* 线程2入口 */
static void thread2_entry(void *param)
{
rt_uint32_t count = 0;
rt_uint32_t quotient = 0;
rt_uint32_t remainder = 0;
EAU_Init();
EAU_SetMode(EAU_MODE_SQRT);
while ((1))
{
count += 1;
// 开始开方运算(除数寄存器不使用)
EAU_StartOperation(count, 0);
// 等待运算完成
while (EAU_GetStatus() & EAU_STATUS_BUSY)
;
// 获取结果
quotient = EAU_GetQuotient();
remainder = EAU_GetRemainder();
if (dev_cfg.debug_mode)
{
rt_kprintf("thread2, %d sqrt = %d,remainder = %d\\n", count, quotient, remainder);
}
rt_thread_mdelay(500);
}
rt_kprintf("thread2 exit\\n");
}
int thread_create(void)
{
tid1 = rt_thread_create("thread1",
thread1_entry, RT_NULL,
THREAD_STACK_SIZE,
THREAD_PRIORITY, THREAD_TIMESLICE);
if (tid1 != RT_NULL)
rt_thread_startup(tid1);
else
rt_kprintf("thread1 create failed\\n");
tid2 = rt_thread_create("thread2",
thread2_entry, RT_NULL,
THREAD_STACK_SIZE,
THREAD_PRIORITY, THREAD_TIMESLICE);
if (tid2 != RT_NULL)
rt_thread_startup(tid2);
else
rt_kprintf("thread2 create failed\\n");
return 0;
}
int32_t main(void)
{
int i = 0;
thread_create();
rt_pin_mode(LED, PIN_MODE_OUTPUT);
while (1)
{
rt_pin_write(LED, i = (i == 0 ? 1 : 0));
rt_thread_mdelay(1000);
}
}
六、加上一些小工具
丰富一下msh,毕竟咱是搞linux的
#include "main.h"
extern DEV_CFG_T dev_cfg;
void ADC_Configuration(void)
{
ADC_InitTypeDef ADC_InitStructure = {0};
__SYSCTRL_ADC_CLK_ENABLE();
ADC_InitStructure.ADC_ClkDiv = ADC_Clk_Div1;
ADC_InitStructure.ADC_ConvertMode = ADC_ConvertMode_Once;
ADC_InitStructure.ADC_SQREns = ADC_SqrEns0to1;
ADC_InitStructure.ADC_IN0.ADC_InputChannel = ADC_InputTs; // 温度
ADC_InitStructure.ADC_IN0.ADC_SampTime = ADC_SampTime518Clk; // 采Ts至少需要40us,ADCCLK = 40us*Fadc = 40*4 =160
ADC_InitStructure.ADC_IN1.ADC_InputChannel = ADC_InputVref1P2; // 内部1.2V参考
ADC_InitStructure.ADC_IN1.ADC_SampTime = ADC_SampTime518Clk; // 采样持续时间至少需要40us
ADC_Init(CW_ADC1, &ADC_InitStructure);
// 采集温度需要开启内置温度传感器
ADC_SetTs(ADC_TsEnable);
ADC_Enable(CW_ADC1);
}
int msh_test(int args, char *argv[])
{
rt_size_t total = 0, used = 0, max_used = 0, free = 0;
rt_memory_info(&total, &used, &max_used);
free = total – used;
rt_kprintf("heap total=%d,used=%d,max used=%d,free=%d\\n", total, used, max_used, free);
rt_kprintf("msh shell cmd get args num = %d\\n", args – 1);
for (int i = 1; i < args; i++)
{
rt_kprintf("argv[%d] = %d\\n", i, atoi(argv[i]));
}
return 0;
}
MSH_CMD_EXPORT(msh_test, msh_test example);
int debug(int args, char *argv[])
{
if (args < 2)
{
rt_kprintf("missing parameter,use 'debug 0' or 'debug 1'\\n");
return 0;
}
switch (atoi(argv[1]))
{
case 0:
dev_cfg.debug_mode = 0;
break;
case 1:
dev_cfg.debug_mode = 1;
break;
default:
break;
}
return 0;
}
MSH_CMD_EXPORT(debug, set debug mode(0 : close printf, 1 : open printf));
int system_info()
{
uint8_t Chip_Type[24];
uint8_t Pin_Count;
uint32_t Flash_Size;
uint16_t Ram_Size;
uint8_t Chip_Uid[10];
DIGITALSIGN_GetChipType(Chip_Type);
Pin_Count = DIGITALSIGN_GetPinCount();
Flash_Size = DIGITALSIGN_GetFlashSize();
Ram_Size = DIGITALSIGN_GetRamSize();
DIGITALSIGN_GetChipUid(Chip_Uid); // UID地址
rt_kprintf("Chip Type:%s\\r\\n", Chip_Type);
rt_kprintf("Chip Pins:%d\\r\\n", Pin_Count);
rt_kprintf("Chip FLASH(bytes):%d\\r\\n", Flash_Size);
rt_kprintf("Chip SRAM(bytes):%d\\r\\n", Ram_Size);
rt_kprintf("Chip UUID:");
for (int i = 0; i < 10; i++)
{
rt_kprintf(" 0x%02X", Chip_Uid[i]);
}
rt_kprintf("\\r\\n");
rt_kprintf("SystemClk:%d\\n", SystemCoreClock);
return 0;
}
MSH_CMD_EXPORT(system_info, printf system information);
int reboot()
{
rt_hw_cpu_reset();
// NVIC_SystemReset();
return 0;
}
MSH_CMD_EXPORT(reboot, reboot system);
int get_temp()
{
uint16_t valueAdc;
float fTsDegree, fVoltage;
ADC_Configuration();
ADC_SoftwareStartConvCmd(CW_ADC1, ENABLE);
while (!CW_ADC1->ISR_f.EOS) // 采样转换完成
{
rt_thread_mdelay(10);
};
CW_ADC1->ICR = 0;
ADC_GetSqr1Result(CW_ADC1, &valueAdc);
fVoltage = ADC_BgrResult2Avcc(valueAdc);
ADC_GetSqr0Result(CW_ADC1, &valueAdc);
fTsDegree = ADC_GetTs(fVoltage, valueAdc);
rt_kprintf("core temp: %.2fC\\r\\n", fTsDegree);
rt_kprintf("ref vol: %.2fV\\r\\n", fVoltage);
ADC_Disable(CW_ADC1);
ADC_DeInit();
return 0;
}
MSH_CMD_EXPORT(get_temp, get mcu core temp);