文章目录
-
- 每日一句正能量
- 导读
- 一、前言:为什么分屏适配是鸿蒙多设备生态的必修课
- 二、HarmonyOS 窗口模式全景认知
-
- 2.1 三种窗口模式的核心特征
- 2.2 分屏比例与设备适配矩阵
- 三、前置配置:声明应用支持的窗口模式
- 四、核心实现:窗口监听与动态布局适配
-
- 4.1 获取窗口实例并注册尺寸监听
- 4.2 响应式断点与布局切换策略
- 五、Navigation 组件的分屏自适应
-
- 5.1 基于断点动态切换 Navigation 模式
- 5.2 折叠屏特殊处理
- 六、状态持久化:防止分屏切换导致数据丢失
-
- 6.1 使用 AppStorage 实现全局状态持久化
- 6.2 ViewModel 层的状态管理
- 七、窗口尺寸限制与拖拽热区配置
-
- 7.1 限制自由窗口最小尺寸
- 7.2 配置窗口拖拽热区
- 八、实战案例:「智笔记」分屏适配完整方案
-
- 8.1 项目结构
- 8.2 主页面布局分发
- 8.3 防止重复操作标志位
- 九、常见问题与解决方案
-
- Q1:模拟器上分屏事件不触发怎么办?
- Q2:分屏切换到全屏后,输入框内容被清空?
- Q3:分屏模式下图片/视频被拉伸变形?
- Q4:分屏后字体过大/过小?
- Q5:如何检测应用是否处于「应用内分屏」?
- 十、总结

每日一句正能量
“人有两次生命,一次是出生,一次是醒悟。” 第一次,我们被赋予生命;第二次,我们选择如何活着。醒悟的瞬间,是意识醒来的时刻——你不再随波逐流,而是握住了自己人生的舵。从那一刻起,你真正诞生了。 愿我们在行走的路上,都拥有这样的从容——把荆棘看成阶梯,将日子过成诗。
导读
承接上一篇「屏幕适配与分辨率处理」,本文将深入探讨 HarmonyOS 分屏模式下的 UI 适配策略。在多设备、多窗口的生态中,分屏模式已成为提升用户生产力的核心能力。如何让应用在从全屏切换到分屏、从左右分屏调整到上下分屏的过程中,始终保持优雅的布局与流畅的交互,是每一位鸿蒙开发者必须掌握的关键技能。
一、前言:为什么分屏适配是鸿蒙多设备生态的必修课
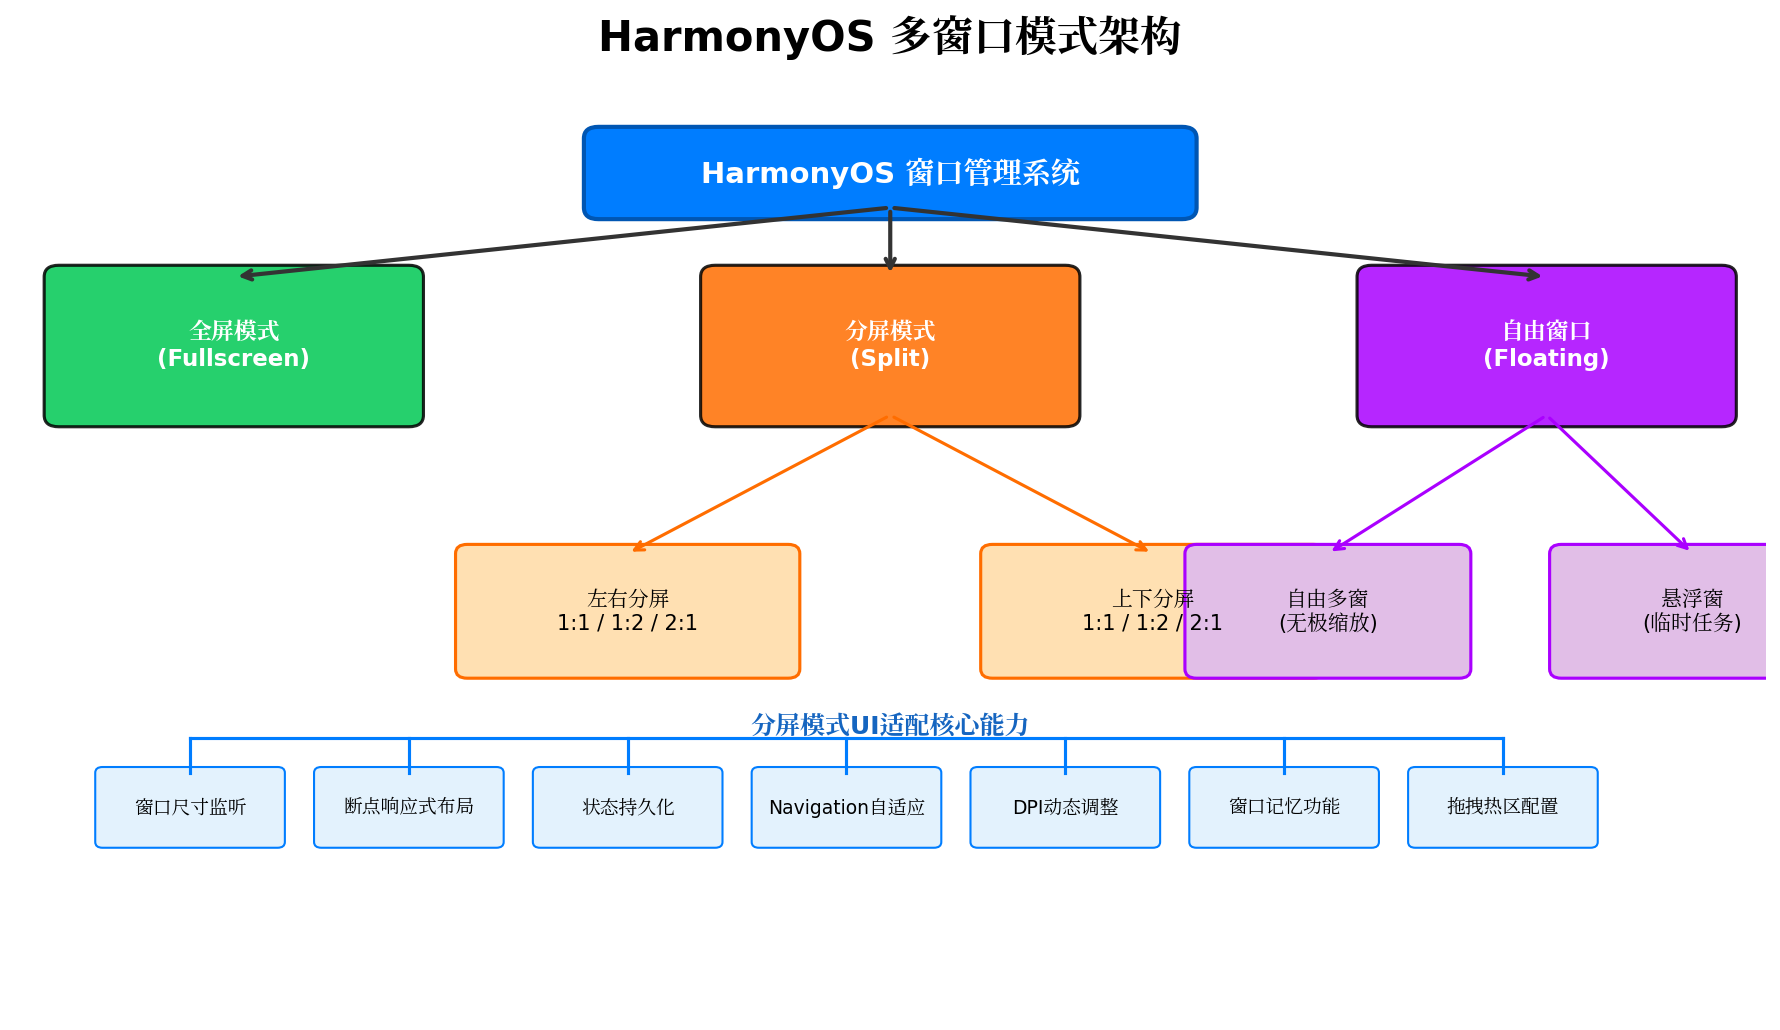
HarmonyOS 作为面向全场景、多设备的分布式操作系统,其窗口管理系统支持**全屏(Fullscreen)、分屏(Split)、自由悬浮多窗(Floating)**三种核心窗口模式。cite🛠web_search:1#3:~:text=HarmonyOS目前支持全屏、分屏、自由悬浮多窗三种应用窗口模式 其中,分屏模式允许用户在同一屏幕上并行操作两个应用,极大提升了多任务处理效率。
然而,分屏模式对开发者提出了严峻挑战:
- 窗口尺寸动态变化:用户拖动分屏分界线时,应用窗口宽高会实时改变,传统固定布局必然出现内容截断或过度留白。
- 设备形态差异巨大:手机上下分屏、平板左右分屏、折叠屏多种展开态的分屏比例各不相同。cite🛠web_search:1#3:~:text=手机上下分屏开发实践…当手机设备进入分屏模式时,窗口高度缩小为原来的1/2或1/3
- 状态丢失风险:分屏切换全屏时组件可能重建,@State 状态若不持久化将导致用户输入丢失。
- 交互热区变化:分屏后按钮、输入框的位置和可点击区域需要重新计算,避免被系统手势冲突。
本文将从配置声明、窗口监听、响应式断点、Navigation 自适应、状态持久化、尺寸限制六个维度,构建一套完整的分屏模式 UI 适配方案。
二、HarmonyOS 窗口模式全景认知
在深入适配之前,我们需要先建立对 HarmonyOS 窗口管理体系的全局认知。
2.1 三种窗口模式的核心特征
| 全屏 | 应用铺满整个屏幕,独占显示资源 | 手机默认 | 沉浸式体验、状态栏/导航栏管理 |
| 分屏 | 两个应用共享屏幕,支持 1:1、1:2、2:1 比例调节 | 手机、平板、折叠屏 | 布局压缩、内容重排、状态同步 |
| 自由窗口 | 窗口大小/位置自由调整,支持无极缩放 | 平板、PC/2in1 | 最小尺寸限制、拖拽热区、DPI 适配 |
2.2 分屏比例与设备适配矩阵
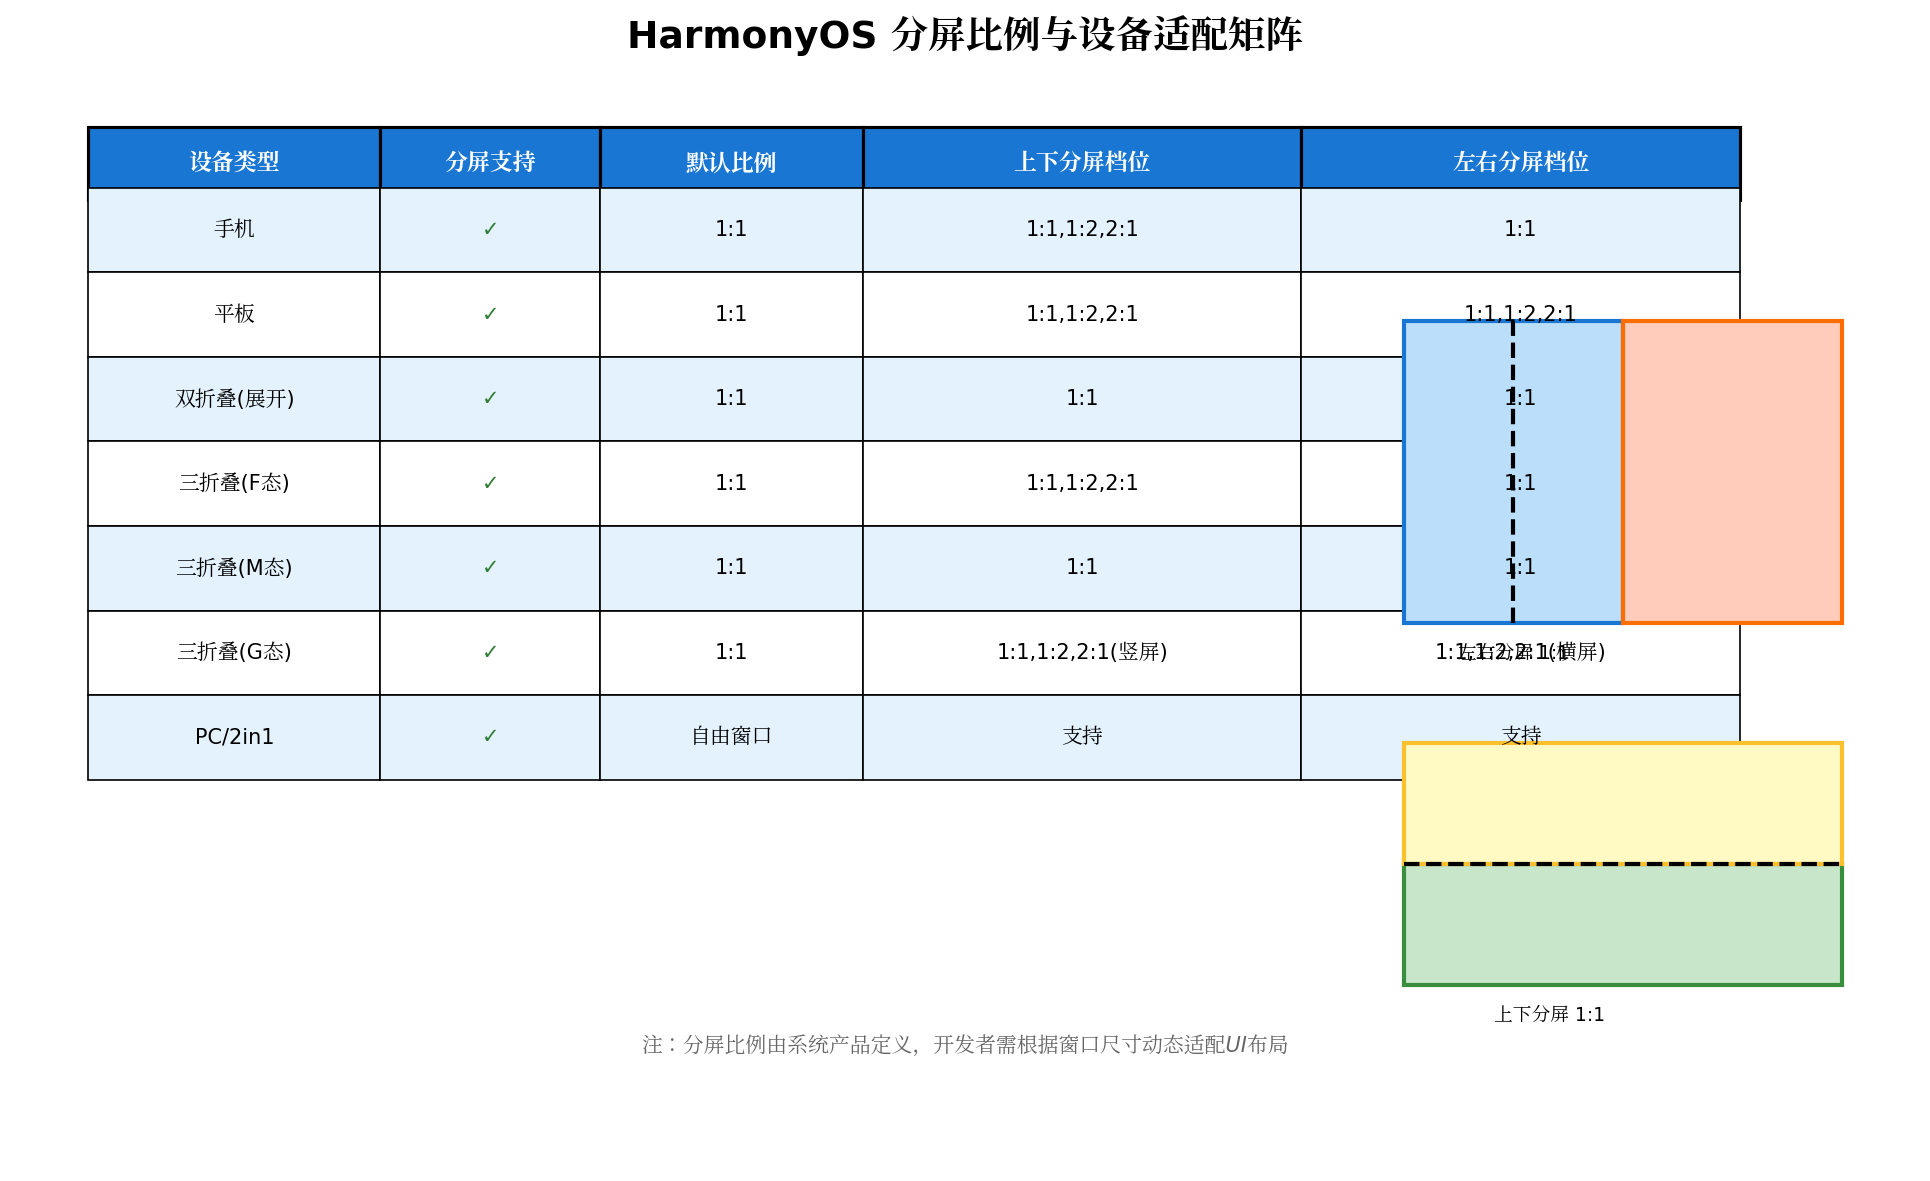
不同设备形态下,系统定义的分屏比例存在显著差异。开发者无法控制系统分屏比例,只能被动响应窗口尺寸变化。
关键结论:
- 手机竖屏下进入分屏,窗口高度骤降为原来的 1/2 或 1/3,垂直方向内容极易被截断。
- 平板横屏支持左右分屏,且可调节档位更丰富(1:1、1:2、2:1)。
- 三折叠设备根据折叠状态(F/M/G 态)动态决定支持的分屏方向与比例。
- PC/2in1 设备默认以自由窗口启动,分屏能力内嵌于自由窗口框架中。
三、前置配置:声明应用支持的窗口模式
在 HarmonyOS 中,应用必须在 module.json5 中显式声明支持的窗口模式,系统才会在多任务界面或手势触发时提供相应入口。cite🛠web_search:1#0:~:text=应用必须在 module.json5 配置文件中明确声明支持的窗口模式
{
"module": {
"name": "entry",
"type": "entry",
"abilities": [
{
"name": "EntryAbility",
"srcEntry": "./ets/entryability/EntryAbility.ets",
"supportWindowMode": [
"fullscreen",
"split",
"floating"
],
"minWindowWidth": 320,
"minWindowHeight": 240,
"maxWindowWidth": 2560,
"maxWindowHeight": 1600,
"minWindowRatio": 0.5,
"maxWindowRatio": 2.0
}
]
}
}
配置字段解析:
- supportWindowMode:声明当前 Ability 支持的窗口模式数组。默认值为 ["fullscreen", "split", "floating"],若应用明确不需要某类模式,可移除以优化系统资源调度。cite🛠web_search:1#3:~:text=supportWindowMode 属性默认值为[“fullscreen”, “split”, “floating”]
- minWindowWidth / minWindowHeight:限制自由窗口/分屏时的最小尺寸(单位 vp),防止窗口过小导致布局异常。cite🛠web_search:1#7:~:text=minWindowWidth 和 minWindowHeight 用于设定应用支持的最小的窗口宽度和高度
- maxWindowWidth / maxWindowHeight:限制最大窗口尺寸,避免在大屏设备上过度拉伸。
- minWindowRatio / maxWindowRatio:限制窗口宽高比范围,确保内容不因比例失调而显示异常。
最佳实践:即使应用主要面向手机开发,也建议保留 "split" 和 "floating" 支持。折叠屏、平板用户随时可能触发分屏,缺失声明将导致应用被强制全屏,破坏多任务体验。
四、核心实现:窗口监听与动态布局适配
4.1 获取窗口实例并注册尺寸监听
在 Stage 模型的 UIAbility 中,通过 windowStage.getMainWindowSync() 获取主窗口实例,并在页面生命周期中注册 windowSizeChange 事件监听。cite🛠web_search:1#1:~:text=windowStage 获取的主窗口对象…在 UIAbility 的 onWindowStageCreate 回调里拿到它
// entryability/EntryAbility.ets
import { UIAbility, Want } from '@kit.AbilityKit';
import { window } from '@kit.ArkUI';
export default class EntryAbility extends UIAbility {
private mainWindow: window.Window | null = null;
onWindowStageCreate(windowStage: window.WindowStage): void {
// 获取主窗口实例(同步方法,需在窗口就绪后调用)
this.mainWindow = windowStage.getMainWindowSync();
// 加载主页面
windowStage.loadContent('pages/Index');
}
onWindowStageDestroy(): void {
// 释放窗口引用,防止内存泄漏
this.mainWindow = null;
}
}
在页面层(Index.ets)中,通过 window.getLastWindow() 获取窗口并监听尺寸变化:
// pages/Index.ets
import { window } from '@kit.ArkUI';
@Entry
@Component
struct Index {
@State windowWidth: number = 0;
@State windowHeight: number = 0;
@State windowStatus: window.WindowStatusType = window.WindowStatusType.FULL_SCREEN;
@State breakpoint: string = 'xs';
private mainWindow: window.Window | null = null;
// 断点定义(单位:vp)
private readonly BREAKPOINT_XS = 320;
private readonly BREAKPOINT_SM = 600;
private readonly BREAKPOINT_MD = 840;
private readonly BREAKPOINT_LG = 1280;
aboutToAppear(): void {
window.getLastWindow(getContext(), (err, win) => {
if (err) {
console.error(`获取窗口失败: ${err.code} – ${err.message}`);
return;
}
this.mainWindow = win;
// 初始化当前窗口尺寸
const rect = win.getWindowProperties().windowRect;
this.updateWindowInfo(rect.width, rect.height);
// 监听窗口尺寸变化(分屏拖动分界线时高频触发)
win.on('windowSizeChange', (size: window.Size) => {
this.updateWindowInfo(size.width, size.height);
});
// 监听窗口模式变化(全屏↔分屏↔自由窗口)
win.on('windowStatusChange', (statusType: window.WindowStatusType) => {
this.windowStatus = statusType;
console.info(`窗口模式切换为: ${statusType}`);
});
});
}
aboutToDisappear(): void {
// 页面销毁时注销监听,避免内存泄漏
if (this.mainWindow) {
this.mainWindow.off('windowSizeChange');
this.mainWindow.off('windowStatusChange');
}
}
private updateWindowInfo(width: number, height: number): void {
this.windowWidth = width;
this.windowHeight = height;
// 计算当前断点
if (width < this.BREAKPOINT_SM) {
this.breakpoint = 'xs';
} else if (width < this.BREAKPOINT_MD) {
this.breakpoint = 'sm';
} else if (width < this.BREAKPOINT_LG) {
this.breakpoint = 'md';
} else {
this.breakpoint = 'lg';
}
console.info(`窗口尺寸: ${width}x${height}, 断点: ${this.breakpoint}`);
}
build() {
// 根据断点渲染不同布局
this.renderByBreakpoint();
}
@Builder
renderByBreakpoint() {
if (this.breakpoint === 'xs' || this.breakpoint === 'sm') {
// 窄屏:单列堆叠布局(手机竖屏 / 分屏窄边)
NarrowLayout({ windowStatus: this.windowStatus });
} else {
// 宽屏:双栏布局(平板 / 分屏宽边 / 横屏)
WideLayout({ windowStatus: this.windowStatus });
}
}
}
4.2 响应式断点与布局切换策略
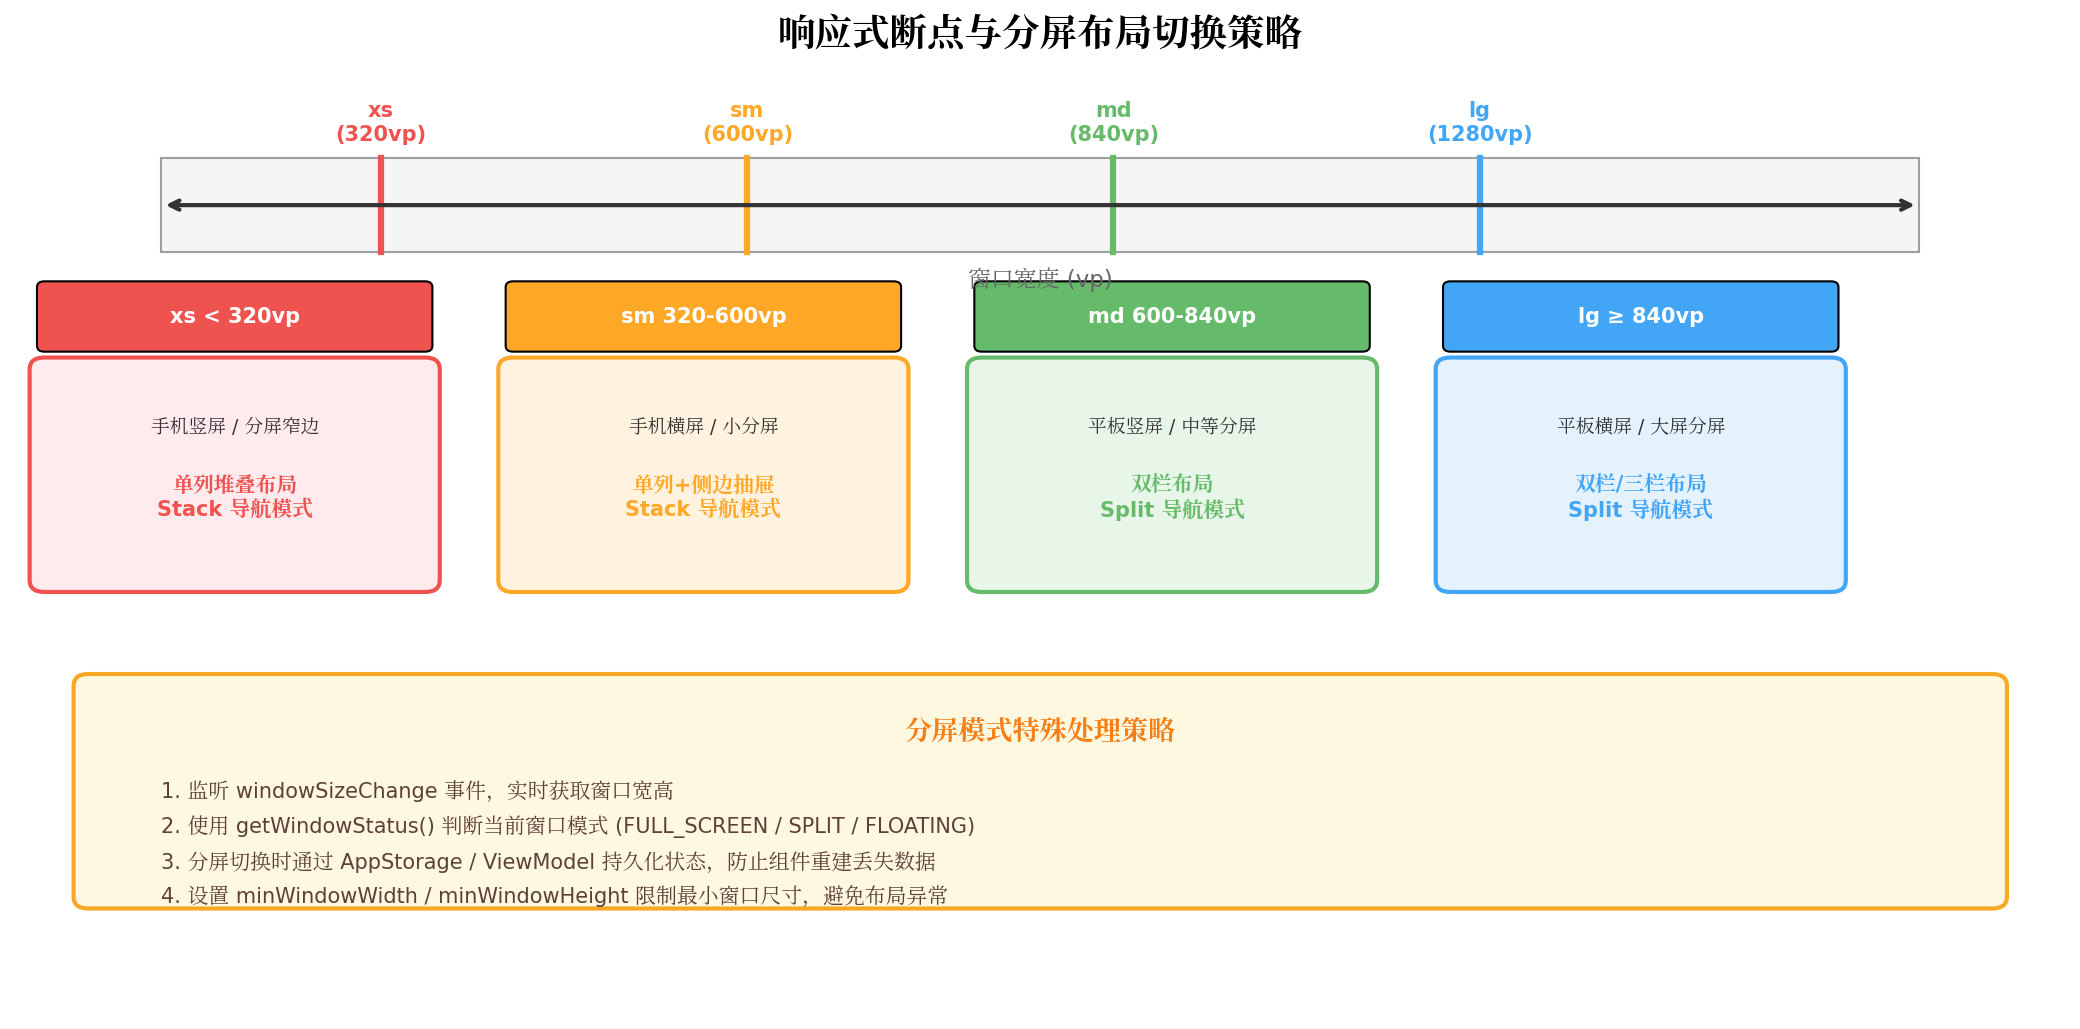
断点(Breakpoint)是响应式布局的核心机制。HarmonyOS 官方推荐以 320vp、600vp、840vp、1280vp 作为关键断点阈值。cite🛠web_search:1#10:~:text=当设备宽度>=600vp时,采用 Split 模式显示;设备宽度<600vp时,采用 Stack 模式显示
断点与布局映射关系:
| xs | < 320vp | 手机竖屏、分屏极窄边 | 单列堆叠 | Stack |
| sm | 320-600vp | 手机横屏、小分屏 | 单列+侧边抽屉 | Stack |
| md | 600-840vp | 平板竖屏、中等分屏 | 双栏布局 | Split |
| lg | ≥ 840vp | 平板横屏、大屏分屏 | 双栏/三栏布局 | Split |
// 断点工具类
export class BreakpointUtil {
static readonly BREAKPOINT_XS = 320;
static readonly BREAKPOINT_SM = 600;
static readonly BREAKPOINT_MD = 840;
static readonly BREAKPOINT_LG = 1280;
static getBreakpoint(width: number): string {
if (width < this.BREAKPOINT_SM) return 'xs';
if (width < this.BREAKPOINT_MD) return 'sm';
if (width < this.BREAKPOINT_LG) return 'md';
return 'lg';
}
static isWideMode(width: number): boolean {
return width >= this.BREAKPOINT_SM;
}
static isSplitMode(status: window.WindowStatusType): boolean {
return status === window.WindowStatusType.SPLIT;
}
}
五、Navigation 组件的分屏自适应
在鸿蒙应用开发中,Navigation 组件是页面导航的核心载体。其 mode 属性支持 Stack(堆叠)和 Split(分栏)两种模式,是实现分屏自适应的关键武器。cite🛠web_search:1#10:~:text=NavigationMode.Stack…NavigationMode.Split
5.1 基于断点动态切换 Navigation 模式
// components/AdaptiveNavigation.ets
import { window } from '@kit.ArkUI';
@Component
export struct AdaptiveNavigation {
@State navigationMode: NavigationMode = NavigationMode.Stack;
@State screenWidth: number = 0;
private readonly DEVICESIZE: number = 600; // 分屏阈值
aboutToAppear(): void {
window.getLastWindow(getContext(), (err, win) => {
if (!err) {
this.screenWidth = win.getWindowProperties().windowRect.width;
this.updateNavigationMode();
win.on('windowSizeChange', (size) => {
this.screenWidth = size.width;
this.updateNavigationMode();
});
}
});
}
private updateNavigationMode(): void {
// 宽屏(分屏宽边、平板横屏)使用 Split 模式
// 窄屏(手机竖屏、分屏窄边)使用 Stack 模式
this.navigationMode = this.screenWidth >= this.DEVICESIZE
? NavigationMode.Split
: NavigationMode.Stack;
}
build() {
Navigation(this.pageStack) {
// 导航栏内容
Text('侧边栏菜单')
.fontSize(16)
.width('100%')
.height(50)
.backgroundColor('#f5f5f5');
}
.hideTitleBar(true)
.navBarWidth(this.navigationMode === NavigationMode.Split ? 240 : 0)
.hideNavBar(this.navigationMode === NavigationMode.Stack)
.mode(this.navigationMode)
.width('100%')
.height('100%');
}
}
5.2 折叠屏特殊处理
折叠屏设备在折叠/展开状态切换时,屏幕宽度和分屏能力会发生突变。需要额外监听折叠状态:
import { display } from '@kit.ArkUI';
@Component
struct FoldableAdaptiveLayout {
@State isFoldable: boolean = false;
@State foldStatus: display.FoldStatus = display.FoldStatus.FOLD_STATUS_UNKNOWN;
@State navigationMode: NavigationMode = NavigationMode.Stack;
aboutToAppear(): void {
// 检测设备是否支持折叠
this.isFoldable = display.isFoldable();
if (this.isFoldable) {
// 注册折叠状态监听
display.on('foldStatusChange', (curFoldStatus: display.FoldStatus) => {
this.foldStatus = curFoldStatus;
this.updateLayoutByFoldStatus();
});
// 初始化当前状态
this.updateLayoutByFoldStatus(display.getFoldStatus());
}
}
private updateLayoutByFoldStatus(status?: display.FoldStatus): void {
const currentStatus = status ?? this.foldStatus;
if (currentStatus === display.FoldStatus.FOLD_STATUS_FOLDED) {
// 折叠态:窄屏,强制 Stack 模式
this.navigationMode = NavigationMode.Stack;
} else {
// 展开态/半折叠态:根据实际宽度决定
window.getLastWindow(getContext(), (err, win) => {
if (!err) {
const width = win.getWindowProperties().windowRect.width;
this.navigationMode = width >= 600 ? NavigationMode.Split : NavigationMode.Stack;
}
});
}
}
aboutToDisappear(): void {
if (this.isFoldable) {
display.off('foldStatusChange');
}
}
}
六、状态持久化:防止分屏切换导致数据丢失
分屏模式与全屏模式切换时,系统可能销毁并重建 Ability 或组件实例。若用户输入、滚动位置等状态仅保存在 @State 中,切换后将全部丢失。cite🛠web_search:1#1:~:text=分屏状态下编辑区可能被销毁,切换到全屏时重新创建,@State 状态会被重置
6.1 使用 AppStorage 实现全局状态持久化
// models/NoteModel.ets
export class NoteModel {
id: string = '';
title: string = '';
content: string = '';
lastModified: number = Date.now();
}
// 初始化 AppStorage 键值
const NOTE_CONTENT_KEY = 'note_current_content';
const NOTE_SCROLL_POSITION_KEY = 'note_scroll_position';
// pages/NoteEditor.ets
@Entry
@Component
struct NoteEditor {
// 通过 AppStorage 绑定,组件重建后自动恢复
@StorageLink(NOTE_CONTENT_KEY) noteContent: string = '';
@StorageLink(NOTE_SCROLL_POSITION_KEY) scrollPosition: number = 0;
@State isProcessing: boolean = false; // 防止重复操作标志
aboutToAppear(): void {
// 从持久化存储恢复数据(如首选项、数据库)
this.loadNoteFromDatabase();
}
private async loadNoteFromDatabase(): Promise<void> {
// 模拟从数据库加载
const savedContent = await preferences.get(getContext(), NOTE_CONTENT_KEY, '');
if (savedContent && this.noteContent === '') {
this.noteContent = savedContent as string;
}
}
private onContentChange(newContent: string): void {
this.noteContent = newContent;
// 防抖保存到数据库
this.debounceSave();
}
private debounceSave(): void {
// 500ms 防抖,避免频繁IO
clearTimeout(this.saveTimer);
this.saveTimer = setTimeout(() => {
preferences.put(getContext(), NOTE_CONTENT_KEY, this.noteContent);
}, 500);
}
build() {
Column() {
TextInput({ text: $$this.noteContent })
.onChange((value) => this.onContentChange(value))
.width('100%')
.height('100%');
}
}
}
6.2 ViewModel 层的状态管理
对于复杂业务场景,建议采用 ViewModel 模式,将 UI 状态与业务数据分离:
// viewmodels/NoteViewModel.ets
import { observable, ObservableArray } from '@kit.ArkUI';
@Observed
export class NoteViewModel {
currentNote: NoteModel = new NoteModel();
noteList: ObservableArray<NoteModel> = new ObservableArray();
isLoading: boolean = false;
errorMessage: string = '';
async loadNote(noteId: string): Promise<void> {
this.isLoading = true;
try {
// 从网络/数据库加载
const note = await noteService.fetchNote(noteId);
this.currentNote = note;
} catch (error) {
this.errorMessage = `加载失败: ${error.message}`;
} finally {
this.isLoading = false;
}
}
updateContent(content: string): void {
this.currentNote.content = content;
this.currentNote.lastModified = Date.now();
// 同步到 AppStorage 防止重建丢失
AppStorage.setOrCreate('note_backup', JSON.stringify(this.currentNote));
}
}
七、窗口尺寸限制与拖拽热区配置
7.1 限制自由窗口最小尺寸
在分屏或自由窗口模式下,用户可能将窗口拖动到极小尺寸,导致布局异常。除了 module.json5 中的静态配置,还可以在运行时动态限制:
// 运行时动态设置窗口限制
async function setWindowLimits(): Promise<void> {
const win = await window.getLastWindow(getContext());
// 设置窗口最小/最大尺寸
const limits: window.WindowLimits = {
minWidth: 320, // 最小宽度 320vp
minHeight: 240, // 最小高度 240vp
maxWidth: 2560, // 最大宽度 2560vp
maxHeight: 1600 // 最大高度 1600vp
};
win.setWindowLimits(limits);
// 获取当前限制(调试用)
const currentLimits = win.getWindowLimits();
console.info(`当前窗口限制: ${JSON.stringify(currentLimits)}`);
}
7.2 配置窗口拖拽热区
在自由窗口模式下,应用可通过标题栏拖拽移动窗口。HarmonyOS 提供了 startMoving() 和 stopMoving() 接口实现自定义拖拽逻辑:cite🛠web_search:1#3:~:text=startMoving()…窗口将跟随鼠标移动,抬手终止移动
// components/CustomTitleBar.ets
@Component
struct CustomTitleBar {
@State isDragging: boolean = false;
build() {
Row() {
Image($r('app.media.icon'))
.width(24)
.height(24);
Text('智笔记 Pro')
.fontSize(16)
.fontWeight(FontWeight.Bold)
.layoutWeight(1);
// 窗口控制按钮
Button('−') // 最小化
.onClick(() => this.minimizeWindow());
Button('□') // 最大化/还原
.onClick(() => this.toggleMaximize());
Button('×') // 关闭
.onClick(() => this.closeWindow());
}
.width('100%')
.height(44)
.padding({ left: 12, right: 12 })
.backgroundColor('#f0f0f0')
.gesture(
PanGesture({ direction: PanDirection.All })
.onActionStart(() => {
this.isDragging = true;
this.startWindowMove();
})
.onActionEnd(() => {
this.isDragging = false;
this.stopWindowMove();
})
);
}
private startWindowMove(): void {
window.getLastWindow(getContext(), (err, win) => {
if (!err) {
// 启动窗口跟随拖拽
win.startMoving();
}
});
}
private stopWindowMove(): void {
window.getLastWindow(getContext(), (err, win) => {
if (!err) {
win.stopMoving();
}
});
}
private async minimizeWindow(): Promise<void> {
const win = await window.getLastWindow(getContext());
win.minimize();
}
private async toggleMaximize(): Promise<void> {
const win = await window.getLastWindow(getContext());
const isMaximized = await win.isMaximized();
if (isMaximized) {
win.recover(); // 还原
} else {
win.maximize(); // 最大化
}
}
private async closeWindow(): Promise<void> {
const context = getContext() as common.UIAbilityContext;
context.terminateSelf();
}
}
八、实战案例:「智笔记」分屏适配完整方案
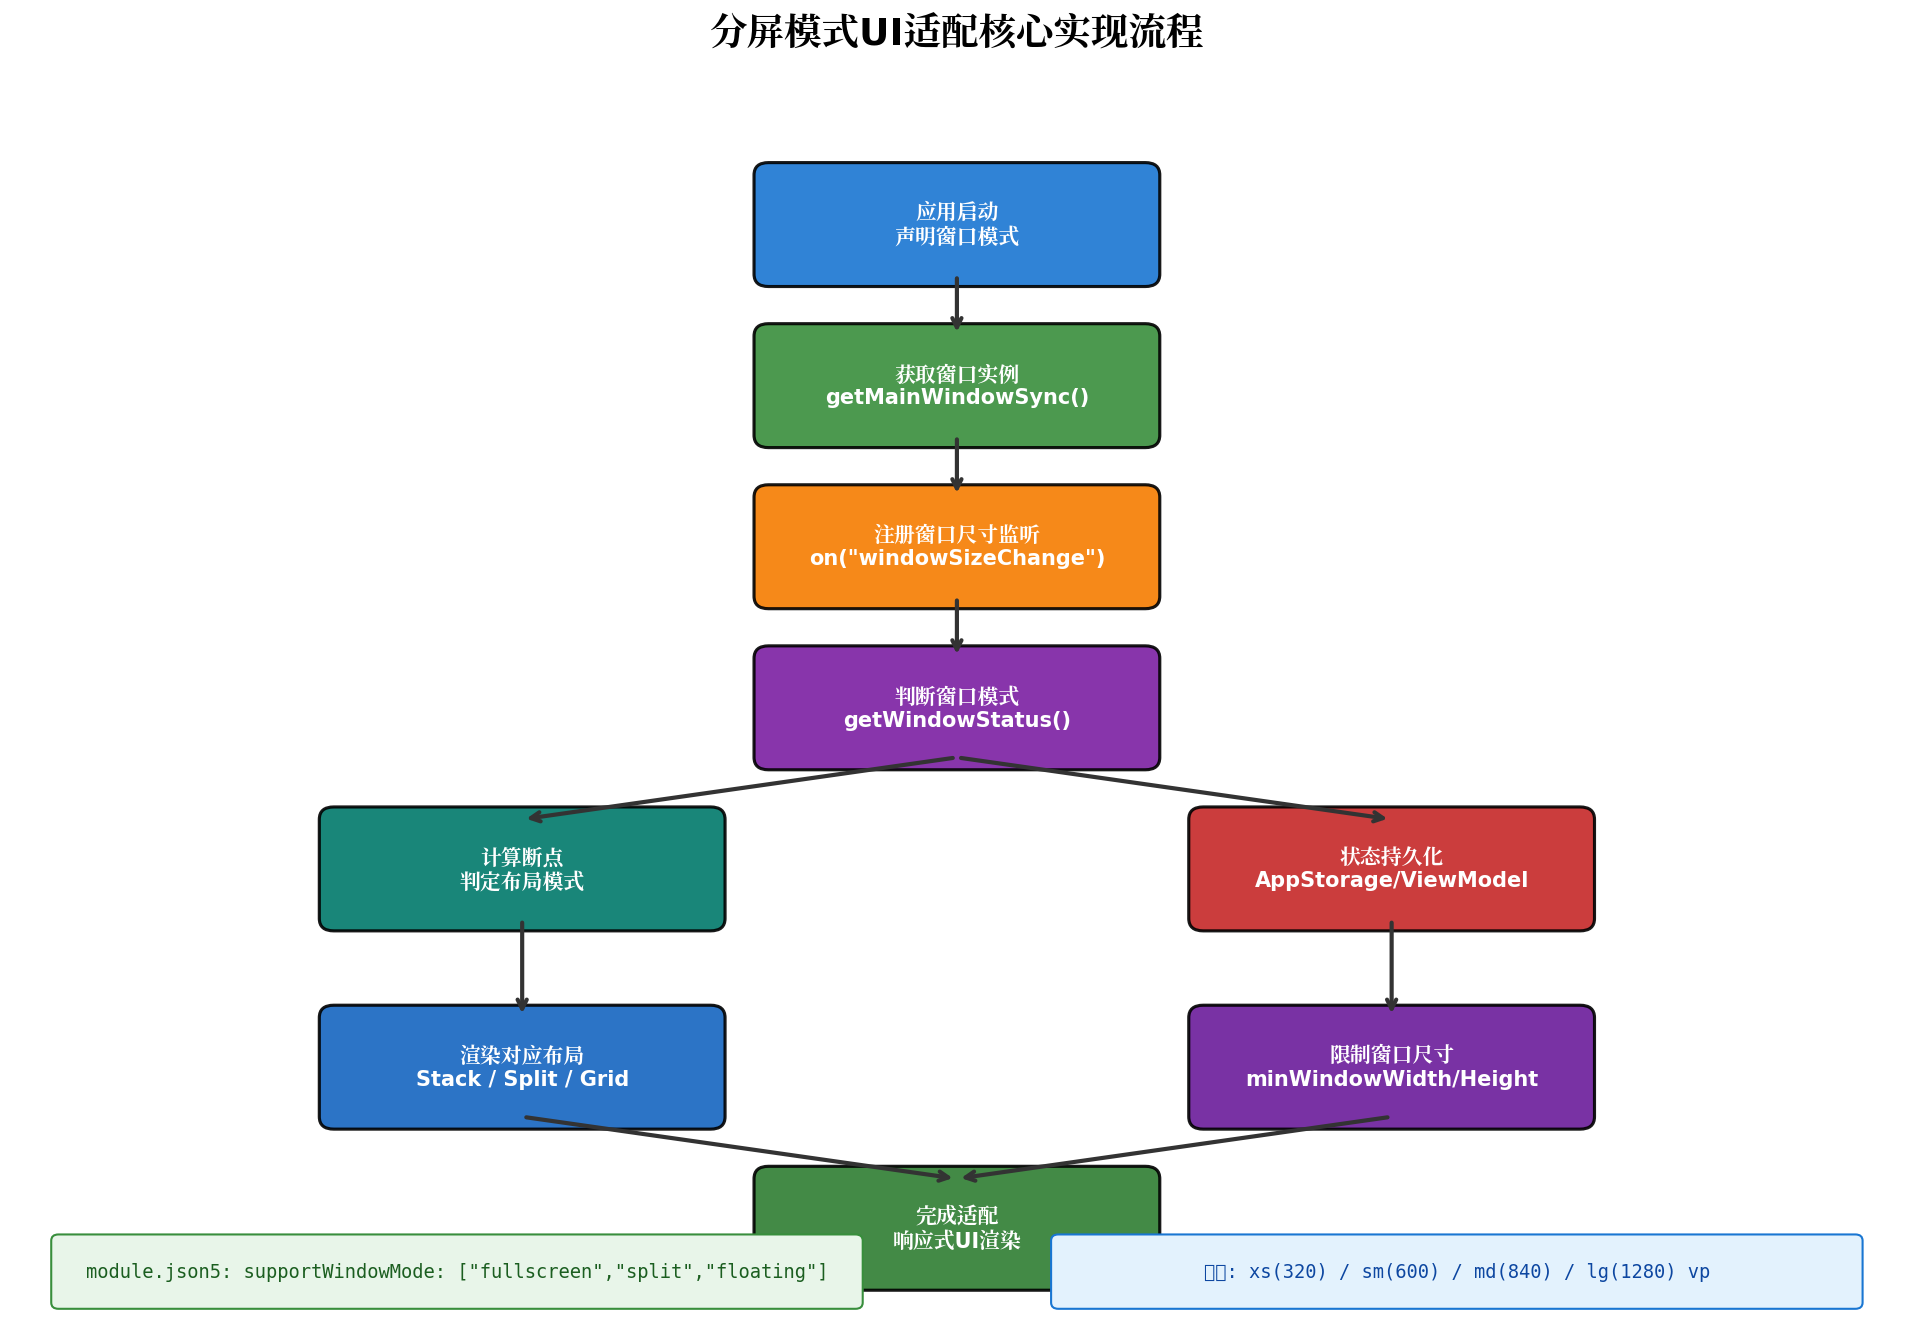
下面以一个笔记应用为例,展示从配置到实现的完整分屏适配流程。
8.1 项目结构
entry/src/main/ets/
├── entryability/
│ └── EntryAbility.ets # Ability 入口,获取窗口实例
├── pages/
│ └── Index.ets # 主页面,断点判断与布局分发
├── components/
│ ├── NoteList.ets # 笔记列表组件(左侧栏)
│ ├── NoteEditor.ets # 笔记编辑组件(右侧区)
│ └── AdaptiveNavigation.ets # 自适应导航组件
├── viewmodels/
│ └── NoteViewModel.ets # 业务状态管理
└── utils/
├── BreakpointUtil.ets # 断点计算工具
└── WindowUtil.ets # 窗口操作工具
8.2 主页面布局分发
// pages/Index.ets
import { window } from '@kit.ArkUI';
import { BreakpointUtil } from '../utils/BreakpointUtil';
import { NoteViewModel } from '../viewmodels/NoteViewModel';
@Entry
@Component
struct Index {
@State breakpoint: string = 'xs';
@State windowStatus: window.WindowStatusType = window.WindowStatusType.FULL_SCREEN;
@State isWideMode: boolean = false;
private viewModel: NoteViewModel = new NoteViewModel();
private mainWindow: window.Window | null = null;
aboutToAppear(): void {
window.getLastWindow(getContext(), (err, win) => {
if (err) return;
this.mainWindow = win;
this.handleWindowChange(win.getWindowProperties().windowRect.width,
win.getWindowProperties().windowRect.height);
// 窗口尺寸变化监听
win.on('windowSizeChange', (size) => {
this.handleWindowChange(size.width, size.height);
});
// 窗口模式变化监听
win.on('windowStatusChange', (status) => {
this.windowStatus = status;
});
});
// 加载笔记数据
this.viewModel.loadNotes();
}
private handleWindowChange(width: number, height: number): void {
this.breakpoint = BreakpointUtil.getBreakpoint(width);
this.isWideMode = BreakpointUtil.isWideMode(width);
// 分屏模式下打印调试信息
if (this.windowStatus === window.WindowStatusType.SPLIT) {
console.info(`[分屏模式] 窗口: ${width}x${height}, 断点: ${this.breakpoint}`);
}
}
build() {
Stack() {
if (this.isWideMode) {
// 宽屏/分屏宽边:双栏布局
WideNoteLayout({ viewModel: this.viewModel, breakpoint: this.breakpoint });
} else {
// 窄屏/分屏窄边:单栏堆叠布局
NarrowNoteLayout({ viewModel: this.viewModel, breakpoint: this.breakpoint });
}
}
.width('100%')
.height('100%')
.backgroundColor('#f5f5f5');
}
}
// 宽屏双栏布局
@Component
struct WideNoteLayout {
@ObjectLink viewModel: NoteViewModel;
@Prop breakpoint: string;
build() {
Row() {
// 左侧笔记列表
Column() {
NoteList({ notes: this.viewModel.noteList,
onSelect: (note) => this.viewModel.selectNote(note) })
}
.width(this.breakpoint === 'md' ? '35%' : '280vp')
.height('100%')
.backgroundColor('#ffffff')
.border({ width: { right: 1 }, color: '#e0e0e0' });
// 右侧编辑区
Column() {
NoteEditor({ note: this.viewModel.currentNote,
onChange: (content) => this.viewModel.updateContent(content) })
}
.layoutWeight(1)
.height('100%')
.backgroundColor('#fafafa');
}
.width('100%')
.height('100%');
}
}
// 窄屏单栏布局
@Component
struct NarrowNoteLayout {
@ObjectLink viewModel: NoteViewModel;
@Prop breakpoint: string;
build() {
Navigation(this.viewModel.pageStack) {
NoteList({ notes: this.viewModel.noteList,
onSelect: (note) => this.viewModel.pageStack.pushPath({ name: 'Editor', param: note }) });
}
.mode(NavigationMode.Stack)
.hideTitleBar(true)
.width('100%')
.height('100%');
}
}
8.3 防止重复操作标志位
分屏模式切换是异步操作,连续快速点击可能导致窗口进入卡死状态。cite🛠web_search:1#1:~:text=setWindowLayoutMode 是异步操作,连续快速调用可能会导致多个状态共存
// utils/WindowUtil.ets
export class WindowUtil {
private static isProcessing: boolean = false;
static async toggleFullscreen(): Promise<void> {
if (this.isProcessing) {
console.warn('窗口切换进行中,请稍候…');
return;
}
this.isProcessing = true;
try {
const win = await window.getLastWindow(getContext());
const currentStatus = win.getWindowStatus();
if (currentStatus === window.WindowStatusType.FULL_SCREEN) {
// 当前全屏,切换为分屏
await win.setWindowLayoutMode(window.WindowLayoutMode.WINDOW_LAYOUT_MODE_SPLIT);
} else {
// 当前非全屏,切换为全屏
await win.setWindowLayoutMode(window.WindowLayoutMode.WINDOW_LAYOUT_MODE_FULL_SCREEN);
}
} catch (error) {
console.error(`窗口模式切换失败: ${error.message}`);
} finally {
// 延迟释放标志位,防止快速连击
setTimeout(() => {
this.isProcessing = false;
}, 500);
}
}
}
九、常见问题与解决方案
Q1:模拟器上分屏事件不触发怎么办?
模拟器不支持真实的分屏手势。需在 DevEco Studio 中通过「多窗口配置」模拟分屏,或在真机上验证。建议优先使用真机调试分屏逻辑。
Q2:分屏切换到全屏后,输入框内容被清空?
这是组件重建导致的 @State 重置。解决方案:
Q3:分屏模式下图片/视频被拉伸变形?
使用 aspectRatio() 约束组件宽高比,或根据窗口宽度动态调整图片尺寸:
Image($r('app.media.cover'))
.width('100%')
.aspectRatio(16/9) // 固定宽高比
.objectFit(ImageFit.Cover); // 裁剪填充
Q4:分屏后字体过大/过小?
自由多窗模式下系统会调整 DPI。开发者应使用 vp(虚拟像素)而非 px,并避免硬编码字体大小。可通过 display.getDefaultDisplaySync().densityPixels 获取当前屏幕密度进行微调。
Q5:如何检测应用是否处于「应用内分屏」?
HarmonyOS 支持应用内分屏(同一应用的两个 Ability 分屏显示)。通过 startAbility() 的 windowMode 参数启动子 Ability 即可实现:cite🛠web_search:1#3:~:text=应用内分屏只支持左右分屏…startAbility()接口的入参StartOptions选项中的windowMode参数
let want: Want = {
bundleName: 'com.example.notes',
abilityName: 'EditorAbility'
};
(this.getUIContext().getHostContext() as common.UIAbilityContext)
.startAbility(want, {
windowMode: AbilityConstant.WindowMode.WINDOW_MODE_SPLIT,
supportWindowModes: [bundleManager.SupportWindowMode.SPLIT]
});
十、总结
HarmonyOS 的分屏模式 UI 适配是一项系统工程,涉及窗口管理、响应式布局、状态持久化、交互优化多个层面。本文从实战角度出发,梳理了完整的适配路径:
随着 HarmonyOS 在平板、折叠屏、PC/2in1 等设备上的持续渗透,分屏与多窗口能力将成为应用竞争力的重要分水岭。掌握本文所述的适配策略,将帮助你的应用在任何窗口形态下都能呈现最佳体验。
转载自:https://blog.csdn.net/u014727709/article/details/163482594 欢迎 👍点赞✍评论⭐收藏,欢迎指正