一、前言
微软近期发布了知识图谱工具 GraphRAG 2.0.0,支持基于本地大模型(Ollama)快速构建知识图谱,显著提升了RAG(检索增强生成)的效果。本文手把手教你如何从零部署,并附踩坑记录和性能实测!
二、环境准备
1. 创建虚拟环境
推荐使用 Python 3.12.4(亲测兼容性较佳):
conda create -n graphrag200 python=3.12.4
conda activate graphrag200
2. 拉取源码
建议通过Git下载最新代码(Windows用户需提前安装Git):
git clone https://github.com/microsoft/graphrag.git
cd graphrag
(附:若直接下载压缩包解压,解压完后需创建一个仓库,不然后续会报错)
创建仓库方法:
git init
git add .
git commit -m "Initial commit"
3. 安装依赖
一键安装所需依赖包:
pip install -e .
4. 创建输入文件夹
用于存放待处理的文档(Windows可以直接手动创建):
mkdir -p ./graphrag_ollama/input
将数据集放入input目录即可。
三、关键配置修改
1. 初始化项目
执行初始化命令(注意与旧版参数不同):
python -m graphrag init –root ./graphrag_ollama
2. 修改settings.yaml
核心配置项(需按需调整):
-
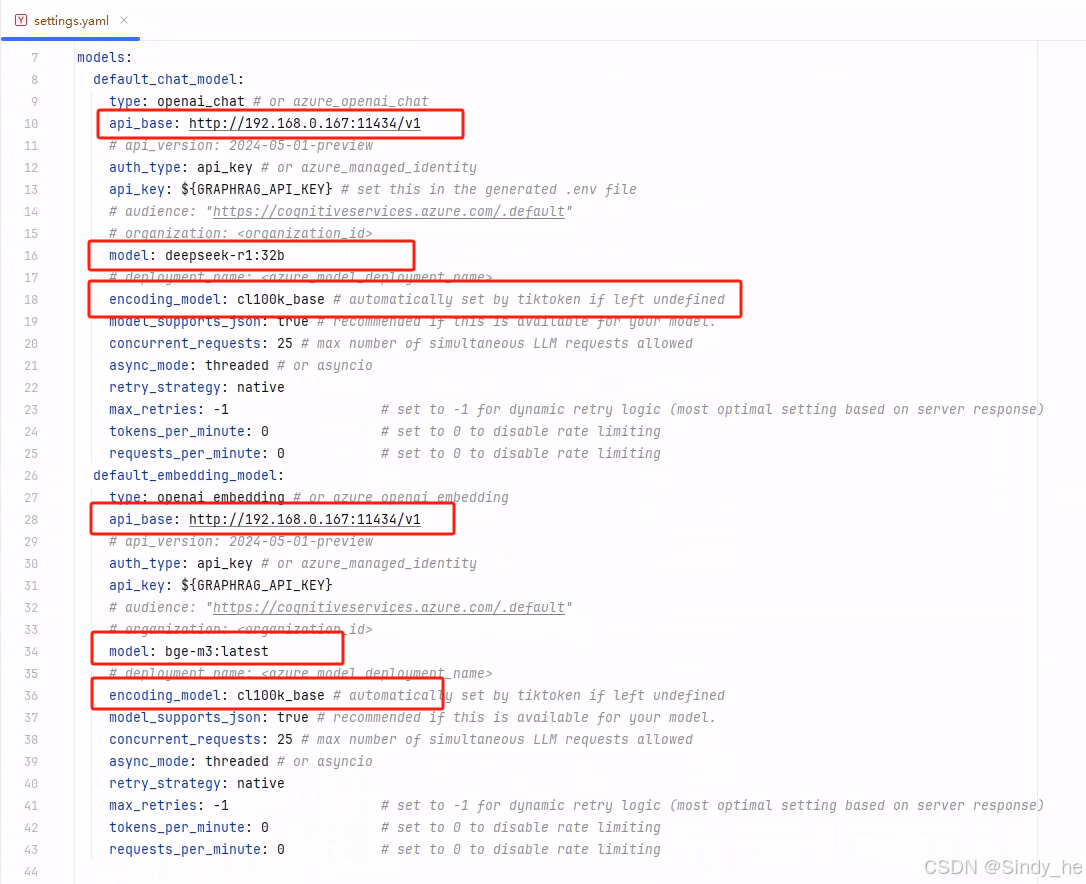
模型设置:使用Ollama本地模型
注意修改一下圈出的几个地方
测试小文件时,建议把chunks改小:
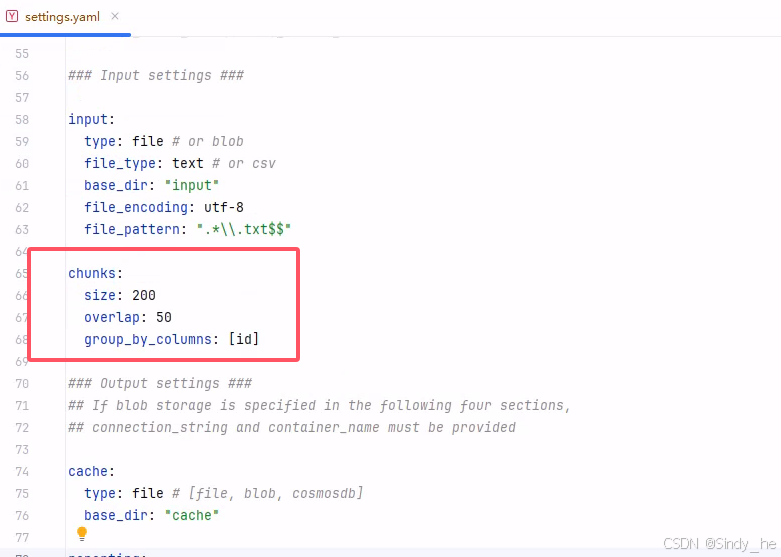
修改结果如下:
- ### This config file contains required core defaults that must be set, along with a handful of common optional settings.
### For a full list of available settings, see https://microsoft.github.io/graphrag/config/yaml/### LLM settings ###
## There are a number of settings to tune the threading and token limits for LLM calls – check the docs.models:
default_chat_model:
type: openai_chat # or azure_openai_chat
api_base: http://192.168.0.167:11434/v1
# api_version: 2024-05-01-preview
auth_type: api_key # or azure_managed_identity
api_key: ${GRAPHRAG_API_KEY} # set this in the generated .env file
# audience: "https://cognitiveservices.azure.com/.default"
# organization: <organization_id>
model: deepseek-r1:32b
# deployment_name: <azure_model_deployment_name>
encoding_model: cl100k_base # automatically set by tiktoken if left undefined
model_supports_json: true # recommended if this is available for your model.
concurrent_requests: 25 # max number of simultaneous LLM requests allowed
async_mode: threaded # or asyncio
retry_strategy: native
max_retries: -1 # set to -1 for dynamic retry logic (most optimal setting based on server response)
tokens_per_minute: 0 # set to 0 to disable rate limiting
requests_per_minute: 0 # set to 0 to disable rate limiting
default_embedding_model:
type: openai_embedding # or azure_openai_embedding
api_base: http://192.168.0.167:11434/v1
# api_version: 2024-05-01-preview
auth_type: api_key # or azure_managed_identity
api_key: ${GRAPHRAG_API_KEY}
# audience: "https://cognitiveservices.azure.com/.default"
# organization: <organization_id>
model: bge-m3:latest
# deployment_name: <azure_model_deployment_name>
encoding_model: cl100k_base # automatically set by tiktoken if left undefined
model_supports_json: true # recommended if this is available for your model.
concurrent_requests: 25 # max number of simultaneous LLM requests allowed
async_mode: threaded # or asyncio
retry_strategy: native
max_retries: -1 # set to -1 for dynamic retry logic (most optimal setting based on server response)
tokens_per_minute: 0 # set to 0 to disable rate limiting
requests_per_minute: 0 # set to 0 to disable rate limitingvector_store:
default_vector_store:
type: lancedb
db_uri: output\\lancedb
container_name: default
overwrite: Trueembed_text:
model_id: default_embedding_model
vector_store_id: default_vector_store### Input settings ###
input:
type: file # or blob
file_type: text # or csv
base_dir: "input"
file_encoding: utf-8
file_pattern: ".*\\\\.txt$$"chunks:
size: 200
overlap: 50
group_by_columns: [id]### Output settings ###
## If blob storage is specified in the following four sections,
## connection_string and container_name must be providedcache:
type: file # [file, blob, cosmosdb]
base_dir: "cache"reporting:
type: file # [file, blob, cosmosdb]
base_dir: "logs"output:
type: file # [file, blob, cosmosdb]
base_dir: "output"### Workflow settings ###
extract_graph:
model_id: default_chat_model
prompt: "prompts/extract_graph.txt"
entity_types: [organization,person,geo,event]
max_gleanings: 1summarize_descriptions:
model_id: default_chat_model
prompt: "prompts/summarize_descriptions.txt"
max_length: 500extract_graph_nlp:
text_analyzer:
extractor_type: regex_english # [regex_english, syntactic_parser, cfg]extract_claims:
enabled: false
model_id: default_chat_model
prompt: "prompts/extract_claims.txt"
description: "Any claims or facts that could be relevant to information discovery."
max_gleanings: 1community_reports:
model_id: default_chat_model
graph_prompt: "prompts/community_report_graph.txt"
text_prompt: "prompts/community_report_text.txt"
max_length: 2000
max_input_length: 8000cluster_graph:
max_cluster_size: 10embed_graph:
enabled: false # if true, will generate node2vec embeddings for nodesumap:
enabled: false # if true, will generate UMAP embeddings for nodes (embed_graph must also be enabled)snapshots:
graphml: false
embeddings: false### Query settings ###
## The prompt locations are required here, but each search method has a number of optional knobs that can be tuned.
## See the config docs: https://microsoft.github.io/graphrag/config/yaml/#querylocal_search:
chat_model_id: default_chat_model
embedding_model_id: default_embedding_model
prompt: "prompts/local_search_system_prompt.txt"global_search:
chat_model_id: default_chat_model
map_prompt: "prompts/global_search_map_system_prompt.txt"
reduce_prompt: "prompts/global_search_reduce_system_prompt.txt"
knowledge_prompt: "prompts/global_search_knowledge_system_prompt.txt"drift_search:
chat_model_id: default_chat_model
embedding_model_id: default_embedding_model
prompt: "prompts/drift_search_system_prompt.txt"
reduce_prompt: "prompts/drift_search_reduce_prompt.txt"basic_search:
chat_model_id: default_chat_model
embedding_model_id: default_embedding_model
prompt: "prompts/basic_search_system_prompt.txt"四、构建知识图谱
执行索引命令(算力警告:亲测4090-24G显卡处理2万字需3小时):
python -m graphrag index –root ./graphrag_ollama
五、知识图谱查询
支持多种查询方式,按需选择:
-
方法命令示例用途 全局查询 python -m graphrag query –method global –query "知识图谱定义" 跨文档综合分析 局部查询 python -m graphrag query –method local –query "知识图谱定义" 单文档精准检索 DRIFT查询 python -m graphrag query –method drift –query "知识图谱定义" 动态漂移分析 基础查询 python -m graphrag query –method basic –query "知识图谱定义" 传统RAG检索
六、注意事项
模型路径:确保Ollama服务已启动,且模型名称与配置一致(如deepseek-r1:32b需提前拉取)。
算力需求:小规模数据集建议使用GPU加速,CPU模式耗时可能成倍增加。
文件编码:输入文档需为UTF-8编码,否则可能报错。
配置备份:修改settings.yaml前建议备份原始文件。
七、总结
GraphRAG 2.0.0大幅优化了知识图谱的构建效率,结合本地模型可实现隐私安全的行业级应用。若遇到部署问题,欢迎在评论区留言交流!
相关资源:
GraphRAG GitHub仓库
Ollama模型库
原创声明:本文为作者原创,未经授权禁止转载。如需引用请联系作者。
点赞关注,技术不迷路! 👍 你的支持是我更新的最大动力! ⚡



![[LangChain RAG] 01 大模型为什么需要 RAG:四个问题与标准流程-171主机测评](https://www.171host.com/wp-content/uploads/2026/08/20260825035331-6a8d11bb97bca-220x150.png)