目录
一、前言
二、relation-graph官网地址
三、推荐relation-graph的原因
四、relation-graph的使用
1.Vue2使用
1.1、安装relation-graph
1.2、 可直接复制到vue文件中运行使用
2. Vue3使用
2.1、安装relation-graph
2.2、 可直接复制到vue文件中运行使用
3. React使用
1.1、安装relation-graph
1.2、 可直接复制到文件中运行使用
五、运行结果
六、下面是运行成果图
一、前言
Relation-Graph是一个开源的免费关系图谱组件,支持Vue2、Vue3和React框架。它提供开箱即用的体验,配置简单,文档清晰,并支持通过插槽自定义节点样式。文章详细介绍了在Vue2、Vue3和React中的安装和使用方法,包含完整的代码示例和运行效果图。该组件具有高度可定制性,支持节点点击事件等交互功能,适用于构建各种关系图谱应用。作者强烈推荐该工具,并分享了实际项目中的使用效果。
二、relation-graph官网地址
relation-graph – A Relationship Graph Component
三、推荐relation-graph的原因
四、relation-graph的使用
1.Vue2使用
1.1、安装relation-graph
npm install –save relation-graph
1.2、 可直接复制到vue文件中运行使用
<template>
<div>
<div style="height:calc(100vh – 60px);">
<RelationGraph ref="graphRef" :options="graphOptions" :on-node-click="onNodeClick" :on-line-click="onLineClick" />
</div>
</div>
</template>
<script>
// relation-graph也支持在main.js文件中使用Vue.use(RelationGraph);这样,你就不需要下面这一行代码来引入了。
import RelationGraph from 'relation-graph'
export default {
name: 'Demo',
components: { RelationGraph },
data() {
return {
graphOptions: {
defaultJunctionPoint: 'border'
// 这里可以参考"Graph 图谱"中的参数进行设置 https://www.relation-graph.com/#/docs/graph
}
}
},
mounted() {
this.showGraph()
},
methods: {
showGraph() {
const jsonData = {
rootId: 'a',
nodes: [
{ id: 'a', text: 'A', borderColor: 'yellow' },
{ id: 'b', text: 'B', color: '#43a2f1', fontColor: 'yellow' },
{ id: 'c', text: 'C', nodeShape: 1, width: 80, height: 60 },
{ id: 'e', text: 'E', nodeShape: 0, width: 150, height: 150 }
],
lines: [
{ from: 'a', to: 'b', text: '关系1', color: '#43a2f1' },
{ from: 'a', to: 'c', text: '关系2' },
{ from: 'a', to: 'e', text: '关系3' },
{ from: 'b', to: 'e', color: '#67C23A' }
]
}
// 以上数据中的node和link可以参考"Node节点"和"Link关系"中的参数进行配置
this.$refs.graphRef.setJsonData(jsonData, (graphInstance) => {
// Called when the relation-graph is completed
})
},
onNodeClick(nodeObject, $event) {
console.log('onNodeClick:', nodeObject)
},
onLineClick(lineObject, $event) {
console.log('onLineClick:', lineObject)
}
}
}
</script>
2. Vue3使用
2.1、安装relation-graph
npm install –save relation-graph-vue3
2.2、 可直接复制到vue文件中运行使用
<template>
<div>
<div style="border: #efefef solid 1px; height: calc(100vh – 100px);width: 100%;">
<relation-graph ref="graphRef$" :options="options" />
</div>
</div>
</template>
<script setup lang="ts">
import { onMounted, ref } from 'vue'
import RelationGraph from 'relation-graph-vue3'
const graphRef$ = ref<RelationGraph>()
const options = {
defaultExpandHolderPosition: 'right'
}
onMounted(() => {
const jsonData = {
rootId: 'a',
nodes: [
{ id: 'a', text: 'a', },
{ id: 'b', text: 'b', },
{ id: 'c', text: 'c', },
{ id: 'd', text: 'd', },
{ id: 'e', text: 'e', },
{ id: 'f', text: 'f', },
],
lines: [
{ from: 'a', to: 'b', },
{ from: 'a', to: 'c', },
{ from: 'a', to: 'd', },
{ from: 'a', to: 'e', },
{ from: 'a', to: 'f', },
],
}
// The node and line in the above data can refer to the options in "Node" and "Link & Line" for configuration.
// Node: https://www.relation-graph.com/#/docs/node
// Link & Line: https://www.relation-graph.com/#/docs/link
graphRef$.value.setJsonData(jsonData)
// The graphRef$.value.setJsonData(jsonData, callback) method is a convenient method that is equivalent to the following code:
// const graphInstance = graphRef$.value.getInstance();
// graphInstance.addNodes(jsonData.nodes);
// graphInstance.addLines(jsonData.lines);
// graphInstance.rootNode = graphInstance.getNodeById(jsonData.rootId);
// await graphInstance.doLayout(); // Layout using the layouter set in graphOptions
// await graphInstance.moveToCenter(); // Find the center based on node distribution and center the view
// await graphInstance.zoomToFit(); // Zoom to fit, so that all nodes can be displayed in the visible area
})
</script>
3. React使用
1.1、安装relation-graph
npm install –save relation-graph-react
1.2、 可直接复制到文件中运行使用
import React, { useEffect, useRef } from 'react';
import RelationGraph, {RelationGraphInstance} from 'relation-graph-react';
import type { MutableRefObject} from 'react';
import type {
RGLine,
RGLink,
RGNode,
RGNodeSlotProps,
RGOptions,
RelationGraphExpose
} from 'relation-graph-react';
const staticJsonData = {
rootId: '2',
nodes: [
{ id: '1', text: '节点-1', myicon: 'el-icon-star-on' },
{ id: '2', text: '节点-2', myicon: 'el-icon-setting', width: 100, height: 100 },
{ id: '3', text: '节点-3', myicon: 'el-icon-setting' },
{ id: '4', text: '节点-4', myicon: 'el-icon-star-on' },
{ id: '6', text: '节点-6', myicon: 'el-icon-setting' },
{ id: '7', text: '节点-7', myicon: 'el-icon-setting' },
{ id: '8', text: '节点-8', myicon: 'el-icon-star-on' },
{ id: '9', text: '节点-9', myicon: 'el-icon-headset' },
{ id: '71', text: '节点-71', myicon: 'el-icon-headset' },
{ id: '72', text: '节点-72', myicon: 'el-icon-s-tools' },
{ id: '73', text: '节点-73', myicon: 'el-icon-star-on' },
{ id: '81', text: '节点-81', myicon: 'el-icon-s-promotion' },
{ id: '82', text: '节点-82', myicon: 'el-icon-s-promotion' },
{ id: '83', text: '节点-83', myicon: 'el-icon-star-on' },
{ id: '84', text: '节点-84', myicon: 'el-icon-s-promotion' },
{ id: '85', text: '节点-85', myicon: 'el-icon-sunny' },
{ id: '91', text: '节点-91', myicon: 'el-icon-sunny' },
{ id: '92', text: '节点-82', myicon: 'el-icon-sunny' },
{ id: '5', text: '节点-5', myicon: 'el-icon-sunny' }
],
lines: [
{ from: '7', to: '71', text: '投资' },
{ from: '7', to: '72', text: '投资' },
{ from: '7', to: '73', text: '投资' },
{ from: '8', to: '81', text: '投资' },
{ from: '8', to: '82', text: '投资' },
{ from: '8', to: '83', text: '投资' },
{ from: '8', to: '84', text: '投资' },
{ from: '8', to: '85', text: '投资' },
{ from: '9', to: '91', text: '投资' },
{ from: '9', to: '92', text: '投资' },
{ from: '1', to: '2', text: '投资' },
{ from: '3', to: '1', text: '高管' },
{ from: '4', to: '2', text: '高管' },
{ from: '6', to: '2', text: '高管' },
{ from: '7', to: '2', text: '高管' },
{ from: '8', to: '2', text: '高管' },
{ from: '9', to: '2', text: '高管' },
{ from: '1', to: '5', text: '投资' }
]
};
const NodeSlot: React.FC<RGNodeSlotProps> = ({node}) => {
console.log('NodeSlot:');
if (node.id === '2') { // if rootNode
return <div style={{zIndex: 555, opacity: 0.5, lineHeight:'100px', width: '100px', height: '100px', color: '#000000', borderRadius:'50%', boxSizing: 'border-box', fontSize: '18px', textAlign: 'center', overflow: 'hidden'}}>
<div style={{width: '100%', height: (node.data!.percent * 100) + '%', marginTop: ((1-node.data!.percent) * 100) + '%', background: 'linear-gradient(to bottom, #00FFFF, #FF00FF)'}}>
{node.text}
</div>
</div>;
}
return <div style={{lineHeight: '80px', textAlign: 'center'}}>
<span>{node.text}</span>
</div>
};
const SimpleGraph: React.FC = () => {
const graphRef = useRef() as MutableRefObject<RelationGraphExpose>;
useEffect(() => {
showGraph();
}, []);
const showGraph = async () => {
// The node and line in the above data can refer to the options in "Node" and "Link & Line" for configuration.
// Node: https://www.relation-graph.com/#/docs/node
// Link & Line: https://www.relation-graph.com/#/docs/link
await graphRef.current.setJsonData(staticJsonData, (graphInstance) => {
// Do something when graph ready
});
// The graphRef.current.setJsonData(jsonData, callback) method is a convenient method that is equivalent to the following code:
// const graphInstance = graphRef.current.getInstance();
// graphInstance.addNodes(jsonData.nodes);
// graphInstance.addLines(jsonData.lines);
// graphInstance.rootNode = graphInstance.getNodeById(jsonData.rootId);
// await graphInstance.doLayout(); // Layout using the layouter set in graphOptions
// await graphInstance.moveToCenter(); // Find the center based on node distribution and center the view
// await graphInstance.zoomToFit(); // Zoom to fit, so that all nodes can be displayed in the visible area
}
const options:RGOptions = {
debug: true,
defaultLineShape: 1,
layout: {
layoutName: 'center',
maxLayoutTimes: 3000
},
defaultExpandHolderPosition: 'right'
};
const onNodeClick = (node: RGNode, _e: MouseEvent | TouchEvent) => {
console.log('onNodeClick:', node.text);
return true;
};
const onLineClick = (line: RGLine, _link: RGLink, _e: MouseEvent | TouchEvent) => {
console.log('onLineClick:', line.text, line.from, line.to);
return true;
};
return <div>
<div>ok</div>
<div style={{ height: 600, width: 900, border: '#efefef solid 1px' }}>
<RelationGraph
ref={graphRef}
options={options}
nodeSlot={NodeSlot}
onNodeClick={onNodeClick}
onLineClick={onLineClick}
/>
</div>
</div>;
};
export default SimpleGraph;
五、运行结果
因为我是Vue2项目,所以下面展示的是我在Vue2项目中的代码,可直接复制运行,需要注意的是我使用了less
<template>
<div class="dev-linkage-diagram">
<div class="header">
<h3>设备联动图</h3>
</div>
<div class="graphRefBox">
<RelationGraph ref="graphRef" :options="graphOptions" :on-node-click="onNodeClick" :on-line-click="onLineClick">
<template #node="{ node }">
<div class="c-my-rg-node nodeBox">
<div class="top">
<div class="left">
<span></span>
<strong>声光</strong>
<div class="state">离线</div>
</div>
<div class="num">
<span>4</span>
</div>
</div>
<div class="bottom">
办公室1
</div>
</div>
</template>
</RelationGraph>
</div>
</div>
</template>
<script>
import RelationGraph from 'relation-graph'
export default {
name: "DevLinkageDiagram",
components: { RelationGraph },
props: {},
data() {
return {
graphOptions: {
defaultJunctionPoint: 'border',
allowShowDownloadButton: false,
defaultFocusRootNode: false,
defaultNodeWidth: 1,
defaultNodeHeight: 1,
defaultShowLineLabel: false,
allowShowRefreshButton: true,
// 这里可以参考"Graph 图谱"中的参数进行设置 https://www.relation-graph.com/#/docs/graph
}
};
},
computed: {},
created() { },
mounted() {
this.showGraph()
},
methods: {
showGraph() {
const jsonData = {
rootId: 'a',
nodes: [
{ id: 'a', text: 'A', },
{ id: 'b', text: 'B', },
{ id: 'c', text: 'C', },
{ id: 'e', text: 'E', }
],
lines: [
{ from: 'a', to: 'b', },
{ from: 'a', to: 'c', },
{ from: 'a', to: 'e', },
]
}
// 以上数据中的node和link可以参考"Node节点"和"Link关系"中的参数进行配置
this.$refs.graphRef.setJsonData(jsonData, (graphInstance) => {
// Called when the relation-graph is completed
})
},
onNodeClick(nodeObject, $event) {
// console.log('onNodeClick:', nodeObject)
},
onLineClick(lineObject, $event) {
// console.log('onLineClick:', lineObject)
}
},
};
</script>
<style scoped lang="less">
.dev-linkage-diagram {
padding: 15px;
background-color: #ffffff;
border-radius: 4px;
box-shadow: 0 2px 12px 0 rgba(0, 0, 0, 0.1);
.header {
display: flex;
justify-content: space-between;
align-items: center;
margin-bottom: 15px;
padding-bottom: 10px;
border-bottom: 1px solid #eee;
}
.graphRefBox {
height: 580px;
background-color: #cfcece;
}
.rel-node-peel {
position: relative;
.c-my-rg-node {
position: absolute;
top: 50%;
left: 50%;
transform: translate(-50%, -50%);
}
}
.nodeBox {
width: 200px;
border-radius: 20px;
overflow: hidden;
>div {
padding: 0 16px;
}
.top {
display: flex;
justify-content: space-between;
align-items: center;
width: 100%;
height: 40px;
background-color: #deb922;
.left {
display: flex;
align-items: center;
color: #fff;
.state {
padding: 1px 4px;
margin-left: 4px;
background-color: rgba(245, 245, 245, 0.3);
border-radius: 4px;
}
}
.num {
display: flex;
justify-content: center;
align-items: center;
width: 24px;
height: 24px;
background-color: rgba(226, 226, 226, 0.5);
border: 1px solid #fff;
border-radius: 50%;
color: #fff;
font-weight: 700;
font-size: 14px;
}
}
.bottom {
display: flex;
align-items: center;
width: 100%;
height: 40px;
background-color: #72716d;
font-size: 14px;
}
}
}
</style>
六、下面是运行成果图
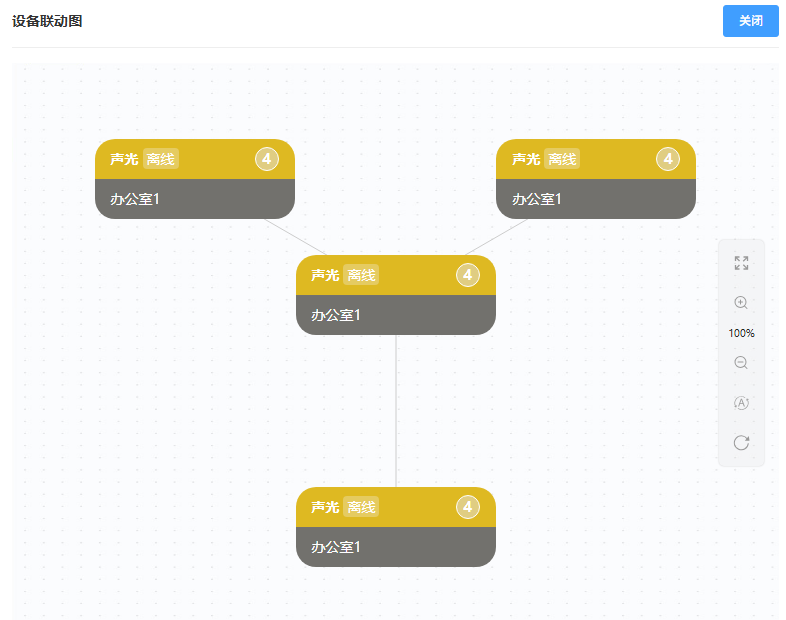
非常完美!!!真的很好用,真心推荐!!!如果觉得有用就请用发财的小手点点赞趴,谢谢啦!