Linux网络编程:从零设计应用层协议!Jsoncpp序列化、Encode/Decode拆包与TCP网络计算器完整实现

🔥 星恒随风:
个人主页
❄️ 个人专栏:
《指针合集》
|
《C语言基础》
|
《数据结构》
|
《机器学习导论》
|
《前端基础》
|
《python基础》
|
《C++从入门到入土》
|
《Linux的学习之旅》
✨ 数据即知识,压缩即智能
文章目录
- Linux网络编程:从零设计应用层协议!Jsoncpp序列化、Encode/Decode拆包与TCP网络计算器完整实现
-
- 前言:能够接收字节,为什么还不能直接处理请求?
- 一、先设计整个网络计算器
-
- 1.1 客户端要完成什么?
- 1.2 服务器要完成什么?
- 1.3 为什么需要分成多个模块?
- 二、完整项目结构与依赖关系
- 三、先设计应用层协议中的Request
-
- 3.1 Request需要保存什么?
- 3.2 需要提供什么接口?
- 四、再设计Response
-
- 4.1 为什么不仅需要result?
- 4.2 设计接口
- 4.3 状态码应该怎样约定?
- 五、为什么需要Jsoncpp?
- 六、安装Jsoncpp
-
- 6.1 头文件
- 6.2 编译时为什么还需要链接库?
- 6.3 CentOS等发行版
- 七、Json::Value是什么?
-
- 7.1 为什么使用operator[]?
- 7.2 为什么operator[]可以保存不同类型?
- 八、序列化:Json::FastWriter
-
- 8.1 FastWriter有什么作用?
- 8.2 为什么把运算符转成整数?
- 九、反序列化:Json::Reader
-
- 9.1 为什么还需要检查字段类型?
- 十、除了序列化,还需要解决报文边界问题
-
- 10.1 TCP为什么会出现半包现象?
- 10.2 什么是粘包?
- 10.3 怎样解决?
- 十一、设计报文格式:长度 + 有效载荷 + 分隔符
-
- 11.1 为什么要增加长度?
- 11.2 为什么长度不包含分隔符?
- 11.3 能不能使用\\r\\n?
- 11.4 为什么还要保留最后一个换行符?
- 十二、设计Encode接口
-
- 12.1 Encode需要实现什么?
- 12.2 为什么要返回string?
- 12.3 设计接口
- 十三、设计Decode接口
-
- 13.1 Decode需要实现什么?
- 13.2 为什么package必须传引用?
- 13.3 为什么message使用指针?
- 13.4 拆包的核心步骤
- 13.5 为什么不能找到第一个换行就直接提取?
- 十四、重新认识半包和多包的各种情况
-
-
- 情况一:只读到长度的一部分
- 情况二:读到长度字段
- 情况三:读到部分有效载荷
- 情况四:有效载荷已到,但结束标记还没到
- 情况五:完整报文
- 情况六:完整报文后面还有下一条的一部分
- 情况七:一次收到了两条完整报文
-
- 十五、实现Protocol.hpp之前,先规划整个文件
- 十六、Protocol.hpp完整实现
- 十七、深入分析Encode和Decode
-
- 17.1 Encode到底做了什么?
- 17.2 Decode为什么需要先找换行?
- 17.3 为什么要验证长度字段?
- 17.4 为什么不能只判断package.size()?
- 17.5 为什么Decode成功以后要erase?
- 17.6 Decode返回false代表什么?
- 十八、为什么Json::FastWriter末尾的换行不会破坏协议?
- 十九、Factory为什么也属于Protocol.hpp?
-
- 19.1 为什么使用shared_ptr?
- 19.2 为什么Factory不是必需的?
- 二十、先测试Protocol.hpp
-
- 20.1 测试目标
- 20.2 测试文件完整实现
- 二十一、设计Calculate.hpp
-
- 21.1 文件需要实现什么?
- 21.2 为什么计算模块不应该处理Socket?
- 21.3 为什么返回Response?
- 21.4 为什么需要处理整数溢出?
- 二十二、Calculate.hpp完整实现
-
- 22.1 为什么使用switch?
- 22.2 为什么单独检查除零?
- 22.3 为什么不让Calculator直接序列化结果?
- 二十三、设计TcpServer.hpp
-
- 23.1 服务器应该做什么?
- 23.2 设计成员变量
- 23.3 设计接口
- 23.4 为什么Service使用shared_ptr?
- 23.5 为什么Service是static?
- 二十四、TCP服务器必须怎样处理接收缓冲区?
- 二十五、TcpServer.hpp完整实现
- 二十六、深入分析服务器的完整处理过程
-
- 26.1 为什么每个连接需要独立的inbuffer?
- 26.2 为什么先Decode再Recv?
- 26.3 为什么反序列化失败也需要Response?
- 26.4 为什么先Serialize,再Encode?
- 26.5 为什么Socket::Recv使用append?
- 26.6 当前线程模型有什么边界?
- 二十七、设计TcpServerMain.cc
-
- 27.1 文件职责
- 27.2 完整实现
- 二十八、设计TcpClientMain.cc
-
- 28.1 客户端需要完成哪些功能?
- 28.2 需要哪些对象?
- 28.3 怎样读取运算表达式?
- 二十九、TcpClientMain.cc完整实现
- 三十、为什么客户端也需要Decode循环?
- 三十一、设计Makefile
-
- 31.1 为什么要链接jsoncpp?
- 31.2 为什么需要-pthread?
- 31.3 完整Makefile
- 三十二、完整联调:运行网络计算器
-
- 32.1 编译
- 32.2 启动服务器
- 32.3 启动客户端
- 32.4 测试加法
- 32.5 测试减法
- 32.6 测试乘法
- 32.7 测试除法
- 32.8 测试取模
- 32.9 测试除零
- 32.10 测试取模除零
- 32.11 测试不支持的运算符
- 32.12 测试整数溢出
- 三十三、完整复盘:100 + 200究竟经历了什么?
-
- 第一步:构造请求对象
- 第二步:序列化
- 第三步:封装报文
- 第四步:发送TCP字节流
- 第五步:服务器接收
- 第六步:服务器解包
- 第七步:反序列化
- 第八步:计算
- 第九步:响应序列化
- 第十步:响应封装与发送
- 第十一步:客户端接收与解析
- 第十二步:打印
- 三十四、附录:Jsoncpp有哪些常见序列化方式?
-
- 34.1 Json::Value::toStyledString()
- 34.2 Json::FastWriter
- 34.3 Json::StyledWriter
- 34.4 Json::StreamWriter
- 三十五、Jsoncpp有哪些反序列化方式?
-
- 35.1 Json::Reader
- 35.2 CharReader相关接口
- 三十六、JsoncppDemo.cc完整实现
-
- 36.1 文件目标
- 36.2 完整代码
- 三十七、Json::Value常用API总结
-
- 37.1 构造
- 37.2 访问对象字段
- 37.3 类型检查
- 37.4 类型转换
- 37.5 数组操作
- 37.6 常用容器接口
- 三十八、为什么协议设计不等于简单地使用JSON?
- 三十九、最终知识体系
前言:能够接收字节,为什么还不能直接处理请求?
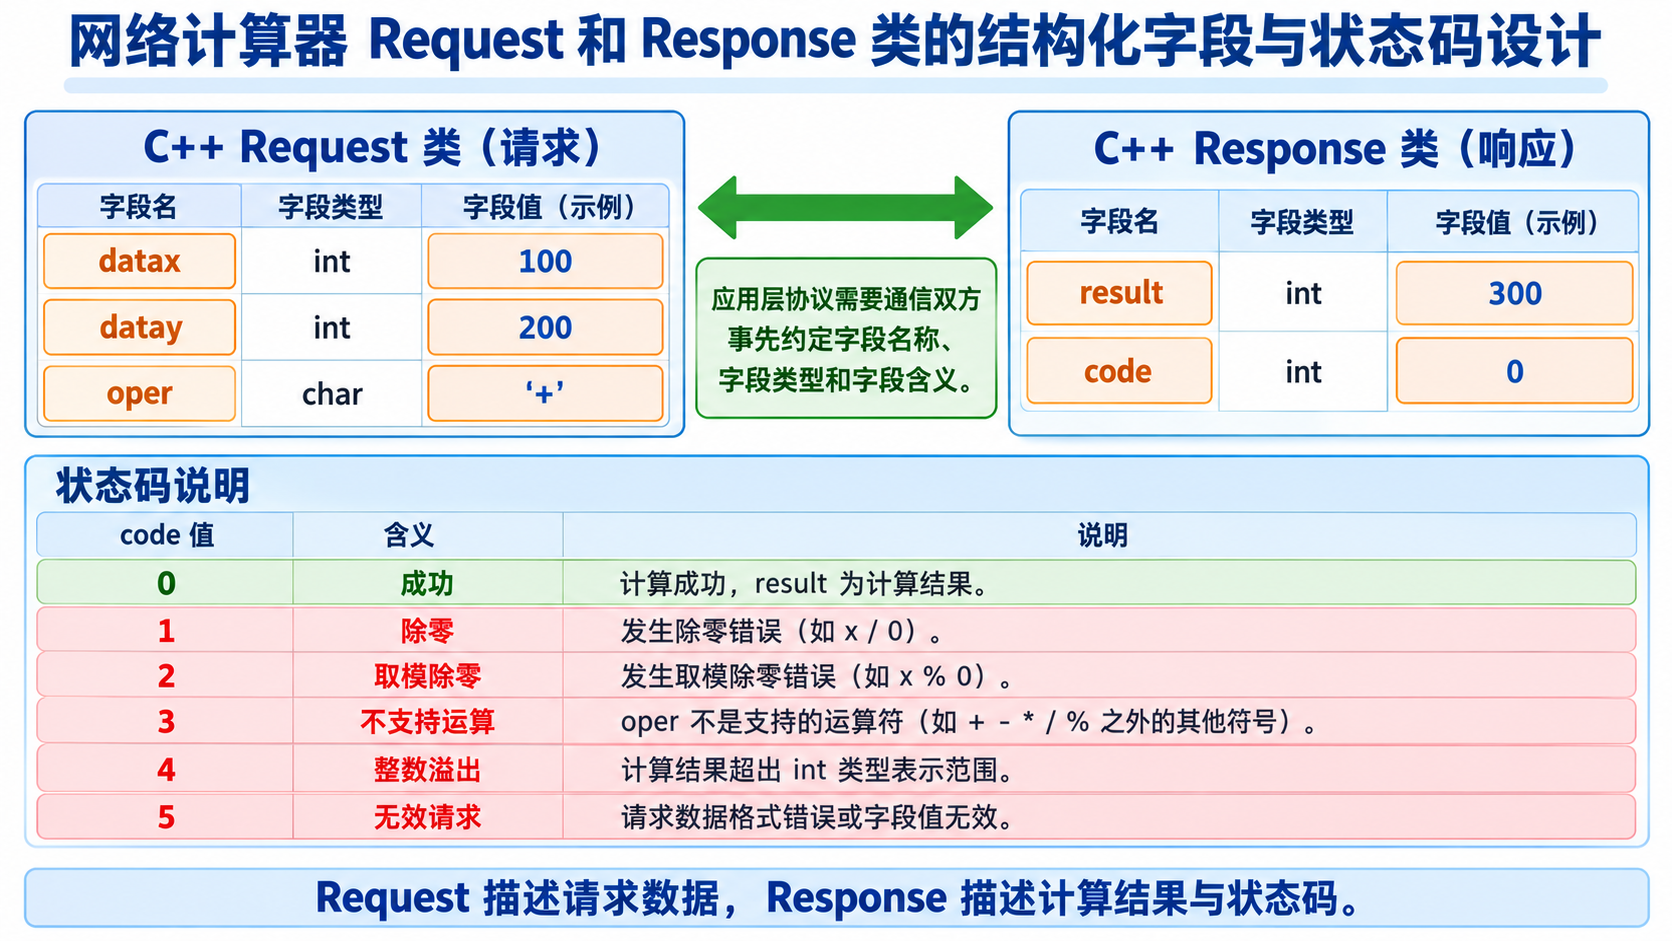
在上一篇中,我们已经明确了应用层协议的基本含义,并且通过网络计算器设计了两个结构:
Request
表示客户端请求。
Response
表示服务器响应。
同时完成了:
Socket
抽象基类和:
TcpSocket
具体实现类。
现在客户端已经能够:
建立TCP连接
↓
发送数据
↓
接收数据
但是还没有解决两个重要问题。
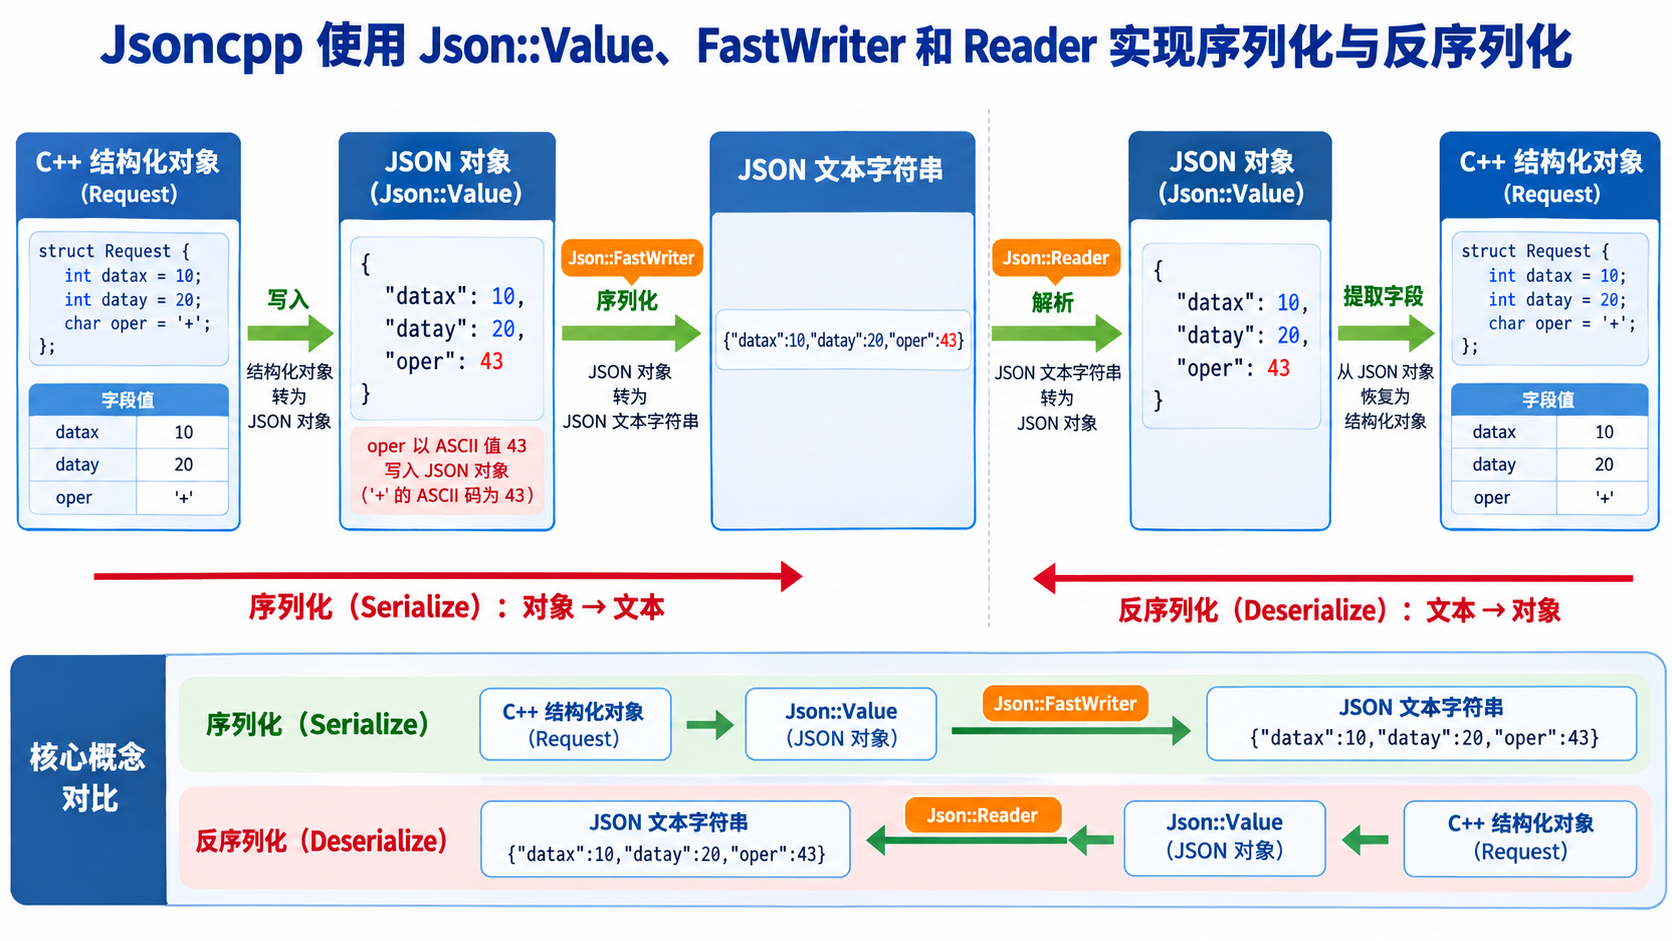
第一个问题:怎样把Request与Response转换成适合网络传输的数据?
例如:
Request req(10, 20, '+');
需要转换为:
{"datax":10,"datay":20,"oper":43}
服务器收到以后,再恢复原来的字段。
这需要:
序列化与反序列化
第二个问题:怎样从TCP字节流中识别一条完整的请求?
即使客户端一次发送了完整JSON,服务器也不一定能通过一次 recv() 读取完整。
因此,还需要:
报文封装与报文解析
对应:
Encode()
Decode()
一、先设计整个网络计算器
1.1 客户端要完成什么?
客户端输入:
100 + 200
然后构造:
Request req(100, 200, '+');
通过协议模块将请求转换为:
可以通过TCP传输的报文
发送到服务器。
服务器返回响应后,客户端需要将其恢复为:
Response
对象。
最后输出:
result = 300
1.2 服务器要完成什么?
服务器的基本流程:
接收TCP字节流
↓
保存到接收缓冲区
↓
判断是否包含完整报文
↓
提取报文有效载荷
↓
反序列化Request
↓
执行计算
↓
构造Response
↓
序列化Response
↓
封装响应报文
↓
通过TCP发送
1.3 为什么需要分成多个模块?
因为整个过程包含不同职责。
Socket.hpp
负责网络字节传输
Protocol.hpp
负责消息格式与序列化
Calculate.hpp
负责算术计算
TcpServer.hpp
负责组织服务器处理流程
TcpClientMain.cc
负责客户端交互
这样不同文件之间就不会混合大量互不相关的实现细节。
二、完整项目结构与依赖关系
本项目继续使用C++11。
工程结构:
network_calculator/
├── Socket.hpp
├── Protocol.hpp
├── Calculate.hpp
├── TcpServer.hpp
├── TcpServerMain.cc
├── TcpClientMain.cc
├── JsoncppDemo.cc
└── Makefile
其中:
Socket.hpp
直接复用上一篇的完整实现。
其他文件在本文中按照:
文件职责
↓
接口设计
↓
完整代码
↓
关键实现
的方式逐一讲解。
三、先设计应用层协议中的Request
3.1 Request需要保存什么?
当前计算器需要:
第一个操作数
第二个操作数
运算符
所以设计:
class Request
{
private:
int _data_x;
int _data_y;
char _oper;
};
例如:
Request req(10, 20, '+');
表示:
10 + 20
3.2 需要提供什么接口?
构造函数:
Request();
Request(int x, int y, char op);
序列化:
bool Serialize(std::string* out) const;
反序列化:
bool Deserialize(const std::string& in);
获取操作数和运算符:
int GetX() const;
int GetY() const;
char GetOper() const;
另外保留两个辅助接口:
void Debug() const;
void Inc();
其中:
Debug()
用于调试打印字段。
Inc()
用于对两个操作数分别加1,便于在实验中观察对象字段变化。
它不是网络计算器正式运算流程所必须的接口,但可以帮助理解对象的数据状态。
四、再设计Response
4.1 为什么不仅需要result?
例如:
10 / 0
不能得到普通整数运算结果。
因此服务器需要返回:
计算结果
计算状态
所以:
class Response
{
private:
int _result;
int _code;
};
4.2 设计接口
Response();
Response(int result, int code);
序列化:
bool Serialize(std::string* out) const;
反序列化:
bool Deserialize(const std::string& in);
修改结果:
void SetResult(int result);
void SetCode(int code);
读取结果:
int GetResult() const;
int GetCode() const;
4.3 状态码应该怎样约定?
code的具体含义需要由应用层协议约定。
本例采用:
| 0 | 计算成功 |
| 1 | 除数为0 |
| 2 | 取模时除数为0 |
| 3 | 不支持的运算符 |
| 4 | 计算结果超出int范围 |
| 5 | 请求结构不合法 |
其中后面几种状态是为了让这个完整实现具有较明确的错误处理而采用的示例约定。
需要记住:
状态码不是TCP规定的,而是网络计算器自己定义的应用层协议内容。
五、为什么需要Jsoncpp?
现在已经定义:
Request
Response
两个C++对象。
但Socket并不会自动将对象转换成网络消息。
例如:
Request req(10, 20, '+');
我们需要将它转换为类似:
{
"datax": 10,
"datay": 20,
"oper": 43
}
的结构化文本。
可以自己编写转换代码。
但当前希望集中学习:
应用层协议
报文格式
TCP字节流处理
所以直接使用现成的:
Jsoncpp
库完成JSON序列化和反序列化。
六、安装Jsoncpp
在Ubuntu中执行:
sudo apt update
安装:
sudo apt install -y libjsoncpp-dev pkg-config
其中:
libjsoncpp-dev
提供Jsoncpp开发所需头文件与链接库。
pkg-config
用于查询编译和链接参数。
6.1 头文件
当前Ubuntu环境下常用:
#include <jsoncpp/json/json.h>
具体头文件搜索路径与安装方式有关。
6.2 编译时为什么还需要链接库?
例如:
g++ test.cc -std=c++11 -ljsoncpp -o test
其中:
-ljsoncpp
告诉链接器使用Jsoncpp库。
也可以通过:
pkg-config –cflags –libs jsoncpp
查询编译所需参数。
6.3 CentOS等发行版
在使用相应旧式包管理环境时,可能通过:
sudo yum install jsoncpp-devel
安装开发包。
实际命令应以所在发行版的包管理器为准。
七、Json::Value是什么?
使用Jsoncpp时,经常首先创建:
Json::Value root;
它用于保存JSON数据结构。
例如:
Json::Value root;
root["datax"] = 10;
root["datay"] = 20;
root["oper"] = 43;
这样就构建了一个JSON对象。
7.1 为什么使用operator[]?
例如:
root["datax"]
用于访问名为:
datax
的字段。
赋值:
root["datax"] = 10;
就相当于为JSON对象添加:
"datax": 10
7.2 为什么operator[]可以保存不同类型?
因为:
Json::Value
能够表示多种JSON数据类型。
例如:
对象
数组
字符串
数字
布尔值
null
所以可以写:
root["name"] = "zhangsan";
root["age"] = 20;
root["student"] = true;
八、序列化:Json::FastWriter
8.1 FastWriter有什么作用?
Json::FastWriter writer;
可以把:
Json::Value
转换为JSON字符串。
例如:
Json::Value root;
root["datax"] = 10;
root["datay"] = 20;
root["oper"] = 43;
Json::FastWriter writer;
std::string result = writer.write(root);
此时:
result
包含对应的JSON文本。
需要注意,Jsoncpp常见的 FastWriter 实现默认还会在生成的文本末尾附加换行符。
因此实际有效载荷长度应以:
result.size()
为准,不能凭肉眼估计JSON字符数量。
8.2 为什么把运算符转成整数?
这里规定:
root["oper"] = static_cast<int>(_oper);
例如:
'+'
对应:
43
服务器反序列化以后:
_oper = static_cast<char>(43);
就可以恢复:
'+'
这个规则是我们为计算器协议设计的字段表示方法。
九、反序列化:Json::Reader
现在假设服务器收到:
{"datax":10,"datay":20,"oper":43}
需要恢复成:
Request
对象。
可以使用:
Json::Reader reader;
例如:
Json::Value root;
Json::Reader reader;
bool ok = reader.parse(
json_string,
root
);
如果:
ok == true
说明JSON文本成功解析为对应的JSON数据结构。
然后读取字段:
int x = root["datax"].asInt();
int y = root["datay"].asInt();
int op = root["oper"].asInt();
最后:
char oper = static_cast<char>(op);
9.1 为什么还需要检查字段类型?
因为:
reader.parse()
成功,只表示输入是可以解析的JSON。
并不自动保证它一定符合我们的计算器请求格式。
例如:
{"datax":"abc","datay":20,"oper":43}
可能是合法JSON。
但:
datax
并不是计算器期望的整数。
因此,还需要检查:
root.isObject()
root["datax"].isInt()
root["datay"].isInt()
root["oper"].isInt()
等条件。
这体现了一个重要区别:
合法JSON不一定是合法的应用层请求。
十、除了序列化,还需要解决报文边界问题
我们现在可以把:
Request
转换为JSON。
但是:
send()
发送JSON以后:
recv()
不一定一次获得完整JSON。
10.1 TCP为什么会出现半包现象?
假设完整请求是:
{"datax":10,"datay":20,"oper":43}
服务器可能先读到:
{"datax":10,
然后再读到:
"datay":20,"oper":43}
如果第一次读取后就执行:
Deserialize()
会因为请求尚未完整而失败。
这种现象通常称为:
半包
但本质上是:
应用程序的一条完整消息分散在多次TCP读取结果中。
10.2 什么是粘包?
假设客户端先后发送两条请求。
请求A
请求B
服务器的一次 recv() 可能取得:
请求A请求B
形成的连续字节。
如果程序错误地把本次 recv() 的所有数据都当成一条请求,就无法正确区分A和B。
这种现象通常称为:
粘包
更准确地说,TCP本身只提供连续字节流。
半包、粘包描述的是应用层消息边界与某次接收结果不一致的问题。
10.3 怎样解决?
我们自己定义一个报文格式。
使接收方能够判断:
一条消息有多长?
什么时候接收完整?
剩下的数据属于下一条消息吗?
十一、设计报文格式:长度 + 有效载荷 + 分隔符
11.1 为什么要增加长度?
假设要发送:
hello
长度是:
5
可以把报文设计为:
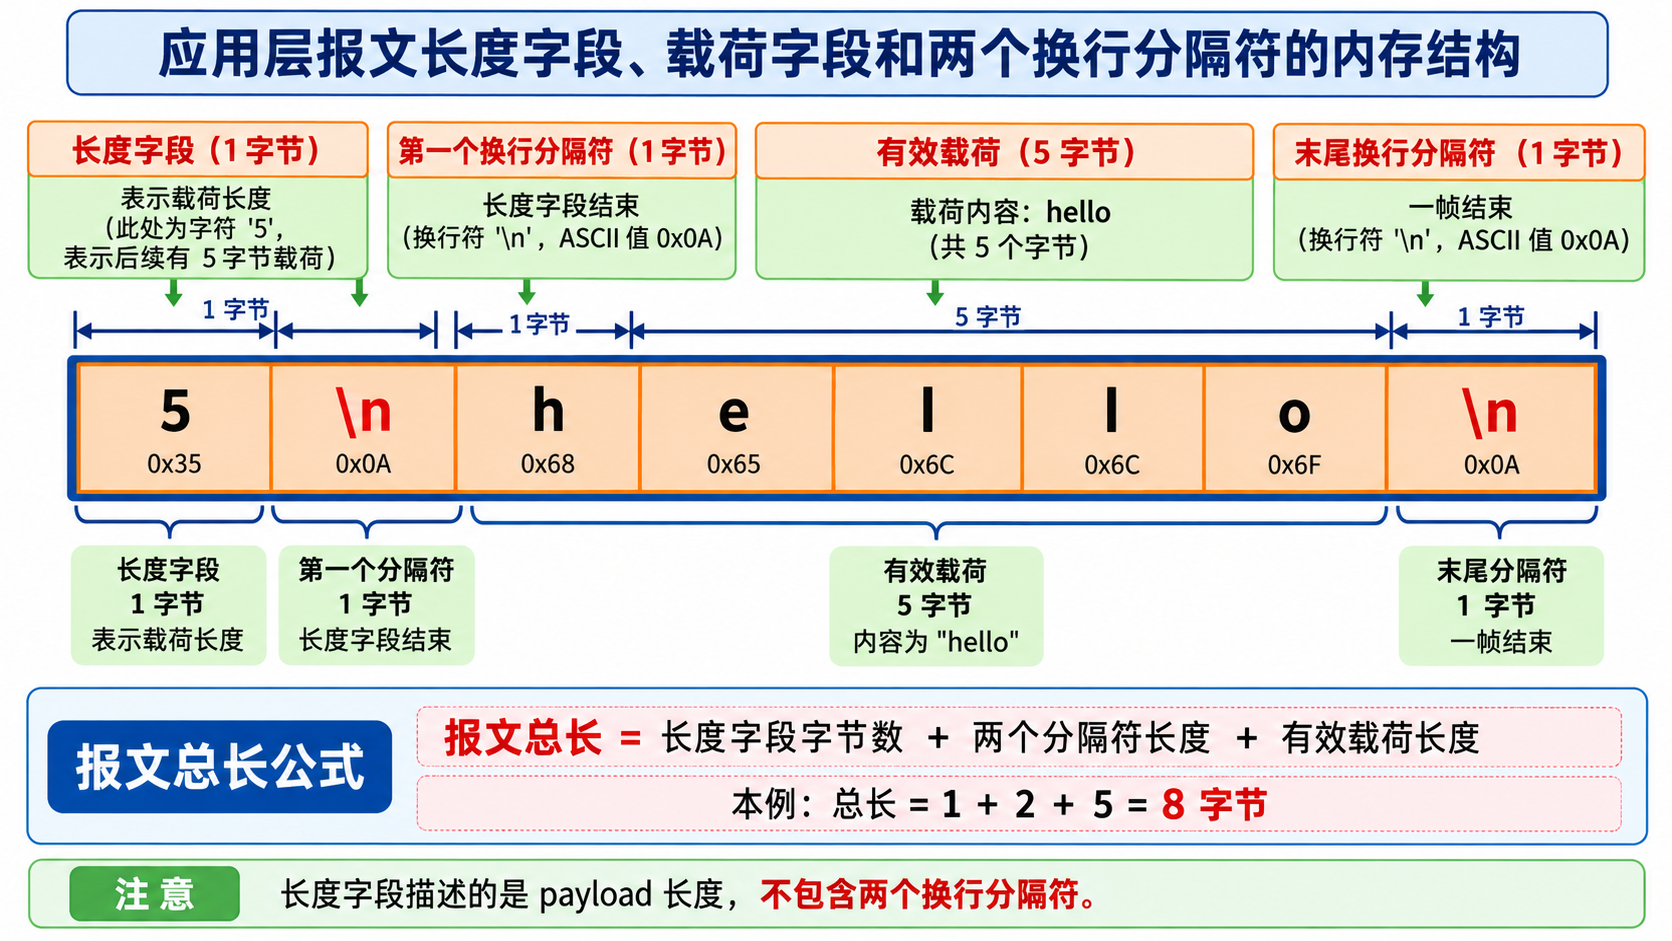
5\\nhello\\n
其中:
5:有效载荷长度
\\n:长度字段结束标记
hello:有效载荷
\\n:报文结束标记
用更直观的形式表示:
+——–+—–+———+—–+
| 长度 | \\n | 载荷 | \\n |
+——–+—–+———+—–+
11.2 为什么长度不包含分隔符?
这里约定:
长度字段表示有效载荷的字节数
因此:
5\\nhello\\n
中的:
5
只表示:
hello
占5个字节。
两个换行符是协议的辅助字段,不计入有效载荷长度。
11.3 能不能使用\\r\\n?
可以。
例如:
5\\r\\nhello\\r\\n
也是一种可行约定。
但必须保证:
客户端编码规则
服务器解码规则
完全一致。
为了使后续字符串处理更直接,本文统一使用:
const std::string LineBreakSep = "\\n";
不混合使用不同分隔符。
11.4 为什么还要保留最后一个换行符?
当前采用:
长度 + 换行 + 载荷 + 换行
的双分隔符形式,便于观察和调试报文。
不过接收方真正确定有效载荷位置和长度,主要依赖长度字段。
最后一个换行符仍然需要按照协议检查,不能在解析时随意跳过。
十二、设计Encode接口
12.1 Encode需要实现什么?
输入:
std::string message;
输出:
长度\\n有效载荷\\n
例如:
message = "hello";
经过:
Encode(message)
以后:
5\\nhello\\n
12.2 为什么要返回string?
因为TCP发送接口可以直接发送:
std::string
中保存的连续字节。
12.3 设计接口
std::string Encode(
const std::string& message
);
实现思路:
读取有效载荷长度
↓
转换为十进制字符串
↓
拼接换行符
↓
拼接有效载荷
↓
拼接末尾换行符
例如:
std::string len =
std::to_string(message.size());
最后:
return len + "\\n" + message + "\\n";
十三、设计Decode接口
Decode() 比 Encode() 更重要。
因为它不仅要提取数据,还要处理TCP可能分多次读取或者一次读取多条消息的情况。
13.1 Decode需要实现什么?
输入:
std::string& package
表示当前累计的TCP接收缓冲区。
输出:
std::string* message
保存一条完整报文的有效载荷。
返回:
true:成功提取一条完整报文
false:暂时还没有完整报文
13.2 为什么package必须传引用?
因为:
Decode()
成功提取一条报文以后,还需要删除已经消费的字节。
例如原缓冲区:
5\\nhello\\n5\\nworld\\n
第一次 Decode():
提取hello
剩余:
5\\nworld\\n
第二次:
提取world
剩余:
空字符串
因此:
package
需要被修改。
13.3 为什么message使用指针?
因为它是一个输出参数。
例如:
std::string message;
bool ok = Decode(
package,
&message
);
成功以后:
message
保存提取出的完整有效载荷。
13.4 拆包的核心步骤
可以分为:
找到长度字段结束位置
↓
解析有效载荷长度
↓
计算完整报文的总长度
↓
判断接收缓冲区是否足够
↓
检查报文结束分隔符
↓
提取有效载荷
↓
删除已消费的字节
13.5 为什么不能找到第一个换行就直接提取?
因为第一个换行只是:
长度字段的结束位置
不是整条消息的结束位置。
例如:
5\\nhel
虽然已经存在第一个换行,但有效载荷仍然没有接收完整。
因此必须继续检查:
当前缓冲区长度 >= 完整报文总长度
才能解包。
十四、重新认识半包和多包的各种情况
假设完整报文为:
5\\nhello\\n
TCP接收缓冲区可能依次变化。
情况一:只读到长度的一部分
5
还不知道长度字段是否结束。
不能提取。
情况二:读到长度字段
5\\n
已经知道有效载荷应该有5个字节。
但有效载荷还没有到齐。
不能提取。
情况三:读到部分有效载荷
5\\nhel
仍然不完整。
情况四:有效载荷已到,但结束标记还没到
5\\nhello
按照当前协议仍然不能算完整报文。
情况五:完整报文
5\\nhello\\n
可以提取:
hello
情况六:完整报文后面还有下一条的一部分
5\\nhello\\n5\\nwo
可以提取第一条:
hello
剩余:
5\\nwo
继续等待。
情况七:一次收到了两条完整报文
5\\nhello\\n5\\nworld\\n
可以连续执行两次:
Decode()
提取:
hello
world
这就是为什么解码通常要放在循环中,而不是每次网络接收只调用一次。
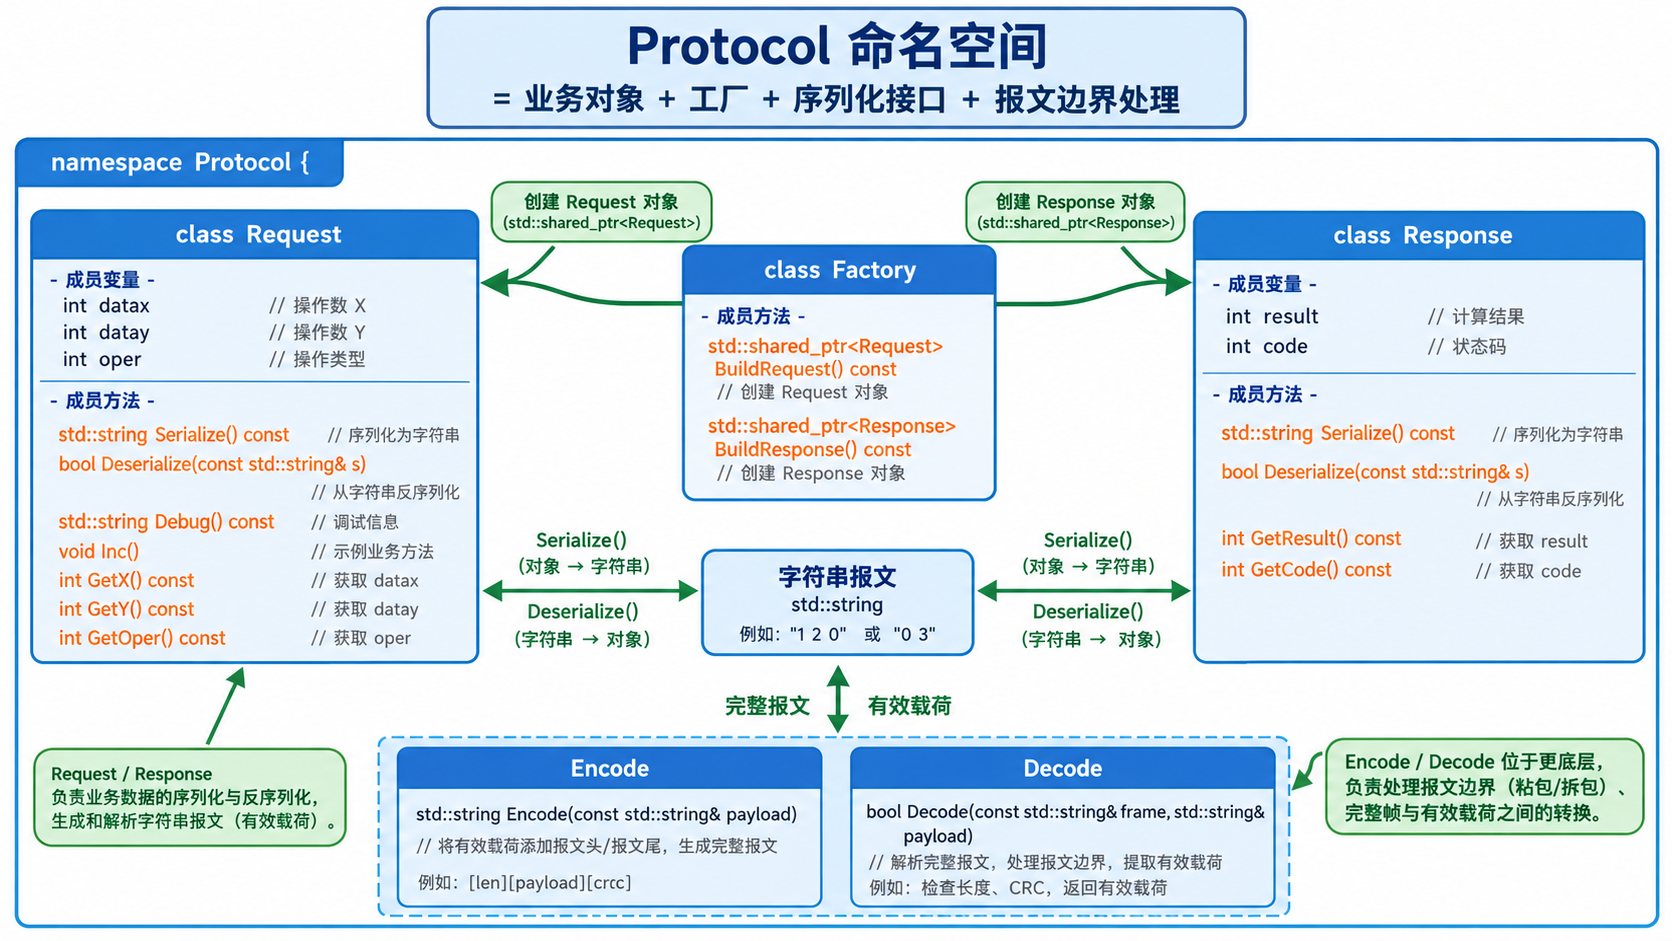
十五、实现Protocol.hpp之前,先规划整个文件
这个文件需要实现三类功能。
第一类:
Encode和Decode
负责报文封装与拆包。
第二类:
Request和Response
负责描述应用层结构化消息,以及JSON序列化。
第三类:
Factory
负责统一创建请求和响应对象。
因此结构可以设计为:
namespace Protocol
{
std::string Encode(...);
bool Decode(...);
class Request;
class Response;
class Factory;
}
其中保留:
const std::string ProtSep = " ";
作为手工字符串协议方案中字段分隔符的示例定义。
当前JSON格式不会直接使用它。
十六、Protocol.hpp完整实现
下面给出可以直接用于网络计算器的完整实现。
与最简单的拆包代码相比,主要补充三类检查:
长度字段必须合法
有效载荷长度不能无限扩大
必须验证报文末尾分隔符
避免错误输入直接导致不受控制的字符串转换或缓冲区增长。
#pragma once
#include <cstddef>
#include <iostream>
#include <limits>
#include <memory>
#include <stdexcept>
#include <string>
#include <jsoncpp/json/json.h>
namespace Protocol
{
const std::string ProtSep = " ";
const std::string LineBreakSep = "\\n";
// 当前实验允许的最大有效载荷
const std::size_t MaxPayload = 64 * 1024;
// 有效载荷 -> 完整报文
inline std::string Encode(
const std::string& message
)
{
if (message.size() > MaxPayload)
{
throw std::length_error(
"payload too large"
);
}
std::string len =
std::to_string(message.size());
return len +
LineBreakSep +
message +
LineBreakSep;
}
// 从TCP累计缓冲区提取一条完整报文
// 不完整返回false;格式错误抛出异常
inline bool Decode(
std::string& package,
std::string* message
)
{
if (message == nullptr)
{
throw std::invalid_argument(
"null message pointer"
);
}
std::size_t pos =
package.find(LineBreakSep);
// 长度字段尚未完整
if (pos == std::string::npos)
{
if (package.size() > 20)
{
throw std::runtime_error(
"invalid length header"
);
}
return false;
}
if (pos == 0 || pos > 20)
{
throw std::runtime_error(
"invalid length header"
);
}
// 手动解析十进制长度,避免异常和溢出
std::size_t payload_len = 0;
for (std::size_t i = 0; i < pos; ++i)
{
char ch = package[i];
if (ch < '0' || ch > '9')
{
throw std::runtime_error(
"non-numeric length"
);
}
std::size_t digit =
static_cast<std::size_t>(ch – '0');
if (payload_len >
(MaxPayload – digit) / 10)
{
throw std::runtime_error(
"payload length too large"
);
}
payload_len =
payload_len * 10 + digit;
}
// 有效载荷的起始位置
const std::size_t body_begin =
pos + LineBreakSep.size();
// 整条报文的总字节数
const std::size_t total =
body_begin +
payload_len +
LineBreakSep.size();
// 当前还没收齐整条报文
if (package.size() < total)
{
return false;
}
// 检查报文结束分隔符
if (package.compare(
body_begin + payload_len,
LineBreakSep.size(),
LineBreakSep
) != 0)
{
throw std::runtime_error(
"invalid packet terminator"
);
}
// 提取有效载荷
*message = package.substr(
body_begin,
payload_len
);
// 删除已经消费的完整报文字节
package.erase(0, total);
return true;
}
// 计算请求
class Request
{
public:
Request()
: _data_x(0),
_data_y(0),
_oper(0)
{
}
Request(int x, int y, char op)
: _data_x(x),
_data_y(y),
_oper(op)
{
}
void Debug() const
{
std::cout
<< "_data_x: " << _data_x
<< std::endl;
std::cout
<< "_data_y: " << _data_y
<< std::endl;
std::cout
<< "_oper: " << _oper
<< std::endl;
}
// 用于对象字段变化的教学实验
void Inc()
{
++_data_x;
++_data_y;
}
// Request对象 -> JSON字符串
bool Serialize(
std::string* out
) const
{
if (out == nullptr)
{
return false;
}
Json::Value root(Json::objectValue);
root["datax"] = _data_x;
root["datay"] = _data_y;
root["oper"] =
static_cast<int>(_oper);
Json::FastWriter writer;
*out = writer.write(root);
return true;
}
// JSON字符串 -> Request对象
bool Deserialize(
const std::string& in
)
{
Json::Value root;
Json::Reader reader;
if (!reader.parse(in, root))
{
return false;
}
if (!root.isObject())
{
return false;
}
if (!root.isMember("datax") ||
!root.isMember("datay") ||
!root.isMember("oper"))
{
return false;
}
if (!root["datax"].isInt() ||
!root["datay"].isInt() ||
!root["oper"].isInt())
{
return false;
}
int op = root["oper"].asInt();
if (op < 0 || op > 127)
{
return false;
}
_data_x = root["datax"].asInt();
_data_y = root["datay"].asInt();
_oper = static_cast<char>(op);
return true;
}
int GetX() const
{
return _data_x;
}
int GetY() const
{
return _data_y;
}
char GetOper() const
{
return _oper;
}
private:
int _data_x;
int _data_y;
char _oper;
};
// 计算响应
class Response
{
public:
Response()
: _result(0),
_code(0)
{
}
Response(int result, int code)
: _result(result),
_code(code)
{
}
// Response对象 -> JSON字符串
bool Serialize(
std::string* out
) const
{
if (out == nullptr)
{
return false;
}
Json::Value root(Json::objectValue);
root["result"] = _result;
root["code"] = _code;
Json::FastWriter writer;
*out = writer.write(root);
return true;
}
// JSON字符串 -> Response对象
bool Deserialize(
const std::string& in
)
{
Json::Value root;
Json::Reader reader;
if (!reader.parse(in, root))
{
return false;
}
if (!root.isObject())
{
return false;
}
if (!root.isMember("result") ||
!root.isMember("code"))
{
return false;
}
if (!root["result"].isInt() ||
!root["code"].isInt())
{
return false;
}
_result = root["result"].asInt();
_code = root["code"].asInt();
return true;
}
void SetResult(int result)
{
_result = result;
}
void SetCode(int code)
{
_code = code;
}
int GetResult() const
{
return _result;
}
int GetCode() const
{
return _code;
}
private:
int _result;
int _code;
};
// 简单的对象工厂
class Factory
{
public:
std::shared_ptr<Request> BuildRequest()
{
return std::make_shared<Request>();
}
std::shared_ptr<Request> BuildRequest(
int x,
int y,
char op
)
{
return std::make_shared<Request>(
x,
y,
op
);
}
std::shared_ptr<Response> BuildResponse()
{
return std::make_shared<Response>();
}
std::shared_ptr<Response> BuildResponse(
int result,
int code
)
{
return std::make_shared<Response>(
result,
code
);
}
};
} // namespace Protocol
十七、深入分析Encode和Decode
17.1 Encode到底做了什么?
std::string Encode(
const std::string& message
)
将有效载荷封装为:
长度\\n有效载荷\\n
例如:
Encode("hello");
得到:
5\\nhello\\n
需要注意这里的:
message.size()
表示字节长度。
如果JSON字符串由Jsoncpp生成,应该使用实际生成的字符串长度,而不是根据对象字段数量估计。
17.2 Decode为什么需要先找换行?
因为长度字段是十进制文本。
例如:
5\\nhello\\n
在第一个换行以前:
5
就是有效载荷长度。
17.3 为什么要验证长度字段?
例如:
abc\\nhello\\n
长度字段不是合法整数。
如果直接:
std::stoi("abc");
就可能抛出异常。
因此需要明确判断输入是否合法。
此外:
999999999999999999999
这样的超大长度也不能不加限制地接受。
17.4 为什么不能只判断package.size()?
因为缓冲区包含:
长度字段
分隔符
有效载荷
末尾分隔符
所以完整报文总长度不是单纯的有效载荷长度。
应该是:
长度字段自身的字节数
+
第一个分隔符长度
+
有效载荷长度
+
第二个分隔符长度
17.5 为什么Decode成功以后要erase?
因为TCP接收缓冲区可能包含多条完整报文。
例如:
5\\nhello\\n5\\nworld\\n
提取第一条以后,必须保留第二条。
因此:
package.erase(0, total);
只删除已经消费的报文字节。
不能直接:
package.clear();
否则可能丢失后面的有效请求。
17.6 Decode返回false代表什么?
当前实现中,返回false表示:
还没有一条完整报文
而不是:
报文一定错误
格式确实不合法时,当前实现会抛出异常。
这样服务器就能区分:
等待更多字节
和:
错误格式,需要终止当前连接处理
十八、为什么Json::FastWriter末尾的换行不会破坏协议?
假设序列化结果是:
{"datax":10,"datay":20,"oper":43}\\n
注意,这个换行符属于:
JSON序列化生成的有效载荷内容
因为:
message.size()
会将它计入有效载荷长度。
随后:
Encode(message)
又会在有效载荷外增加一个:
'\\n'
作为报文结束标记。
因此实际报文末尾可能出现两个连续的换行符:
JSON内容\\n\\n
它们的意义不同:
第一个:有效载荷内部的换行
第二个:报文结束分隔符
只要:
Encode()
和:
Decode()
按照相同的长度规则处理,就不会因为这两个换行符而产生歧义。
这也说明:
长度字段才是有效载荷边界判断的核心依据。
十九、Factory为什么也属于Protocol.hpp?
我们已经定义:
Request
Response
两个类。
客户端需要创建:
Request
服务器需要创建:
Request
Response
因此可以提供一个简单工厂:
Factory
例如:
Protocol::Factory factory;
创建默认请求:
auto req = factory.BuildRequest();
创建带参数请求:
auto req = factory.BuildRequest(
100,
200,
'+'
);
创建响应:
auto resp = factory.BuildResponse(
300,
0
);
19.1 为什么使用shared_ptr?
因为工厂通过:
std::make_shared<Request>()
创建对象。
调用者不需要手动:
delete
释放返回的对象。
19.2 为什么Factory不是必需的?
实际上我们完全可以直接:
Request req(100, 200, '+');
构造对象。
当前保留:
Factory
主要是为了学习:
如何通过统一接口创建不同的协议对象。
它是一个简单的工厂形式,不需要把它理解为复杂的设计模式框架。
【配图05:Protocol中的Request、Response、Factory与Serialize接口关系】
(此处留白,后续插入图片)
二十、先测试Protocol.hpp
正式接入网络之前,应先验证协议模块自身是否正确。
20.1 测试目标
需要验证:
Request能够序列化
Encode能够封装报文
Decode能够提取消息
Request能够反序列化
多个报文能够依次提取
20.2 测试文件完整实现
ProtocolTest.cc:
#include <iostream>
#include <string>
#include "Protocol.hpp"
int main()
{
Protocol::Factory factory;
auto req = factory.BuildRequest(
10,
20,
'+'
);
std::string json;
if (!req->Serialize(&json))
{
return 1;
}
std::cout
<< "serialized: "
<< json
<< std::endl;
std::string frame =
Protocol::Encode(json);
std::cout
<< "frame size: "
<< frame.size()
<< std::endl;
// 模拟两个报文连续到达
std::string recvbuffer =
frame + frame;
std::string message;
int count = 0;
while (Protocol::Decode(
recvbuffer,
&message
))
{
Protocol::Request restored;
if (!restored.Deserialize(message))
{
return 2;
}
++count;
std::cout
<< "request " << count
<< std::endl;
restored.Debug();
}
std::cout
<< "remaining bytes: "
<< recvbuffer.size()
<< std::endl;
return 0;
}
编译:
g++ ProtocolTest.cc \\
-std=c++11 \\
-Wall -Wextra \\
-ljsoncpp \\
-o protocol_test
运行:
./protocol_test
可以验证:
连续两个完整报文
会被分别提取。
最后:
remaining bytes: 0
表示没有遗留尚未解析的数据。
二十一、设计Calculate.hpp
现在协议模块已经可以处理请求和响应。
但服务器还需要实际执行计算。
因此设计:
Calculate.hpp
21.1 文件需要实现什么?
输入:
Protocol::Request
输出:
Protocol::Response
例如:
Request(10,20,'+')
|
v
Calculator
|
v
Response(30,0)
21.2 为什么计算模块不应该处理Socket?
因为:
算术计算
不需要知道:
客户端IP
客户端端口
文件描述符
TCP协议
它只需要操作数和运算符。
因此设计:
class Calculator
{
public:
static Protocol::Response Calculate(
const Protocol::Request& req
);
};
21.3 为什么返回Response?
因为计算结果不仅包含:
result
还包含:
code
表示计算状态。
21.4 为什么需要处理整数溢出?
例如:
2147483647 + 1
可能超出32位有符号整数的表示范围。
如果不检查,直接对 int 执行溢出的有符号整数运算,会存在不正确的行为。
因此当前示例先使用更大的整数类型完成计算,再判断结果是否能放进 int。
二十二、Calculate.hpp完整实现
#pragma once
#include <limits>
#include "Protocol.hpp"
class Calculator
{
public:
static Protocol::Response Calculate(
const Protocol::Request& req
)
{
long long x = req.GetX();
long long y = req.GetY();
char op = req.GetOper();
long long value = 0;
int code = 0;
switch (op)
{
case '+':
value = x + y;
break;
case '-':
value = x – y;
break;
case '*':
value = x * y;
break;
case '/':
if (y == 0)
{
code = 1;
}
else
{
value = x / y;
}
break;
case '%':
if (y == 0)
{
code = 2;
}
else
{
value = x % y;
}
break;
default:
code = 3;
break;
}
if (code != 0)
{
return Protocol::Response(
0,
code
);
}
if (value >
std::numeric_limits<int>::max() ||
value <
std::numeric_limits<int>::min())
{
return Protocol::Response(
0,
4
);
}
return Protocol::Response(
static_cast<int>(value),
0
);
}
};
22.1 为什么使用switch?
因为当前运算符只有:
+ – * / %
可以使用:
switch(op)
分支处理。
22.2 为什么单独检查除零?
因为:
x / 0
不能按照普通整数除法执行。
所以需要提前判断:
if (y == 0)
并返回错误状态。
22.3 为什么不让Calculator直接序列化结果?
因为:
Calculator
的职责是计算。
而:
Protocol::Response
已经提供:
Serialize()
方法。
因此不需要在计算类中再次处理JSON格式。
这样可以明确区分:
业务计算
协议数据表示
两个职责。
二十三、设计TcpServer.hpp
现在已经拥有:
Socket.hpp
Protocol.hpp
Calculate.hpp
接下来需要将它们组织成一个完整TCP服务器。
23.1 服务器应该做什么?
创建监听Socket
↓
绑定并监听端口
↓
accept新连接
↓
为连接创建服务执行流
↓
接收字节到缓冲区
↓
Decode提取完整报文
↓
Request::Deserialize
↓
Calculator::Calculate
↓
Response::Serialize
↓
Encode封装响应
↓
Socket::Send
23.2 设计成员变量
需要:
uint16_t _port;
表示监听端口。
需要:
std::unique_ptr<Net_Work::Socket> _listen_socket;
管理监听Socket。
23.3 设计接口
class TcpServer
{
public:
explicit TcpServer(uint16_t port);
void Init();
void Start();
private:
static void Service(
std::shared_ptr<Net_Work::Socket> conn,
std::string peerip,
uint16_t peerport
);
};
23.4 为什么Service使用shared_ptr?
因为服务器通过:
AcceptConnection()
取得一个新的通信Socket对象。
随后交给工作线程处理。
因此希望这条连接对应的Socket对象能够在工作线程执行期间保持有效。
使用:
std::shared_ptr<Net_Work::Socket>
便于将Socket对象安全传递给线程函数,并在不再有持有者时自动释放。
23.5 为什么Service是static?
因为当前服务函数只需要:
当前连接Socket
客户端IP
客户端Port
不需要直接访问其他服务器对象成员。
所以可以使用:
static
成员函数作为线程入口。
二十四、TCP服务器必须怎样处理接收缓冲区?
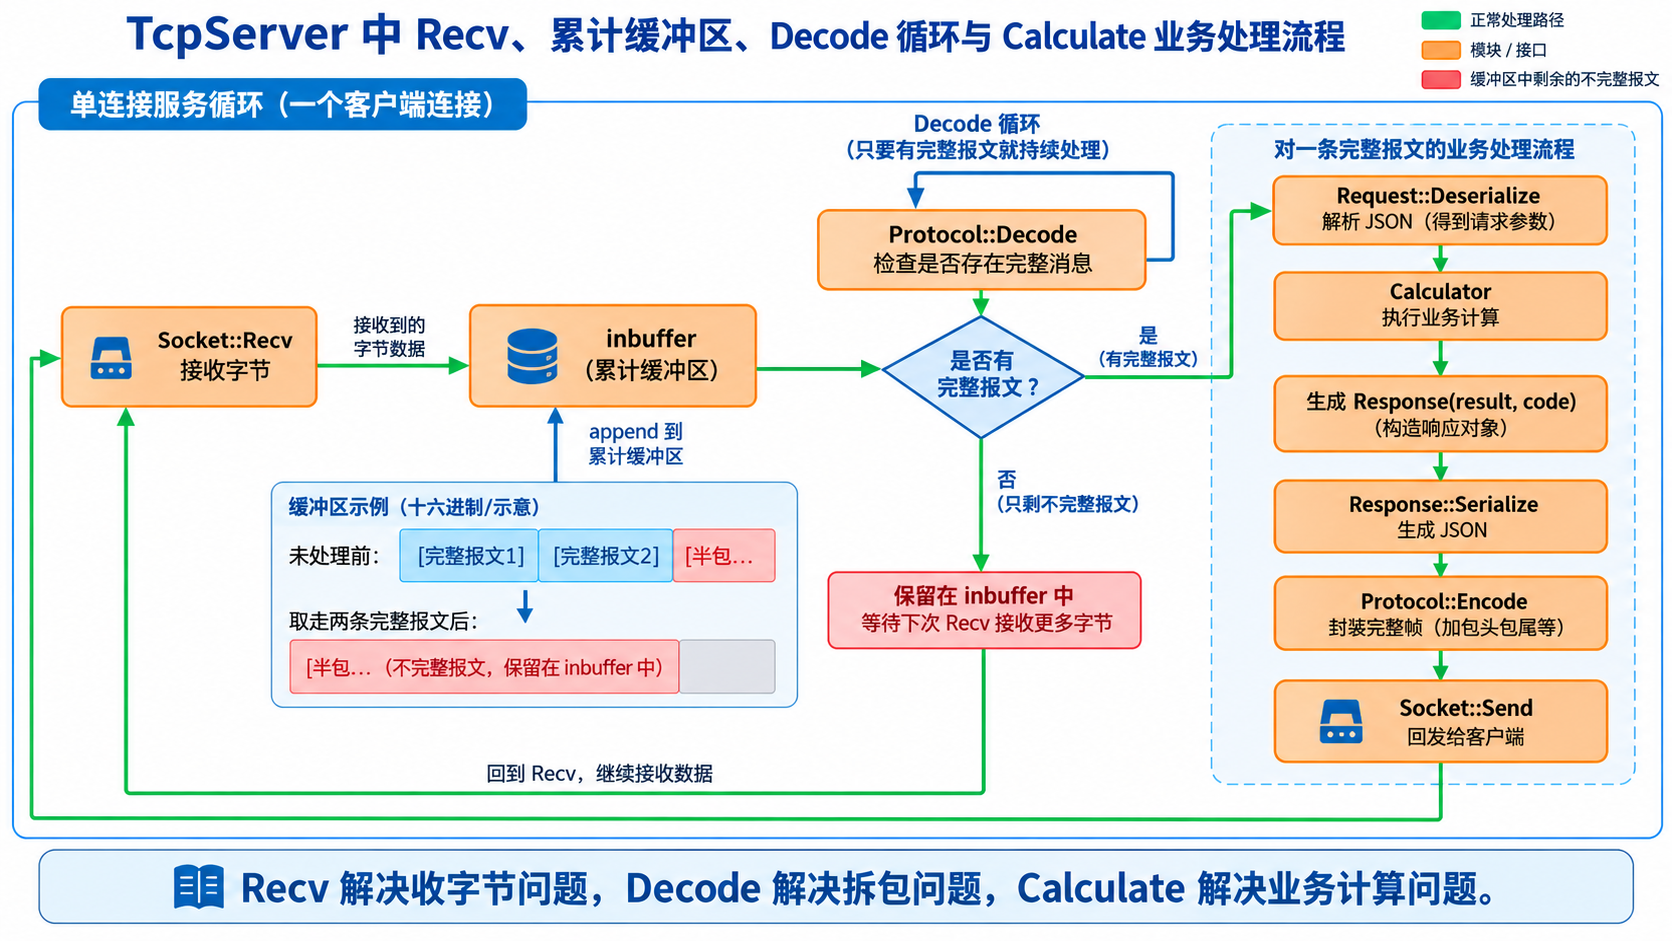
在给出完整代码之前,先理解最关键的循环。
假设:
std::string inbuffer;
用于保存当前连接累计收到的数据。
每次:
conn->Recv(&inbuffer, 1024);
会将本次收到的字节:
追加到inbuffer末尾
然后需要执行:
while (Protocol::Decode(
inbuffer,
&message
))
{
// 处理完整消息
}
为什么是:
while
而不是:
if
?
因为:
Recv()
一次可能读到:
一条完整请求
多条完整请求
若干完整请求加一条不完整请求
例如:
5\\nhello\\n5\\nworld\\n3\\nab
连续解码:
第一次:
hello
第二次:
world
然后剩余:
3\\nab
第三次:
Decode()
返回:
false
表示暂时不完整。
于是保留剩余缓冲区,继续:
Recv()
接收更多字节。
这一过程可以概括为:
读入字节
↓
追加缓冲区
↓
反复提取完整报文
↓
不足一条时停止解码
↓
继续接收字节
二十五、TcpServer.hpp完整实现
这里采用已经学习过的C++11线程,为不同客户端创建独立服务线程。
这样服务器可以在处理一条连接的同时继续接受其他连接。
#pragma once
#include <cerrno>
#include <cstdint>
#include <exception>
#include <iostream>
#include <memory>
#include <string>
#include <thread>
#include "Socket.hpp"
#include "Protocol.hpp"
#include "Calculate.hpp"
class TcpServer
{
public:
explicit TcpServer(uint16_t port)
: _port(port),
_listen_socket(
new Net_Work::TcpSocket()
)
{
}
// 创建、绑定并监听Socket
void Init()
{
_listen_socket->BuildListenSocketMethod(
_port,
Net_Work::backlog
);
std::cout
<< "calculator server started, port: "
<< _port
<< std::endl;
}
// 处理单个客户端
static void Service(
std::shared_ptr<Net_Work::Socket> conn,
std::string peerip,
uint16_t peerport
)
{
std::cout
<< "client connected: "
<< peerip << ":" << peerport
<< std::endl;
// 当前连接的累计接收缓冲区
std::string inbuffer;
Protocol::Factory factory;
try
{
while (true)
{
// 先处理缓冲区中已有的完整报文
while (true)
{
std::string message;
if (!Protocol::Decode(
inbuffer,
&message
))
{
break;
}
// 1. 反序列化请求
auto req =
factory.BuildRequest();
Protocol::Response response;
if (!req->Deserialize(message))
{
// 请求结构不合法
response = Protocol::Response(
0,
5
);
}
else
{
// 2. 执行业务计算
response =
Calculator::Calculate(*req);
}
// 3. 序列化响应
std::string response_json;
if (!response.Serialize(
&response_json
))
{
throw std::runtime_error(
"serialize response failed"
);
}
// 4. 封装应用层报文
std::string response_packet =
Protocol::Encode(
response_json
);
// 5. 发送响应
conn->Send(response_packet);
}
// 当前没有完整报文,继续收取字节
bool ok = conn->Recv(
&inbuffer,
1024
);
if (!ok)
{
if (!inbuffer.empty())
{
std::cerr
<< "connection ended with "
<< "incomplete packet"
<< std::endl;
}
break;
}
}
}
catch (const std::exception& e)
{
std::cerr
<< "service error: "
<< e.what()
<< std::endl;
}
std::cout
<< "client disconnected: "
<< peerip << ":" << peerport
<< std::endl;
// conn由shared_ptr管理,退出时自动关闭
}
// 不断接受新连接
void Start()
{
while (true)
{
std::string peerip;
uint16_t peerport = 0;
// 获得通信Socket对象
Net_Work::Socket* raw =
_listen_socket->AcceptConnection(
&peerip,
&peerport
);
if (raw == nullptr)
{
if (errno == EINTR)
{
continue;
}
perror("accept");
continue;
}
// 接管新Socket对象的生命周期
std::shared_ptr<Net_Work::Socket> conn(raw);
// 工作线程处理当前连接
std::thread worker(
&TcpServer::Service,
conn,
peerip,
peerport
);
worker.detach();
}
}
private:
uint16_t _port;
std::unique_ptr<Net_Work::Socket> _listen_socket;
};
二十六、深入分析服务器的完整处理过程
26.1 为什么每个连接需要独立的inbuffer?
std::string inbuffer;
位于:
Service()
内部。
所以每条客户端连接有自己的接收缓冲区。
例如:
Client-A累计缓冲区
Client-B累计缓冲区
两者不能随意混合。
因为不同TCP连接的字节流彼此独立。
26.2 为什么先Decode再Recv?
因为当前:
inbuffer
里可能已经保存上一轮接收留下的完整报文。
因此先尝试:
Decode()
把能处理的完整报文全部提取出来。
没有完整报文以后,再继续:
Recv()
等待新数据。
26.3 为什么反序列化失败也需要Response?
例如客户端发送的是合法报文:
长度\\n有效载荷\\n
但有效载荷不是合法的:
Request
JSON结构。
此时可以返回:
Response(0, 5);
表示请求结构不合法。
这样能够区分:
完整报文存在,但业务数据格式错误
和:
报文根本还没有接收完整
两种情况。
26.4 为什么先Serialize,再Encode?
因为它们解决的是不同问题。
Serialize()
负责:
Response对象 -> JSON字符串
而:
Encode()
负责:
JSON字符串 -> 带长度字段的完整报文
因此顺序必须是:
Response
↓
Serialize
↓
JSON
↓
Encode
↓
完整报文
26.5 为什么Socket::Recv使用append?
因为:
Recv()
不保证一次接收到一条完整请求。
所以需要将数据逐次累积。
而:
Decode()
成功以后又会:
package.erase(0, total);
移除已经解析的报文。
二者配合,实现:
累计数据
提取完整报文
保留未完成部分
26.6 当前线程模型有什么边界?
这里使用:
std::thread
为每个客户端创建独立线程。
这是为了让网络计算器能够同时服务多个客户端,并保持代码容易理解。
但每连接一线程会占用线程资源。
同时分离线程的退出与服务器停止,还需要在更完整的工程中额外设计管理策略。
当前主要学习重点仍然是:
应用层协议、序列化和TCP字节流处理。
二十七、设计TcpServerMain.cc
27.1 文件职责
服务器入口只需要:
检查命令行参数
↓
解析端口号
↓
创建TcpServer
↓
Init
↓
Start
不应在:
main()
中重复编写协议解析和计算业务。
27.2 完整实现
TcpServerMain.cc:
#include <cerrno>
#include <cstdint>
#include <cstdlib>
#include <iostream>
#include "TcpServer.hpp"
bool ParsePort(
const char* text,
uint16_t* port
)
{
if (text == nullptr || port == nullptr)
{
return false;
}
char* end = nullptr;
errno = 0;
long value = std::strtol(
text,
&end,
10
);
if (errno != 0 ||
end == text ||
*end != '\\0' ||
value <= 0 ||
value > 65535)
{
return false;
}
*port = static_cast<uint16_t>(value);
return true;
}
int main(int argc, char* argv[])
{
if (argc != 2)
{
std::cerr
<< "Usage: "
<< argv[0]
<< " local_port"
<< std::endl;
return 1;
}
uint16_t port = 0;
if (!ParsePort(argv[1], &port))
{
std::cerr
<< "invalid port"
<< std::endl;
return 1;
}
TcpServer server(port);
server.Init();
server.Start();
return 0;
}
运行时:
./tcp_server 8888
即可启动服务器。
二十八、设计TcpClientMain.cc
现在服务器已经完整。
接下来实现客户端。
28.1 客户端需要完成哪些功能?
解析服务器IP与Port
↓
创建TCP Socket
↓
连接服务器
↓
读取终端输入
↓
构造Request
↓
Serialize
↓
Encode
↓
Send
↓
Recv累计字节
↓
Decode
↓
Response::Deserialize
↓
输出结果
28.2 需要哪些对象?
首先需要:
Net_Work::TcpSocket
负责网络通信。
然后需要:
Protocol::Factory
创建请求对象。
还需要:
std::string inbuffer;
用于累计服务器返回的TCP字节流。
28.3 怎样读取运算表达式?
例如用户输入:
100 + 200
使用:
std::istringstream
解析出:
int x;
char op;
int y;
这样可以直接处理:
100 + 200
也可以处理:
100+200
的输入形式。
二十九、TcpClientMain.cc完整实现
#include <cerrno>
#include <cstdint>
#include <cstdlib>
#include <iostream>
#include <sstream>
#include <string>
#include "Socket.hpp"
#include "Protocol.hpp"
bool ParsePort(
const char* text,
uint16_t* port
)
{
if (text == nullptr || port == nullptr)
{
return false;
}
char* end = nullptr;
errno = 0;
long value = std::strtol(
text,
&end,
10
);
if (errno != 0 ||
end == text ||
*end != '\\0' ||
value <= 0 ||
value > 65535)
{
return false;
}
*port = static_cast<uint16_t>(value);
return true;
}
int main(int argc, char* argv[])
{
if (argc != 3)
{
std::cerr
<< "Usage: "
<< argv[0]
<< " server_ip server_port"
<< std::endl;
return 1;
}
std::string serverip = argv[1];
uint16_t port = 0;
if (!ParsePort(argv[2], &port))
{
std::cerr
<< "invalid port"
<< std::endl;
return 1;
}
Net_Work::TcpSocket client;
// 创建Socket并连接服务器
if (!client.BuildConnectSocketMethod(
serverip,
port
))
{
std::cerr
<< "connect failed"
<< std::endl;
return 2;
}
std::cout
<< "connect success"
<< std::endl;
Protocol::Factory factory;
// 服务器响应的累计字节缓冲区
std::string inbuffer;
try
{
while (true)
{
std::string line;
std::cout
<< "Please Enter# ";
if (!std::getline(std::cin, line))
{
break;
}
if (line == "quit")
{
break;
}
// 解析表达式
std::istringstream iss(line);
int x = 0;
int y = 0;
char op = 0;
std::string extra;
if (!(iss >> x >> op >> y) ||
(iss >> extra))
{
std::cout
<< "invalid expression"
<< std::endl;
continue;
}
// 1. 构造Request
auto req = factory.BuildRequest(
x,
y,
op
);
// 2. 序列化Request
std::string request_json;
if (!req->Serialize(&request_json))
{
std::cerr
<< "serialize failed"
<< std::endl;
break;
}
// 3. 封装报文
std::string request_packet =
Protocol::Encode(
request_json
);
// 4. 发送请求
client.Send(request_packet);
// 5. 等待一条完整响应
std::string response_json;
while (!Protocol::Decode(
inbuffer,
&response_json
))
{
if (!client.Recv(
&inbuffer,
1024
))
{
throw std::runtime_error(
"server closed connection"
);
}
}
// 6. 反序列化Response
auto resp = factory.BuildResponse();
if (!resp->Deserialize(
response_json
))
{
std::cerr
<< "invalid response"
<< std::endl;
break;
}
// 7. 显示计算结果
if (resp->GetCode() == 0)
{
std::cout
<< "result = "
<< resp->GetResult()
<< std::endl;
}
else
{
std::cout
<< "calculate failed, code = "
<< resp->GetCode()
<< std::endl;
}
}
}
catch (const std::exception& e)
{
std::cerr
<< "client error: "
<< e.what()
<< std::endl;
}
client.CloseSocket();
return 0;
}
三十、为什么客户端也需要Decode循环?
因为服务器返回的:
Response
经过:
Serialize()
和:
Encode()
以后,同样是一条应用层报文。
TCP并不保证客户端一次:
Recv()
就能读取完整响应。
因此客户端也需要:
std::string inbuffer;
保存累计数据。
然后反复尝试:
Decode()
直到获得完整响应。
所以无论:
客户端 -> 服务器
还是:
服务器 -> 客户端
只要使用相同的报文格式,都需要遵守相应的封装与解析规则。
这也说明:
协议是双方共同遵守的,不是只在服务器端实现的一个函数。
三十一、设计Makefile
现在已经完成:
Socket.hpp
Protocol.hpp
Calculate.hpp
TcpServer.hpp
TcpServerMain.cc
TcpClientMain.cc
因此需要将它们编译为:
tcp_server
tcp_client
还需要:
protocol_test
jsoncpp_demo
作为辅助实验程序。
31.1 为什么要链接jsoncpp?
因为:
Json::Reader
Json::FastWriter
Json::Value
都来自Jsoncpp库。
因此在链接阶段需要指定该库。
31.2 为什么需要-pthread?
因为服务器使用:
std::thread
为客户端创建工作线程。
在Linux编译环境中,使用:
-pthread
是常见的线程程序编译方式。
31.3 完整Makefile
CXX := g++
JSON_CFLAGS := $(shell pkg-config –cflags jsoncpp)
JSON_LIBS := $(shell pkg-config –libs jsoncpp)
CXXFLAGS := -std=c++11 -Wall -Wextra -pthread $(JSON_CFLAGS)
.PHONY: all clean
all: tcp_server tcp_client protocol_test jsoncpp_demo
tcp_server: TcpServerMain.cc Socket.hpp Protocol.hpp Calculate.hpp TcpServer.hpp
$(CXX) $(CXXFLAGS) -o $@ TcpServerMain.cc $(JSON_LIBS)
tcp_client: TcpClientMain.cc Socket.hpp Protocol.hpp
$(CXX) $(CXXFLAGS) -o $@ TcpClientMain.cc $(JSON_LIBS)
protocol_test: ProtocolTest.cc Protocol.hpp
$(CXX) $(CXXFLAGS) -o $@ ProtocolTest.cc $(JSON_LIBS)
jsoncpp_demo: JsoncppDemo.cc
$(CXX) $(CXXFLAGS) -o $@ JsoncppDemo.cc $(JSON_LIBS)
clean:
rm -f tcp_server tcp_client protocol_test jsoncpp_demo
其中 JsoncppDemo.cc 会在后面的附录给出。
注意:
Makefile中的编译命令需要使用Tab。
三十二、完整联调:运行网络计算器
32.1 编译
在项目目录执行:
make
生成:
tcp_server
tcp_client
protocol_test
jsoncpp_demo
32.2 启动服务器
终端一:
./tcp_server 8888
可能输出:
calculator server started, port: 8888
32.3 启动客户端
终端二:
./tcp_client 127.0.0.1 8888
输出:
connect success
Please Enter#
32.4 测试加法
输入:
100 + 200
返回:
result = 300
32.5 测试减法
输入:
100 – 200
返回:
result = -100
32.6 测试乘法
输入:
10 * 20
返回:
result = 200
32.7 测试除法
输入:
10 / 3
由于当前实现使用整数运算,返回:
result = 3
32.8 测试取模
输入:
10 % 3
返回:
result = 1
32.9 测试除零
输入:
10 / 0
返回:
calculate failed, code = 1
32.10 测试取模除零
输入:
10 % 0
返回:
calculate failed, code = 2
32.11 测试不支持的运算符
输入:
10 & 20
返回:
calculate failed, code = 3
32.12 测试整数溢出
输入:
2147483647 + 1
在32位 int 的常见Linux环境中,返回:
calculate failed, code = 4
输入:
quit
客户端结束。
三十三、完整复盘:100 + 200究竟经历了什么?
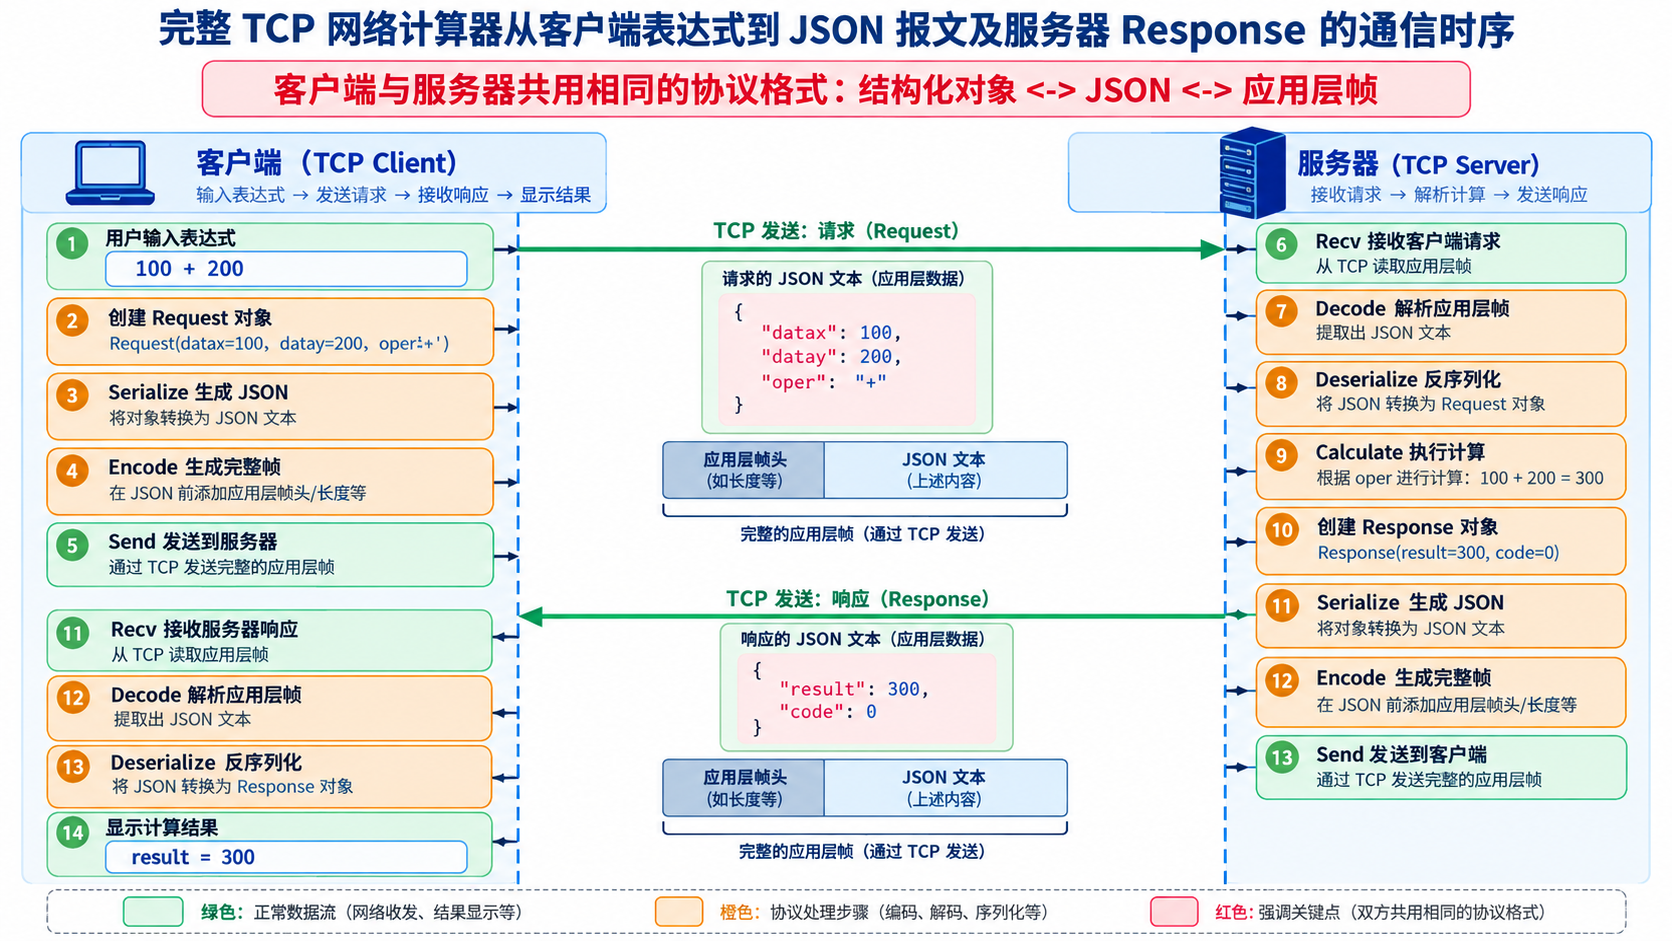
这是整个实验最重要的部分。
假设客户端输入:
100 + 200
第一步:构造请求对象
Request req(100, 200, '+');
此时内存中的结构化字段为:
datax = 100
datay = 200
oper = '+'
第二步:序列化
执行:
req.Serialize(&json);
得到JSON文本。
示意:
{"datax":100,"datay":200,"oper":43}
实际 FastWriter 输出中可能带有末尾换行。
第三步:封装报文
执行:
Encode(json);
得到:
长度\\nJSON有效载荷\\n
注意:
长度按照实际JSON字节数计算。
第四步:发送TCP字节流
client.Send(packet);
Socket把报文字节交给TCP发送操作。
第五步:服务器接收
conn->Recv(&inbuffer, 1024);
收到的字节追加到:
inbuffer
第六步:服务器解包
Decode(inbuffer, &message);
判断当前是否存在一条完整报文。
如果没有:
继续接收
如果有:
提取JSON有效载荷
第七步:反序列化
req.Deserialize(message);
恢复:
100
200
+
第八步:计算
Calculator::Calculate(req);
得到:
result = 300
code = 0
第九步:响应序列化
resp.Serialize(&response_json);
生成:
{"result":300,"code":0}
第十步:响应封装与发送
Encode(response_json);
随后:
conn->Send(response_packet);
第十一步:客户端接收与解析
客户端:
Recv()
累计响应字节。
再执行:
Decode()
提取完整JSON。
最后:
Response::Deserialize()
恢复结果。
第十二步:打印
result = 300
因此完整流程是:
用户输入表达式
↓
Request对象
↓
JSON序列化
↓
Encode封装报文
↓
TCP发送
↓
TCP接收
↓
Decode提取报文
↓
Request反序列化
↓
Calculator计算
↓
Response对象
↓
JSON序列化
↓
Encode
↓
TCP发送
↓
客户端Decode
↓
Response反序列化
↓
显示结果
三十四、附录:Jsoncpp有哪些常见序列化方式?
前面的完整工程使用了:
Json::FastWriter
但Jsoncpp并不只有这一种序列化接口。
接下来补充几种常见写法。
34.1 Json::Value::toStyledString()
例如:
Json::Value root;
root["name"] = "joe";
root["sex"] = "男";
std::string s = root.toStyledString();
这种方式会生成格式化的JSON字符串。
例如:
{
"name" : "joe",
"sex" : "男"
}
适合:
调试输出
观察JSON结构
34.2 Json::FastWriter
Json::FastWriter writer;
std::string s = writer.write(root);
它生成紧凑的JSON字符串。
例如:
{"name":"joe","sex":"男"}
与格式化输出相比,通常减少了不必要的缩进和空格。
但实际输出可能包含末尾换行。
34.3 Json::StyledWriter
Json::StyledWriter writer;
std::string s = writer.write(root);
与FastWriter相比,StyledWriter更侧重于可读性。
因此常用于观察JSON对象的结构。
这些旧式Writer接口在相关教学代码中比较常见;新项目也可以使用Jsoncpp提供的Builder系列接口。
34.4 Json::StreamWriter
例如:
Json::StreamWriterBuilder builder;
std::unique_ptr<Json::StreamWriter> writer(
builder.newStreamWriter()
);
std::stringstream ss;
writer->write(root, &ss);
这样可以把JSON输出到:
std::stringstream
中。
然后:
ss.str()
取得字符串。
相比最简单的 FastWriter,这种方式具有更灵活的输出配置能力。
三十五、Jsoncpp有哪些反序列化方式?
35.1 Json::Reader
前面已经使用:
Json::Reader reader;
Json::Value root;
reader.parse(json_string, root);
这种方式比较直观。
如果解析失败,还可以查看:
reader.getFormattedErrorMessages()
获得错误信息。
例如:
if (!reader.parse(json_string, root))
{
std::cerr
<< reader.getFormattedErrorMessages()
<< std::endl;
}
35.2 CharReader相关接口
Jsoncpp还提供:
Json::CharReader
以及:
Json::CharReaderBuilder
等解析接口。
它们支持更灵活地设置JSON解析行为。
当前网络计算器使用:
Json::Reader
就已经足够展示:
JSON字符串
转换为Json::Value
读取对应字段
的完整过程。
因此暂时不需要为了基础计算器引入更多解析器封装。
三十六、JsoncppDemo.cc完整实现
为了集中测试这些JSON接口,可以编写一个独立的实验程序。
36.1 文件目标
验证:
toStyledString
FastWriter
StyledWriter
StreamWriter
Reader
五种常见操作。
36.2 完整代码
JsoncppDemo.cc:
#include <iostream>
#include <memory>
#include <sstream>
#include <string>
#include <jsoncpp/json/json.h>
int main()
{
// 1. 构造JSON对象
Json::Value root(Json::objectValue);
root["name"] = "joe";
root["sex"] = "男";
root["age"] = 20;
// 2. toStyledString
std::cout
<< "toStyledString:\\n"
<< root.toStyledString()
<< std::endl;
// 3. FastWriter
Json::FastWriter fast_writer;
std::string fast_json =
fast_writer.write(root);
std::cout
<< "FastWriter:\\n"
<< fast_json
<< std::endl;
// 4. StyledWriter
Json::StyledWriter styled_writer;
std::string styled_json =
styled_writer.write(root);
std::cout
<< "StyledWriter:\\n"
<< styled_json
<< std::endl;
// 5. StreamWriter
Json::StreamWriterBuilder builder;
std::unique_ptr<Json::StreamWriter> writer(
builder.newStreamWriter()
);
std::stringstream ss;
writer->write(root, &ss);
std::cout
<< "StreamWriter:\\n"
<< ss.str()
<< std::endl;
// 6. Json::Reader反序列化
Json::Reader reader;
Json::Value parsed;
if (!reader.parse(
fast_json,
parsed
))
{
std::cerr
<< reader.getFormattedErrorMessages()
<< std::endl;
return 1;
}
// 7. 提取字段
std::string name =
parsed["name"].asString();
std::string sex =
parsed["sex"].asString();
int age =
parsed["age"].asInt();
std::cout
<< "Name: " << name
<< std::endl;
std::cout
<< "Sex: " << sex
<< std::endl;
std::cout
<< "Age: " << age
<< std::endl;
return 0;
}
编译:
g++ JsoncppDemo.cc \\
-std=c++11 \\
-ljsoncpp \\
-o jsoncpp_demo
运行:
./jsoncpp_demo
可以观察不同Writer的输出格式差异,以及Reader将JSON重新转换为结构化数据的过程。
三十七、Json::Value常用API总结
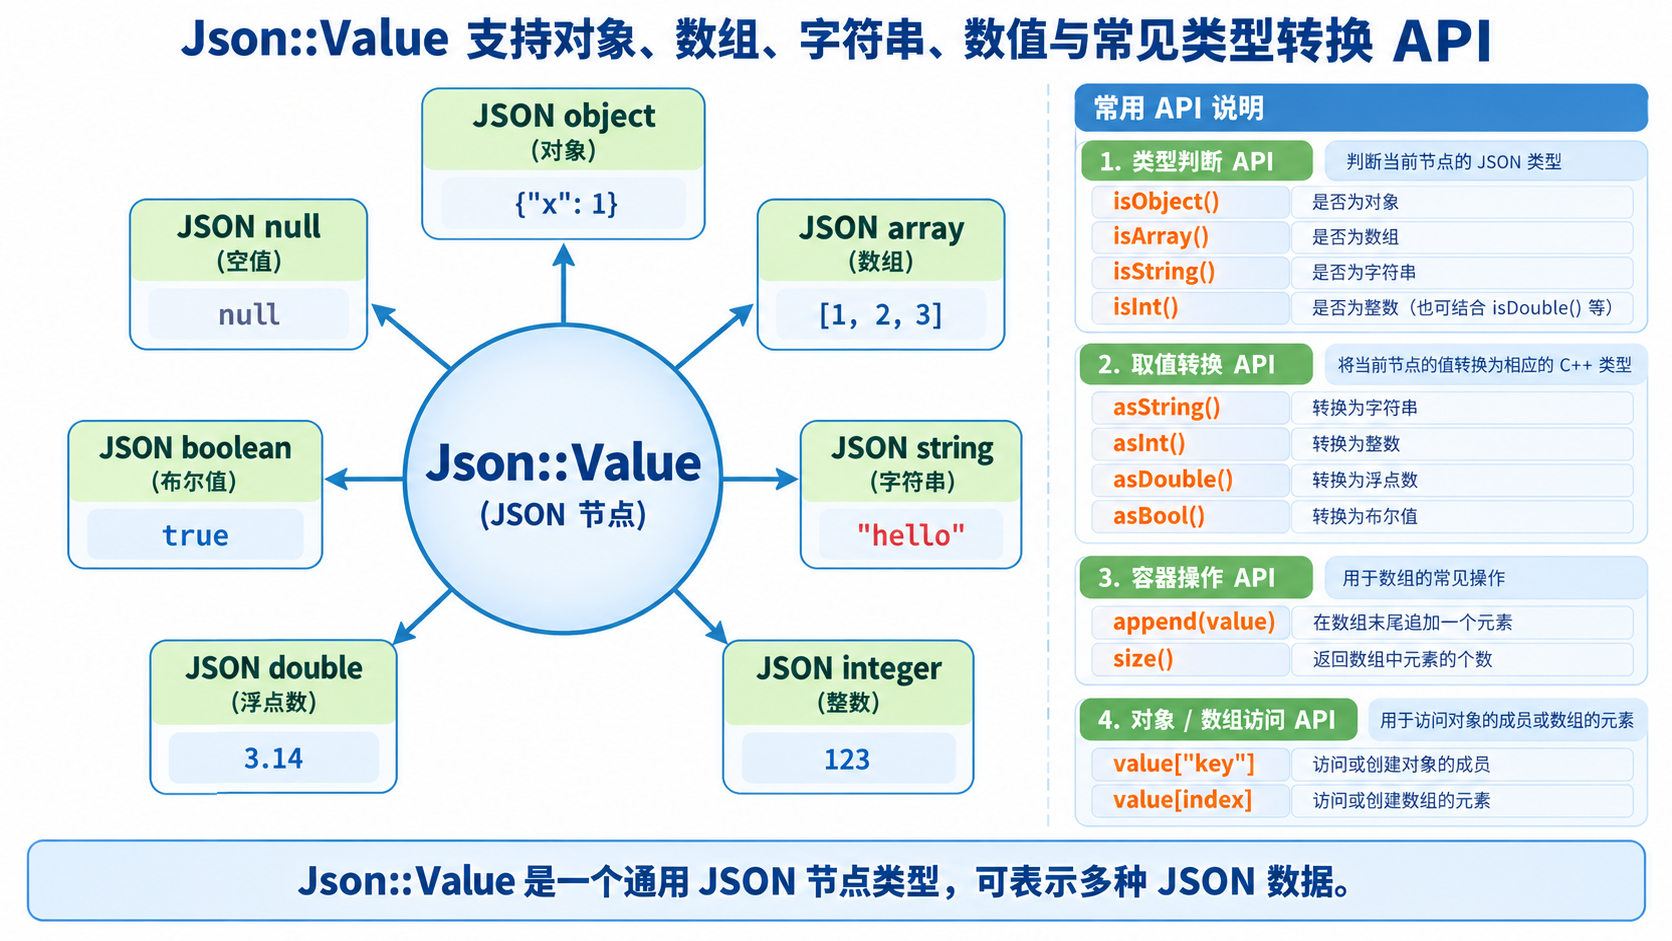
Json::Value 是Jsoncpp中最常使用的核心数据结构之一。
37.1 构造
Json::Value root;
创建默认值。
Json::Value root(Json::objectValue);
创建JSON对象。
Json::Value array(Json::arrayValue);
创建JSON数组。
37.2 访问对象字段
root["name"]
访问名为:
name
的字段。
对于可修改的对象,如果对应字段不存在,使用 operator[] 可能创建该字段。
37.3 类型检查
| isNull() | 判断是否为null |
| isBool() | 判断是否为布尔值 |
| isInt() | 判断是否为int |
| isInt64() | 判断是否为64位整数 |
| isUInt() | 判断是否为无符号整数 |
| isUInt64() | 判断是否为64位无符号整数 |
| isDouble() | 判断是否为浮点数 |
| isNumeric() | 判断是否为数值 |
| isString() | 判断是否为字符串 |
| isArray() | 判断是否为数组 |
| isObject() | 判断是否为对象 |
例如:
if (root["age"].isInt())
{
int age = root["age"].asInt();
}
先检查:
isInt()
再读取整数。
37.4 类型转换
asBool()
取得布尔值。
asInt()
取得整数。
asInt64()
取得64位整数。
asUInt()
取得无符号整数。
asUInt64()
取得64位无符号整数。
asDouble()
取得浮点数。
asString()
取得字符串。
需要注意,这些转换操作仍然要求数据类型符合相应预期。
不要简单认为:
任何JSON值都可以无条件转换成任何C++类型
37.5 数组操作
例如:
Json::Value array(Json::arrayValue);
array.append(10);
array.append(20);
array.append(30);
形成:
[10,20,30]
访问:
array[0]
得到第一个元素。
37.6 常用容器接口
size()
取得数组或对象的元素数量。
empty()
检查是否为空。
resize()
调整JSON数组大小。
clear()
清除元素。
append()
向JSON数组末尾增加元素。
不同Jsoncpp版本的部分辅助访问接口可能有所区别,实际使用时应以安装版本提供的头文件和API为准。
三十八、为什么协议设计不等于简单地使用JSON?
到这里很容易产生一种误解:
使用JSON
=
已经设计好了完整应用层协议
但实际并不是。
JSON主要解决:
结构化数据如何表示
例如:
{"datax":10,"datay":20,"oper":43}
但应用层协议还需要规定:
一条报文在哪里开始、在哪里结束?
请求包含哪些字段?
字段分别代表什么?
收到不合法数据怎样处理?
服务器如何返回错误?
客户端如何区分不同响应?
当前计算器通过:
Request
Response
定义消息字段。
通过:
Serialize()
Deserialize()
实现结构化数据转换。
通过:
Encode()
Decode()
解决报文边界。
通过:
Calculate()
和:
code
定义业务语义及计算状态。
这些部分共同构成了当前简单网络计算器的应用层通信约定。
三十九、最终知识体系
可以把本次应用层自定义协议项目概括为:
应用层协议
|
v
明确业务数据结构
|
+—- Request
|
+—- Response
|
v
Jsoncpp序列化
|
+—- Json::Value
|
+—- FastWriter
|
+—- Reader
|
v
报文封装
|
+—- Encode
|
+—- Decode
|
v
TCP字节流处理
|
+—- 接收缓冲区
|
+—- 半包
|
+—- 多包
|
v
网络计算器
|
+—- Socket
|
+—- Protocol
|
+—- Calculate
|
+—- TcpServer
|
+—- TcpClient
注意其中最重要的两个层次:
序列化
解决:
结构化数据怎样转换为可传输的数据表示。
而:
Encode/Decode
解决:
怎样从TCP连续字节流中区分完整的应用层报文。
不要把这两个问题混为一谈。